seats MERCEDES-BENZ E-CLASS CABRIOLET 2010 Owners Manual
[x] Cancel search | Manufacturer: MERCEDES-BENZ, Model Year: 2010, Model line: E-CLASS CABRIOLET, Model: MERCEDES-BENZ E-CLASS CABRIOLET 2010Pages: 333, PDF Size: 7.64 MB
Page 6 of 333
Index
....................................................... 4Introduction
......................................... 18 At
ag lance ........................................... 21 Safety
................................................... 31 Opening and closing
...........................65 Seats, steering wheel and mirrors
....91 Light
sand windscreen wipers .........105 Clima
tecontrol ................................. 119 Driving and pa
rking .......................... 133 On-boa
rdcomputer and displays ....191 Loading, stowing and fea
tures........ 243 Maintenance and care
......................257 Breakdown assistance
.....................271 Ty
resa nd wheels .............................. 297 Technical da
ta................................... 309 Contents
3BA 20
7ECE ÄJ 2010/1a; 1; 2, en-GB
mkalafa Version:3.0.2.11
2010-01-26T13:03:22+01:0
0-Seite 3
Page 17 of 333
Roo
floa d( maximum) ........................ 317
Route seeR oute guidance (on-board
computer)
Route guidance (on-board com-
puter) ................................................. .198 S
Safety Children in the vehicle .....................44
Ch ildr estra ints ystems .................... 44
Safety systems
seeD riving safety sy stems
Seat backrest
Folding forwards/back ....................96
Seat be lt
Adjusting the driver's and front-
passenger sea tbelt ......................... 42
Bel tforc elimiter .............................. 43
Bel ttensioner .................................. 43
Clean ing. ........................................ 270
Disp laym essage ............................ 211
Fasten ing. ........................................ 41
Important safety gu idelines ............. 40
Rea rseat belt status indicator .........43
Releasing ......................................... 42
Switch ingb elta djustment on/off
(on-board computer) ......................209
Warn ingl am p(function) ................... 42
Seat be lts
Warn ingl am p................................. 236
Seats
Adjusting (electrically )..................... 94
Adjusting (manually and el ectri-
cally) ................................................ 93
Adjusting the 4-way lumba rsup-
port .................................................. 97
Adjusting the head restraint............ 94
Clean ingt he cover ......................... 269
Correct driver's se at position ........... 92
Important safety instructions ...........93
Mu lticontour sea t............................ 96
Storing settings (memory func-
tion) ............................................... 103
Switch ingA IRSCAR Fon/off ............ 98Switch
ings eat heating on/off .........97
Switch ingt he seat ventilation on/
off .................................................... 98
Seat ve ntilation
Malfunction indicator lamp ..............98
Se nsors (cleaning instructions) .......267
Service indicator seeA SSYST PLUS service interval
display
Serv icem enu (on-board computer) .204
Service products Brake fluid ..................................... 316
Co olan t(engine) ............................ 317
Engine oi l....................................... 315
Fue l................................................ 313
Important safety note s.................. 313
Note s............................................. 313
Settings
Factory (on-bo ardc omputer )......... 209
On-bo ardc omputer ....................... 204
Shift rang es....................................... 145
Shift rec ommendation ...................... 142
Sho wing th edistance displa y(on-
bo ard computer) ............................... 202
Sidebag ................................................ 36
Side window Important safety informatio n........... 73
Side windo ws
Convenience closing ........................75
Convenience opening ......................75
Opening/closing .............................. 74
Tro ubleshoot ing............................... 76
Side windo ws(Cabriolet)
Opening/closing al l......................... 75
Sl iding sunroof
Important safety information ...........87
Tro ubleshoot ing............................... 89
se eP anorama sliding sunroof
Sno wchains ...................................... 157
So cket ................................................ 253
Cockpi t.......................................... 253
Rea rcompartmen t......................... 253
Soft top
AIRCAP ............................................ 84
Clean ing. ........................................ 265
Closing manually in an emergency ... 78
Disp laym essage ............................ 23314
Index BA 207 ECE ÄJ 2010/1a; 1; 2, en-GB
mkalafa
Version: 3.0.2.11 2010-01-26T13:03:22+01:00-Seite 14
Page 42 of 333

an accident. This could result in sever
eor
even fatal injuries to you and other occupants.
In this case, visi taqualifieds pecialist work-
shop immediately and have the roll bar
checked. PRE-SAFE
®
system
PRE-SAFE ®
take spre-e mptive measures to
protect you in certain hazardous situations.
PRE-SAFE ®
intervenes:
R in emergency braking situations, e.g. if the
BA SB rake Assist System is activate dorthe
BA SP LUS Brak eAssist System intervenes
powerfully
R if the radar sensor system detects an immi-
nen tdanger of collision in certain situa-
tion s(on vehicles with DI STRONIC PLUS)
R in critical situatio nsinvolvin gdriving
dynamics, e.g .ifthe vehicle oversteers or
understeers significantly due to physical
limits being exceeded or if the vehicle
swerves to avoid an obstacle at aspeed of
over 14 0km/h.
PRE-SAFE ®
takes th efollowin gmeasures
dependin gonthe hazardou ssituation detec-
ted:
R the fron tseat belts are pre- tensio ned.
R vehicles with memory fun ctions: under
acciden tconditions, it adjusts the front-
passenger seat if it is in an unfavourable
position.
R vehicles with amulticontour seat: the air
pressure in the seat side cushions and in
the backrest side bolsters is increased.
R if the vehicle skids ,the fron tside windows
and, on the Coupé, the panorama sliding
sunroof, are closed so that only asmall gap
remains.
If th ehazardous situation passe swithout
resulting in an accident ,PRE-SAFE ®
slackens
the belt pretensioning. The air pressure in the
side bols terson the multicontour seat is redu
ceda gain. All settings made by PRE-
SAFE ®
can the nbereversed.
If the seat belts are not released:
X Move the backrest or the seat back slightly
until the belt pretensionin gisreduced.
The locking mechanism releases. G
Warning
Make sure that nobody can becom etrapped
as yo uadjust the seat.
! Make sure that there are no objects in the
footwell or behind the seats when moving
the seat back. There is arisk that the seats
and/or the objects could be damaged.
More information abou tbelt adjust ment,a
convenience function integrate dinto PRE-
SAFE ®
,c an be found in the "Belt adjustment"
section (Y page 42). NECK-PRO head restraints
The NECK -PRO head restraints increase pro-
tection to the driver's and front-passenger's
head and neck .Tot his end, the head
restraint sonthe driver's and front-passenger
seats ar emoved forwards and upwards in the
even tofa rear-end collision of acertain
severity. This provides better head support. G
Risk of inju
ry
Head restraint cove rsprevent the NECK-PRO
head restraint sfrom triggering correctly .Con-
sequently, the NECK-PRO head restraints
cannot provide the intended level of protec-
tion .Don ot use head restraint covers.
If the NECK-PRO head restraints have been
triggered in an accident, you must reset the
NECK-PRO head restraints on the driver’s and
front-passenger seat (Y page 40). Other-
wise, the additional protection will not be
available in the even tofanother rear-end col-
lis ion. You can recognise whe nNECK-PRO
head restraints have bee ntriggere dbythe
fact that they hav emoved forwards and can
no longer be adjusted. Occupant safety
39Safety
BA 207ECE ÄJ 2010/1a; 1; 2, en-GB
mkalafa Version: 3.0.2.11 2010-01-26T13:03:22+01:00-Seite 39 Z
Page 46 of 333
belt. If the vehicle is stationar
yand adoor is
opened, the 7seat belt warnin glamp
goes out and the warning ton eceases.
For cer tain countries only: regardless of
whether the driver or the fron tpassenger
have fastened their seat belts, the 7seat
belt warning lamp lights up for 6seconds
after the engin eisstarted. It then goe sout
onc ethe driver and the fron tpassenger have
fastened their seat belts.
i For mor einformation on the 7seat
bel twarning lamp, see "Indicator and warn-
in gl am ps in the instrument cluster ,seat
belt" (Y page 236).
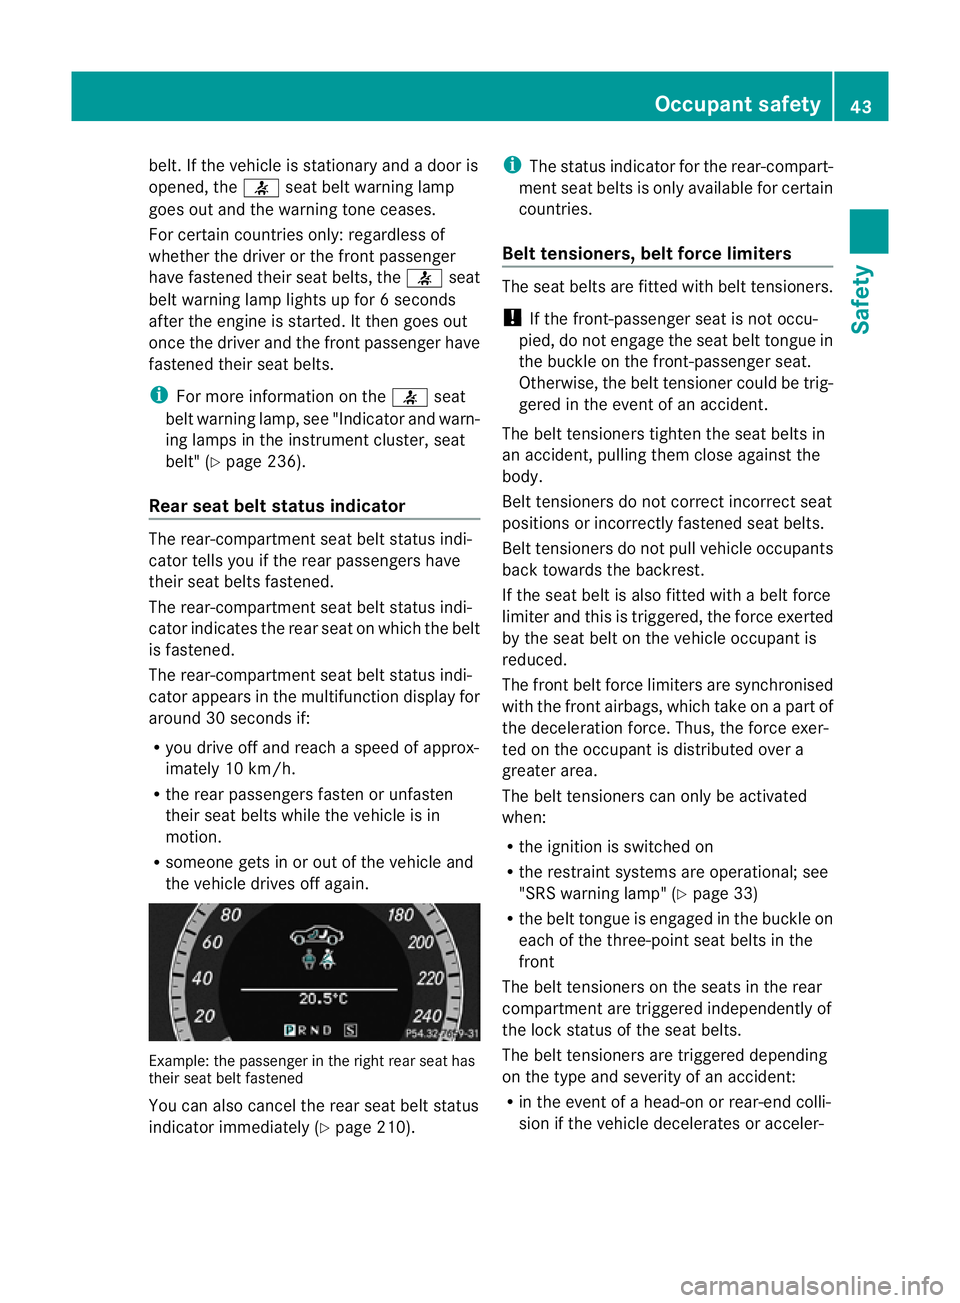
Rear seat belt status indicator The rear-compartment sea
tbelt status indi-
cator tells you if the rear passengers have
their seat belts fastened.
The rear-compartment seat belt status indi-
cator indicates the rear seat on which the belt
is fastened.
The rear-compartment seat belt status indi-
cator appear sint he multifunction displa yfor
around 30 seconds if:
R you drive off and reach aspeed of approx-
imately 10 km/h.
R the rear passengers fasten or unfasten
their seat belts while the vehicle is in
motion.
R someon egets in or out of the vehicle and
the vehicle drives off again. Example: the passenger in the right rea
rseat has
their seat belt fastened
You can also cancel the rear seat belt status
indicator immediately (Y page 210). i
The status indicator for the rear- compart-
ment seat belts is only available for certain
countries.
Bel ttensioners, belt force limiters The seat belts are fitted with belt tensioners.
!
If the front-passenger seat is not occu-
pied, do not engage the seat belt tongue in
the buckle on the front-passenger seat.
Otherwise, the belt tensioner could be trig-
gered in the event of an accident.
The belt tensioners tighten the seat belts in
an accident, pulling them close against the
body.
Belt tensioners do not correct incorrect seat
positions or incorrectly fastened seat belts.
Belt tensioners do not pull vehicle occupants
back towards the backrest.
If the seat belt is also fitted with abelt for ce
limiter and this is triggered, the forc eexerted
by the sea tbelt on the vehicle occupan tis
red uced.
Th ef ront be ltforce limiter sare synchronised
wit hthe front airbags, whic htake on apart of
the deceleration force. Thus, the force exer-
ted on the occupant is distributed over a
greater area.
The belt tensioners can only be activated
when:
R the ignition is switched on
R the restraint systems are operational; see
"SRS warning lamp" (Y page 33)
R the belt tongue is engaged in the buckle on
each of the three-point seat belts in the
front
The belt tensioners on the seats in the rear
compartment are triggered independently of
the lock status of the seat belts.
The belt tensioners are triggered depending
on the type and severity of an accident:
R in the event of ahead-on or rear-end colli-
sion if the vehicle decelerates or acceler- Occupant safety
43Safety
BA 207ECE ÄJ 2010 /1a; 1; 2, en-GB
mkalafa Version: 3.0.2.11 2010-01-26T13:03:22+01:00 -Seite 43 Z
Page 48 of 333
in specia
lchild restraint systems on asuit-
able vehicle seat. This is necessary
because the seat belts are not desig nedfor
children.
R Do not secur echildren less than 1.50 mtall
or under twelv eyears of age on th efront-
passenger seat .Exception: the child is
secured in avehicle with automatic child
sea trecognition on the front-passenger
seat and is secured in achild restraint sys-
tem with automatic chil dseat recognition.
R If you secur eaforward-facing child
restraint system to the front-passenger
seat, you must mov ethe front-passenger
seat as fa rback as possible.
R Children must never travel sitting on the lap
of another occupant. Due to the forces
which occur in the event of asudden
change of direction, heavy braking or an
accident, it would not be possible to
restrain the child. The child could be thrown
against parts of the vehicle interior and be
seriously or even fatally injured. G
Risk of injury
The child restraint system cannot perform its
protective function if it is not correctly fitted
to as uitable vehicle seat. The child cannot be
restrained in the event of an accident, heavy
braking or sudde nchanges of direction. The
chil dcould be seriously or even fatally injured.
For this reason, when fittin gachild restraint
system ,observ ethe manufacturer' sinstalla-
tion instructions and the correct use of the
child restraint system.
Chil drestraint systems should be fitted to the
rear seats. Children are generally better pro-
tected there.
The entir ebase of the child restraint system
must always rest on the seat cushion. There-
fore, never place objects, e.g. acushion,
under the child restraint system.
Only use child restraint systems with the orig-
inal cover designed for them. Only replace
damaged covers with genuine Mercedes-Benz
covers. We recommen
dthe use of chil drestraint sys-
tems which have been approved for
Mercedes-Ben zvehicles.
Child seat lock The seat belts on the rear bench seats are
fitted with
achild seat lock .When enabled,
the child-sea tlock function ensures that the
belt does not slacken onc ethe chil dseat is
secured.
Installing achild restraint system:
X Always comply with the manufacturer's
installation instructions.
X Pull the seat belt smoothly from the inertia
reel.
X Engage the seat belt tongue in the belt
buckle.
Ac tivating th echild seat lock:
X Pull the seat belt out fully and let the inertia
reel retract it again.
While the seat belt is retracting, you should
hear aratcheting sound. The child-seat lock
function is enabled.
X Push down on the child restraint system to
take up any slack.
Removing achild restraint system/deactivat-
ing the chil dseat lock:
X Alway scompl ywith the manufacturer's
installation instruc tions.
X Press the seat belt release button and
guide the belt tongu etothe belt outlet.
The child-sea tlock func tion is deactivated. Children in th
evehicle
45Safety
BA 207ECE ÄJ 2010 /1a;1;2,e n-GB
mkalafa Version: 3.0.2.11 2010-01-26T13:03:22+01:00-Seite 45 Z
Page 50 of 333
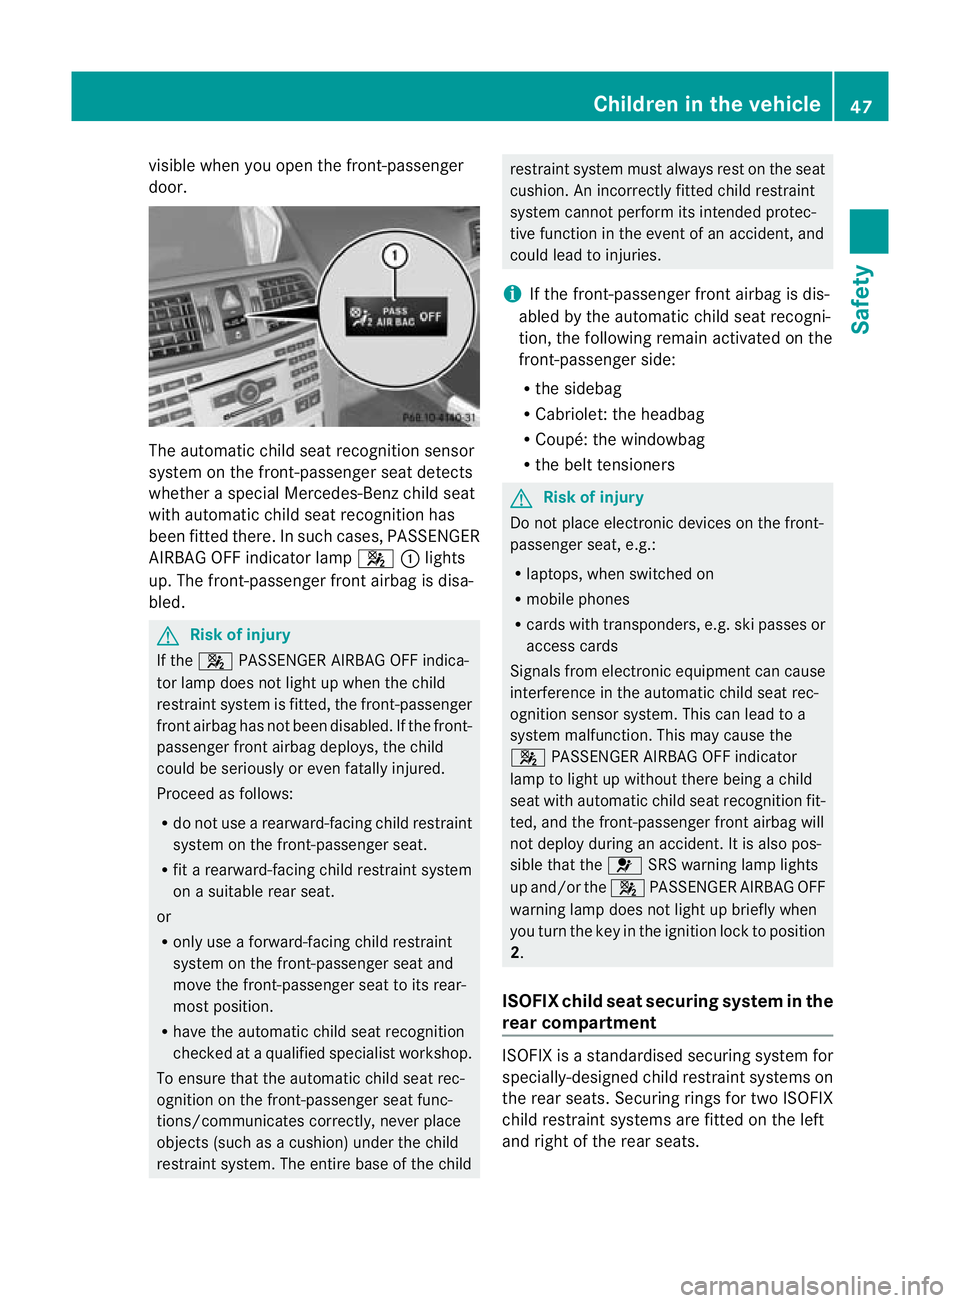
vis
iblew hen you open the front-passenger
door. The automatic chil
dseat recognition sensor
syste mont he front-passenger seat detects
whether aspecial Mercedes-Ben zchild seat
with automatic chil dseat recognition has
been fitted there. In such cases, PASSENGER
AIRBA GOFF indicato rlamp 4 :lights
up. The front-passenger front airbag is disa-
bled. G
Risk of injury
If the 4 PASSENGER AIRBA GOFF indica-
tor lamp doe snot light up when the child
restraint system is fitted, the front-passenger
front airbag has not been disabled. If the front-
passenger front airbag deploys, the child
coul dbes eriously or even fatally injured.
Proceed as follows:
R do not use arearward-facing child restraint
system on the front-passenger seat.
R fit arearward-facing child restraint system
on asuitable rear seat.
or
R only use aforward-facing child restraint
system on the front-passenger seat and
mov ethe front-passenger seat to its rear-
most position.
R hav ethe automatic chil dseat recognition
checked at aqualified specialist workshop.
To ensure that the automatic child seat rec-
ognitio nonthe front-passenger seat func-
tions/communicates correc tly, never place
objects (such as acushion) under the child
restraint system. The entire base of the child restraint system must always rest on the seat
cushion. An incorrectly fitted child restraint
system cannot perform its intended protec-
tive function in the event of an accident, and
could lead to injuries.
i If the front-passenger front airbag is dis-
abled by the automatic child seat recogni-
tion, the following remain activated on the
front-passenger side:
R the sidebag
R Cabriolet: the headbag
R Coupé :the windowbag
R the belt tensioners G
Risk of injury
Do not plac eelectronic devices on the fron t-
passenger seat, e.g.:
R laptops, when switched on
R mobile phones
R cards with transponders, e.g. ski passes or
access cards
Signal sfrom electroni cequipmen tcan cause
interference in the automatic child seat rec-
ognition senso rsystem. This can lead to a
syste mmalfunction. This may cause the
4 PASSENGER AIRBA GOFF indicator
lamp to light up without there being achild
seat with automatic chil dseat recognition fit-
ted, and the front-passenger front airba gwill
not deploy during an accident .Itisalso pos-
sible that the 6SRS warnin glamp lights
up and/or the 4PASSENGER AIRBA GOFF
warning lamp does not light up briefly when
you turn the key in the ignitio nlock to position
2.
ISOFIX chil dseat securing system in the
rear compar tment ISOFI
Xisas tandardised securing system for
specially-designed child restraint systems on
the rear seats .Securing rings for two ISOFIX
child restraint system sare fitted on th eleft
and right of the rear seats. Children in the vehicle
47Safety
BA 207ECE ÄJ 2010 /1a;1;2,e n-GB
mkalafa Version: 3.0.2.11 2010-01-26T13:03:22+01:00-Seite 47 Z
Page 51 of 333
Mercedes-Ben
zrecommends the use of ISO-
FI Xc hild restraint system slisted on
(Y page 53) together with the insertion
guides included. Fitting the ISOF IXchild
restraint system is eased by using the inser-
tio ng uides. G
Risk of injury
Ac hild restraint system secured by the ISOFIX
chil dseat securing system does not provide
sufficien tprotection for children weighing
more than 22 kg. For this reason, do not
secure children weighing more than 22 kg in
ac hild restraint system secured by the ISOFIX
chil dseat securing system. If the child weighs
mor ethan 22 kg, secur ethe chil drestraint
system using alap-shoulde rbelt. G
Risk of injury
The child restraint system can notp erform its
protectiv efunction if it is not correctly fitted
to as uitable vehicle seat. The child cannot be
restrained in the event of an accident, heavy
braking or sudde nchanges of direction. The
chil dcould be seriously or even fatally injured.
For this reason, when fit ting achild rest raint
system, observe the manufacturer's installa-
tion instructions and the correct use of the
child restraint system.
For reasons of safety, only use child restraint
systems with the ISOFIX child seat securing
system on the rear seats.
We recommend the use of ISOFIX child
restraint systems which have been approved
for Mercedes-Benz vehicles.
An incorrectly fitted child restraint system
could come loose and seriously or even fatally
injur ethe chil dorother vehicle occupants.
Whe nfitting the child restraint system, always
make sure that it is engaged correctly in the
securing rings on both sides. G
Risk of injury
Please not ethat if chil drestraint systems, or
their retaining systems, are damaged or sub-
jected to aload in an accident, they may not
be able to provide their protectiv efunction. This could result in serious or even fatal inju-
ries to the secured child in the event of an
accident, heavy braking or
asudden change
in direction.
For this reason, have child restraint systems
and their anchorages which have been dam-
aged or subjected to aload in an accident
chec kedi mmediatel yataqualified specialist
workshop. Coupé
Cabriolet
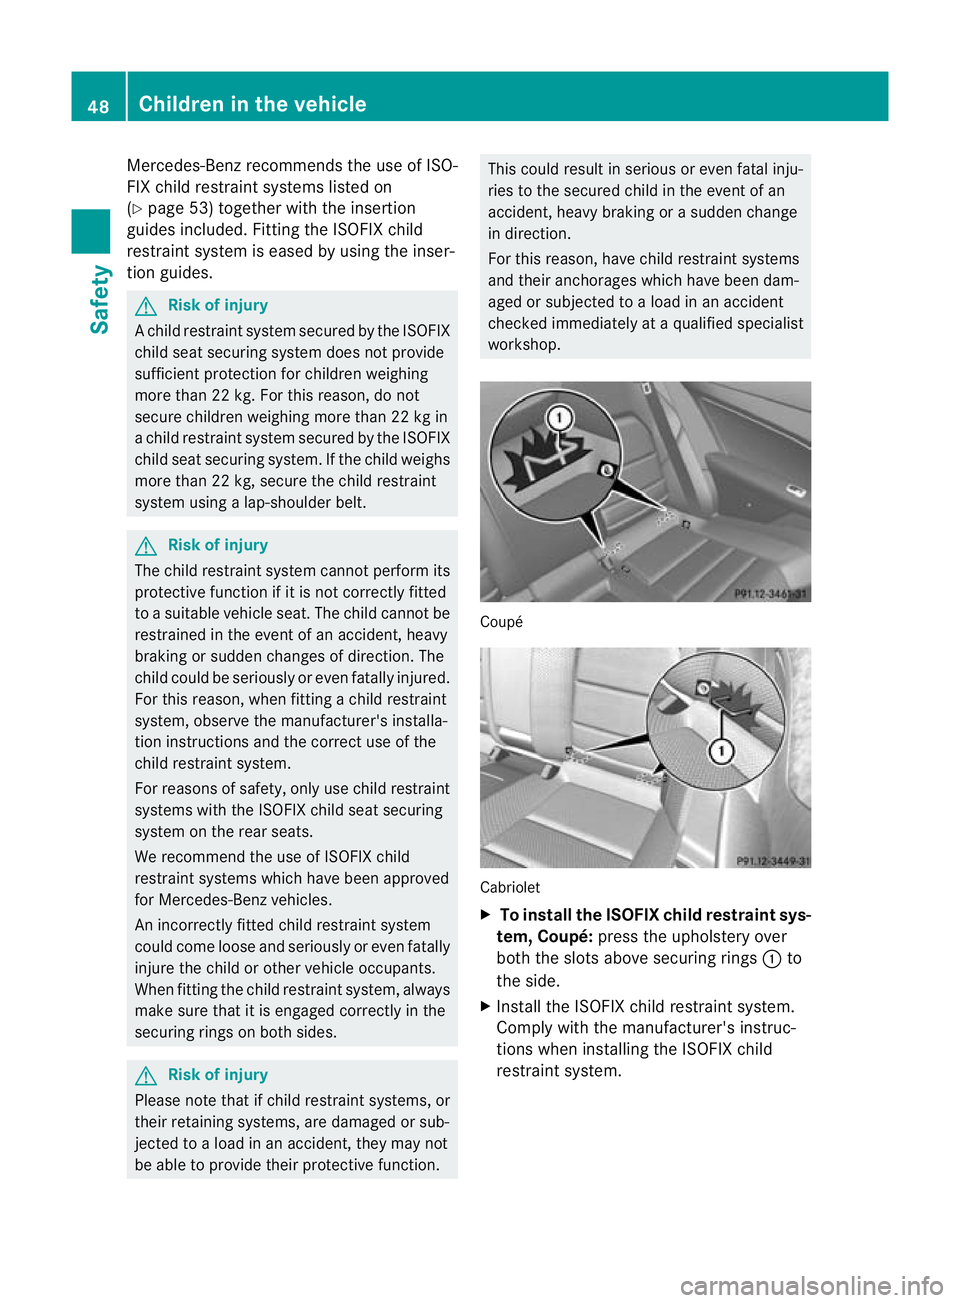
X
To install the ISOFIX child restraint sys-
tem, Coupé: press the upholstery over
both the slots above securing rings :to
the side.
X Install the ISOFIX child restraint system.
Comply with the manufacturer's instruc-
tions when installing the ISOFIX child
restraint system. 48
Children in th
evehicleSafety
BA 20 7ECE ÄJ 2010/1a; 1; 2, en-GB
mkalafa Version: 3.0.2.11 2010-01-26T13:03:22+01:00-Seite 48
Page 81 of 333
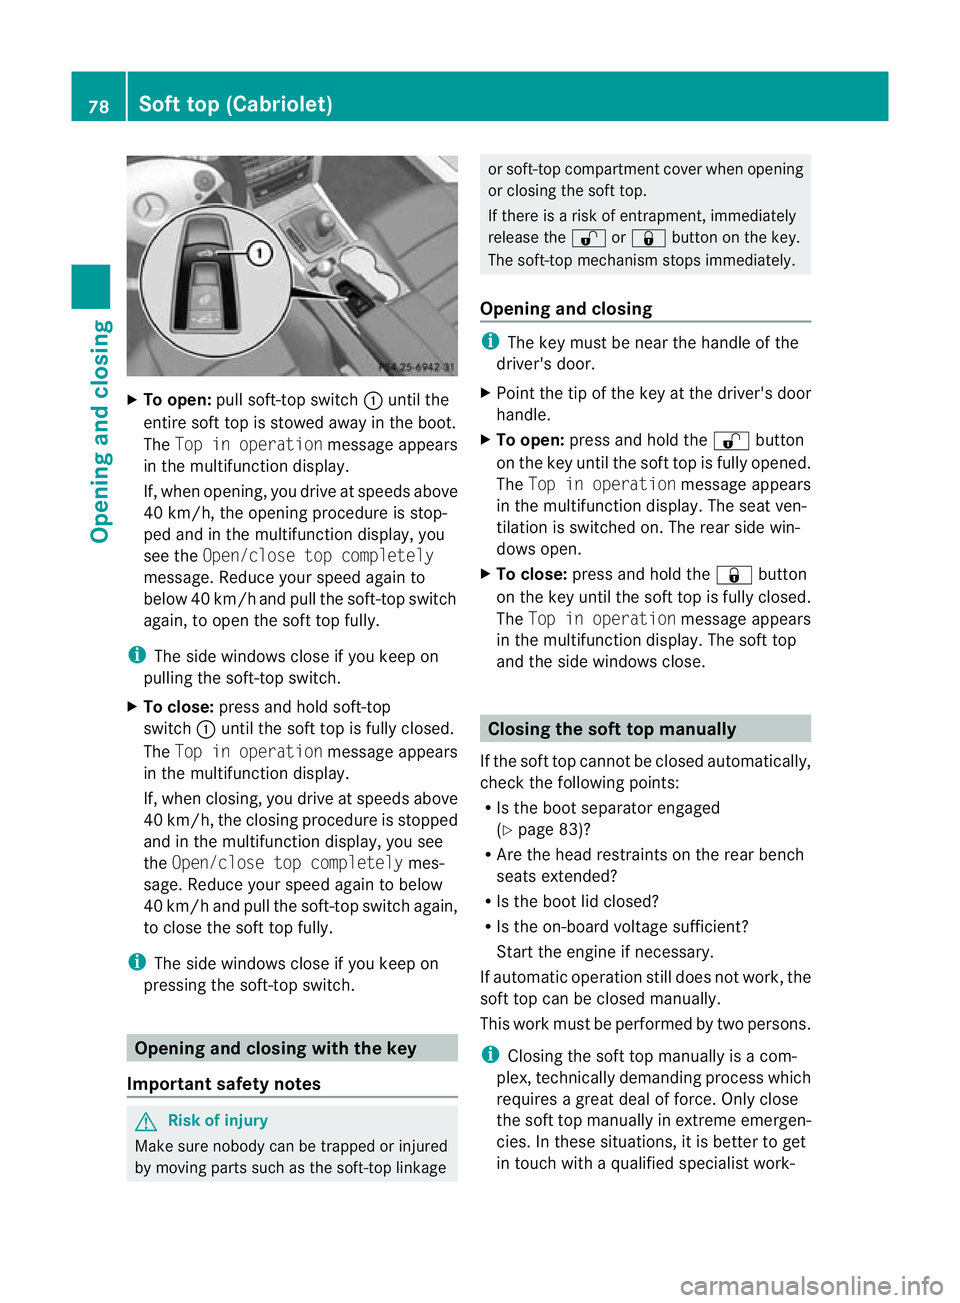
X
To open: pull soft-top switch :unti lthe
entire soft top is stowed away in the boot.
The Top in operation message appears
in the multifunction display.
If, whe nopening, you driv eatspeeds above
40 km/h, the opening procedure is stop-
ped and in the multifunction display, you
see the Open/close to pcompletely
message .Reduce your speed again to
below 40 km /hand pull th esoft-top switch
again, to open the soft top fully.
i Thes ide windows close if you keep on
pulling the soft-top switch.
X To close: press and hold soft-top
switch :until the soft top is fully closed.
The Topino peration message appears
in th emultifunction display.
If, when closing, you drive at speeds above
40 km/h, the closing procedure is stopped
and in the multifunction display ,you see
the Open/close to pcompletely mes-
sage .Reduce your speed again to below
40 km /hand pull th esoft-top switch again,
to close the soft top fully.
i Thes ide windows close if you keep on
pressing the soft-top switch. Opening and closin
gwith the key
Impor tant safety notes G
Risk of inju
ry
Make sur enobody can be trapped or injured
by moving parts such as the soft-top linkage or soft-top compartment cover when opening
or closin
gthe soft top.
If ther eisariskofe ntrapment, immediately
releas ethe % or& button on the key.
The soft -top mechanism stops immediately.
Opening and closing i
The key must be near the handle of the
driver' sdoor.
X Point the tip of the key at the driver's door
handle.
X To open: press and hold the %button
on the key until the soft top is fully opened.
The Topino peration message appears
in th emultifunction display .The seat ven-
tilation is switched on. The rea rside win-
dows open.
X To close: press and hold the &button
on the key until the soft top is fully closed.
The Topino peration message appe ars
in the multifunction display. The soft top
and the sid ewindows close. Closing the soft top manually
If the soft top cannot be closed automatically,
check the following points:
R Is the boot separator engaged
(Y page 83)?
R Are the head restrain tson the rea rbench
seats extended?
R Is the boot lid closed?
R Is the on-boar dvoltage sufficient?
Start the engin eifnecessary.
If automatic operation still does not work ,the
soft top can be closed manually.
This wor kmust be performed by two persons.
i Closing the soft top manually is acom-
plex, technically demandin gprocess which
require sagreatdeal of force. Only close
the soft top manually in extreme emergen-
cies. In these situations, it is better to get
in touc hwithaqualified specialist work- 78
Soft top (Cabriolet)Openin
gand closing
BA 20 7ECE ÄJ 2010 /1a;1;2,e n-GB
mkalafa Version: 3.0.2.11 2010-01-26T13:03:22+01:00-Seite 78
Page 87 of 333
above the rear benc
hseats. For this reason,
only th edriver and the front passenger can
trave linthe vehicl ewhen th edraugh tstopis
fitted. G
Risk of accident
Yo uc oul dcause an accident if your rea rview
is limited by darkness or other conditions.
Therefore, fold back the upper section of the
draught stop if it restricts your vision or when
it is dark.
! Mercedes-Benz recommends that you
only use draught stops which have been
tested and approved for Mercedes-Benz
vehicles. This helps to prevent damage to
the vehicle.
! Observe the backrest position of the front
seats if the draught stop is installed, since
the backrest could collide with the draught
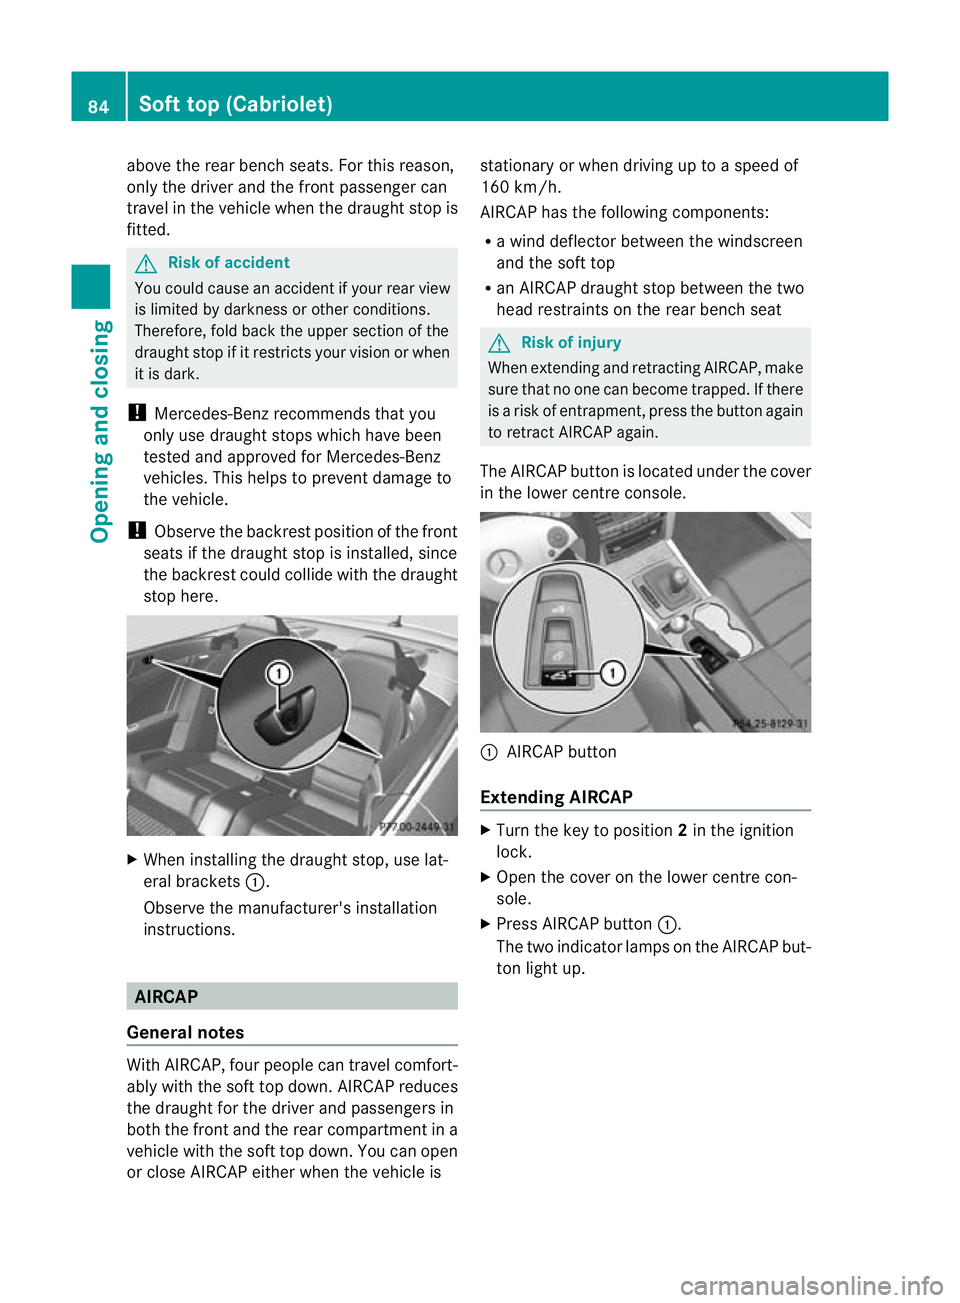
stop here. X
When installing the draught stop, use lat-
eral brackets :.
Observe the manufacturer' sinstallation
instructi ons. AIRCAP
General notes With AIRCAP, four people can travel comfort-
ably with the soft top down. AIRCAP reduces
the draugh tfor the driver and passenger sin
both the fron tand the rear compartment in a
vehicl ewith the soft top down. You can open
or close AIRCAP either when the vehicle is stationary or when drivin
guptoa speed of
16 0k m/h.
AIRCAP ha sthe followin gcomponents:
R aw ind deflector between the windscreen
and the soft top
R an AIRCAP draught stop between the two
head restraint sonthe rea rbench seat G
Risk of inju
ry
When extending and retractin gAIRCAP, make
sure that no on ecan become trapped. If there
is ar isk of entrapment ,pres sthe button again
to ret ract AIRCAP again.
Th eA IRCA Pbutton is located under the cover
in the lower centre console. :
AIRCAP button
Extendin gAIRCAP X
Turn the key to position 2in the ignition
lock.
X Open the cover on the lower centre con-
sole.
X Press AIRCAP button :.
The two indicator lamps on the AIRCAP but-
ton light up. 84
Soft top (Cabriolet)Opening and clos
ing
BA 207 ECE ÄJ 2010/1a; 1; 2, en-GB
mkalafa Version: 3.0.2.11
2010-01-26T13:03:22+01:00
-Seite 84
Page 88 of 333
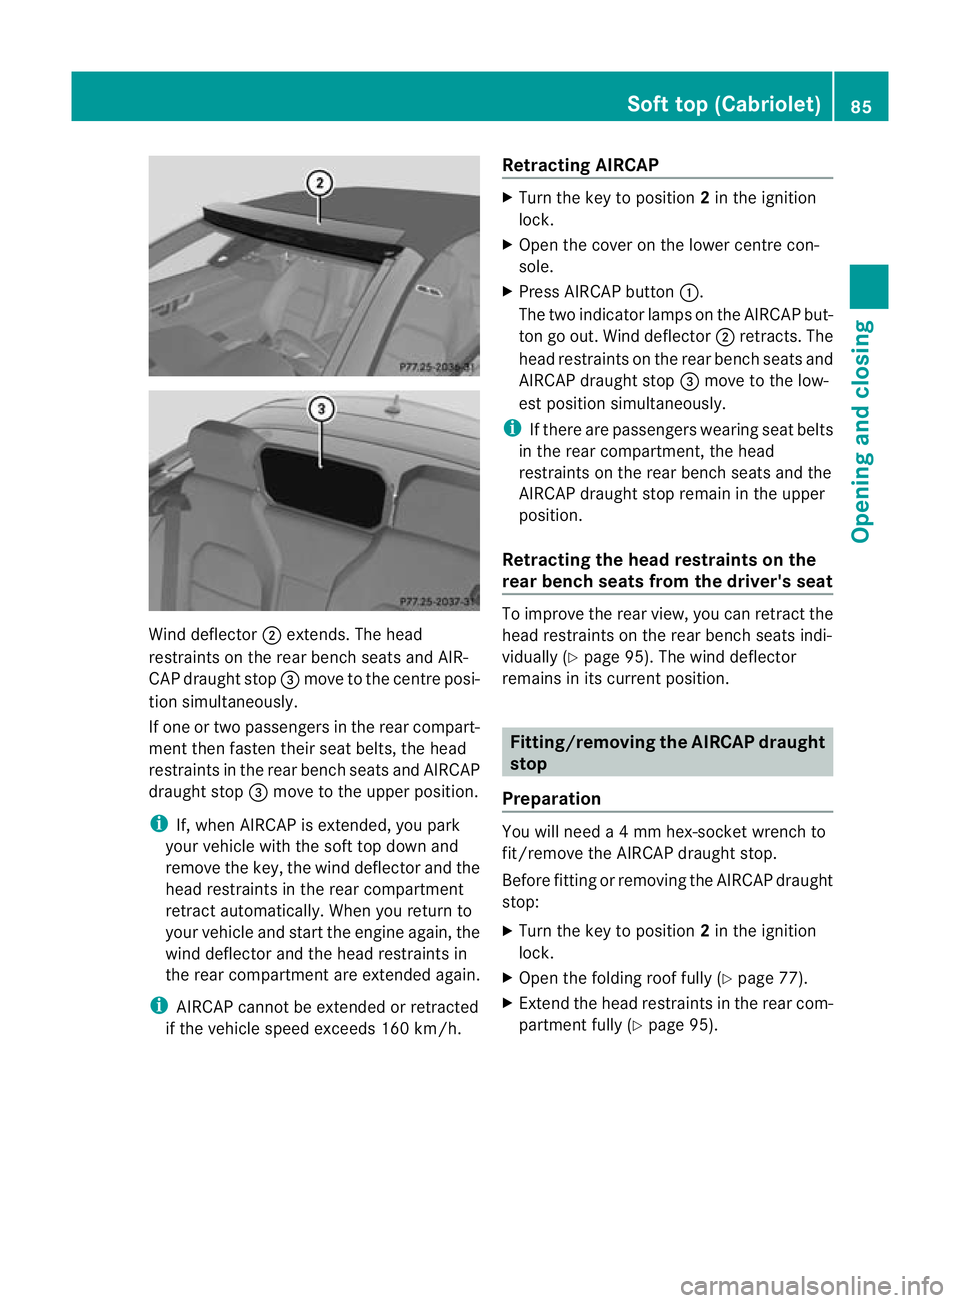
Wind deflec
tor;extends. The head
restraint sonthe rea rbench seats and AIR-
CAP draught stop =mov etot he cen trep osi-
tion simultaneously.
If one or two passenger sinthe rea rcompart-
men tthen fasten their seat belts, the head
rest raints in the rear bench seats and AIRCAP
draught stop =move to the upper position.
i If,w hen AIRCA Pisextended, you park
your vehicl ewith the soft top down and
remov ethe key ,the win ddeflec tora nd the
hea drestraint sinthe rea rcompartment
ret ract automatically. When you return to
your vehicle and start the engine again, the
wind deflector and the head rest raints in
the rear compar tment are extended again.
i AIRCAP can notb ee xtende dorretracted
if the vehicle speed exceeds 16 0km/h. Ret
racting AIRCAP X
Turn the key to position 2in the ignition
lock.
X Open the cover on the lower centre con-
sole.
X Press AIRCAP button :.
The two indicato rlamps on the AIRCAP but-
ton go out. Wind deflector ;retra cts. The
head rest raints on the rear bench seats and
AIRCAP draught stop =move to the low-
est position simultaneously.
i If there are passengers wearing seat belts
in the rear compartment, the head
restraints on the rear bench seats and the
AIRCAP draught stop remain in the upper
position.
Retracting the head restraints on the
rear bench seats from the driver's seat To improv
ethe rea rview, you can retrac tthe
head restraint sonthe rea rbench seats indi-
vidually (Y page 95). The wind deflector
remains in its curren tposition. Fitting/removing th
eAIRCAP draught
stop
Preparation You will need
a4mmhex-socket wrench to
fit/remov ethe AIRCA Pdraugh tstop.
Before fitting or removing the AIRCAP draught
stop:
X Turn the key to pos ition 2in the ignition
lock.
X Open the folding roof fully (Y page77).
X Extend the head restraints in the rear com-
part ment fully (Y page95). Soft top (Cabriolet)
85Openingand closing
BA 20 7ECE ÄJ 2010/1a; 1; 2, en-GB
mkalafa Version:3.0.2.11
2010-01-26T13:03:22+01:0
0-Seite 85 Z