tire type MERCEDES-BENZ E-CLASS CABRIOLET 2010 Owners Manual
[x] Cancel search | Manufacturer: MERCEDES-BENZ, Model Year: 2010, Model line: E-CLASS CABRIOLET, Model: MERCEDES-BENZ E-CLASS CABRIOLET 2010Pages: 333, PDF Size: 7.64 MB
Page 19 of 333

E3
50 CG IBlueEFFICIENCY ...........319
E5 00 ............................................. 320
Note s............................................. 310
Traile rloads ................................... 323
Tyres/whee ls................................. 303
Telephone
Accepting acall............................. 201
Display message ............................ 233
Menu (on-bo ardc omputer )............ 200
Number from the phone book ........ 201
Redialling ....................................... 202
Rej ecting/end ingac all................. 201
Tel ephon ecom partment .................. 245
Temperature Coolan t.......................................... 192
Outs idet emper ature ...... ............... .193
Setting ........................................... 125
Through-loading ................................ 246
Through-loadin gfeature ................... 246
Time (on-b oard computer) ................205
TIRE FITk it.......................................... 276
Topping up the headlamp clean ing
system ................................................ 262
Toppin gupthe winds creen washer
system ................................................ 262
Top Tether ............................................ 49
Total distanc erecorder .................... 197
Tow-away protection ..........................61
Towing Important safety notes ..................290
Towing atrailer
Folding in the ball coupling ............189
Fol ding out the bal lcoupling .......... 186
Towing away
Fitting the tow inge ye.................... 291
Removing the tow inge ye............... 292
Tow-starting
Emergency engine starting ............293
Fitting the tow inge ye.................... 291
Important safety notes ..................290
Removing the tow inge ye............... 292
Trailer
7-pi nconnector ............................. 190
Bulb failure ind icator for LED
lamps ............................................. 190
Co upling up ................................... 186
Decouplin g..................................... 187 Disp
laym essage ............................ 218
Po wer suppl y................................. 189
Trailer coupli ng(cleaning instruc-
tions) .................................................. 268
Trailer coupli ng(display message) ..232
Trailer loads Techn ical data ............................... 323
Trailer tow hitch ................................ 186
Trailer towing .................................... 144
Blind Spo tAssist ...... ...................... 185
Driving tips .................................... 187
ESP ®
................................................ 58
Mo unting dimensions ....................322
Parking Guid ance ........................... 180
Parktroni c...................................... 176
Transmission pos ition display .........143
Transmission pos itions .................... 143
Trip computer (on-b oard com-
puter) ................................................. .197
Trip meter Calling up ....................................... 197
Resetting (on-bo ardc omputer )...... 198
Turn si gnal (di splay message) .........218
Turn si gnal lamps .............................. 108
TV Operating (on-bo ardc omputer )..... 200
se eS eparate operating instructions
Two- wayradio
Freq uencies ................................... 311
Installati on .................................... .311
Transmissio noutput (maximum ).... 311
Type identification plate
seeV ehicle identificat ionplate
Tyre grip ............................................. 155
Tyre pressure Display message ............................ 230
Not reac hed( TIREFIT) .................... 279
Pressure loss warning ....................301
Reache d(TIREFIT) .......................... 279
Rec ommended ............................... 299
Tyres
Checking ........................................ 299
Cleaning ......................................... 299
Direction of rotatio n...................... 302
Flat tyre ......................................... 275
Guid elines to be observed .............298
Replacing ....................................... 30216
Index BA 207 ECE ÄJ 2010/1a; 1; 2, en-GB
mkalafa
Version: 3.0.2.11 2010-01-26T13:03:22+01:00-Seite 16
Page 184 of 333

R
if the area is lit by fluorescen tlight (the dis-
play may flicker)
R if ther eisas udden change in temperature,
e.g. when drivin gintoah eatedgarage in
winter
R if the camer alens is dirt yorobstruc ted
R if the rear of your vehicle is damaged. In this
even thave the camera position and setting
checked at aqualified specialist workshop.
Mercedes-Ben zrecom mends that you use
aM ercedes-Benz Ser vice Centre for this
purpose.
Do not use the reversing camera in these
type sofs ituation .You could, otherwise,
injure other sordamage objects and your
vehicle while you are parking.
Activating the reversing camera X
Make sure that the key is in position 2in
the ignition lock.
X Make sure that the "Reversing camera"
function is selected in COMAND APS (see
the separate operating instructions for
COMAND APS).
X Engage reverse gear.
The area behind the vehicle is shown in the
COMAND APS display.
Guide lines in the COMAND APS display
Depending on the date of manufacture of the
vehicle, the guide lines are shown in the
COMAND APS display. G
Risk of accident
Please note that objects not on ground level
may appear to be further away than they
actually are. Thes einclude:
R the bumper of the vehicl eparked behind
R trailer tow bars
R the tail-end of alorry
R slanted posts
The lines are only guides, not accurate meas-
urements of the distance to an obstacle.
Therefore, you should never pass the red line
when approachin ganobstacle. You could oth- erwise cause an accident and injur
eyourself
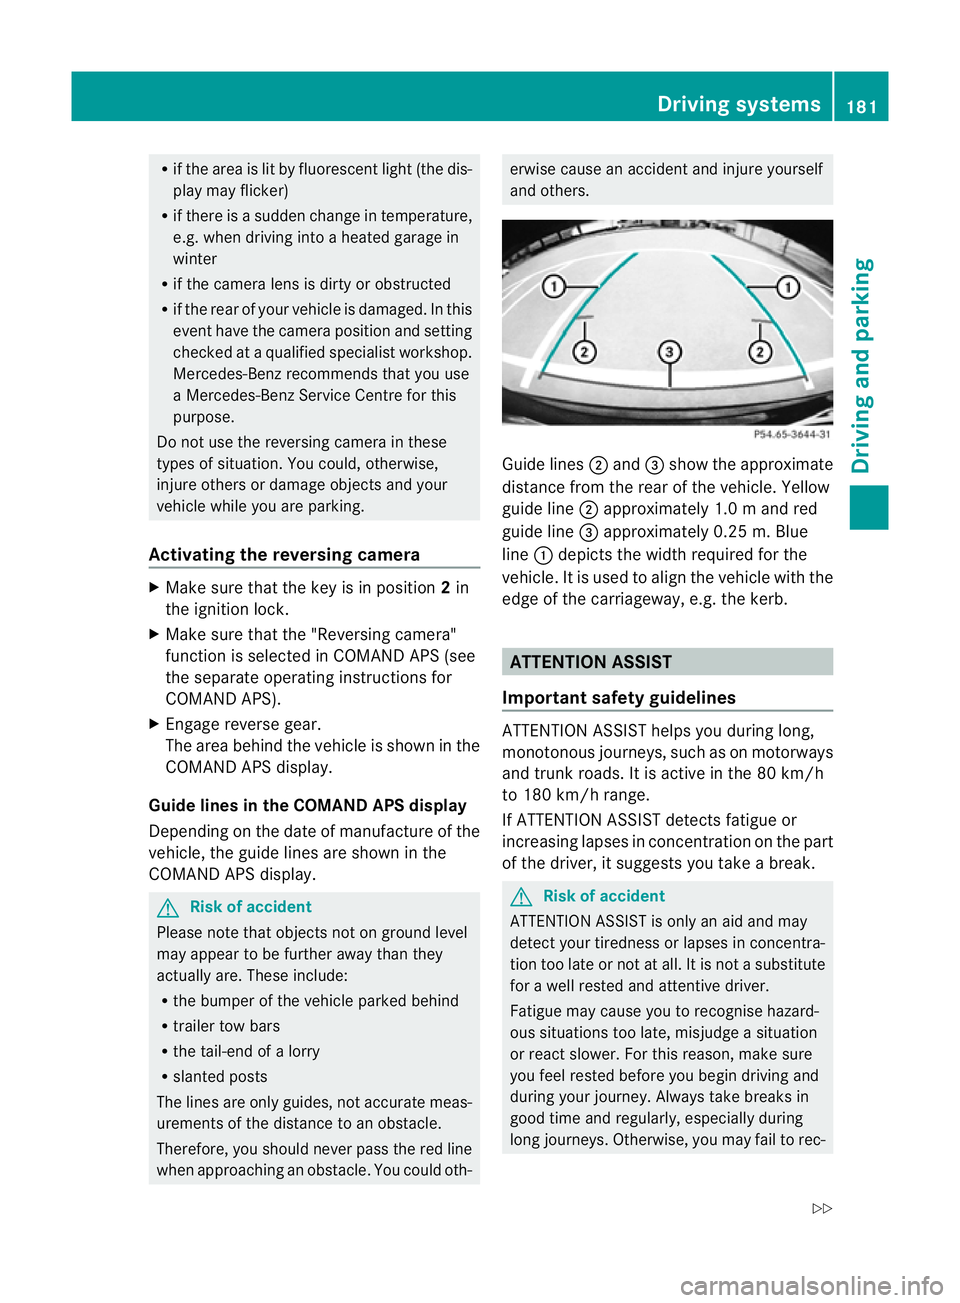
and others. Guide lines
;and =show the approximate
distance from the rear of the vehicle. Yellow
guide line ;approximately 1. 0mand red
guid eline =approximately 0.2 5m.Blue
line :depicts the width required for the
vehicle. It is used to align the vehicle with the
edge of the carriageway, e.g. the kerb. ATTENTION ASSIST
Important safet yguidelines ATTENTION ASSIST help
syou during long,
monotonous journeys, such as on motorways
and trunk roads. It is active in the 80 km /h
to 180 km/ hrange.
If ATTENTION ASSIST detects fatigue or
increasing lapses in concentration on the part
of the driver, it suggests you take abreak. G
Ris
kofa ccident
ATTENTION ASSIST is only an aid and may
detect your tiredness or lapses in concentra-
tion too late or not at all. It is not asubstitute
for aw ell reste dand attentiv edriver.
Fatigue may cause yo utorecognise hazard-
ous situations to olate ,misjudge asituation
or reac tslower .For this rea son, make sure
you fee lreste dbefore you begin driving and
duri ngyour jour ney. Always tak ebreaks in
good time and regularly ,especiall yduring
long jour neys. Otherwise ,you may fai ltorec- Driving systems
181Driving and parking
BA 207 ECE ÄJ 2010/1a; 1; 2, en-GB
mkalafa Version: 3.0.2.11 2010-01-26T13:03:22+01:00-Seite 181 Z
Page 272 of 333

!
For cleaning ,donot use any of the fol-
lowing:
R alcohol-based thinner or petrol
R abrasive cleanin gagents
R commercially-available household clean-
ing agents
These ma ydamage the displ ay surface.Do
not put pressure on the displa ysurface
when cleaning. This could lead to irrepara-
ble damage to the display.
Cleaning the plastic trim G
Risk of injury
When cleaning the steering wheel boss and
dashboard, do not use cockpit sprays or
cleaning agents containing solvents. Cleaning
agents containing solvents cause the surface
to become porous, and as aresult plastic
part smay break away and be thrown around
the interior when an airbag is deployed, which
may result in severe injuries.
! Do not affix the following to plastic surfa-
ces:
R stickers
R films
R scented oil bottles or similar items
You can otherwise damage the plastic.
! Do not allow cosmetics, insect repellent
or sunscreen to come in contact with the
plastic trim .This maintain sthe high-quality
look of the surfaces.
X Wipe the plastic trim with adamp, lint-free
cloth, e.g. amicrofibre cloth.
X Heavy soiling: use car care and cleaning
products recommended and approved by
Mercedes-Benz.
The surface may change colour tempora-
rily. Wait until the surface is dry again. Cleanin
greal wood and trim strips X
Wipe the wooden trim and trim strips with
ad amp, lint-free cloth, e.g. amicrofibre
cloth.
X Heavy soiling: use car care and cleaning
products recommended and approved by
Mercedes-Benz.
! Do not use solvent-based cleaning agents
such as tar remover, wheel cleaners, pol-
ishes or waxes. There is otherwise arisk of
damaging the surface.
Cleanin gthe seat covers !
Do not us emicrofibre cloths to clean gen-
uine leather, artificial leather or
Alcantara ®
covers. If used often ,these can
damage the cover.
! Observ ethe followin gwhen cleaning:
R clea ngenuin eleather covers carefully
with adamp cloth and then wipe the cov-
ers down with adry cloth .Make sure that
the leather does not become soaked .It
may otherwise become rough and
cracked .Only use leather care agents
that have bee ntested and approved by
Mercedes-Benz. You can obtain these
from aqualified specialist workshop, e.g.
aM ercedes-Ben zService centre.
R clean artificial leather covers with acloth
moistened with asolution con taining 1%
detergent (e.g. washing-up liquid).
R clean cloth cover switham icrofibre cloth
moistened with asolution con taining 1%
detergent (e.g. washing-up liquid). Rub
carefully and always wipe entire seat sec-
tions to avoid leaving visible lines. Leave
the seat to dry afterwards. Cleaning
results depend on the type of dirt and
how long it has been there.
R clean Alcantara ®
cover swithadamp
cloth. Make sure you wipe entire seat
sections to avoid leaving visible lines. Care
269Maintenance and care
BA 207 ECE ÄJ 2010/1a; 1; 2, en-GB
mkalafa Version:3.0.2.11
2010-01-26T13:03:22+01:00
-Seite 269 Z
Page 306 of 333

For safety reasons, Mercedes-Benz recom-
mends that yo
uonly use wheel bolts of the
correct size which hav ebeena pproved for
Mercedes-Benz vehicles.
The wear patterns on the fron tand rea rtyres
differ ,dependin gonthe opera tingconditions.
Interchange the wheels befor eaclear wear
pattern ha sform edon the tyr es.F ront tyres
typicall ywearm ore on the shoulder sand the
rea rtyre sint he centre.
On vehicles that have the same size front and
rear wheels, you can interchange the wheels
every 500 0kmto10,000 km depending on
the degre eoftyre wear. Do not reverse the
direction of tyre rotation.
Clea nthe con tact surface softhe wheel and
the brake disc thoroughly ever ytime awheel
is interchanged. Chec kthe tyr epressure and,
if necessary, restart th etyre pressure loss
warning system. Wheel and tyr
ecombinations Please bear the followin
ginmind
! For safety reasons, Mercedes-Ben zrec-
ommends that you only use tyres, wheels
and accessories which have been approved
by Mercedes-Ben zspecifically for your
vehicle. These tyres have been specially
adapted for use with the contro lsystems,
such as AB SorESP®
,a nd are marked as
follows:
R MO =Mercedes-Ben zOriginal
R MOE =Mercedes-Ben zOriginal Extended
(tyres with run-flat characteristics)
R MO1 =Mercedes-Ben zOriginal (AMG)
Only use Mercedes-Benz Original Extended
tyres on wheels that have been specifically
approved by Mercedes-Benz.
If you use other tyres, wheels and acces-
sories, Mercedes-Benz cannot accept any
responsibility for damage that may result
from this. Further informat ionabout tyres,
wheels and approved combinations can be obtained from any Mercedes-Benz Service
Centre.
! If you fit tyres other than those tested and
recommended by Mercedes-Benz, charac-
teristics such as handling, noise levels and
fuel consumption, etc. may be adversely
affected. In addition, when driving with a
load, tyre dimensional variations could
caus ethe tyres to com einto contact with
the bod ywork and axle components. This
could result in dam agetot he tyres or the
vehicle.
i Further information about tyres and
wheels can be obtained from any
Mercedes-Benz Servic eCentre.
i You will fin datable of tyre pressures on
the insid eofyourv ehicle' sfuel filler flap.
For further information on tyre pressure,
see (Y page 299).
i Notes on the vehicle equipment:
Always fit the vehicle:
R with tyres of the same size on agiven axle
(left/right)
R with the same type of tyres at agiven
time (summer tyres, winter tyres,
MOExtended tyres)
i Vehicles featurin gthe MOExtended run-
fla ts ystem are not equipped with the
TIREFIT kit.
It is therefore recommended that you addi-
tionally equip your vehicle with the TIREFIT
kit if you fit tyres that do not feature run-
flat properties, e.g. winter tyres.
AT IREFIT kit is availa blef rom any qu alified
specialist workshop, e.g. aMercedes-Benz
Ser vice Centre. Wheel and tyr
ecombinations
303Tyres and wheels
BA 207ECE ÄJ 2010/1a; 1; 2, en-GB
mkalafa Version:3.0.2.11
2010-01-26T13:03:22+01:0
0-Seite 303 Z