sensor MERCEDES-BENZ E-CLASS CABRIOLET 2011 Owner's Manual
[x] Cancel search | Manufacturer: MERCEDES-BENZ, Model Year: 2011, Model line: E-CLASS CABRIOLET, Model: MERCEDES-BENZ E-CLASS CABRIOLET 2011Pages: 353, PDF Size: 8.42 MB
Page 83 of 353
i
You will fin ddetails of the boot lid opening
dimension sinthe Technical data section
(Y page 343).
The boot lid can be:
R opened and closed manually fro moutside
R opened automatically from outside
R opened automatically from inside
R locke dseparately
R unlocked wit hthe emergenc ykey element Opening/closing manually
Opening X
Press the %button on the key. X
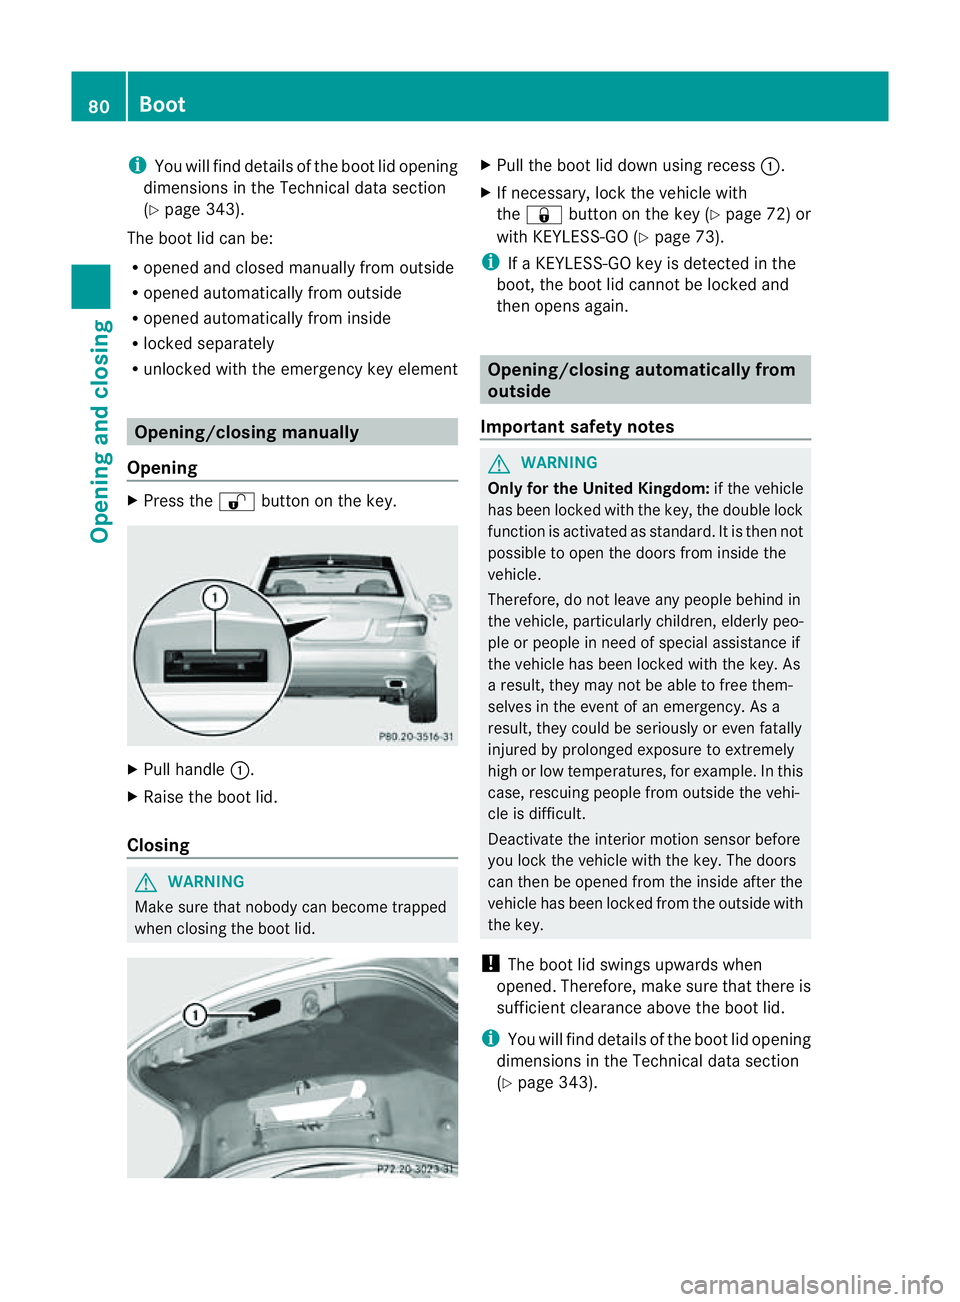
Pull handle :.
X Raise the boot lid.
Closing G
WARNING
Make sure that nobody can become trapped
when closing the boot lid. X
Pull the boot lid down using recess :.
X If necessary, lock the vehicle with
the & button on the key (Y page 72) or
with KEYLESS-GO (Y page 73).
i IfaK EYLESS-GO key is detected in the
boot, the boot lid cannot be locked and
then opens again. Opening/closing automatically from
outside
Important safet ynotes G
WARNING
Only for the United Kingdom: if the vehicle
has been locked with the key, the double lock
function is activated as standard. It is then not
possible to open the doors from inside the
vehicle.
Therefore, do not leave any people behind in
the vehicle, particularly children ,elderly peo-
ple or people in need of special assistanc eif
the vehicle has been locked with the key. As
ar esult, they may not be able to free them-
selves in the event of an emergency. As a
result, they could be seriously or even fatally
injured by prolonged exposure to extremely
high or low temperatures, for example. In this
case, rescuin gpeople from outside the vehi-
cle is difficult.
Deactivate the interior motion sensor before
you lock the vehicle with the key. The doors
can then be opened from the inside after the
vehicle has been locked from the outside with
the key.
! The boot lid swings upwards when
opened. Therefore, make sure that ther eis
sufficien tclearance above the boot lid.
i You will fin ddetails of the boot lid opening
dimension sinthe Technical data section
(Y page 343). 80
BootOpening and closing
Page 87 of 353
Convenience closing (Coupé)
General notes When you loc
kthe vehicle, you can simulta-
neously:
R close the side windows
R close the panorama sliding sunroof
On vehicles with apanorama sliding sunroof,
you can then close the roller sunblind. G
WARNING
When using the convenience closing feature,
make sure that nobody can become trapped.
Proceed as follows if there is arisk of entrap-
ment:
With the key:
R release the &button.
R press and hold the %button until the
side windows and the panorama sliding
sunroof open again.
With KEYLESS-GO:
R release the sensor surface on the door han-
dle.
R pull the door handle immediately and hold
it.
The side windows and the panorama sliding
sunroof open.
Using the key i
The key must be close to the driver's door
handle.
X Point the tip of the key at the driver's door
handle.
X Press and hold the &button until the
side windows and the panorama sliding
sunroof are fully closed.
X Make sure that all the side windows and the
panorama sliding sunroof are closed.
On vehicles with apanorama sliding sunroof:
X Press and hold the &button again until
the roller sunblind of the panorama sliding
sunroof closes. X
To interrupt conveniencec losing:
release the &button.
Using KEYLESS-GO The KEYLESS-GO key must be outside the
vehicle. All the doors must be closed.
X
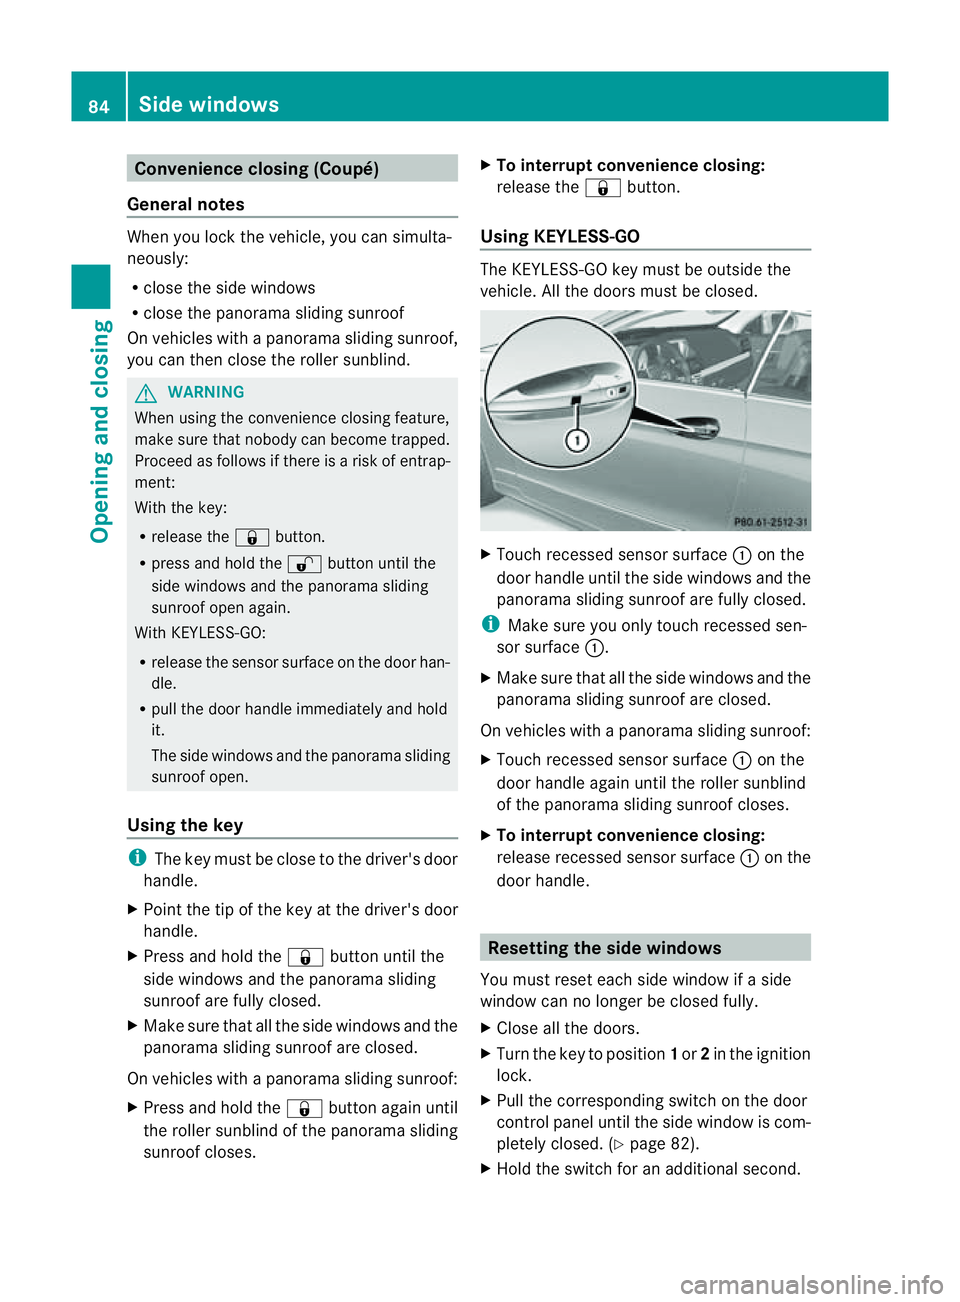
Touch recessed sensor surface :on the
door handle until the side windows and the
panorama sliding sunroof are fully closed.
i Make sure you only touch recessed sen-
sor surface :.
X Make sure that all the side windows and the
panorama sliding sunroof are closed.
On vehicles with apanorama sliding sunroof:
X Touch recessed sensor surface :on the
door handle again until the roller sunblind
of the panorama sliding sunroof closes.
X To interrupt conveniencec losing:
release recessed sensor surface :on the
door handle. Resetting the side windows
You must reset each side window if aside
window can no longer be closed fully.
X Close all the doors.
X Turn the key to position 1or 2in the ignition
lock.
X Pull the corresponding switch on the door
control panel until the side window is com-
pletely closed. (Y page 82).
X Hold the switch for an additional second. 84
Side windowsOpening and closing
Page 100 of 353
G
WARNING
The glass in the panorama sunroof could
brea kinana ccident. If yo uare not wearing a
sea tbelt, there is arisk that you could be
thrown through the opening in the event of the
vehicle overturning .Therefore, always wear a
seat belt to reduce the risk of injuries.
! Only open the panorama sliding sunroof
if it is free of snow and ice. Otherwise, mal-
functions may occur.
Do not allow anything to protrude from the
sliding sunroof. Otherwise, the seals could
be damaged.
i Resonance noises can occur in addition
to the usuala irflow noises when the sliding
sunroof is open. They are caused by minor
pressure fluctuations in the vehicle interior.
Change the position of the sliding sunroof
or open aside window slightly to reduce or
eliminate these noises. Operating the panoramas
liding sun-
roof
Opening and closing Overhead control panel
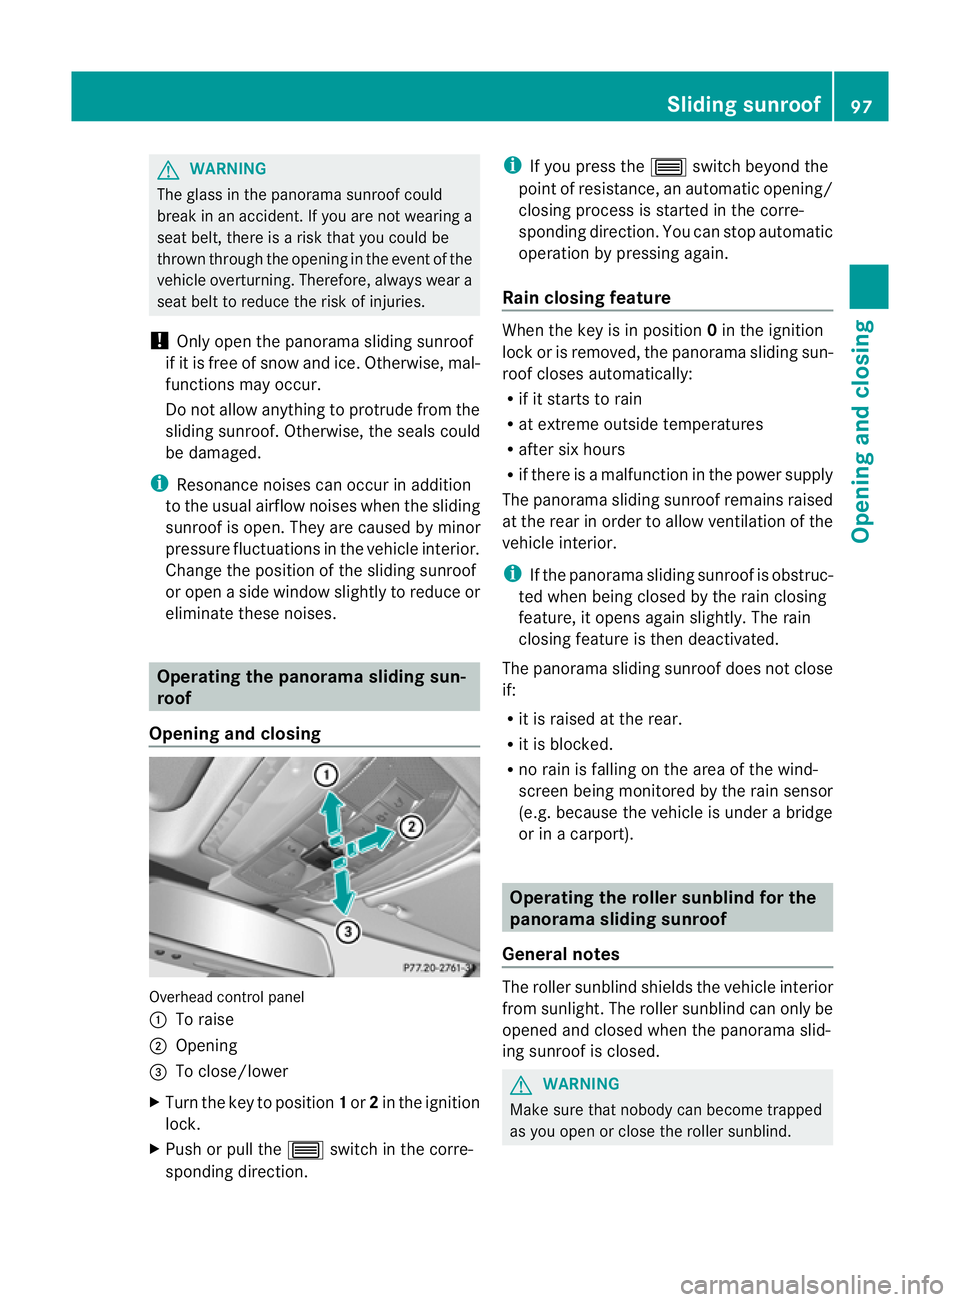
:
To raise
; Opening
= To close/lower
X Turn the key to position 1or 2in the ignition
lock.
X Push or pull the 3switch in the corre-
sponding direction. i
If you press the 3switch beyond the
point of resistance, an automatic opening/
closing process is started in the corre-
sponding direction. You can stop automatic
operation by pressing again.
Rain closing feature When the key is in position
0in the ignition
lock or is removed, the panorama sliding sun-
roof closes automatically:
R if it starts to rain
R at extreme outside temperatures
R after six hours
R if there is amalfunction in the power supply
The panorama sliding sunroof remains raised
at the rear in order to allow ventilation of the
vehicle interior.
i If the panorama sliding sunroof is obstruc-
ted when being closed by the rain closing
feature, it opens again slightly. The rain
closing feature is then deactivated.
The panorama sliding sunroof does not close
if:
R it is raised at the rear.
R it is blocked.
R no rain is falling on the area of the wind-
screen being monitored by the rain sensor
(e.g. because the vehicle is under abridge
or in acarport). Operating the roller sunblind for the
panoramas
liding sunroof
General notes The roller sunblin
dshields the vehicle interior
from sunlight. The roller sunblin dcan only be
opened and close dwhen the panorama slid-
ing sunroof is closed. G
WARNING
Make sure that nobody can becom etrapped
as you open or close the roller sunblind. Sliding sunroof
97Opening and closing Z
Page 114 of 353
Automati
canti-dazzle mirrors G
WARNING
If inciden tlight fro mheadlamps is prevented
from striking the sensor in the rear-view mir-
ror, for instance, by luggage piled too high in
the vehicle, the mirror's automatic anti-dazzle
function will not operate.
Incident light could then blind you. This may
distrac tyou from the traffic conditions and,
as aresult, you may cause an accident.
The rear-view mirror and the exterior mirror
on the driver's side automatically go into anti-
dazzle mode if the ignition is switched on and
inciden tlight fro mheadlamps strikes the sen-
sor in the rear-view mirror.
The mirror sdonot go intoa nti-dazzle mode if
revers egear is engaged. Parking position for the exterior mir-
ror on the front-passenger side
Setting and storing the parking position You can position the front-passenger side
exterior mirror in such away that you can see
the rear wheel on that side as soon as you
engage revers egear. You can stor ethis posi-
tion. X
Make sure that the vehicle is stationary and
that the key is in position 2in the ignition
lock.
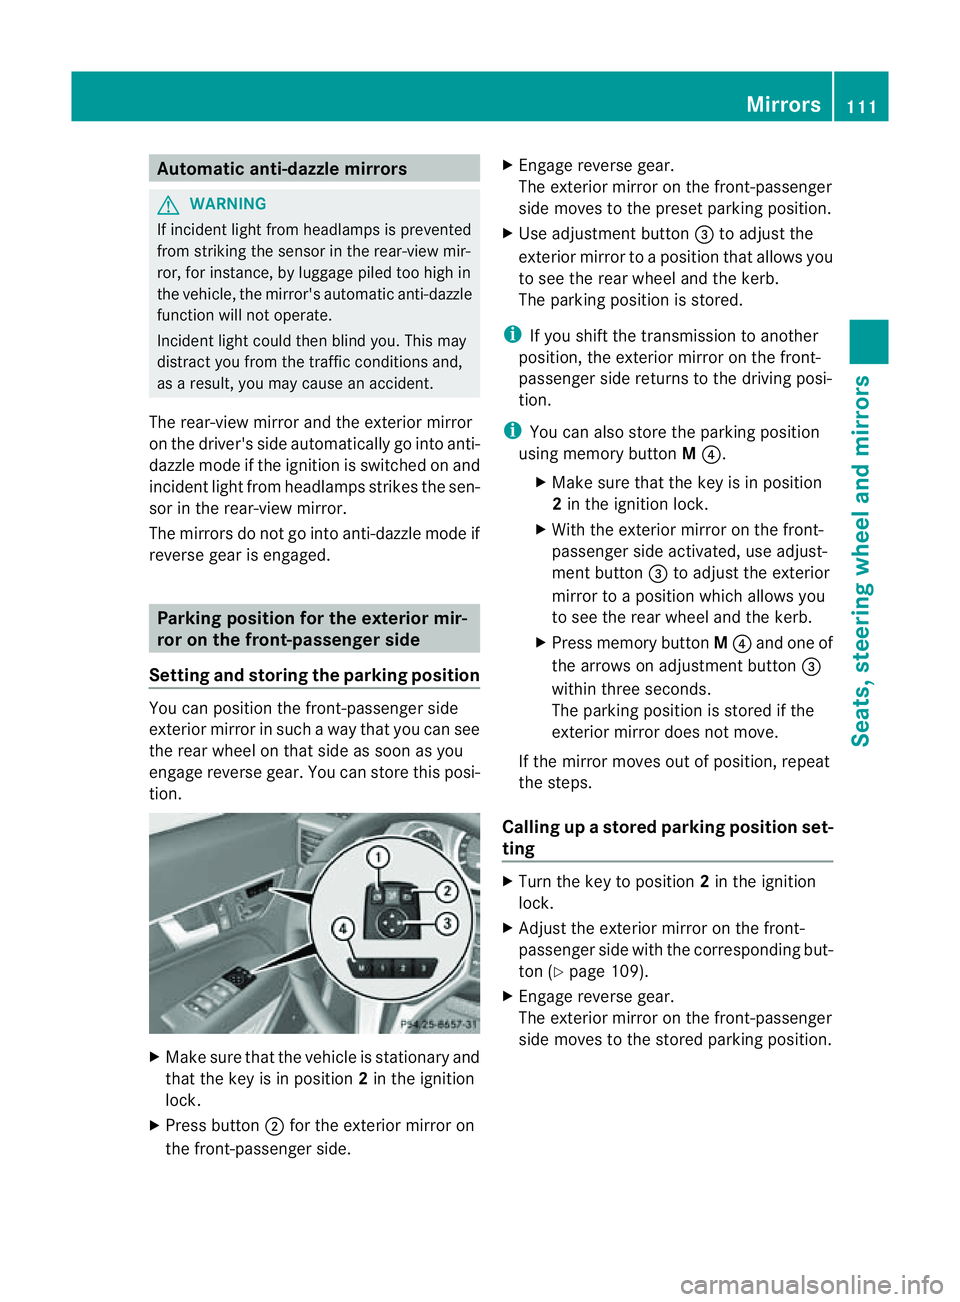
X Press button ;for the exterior mirror on
the front-passenger side. X
Engage revers egear.
The exterior mirror on the front-passenger
side moves to the preset parkin gposition.
X Use adjustment button =to adjust the
exterior mirror to aposition that allows you
to see the rear wheel and the kerb.
The parkin gposition is stored.
i If you shift the transmission to another
position ,the exterior mirror on the front-
passenger side return stothe driving posi-
tion.
i You can also stor ethe parkin gposition
using memory button M?.
X Make sure that the key is in position
2in the ignition lock.
X With the exterior mirror on the front-
passenger side activated, use adjust-
ment button =to adjust the exterior
mirror to aposition which allows you
to see the rear wheel and the kerb.
X Press memory button M? and one of
the arrows on adjustment button =
within three seconds.
The parkin gposition is stored if the
exterior mirror does not move.
If the mirror moves out of position ,repeat
the steps.
Calling up astore dparking position set-
ting X
Tur nthe key to position 2in the ignition
lock.
X Adjust the exterior mirror on the front-
passenger side with the corresponding but-
ton (Y page 109).
X Engage reverse gear.
The exterior mirror on the front-passenger
side moves to the stored parking position. Mirrors
111Seats, steering wheela nd mirrors Z
Page 122 of 353
Active:
if you are driving at speeds below
70 km/h and you switch on th erear foglamp
Not active: if you are driving at speeds above
10 0k m/h or if you switch off the rear foglamp
following activation Adaptive Highbeam Assist
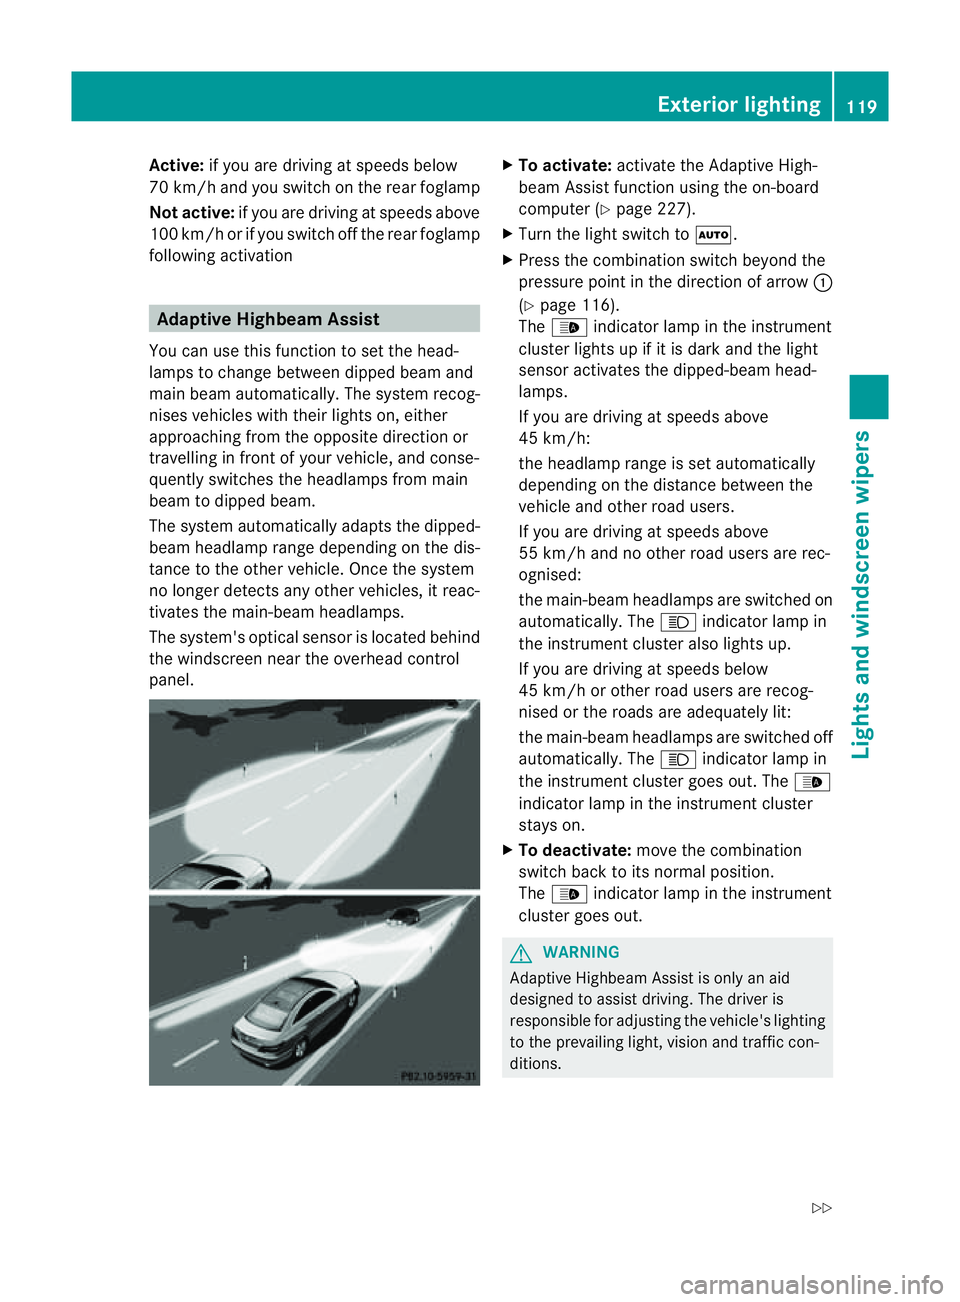
You can use this function to set the head-
lamp stoc hange between dipped beama nd
main beam automatically. The system recog-
nises vehicles with thei rlight son, either
approaching fro mthe opposite direction or
travelling in front of your vehicle, and conse-
quently switches the headlamps from main
beam to dipped beam.
The system automatically adapts the dipped-
beam headlamp range depending on the dis-
tance to the other vehicle. Once the system
no longer detects any other vehicles, it reac-
tivates the main-beam headlamps.
The system's optical sensor is located behind
the windscreen near the overhead control
panel. X
To activate: activate the Adaptive High-
beam Assist function using the on-board
computer (Y page 227).
X Turn the light switch to Ã.
X Press the combination switch beyond the
pressure point in the direction of arrow :
(Y page 116).
The _ indicator lamp in the instrument
cluster lights up if it is dark and the light
sensor activates the dipped-beamh ead-
lamps.
If you are driving at speeds above
45 km/h:
the headlamp range is set automatically
depending on the distanc ebetween the
vehicle and other road users.
If you are driving at speeds above
55 km/ha nd no other road users are rec-
ognised:
the main-beam headlamps are switched on
automatically. The Kindicator lamp in
the instrument cluster also lights up.
If you are driving at speeds below
45 km/ho rother road users are recog-
nised or the roads are adequately lit:
the main-beam headlamps are switched off
automatically. The Kindicator lamp in
the instrument cluster goes out. The _
indicator lamp in the instrument cluster
stays on.
X To deactivate: move the combination
switch back to its normal position.
The _ indicator lamp in the instrument
cluster goes out. G
WARNING
Adaptiv eHighbeam Assist is only an aid
designed to assist driving. The driver is
responsible for adjustin gthe vehicle's lighting
to the prevailing light, vision and traffic con-
ditions. Exterior lighting
119Lights and windscreen wipers
Z
Page 123 of 353
The system may be impaired or deactivated:
R
if there is poor visibility, e.g. due to snow,
rain, fog or spray
R if the area of the windscreen around the
optical sensor is dirty, misted up or covered
up, e.g. by asticker
The system may not recognise the following
road users:
R road users that have no lighting, e.g. pedes-
trians
R road users that have poor lighting, e.g.
cyclists
R road users whose lighting is not clearly visi-
ble, e.g. road users behind acrash barrier
R on rare occasions :road users that have
lights that may be recognised too late or not
at all
The automatic main-beam headlamps will not
be deactivated, or they may be activated
despite road users travelling in front of or
approaching the vehicle.
Thus, you could cause an accident and injure
yourself and others. Always observe traffic
conditions and, if necessary, dip the lights
manually. Headlamps misted up inside
The headlamps may mist up on the inside if
there is high atmospheric humidity.
X Drive with the headlamps switched on.
The level of moisture diminishes, depend-
ing on the length of the journey and the
weather conditions (humidity and temper-
ature).
If the level of moisture does not diminish:
X Have the headlamps checked at aqualified
specialist workshop. Interior lighting
Overview of interior lighting
Overhead control panel (example: Coupé)
:
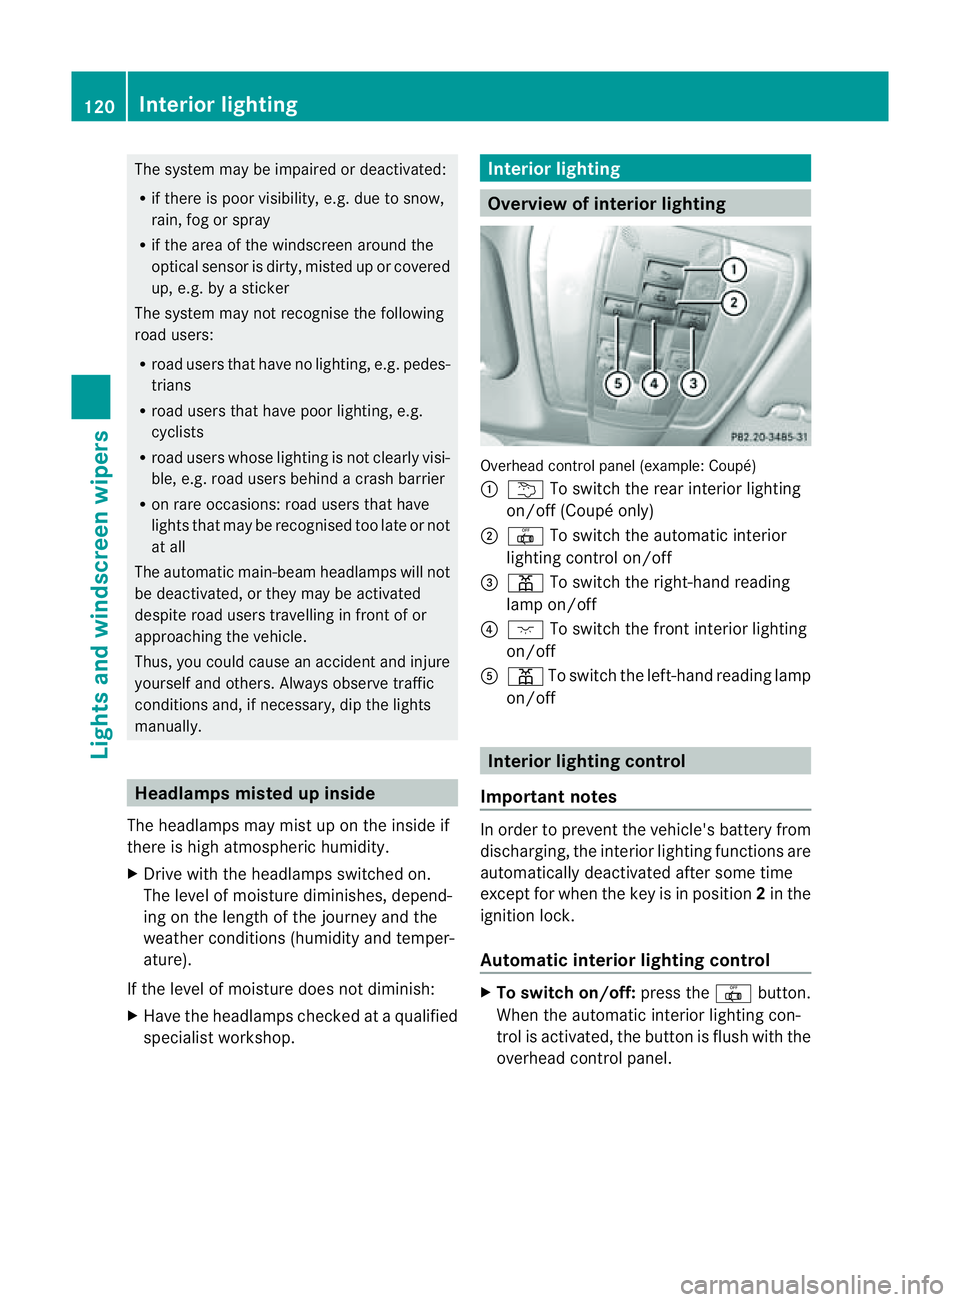
u To switch the rear interior lighting
on/off( Coupé only)
; | To switch th eautomatic interior
lighting control on/off
= p To switch th eright-hand reading
lamp on/off
? c To switch th efront interio rlighting
on/off
A p To switch th eleft-hand reading lamp
on/off Interior lightin
gcontrol
Important notes In order to preven
tthe vehicle's battery from
discharging, the interior lighting functions are
automatically deactivated after some time
except for when the key is in position 2in the
ignition lock.
Automatic interior lighting control X
To switch on/off: press the|button.
When the automatic interior lighting con-
trol is activated, the button is flush with the
overhead control panel. 120
Interior lightingLights and windscreen wipers
Page 127 of 353
X
Turn the bulb anti-clockwise, applying
slight pressure, and remove it from bulb
holder :.
X Insert the new bulb into bulb holder :and
turn it clockwise.
X Insert bulb holder :into the lamp and turn
it clockwise. Windscreen wipers
Switching the windscreen wipers on/
off
G
WARNING
The windscreen will not longer be wiped prop-
erly if the wiper blades are worn. This could
prevent you from observing the traffic condi-
tions, thereby causing an accident .Replace
the wiper blades twice ayear, ideally in spring
and autumn.
! Do not operate the windscreen wipers
when the windscreen is dry, as this could
damage the wiper blades. Moreover ,dust
that has collected on the windscreen can
scratch the glass if wiping takes place when
the windscreen is dry.
! If the windscreen wipers leave smears on
the windscreen after the vehicle has been
washed in an automatic car wash, this may
be due to wax or other residue. Clean the
windscreen with washer fluid after an auto-
matic car wash. Combination switch
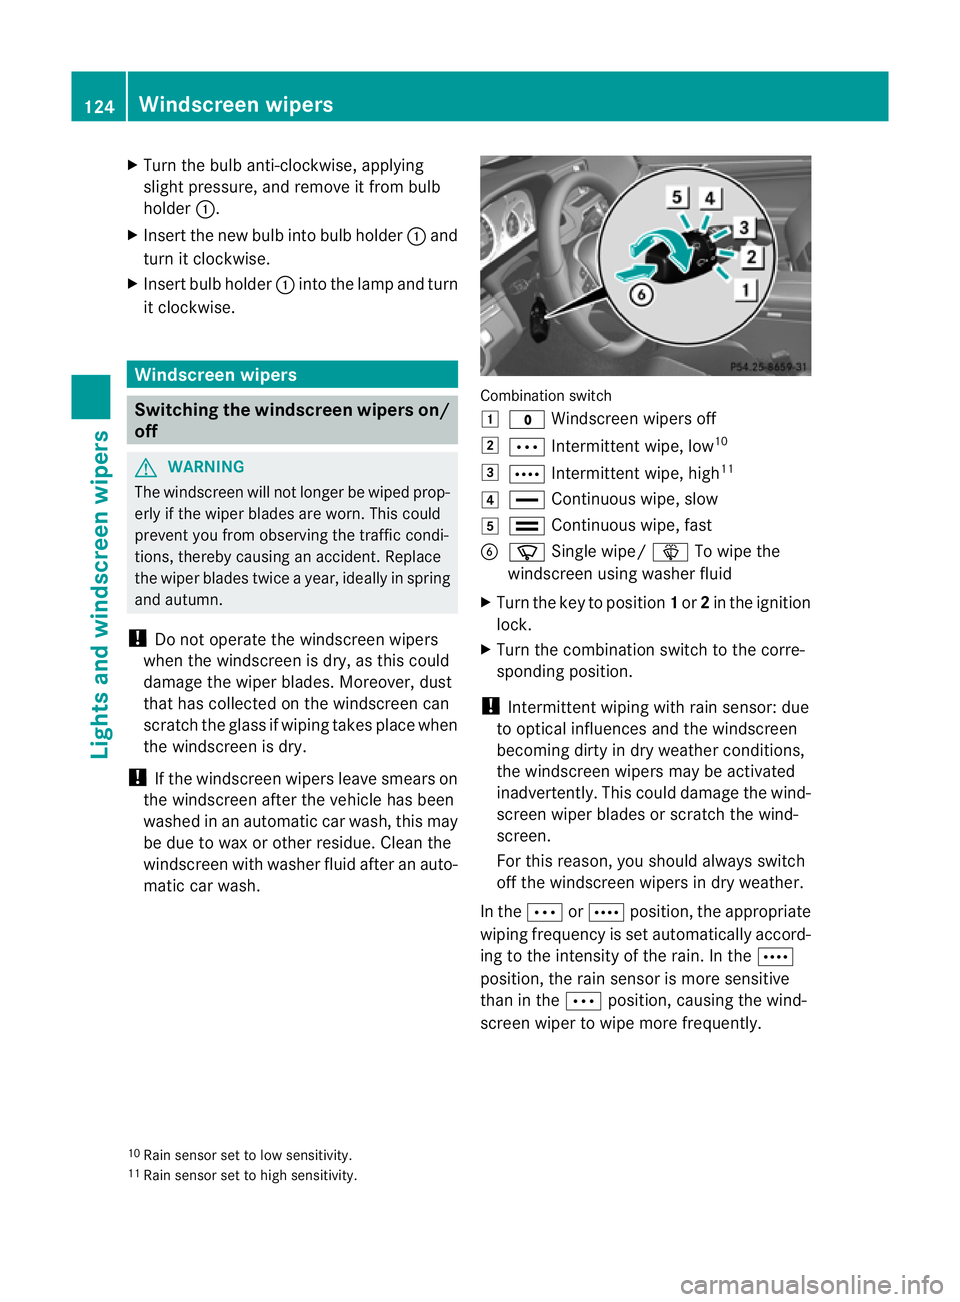
1
$ Windscreen wipers off
2 Ä Intermittentw ipe, low10
3 Å Intermittentw ipe, high11
4 ° Continuous wipe, slow
5 ¯ Continuous wipe, fast
B í Single wipe/ îTo wipe the
windscreen using washer fluid
X Turn the key to position 1or 2in the ignition
lock.
X Turn the combination switch to the corre-
spondin gposition.
! Intermittentw iping with rain sensor :due
to optical influences and the windscreen
becomin gdirty in dry weather conditions,
the windscreen wipers may be activated
inadvertently. This could damage the wind-
screen wiper blades or scratch the wind-
screen.
For this reason, you should alway sswitch
off the windscreen wipers in dry weather.
In the ÄorÅ position ,the appropriate
wiping frequenc yisset automatically accord-
ing to the intensity of the rain. In the Å
position ,the rain sensor is more sensitive
than in the Äposition ,causing the wind-
screen wiper to wipe more frequently.
10 Rain sensor set to low sensitivity.
11 Rain sensor set to high sensitivity. 124
Windscreen wipersLights and windscreen wipers
Page 175 of 353
On long and steep downhill gradients, espe-
cially if the vehicle is laden or towing atrailer,
you must select shift range 1,2or 3in good
time. By doing so, you will make use of the
braking effect of the engine, which relieves
the load on the brake system and prevents
the brakes from overheating and wearing too
quickly.
If as lower-moving vehicle is detected in front,
DISTRONIC PLUS causes your vehicle to
brake and maintain apreset distance to the
vehicle in front. G
WARNING
Do not change down for additional engine
braking on aslippery road surface. This could
cause the drive wheels to lose their grip and
the vehicle could skid. G
WARNING
DISTRONIC PLUS is only an aid designed to
assist driving. The driver remains fully respon-
sible for the vehicle's distance from other
vehicles, the vehicle's speed and for braking
in good time.
DISTRONIC PLUS does not react in particular
to:
R pedestrians
R stationary obstacles on the road, e.g. stop-
ped or parked vehicles
R oncoming and crossing traffic
DISTRONIC PLUS may not detect narrow vehi-
cles driving in front,e .g. motorcycles, or vehi-
cle sd riving on adifferent line. Therefore,
always pa yattention to traffic conditions even
when DISTRONIC PLU Sisactivated. Other-
wise, yo umay fai ltorecognis edanger sin
time ,cause an accident and injure yourself
and others. G
WARNING
DISTRONIC PLU Scanno ttake account of road
and traffic conditions .IfDISTRONIC doe snot
recognise or no longer recognises the vehicle
in front,don ot activate DISTRONIC or, if it is
already active, deactivate it. This is especially
the case:
R before corners
R on filter lanes
R when changing to alane with faster moving
traffic
R in complex driving situations or where lanes
are diverted, e.g. at roadworks on amotor-
way
DISTRONIC PLUS otherwise maintains the
current speed set by you or accelerates up to
the set speed.
DISTRONIC PLUS cannot take account of
weather conditions. Deactivate, or do not
activate, DISTRONIC PLUS:
R if the roads are slippery, snow-covered or
icy. The wheels could lose their grip when
braking or accelerating. The vehicle could
start to skid.
R if the sensors are dirty or there is poor vis-
ibility, e.g. due to snow, rain or fog. Dis-
tancec ontrol may be impaired.
Always pay attention to traffic conditions
even when DISTRONIC PLUS is activated.
Otherwise, you may fail to recognise dangers
in time, cause an accident and injure yourself
and others.
! You must deactivate the radar sensor sys-
tem in certain countries and near radio
telescope facilities. You will find further
information under "Radar sensor system"
in the index.
The radar sensor system is automatically
deactivated near radio telescope facilities
(Y page 345).
If you want DISTRONIC PLUS to assist you,
the radar sensor system must be activated
(Y page 229) and operational. 172
Driving systemsDriving and parking
Page 182 of 353
or
X
Briefly press the cruise control lever in the
direction of arrow =.
Variable SPEEDTRONIC is selected. LIM
indicator lamp ;in the cruise control lever
lights up.
If you deactivate DISTRONIC PLUS, the DIS‐TRONIC PLUS off message is shown in the
multifunction display for approximately five
seconds.
i The last speed stored remains stored until
you switch off the engine.
i DISTRONIC PLUS is not deactivated if you
depress the accelerator pedal. If you accel-
erate to overtake, DISTRONIC PLUS
adjusts the vehicle's speed to the last
speed stored after you have finished over-
taking.
DISTRONIC PLUS is automatically deactiva-
ted if:
R you apply the parking brake.
R you are driving slower than 25 km/ha nd
there is no vehicle in front,orift he vehicle
in front is no longer detected.
R ESP ®
intervenes or if you deactivate ESP ®
.
R the transmission is in the P,Ror Nposition.
R the vehicle is near aradio telescope facility
(Y page 345).
R you switch off the radar sensor system
(Y page 229).
R you pull the cruise control lever towards
you in order to pull away and the front-
passenger door is open.
R the vehicle has skidded.
If DISTRONIC PLUS is deactivated, you will
hear awarning tone. The DISTRONIC PLUS off message is shown in the multifunction
display for approximately five seconds.
If the vehicle has been stopped by DISTRONIC
PLUS and afault occurs in the system, the
Brake immediately message appears in the
multifunction. Depress the brake pedal
immediately so that the vehicle does not roll away.D
ISTRONIC PLUS is then deactivated,
and the messag edisappears.
Tips for driving with DISTRONIC PLUS General notes
The following contains descriptions of certain
road and traffic conditions in which you must
be particularly attentive. In such situations,
brake if necessary .DISTRONIC PLUS is then
deactivated.
Cornering, going into and comingo ut of a
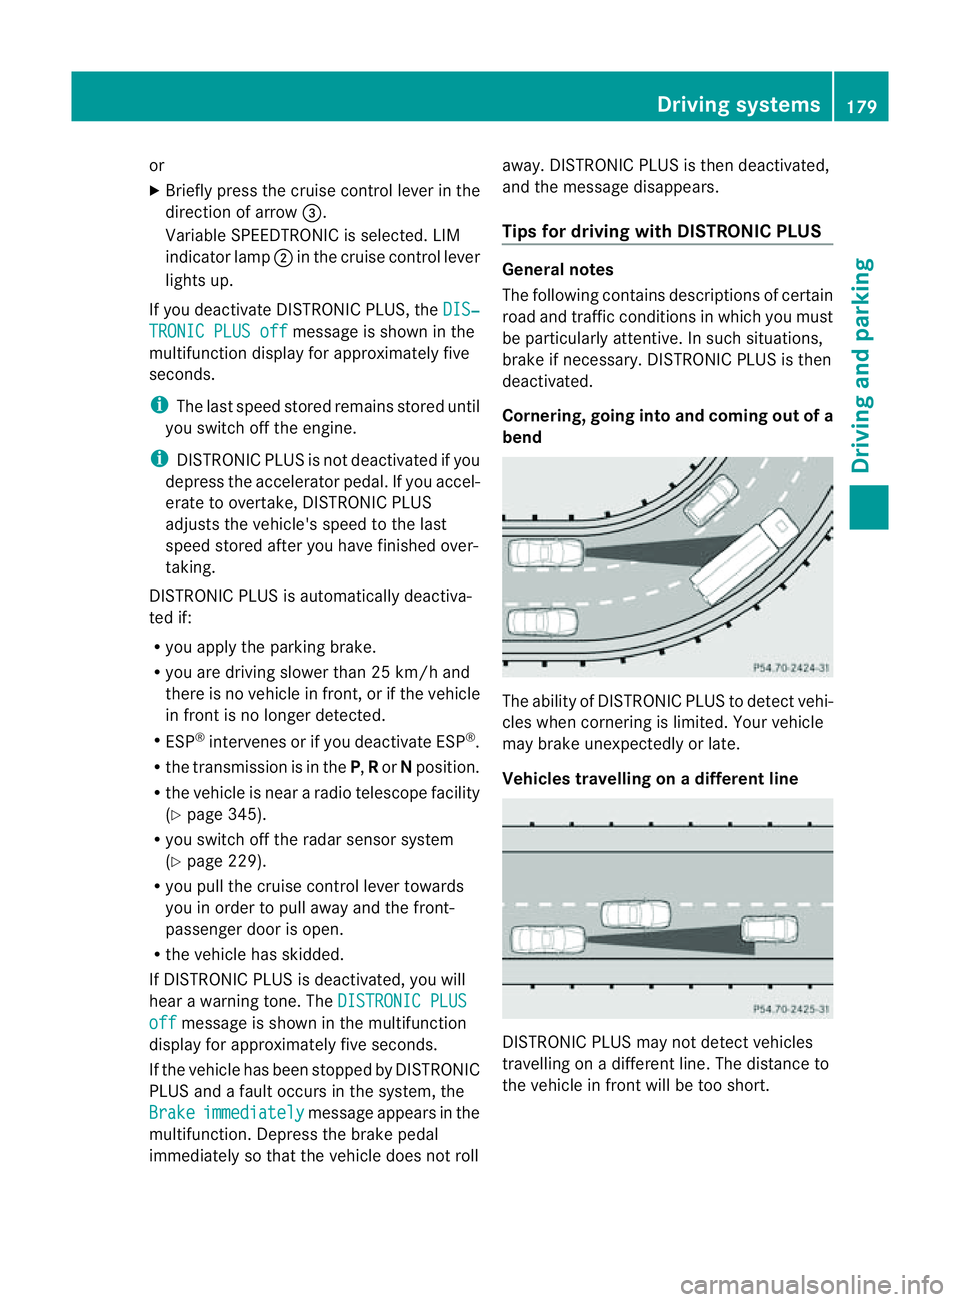
bend The ability of DISTRONIC PLUS to detect vehi-
cles when cornering is limited. Yourv
ehicle
may brake unexpectedly or late.
Vehicles travelling on adifferent line DISTRONIC PLUS may not detec
tvehicles
travelling on adifferent line. The distance to
the vehicle in fron twill be too short. Driving systems
179Driving and parking Z
Page 188 of 353
The braking effect of the HOLD function is
cancelled and the vehicle could roll away if:
R the HOLD function is deactivated by
depressing the accelerator pedal or the
brake pedal.
R there is amalfunction in the system or an
interruption in the power supply, e.g. bat-
tery failure.
R the electrical system in the engine com-
partment, the battery or the fuses are tam-
pered with.
R the battery is disconnected.
If you leave the vehicle or park it, deactivate
the HOLD function and secure the vehicle
against rolling away.
You will see awarning message in the multi-
function display if the HOLD function is acti-
vated and:
R the driver's door is open and the driver's
seat belt is unfastened.
R the engine is switched off, unless it is auto-
matically switched off by the ECO start/
stop function.
R the bonnet is opened.
For vehicles with manual transmission:
Brake immediately X
Immediately depress the brake pedal firmly
until the warning message in the multifunc-
tion display goes out. This deactivates the
HOLD function.
On vehicles with automatic transmission:
Select Park (P) X
Move the selector lever to Pto prevent the
vehicle from rolling away.
The HOLD function is deactivated. The
warning message in the multifunction dis-
play disappears.
Ah orn will also sound at regular intervals if
the HOLD function is activated and you:
R switch the engine off, open the driver's
door and take off your seat belt
R open the bonnet The sounding of the horn alerts you to the fact
that the vehicle has been parked while the
HOLD function is still activated. The tone
becomes louder if you attempt to lock the
vehicle. The vehicle is not locked until the
HOLD function is deactivated.
i If the engine has been switched off, it
cannot be started again until the HOLD
function has been deactivated.
If there is afault in the system or power supply
while the HOLD function is activated, the
Brake immediately message is shown in
the multifunction display .Immediately
depress the brake firmly until the warning
message in the multifunction display goes
out.
On vehicles with automatic transmission, you
can alsos hift into position P.This deactivates
the HOLD function. PARKTRONIC
Important safety notes G
WARNING
PARKTRONIC is only an aid and may not
detect all obstacles. It is not asubstitute for
attentive driving.
You are always responsible for safety and
must continue to pay attention to your imme-
diate surroundings when parking and
manoeuvring. You could otherwise endanger
yourself and others. G
WARNING
Make sure that no persons or animals are in
the manoeuvring range. Otherwise, they
could be injured.
PARKTRONIC is an electronic parking aid with
ultrasonic sensors. It indicates visuallya nd
audibly the distance between your vehicle
and an object. Driving systems
185Driving and parking Z