parking brake MERCEDES-BENZ E-CLASS CABRIOLET 2011 Repair Manual
[x] Cancel search | Manufacturer: MERCEDES-BENZ, Model Year: 2011, Model line: E-CLASS CABRIOLET, Model: MERCEDES-BENZ E-CLASS CABRIOLET 2011Pages: 353, PDF Size: 8.42 MB
Page 299 of 353
R
Jack
R Centrin gpin
R On ep air of gloves
R Whee lwrench
R Towin geye "Minispare" emergency spare wheel
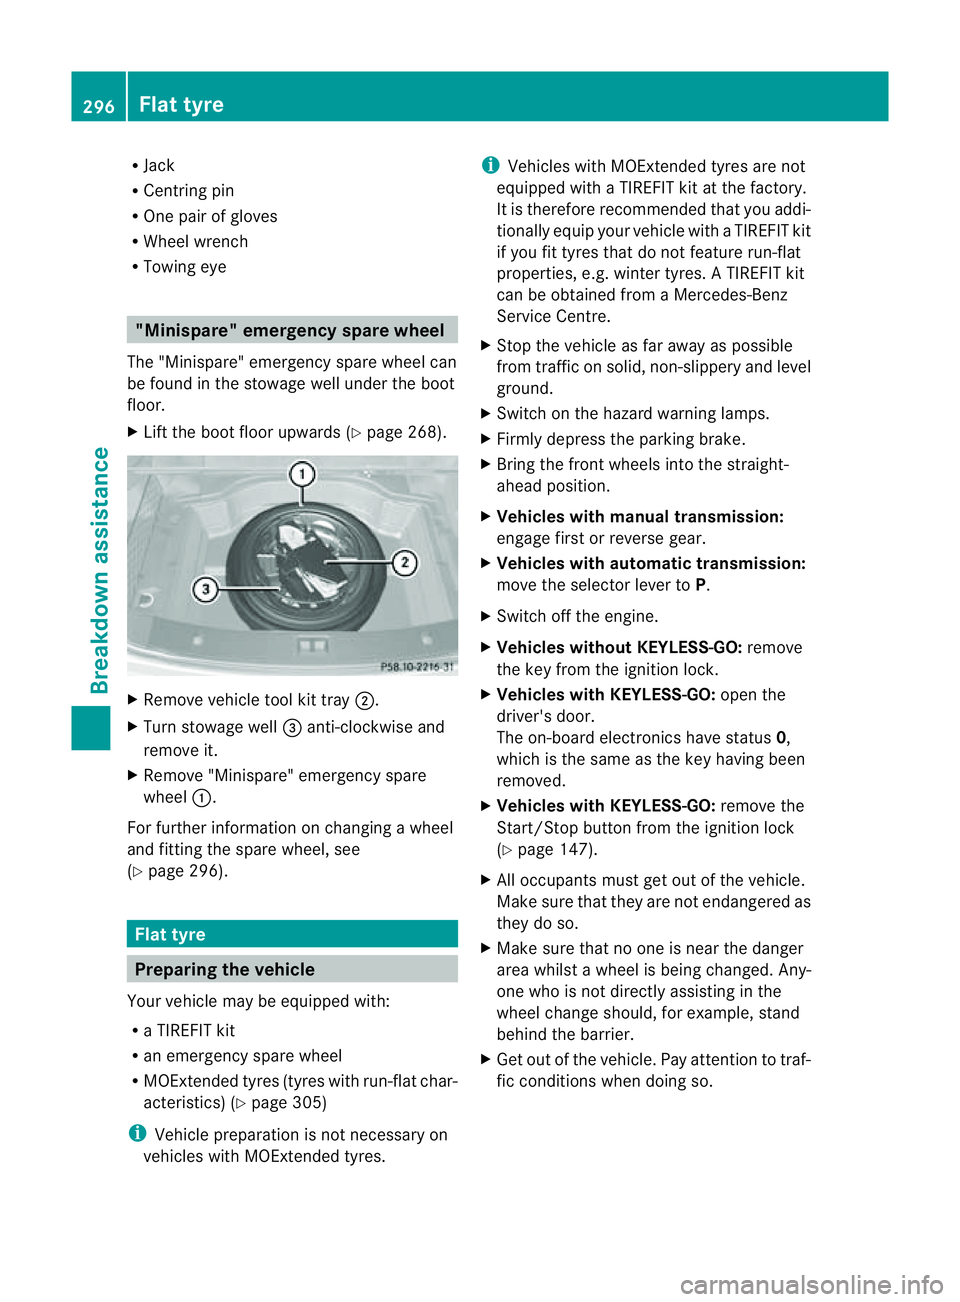
The "Minispare" emergency spar ewheel can
be foun dinthestowage well unde rthe boot
floor.
X Lift the boot floor upwards (Y page 268).X
Remove vehicle tool kit tray ;.
X Turn stowage well =anti-clockwise and
remove it.
X Remove "Minispare" emergency spare
wheel :.
For further information on changing awheel
and fittingt he spare wheel, see
(Y page 296). Flat tyre
Preparing the vehicle
Your vehicle may be equipped with:
R aT IREFIT kit
R an emergency spare wheel
R MOExtended tyres (tyres with run-flat char-
acteristics) (Y page 305)
i Vehicle preparation is not necessary on
vehicles with MOExtended tyres. i
Vehicles with MOExtended tyres are not
equipped with aTIREFIT kit at the factory.
It is therefore recommended that you addi-
tionally equip your vehicle with aTIREFIT kit
if you fit tyres that do not feature run-flat
properties, e.g. winter tyres. ATIREFIT kit
can be obtained from aMercedes-Benz
Service Centre.
X Stop the vehicle as far away as possible
from traffic on solid, non-slippery and level
ground.
X Switch on the hazard warning lamps.
X Firmly depress the parking brake.
X Bring the front wheels into the straight-
ahead position.
X Vehicles with manualt ransmission:
engage first or reverse gear.
X Vehicles with automatic transmission:
move the selector lever to P.
X Switch off the engine.
X Vehicles without KEYLESS-GO: remove
the key from the ignition lock.
X Vehicles with KEYLESS-GO: open the
driver's door.
The on-board electronicsh ave status0,
which is the same as the key having been
removed.
X Vehicles with KEYLESS-GO: remove the
Start/Stop button from the ignition lock
(Y page 147).
X All occupants must get out of the vehicle.
Make sure that they are not endangered as
they do so.
X Make sure that no one is near the danger
area whilst awheel is being changed. Any-
one who is not directly assisting in the
wheel change should, for example, stand
behind the barrier.
X Get out of the vehicle. Pay attention to traf-
fic conditionsw hen doing so.296
Flat tyreBreakdown assistance
Page 310 of 353
may otherwise destroy electronic compo-
nents, such as the alternator.
i When you park the vehicle, remove the
key if you do not require any electrica lcon-
sumers .The vehicle will then use very little
energy, thus conserving battery power.
Mercedes-Ben zrecommends that you do not
carry out work on batteries yourself, e.g.
removin gorcharging. Have this work per-
formed at aqualified specialist workshop, e.g.
aM ercedes-Benz Service Centre. Installation location of the battery
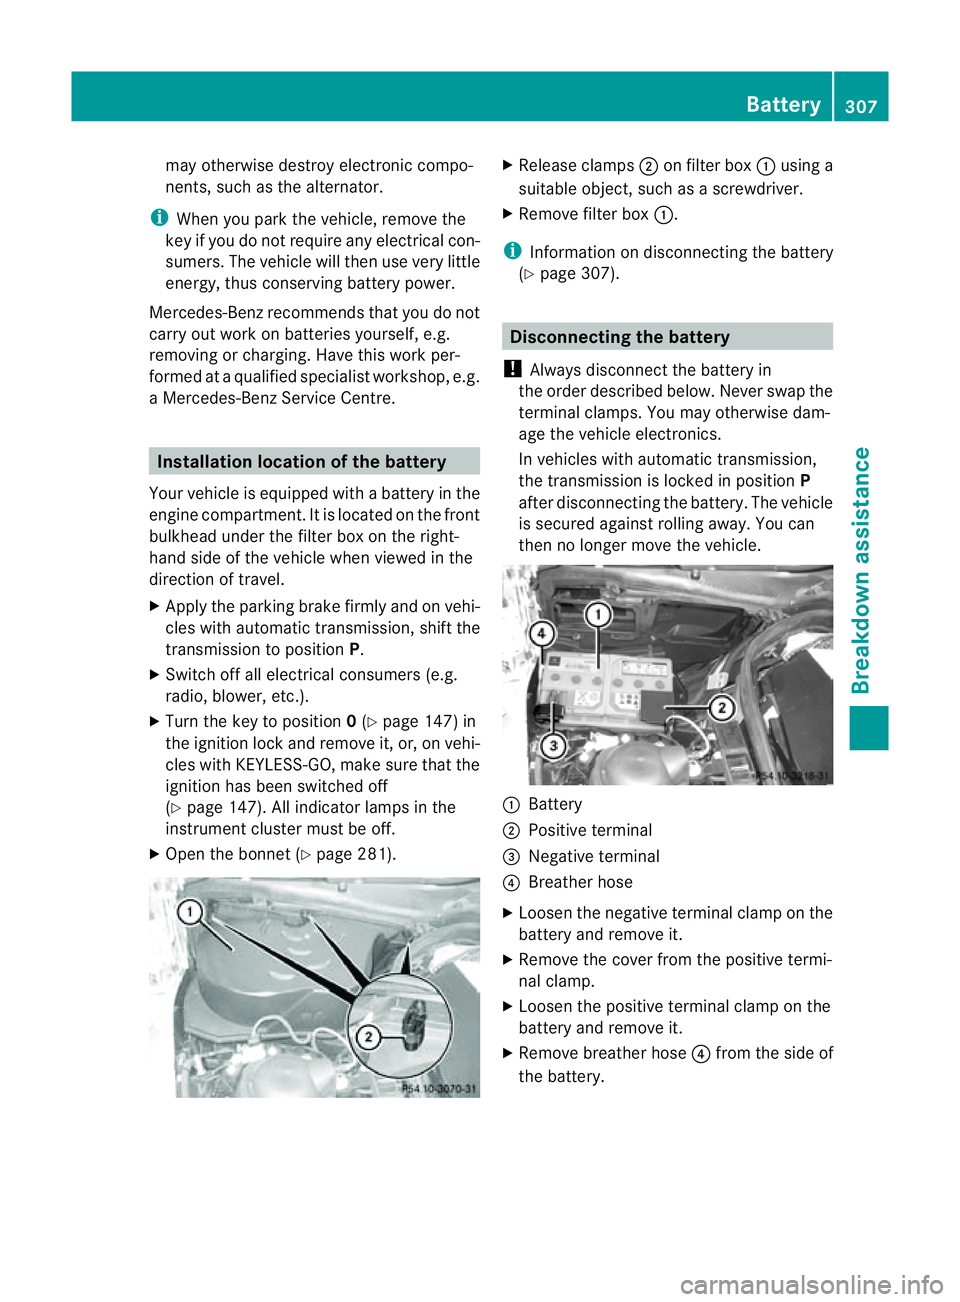
Your vehicle is equipped with abatter yint he
engin ecompartment .Itislocated on the front
bulkhead under the filter box on the right-
hand side of the vehicle when viewed in the
direction of travel.
X Apply the parking brake firmly and on vehi-
cles with automatic transmission, shift the
transmission to position P.
X Switch off all electrical consumers (e.g.
radio, blower, etc.).
X Turn the key to position 0(Y page 147) in
the ignition lock and remove it, or, on vehi-
cles with KEYLESS-GO, make sure that the
ignition has been switched off
(Y page 147). All indicator lamps in the
instrument cluster must be off.
X Open the bonnet (Y page 281). X
Release clamps ;on filter box :using a
suitableo bject, such as ascrewdriver.
X Remove filter box :.
i Information on disconnecting the battery
(Y page 307). Disconnecting the battery
! Alwaysd isconnect the battery in
the order described below. Never swap the
terminal clamps. You may otherwise dam-
age the vehicle electronics.
In vehicles with automatic transmission,
the transmission is locked in position P
after disconnecting the battery. The vehicle
is secured against rolling away. You can
then no longer move the vehicle. :
Battery
; Positive terminal
= Negative terminal
? Breather hose
X Loosen the negative terminal clamp on the
battery and remove it.
X Remove the cover from the positive termi-
nal clamp.
X Loosen the positive terminal clamp on the
battery and remove it.
X Remove breather hose ?from the side of
the battery. Battery
307Breakdown assistance Z
Page 312 of 353
Jump-starting
G
WARNING
There is arisk of acid burns when jump-starting avehicle due to the gases which escape from
the battery. Do not lean over the battery while the engine is being jump-started. G
WARNING
Gases escaping from the battery during jump-starting may cause minor explosions. Avoid cre-
ating sparks. Keep naked flames away from the battery, and do not smoke.
Comply with safety precautions when handling batteries. You will find these under "Battery" in
the index.
! Avoid repeated and lengthy startinga ttempts. Otherwise, non-combusted fuel may dam-
age the catalytic converter 22
and create arisk of fire.
Do not use arapid-charging device to start the engine.
Make sure the jump leads are not damaged.
Make sure the jump leads are not touching any other metal objectsw hen they are connected
to the battery.
If your vehicle's battery is discharged, the engine can be jump-started from another vehicle
or from asecond battery using jump leads.
Observe the following points:
X The battery is not accessible in all vehicles. If the other vehicle's battery is not accessible,
jump-start the vehicle using asecond battery or ajump-starting device.
X Only jump-start th evehicl ewhen th eengineisc olda nd th ecatalyti cconverter system has
cooled down 23
.
X Do not start the engine if the battery is frozen. Let the battery thaw first.
X Jump-starting may only be performed from batteries with anominal voltage of 12 V.
X Only use jump leads which have asufficient cross-section and insulated terminal clamps.
X Make sure that the jump leads cannot come into contact with parts, such as the pulley or
the fan. These parts move when the engine is started and while it is running.
X If the battery is fully discharged, leave the battery that is being used to jump-start connected
for afew minutes before attempting to start.T his charges the empty batteryalittle.
i Jump leads and further information about jump-starting can be obtained from any
Mercedes-Ben zService Centre, for example.
X Make sure that the two vehicles do not touch.
X Apply the parking brake firmly.
X Manual transmission: engage neutral.
X Automatic transmission: move the selector lever toP.
X Switch off all electrical consumers (e.g. radio, blower, etc.).
X Open the bonnet (Y page 281).
22 Only vehicles with apetrol engine.
23 Only vehicles with apetrol engine. Jump-starting
309Breakdown assistance Z
Page 315 of 353
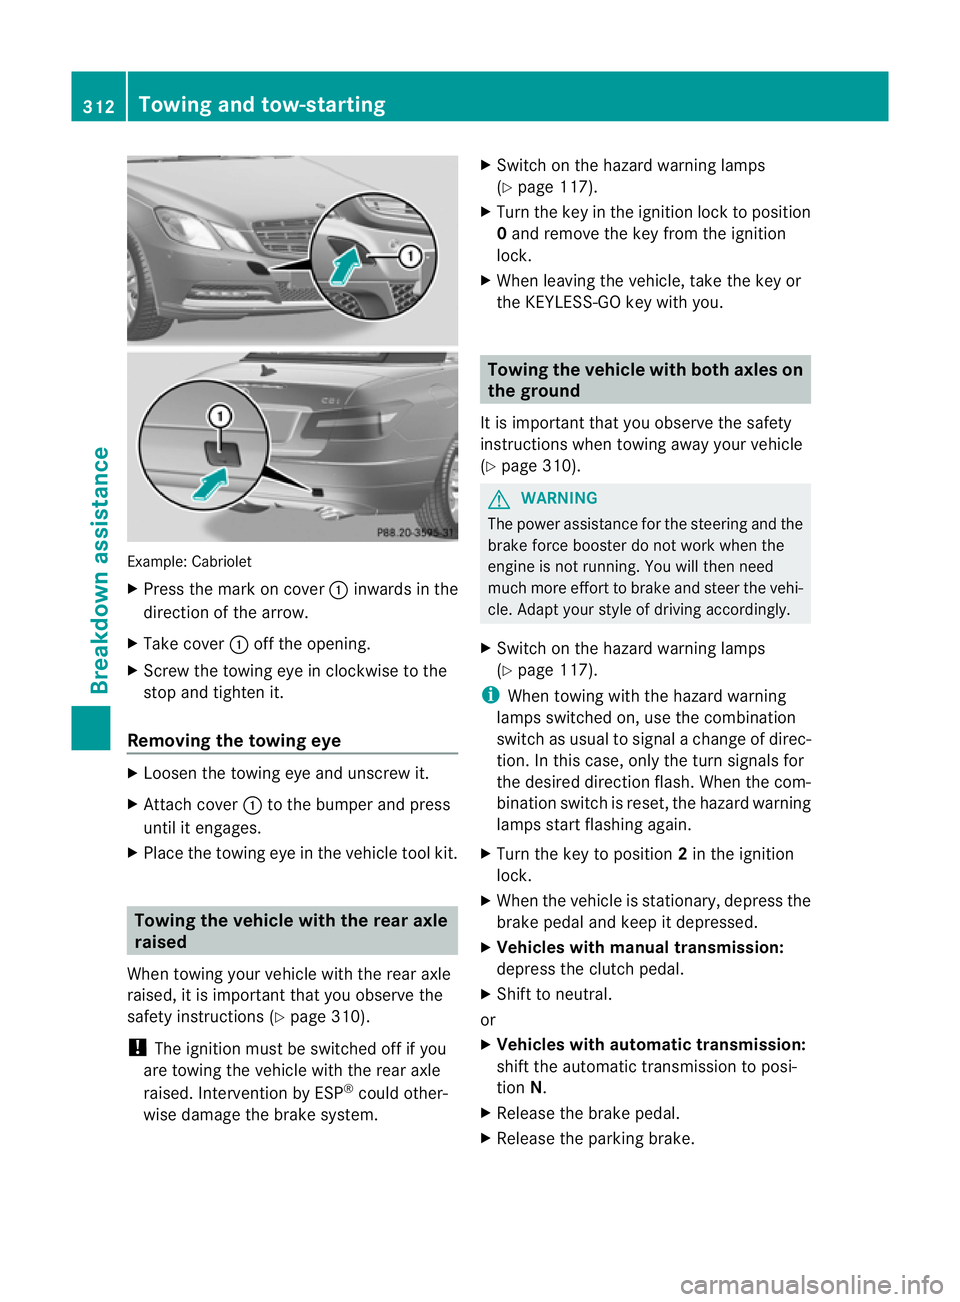
Example: Cabriolet
X
Press the mark on cover :inwards in the
direction of the arrow.
X Take cover :off the opening.
X Screw the towing ey einclockwise to the
stop and tighten it.
Removing the towin geye X
Loosen the towing ey eand unscrew it.
X Attach cover :to the bumpe rand press
unti lite ngages.
X Place the towing ey einthe vehicl etool kit. Towin
gthe vehicle with the rear axle
raised
Whe ntowing your vehicle with the rear axle
raised, it is important that you observe the
safety instructions (Y page 310).
! The ignition must be switched off if you
are towing the vehicle with the rear axle
raised. Intervention by ESP ®
could other-
wise damage the brake system. X
Switch on the hazard warning lamps
(Y page 117).
X Turn the key in the ignition lock to position
0and remove the key from the ignition
lock.
X When leaving the vehicle, take the key or
the KEYLESS-GO key with you. Towing the vehicle with both axles on
the ground
It is important that you observe the safety
instructions when towing away your vehicle
(Y page 310). G
WARNING
The power assistance for the steering and the
brake force booster do not work when the
engine is not running. You will then need
much more effort to brake and steer the vehi-
cle. Adapt your style of driving accordingly.
X Switch on the hazard warning lamps
(Y page 117).
i When towing with the hazard warning
lamps switched on, use the combination
switch as usual to signal achange of direc-
tion. In this case, only the turn signals for
the desired direction flash. When the com-
bination switch is reset, the hazard warning
lamps start flashing again.
X Turn the key to position 2in the ignition
lock.
X When the vehicle is stationary, depress the
brake pedal and keep it depressed.
X Vehicles with manualt ransmission:
depress the clutch pedal.
X Shift to neutral.
or
X Vehicles with automatic transmission:
shift the automatic transmission to posi-
tion N.
X Release the brake pedal.
X Release the parking brake. 312
Towing and tow-startingBreakdown assistance
Page 316 of 353
Transporting the vehicle
The towing eyes or trailer tow hitch can be
used to pull the vehicl eonto atrailer or trans-
porter if yo uwishtot ransport it.
X Vehicle swithm anual transmission:
shift to neutral.
X Vehicle switha utomatic transmission:
tur nthe key to position 2in the ignition
lock.
X Move the selector lever to N.
As soon as the vehicle is loaded:
X Prevent the vehicle from rolling away by
applying the parking brake.
X Vehicles with manualt ransmission:
shift to first gear or reverse gear.
X Vehicles with automatic transmission:
move the selector lever to P.
X Turn the key in the ignition lock to position
0 and remove the key from the ignition
lock.
X Secure the vehicle.
! Only lash the vehicle down by the wheels
or wheel rims, not by parts of the vehicle
such as axle or steering components. Oth-
erwise, the vehicle could be damaged. Tow-starting (emergency engine
starting)
When tow-starting, it is important that you
observe the safety instructions (Y page 310)
and the legal requirements in each respective
country.
! Vehicles with automatic transmission
must not be tow-started. The transmission
may otherwise be damaged.
Before tow-starting the following conditions
must be fulfilled:
R the battery is connected.
R the engine has cooled down.
R the catalytic converters have cooled down. X
Switch on the hazard warning lamps
(Y page 117).
X Fit the towing eye (Y page 311).
X Secure the rigid towing bar or the towing
rope.
X Depress and hold the brake pedal.
X Turn the key to position 2in the ignition
lock.
X Depress the clutch pedal and keep it
depressed.
X Shift to neutral.
X Release the brake pedal.
X Tow-start the vehicle.
X Engage second gear.
X Release the clutch pedal slowly;don ot
operate the accelerator pedal while doing
so.
The engine is started.
X Depress the clutch pedal and shift to neu-
tral.
X Stop at asuitable place.
X Apply the parking brake.
X Remove the rigid towing bar or towing rope.
X Remove the towing eye (Y page 312).
X Switch off the hazard warning lamps. Electrical fuses
Important safety notes
The fuses in your vehicle serve to close down
faulty circuits. If afuse blows ,all th ecom po-
nent sont hecircuit and their function sstop
operating. G
WARNING
Only use fuses that have been approve dfor
Mercedes-Ben zvehicles and which have the
correct fuse ratin gfor the systems con-
cerned. Do not attempt to repair or bridge
faulty fuses. Otherwise, acircuit overload
could cause afire. Have the cause traced and
rectified at aqualified specialist workshop,
e.g. aMercedes-Benz Service Centre. Electrical fuses
313Breakdown assistance Z
Page 317 of 353
Blow
nfuses must be replace dwith fuses of
the same rating, which you can recognise by
the colour and value. The fuse ratings are lis-
ted in the fuse allocation chart. AMercedes-
BenzS ervice Centr ewill be happy to advise
you.
If the newly inserted fuse also blows, have the
cause traced and rectified at aqualified spe-
cialist workshop, e.g. aMercedes-Benz
Service Centre.
! Only use fuses that have been approved
for Mercedes-Benz vehicles and which
have the correct fuse ratin gfor the system
concerned. Otherwise, componentsors ys-
tems could be damaged. Befor
echanging afuse
X Park the vehicle and apply the parking
brake.
X Switc hoff all electrical consumers.
X Remove the key from the ignition lock.
The fuses are located in various fuse boxes:
R fuse box on the driver's side of the dash-
board
R fuse box in the engin ecompartment on the
left-hand side of the vehicle, when viewed
in the direction of travel
R fuse box in the boot on the right-hand side
of the vehicle, when viewed in the direction
of travel
The fuse allocation chart is located in the
vehicle tool kit (Y page 295)inthe stowage
compartment under the boot floor. Dashboar
dfuse box
! Do not use apointed objec tsuch as a
screwdriver to open th ecover in th edash-
board. You could damag ethe dashboard or
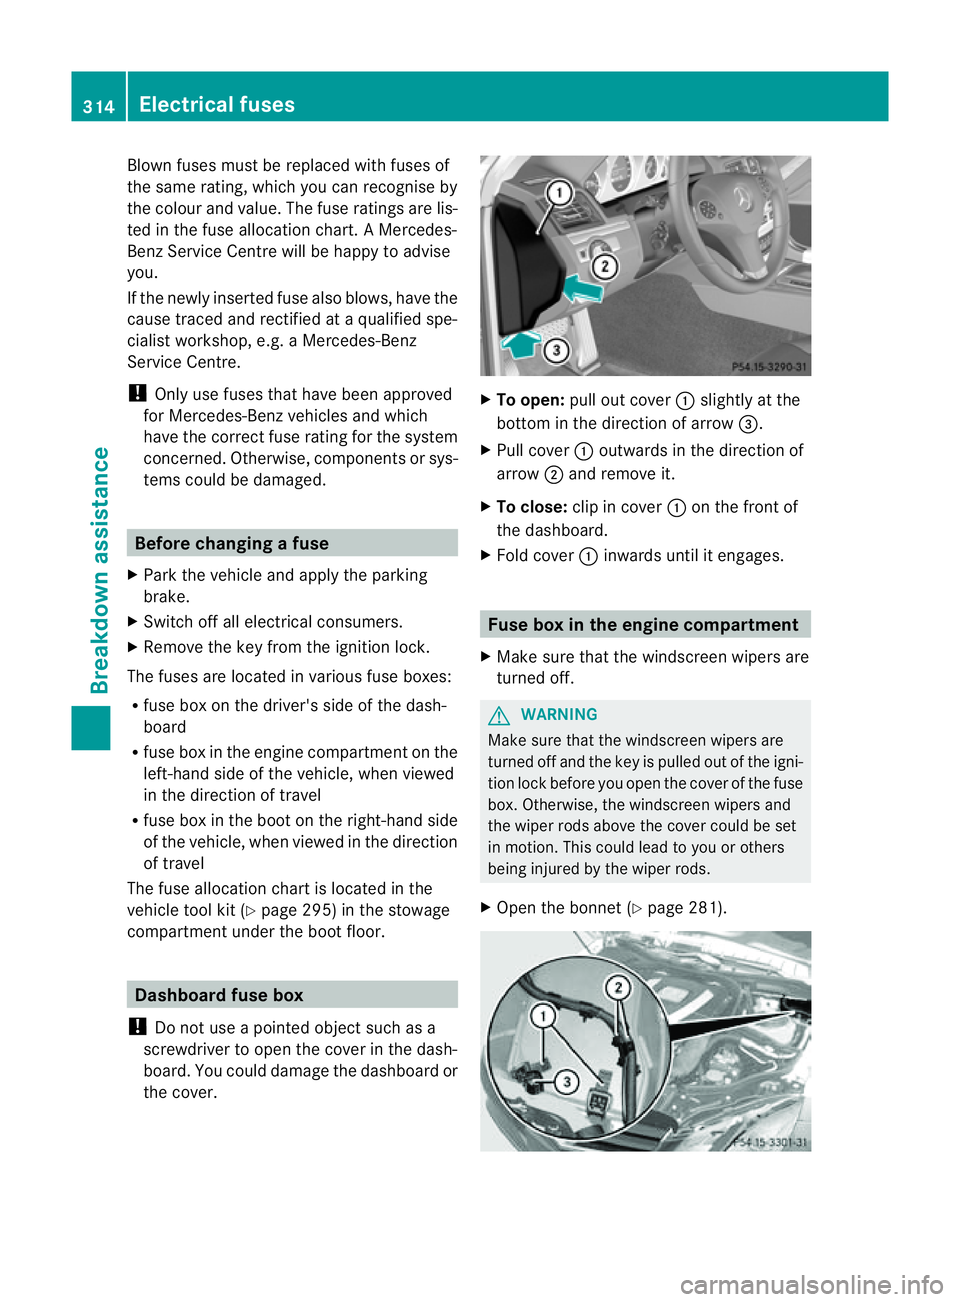
the cover. X
To open: pull out cover :slightly at the
botto mint hedirection of arrow =.
X Pull cover :outwards in th edirection of
arrow ;and remove it.
X To close: clip in cover :on th efront of
th ed ashboard.
X Fol dc over : inwards until it engages. Fuse box in th
eengine compartment
X Mak esure that th ewindscree nwipers are
turned off. G
WARNING
Make sure that the windscreen wipers are
turned off and the key is pulled out of the igni-
tion lock befor eyou open the cover of the fuse
box. Otherwise, the windscreen wipers and
the wiper rods above the cover could be set
in motion. This could lead to you or others
being injured by the wiper rods.
X Open the bonnet (Y page 281).314
Electrical fusesBreakdown assistance