cooling system MERCEDES-BENZ E-CLASS CABRIOLET 2011 Owners Manual
[x] Cancel search | Manufacturer: MERCEDES-BENZ, Model Year: 2011, Model line: E-CLASS CABRIOLET, Model: MERCEDES-BENZ E-CLASS CABRIOLET 2011Pages: 353, PDF Size: 8.42 MB
Page 7 of 353
1, 2,
3...
12 Vsocket
see Sockets A
ABS (Anti-lock Braking System) Display message ............................ 233
Function/notes ................................ 62
Important safety notes ....................62
Warning lamp ................................. 257
Activating/deactivatin gair-recir-
culation mode .................................... 135
Activating/deactivating cooling
with air dehumidification .................131
Active Blin dSpot Assist
Activating/deactivating (on-
board computer) ............................ 224
Display message ............................ 246
Function/notes ............................. 199
Towing atrailer .............................. 202
Active Driving Assistanc epackage .199
Active Lane Keepin gAssist
Activating/deactivating (on-
board computer) ............................ 224
Display message ............................ 245
Function/informatio n.................... 202
Towing atrailer .............................. 204
Active light function .........................118
Active Service Syste mPLUS
see ASSYS TPLUS service interval
display
ADAPTIVE BRAKE .................................66
Adaptive brak elamps ......................... 63
Adaptive Highbeam Assist Function/notes ............................. 119
Adaptive Main-Beam Assist
Display message ............................ 241
Switching on/off (on-board com-
puter) ............................................. 227
Additional speedometer ...................225
Additives (engine oil) ........................336
Adjustin gthe headlamp range .........116
Airbag Headbag .......................................... 43Airbags
Activatio n......................................... 39
Front airba g(driver, front
passenger )....................................... 42
Important safety guidelines .............40
Kneeba g.......................................... .42
Pelvis airbag .................................... 43
Sidebag ............................................ 43
Windowba g...................................... 44
AIRCAP
Cleaning instructions .....................288
Extending/retracting .......................92
Fitting/removing the wind deflec-
tor .................................................... 94
General notes .................................. 92
Air-conditionin gsystem
see Climate control
Airf ilter (white display message) ....243
Airp ressure
see Tyr epressure
AIRSCARF
Setting the vents ........................... 143
Switching on/off ........................... 107
Airv ents
Glove compartmen t....................... 142
Important safety notes ..................141
Rea r............................................... 142
Setting ........................................... 141
Setting the AIRSCARF vents ..........143
Setting the centre airv ents........... 142
Setting the sid eairvents ............... 142
Switching AIRSCAR Fon/off .......... 107
Alarm system
see ATA (Anti-Theft Alarm system)
Alertnes sAssistant
see ATTENTION ASSIST
Anti-glare film .................................... 278
Anti-loc kBraking System
se eA BS (Anti-lock Braking System)
Anti-Thef tAlarm system
se eA TA (Anti-Theft Alarm system)
Anti-thef tsystem
Immobilise r...................................... 68
Aquaplaning ....................................... 168
Ashtray ............................................... 271
Assistanc emenu (on-board com-
puter) ................................................. .222 4
Index
Page 10 of 353
Cell phone
see Mobile phone
Centra llocking
Automatic lockin g(on-board com-
puter) ............................................ .228
Locking/unlocking (key ).................. 72
Centre console ..................................... 32
Changing bulbs Dipped-bea mheadlamps ............... 122
Important safety notes ..................121
Main-beam headlamps ................... 123
Overview of bul btypes .................. 122
Parking lamps (front) .....................123
Standing lamps .............................. 123
Turn signals (front) ......................... 123
Child-proof locks
Child sea tlock ................................. 52
Important safety notes ....................61
Children
In the vehicle ................................... 51
Restraint systems ............................ 51
Child seat
Automatic recognition .....................53
Child sea tlock ................................. 52
Display message ............................ 237
ISOFIX .............................................. 54
On the front-passenger sea t............ 52
Problem (malfunction) .....................57
Recommendations ...........................59
Suitable positions ............................ 57
Cigarette lighter ................................ 272
Cleaning Trailer tow hitch ............................. 291
Climate control
Activating/deactivating rear win-
dow heating ................................... 135
Auxiliary heating/ventilatio n.......... 137
Controlling automatically ...............132
Convenience opening/closing (air
recirculation) ................................. 136
Cooling with aird ehumidification..131
Demisting the windows .................. 135
Demisting the windscree n............. 134
Important safety notes ..................128
Indicator lamp ................................ 132
Notes on using THERMATI Cauto-
matic climate control .....................129Notes on using THERMOTRONIC
automatic climate control
..............131
Overview of systems ......................128
Problems with cooling with air
dehumidification ............................ 132
Problem with the rear window
heating .......................................... 135
Rea rcontrol panel ......................... 130
Setting the aird istribution.............133
Setting the airflow .........................134
Setting the airv ents...................... 141
Setting the climate mode .............. .132
Setting the temperature ................133
Switching air-recirculation mode
on/off ............................................ 135
Switching on/off ........................... 131
Switching residua lheato n/off ......136
Switching the ZONE function on/
off .................................................. 134
THERMATI Cautomatic climate
control (2-zone) ............................. 129
THERMOTRONIC (3-zone) auto-
matic climate control .....................130
Clock( on-board computer) ...............226
Cockpit Overview .......................................... 26
see Instrument cluster
COMAND
see Separate operating instructions
Combination switch ..........................116
Constant headlamp mode see Daytime driving lamps
Consumptio nstatistic s(on -board
computer) .......................................... 217
Convenience closing feature ..............84
Convenience opening/closing (air-
recirculation mode) ........................... 136
Convenience opening feature ............83
Coolan t(engine)
Checkin gthe level ......................... 283
Display message ............................ 242
Notes ............................................. 337
Temperature gauge ........................ 212
Warning lamp ................................. 260
Cooling
see Climate control Index
7
Page 131 of 353
Useful information
i This Owner's Manual describes all models
and all standard and optional equipment
available to your vehicle at the time of pub-
lication of the Owner's Manual. Country-
specific deviation sare possible. Please
not ethat your vehicle may not be equipped
with all feature sdescribed. This also
applies to safety-relevan tsystems and
functions.
i Pleas ereadt he information on qualified
specialist workshop s(Ypage 22). Overview of climat
econtro lsystems Important safet
ynotes G
WARNING
Observ ethe setting srecommended on the
following pages. Otherwise ,the windows
could mist up. This may obstruct your view of
the traffic situation and, as aresult ,you may
cause an accident.
THERMATIC/THERMOTRONIC automatic cli-
mate control controls the temperature and
the humidit yofthe vehicle interior and filters
out undesirable substances fro mthe air.
THERMATIC/THERMOTRONIC automatic cli-
mate control is only operational when the
engine is running. 12
i Ventilate the vehicle for abrief period
during warm weather, e.g. using the con-
venience opening feature (Y page 83). This
will speed up the cooling process and the
desired vehicle interior temperature will be
reached more quickly.
i The integrated filter can filter out most
particles of dust and completely filters out
pollen. Aclogged filter reduces the amount
of air supplied to the vehicle interior .For
this reason, you should always observe the interval for replacing the filter, which is
specified in the Servic
eBooklet .Asit
depends on environmental conditions, e.g.
heavy air pollution, the interval may be
shorter than stated in the Service Booklet.
i It is possible that the residualh eat func-
tion may be activated automaticallyanh our
after the key is removed. The vehicle is then
ventilated for 30 minutes to dry the air-
conditioning system.
12 THERMOTRONIC automatic climate control: the residualh eat function can only be activated/deactivated
when the ignition is switched off. 128
Overview of climatec
ontrol systemsClimatecontrol
Page 133 of 353
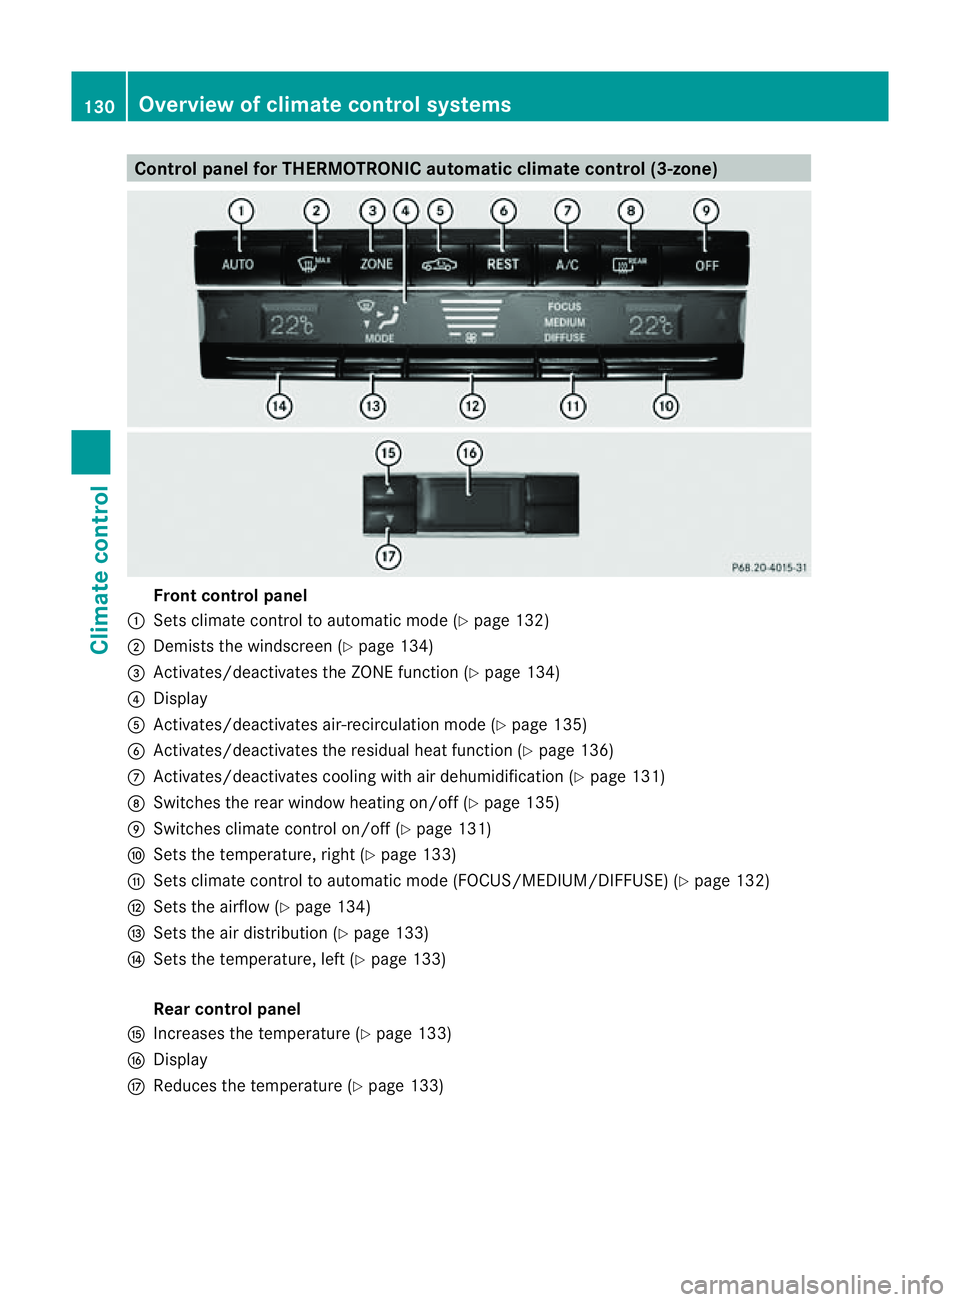
Control panel for THERMOTRONIC automatic climat
econtrol (3-zone) Fron
tcontrol panel
: Setsclimate control to automatic mode (Y page 132)
; Demist sthe windscreen (Y page 134)
= Activates/deactivates th eZONE function (Y page 134)
? Display
A Activates/deactivates air-recirculatio nmode (Y page 135)
B Activates/deactivates the residual heat function (Y page 136)
C Activates/deactivates cooling with air dehumidification ( Ypage 131)
D Switches the rear window heating on/off( Ypage 135)
E Switches climat econtro lon/off (Y page 131)
F Setsthe temperature, right (Y page 133)
G Setsclimat econtro ltoautomatic mode (FOCUS/MEDIUM/DIFFUSE )(Y page 132)
H Setsthe airflow (Y page 134)
I Setsthe air distribution (Y page 133)
J Setsthe temperature, left (Y page 133)
Rear control panel
K Increases the temperature (Y page 133)
L Display
M Reduces the temperature ( Ypage 133) 130
Overview of climat
econtrol systemsClimat econtrol
Page 134 of 353
Note
sonu sing THERMOTRONI Cauto-
matic climate control
Below ,you can find anumbe rofnotes and
recommendations to help you use
THERMOTRONIC automatic climate control
optimally.
R Activate climate control using the Ãand
¿ buttons. The indicator lamps above
the à and¿ button slight up. You
can also set the airflow and air distribution
of the automatic climate control to one of
three levels (FOCUS/MEDIUM/DIFFUSE).
You can set the desired level using button
G.T he MEDIUM level is recommended.
R Set the temperature to 22 †.
R Only use the demisting function briefly until
the windscreen is clear again.
R Only use air-recirculation mode briefly, e.g.
if there are unpleasant outside odours or
when in atunnel. The windows could oth-
erwise mist up, as in air-recirculation mode,
no fresh air is drawn into the vehicle.
R Use the ZONE function to adopt the tem-
perature settings on the driver's side for
the front-passenger side and the rear com-
partment as well. The indicator lamp above
the á button goes out.
R Use the residual heat function if you want
to heat or ventilate the vehicle interior
when the ignition is switched off. The resid-
ual heat function can only be activated or
deactivated with the ignition switched off. Operating the climate control system
Switching climate control on/off
Important information i
When climate control is switched off, the
air supply and air circulation are also
switched off. Only select this setting
briefly. Otherwise, the windows may mist
up. i
Switch on climate control primarily using
the à button (Y page 132).
Activating/deactivating X
Turn the key to position 2in the ignition
lock.
X To switch on: press theÃbutton.
The indicator lamp above the Ãbutton
lights up. Airflow and air distribution are set
to automatic mode.
or
X Press button ^.
The indicator lamp above the ^button
goes out. The previously selected settings
come into effect again.
X To switch off: press the^button.
The indicator lamp above the ^button
lights up. Activating/deactivating cooling with
air dehumidification
Important information The cooling with air dehumidification function
is only available when the engine is running.
The air inside the vehicle is cooled and dehu-
midified according to the temperature selec-
ted.
G
WARNING
If the "cooling with air dehumidification" func-
tion is deactivated, the air inside the vehicle
will not be cooled (during warm weather) or
dehumidified. The windows could mist up
more quickly. This may prevent you from
observing the traffic conditions, thereby caus-
ing an accident.
Condensation may drip from the underside of
the vehicle when THERMOTRONIC is in cool-
ing mode. This is normal and not asign that
there is amalfunction.
i The cooling with air dehumidification
function uses refrigerant R134a. This cool- Operating the climate control system
131Climatecontrol Z
Page 135 of 353
ant does no
tcontain chlorofluorocarbons,
and therefor edoes not damage the ozone
layer.
Activating/deactivating X
To activate: press the¿button.
The indicator lamp above the ¿button
lights up.
X To switch off: press the¿button.
The indicator lamp above the ¿button
goes out. The cooling with air dehumidifi-
cation function has adelayed switch-off
feature.
Problems with the cooling with air
dehumidification function When you press the
¿button ,the indica-
tor lamp in the button flashes three times or
remains off. You can no longer switch on the
cooling with air dehumidification function.
X Consult aqualified specialist workshop. Setting climate control to automatic
mode
In automatic mode, the set temperature is
maintained automatically at aconstant level.
The system automatically regulates the tem-
perature of the dispensed air, the airflow and
the air distribution.
Automatic mode will achieve optimal opera-
tion if cooling with air dehumidification is also
activated. If desired, cooling with air dehu-
midification can be deactivated.
X Turn the key to position 2in the ignition
lock.
X Set the desired temperature.
X To activate: press theÃbutton.
The indicator lamp above the Ãbutton
lights up. Automatic air distribution and air-
flow are activated.
i THERMOTRONIC automatic climate con-
trol: when automatic mode is activated, you can select
aclimate mode setting
(Y page 132).
X To deactivate: press the air distribution
button.
THERMATIC automatic climate control:
press button F(Ypage 129).
THERMOTRONIC automatic climate con-
trol: press button I(Ypage 130).
The indicator lamp above the Ãbutton
goes out.
or
X Press the airflow button.
THERMATIC automatic climate control:
press button G(Ypage 129).
THERMOTRONIC automatic climate con-
trol: press button H(Ypage 130).
The indicator lamp above the Ãbutton
goes out. Adjusting the climate control settings
This function is only available with the
THERMOTRONIC automatic climate control.
The climate control settings are especially
effective at high temperatures.
You can select the following climate control
settings in automatic mode:
FOCUS high airflow that is set slightly cooler
MEDIUM medium airflow, standard setting
DIFFUSE low airflow that is set slightly warmer and with alower rate of
airflow
X Turn the key to position 2in the ignition
lock.
X Press the Ãbutton.
X Press button Gup or down and select the
desired level (Y page 130)132
Operating the climate control systemClimate control
Page 137 of 353
THERMOTRONI
Cautomatic climate
control X
Turn the key to position 2in the ignition
lock.
X Press switch Iup or down repeatedly until
the desired symbo lappears in the display
(Y page 130). Settin
gthe airflow
THERMATIC automatic climate control X
Turn the key to position 2in the ignition
lock.
X To increase/reduce: press buttonGup
or down (Y page 129).
THERMOTRONI Cautomatic climate
control X
Turn the key to position 2in the ignition
lock.
X To increase/reduce: press buttonHup
or down (Y page 130). Switchin
gthe ZONE function on/off
X To switc hon:press the ábutton.
The indicator lamp above the ábutton
lights up.
THERMATIC automatic climate control: the
temperature setting for the driver's side is
not adopted for the front-passenger side.
THERMOTRONIC automatic climate con-
trol: the temperature setting for the driver's
side is not adopted for the front-passenger
side and the rear compartment.
When the button sfor temperature, airflow or
air distribution are activated, the temperature
setting for the driver's side is not adopted for
the other climate control zones. X
To switch off: press theábutton.
The indicator lamp above the ábutton
goes out.
THERMATIC automatic climate control: the
temperature setting for the driver's side is
adopted for the front-passenger side.
THERMOTRONIC automatic climate con-
trol: the temperature setting for the driver's
side is adopted for the front-passenger side
and the rear compartment. Demisting the windscreen
You can use this function to defrost the wind-
screen or to demist the inside of the wind-
screen and the side windows.
i You should only select the demisting
function until the windscreen is clear again.
X Turn the key to position 2in the ignition
lock.
X To activate: press the¬button.
The indicator lamp above the ¬button
lights up.
The climate control system switches to the
following functions:
R cooling with air dehumidification on
R high airflow 15
R high temperature 15
R air distribution to the windscreen and
fron tside windows
R air-recirculation mode off
X To switch off: press the¬button.
The indicator lamp above the ¬button
goes out. The previously selected settings
com eintoe ffect again. The coolin gwith air
dehumidification function remain son. Air-
recirculation mode remain sdeactivated.
or
15 Dependin gonthe outside temperature. 134
Operating thec
limate control systemClimate control
Page 138 of 353
X
Press the Ãbutton.
The indicator lamp above the ¬button
goes out. Airflow and air distribution are set
to automatic mode.
or
X THERMATIC automatic climate control:
press temperature button EorH up or
down (Y page 129).
THERMOTRONIC automatic climate
control: press temperature button For
J up or down (Y page 130).
or
X THERMATIC automatic climate control:
press button Gup or down (Y page 129).
THERMOTRONIC luxur yautomatic cli-
matec ontrol: press button Hup or down
(Y page 130). Demisting the windows
Windows misted up on the inside X
Activate the ¿cooling with air dehu-
midification function.
X Activate automatic mode Ã.
X If the windows continue to mist up, activate
the demisting function (Y page 134).
i You should only select this setting until
the windscreen is clear again.
Windows misted up on the outside X
Activate the windscreen wipers.
X THERMATIC automatic climate control:
press button Fup or down
(Y page 129)until the PorO symbol
appears in the display.
X THERMOTRONIC automatic climate
control: press button Iup or down
(Y page 130) until the PorO symbol
appears in the display.
i You should only select this setting until
the windscreen is clear again. Rear window heating
Activating/deactivating G
WARNING
Clear all windows of ice or snow before setting
off. Otherwise, impaired visibility could
endanger you and others.
The rear window heating has ahigh current
draw. You should therefore switc hitoff as
soon as the window is clear .asitonly
switches off automaticallya fter several
minutes.
If the battery voltage is too low, the rear win-
dow heating may switch off.
X Turn the key to position 2in the ignition
lock.
X Press the ¤button.
The indicator lamp above the ¤button
lights up or goes out.
Problems with the rear window heating The rear window heating has switched off
prematurely or cannot be activated.
X
Switch off any consumers that are not
required, e.g. reading lamps or interior
lighting.
When the battery is sufficiently charged,
the rear window heating is activated again
automatically. Activating/deactivating air-recircula-
tion mode
You can deactivate the flow of fresh air if
unpleasant odours are entering the vehicle
from outside. The air already inside the vehi-
cle will then be recirculated.
The operation of air-recirculation mode is the
same for all control panels. G
WARNING
Only switch over to air-recirculation mode
briefly at low outside temperatures. Other-
wise, the windows could mist up, thus impair- Operating the climatec
ontrol system
135Climatecontrol
Z
Page 264 of 353
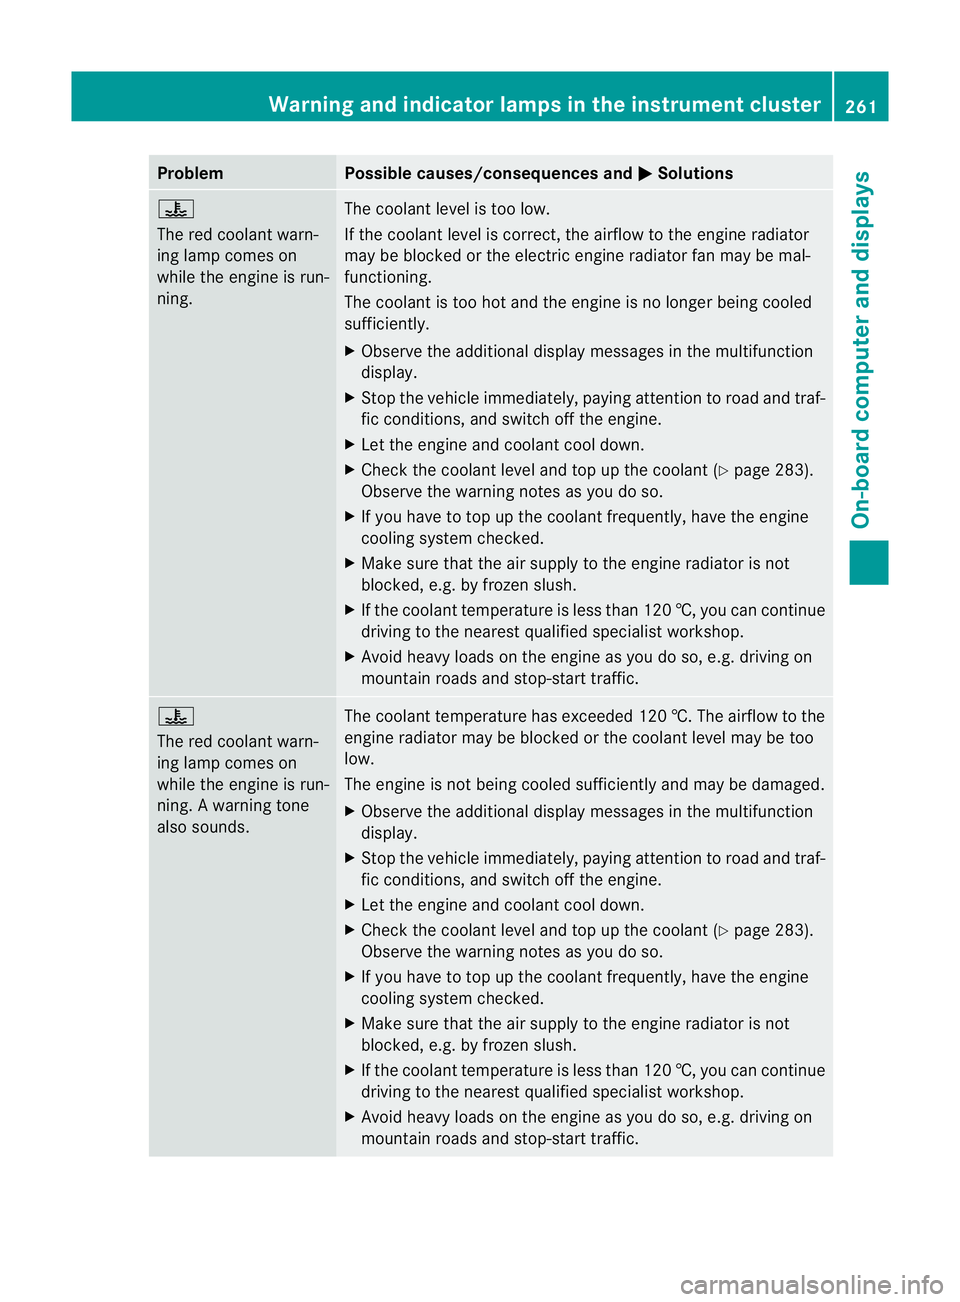
Problem Possible causes/consequences and
M Solutions
?
The red coolant warn-
ing lamp comes on
while the engine is run-
ning.
The coolant level is too low.
If the coolant level is correct, the airflow to the engine radiator
may be blocked or the electric engine radiator fan may be mal-
functioning.
The coolant is too hot and the engine is no longer being cooled
sufficiently.
X
Observe the additional display messages in the multifunction
display.
X Stop the vehicle immediately, paying attention to road and traf-
fic conditions, and switch off the engine.
X Let the engine and coolant cool down.
X Check the coolant level and top up the coolant (Y page 283).
Observe the warning notes as you do so.
X If you have to top up the coolant frequently, have the engine
cooling system checked.
X Make sure that the air supply to the engine radiator is not
blocked, e.g. by frozen slush.
X If the coolant temperature is less than 120 †, you can continue
driving to the nearest qualified specialist workshop.
X Avoid heavy loads on the engine as you do so, e.g. driving on
mountain roads and stop-start traffic. ?
The red coolant warn-
ing lamp comes on
while the engine is run-
ning.
Awarning tone
also sounds. The coolant temperature has exceeded 120 †. The airflow to the
engine radiator may be blocked or the coolant level may be too
low.
The engine is not being cooled sufficiently and may be damaged.
X
Observe the additional display messages in the multifunction
display.
X Stop the vehicle immediately, paying attention to road and traf-
fic conditions, and switch off the engine.
X Let the engine and coolant cool down.
X Check the coolant level and top up the coolant (Y page 283).
Observe the warning notes as you do so.
X If you have to top up the coolant frequently, have the engine
cooling system checked.
X Make sure that the air supply to the engine radiator is not
blocked, e.g. by frozen slush.
X If the coolant temperature is less than 120 †, you can continue
driving to the nearest qualified specialist workshop.
X Avoid heavy loads on the engine as you do so, e.g. driving on
mountain roads and stop-start traffic. Warning and indicator lampsint
he instrument cluster
261On-board computer and displays Z
Page 286 of 353
X
Slowl yslide oi ldipstick :into the guide
tub etot he stop ,and take it ou tagain.
The oil level is correc tifthe level is between
MIN mark =and MAX mark ;.
X Top up the oil if necessary.
Adding engine oil H
Environmental note
When topping up the oil, take care not to spill
any. If oil enters the soil or waterways, it is
harmful to the environment. G
WARNING
If engine oil comes into contact with hot
engine parts, it may ignite and you could burn
yourself. Do not spill any engine oil on hot
engine parts. Example: engine oil cap
X
Turn cap :anti-clockwise and remove it.
X Top up with the amount of oil required.
Fill carefully to the maximum mark on the oil
dipstick.
i Depending on the engine, the difference
between the minimum mark and the maxi-
mum mark is approximately 1.5 –2litres.
! Do not add too much oil. If the oil level is
above the "max" mark on the dipstick, too
much oil has been added. This can lead to
damage to the engine or the catalytic con-
verter. Have excess oil siphoned off.
For further information on engine oil, see
(Y page 335). X
Replace cap :on the filler neck and
tighten clockwise.
Ensure that the cap locks into place
securely. Checking and adding other service
products
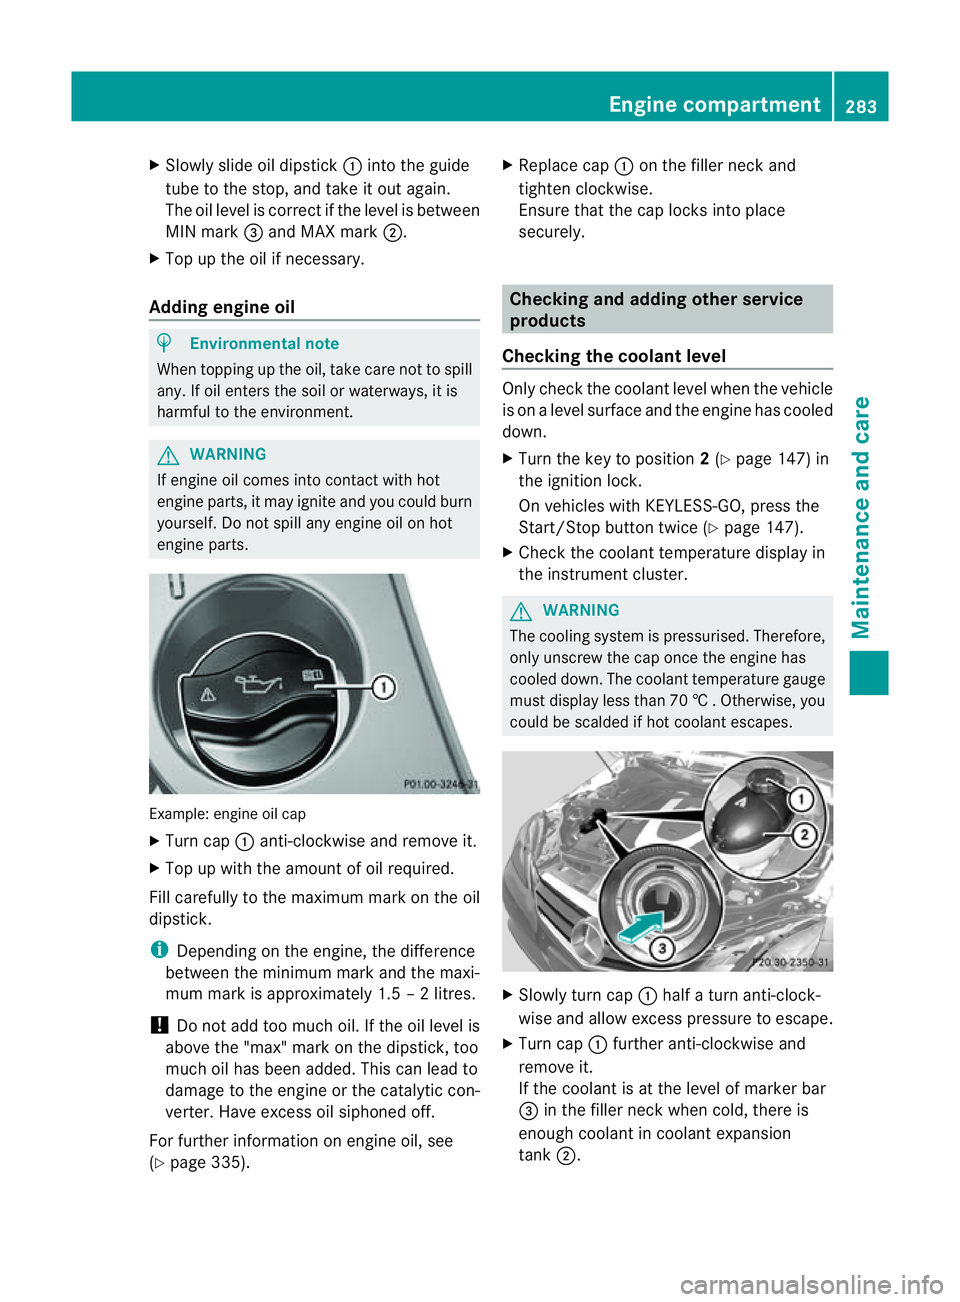
Checking the coolant level Only check the coolant level when the vehicle
is on alevel surface and the engine has cooled
down.
X Turn the key to position 2(Y page 147) in
the ignition lock.
On vehicles with KEYLESS-GO, press the
Start/Stop button twice (Y page 147).
X Check the coolant temperature displayin
the instrumentc luster. G
WARNING
The cooling system is pressurised. Therefore,
only unscrew the cap once the engine has
cooled down. The coolant temperature gauge
must display less than 70 †.Otherwise, you
could be scalded if hot coolant escapes. X
Slowl yturnc ap : half aturna nti-clock-
wise and allow exces spressure to escape.
X Turn cap :further anti-clockwis eand
remove it.
If th ecoolan tisatt heleve lofm arkerbar
= in th efille rneck when cold, there is
enough coolant in coolant expansion
tank ;. Engine compartment
283Maintenance and care Z