dimensions MERCEDES-BENZ E-Class CABRIOLET 2013 C207 Owner's Manual
[x] Cancel search | Manufacturer: MERCEDES-BENZ, Model Year: 2013, Model line: E-Class CABRIOLET, Model: MERCEDES-BENZ E-Class CABRIOLET 2013 C207Pages: 372, PDF Size: 12.69 MB
Page 20 of 372
Maximum load on a tire
(definition) .....................................
343
Maximum permissible tire
pressure (definition) .......................
343
Maximum tire load ......................... 340
Maximum tire load (definition) .......343
MOExtended tires .......................... 324
Optional equipment weight
(definition) ..................................... 343
PSI (pounds per square inch)
(definition) ..................................... 343
Replacing ....................................... 344
Service life ..................................... 324
Sidewall (definition) .......................343
Speed rating (definition) ................ 342
Storing ........................................... 344
Structure and characteristics
(definition) ..................................... 341
Temperature .................................. 337
TIN (Tire Identification Number)
(definition) ..................................... 343
Tire bead (definition) ......................343
Tire pressure (definition) ................ 343
Tire pressures (recommended) ...... 342
Tire size (data) ............................... 349
Tire size designation, load-bearing
capacity, speed rating .................... 338
Tire tread ....................................... 323
Tire tread (definition) .....................343
Total load limit (definition) ............. 344
Traction ......................................... 337
Traction (definition) ....................... 343
Tread wear ..................................... 337
Uniform Tire Quality Grading
Standards ...................................... 336
Uniform Tire Quality Grading
Standards (definition) .................... 342
Unladen weight (definition) ............ 343
Wear indicator (definition) .............343
Wheel rim (definition) .................... 342
see Flat tire
Top Tether ............................................ 62
Towing Important safety guidelines ...........315
Installing the towing eye ................ 315
Removing the towing eye ...............316
With the rear axle raised ................ 316Towing away
With both axles on the ground ....... 316
Tow-starting
Emergency engine starting
............317
Important safety notes .................. 315
Transfer case ..................................... 164
Transmission see Automatic transmission
Transporting the vehicle .................. 317
Trim pieces (cleaning instructions) . 306
Trip computer (on-board
computer) .......................................... 216
Trip odometer Calling up ....................................... 216
Resetting (on-board computer) ...... 217
Trunk
Emergency release .......................... 83
Important safety notes .................... 81
Locking separately ...........................83
Opening/closing (manually from
outside) ............................................ 82
Opening (automatically from
inside) .............................................. 83
Opening (automatically from
outside) ............................................ 82
Trunk lid
Display message ............................ 252
Opening/closing .............................. 81
Opening dimensions ...................... 367
Trunk load (maximum) ...................... 367
Trunk partition Display message ............................ 253
General notes .................................. 96
Opening/closing .............................. 96
Turn signals
Changing bulbs (front) ................... 132
Display message ............................ 236
Switching on/off ........................... 124
Type identification plate
see Vehicle identification plate U
Unlocking Emergency unlocking .......................80
From inside the vehicle (central
unlocking button) ............................. 7918
Index
Page 21 of 372
V
Vanity mirror (in the sun visor) ........
274
Vehicle Data acquisition ............................... 25
Display message ............................ 251
Equipment ....................................... 21
Individual settings ..........................223
Limited Warranty ............................. 25
Loading .......................................... 333
Locking (in an emergency) ............... 81
Locking (SmartKey) .......................... 73
Lowering ........................................ 348
Maintenance .................................... 22
Parking for a long period ................ 169
Pulling away ................................... 153
Raising ........................................... 346
Reporting problems .........................24
Securing from rolling away ............345
Towing away .................................. 315
Transporting .................................. 317
Unlocking (in an emergency) ........... 80
Unlocking (SmartKey) ......................73
Vehicle data ................................... 367
Vehicle data ....................................... 367
Vehicle dimensions ...........................367
Vehicle emergency locking ................81
Vehicle identification number see VIN
Vehicle identification plate ..............361
Vehicle tool kit .................................. 308
Video Operating the DVD ......................... 220
VIN ...................................................... 361W
Warning and indicator lamps ABS
................................................ 258
Brakes ........................................... 258
Check Engine ................................. 262
Coolant .......................................... 262
Distance warning ........................... 264
DISTRONIC PLUS ........................... 264
ESP ®
.............................................. 259
ESP ®
OFF ....................................... 260
Fuel tank ........................................ 262
Overview .................................. 30, 256PASSENGER AIR BAG OFF
indicator lamp
.................................. 46
Reserve fuel
................................... 262
Seat belt ........................................ 257
SRS ................................................ 261
Tire pressure monitor .................... 265
Warranty ............................................ 360
Washer fluid Display message ............................ 254
Wheel bolt tightening torque ...........348
Wheel chock ...................................... 345
Wheels Changing a wheel .......................... 344
Checking ........................................ 323
Cleaning ......................................... 303
Cleaning (warning) .........................344
Emergency spare wheel ................. 355
Important safety notes .................. 322
Interchanging/changing ................344
Mounting a new wheel ................... 348
Mounting a wheel .......................... 345
Removing a wheel ..........................347
Storing ........................................... 344
Tightening torque ........................... 348
Wheel size/tire size ....................... 349
Wind deflector
see AIRCAP
Wind deflector (cleaning
instructions) ...................................... 302
Window curtain air bag Operation ......................................... 46
Windows
see Side windows
Wind screen (cleaning
instructions) ...................................... 303
Windshield Defrosting ...................................... 143
Windshield washer fluid
see Windshield washer system
Windshield washer system
Adding washer fluid .......................297
Filling capacity ............................... 367
Notes ............................................. 367
Windshield wipers
Problem (malfunction) ...................133
Replacing the wiper blades ............ 133
Switching on/off ........................... 132 Index
19
Page 84 of 372
G
WARNING
Do not carry heavy or hard objects in the
passenger compartment or trunk unless they
are firmly secured in place.
Unsecured or improperly positioned cargo
increases a child's risk of injury in the event
of
R strong braking maneuvers
R sudden changes of direction
R an accident
! The trunk lid swings upwards when
opened. Therefore, make sure that there is
sufficient clearance above the trunk lid.
i Opening dimensions of the trunk lid
(Y page 367).
Do not leave the SmartKey in the trunk. You
could otherwise lock yourself out.
The trunk lid can be:
R opened and closed manually from outside
R opened automatically from outside
R opened automatically from inside
R locked separately
R opened with the emergency release button
R unlocked with the mechanical key Opening/closing from outside
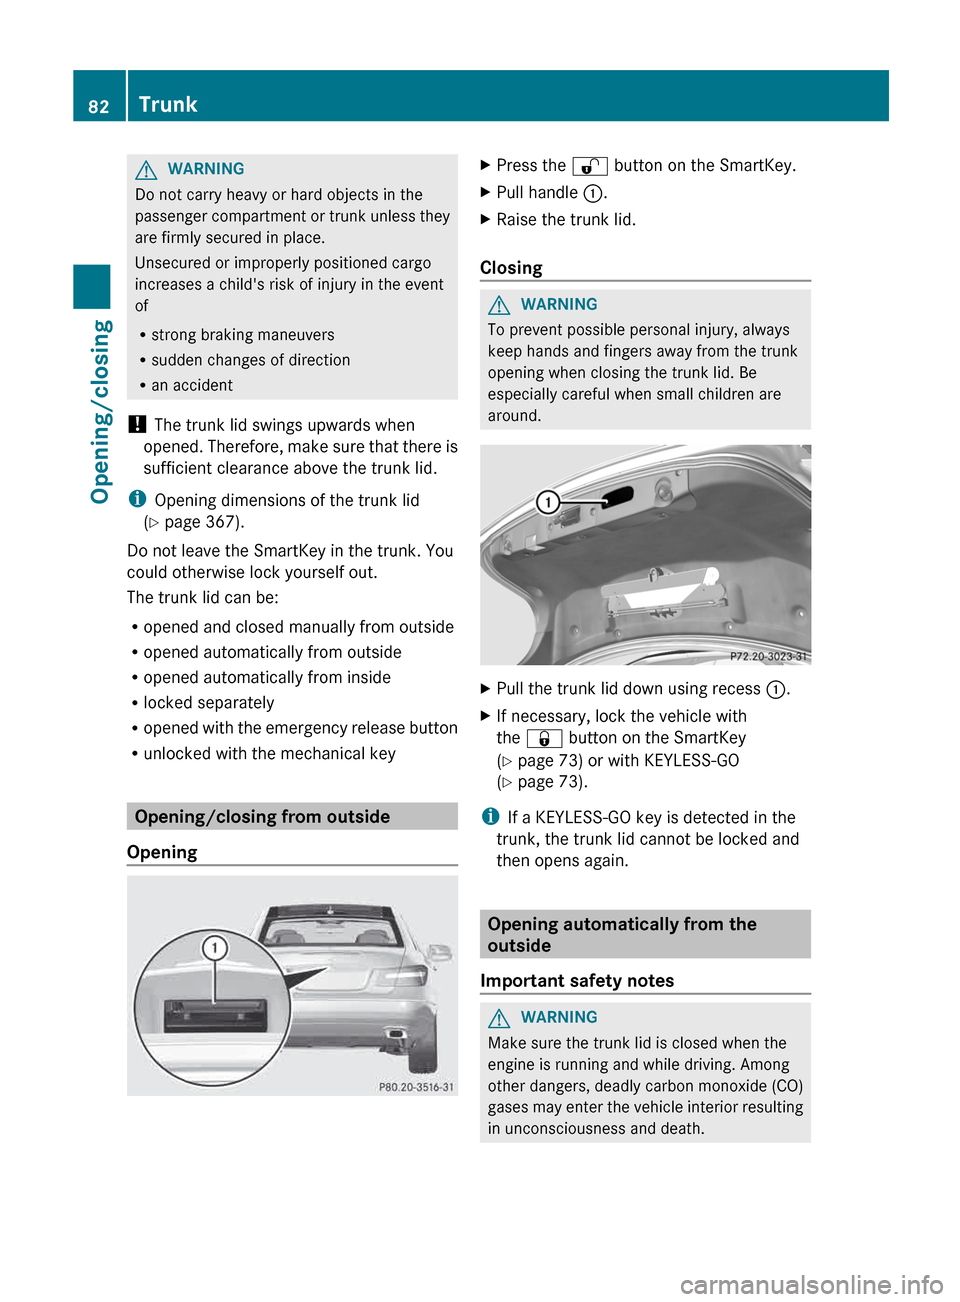
Opening X
Press the % button on the SmartKey.
X Pull handle :.
X Raise the trunk lid.
Closing G
WARNING
To prevent possible personal injury, always
keep hands and fingers away from the trunk
opening when closing the trunk lid. Be
especially careful when small children are
around. X
Pull the trunk lid down using recess :.
X If necessary, lock the vehicle with
the & button on the SmartKey
(Y page 73) or with KEYLESS-GO
(Y page 73).
i If a KEYLESS-GO key is detected in the
trunk, the trunk lid cannot be locked and
then opens again. Opening automatically from the
outside
Important safety notes G
WARNING
Make sure the trunk lid is closed when the
engine is running and while driving. Among
other dangers, deadly carbon monoxide (CO)
gases
may enter the vehicle interior resulting
in unconsciousness and death. 82
Trunk
Opening/closing
Page 85 of 372

!
The trunk lid swings upwards when
opened.
Therefore, make sure that there is
sufficient clearance above the trunk lid.
i Opening dimensions of the trunk lid
(Y page 367).
Opening You can unlock and open the trunk lid
simultaneously with the SmartKey.
X
Press and hold the F button on the
SmartKey until the trunk lid opens. Opening automatically from the
inside
Important safety notes G
WARNING
Make sure the trunk lid is closed when the
engine is running and while driving. Among
other dangers, deadly carbon monoxide (CO)
gases
may enter the vehicle interior resulting
in unconsciousness and death.
i Opening dimensions of the trunk lid
(Y page 367).
Opening X
To open: pull remote operating switch for
trunk lid : until the trunk lid opens.
You can open the trunk lid from the driver's
seat when the vehicle is stationary and
unlocked. Locking the trunk separately
You
can lock the trunk separately. If you then
unlock the vehicle centrally, the trunk
remains locked and cannot be opened.
X Close the trunk lid.
X Take the mechanical key out of the
SmartKey (Y page 74). 1
Basic position
2 Locking
X Insert the mechanical key into the trunk lid
lock as far as the stop.
X Turn the mechanical key clockwise from
position 1 to position 2.
X Remove the mechanical key.
X Insert the mechanical key into the
SmartKey. Unlocking the trunk (mechanical key)
! The trunk lid swings upwards when
opened.
Therefore, make sure that there is
sufficient clearance above the trunk lid.
If the trunk cannot be unlocked with the
SmartKey or KEYLESS-GO, use the
mechanical key.
If you use the mechanical key to unlock and
open the trunk lid, the anti-theft alarm system
will be triggered ( Y page 70).
X Take the mechanical key out of the
SmartKey (Y page 74).
X Insert the mechanical key into the trunk lid
lock as far as the stop. Trunk
83
Opening/closing Z
Page 324 of 372
Useful information
i This Operator's Manual describes all
models and all standard and optional
equipment of your vehicle available at the
time of publication of the Operator's
Manual. Country-specific differences are
possible.
Please note that your vehicle may
not be equipped with all features
described. This also applies to safety-
related systems and functions.
i Read the information on qualified
specialist workshops: ( Y page 24).Important safety notes
G
WARNING
If wheels and tires of the wrong size are used,
the wheel brakes or suspension components
may be damaged. There is a risk of accident.
Always replace wheels and tires with those
that fulfill the specifications of the original
part (designation, manufacturer, model). G
WARNING
A flat tire severely impairs the driving,
steering and braking characteristics of the
vehicle. There is a risk of accident.
Tires without run-flat characteristics:
R do not drive with a flat tire.
R immediately replace the flat tire with your
emergency spare wheel or spare wheel, or
consult a qualified specialist workshop.
Tires with run-flat characteristics:
R pay attention to the information and
warning
notices on MOExtended tires (tires
with run-flat characteristics).
Accessories that are not approved for your
vehicle by Mercedes-Benz or are not being
used correctly can impair the operating
safety. Before purchasing and using non-approved
accessories, visit a qualified specialist
workshop and inquire about:
R
suitability
R legal stipulations
R factory recommendations
Information on the dimensions and types of
wheels
and tires for your vehicle can be found
under "Wheel/tire combinations"
(Y page 349).
Information on air pressure for the tires on
your vehicle can be found:
R on the vehicle's Tire and Loading
Information placard on the B-pillar
(Y page 333)
R on the tire pressure label on the fuel filler
flap ( Y page 165)
R under "Tire pressure" ( Y page 325)
R in the "Tire pressure" section Operation
Information on driving
If the vehicle is heavily laden, check the tire
pressures and correct them if necessary.
While driving, pay attention to vibrations,
noises and unusual handling characteristics,
e.g.
pulling to one side. This may indicate that
the wheels or tires are damaged. If you
suspect that a tire is defective, reduce your
speed immediately. Stop the vehicle as soon
as possible to check the wheels and tires for
damage. Hidden tire damage could also be
causing the unusual handling characteristics.
If you find no signs of damage, have the tires
and wheels checked at a qualified specialist
workshop.
When parking your vehicle, make sure that
the tires do not get deformed by the curb or
other obstacles. If it is necessary to drive over
curbs, speed humps or similar elevations, try
to do so slowly and at an obtuse angle.
Otherwise, the tires, particularly the
sidewalls, may be damaged. 322
Operation
Wheels and tires
Page 328 of 372
Follow recommended tire inflation pressures
and check the pressure of all the tires
including the spare wheel:
R
monthly, at least
R if the load changes
R before beginning a long journey
R under different operating conditions, e.g.
off-road driving
If necessary, correct the tire pressure.
i The
specifications on the sample Tire and
Loading Information placard and tire
pressure tables are examples. Tire
pressure specifications are vehicle-specific
and may deviate from the data shown here.
The tire pressure specifications that are
valid for your vehicle can be found on the
Tire and Loading Information placard and
tire pressure table on the vehicle.
General notes The recommended tire pressures for the tires
mounted at the factory can be found on the
labels described here.
Operation with the emergency spare
wheel
(Y page 355).
Further information on tire pressures can be
obtained at a qualified specialist workshop.
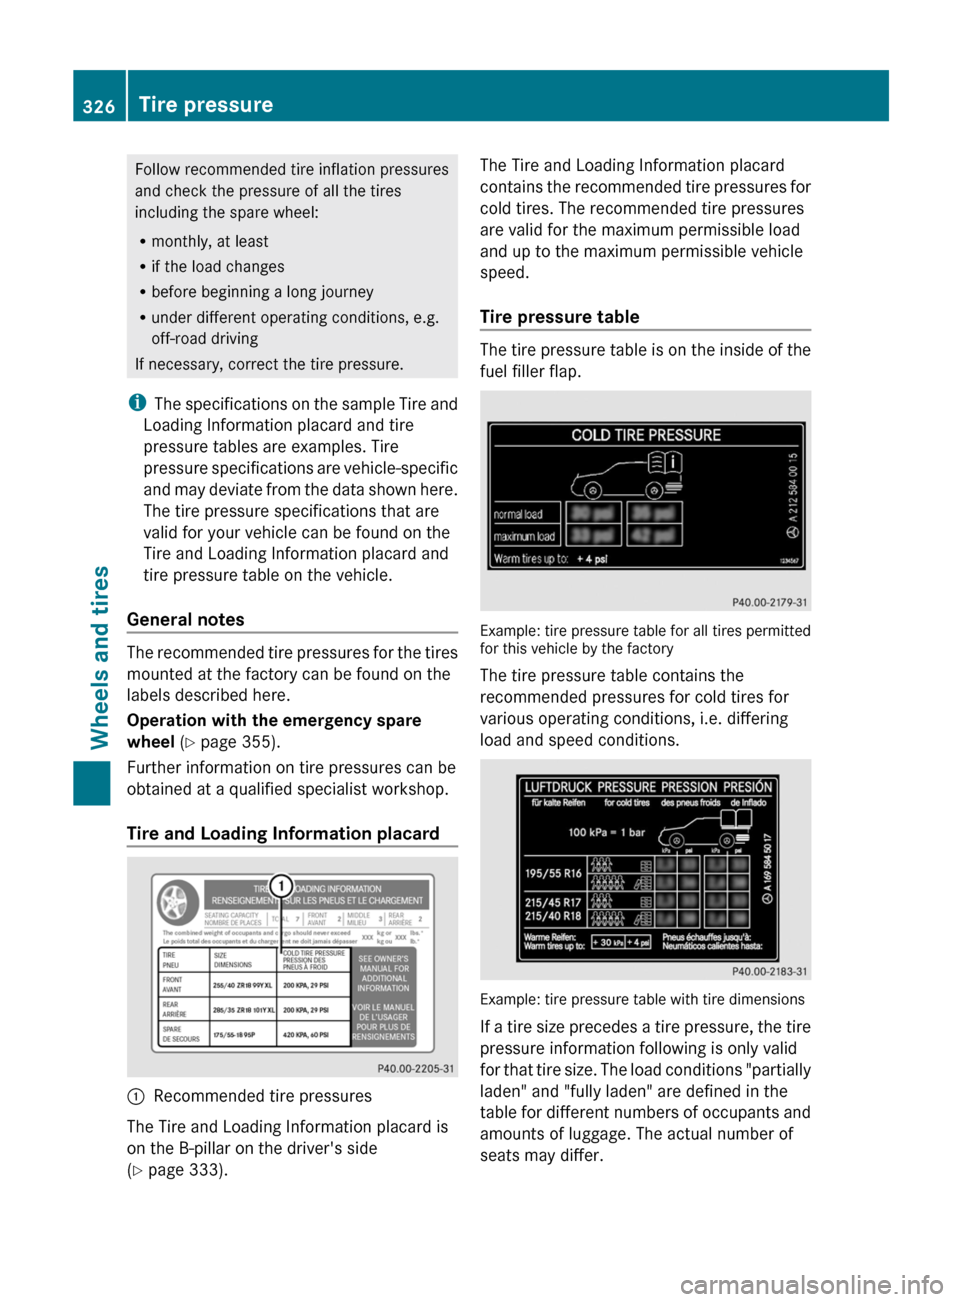
Tire and Loading Information placard :
Recommended tire pressures
The Tire and Loading Information placard is
on the B-pillar on the driver's side
(Y page 333). The Tire and Loading Information placard
contains
the recommended tire pressures for
cold tires. The recommended tire pressures
are valid for the maximum permissible load
and up to the maximum permissible vehicle
speed.
Tire pressure table The tire pressure table is on the inside of the
fuel filler flap.
Example: tire pressure table for all tires permitted
for this vehicle by the factory
The tire pressure table contains the
recommended pressures for cold tires for
various operating conditions, i.e. differing
load and speed conditions.
Example: tire pressure table with tire dimensions
If
a tire size precedes a tire pressure, the tire
pressure information following is only valid
for that tire size. The load conditions "partially
laden" and "fully laden" are defined in the
table for different numbers of occupants and
amounts of luggage. The actual number of
seats may differ. 326
Tire pressure
Wheels and tires
Page 346 of 372
Occupant distribution
The distribution of occupants in a vehicle at
their designated seating positions.
Total load limit
Rated cargo and luggage load plus
68 kilograms (150 lb) multiplied by the
number of seats in the vehicle.
Changing a wheel
Flat tire
You can find information on what to do in the
event of a flat tire in the "Breakdown
assistance" section (Y page 308).
Instructions for driving with MOExtended
tires in the event of a flat tire are also provided
there.
The "Breakdown assistance" section
(Y page 308) contains information and notes
on how to deal with a flat tire. Instructions for
driving with MOExtended tires in the event of
a flat tire are also provided there. Interchanging the wheels
G
WARNING
Interchanging the front and rear wheels may
severely impair the driving characteristics if
the
wheels or tires have different dimensions.
The wheel brakes or suspension components
may also be damaged. There is a risk of
accident.
Rotate front and rear wheels only if the wheels
and tires are of the same dimensions.
! On vehicles equipped with a tire pressure
monitor, electronic components are
located in the wheel.
Tire-mounting tools should not be used
near the valve. This could damage the
electronic components.
Only have tires changed at a qualified
specialist workshop. Always observe the instructions and safety
notes in the "Mounting a wheel" section
(Y page 345).
The wear patterns on the front and rear tires
differ,
depending on the operating conditions.
Rotate the wheels before a clear wear pattern
has formed on the tires. Front tires typically
wear more on the shoulders and the rear tires
in the center.
If your vehicle's tire configuration allows, you
can rotate the wheels according to the
intervals in the tire manufacturer's warranty
book in your vehicle documents. If this is not
available, the tires should then be replaced
every 3,000 to 6,000 miles (5,000 to
10,000 km), or earlier if the tire wear requires
this. Do not change the direction of wheel
rotation.
Clean the contact surfaces of the wheel and
the brake disc thoroughly every time a wheel
is interchanged. Check the tire pressure and,
if necessary, restart the tire pressure loss
warning system or the tire pressure monitor. Direction of rotation
Tires with a specified direction of rotation
have
additional benefits, e.g. if there is a risk
of hydroplaning. You will only gain these
benefits if the correct direction of rotation is
maintained.
An arrow on the sidewall of the tire indicates
its correct direction of rotation. Storing wheels
Store
wheels that are not being used in a cool,
dry and preferably dark place. Protect the
tires from oil, grease, gasoline and diesel. Cleaning the wheels
G
WARNING
The water jet from a circular jet nozzle (dirt
blasters)
can cause invisible exterior damage344
Changing a wheel
Wheels and tires
Page 357 of 372
Winter tires
R18
Tires Alloy wheels
BA: 235/40 R18 95 H XL M+S
i BA: 8.0 J x 18 H2
Wheel offset: 1.77 in
(45 mm)Emergency spare wheel
Important safety notes
G
WARNING
The wheel or tire size as well as the tire type
of
the spare wheel or emergency spare wheel
and the wheel to be replaced may differ.
Mounting an emergency spare wheel may
severely impair the driving characteristics.
There is a risk of an accident.
To avoid hazardous situations:
R adapt your driving style accordingly and
drive carefully.
R never install more than one spare wheel or
emergency spare wheel that differs in size.
R only use a spare wheel or emergency spare
wheel of a different size briefly.
R do not switch ESP ®
off.
R have a spare wheel or emergency spare
wheel of a different size replaced at the
nearest qualified specialist workshop.
Observe that the wheel and tire dimensions
as well as the tire type must be correct.
When using an emergency spare wheel or
spare wheel of a different size, you must not
exceed the maximum speed of 50 mph
(80 km/h).
Snow chains must not be mounted on
emergency spare wheels. General notes
You should regularly check the pressure of
the
emergency spare wheel, particularly prior
to long trips, and correct the pressure as
necessary (Y page 325). The applicable value is found on the wheel or under "Technical
data" (
Y page 357).
An emergency spare wheel may also be
mounted against the direction of rotation.
Observe
the time restriction on use as well as
the speed limitation specified on the
emergency spare wheel.
Replace the tires after six years at the latest,
regardless of wear. This also applies to the
emergency spare wheel.
i When you are driving with the collapsible
spare wheel mounted, the tire pressure
loss warning system or the tire pressure
monitor cannot function reliably. Only
restart the tire pressure loss warning
system/the tire pressure monitor when the
damaged wheel has been replaced with a
new wheel.
Vehicles with tire pressure monitor:
after mounting an emergency spare wheel,
the system may still display the tire
pressure of the removed wheel for a few
minutes. The value displayed for the
mounted emergency spare wheel is not the
same as the current tire pressure of the
emergency spare wheel. Emergency spare wheel
355
Wheels and tires Z
Page 370 of 372
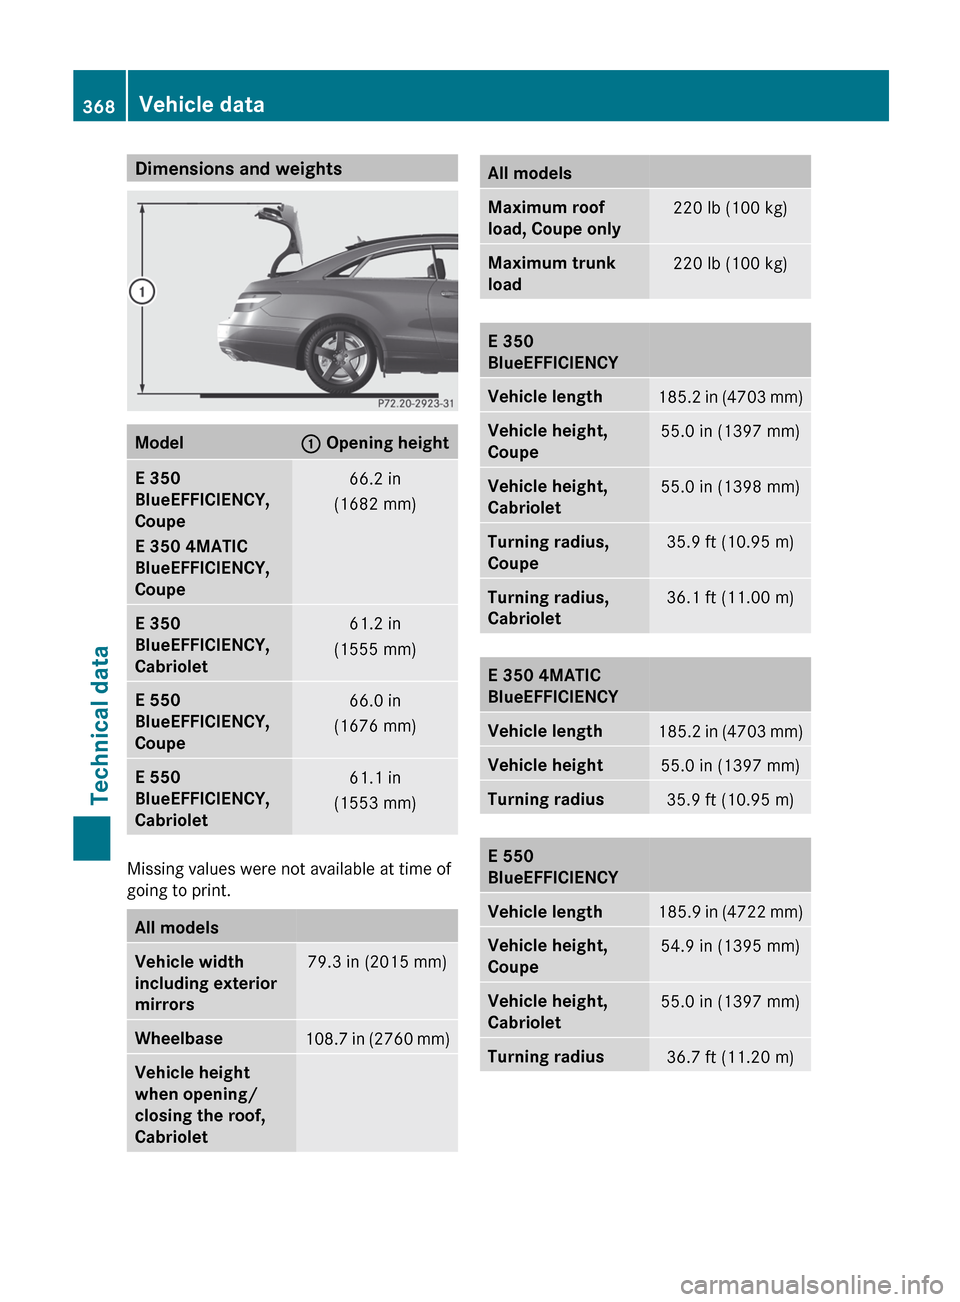
Dimensions and weights
Model : Opening height
E 350
BlueEFFICIENCY,
Coupe
E 350 4MATIC
BlueEFFICIENCY,
Coupe
66.2 in
(1682 mm) E 350
BlueEFFICIENCY,
Cabriolet
61.2 in
(1555 mm) E 550
BlueEFFICIENCY,
Coupe
66.0 in
(1676 mm) E 550
BlueEFFICIENCY,
Cabriolet
61.1 in
(1553 mm) Missing values were not available at time of
going to print.
All models
Vehicle width
including exterior
mirrors
79.3 in (2015 mm)
Wheelbase
108.7 in (2760 mm)
Vehicle height
when opening/
closing the roof,
Cabriolet All models
Maximum roof
load, Coupe only
220 lb (100 kg)
Maximum trunk
load
220 lb (100 kg)
E 350
BlueEFFICIENCY
Vehicle length
185.2 in (4703 mm)
Vehicle height,
Coupe
55.0 in (1397 mm)
Vehicle height,
Cabriolet
55.0 in (1398 mm)
Turning radius,
Coupe
35.9 ft (10.95 m)
Turning radius,
Cabriolet
36.1 ft (11.00 m)
E 350 4MATIC
BlueEFFICIENCY
Vehicle length
185.2 in (4703 mm)
Vehicle height
55.0 in (1397 mm)
Turning radius
35.9 ft (10.95 m)
E 550
BlueEFFICIENCY
Vehicle length
185.9 in (4722 mm)
Vehicle height,
Coupe
54.9 in (1395 mm)
Vehicle height,
Cabriolet
55.0 in (1397 mm)
Turning radius
36.7 ft (11.20 m)368
Vehicle dataTechnical data