MERCEDES-BENZ E-Class CABRIOLET 2014 C207 Owner's Manual
Manufacturer: MERCEDES-BENZ, Model Year: 2014, Model line: E-Class CABRIOLET, Model: MERCEDES-BENZ E-Class CABRIOLET 2014 C207Pages: 394, PDF Size: 5.28 MB
Page 311 of 394
X
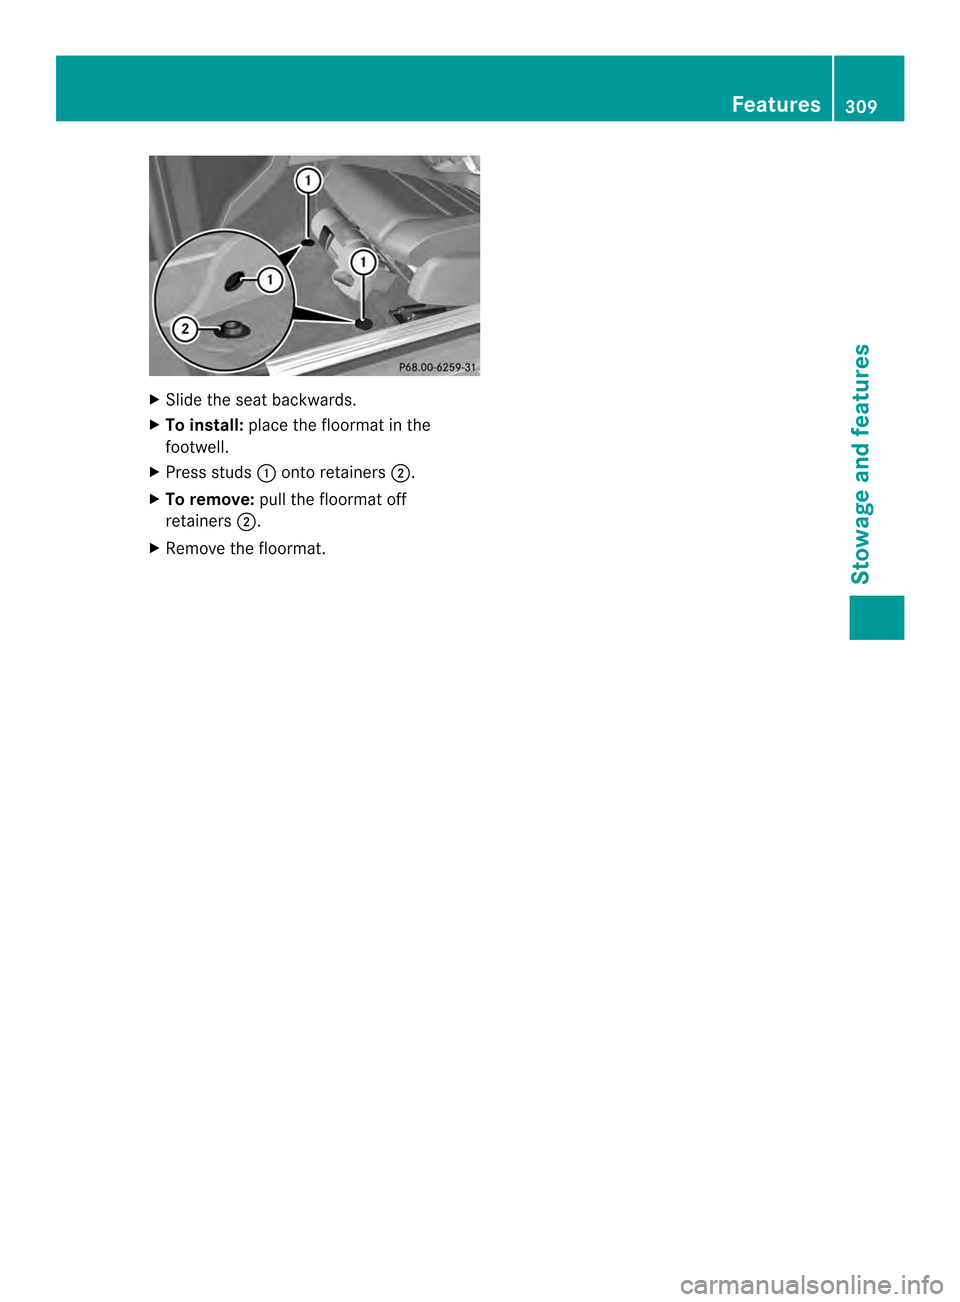
Slide the sea tbackwards.
X To install: place the floormat in the
footwell.
X Press studs 0002onto retainers 0003.
X To remove: pull the floormat off
retainers 0003.
X Remove the floormat. Features
309Stowage and features Z
Page 312 of 394

310
Page 313 of 394
Useful information
............................312
Engine compartment ........................312
Maintenance ...................................... 316
Care .................................................... 317 311Maintenance and care
Page 314 of 394
Useful information
i This Operator's Manual describes all
models and all standard and optional
equipment of your vehicle available at the
time of publication of the Operator's
Manual. Country-specific differences are
possible. Please note that your vehicle may
not be equipped with all features
described. This also applies to safety-
related systems and functions.
i Read the information on qualified
specialist workshops: (Y page 25).Engine compartment
Hood
Important safety notes G
WARNING
If the hood is unlatched, it may open up when
the vehicle is in motion and block your view.
There is a risk of an accident.
Never unlatch the hood while driving. G
WARNING
When opening and closing the hood, it may
suddenly fall into the closed position .There is
a risk of injury to persons within range of
movement of the hood.
Open and close the hood only when no one is
within its range of movement. G
WARNING
Opening the hood when the engine is
overheated or when there is a fire in the
engine compartmentc ould expose you to hot
gases or other service products. There is a
risk of injury.
Let an overheated engine cool down before
opening the hood. If there is a fire in the
engine compartment, keep the hood closed
and contact the fire department. G
WARNING
The engine compartment contains moving
components. Certain components, such as
the radiator fan, may continue to run or start
again suddenly when the ignition is off. There
is a risk of injury.
If you need to do any work inside the engine
compartment,
R switch off the ignition
R never reach into the area where there is a
risk of danger from moving components,
such as the fan rotation area
R keep clothing away from moving parts G
WARNING
The ignition system and the fuel injection
system work under high voltage. If you touch
components which are under voltage, you
could get an electric shock. There is a risk of
injury.
Never touch components of the ignition
system or fuel injection system when the
ignition is switched on.
Opening the hood G
WARNING
Certain components in the engine
compartment, such as the engine, radiator
and parts of the exhaust system, can become
very hot. Working in the engine compartment
poses a risk of injury.
Where possible, let the engine cool down and
touch only the components described in the
following. G
WARNING
When the hood is open and the windshield
wipers are set in motion ,you can be injured
by the wiper linkage. There is a risk of injury.
Always switch off the windshield wipers and
the ignition before opening the hood.
! Make sure that the windshield wipers are
not folded away from the windshield. You 312
Engine compartmentMaintenance and care
Page 315 of 394

could otherwise damage the windshield
wipers or the hood. X
Make sure that the windshield wipers are
turned off.
X Pull release lever 0002on the hood.
The hood is released. X
Reach into the gap, pull hoo dcatch
handle 0003up and lift the hood.
If you lift the hood by approximately 15 in
(40 cm), the hood is opened and held open
automatically by the gas-filled strut.
Closing the hood X
Lowe rthe hood and let it fall from a height
of approximately 8inche s(20 cm).
X Check that the hood has engaged properly.
If the hood can be raised slightly, it is not
properly engaged. Open it again and close
it with a little more force. Engine oil
General notes Depending on the driving style, the vehicle
consumes up to 0.9 US qt (0.8 liters) of oil
over
adistanc eof600 miles (1,000 km). The
oil consumption may be higher than this when
the vehicle is new or if you frequently drive at
high engine speeds.
Depending on the engine, the oil dipstic kmay
be in a different location.
When checking the oil level:
R park the vehicle on a level surface.
R the engine should be switched off for
approximately five minutes if the engine is
at normal operating temperature.
R if the engine is not at normal operating
temperature, e.g .ifthe engine was only
started briefly, wait about 30 minutes
before carrying out the measurement.
Checking the oil level using the oil
dipstick G
WARNING
Certain components in the engine
compartment, such as the engine, radiator
and parts of the exhaust system, can become
very hot. Working in the engine compartment
poses a risk of injury.
Where possible, let the engine cool down and
touch only the components described in the
following. Engine compartment
313Maintenance and care Z
Page 316 of 394
X
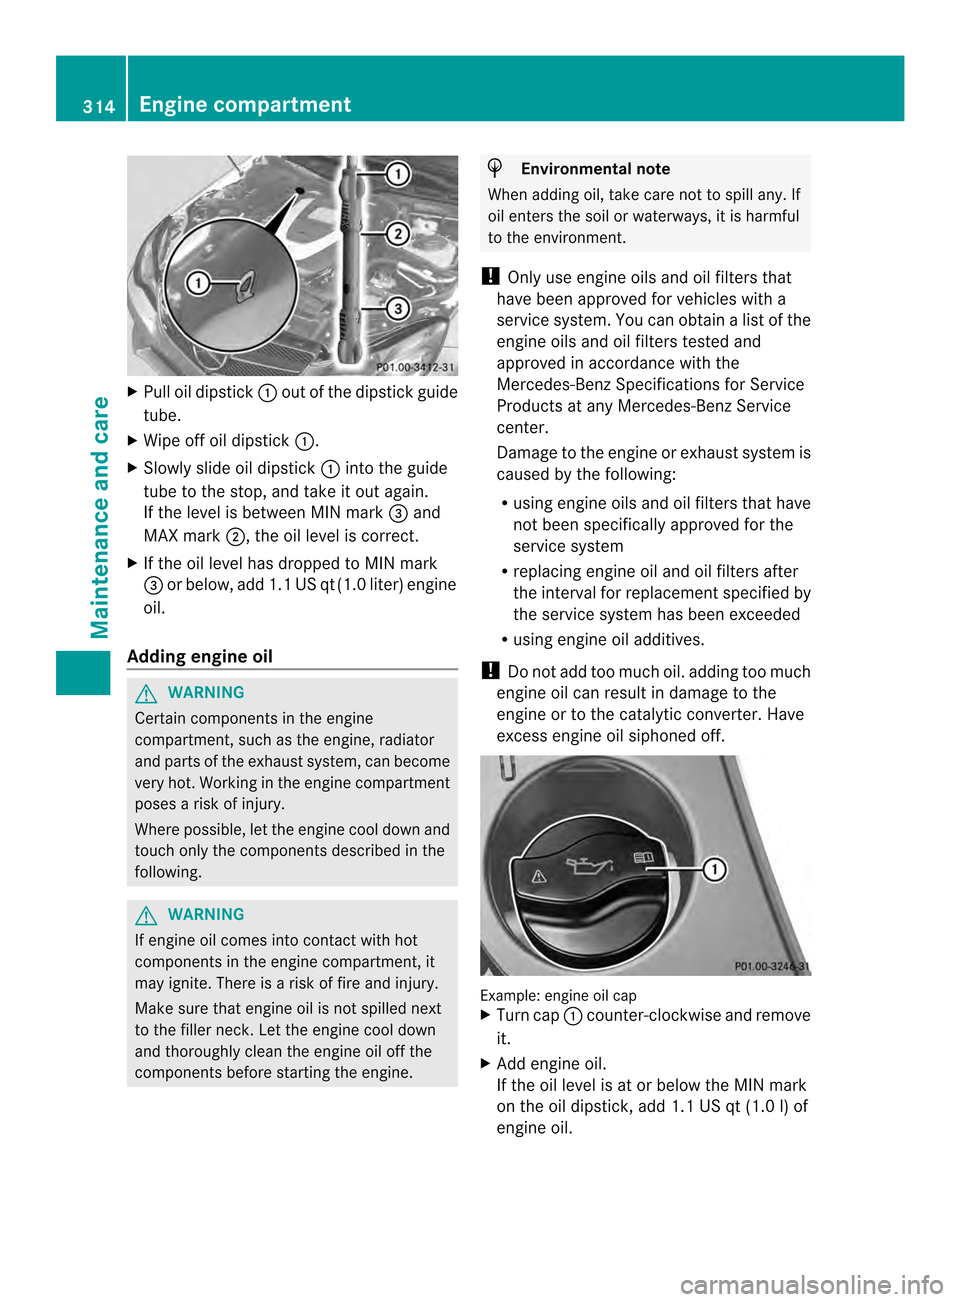
Pull oil dipstick 0002out of the dipstick guide
tube.
X Wipe off oil dipstick 0002.
X Slowly slide oil dipstick 0002into the guide
tube to the stop, and take it out again.
If the level is between MIN mark 0023and
MAX mark 0003, the oil level is correct.
X If the oil level has dropped to MIN mark
0023 or below, add 1.1 US qt (1.0 liter) engine
oil.
Adding engine oil G
WARNING
Certain components in the engine
compartment, such as the engine, radiator
and parts of the exhaust system, can become
very hot. Working in the engine compartment
poses a risk of injury.
Where possible, let the engine cool down and
touch only the componentsd escribed in the
following. G
WARNING
If engine oil comes into contact with hot
components in the engine compartment, it
may ignite. There is a risk of fire and injury.
Make sure that engine oil is not spilled next
to the filler neck. Let the engine cool down
and thoroughly clean the engine oil off the
components before starting the engine. H
Environmental note
When adding oil, take care not to spill any. If
oil enters the soil or waterways, it is harmful
to the environment.
! Only use engine oils and oil filters that
have been approved for vehicles with a
service system. You can obtain a list of the
engine oils and oil filters tested and
approved in accordance with the
Mercedes-Benz Specifications for Service
Products at any Mercedes-Benz Service
center.
Damage to the engine or exhaust system is
caused by the following:
R using engine oils and oil filters that have
not been specifically approved for the
service system
R replacing engine oil and oil filters after
the interval for replacemen tspecified by
the service system has been exceeded
R using engine oil additives.
! Do not add too much oil. adding too much
engine oil can result in damage to the
engine or to the catalytic converter. Have
excess engine oil siphoned off. Example: engine oil cap
X
Turn cap 0002counter-clockwise and remove
it.
X Add engine oil.
If the oil level is at or below the MIN mark
on the oil dipstick, add 1.1 US qt (1.0 l) of
engine oil. 314
Engine compartmentMaintenance and care
Page 317 of 394

X
Replace cap 0002on the filler neck and turn
clockwise.
Ensure that the cap locks into place
securely.
X Chec kthe oil level again with the oil
dipstick (Y page 313).
Further information on engine oil
(Y page 386). Additional service products
Checking coolant level G
WARNING
Certain components in the engine
compartment, such as the engine, radiator
and parts of the exhaust system, can become
very hot. Working in the engine compartment
poses a risk of injury.
Where possible, let the engine cool down and
touch only the components described in the
following. G
WARNING
The engine cooling system is pressurized,
particularly when the engine is warm. When
opening the cap, you could be scalded by hot
coolant spraying out. There is a risk of injury.
Let the engine cool down before opening the
cap. Wear eye and hand protection when
opening the cap. Open the cap slowly half a
turn to allow pressure to escape. X
Park the vehicle on a level surface. Only check the coolant level when the
vehicle is on a level surface and the engine
has cooled down.
X Turn the SmartKey to position 2in the
ignition lock (Y page 165).
On vehicles with KEYLESS-GO, press the
Start/Stop button twice (Y page 165).
X Check the coolant temperature display in
the instrument cluster.
The coolant temperature must be below
158 ‡ (70 †).
X Turn the SmartKey to position
0(Y page 165) in the ignition lock.
X Slowly turn cap 0002half a turn counter-
clockwise to allow excess pressure to
escape.
X Turn cap 0002further counter-clockwise and
remove it.
If the coolant is at the level of marker bar
0023 in the filler neck when cold, there is
enough coolant in coolant expansion
tank 0003.
If the coolant level is approximately 0.6 in
(1.5 cm) above marker bar 0023in the fuel
filler neck when warm, there is enough
coolant in expansion tank 0003.
X If necessary, add coolant that has been
tested and approved by Mercedes-Benz.
X Replace cap 0002and turn it clockwise as far
as it will go.
For further information on coolant, see
(Y page 388).
Adding washer fluid to the windshield
washer system G
WARNING
Certain components in the engine
compartment, such as the engine, radiator
and parts of the exhaust system, can become
very hot. Working in the engine compartment
poses a risk of injury.
Where possible, let the engine cool down and
touch only the components described in the
following. Engine compartment
315Maintenance and care Z
Page 318 of 394
G
WARNING
Windshield washer concentrate is highly
flammable. If it comes into contact with hot
engine components or the exhaust system it
could ignite. There is a risk of fire and injury.
Make sure that no windshield washer
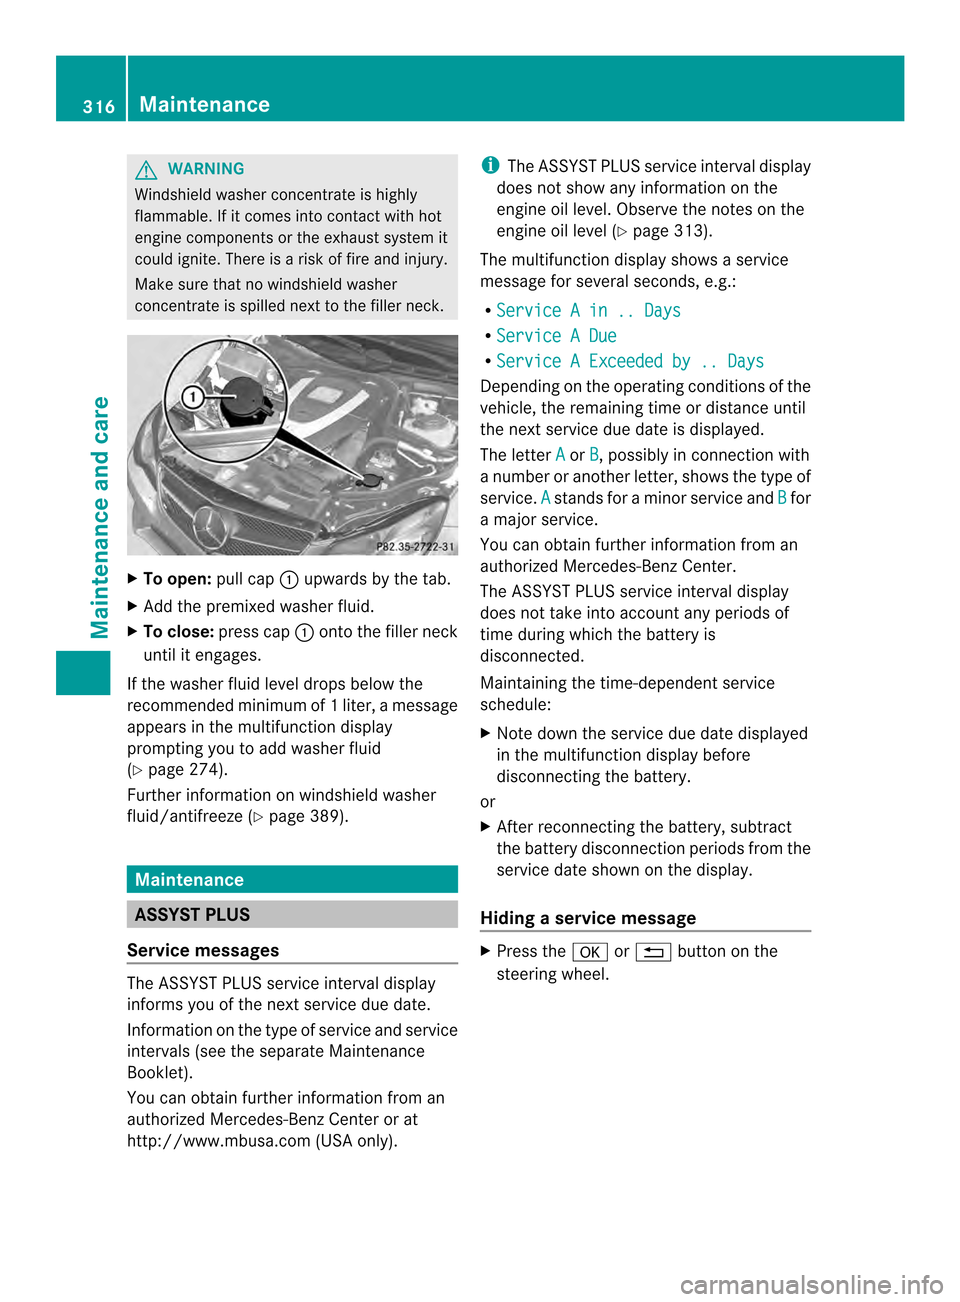
concentrate is spilled next to the filler neck. X
To open: pull cap0002upwards by the tab.
X Add the premixed washer fluid.
X To close: press cap 0002onto the filler neck
until it engages.
If the washer fluid level drops below the
recommended minimu mof1liter, a message
appears in the multifunction display
prompting you to add washer fluid
(Y page 274).
Further information on windshield washer
fluid/antifreeze (Y page 389).Maintenance
ASSYST PLUS
Service messages The ASSYST PLUS service interval display
informs you of the nex
tservice due date.
Information on the type of service and service
intervals (see the separate Maintenance
Booklet).
You can obtain further information from an
authorized Mercedes-Benz Center or at
http://www.mbusa.com (USA only). i
The ASSYST PLUS servic einterval display
does not show any informatio nonthe
engine oil level. Observe the notes on the
engine oil level (Y page 313).
The multifunction display shows a service
message for several seconds, e.g.:
R Service A in .. Days R
Service A Due R
Service A Exceeded by .. Days Depending on the operating conditions of the
vehicle, the remaining time or distance until
the next service due date is displayed.
The letter
A or
B , possibly in connection with
a number or another letter, shows the type of
service. A stands for a minor service and
B for
a major service.
You can obtain further information from an
authorized Mercedes-Ben zCenter.
The ASSYST PLUS service interval display
does not take into accoun tany periods of
time during which the battery is
disconnected.
Maintaining the time-dependent service
schedule:
X Note down the service due date displayed
in the multifunctio ndisplay before
disconnecting the battery.
or
X After reconnecting the battery, subtract
the battery disconnection periods fro mthe
service date shown on the display.
Hiding aservice message X
Press the 000Bor0007 button on the
steering wheel. 316
MaintenanceMaintenance and care
Page 319 of 394
Displaying service messages
X
Switch on the ignition.
X Press the 0002or0005 button on the
steering wheel to selec tthe Serv. menu.
X Press the 0003or0004 button to select the
ASSYST PLUS submenu and confirm by
pressing the 000Bbutton.
The service due date appears in the
multifunction display.
Information about Service Resetting the ASSYST PLUS service
interval display
!
If the ASSYST PLUS service interval
display has been inadvertently reset, this
setting can be corrected at a qualified
specialist workshop.
Have service work carried out as described
in the Maintenance Booklet. This may
otherwise lead to increased wear and
damage to the major assemblies or the
vehicle.
Aq ualified specialist workshop, e.g. an
authorized Mercedes-Ben zCenter, will reset
the ASSYST PLUS service interval display
after the service work has been carried out.
You can also obtain further information on
maintenance work, for example.
Special service requirements
The specified maintenance interval takes only
the normal operation of the vehicle into
account. Under arduous operating conditions
or increased load on the vehicle,
maintenance work must be carried out more
frequently, for example:
R regular city driving with frequent
intermediate stops
R if the vehicle is primarily used to travel
short distances
R use in mountainous terrain or on poor road
surfaces
R if the engine is often left idling for long
periods Under these or similar conditions, have, for
example, the air filter, engine oil and oil filter
replaced or changed more frequently. Under
arduous operating conditions, the tires must
be checked more often. Further information
can be obtained at a qualified specialist
workshop, e.g. an authorized Mercedes-Benz
Center.
Driving abroad
An extensive Mercedes-Benz Service network
is also available in other countries. You can
obtain further information from any
authorized Mercedes-BenzC
enter. Care
General notes
H
Environmental note
Dispose of empty packaging and cleaning
cloths in an environmentally responsible
manner.
! For cleaning your vehicle, do not use any
of the following:
R dry, rough or hard cloths
R abrasive cleaning agents
R solvents
R cleaning agents containing solvents
Do not scrub.
Do not touch the surfaces or protective
films with hard objects, e.g. a ring or ice
scraper. You could otherwise scratch or
damage the surfaces and protective film.
! Do not park the vehicle for an extended
period straight after cleaning it, particularly
after having cleaned the wheels with wheel
cleaner. Wheel cleaners could cause
increased corrosion of the brake discs and
brake pads/linings. For this reason, you
should drive for a few minutes after
cleaning. Braking heats the brake discs and
the brake pads/linings, thus drying them.
The vehicle can then be parked. Care
317Maintenance and care Z
Page 320 of 394
Regular care of your vehicle is a condition for
retaining the quality in the long term.
Use care products and cleaning agents
recommended and approved by Mercedes-
Benz. Washing the vehicle and cleaning the
paintwork
Automatic car wash G
WARNING
Braking efficiency is reduced after washing
the vehicle. There is a ris kofanaccident.
After the vehicle has bee nwashed, brake
carefully while paying attention to the traffic
conditions until full braking power is restored.
! If DISTRONIC PLUS or th eHOLD function
is activated, the vehicle brakes
automatically in certain situations. To
prevent damage to the vehicle, deactivate
DISTRONIC PLUS and the HOLD function in
the following or other similars ituations:
R when towing the vehicle
R in the car wash
! Preferably use automatic car washes with
adjustable high-pressure pre-cleaning. This
corresponds with the specification for the
Cabriolet program. In car washes that use
high water pressures, there is a risk that a
small amoun tofwaterm ay leak into the
vehicle.
! Cabriolet: do not treat the vehicle with
hot wax under any circumstances.
! Cabriolet: pull the SmartKey out of the
ignition loc kwhen washing the vehicle. This
ensures that the wind deflector on the
windshield is retracted. The wind deflector
may otherwise be damaged.
! Never clean your vehicle in a Touchless
Automatic Car Wash as these use special
cleaning agents. These cleaning agents can
damage the paintwork or plastic parts. !
Make sure that:
R the side windows and the sliding sunroof
or soft top are fully closed.
R the ventilation/heating is switched off
(the OFF button has been pressed).
R the windshield wiper switch is in position
0.
Otherwise, the vehicle might be damaged.
! In car washes with a towing mechanism,
make sure that the automatic transmission
is in transmission position N, otherwise the
vehicle could be damaged.
R Vehicles with a SmartKey:
Do not remove the SmartKey from the
ignition lock. Do not open the driver's
door or front-passenger door when the
engine is switched off. Otherwise, the
automatic transmission selects park
position Pautomatically and locks the
wheels. You can prevent this by shifting
the automatic transmission to N
beforehand.
R Vehicles with KEYLESS-GO:
Do not open the driver's door or front-
passenger door when the engine is
switched off. Otherwise, the automatic
transmission selects park position P
automatically and locks the wheels.
Observe the following to make sure that the
automatic transmission stays in position N:
X Make sure the vehicle is stationary and the
ignition is switched off.
X Turn the SmartKey to position 2in the
ignition lock (Y page 165).
Use the SmartKey instead of the Start/
Stop button on vehicles with KEYLESS-GO.
X Depress and hold the brake pedal.
X Shift the automatic transmission to
position N.
X Release the brake pedal.
X Release the parking brake.
X Switch off the ignition and leave the
SmartKey in the ignition lock. 318
CareMaintenance and care