USB port MERCEDES-BENZ E-CLASS CABRIOLET 2015 Owners Manual
[x] Cancel search | Manufacturer: MERCEDES-BENZ, Model Year: 2015, Model line: E-CLASS CABRIOLET, Model: MERCEDES-BENZ E-CLASS CABRIOLET 2015Pages: 349, PDF Size: 12.51 MB
Page 10 of 349
Rear control panel ........................
.124
Setting the air distribution ............. 128
Setting the air vents ..................... .136
Setting the airflow ......................... 129
Setting the climate mode .............. .128
Setting the temperature ................ 128
Setting the temperature,
THERMATIC ................................... 128
Setting the temperature,
THERMOTRONIC ............................ 128
Switching air-recirculation mode
on/off ............................................ 131
Switching on/off ........................... 125
Switching residual heat on/off ...... 132
Switching the rear window heat-
ing on/off ...................................... 130
Switching the ZONE function on/
off ................................................. .129
THERMATIC automatic climate
control (2-zone) ............................ .124
THERMOTRONIC (3-zone) auto-
matic climate control ..................... 124
Cockpit
Overview .......................................... 29
see Instrument cluster
COLLISION PREVENTION ASSIST
PLUS
Activating/deactivating ................. 221
Display message ............................ 232
Operation/notes .............................. 64
COMAND display
Cleaning ......................................... 301
COMAND Online
Switching on/off ........................... 263
Combination switch .......................... 116
Connecting a USB device
See also Digital Owner's Manual ... 263
Consumption statistics (on-board
computer) .......................................... 216
Controller .......................................... .264
Convenience opening/closing (air-
recirculation mode) ........................... 131
Coolant (engine)
Checking the level ......................... 292
Display message ............................ 238
Important safety notes .................. 341
Temperature gauge ........................ 213
Warning lamp ................................. 259 Cooling
see Climate control
Copyright ............................................. 28
Cornering light function
Display message ............................ 236
Function/notes ............................ .117
Cruise control
Activation conditions ..................... 164
Cruise control lever ....................... 163
Deactivating ................................... 165
Display message ............................ 245
Driving system ............................... 163
Important safety notes .................. 163
LIM indicator lamp ......................... 163
Selecting ........................................ 163
Setting a speed .............................. 165
Storing and maintaining current
speed ............................................. 164
Cup holder
Centre console .............................. 278
Important safety notes .................. 277
Rear compartment ......................... 279 D
Dashboard see Instrument cluster
Data
see Technical data
Data carrier
Selecting ........................................ 218
Data modem mode
Telephone with Bluetooth ®
(SAP
profile) .......................................... .269
Daytime driving lights
Display message ............................ 236
Function/notes ............................ .114
Switching on/off (on-board com-
puter) ............................................. 224
Dealership
see Qualified specialist workshop
Declarations of conformity ................. 26
Delayed switch-off
Exterior lighting (on-board com-
puter) ............................................. 225
Interior lighting .............................. 225
Diagnostics connection ......................26
Diesel .................................................. 339 Index
7
Page 16 of 349
Adaptive Highbeam Assist PLUS .... 117
Automatic headlamp mode ............ 114
Cornering light function ................. 117
Dipped-beam headlamps ............... 115
Driving abroad ............................... 114
Foglamps (extended range) ........... 117
Hazard warning lamps ..................
.116
Headlamp flasher ........................... 116
Light switch ................................... 114
Main-beam headlamps ................... 116
Motorway mode ............................ .117
Parking lamps ................................ 115
Rear foglamp ................................. 115
Setting brightness for display/
switches (on-board computer) ....... 223
Side lamps ..................................... 115
Switching the daytime driving
lights on/off (on-board com-
puter) ............................................. 224
Switching the exterior lighting
delayed switch-off on/off (on-
board computer) ............................ 225
Switching the surround lighting
on/off (on-board computer) .......... 225
Turn signals ................................... 116
see Interior lighting
see Replacing bulbs
LIM indicator lamp
Cruise control ................................ 163
DISTRONIC PLUS ........................... 169
Variable SPEEDTRONIC ................. 166
Limiting the speed
see SPEEDTRONIC
LINGUATRONIC
see Separate operating instructions
Loading guidelines ............................ 272
Locking
see Central locking
Locking (doors)
Automatic ........................................ 82
Emergency locking ........................... 82
From inside (central locking but-
ton) ................................................. .81
Locking centrally
see Central locking
Locking verification signal (on-
board computer) .............................. .226 Luggage cover
see Boot separator
Lumbar support
Adjusting the 4-way lumbar sup-
port ................................................ 104 M
M+S tyres .......................................... .323
Main-beam headlamps
Adaptive Highbeam Assist PLUS .... 117
Changing bulbs .............................. 120
Display message ............................ 236
Switching on/off ........................... 116
Maintenance
see ASSYST PLUS
Manual transmission
Engaging reverse gear ................... 146
Gear leve r...................................... 146
Pulling away ................................... 141
Shift recommendation ................... 147
Starting the engine ........................ 141
Matt finish (cleaning instructions) .. 297
Media Interface
USB port in the armrest of the
centre console ............................... 274
see Separate operating instructions
Memory card (audio) ......................... 218
Memory function ............................... 112
Mercedes-Benz Contact
Display message ............................ 232
Mercedes-Benz emergency call
system
Switch in the overhead control
panel .............................................. 281
Mercedes-Benz Intelligent Drive
360°camera .................................. 192
Active Blind Spot Assist ................. 203
Active Lane Keeping Assist ............ 206
Active Parking Assist ..................... 183
ATTENTION ASSIST ........................ 196
Blind Spot Assist ............................ 200
Cruise control ................................ 163
DISTRONIC PLUS ........................... 168
DISTRONIC PLUS with Steering
Assist and Stop&Go Pilot ............... 176
General notes ................................ 162
Lane Keeping Assist ...................... 202 Index
13
Page 22 of 349
T
Tail lamps Display message ............................ 236
Tank
see Fuel tank
Technical data
Capacities ...................................... 337
Emergency spare wheel ................. 334
Information .................................... 335
Trailer load s................................... 344
Tyres/wheels ................................. 333
Vehicle data ................................... 342
Telephone
Accepting a call (multifunction
steering wheel) .............................. 219
Authorising a mobile phone (con-
necting) ......................................... 266
Connecting a Mobile phone (gen-
eral information) ............................ 266
Display message ............................ 251
Menu (on-board computer) ............ 219
Number from the phone book ........ 220
Redialling ....................................... 220
Rejecting/ending a call ................. 220
See also Digital Owner's Manua l... 263
Switching between mobile
phones ........................................... 267
Telephone compartment ................ 274
Telephone module with Bluetooth ®
(SAP profile) Activating and connecting the
module ........................................... 268
Charging a mobile phone ............... 270
Connecting the mobile phone ........ 269
Connecting the module using a
USB cable ...................................... 268
Data modem mode ........................ 269
Installing the module ..................... 268
Introduction ................................... 267
Saving/deleting the PIN for the
SIM card ........................................ 269
Setting s......................................... 269
SIM card mode .............................. 268
Text messages ............................... 270
Transferring the phone book .......... 269
Temperature
Coolant .......................................... 213 Outside temperature ...................... 213
Setting (climate control
)................ 128
TEMPOMAT
Function/note s............................. 163
Text messages
Telephone module with Blue-
tooth ®
(SAP profile) ....................... 270
Through-loading ................................ 276
TIREFIT kit .......................................... 307
Important safety notes .................. 307
Storage location ............................ 305
Tyre pressure not reached ............. 309
Tyre pressure reached ................... 309
Total distance recorder .................... 215
Tow-away protection
Activating ......................................... 72
Deactivating ..................................... 72
Function ........................................... 72
Tow-starting
Emergency engine starting ............ 318
Important safety notes .................. 315
Towing
Important safety notes .................. 315
Transporting the vehicle ................ 317
With the rear axle raised ................ 317
Towing a trailer
Active Blind Spot Assist ................. 205
Active Lane Keeping Assist ............ 208
Active Parking Assist ..................... 187
Axle load, permissibl e.................... 344
ESP ®
(Electronic Stability Pro-
gram) ............................................... 68
Failure check for LEDs ................... 212
General notes ................................ 209
Trailer tow hitch display message .. 251
Towing away
Fitting the towing ey e.................... 316
Removing the towing eye ............... 317
With both axles on the ground ....... 317
Towing eye ......................................... 305
Traffic Sign Assist
Activating/deactivating the warn-ing function .................................... 221
Display message ............................ 241
Function/note s............................. 197
Important safety notes .................. 198
Instrument cluster display ............. 198 Index
19
Page 23 of 349
Trailer
Folding the ball coupling in/out ..... 210
Trailer coupling
see Towing a trailer
Trailer towing
7-pin connector ............................. 212
Blind Spot Assist ............................ 202
Cleaning the trailer tow hitch ......... 301
Coupling up a traile r...................... 211
Decoupling a trailer ....................... 211
Driving tips .................................... 209
Folding in the ball coupling ............ 211
Folding out the ball coupling .......... 210
Important safety notes .................. 208
Lights display message .................. 236
Mounting dimensions .................... 343
Parktronic ...................................... 181
Power supply ................................. 211
Trailer load s................................... 344
Transmission
see Automatic transmission
see Manual transmission
Transmission position display ......... 147
Transmission position display
(DIRECT SELECT lever) ...................... 147
Transporting the vehicle .................. 317
Trim pieces (cleaning instruc-
tions) .................................................. 302
Trip computer (on-board com-
puter) .................................................. 216
Trip meter
Calling up ....................................... 215
Resetting (on-board computer) ...... 216
Turn signals
Switching on/of f........................... 116
TV
Operating (on-board computer) ..... 219
see Separate operating instructions
Two-way radio
Frequencies ................................... 335
Installation ..................................... 335
Transmission output (maximum) .... 335
Type identification plate
see Vehicle identification plate
Tyre changing tool kit ....................... 305
Tyre inflation compressor
see TIREFIT kit Tyre pressure
Calling up (on-board computer) ..... 326
Display message ............................ 246
Not reached (TIREFIT) .................... 309
Reached (TIREFIT) .......................... 309
Recommended ............................... 324
Tyre pressure loss warning
General notes ................................ 325
Important safety notes .................. 326
Restarting ...................................... 326
Tyre pressure monitor
Checking the tyre pressure elec-
tronically ........................................ 327
Function/note s............................. 326
General notes ................................ 326
Important safety notes .................. 327
Restarting ...................................... 328
Warning lamp ................................. 262
Warning message .......................... 328
Tyres
Changing a whee l.......................... 328
Checking ........................................ 321
Direction of rotation ...................... 329
Display message ............................ 246
Important safety notes .................. 321
Information on driving .................... 321
MOExtended tyre s......................... 323
Replacing ....................................... 329
Service life ..................................... 322
Storing ........................................... 329
Tyre size (data ).............................. 333
Tyre tread ...................................... 322
Wheel and tyre combinations ........ 333
see Flat tyre U
Unlocking Emergency unlocking ....................... 82
From inside the vehicle (central
unlocking button) ............................. 81
USB devices
Connecting to the Media Inter-
face ............................................... 271 V
Vanity mirror (in sun visor) .............. 27920
Index
Page 271 of 349
R
access to the phone book of the mobile phone
(if supported by the mobile phone)
(Y page 269)
R charging a mobile phone via the USB connec-
tion (Y page 270)
i The module is not available in all vehicles,
depending on the equipment.
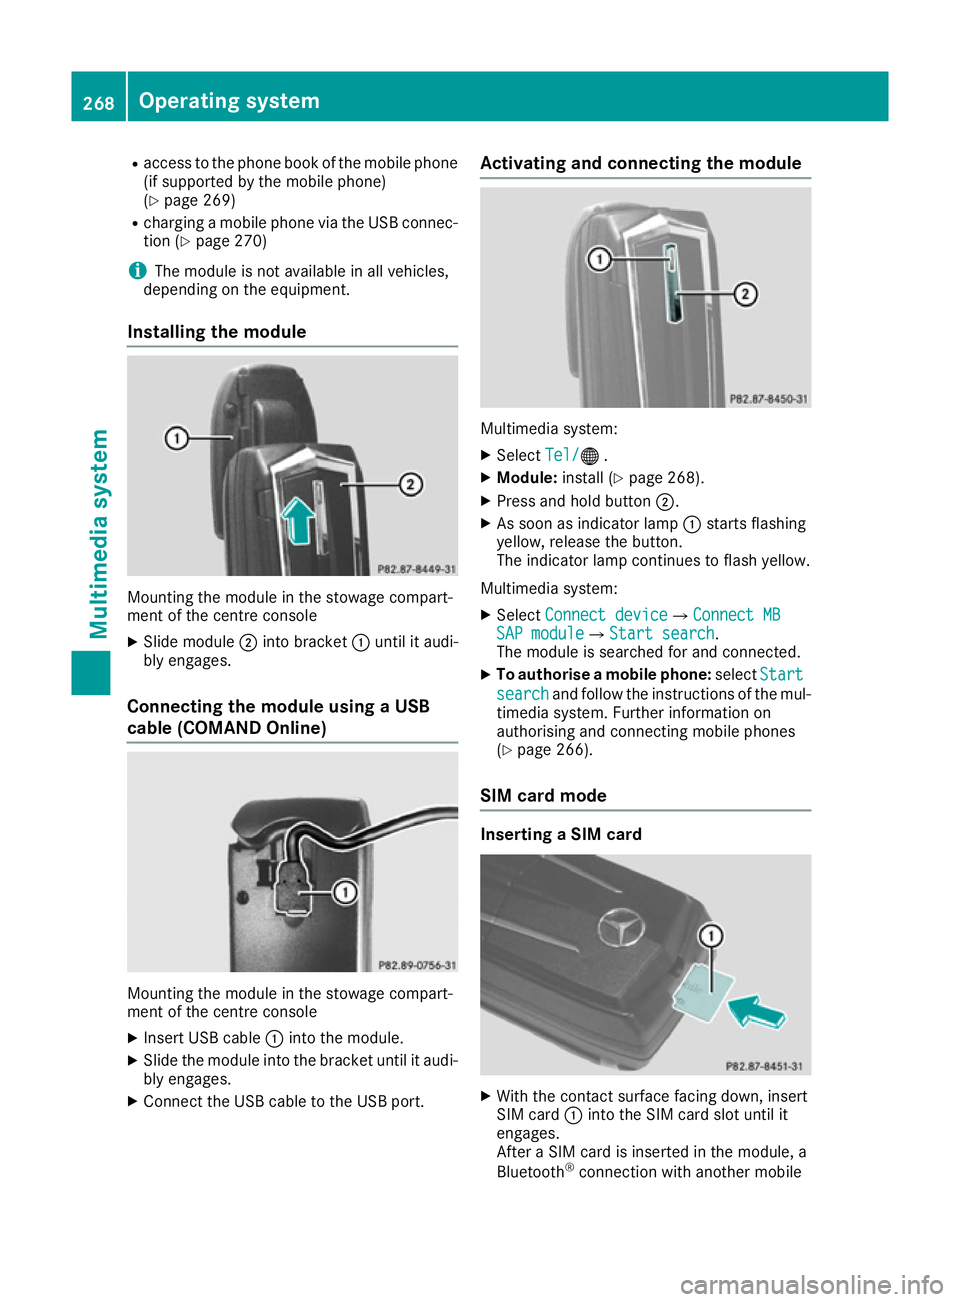
Installing the module Mounting the module in the stowage compart-
ment of the centre console
X Slide module ;into bracket :until it audi-
bly engages.
Connecting the module using a USB
cable (COMAND Online) Mounting the module in the stowage compart-
ment of the centre console
X Insert USB cable :into the module.
X Slide the module into the bracket until it audi-
bly engages.
X Connect the USB cable to the USB port. Activating and connecting the module
Multimedia system:
X Select Tel/ Tel/® .
X Module: install (Y page 268).
X Press and hold button ;.
X As soon as indicator lamp :starts flashing
yellow, release the button.
The indicator lamp continues to flash yellow.
Multimedia system: X Select Connect device Connect device QConnect MBConnect MB
SAP module
SAP module QStart searchStart search .
The module is searched for and connected.
X To authorise a mobile phone: selectStart
Start
search
search and follow the instructions of the mul-
timedia system. Further information on
authorising and connecting mobile phones
(Y page 266).
SIM card mode Inserting a SIM card
X
With the contact surface facing down, insert
SIM card :into the SIM card slot until it
engages.
After a SIM card is inserted in the module, a
Bluetooth ®
connection with another mobile 268
Operating systemMultimedia system
Page 273 of 349
Text messages
Requirements
The module is connected with the mobile phone
(Y page 269) or is being used in the SIM card
mode (Y page 268).
Activating/deactivating text message
downloading from the mobile phone Dial number Function
00080 Text message down-
loading is deactiva-
ted.
00081 Text message down-
loading is activated.
For further information on receiving text mes-
sages when using the telephone module (see
the manufacturer's operating instructions).
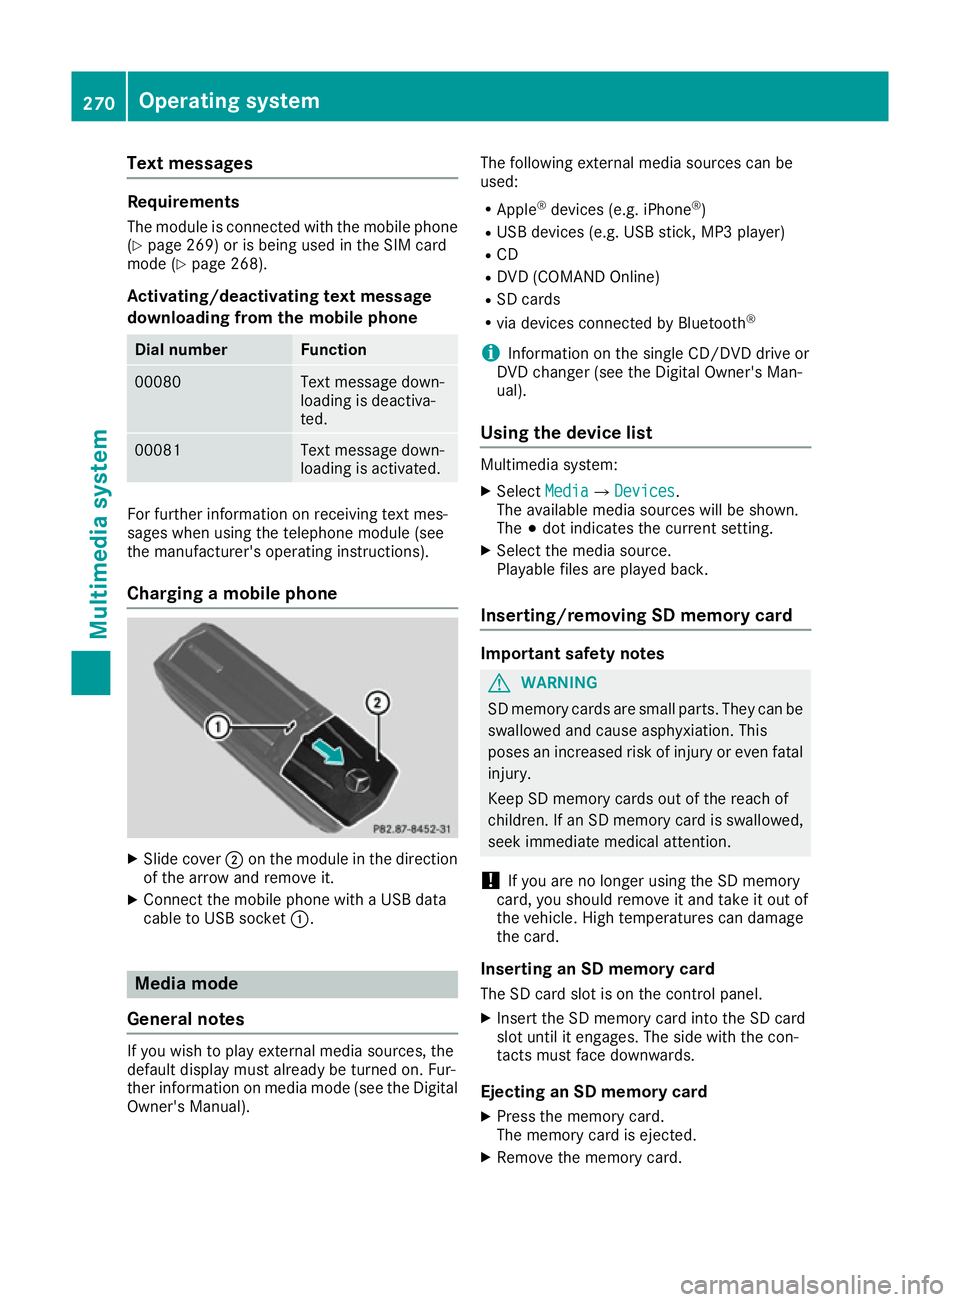
Charging a mobile phone X
Slide cover ;on the module in the direction
of the arrow and remove it.
X Connect the mobile phone with a USB data
cable to USB socket :.Media mode
General notes If you wish to play external media sources, the
default display must already be turned on. Fur-
ther information on media mode (see the Digital
Owner's Manual). The following external media sources can be
used:
R Apple ®
devices (e.g. iPhone ®
)
R USB devices (e.g. USB stick, MP3 player)
R CD
R DVD (COMAND Online)
R SD cards
R via devices connected by Bluetooth ®
i Information on the single CD/DVD drive or
DVD changer (see the Digital Owner's Man-
ual).
Using the device list Multimedia system:
X Select Media MediaQ Devices
Devices.
The available media sources will be shown.
The #dot indicates the current setting.
X Select the media source.
Playable files are played back.
Inserting/removing SD memory card Important safety notes
G
WARNING
SD memory cards are small parts. They can be swallowed and cause asphyxiation. This
poses an increased risk of injury or even fatal injury.
Keep SD memory cards out of the reach of
children. If an SD memory card is swallowed,
seek immediate medical attention.
! If you are no longer using the SD memory
card, you should remove it and take it out of
the vehicle. High temperatures can damage
the card.
Inserting an SD memory card
The SD card slot is on the control panel.
X Insert the SD memory card into the SD card
slot until it engages. The side with the con-
tacts must face downwards.
Ejecting an SD memory card X Press the memory card.
The memory card is ejected.
X Remove the memory card. 270
Operating systemMultimedia system
Page 274 of 349
Connecting USB devices
There are two USB ports in the stowage space
under the armrest.
X Connect the USB device to the USB port.
X Select the media source (Y page 270). Operating system
271Multimedia system Z
Page 277 of 349
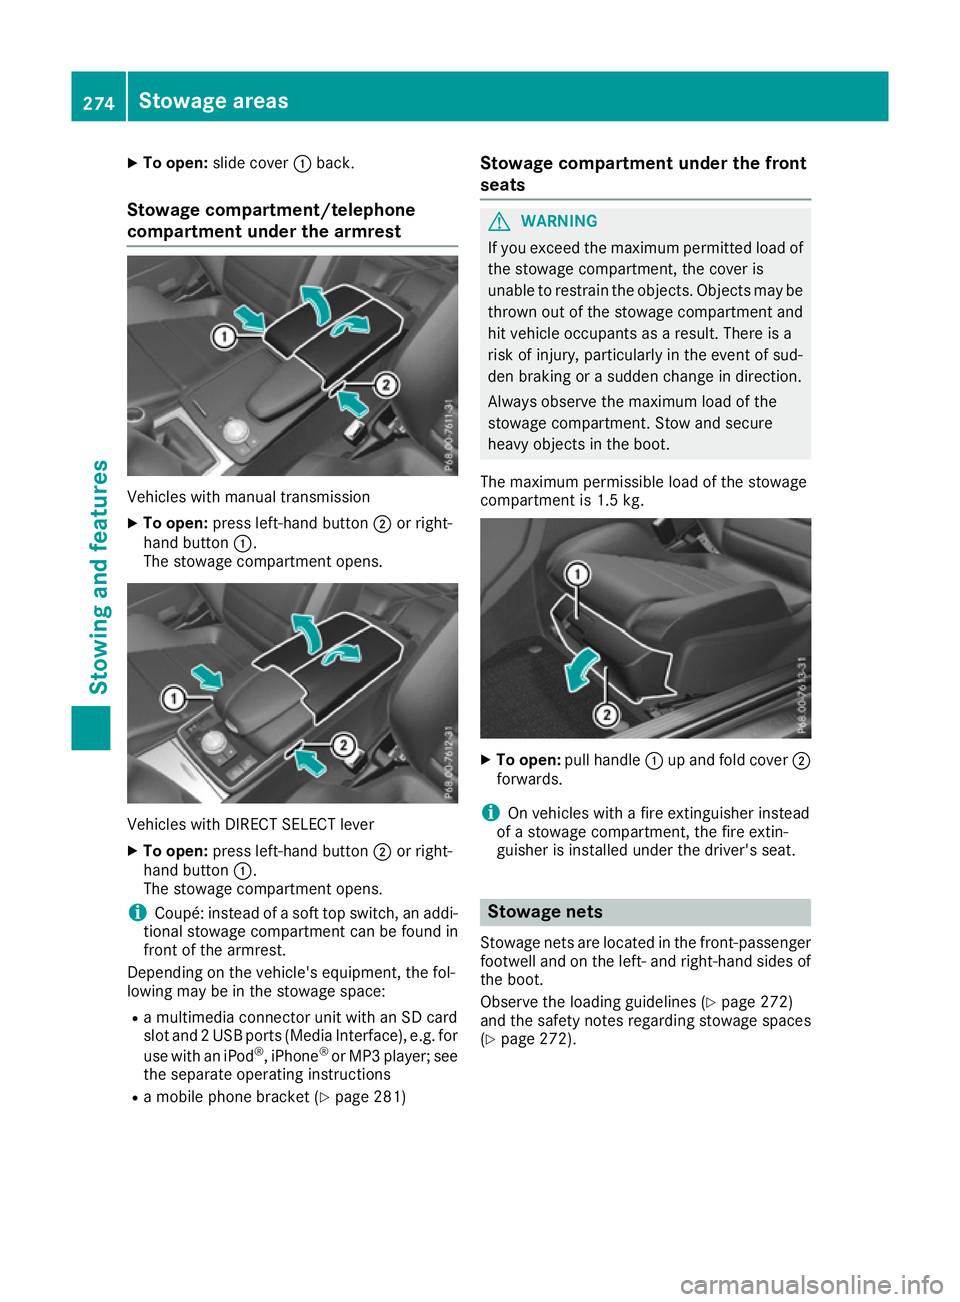
X
To open: slide cover :back.
Stowage compartment/telephone
compartment under the armrest Vehicles with manual transmission
X To open: press left-hand button ;or right-
hand button :.
The stowage compartment opens. Vehicles with DIRECT SELECT lever
X To open: press left-hand button ;or right-
hand button :.
The stowage compartment opens.
i Coupé: instead of a soft top switch, an addi-
tional stowage compartment can be found in
front of the armrest.
Depending on the vehicle's equipment, the fol-
lowing may be in the stowage space:
R a multimedia connector unit with an SD card
slot and 2 USB ports (Media Interface), e.g. for
use with an iPod ®
, iPhone ®
or MP3 player; see
the separate operating instructions
R a mobile phone bracket (Y page 281)Stowage compartment under the front
seats G
WARNING
If you exceed the maximum permitted load of the stowage compartment, the cover is
unable to restrain the objects. Objects may be
thrown out of the stowage compartment and
hit vehicle occupants as a result. There is a
risk of injury, particularly in the event of sud-
den braking or a sudden change in direction.
Always observe the maximum load of the
stowage compartment. Stow and secure
heavy objects in the boot.
The maximum permissible load of the stowage
compartment is 1.5 kg. X
To open: pull handle :up and fold cover ;
forwards.
i On vehicles with a fire extinguisher instead
of a stowage compartment, the fire extin-
guisher is installed under the driver's seat. Stowage nets
Stowage nets are located in the front-passenger footwell and on the left- and right-hand sides of
the boot.
Observe the loading guidelines (Y page 272)
and the safety notes regarding stowage spaces
(Y page 272). 274
Stowage areasSto
wing an d features
Page 285 of 349
An exterior aerial has the following advantages:
R it conducts the electromagnetic fields gener-
ated by a wireless device to the exterior
R the field strength in the vehicle interior is
lower than in a vehicle that does not have an exterior aerial
Information on retrofitting two-way radios and
mobile phones (RF transmitters) (Y page 335).
General notes There are various mobile phone brackets that
may be fitted in your vehicle; in some cases,
these are country-specific.
More information on suitable mobile phones,
mobile phone brackets and on connecting Blue-
tooth ®
-capable mobile phones with the multi-
media system can be obtained:
R at your Mercedes-Benz Service Centre
R on the Internet at http://www.mercedes-
benz.com/connect
The functions and services available when you
use the phone depend on your mobile phone
model and service provider.
Using a mobile phone To connect a mobile phone to the exterior aerial
and charge it, insert it into the mobile phone
bracket.
X Open the telephone compartment
(Y page 274).
X Place the mobile phone bracket into the pre-
installed fitting; see the separate installation
instructions for the mobile phone fitting.
X Insert the mobile phone into the mobile phone
bracket; see the separate installation instruc-
tions for the mobile phone fitting.
i The mobile phone can also be operated
without being in the bracket. However, the
charging function and aerial function are not
available.
In order to use Bluetooth ®
(SAP profile) on your
telephone module, you must first insert the tele-
phone module into the pre-installed fitting. This connects it to the exterior aerial. If you wish to
charge the mobile phone, then you must con-
nect it to a USB port.
Further information on the telephone module
with Bluetooth ®
(SAP profile) can be found in the
Digital Owner's Manual. Operating the mobile phone You can operate the telephone using the
6
and ~ buttons on the multifunction steering
wheel. You can operate other mobile phone
functions via the on-board computer
(Y page 219).
When you remove the key from the ignition lock,
the mobile phone is disconnected from the
hands-free system. Active calls will first be
transferred to the mobile phone directly.
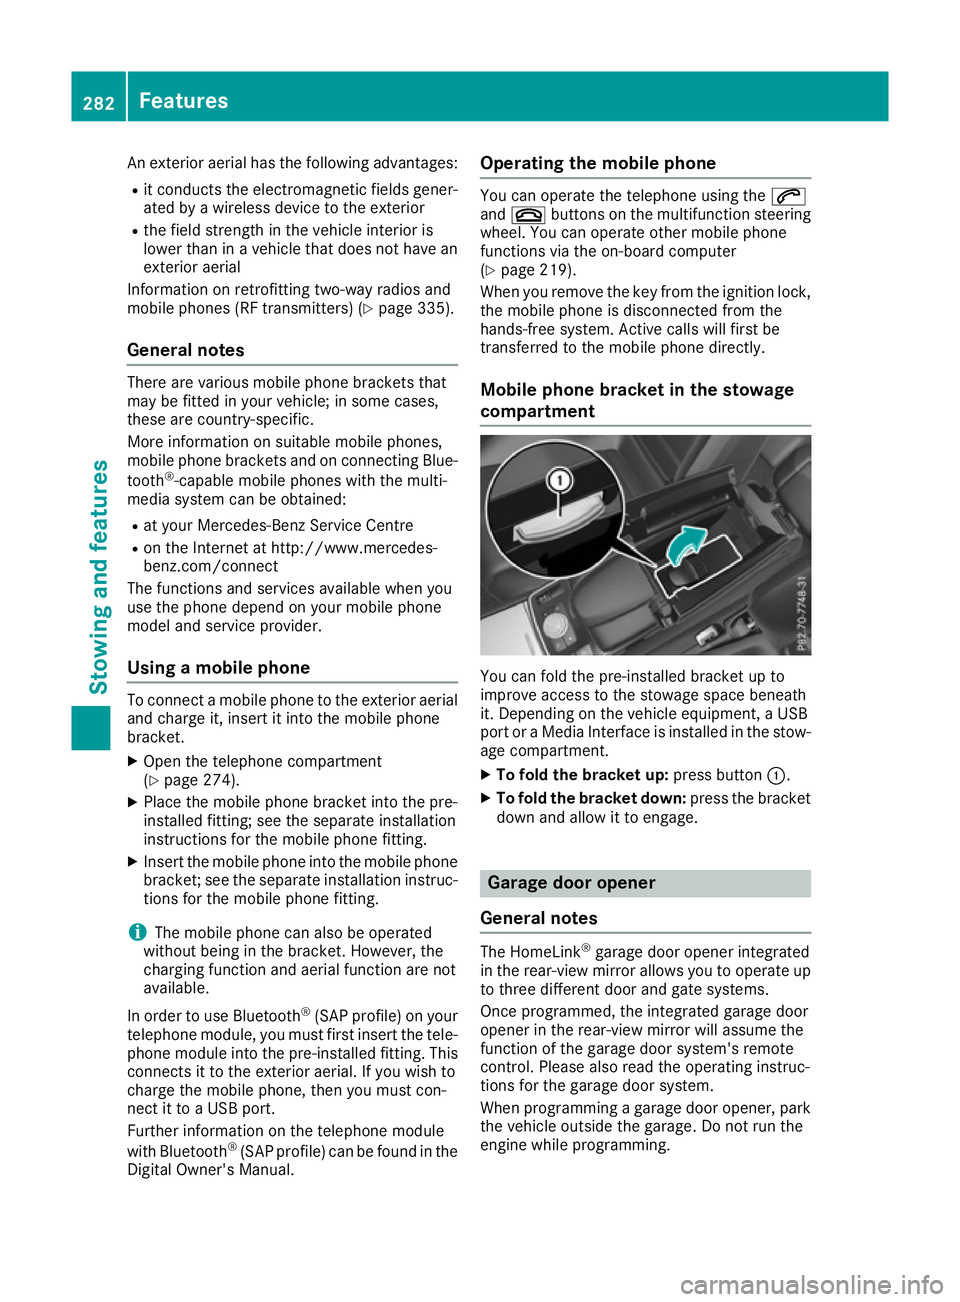
Mobile phone bracket in the stowage
compartment You can fold the pre-installed bracket up to
improve access to the stowage space beneath
it. Depending on the vehicle equipment, a USB
port or a Media Interface is installed in the stow- age compartment.
X To fold the bracket up: press button:.
X To fold the bracket down: press the bracket
down and allow it to engage. Garage door opener
General notes The HomeLink
®
garage door opener integrated
in the rear-view mirror allows you to operate up
to three different door and gate systems.
Once programmed, the integrated garage door
opener in the rear-view mirror will assume the
function of the garage door system's remote
control. Please also read the operating instruc-
tions for the garage door system.
When programming a garage door opener, park
the vehicle outside the garage. Do not run the
engine while programming. 282
FeaturesSto
wing an d features