instrument cluster MERCEDES-BENZ E-Class CABRIOLET 2016 C207 User Guide
[x] Cancel search | Manufacturer: MERCEDES-BENZ, Model Year: 2016, Model line: E-Class CABRIOLET, Model: MERCEDES-BENZ E-Class CABRIOLET 2016 C207Pages: 322, PDF Size: 7.97 MB
Page 43 of 322
regular intervals while the engine is running.
Therefore, malfunctions can be detected in
good time.
The6 restraint system warning lamp in the
instrument cluster lights up when the ignition is
switched on. It goes out no later than a few sec-
onds after the vehicle is started. The compo-
nents of the restraint system are in operational
readiness.
A malfunction has occurred if the 6restraint
system warning lamp:
Rdoes not light up after the ignition is switched
on
Rdoes not go out after a few seconds with the
engine running
Rlights up again while the engine is running
GWARNING
If restraint system is malfunctioning, restraint
system components may be triggered unin-
tentionally or might not be triggered at all in
the event of an accident with a high rate of
vehicle deceleration. This can affect the Emer- gency Tensioning Device or air bag, for exam-
ple. This poses an increased risk of injury or
even fatal injury.
Have the restraint system checked and
repaired in a qualified specialist workshop as
soon as possible.
PASSENGER AIR BAG OFF indicator
lamp
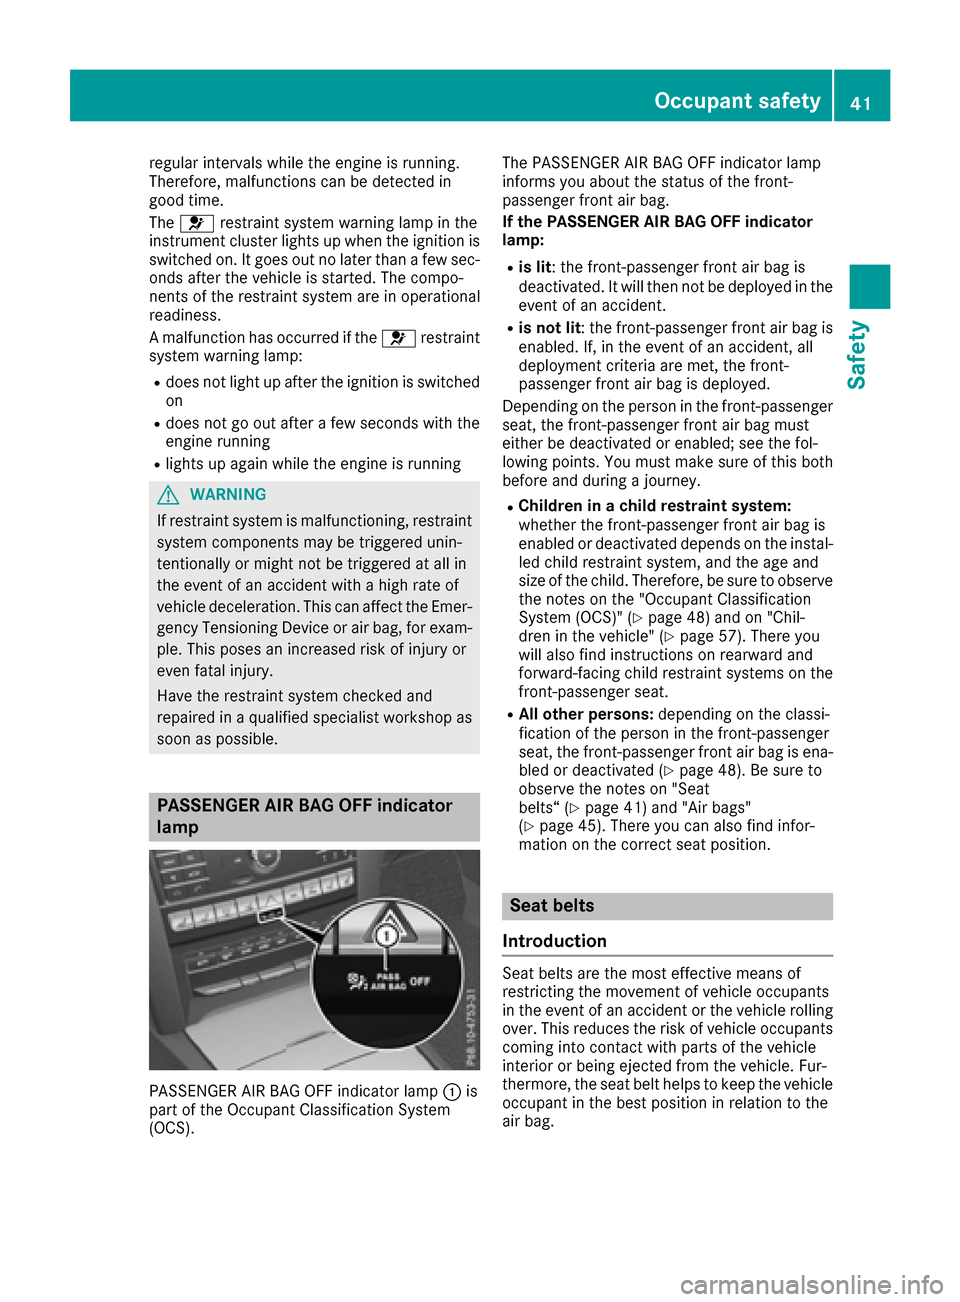
PASSENGER AIR BAG OFF indicator lamp :is
part of the Occupant Classification System
(OCS). The PASSENGER AIR BAG OFF indicator lamp
informs you about the status of the front-
passenger front air bag.
If the PASSENGER AIR BAG OFF indicator
lamp:
Ris lit: the front-passenger front air bag is
deactivated. It will then not be deployed in the
event of an accident.
Ris not lit
: the front-passenger front air bag is
enabled. If, in the event of an accident, all
deployment criteria are met, the front-
passenger front air bag is deployed.
Depending on the person in the front-passenger
seat, the front-passenger front air bag must
either be deactivated or enabled; see the fol-
lowing points. You must make sure of this both
before and during a journey.
RChildren in a child restraint system:
whether the front-passenger front air bag is
enabled or deactivated depends on the instal-
led child restraint system, and the age and
size of the child. Therefore, be sure to observe the notes on the "Occupant Classification
System (OCS)" (
Ypage 48) and on "Chil-
dren in the vehicle" (Ypage 57). There you
will also find instructions on rearward and
forward-facing child restraint systems on the
front-passenger seat.
RAll other persons: depending on the classi-
fication of the person in the front-passenger
seat, the front-passenger front air bag is ena-
bled or deactivated (
Ypage 48). Be sure to
observe the notes on "Seat
belts“ (
Ypage 41) and "Air bags"
(Ypage 45). There you can also find infor-
mation on the correct seat position.
Seat belts
Introduction
Seat belts are the most effective means of
restricting the movement of vehicle occupants
in the event of an accident or the vehicle rolling
over. This reduces the risk of vehicle occupants coming into contact with parts of the vehicle
interior or being ejected from the vehicle. Fur-
thermore, the seat belt helps to keep the vehicle
occupant in the best position in relation to the
air bag.
Occupant safety41
Safety
Z
Page 47 of 322
can no longer fulfill their protective function
and must be replaced. Visit a qualified spe-
cialist workshop.
XPress the release button in the belt buckle,
hold the belt tongue firmly and guide the belt
back.
Seat belt adjustment
The seat-belt adjustment is an integral part of
the PRE-SAFE®convenience function. This func-
tion adjusts the driver's and front-passenger
seat belt to the upper body of the occupants.
The belt strap is tightened slightly when:
Rthe belt tongue is engaged in the buckle when
the seat-belt extender is retracted and
Rthe ignition is switched on
The seat-belt adjustment will apply a certain
retraction force if any slack is detected between
the vehicle occupant and the seat belt. Do not
hold on to the seat belt tightly while it is adjust- ing.
You can switch the seat-belt adjustment on and
off in the on-board computer (
Ypage 201).
Belt warning for the driver and front
passenger
The 7 seat belt warning lamp in the instru-
ment cluster is a reminder that all vehicle occu-
pants must wear their seat belts. It may light up
continuously or flash. In addition, there may be
a warning tone.
Regardless of whether the driver's seat belt has
already been fastened, the 7seat belt warn-
ing lamp lights up for six seconds each time the
engine is started. If, after six seconds, the driver
or front-passenger seat belt has not been fas-
tened and the doors are closed, the 7seat
belt warning lamp lights up. As soon as the driv- er's and front-passenger seat belts are fastened
or a front door is opened again, the 7seat
belt warning lamp goes out.
If the driver's seat belt is not fastened after the
engine is started, an additional warning tone will
sound. The warning tone switches off after six
seconds or once the driver's seat belt is fas-
tened.
If the vehicle's speed exceeds 15 mph
(25 km/h) once and the driver's and front-
passenger seat belts are not fastened, a warning tone sounds. A warning tone also sounds with increasing intensity for 60 seconds or until the
driver or front passenger have fastened their
seat belts.
If the driver or front passenger unfasten their
seat belts during the journey, the seat belt warn-
ing is activated again.
iMore information on the 7seat belt
warning lamp can be found under "Warning
and indicator lamps in the instrument cluster,
seat belt" (
Ypage 225).
Air bags
Introduction
The air bag installation point is identified by the
label AIR BAG.
An air bag supplements a correctly fastened
seat belt. However, it is not intended as a sub-
stitute for the seat belt. Air bags provide addi-
tional protection in the event of an accident.
Not all air bags are deployed in an accident. The
various air bag systems work independently of
each other (
Ypage 53).
There is, however, no system available today
that can completely rule out injury or death.
It is also not possible to rule out a risk of injury
caused by an air bag due to the high speed at
which the air bag must be deployed.
Important safety notes
GWARNING
If you do not sit in the correct seat position,
the air bag cannot protect as intended and
could even cause additional injury when
deployed. This poses an increased risk of
injury or even fatal injury.
To avoid hazardous situations, always make
sure that all of the vehicle's occupants:
Rhave fastened their seat belts correctly,
including pregnant women
Rare sitting correctly and maintain the great-
est possible distance to the air bags
Rfollow the following instructions
Always make sure that there are no objects
between the air bag and the vehicle's occu-
pants.
Occupant safety45
Safety
Z
Page 51 of 322
Prerequisites
To be classified correctly, the front passenger
must sit:
Rwith the seat belt fastened correctly
Rin an almost upright position with their back
against the seat backrest
Rwith their feet resting on the floor, if possible
If the front passenger does not observe these
conditions, OCS may produce a false classifica-
tion, e.g. because the front passenger:
Rtransfers their weight by supporting them-
selves on a vehicle armrest
Rsits in such a way that their weight is raised
from the seat cushion
If it is absolutely necessary to install a child
restraint system on the front-passenger seat, be
sure to observe the correct positioning of the
child restraint system. Never place objects
under or behind the child restraint system, e.g.
cushions. The entire base of the child restraint
system must always rest on the seat cushion of the front-passenger seat. The backrest of the
forward-facing child restraint system must lie as
flat as possible against the backrest of the front-
passenger seat.
The child restraint system must not touch the
roof or be subjected to a load by the head
restraint. Adjust the angle of the seat backrest
and the head restraint position accordingly.
Only then can OCS be guaranteed to function
correctly. Always observe the child restraint sys-
tem manufacturer's installation instructions.
Occupant Classification System opera-
tion (OCS)
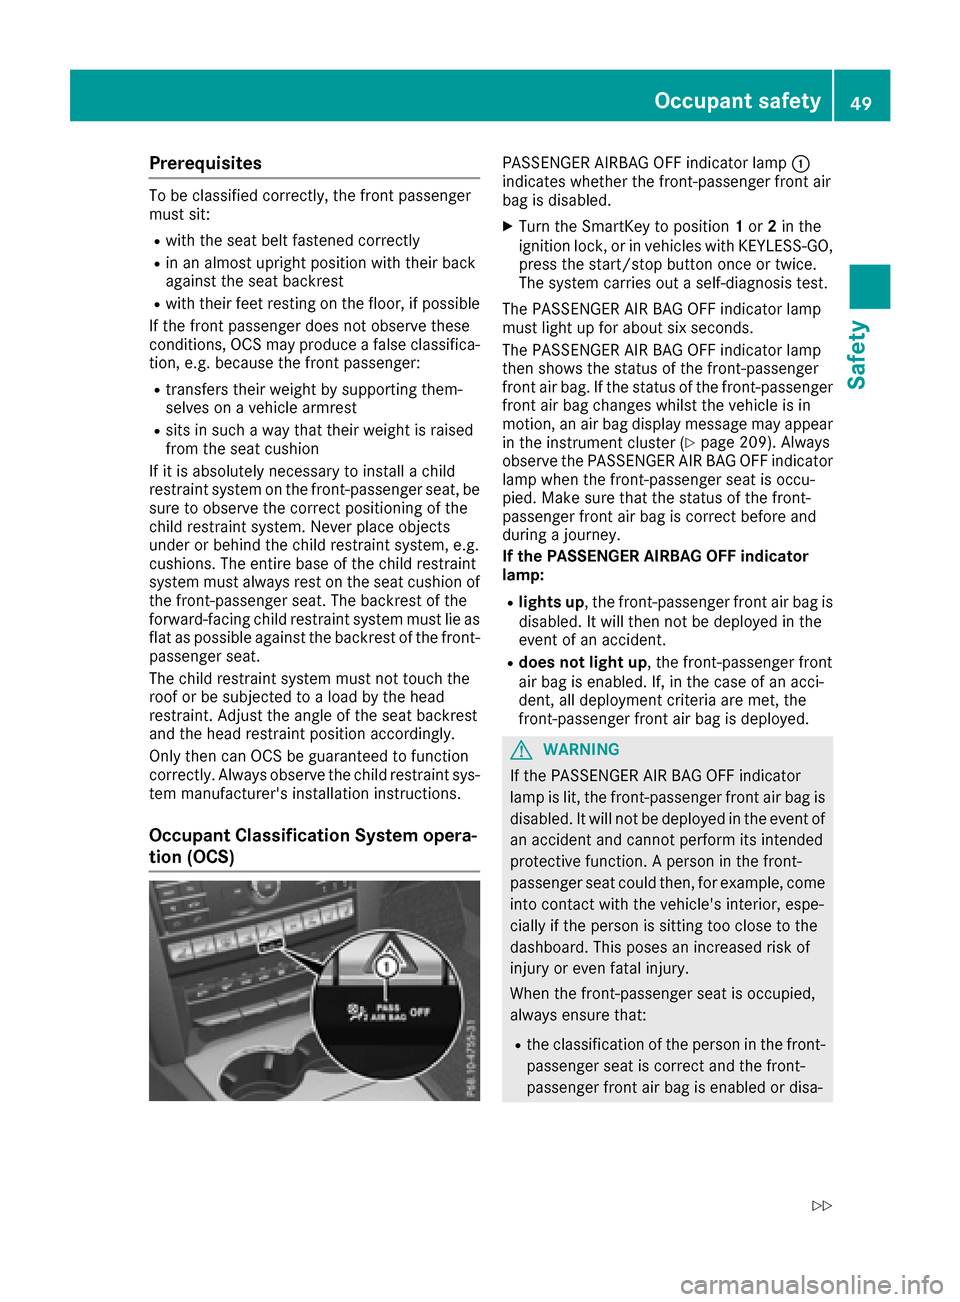
PASSENGER AIRBAG OFF indicator lamp :
indicates whether the front-passenger front air
bag is disabled.
XTurn the SmartKey to position 1or 2in the
ignition lock, or in vehicles with KEYLESS-GO,
press the start/stop button once or twice.
The system carries out a self-diagnosis test.
The PASSENGER AIR BAG OFF indicator lamp
must light up for about six seconds.
The PASSENGER AIR BAG OFF indicator lamp
then shows the status of the front-passenger
front air bag. If the status of the front-passenger
front air bag changes whilst the vehicle is in
motion, an air bag display message may appear
in the instrument cluster (
Ypage 209). Always
observe the PASSENGER AIR BAG OFF indicator
lamp when the front-passenger seat is occu-
pied. Make sure that the status of the front-
passenger front air bag is correct before and
during a journey.
If the PASSENGER AIRBAG OFF indicator
lamp:
Rlights up, the front-passenger front air bag is
disabled. It will then not be deployed in the
event of an accident.
Rdoes not light up, the front-passenger front
air bag is enabled. If, in the case of an acci-
dent, all deployment criteria are met, the
front-passenger front air bag is deployed.
GWARNING
If the PASSENGER AIR BAG OFF indicator
lamp is lit, the front-passenger front air bag is
disabled. It will not be deployed in the event of
an accident and cannot perform its intended
protective function. A person in the front-
passenger seat could then, for example, come
into contact with the vehicle's interior, espe-
cially if the person is sitting too close to the
dashboard. This poses an increased risk of
injury or even fatal injury.
When the front-passenger seat is occupied,
always ensure that:
Rthe classification of the person in the front- passenger seat is correct and the front-
passenger front air bag is enabled or disa-
Occupant safety49
Safety
Z
Page 52 of 322
bled in accordance with the person in the
front-passenger seat
Rthe front-passenger seat has been moved
back as far back as possible.
Rthe person is seated correctly.
Make sure, both before and during the jour-
ney, that the status of the front-passenger
front air bag is correct.
GWARNING
If you secure a child in a child restraint system on the front-passenger seat and the
PASSENGER AIR BAG OFF indicator lamp is
off, the front-passenger front air bag can
deploy in the event of an accident. The child
could be struck by the air bag. This poses an
increased risk of injury or even fatal injury.
Make sure that the front-passenger front air
bag has been disabled. The PASSENGER AIR
BAG OFF indicator lamp must be lit.
GWARNING
If you secure a child in a forward-facing child
restraint system on the front-passenger seat
and you position the front-passenger seat too close to the dashboard, in the event of an
accident, the child could:
Rcome into contact with the vehicle's inte-
rior if the PASSENGER AIR BAG OFF indi-
cator lamp is lit, for example
Rbe struck by the air bag if the PASSENGER
AIR BAG OFF indicator lamp is off
This poses an increased risk of injury or even fatal injury.
Move the front-passenger seat as far back as
possible. Always make sure that the shoulder belt strap is correctly routed from the vehicle
seat-belt extender to the shoulder belt guide
on the child restraint system. The shoulder
belt strap must be routed forwards and down-
wards from the retracted vehicle seat-belt
extender. If necessary, adjust the front-
passenger seat accordingly. Always observe
the child restraint system manufacturer's
installation instructions. If OCS detects that:
Rthe front-passenger seat is not occupied, the
PASSENGER AIR BAG OFF indicator lamp
lights up continuously after the system's self-
diagnosis test. This indicates that the front-
passenger front air bag is deactivated.
Rthe front-passenger seat is occupied by a
child aged up to twelve months in a standard
child restraint system, the PASSENGER AIR
BAG OFF indicator lamp lights up continu-
ously after the system's self-diagnosis test.
This indicates that the front-passenger front
air bag is deactivated.
In the case of a twelve-month-old child in a
standard child restraint system, the
PASSENGER AIR BAG OFF indicator lamp may
go out after the system's self-diagnosis test.
This indicates that the front-passenger front
air bag is activated. Categorization is depend- ent on the type of child restraint system and
the stature of the child, for example. In this
case, always in
stall the child restraint system
on a suitable rear seat.
Rthe front-passenger seat is occupied by a per-
son of smaller stature (e.g. a teenager or a
small adult), the PASSENGER AIR BAG OFF
indicator lamp lights up continuously or goes
off after the system's self-diagnosis test
depending on the categorization.
-If the PASSENGER AIR BAG OFF indicator
lamp is off, position the front-passenger
seat as far back as possible. Alternatively, a
person of smaller stature can sit on a rear
seat.
-If the PASSENGER AIR BAG OFF indicator
lamp lights up, a person of smaller stature
should not sit on the front-passenger seat.
Rthe front-passenger seat is occupied by an
adult or a person of an appropriate size, the
PASSENGER AIR BAG OFF indicator lamp
goes out after the system's self-diagnosis
test. This indicates that the front-passenger
front air bag is activated.
If children are traveling in the vehicle, be sure to
observe the notes on "Children in the vehicle"
(
Ypage 57).
If the OCS is malfunctioning, both the red 6
restraint system warning lamp in the instrument
cluster and the PASSENGER AIR BAG OFF indi-
cator lamp light up simultaneously. In this case,
the front-passenger air bag is deactivated and
does not deploy during an accident. Have the
system checked by qualified technicians as
50Occupant safety
Safety
Page 64 of 322
weather conditions and maintain a safe distance
from the vehicle in front. Drive carefully.
The driving safety systems described only work
as effectively as possible when there is ade-
quate contact between the tires and the road
surface. Please pay special attention to the
notes on tires, recommended minimum tire
tread depths, etc. (
Ypage 285).
In wintry driving conditions, always use winter
tires (M+S tires) and if necessary, snow chains.
Only in this way will the driving safety systems
described in this section work as effectively as
possible.
ABS (Anti-lock Braking System)
General information
ABS regulates brake pressure in such a way that
the wheels do not lock when you brake. This
allows you to continue steering the vehicle when
braking.
The ! ABS warning lamp in the instrument
cluster lights up when the ignition is switched
on. It goes out when the engine is running.
ABS works from a speed of about 5 mph
(8 km/h), regardless of road-surface conditions.
ABS works on slippery surfaces, even when you
only brake gently.
Important safety notes
iObserve the "Important safety notes" sec-
tion (Ypage 61).
GWARNING
If ABS is faulty, the wheels could lock when
braking. The steerability and braking charac-
teristics may be severely impaired. Addition-
ally, further driving safety systems are deac-
tivated. There is an increased danger of skid-
ding and accidents.
Drive on carefully. Have ABS checked imme-
diately at a qualified specialist workshop.
When ABS is malfunctioning, other systems,
including driving safety systems, will also
become inoperative. Observe the information
on the ABS warning lamp (
Ypage 227) and dis-
play messages which may be shown in the
instrument cluster (
Ypage 203).
Braking
XIf ABS intervenes: continue to depress the
brake pedal vigorously until the braking sit-
uation is over.
XTo make a full brake application: depress
the brake pedal with full force.
If ABS intervenes when braking, you will feel a
pulsing in the brake pedal.
The pulsating brake pedal can be an indication
of hazardous road conditions, and functions as a
reminder to take extra care while driving.
BAS (Brake Assist System)
General information
BAS operates in emergency braking situations.
If you depress the brake pedal quickly, BAS
automatically boosts the braking force, thus
shortening the stopping distance.
Important safety notes
iObserve the "Important safety notes" sec-
tion (Ypage 61).
GWARNING
If BAS is malfunctioning, the braking distance
in an emergency braking situation is
increased. There is a risk of an accident.
In an emergency braking situation, depress
the brake pedal with full force. ABS prevents
the wheels from locking.
Braking
XKeep the brake pedal firmly depressed until
the emergency braking situation is over.
ABS prevents the wheels from locking.
The brakes will function as usual once you
release the brake pedal. BAS is deactivated.
BAS PLUS (Brake Assist PLUS) with
Cross-Traffic Assist
General information
BAS PLUS can help you to minimize the risk of a
collision with a vehicle or a pedestrian and
reduce the effects of such a collision. If BAS
62Driving safety systems
Safety
Page 69 of 322
ESP®assists the driver when pulling away on
wet or slippery roads. ESP®can also stabilize
the vehicle during braking.
ETS (Electronic Traction System)
ETS traction control is part of ESP®.
Traction control brakes the drive wheels indi-
vidually if they spin. This enables you to pull
away and accelerate on slippery surfaces, for
example if the road surface is slippery on one
side. In addition, more drive torque is transfer-
red to the wheel or wheels with traction.
Traction control remains active, even if you
deactivate ESP
®.
Important safety notes
iObserve the "Important safety notes" sec-
tion (Ypage 61).
GWARNING
If ESP
®is malfunctioning, ESP®is unable to
stabilize the vehicle. Additionally, further driv-
ing safety systems are deactivated. This
increases the risk of skidding and an accident.
Drive on carefully. Have ESP
®checked at a
qualified specialist workshop.
When towing the vehicle with the rear axle
raised, observe the notes on ESP
®
(Ypage 282).
If the å ESP®OFF warning lamp lights up
continuously, then ESP®is deactivated.
If the ÷ ESP®warning lamp and the å
ESP®OFF warning lamp are lit continuously,
ESP®is not available due to a malfunction.
Observe the information on warning lamps
(
Ypage 227) and display messages which may
be shown in the instrument cluster
(
Ypage 203).
iOnly use wheels with the recommended tire
sizes. Only then will ESP®function properly.
Characteristics of ESP®
General information
If the ÷ ESP warning lamp goes out before
beginning the journey, ESP®is automatically
active. If ESP
®intervenes, the
÷ESP®warning lamp
flashes in the instrument cluster.
If ESP
®intervenes:
XDo not deactivate ESP®under any circum-
stances.
XOnly depress the accelerator pedal as far as
necessary when pulling away.
XAdapt your driving style to suit the prevailing
road and weather conditions.
ECO start/stop function
The ECO start/stop function switches the
engine off automatically when the vehicle stops
moving. The engine starts automatically when
the driver wants to pull away again. ESP
®
remains in its previously selected status. Exam-
ple: if ESP®was deactivated before the engine
was switched off, ESP®remains deactivated
when the engine is switched on again.
Deactivating/activating ESP®
Important safety notes
You can select between the following states of
ESP®:
RESP®is activated.
RESP®is deactivated.
GWARNING
If you deactivate ESP
®, ESP®no longer sta-
bilizes the vehicle. There is an increased risk
of skidding and an accident.
Only deactivate ESP
®in the situations descri-
bed in the following.
It may be best to deactivate ESP
®in the follow-
ing situations:
Rwhen using snow chains
Rin deep snow
Ron sand or gravel
iActivate ESP®as soon as the situations
described above no longer apply. ESP®will
otherwise not be able to stabilize the vehicle if
the vehicle starts to skid or a wheel starts to
spin.
!Avoid spinning the driven wheels for an
extended period with ESP®deactivated. You
could otherwise damage the drivetrain.
Driving safet ysystem s67
Safety
Z
Page 72 of 322
Always pay careful attention to the traffic sit-uation and be ready to brake.
In the event of snowfall or heavy rain, the rec-
ognition can be impaired.
Recognition by the radar sensor system is also
impaired if:
Rthere is dirt on the sensors or anything else
covering the sensors
Rthere is interference by other radar sources
Rthere are strong radar reflections, for exam-
ple in parking garages
Ra narrow vehicle is traveling in front, e.g. a
motorbike
Ra vehicle is traveling in front on a different line
relative to the center of your vehicle
Recognition by the camera system is also
impaired in the event of:
Rdirt on the camera or if the camera is covered
Rglare on the camera system, e.g. from the sun being low in the sky
Rdarkness
Ror if:
-pedestrians move quickly, e.g. into the path
of the vehicle
-the camera system no longer recognizes a
pedestrian as a person due to special cloth-ing or other objects
-a pedestrian is concealed by other objects
-the typical outline of a person is not distin-
guishable from the background
Following damage to the front end of the vehicle,
have the configuration and operation of the
radar sensors checked at a qualified specialist
workshop . T
his also applies to collisions at slow
speeds where there is no visible damage to the
front of the vehicle.
Following damage to the windshield, have the
configuration and operation of the camera sys-
tem checked at a qualified specialist workshop.
Function
XTo activate/deactivate: activate or deacti-
vate PRE-SAFE®Brake in the on-board com-
puter (Ypage 197).
If the PRE-SAFE®Brake is not activated, the
æ symbol appears in the multifunction dis-
play. Starting at a speed of around 4 mph (7 km/h),
this function warns you if you rapidly approach a
vehicle in front. An intermittent warning tone
will then sound and the
·distance warning
lamp will light up in the instrument cluster.
XBrake immediately to defuse the situation.
or
XTake evasive action provided it is safe to do
so.
PRE-SAFE
®Brake can also brake the vehicle
automatically under the following conditions:
Rthe driver and front-passenger have their seat
belts fastened
and
Rthe vehicle speed is between approximately
4 mph (7 km/h) and 124 mph (200 km/h)
At speeds of up to approximately 44 mph
(70 km/h) PRE-SAFE
®Brake can also detect:
Rstationary objects in the path of your vehicle,
e.g. stopped or parked vehicles
Rpedestrians in the path of your vehicle
iIf there is an increased risk of a collision,
preventive passenger protection measures
(PRE-SAFE
®) are triggered (Ypage 55).
If the risk of collision with the vehicle in front
remains and you do not bra ke, ta
ke evasive
action or accelerate significantly, the vehicle
may perform automatic emergency braking, up
to the point of full brake application. Automatic
emergency braking is not performed until imme-
diately prior to an imminent accident.
You can prevent the intervention of the PRE-
SAFE
®Brake at any time by:
Rdepressing the accelerator pedal further.
Ractivating kickdown.
Rreleasing the brake pedal.
The braking action of PRE-SAFE®Brake is ended
automatically if:
Ryou maneuver to avoid the obstacle.
Rthere is no longer a risk of collision.
Rthere is no longer an obstacle detected in
front of your vehicle.
70Driving safety systems
Safety
Page 98 of 322
Correct driver's seat position
GWARNING
You could lose control of your vehicle if you do the following while driving:
Radjust the driver's seat, head restraint,
steering wheel or mirrors
Rfasten the seat belt
There is a risk of an accident.
Adjust the driver's seat, head restraint, steer-
ing wheel and mirror and fasten your seat belt before starting the engine.
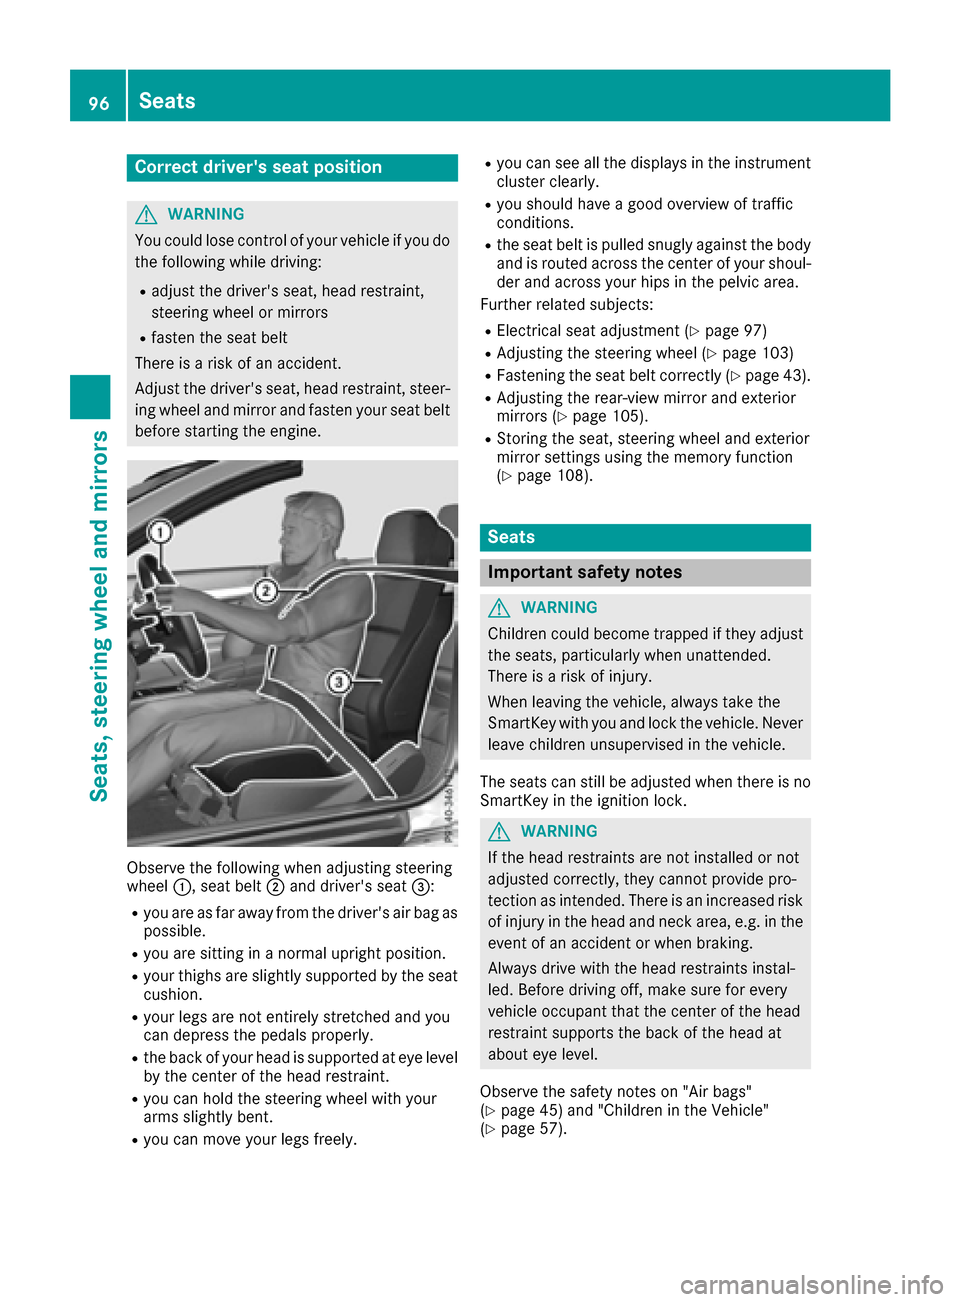
Observe the following when adjusting steering
wheel :, seat belt ;and driver's seat =:
Ryou are as far away from the driver's air bag as
possible.
Ryou are sitting in a normal upright position.
Ryour thighs are slightly supported by the seat
cushion.
Ryour legs are not entirely stretched and you
can depress the pedals properly.
Rthe back of your head is supported at eye level
by the center of the head restraint.
Ryou can hold the steering wheel with your
arms slightly bent.
Ryou can move your legs freely.
Ryou can see all the displays in the instrument
cluster clearly.
Ryou should have a good overview of traffic
conditions.
Rthe seat belt is pulled snugly against the bodyand is routed across the center of your shoul-
der and across your hips in the pelvic area.
Further related subjects:
RElectrical seat adjustment (Ypage 97)
RAdjusting the steering wheel (Ypage 103)
RFastening the seat belt correctly (Ypage 43).
RAdjusting the rear-view mirror and exterior
mirrors (Ypage 105).
RStoring the seat, steering wheel and exterior
mirror settings using the memory function
(
Ypage 108).
Seats
Important safety notes
GWARNING
Children could become trapped if they adjust
the seats, particularly when unattended.
There is a risk of injury.
When leaving the vehicle, always take the
SmartKey with you and lock the vehicle. Never
leave children unsupervised in the vehicle.
The seats can still be adjusted when there is no
SmartKey in the ignition lock.
GWARNING
If the head restraints are not installed or not
adjusted correctly, they cannot provide pro-
tection as intended. There is an increased risk
of injury in the head and neck area, e.g. in the event of an accident or when braking.
Always drive with the head restraints instal-
led. Before driving off, make sure for every
vehicle occupant that the center of the head
restraint supports the back of the head at
about eye level.
Observe the safety notes on "Air bags"
(
Ypage 45) and "Children in the Vehicle"
(Ypage 57).
96Seats
Seats, steering wheel and mirrors
Page 111 of 322
Exterior lighting
General notes
For reasons of safety, Mercedes-Benz recom-
mends that you drive with the lights switched on
even during the daytime. Therefore, your vehicle
is equipped with special daytime running lamps.
In some countries, operation of the headlamps
varies due to legal requirements and self-
imposed obligations.
If you wish to drive during the daytime without
lights, switch off the daytime running lamps
function in the on-board computer
(
Ypage 199).
Setting the exterior lighting
Setting options
Exterior lighting can be set using:
Rthe light switch
Rthe combination switch (Ypage 110)
Rthe on-board computer (Ypage 199)
Light switch
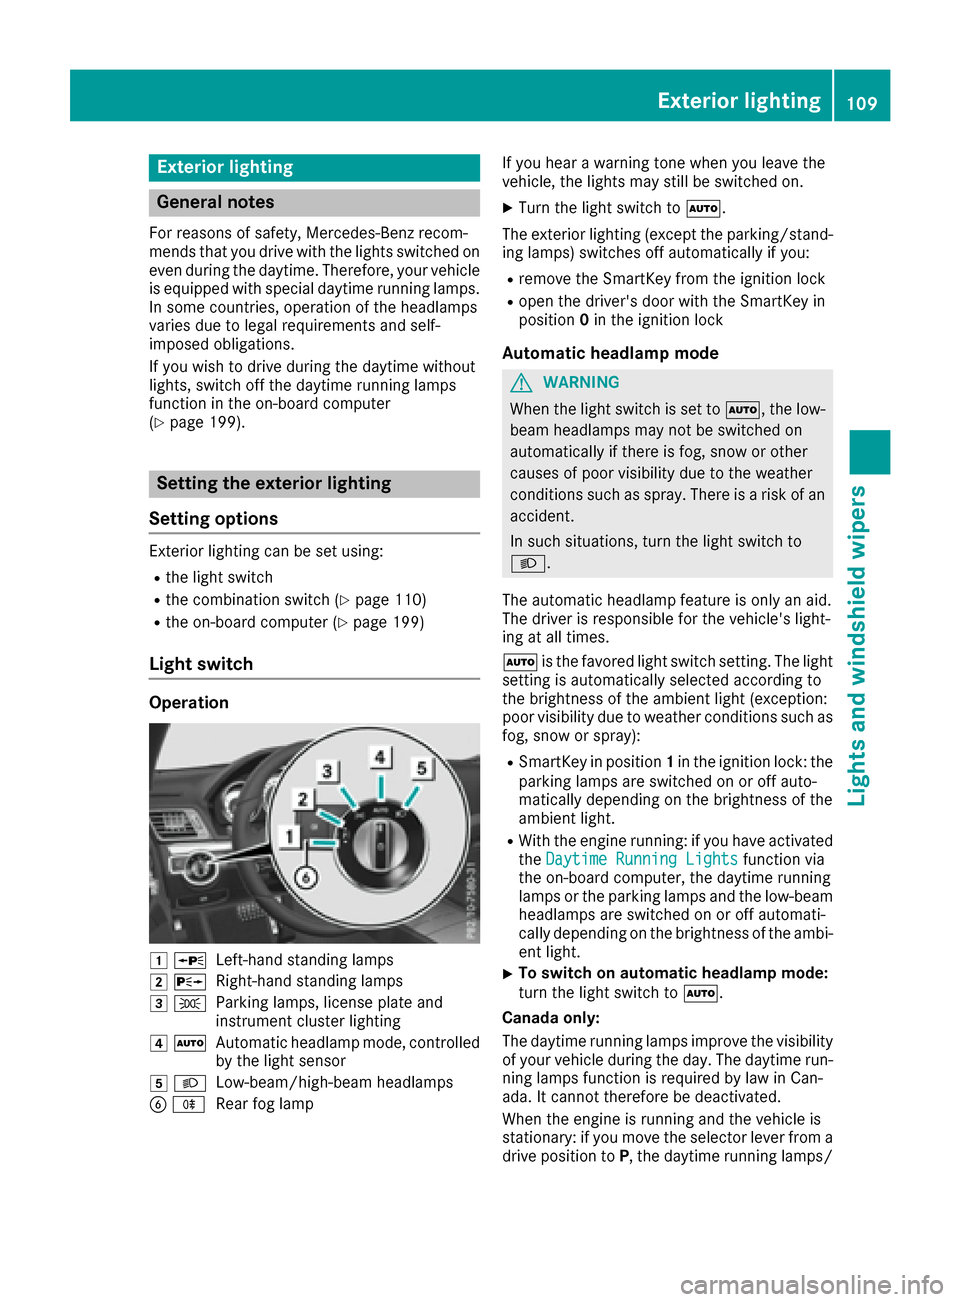
Operation
1 WLeft-hand standing lamps
2XRight-hand standing lamps
3TParking lamps, license plate and
instrument cluster lighting
4ÃAutomatic headlamp mode, controlled
by the light sensor
5 LLow-beam/high-beam headlamps
BRRear fog lamp If you hear a warning tone when you leave the
vehicle, the lights may still be switched on.
XTurn the light switch to
Ã.
The exterior lighting (except the parking/stand-
ing lamps) switches off automatically if you:
Rremove the SmartKey from the ignition lock
Ropen the driver's door with the SmartKey in
position 0in the ignition lock
Automatic headlamp mode
GWARNING
When the light switch is set to Ã, the low-
beam headlamps may not be switched on
automatically if there is fog, snow or other
causes of poor visibility due to the weather
conditions such as spray. There is a risk of an
accident.
In such situations, turn the light switch to
L.
The automatic headlamp feature is only an aid.
The driver is responsible for the vehicle's light-
ing at all times.
à is the favored light switch setting. The light
setting is automatically selected according to
the brightness of the ambient light (exception:
poor visibility due to weather conditions such as
fog, snow or spray):
RSmartKey in position 1in the ignition lock: the
parking lamps are switched on or off auto-
matically depending on the brightness of the
ambient light.
RWith the engine running: if you have activated
the Daytime Running Lightsfunction via
the on-board computer, the daytime running
lamps or the parking lamps and the low-beam
headlamps are switched on or off automati-
cally depending on the brightness of the ambi- ent light.
XTo switch on automatic headlamp mode:
turn the light switch to Ã.
Canada only:
The daytime running lamps improve the visibility
of your vehicle during the day. The daytime run- ning lamps function is required by law in Can-
ada. It cannot therefore be deactivated.
When the engine is running and the vehicle is
stationary: if you move the selector lever from a
drive position to P, the daytime running lamps/
Exterior lighting109
Lights and windshield wipers
Z
Page 114 of 322
vehicle, and consequently switches the head-
lamps from high beam to low beam.
The system automatically adapts the low-beam
headlamp range depending on the distance to
the other vehicle. Once the system no longer
detects any other vehicles, it reactivates the
high-beam headlamps.
The system's optical sensor is located behind
the windshield near the overhead control panel.
Important safety notes
GWARNING
Adaptive Highbeam Assist does not recognize
road users:
Rwho have no lights, e.g. pedestrians
Rwho have poor lighting, e.g. cyclists
Rwhose lighting is blocked, e.g. by a barrier
In very rare cases, Adaptive Highbeam Assist
may fail to recognize other road users that
have lights, or may recognize them too late. In this or similar situations, the automatic high-
beam headlamps will not be deactivated or
activated regardless. There is a risk of an acci-
dent.
Always carefully observe the traffic conditions
and switch off the high-beam headlamps in
good time.
Adaptive Highbeam Assist cannot take into
account road, weather or traffic conditions.
Adaptive Highbeam Assist is only an aid. You are responsible for adjusting the vehicle's lighting
to the prevailing light, visibility and traffic con-
ditions.
In particular, the detection of obstacles can be
restricted if there is:
Rpoor visibility, e.g. due to fog, heavy rain or
snow
Rdirt on the sensors or the sensors are
obscured
Switching Adaptive Highbeam Assist
on/off
XTo switch on: turn the light switch to Ã.
XPress the combination switch beyond the
pressure point in the direction of arrow :.
The _ indicator lamp in the multifunction
display lights up when it is dark and the light
sensor activates the low-beam headlamps.
If you are driving at speeds above approx-
imately 16 mph (25 km/h):
The headlamp range is set automatically
depending on the distance between the vehi-
cle and other road users.
If you are driving at speeds above approx-
imately 19 mph (30 km/h) and no other road
users have been detected:
The high-beam headlamps are switched on
automatically. The Kindicator lamp in the
instrument cluster also lights up.
If you are driving at speeds below approx-
imately 16 mph (25 km/h) or other road users
have been detected or the roads are ade-
quately lit:
The high-beam headlamps are switched off
automatically. The Kindicator lamp in the
instrument cluster goes out. The _indi-
cator lamp in the multifunction display
remains lit.
XTo switch off: move the combination switch
back to its normal position or move the light
switch to another position.
The _ indicator lamp in the instrument
cluster goes out.
Headlamps fogged up on the inside
Certain climatic and physical conditions may
cause moisture to form in the headlamp. This
moisture does not affect the functionality of the
headlamp.
112Exterior lighting
Lights and windshield wipers