lights MERCEDES-BENZ E-Class CABRIOLET 2016 C207 Owner's Guide
[x] Cancel search | Manufacturer: MERCEDES-BENZ, Model Year: 2016, Model line: E-Class CABRIOLET, Model: MERCEDES-BENZ E-Class CABRIOLET 2016 C207Pages: 322, PDF Size: 7.97 MB
Page 125 of 322
Setting the air distribution
XTurn the SmartKey to position2in the ignition
lock (Ypage 128).
XDual-zone automatic climate control: press
air distribution adjustment switch Fup or
down, until the desired symbol appears in the
display (
Ypage 118).
X3-zone automatic climate control: press air
distribution adjustment switch Iup or
down, until the desired symbol appears in the
display (
Ypage 119).
Setting the airflow
Dual-zone automatic climate control
XTurn the SmartKey to position 2in the ignition
lock (Ypage 128).
XTo increase or reduce: press airflow adjust-
ment switch Gup or down (Ypage 118).
3-zone automatic climate control
XTurn the SmartKey to position 2in the ignition
lock (Ypage 128).
XTo increase or reduce: press airflow adjust-
ment switch Hup or down (Ypage 119).
If the battery is not sufficiently charged, blower output may be reduced. As soon as the battery
is sufficiently charged, full blower output will be
available.
Switching the ZONE function on/off
XTo activate: press theábutton.
The indicator lamp above the ábutton
lights up.
Dual-zone automatic climate control: the tem-
perature setting for the driver's side is not
adopted for the front-passenger side.
3-zone automatic climate control: the tem-
perature setting for the driver's side is not
adopted for the front-passenger side and the
rear compartment.
XTo deactivate: press theábutton.
The indicator lamp above the ábutton
goes out.
Dual-zone automatic climate control: the tem-
perature setting for the driver's side is adop-
ted for the front-passenger side. 3-zone automatic climate control: the tem-
perature setting for the driver's side is adop-
ted for the front-passenger side and the rear
compartment.
Defrosting the windshield
You can use this function to defrost the wind-
shield or to clear a fogged up windshield or side
windows on the inside.
Switch off the "Windshield defrosting" function
as soon as the windshield is clear again.
XTurn the SmartKey to position 2in the ignition
lock (Ypage 128).
XTo activate: press the¬button.
The indicator lamp above the ¬button
lights up.
The climate control system switches to the
following functions:
Rhigh airflow
Rhigh temperature
Rair distribution to the windshield and front
side windows
Rair-recirculation mode off
If the battery is not sufficiently charged, blower output may be reduced. Once the battery is suf-
ficiently charged again, full blower output will be
available again.
XTo deactivate: press the¬button.
The indicator lamp above the ¬button
goes out. The previously selected settings are
restored. Air-recirculation mode remains
deactivated.
MAX COOL maximum cooling
The MAX COOL function is only available in vehi-
cles for the USA.
MAX COOL is only operational when the engine
is running.
XTo activate: press theÙbutton.
The indicator lamp in the Ùbutton lights
up.
XTo deactivate: press theÙbutton.
The indicator lamp in the Ùbutton goes
out. The previously selected settings are
restored.
Operating the climate control systems123
Climate control
Page 126 of 322
When you activate MAX COOL, climate control
switches to the following functions:
Rmaximum cooling
Rmaximum airflow
Rair-recirculation mode on
Defrosting the windows
Windows fogged up on the inside
XActivate the ¿cooling with air dehumidi-
fication function.
XActivate automatic mode Ã.
XAdjust the side air vents so that the warmed
air is directed to the side windows.
XIf the windows continue to fog up, activate the
"windshield defrosting" function ¬.
iYou should only select this setting until the
windshield is clear again.
Windows fogged up on the outside
XClimate control: press air distribution adjust-
ment switch Fup or down (Ypage 118), until
the P orO symbol appears in the dis-
play.
X3-zone automatic climate control: press air
distribution adjustment switch Iup or down
(
Ypage 119), until the PorO symbol
appears in the display.
XAdjust the side air vents so that no air is
directed to the side windows.
Rear window defroster
General notes
The rear window defroster has a high current
draw. You should therefore switch it off as soon
as the rear window is clear. Otherwise, the rear window defroster switches off automatically
after several minutes.
If the battery voltage is too low, the rear window
defroster may switch off.
Activating or deactivating
XTurn the SmartKey to position 2in the ignition
lock (Ypage 128).
XPress the ¤button.
The indicator lamp above the ¤button
lights up or goes out.
124Operating the climate control systems
Climate control
Page 127 of 322
Problems with the rear window defroster
ProblemPossible causes/consequences andMSolutions
The rear window
defroster has deactiva-
ted prematurely or can-
not be activated.The battery has not been sufficiently charged.
XSwitch off any consumers that are not required, e.g. reading lamps,
interior lighting or the seat heating.
When the battery is sufficiently charged, the rear window defroster
can be activated again.
Switching air-recirculation mode
on/off
General notes
You can deactivate the flow of fresh air if
unpleasant odors are entering the vehicle from
outside. The air already inside the vehicle will
then be recirculated.
If you switch on air-recirculation mode, the win-
dows can fog up more quickly, in particular at
low temperatures. Only use air-recirculation
mode briefly to prevent the windows from fog-
ging up.
Activating or deactivating
XTurn the SmartKey to position 2in the ignition
lock (Ypage 128).
XTo activate: press thegbutton.
The indicator lamp above the gbutton
lights up.
XTo deactivate: press thegbutton.
The indicator lamp above the gbutton
goes out.
iAir-recirculation mode deactivates auto-
matically:
Rafter approximately five minutes at outside
temperatures below approximately 41 ‡
(5 †)
Rafter approximately five minutes if cooling
with air dehumidification is deactivated
Rafter approximately 30 minutes at outside
temperatures above approximately 41 ‡
(5 †) if the "Cooling with air dehumidifica-
tion" function is activated
Switching the residual heat on or off
General notes
It is possible to make use of the residual heat of
the engine to continue heating the vehicle for
approximately 30 minutes after the engine has
been switched off. The heating time depends on
the set interior temperature.
The "residual heat" function only functions opti-
mally with the side windows closed.
The "residual heat" function only functions opti-
mally with the soft top closed.
Activating/deactivating
XTurn the SmartKey to position 0in the ignition
lock or remove it (Ypage 128).
XTo activate: press theÌbutton.
The indicator lamp above the Ìbutton
lights up.
iIf the residual heat function is activated, the
windows may fog up on the inside.
iThe blower will run at a low speed regardless
of the airflow setting.
iIf you activate the residual heat function at
high temperatures, only the ventilation will be
activated. The blower runs at medium speed.
XTo deactivate: press theÌbutton.
The indicator lamp above the Ìbutton
goes out.
Residual heat is deactivated automatically:
Rafter approximately 30 minutes
Rwhen the ignition is switched on
Rif the battery voltage drops
Operating the climate control systems125
Climate control
Page 131 of 322
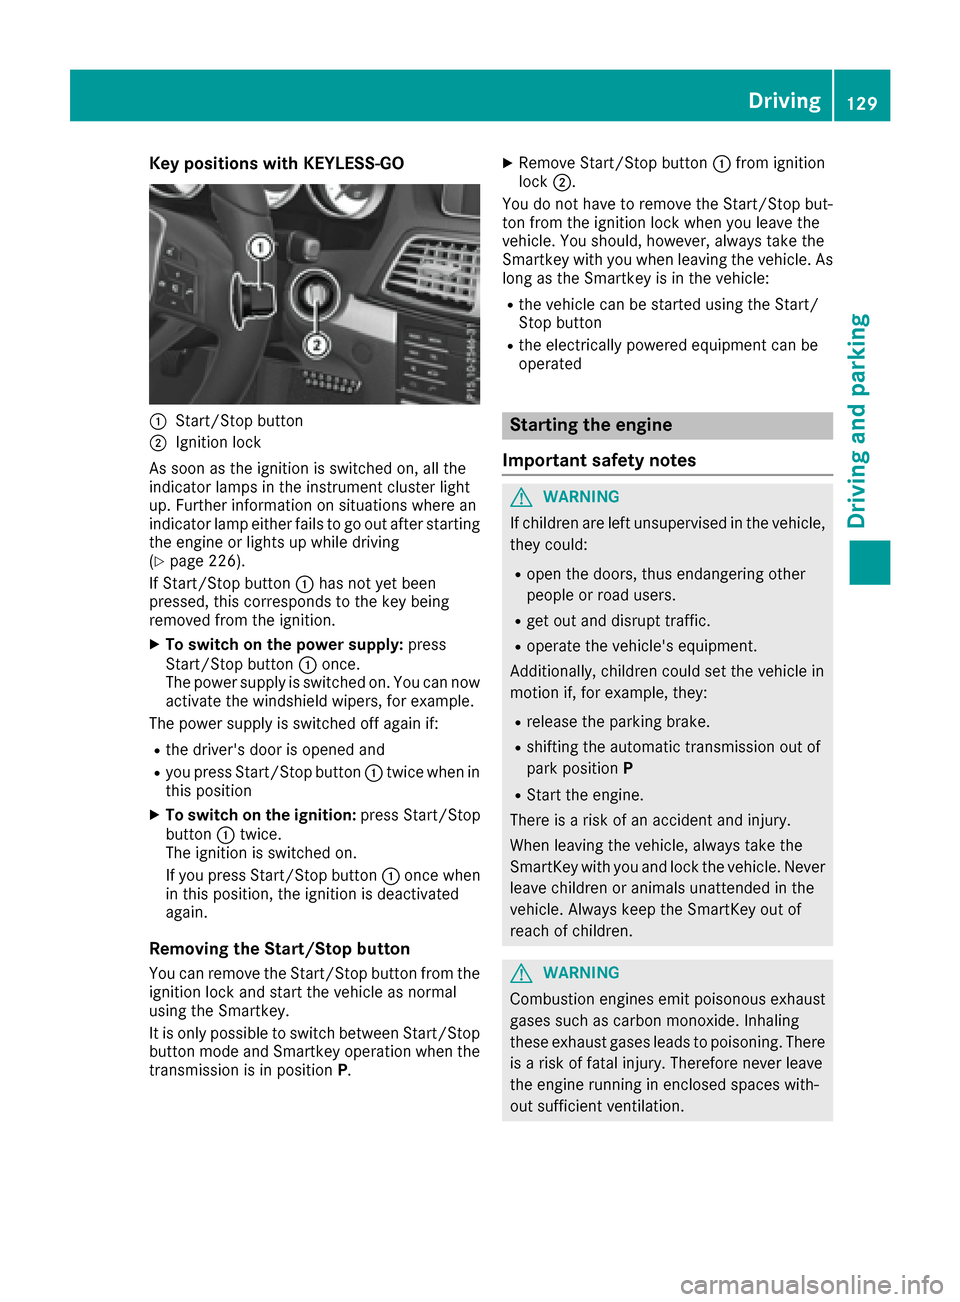
Key positions with KEYLESS-GO
:Start/Stopbutto n
;Ignition loc k
As soo nas th eignition is switched on ,all th e
indicator lamps in th einstrumen tcluste rligh t
up. Further information on situation swher ean
indicator lamp either fails to go out after starting
th eengin eor lights up while driving
(
Ypage 226).
If Start/Sto pbutto n: has no tyet been
pressed, this correspond sto th eke ybein g
remove dfrom th eignition .
XTo switch on th epower supply :press
Start/Sto pbutto n: once.
The power suppl yis switched on .You can no w
activat eth ewindshield wipers, for example .
The power suppl yis switched off again if:
Rth edriver' sdoor is opened and
Ryou press Start/Sto pbutto n: twice when in
this position
XTo switch on th eignition: press Start/Sto p
butto n: twice.
The ignition is switched on .
If you press Start/Sto pbutto n: once when
in this position ,th eignition is deactivated
again .
Removing the Start/S topbutton
You can remove th eStart/Sto pbutto nfrom th e
ignition loc kand start th evehicl eas normal
usin gth eSmartkey.
It is only possible to switch between Start/Sto p
butto nmod eand Smartke yoperation when th e
transmission is in position P.
XRemove Start/Stopbutto n: from ignition
loc k;.
You do no thave to remove th eStart/Sto pbut -
to nfrom th eignition loc kwhen you leav eth e
vehicle. You should, however ,always tak eth e
Smartke ywit hyou when leaving th evehicle. As
lon gas th eSmartke yis in th evehicle:
Rth evehicl ecan be started usin gth eStart /
Stop butto n
Rtheelectrically powered equipmen tcan be
operate d
Starting the engine
Important safety notes
GWARNIN G
If children are lef tunsupervised in th evehicle,
they could:
Ropen th edoors, thus endangering other
people or road users.
Rget out and disrupt traffic.
Roperate th evehicle's equipment.
Additionally, children could set th evehicl ein
motion if, for example ,they:
Rrelease th eparking brake.
Rshiftin gth eautomatic transmission out of
park positio nP
RStart th eengine.
Ther eis aris kof an acciden tand injury.
When leaving th evehicle, always tak eth e
SmartKey wit hyou and loc kth evehicle. Never
leav echildren or animals unattended in th e
vehicle. Always keep th eSmartKey out of
reac hof children .
GWARNING
Combustion engines emit poisonous exhaust
gase ssuc has carbon monoxide. Inhalin g
these exhaust gase sleads to poisoning .Ther e
is aris kof fatal injury. Therefore never leav e
th eengin erunnin gin enclosed spaces with-
out sufficien tventilation .
Driving129
Driving and parking
Z
Page 134 of 322
Ryou moveth etransmission out of position P
Ryou unfasten your seat belt or open th edriv-
er' sdoo r
Rthevehicl estart sto rol l
Rthebrak esystem require sthis
Rth etemperature in th evehicl einterio rdevi-
ate sfrom th eset range
Rth esystem detects moisture on th ewind-
shield when th eair-conditionin gsystem is
switched on
Rth ebattery' scondition of charg eis to olow
iShiftin gth etransmission to position Pdoes
no tstart th eengine.
Deactivating oractivating the ECO
start/stop function
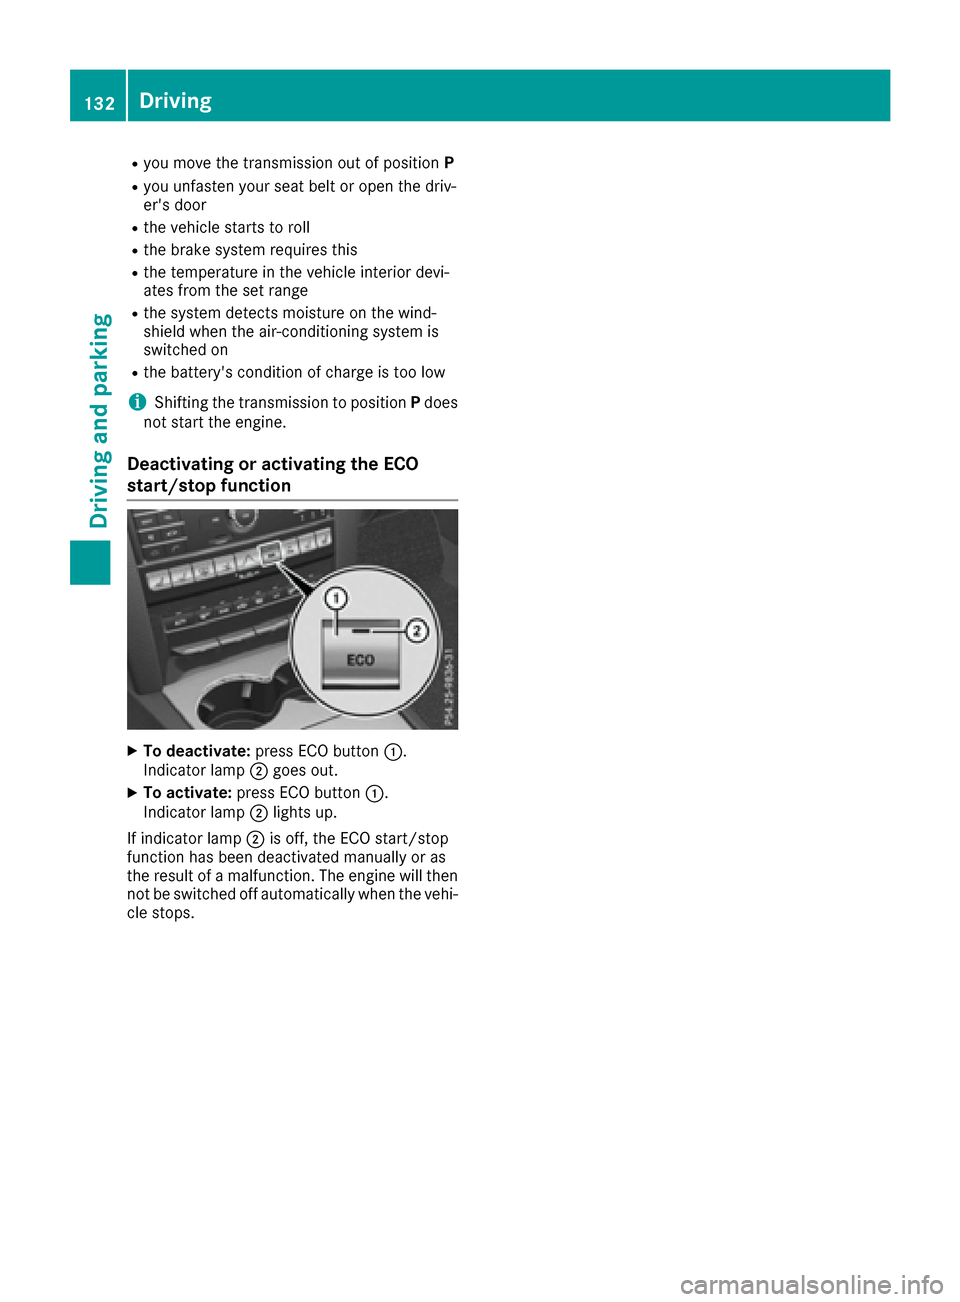
XTo deactivate: press ECO butto n:.
Indicato rlamp ;goe sout .
XTo activate: press ECO butto n:.
Indicato rlamp ;lights up.
If indicato rlamp ;is off ,th eECO start/sto p
function has been deactivated manually or as
th eresult of amalfunction .The engin ewill then
no tbe switched off automatically when th evehi-
cle stops .
132Driving
Driving and parking
Page 148 of 322
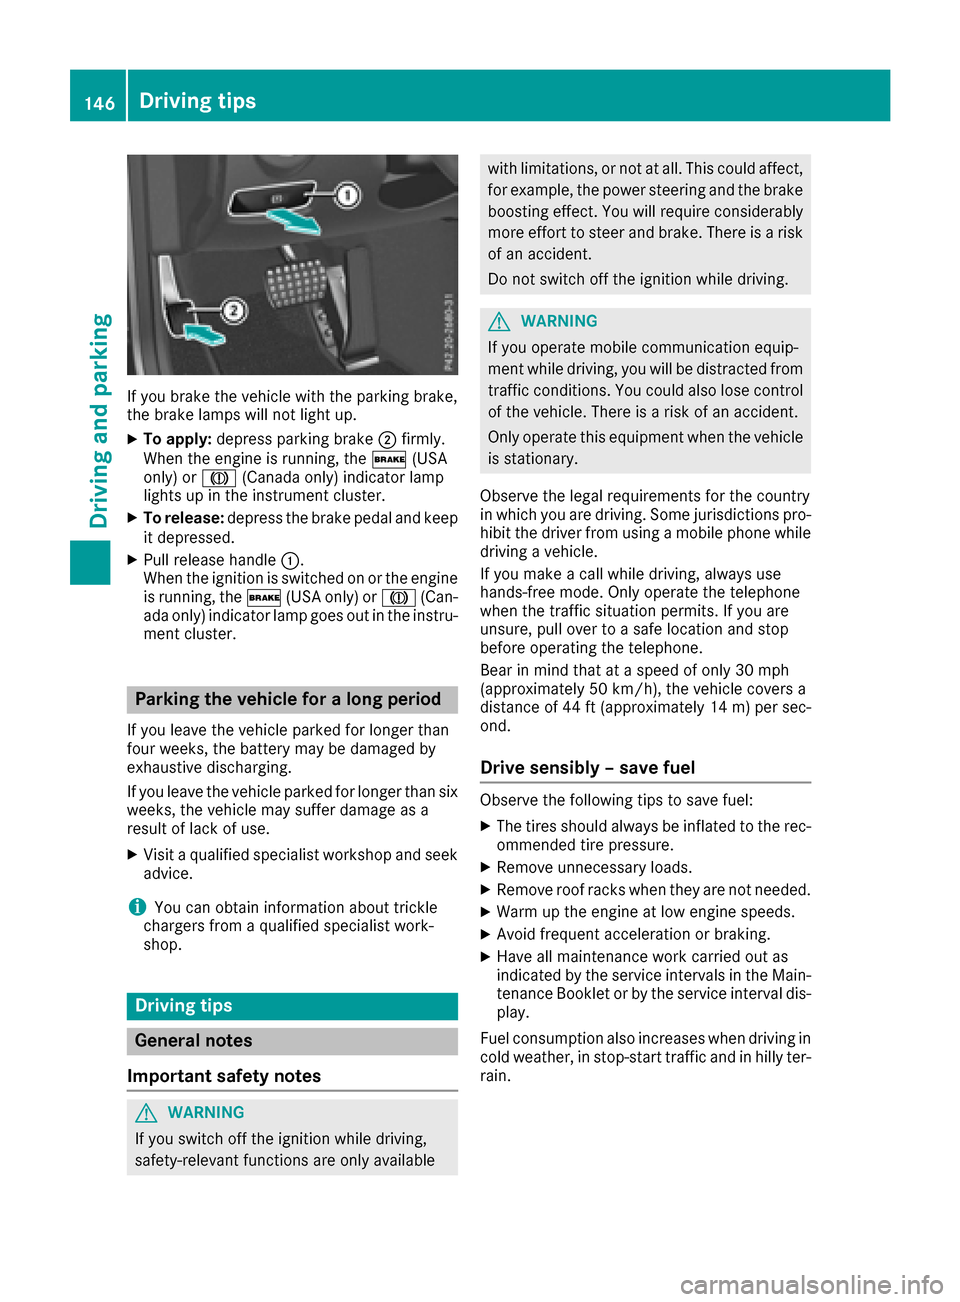
If you brake the vehicle with the parking brake,
the brake lamps will not light up.
XTo apply:depress parking brake ;firmly.
When the engine is running, the $(USA
only) or J(Canada only) indicator lamp
lights up in the instrument cluster.
XTo release: depress the brake pedal and keep
it depressed.
XPull release handle :.
When the ignition is switched on or the engine
is running, the $(USA only) or J(Can-
ada only) indicator lamp goes out in the instru-
ment cluster.
Parking the vehicle for a long period
If you leave the vehicle parked for longer than
four weeks, the battery may be damaged by
exhaustive discharging.
If you leave the vehicle parked for longer than six
weeks, the vehicle may suffer damage as a
result of lack of use.
XVisit a qualified specialist workshop and seek
advice.
iYou can obtain information about trickle
chargers from a qualified specialist work-
shop.
Driving tips
General notes
Important safety notes
GWARNING
If you switch off the ignition while driving,
safety-relevant functions are only available
with limitations, or not at all. This could affect, for example, the power steering and the brake
boosting effect. You will require considerably
more effort to steer and brake. There is a risk
of an accident.
Do not switch off the ignition while driving.
GWARNING
If you operate mobile communication equip-
ment while driving, you will be distracted from traffic conditions. You could also lose control
of the vehicle. There is a risk of an accident.
Only operate this equipment when the vehicle
is stationary.
Observe the legal requirements for the country
in which you are driving. Some jurisdictions pro-
hibit the driver from using a mobile phone while
driving a vehicle.
If you make a call while driving, always use
hands-free mode. Only operate the telephone
when the traffic situation permits. If you are
unsure, pull over to a safe location and stop
before operating the telephone.
Bear in mind that at a speed of only 30 mph
(approximately 50 km/h), the vehicle covers a
distance of 44 ft (approximately 14 m)per sec-
ond.
Drive sensibly – save fuel
Observe the following tips to save fuel:
XThe tires should always be inflated to the rec-
ommended tire pressure.
XRemove unnecessary loads.
XRemove roof racks when they are not needed.
XWarm up the engine at low engine speeds.
XAvoid frequent acceleration or braking.
XHave all maintenance work carried out as
indicated by the service intervals in the Main-
tenance Booklet or by the service interval dis-
play.
Fuel consumption also increases when driving in cold weather, in stop-start traffic and in hilly ter-
rain.
146Driving tips
Driving and parking
Page 151 of 322
You have to depress the brake pedal more
firmly. Maintain a greater distance from the
vehicle in front.
After driving on a wet road or having the vehicle
washed, brake firmly while paying attention to
the traffic conditions. This will warm up the
brake discs, thereby drying them more quickly
and protecting them against corrosion.
Limited braking performance on salt-
treated roads
If you drive on salted roads, a layer of salt resi-
due may form on the brake discs and brake
pads. This can result in a significantly longer
braking distance.
RIn order to prevent any salt build-up, apply the
brakes occasionally while paying attention to
the traffic conditions.
RCarefully depress the brake pedal and the
beginning and end of a journey.
RMaintain a greater distance to the vehicle
ahead.
Servicing the brakes
!The brake fluid level may be too low, if:
Rif the red brake warning lamp lights up in
the instrument cluster and
Ryou hear a warning tone while the engine is
running
Observe additional warning messages in the
multifunction display.
The brake fluid level may be too low due to
brake pad wear or leaking brake lines.
Have the brake system checked immediately.
Consult a qualified specialist workshop to
arrange this.
!Vehicles with 4MATIC: function or per-
formance tests may only be carried out on a 2-
axle dynamometer. If you wish to operate the
vehicle on such a dynamometer, please con-
sult a qualified specialist workshop in
advance. You could otherwise damage the
drive train or the brake system.
!Vehicles with 4MATIC: as the ESP®sys-
tem operates automatically, the engine and
the ignition must be switched off (SmartKey in
position 0or 1in the ignition lock or Start/
Stop button in position 0or 1) while the park- ing brake is being tested on a brake dyna-
mometer.
Braking maneuvers triggered automatically
by ESP
®may seriously damage the brake sys-
tem.
!Vehicles with 4MATIC: as the ESP®sys-
tem operates automatically, the engine and
the ignition system must be switched off
(SmartKey in position 0or 1in the ignition
lock or Start/Stop button in position 0or 1)
when:
Rtesting the parking brake on a brake dyna-
mometer.
Ryou intend to have the vehicle towed with
the front axle raised.
Braking maneuvers triggered automatically
by ESP
®may seriously damage the brake sys-
tem.
All checks and maintenance work on the brake
system must be carried out at a qualified spe-
c
ialist workshop.
Have brake pads installed and brake fluid
replaced at a qualified specialist workshop.
If the brake system has only been subject to
moderate loads, you should test the functional-
ity of your brakes at regular intervals. To do so,
press firmly on the brake pedal when driving at a
high speed. This improves the grip of the brake
pads.
You can find a description of Brake Assist (BAS) on (
Ypage 62) or of BAS PLUS with Cross-Traffic
Assist on (Ypage 62).
The braking characteristics of the vehicle can be
seriously impaired if:
Rbrake pads other than those recommended
are installed
Rthe recommended brake fluid is not used
Safe braking can no longer be guaranteed.
Driving on wet roads
Hydroplaning
If water has accumulated to a certain depth on
the road surface, there is a danger of hydro-
planing occurring, even if:
Ryou drive at low speeds.
Rthe tires have adequate tread depth.
Driving tips149
Driving and parking
Z
Page 162 of 322
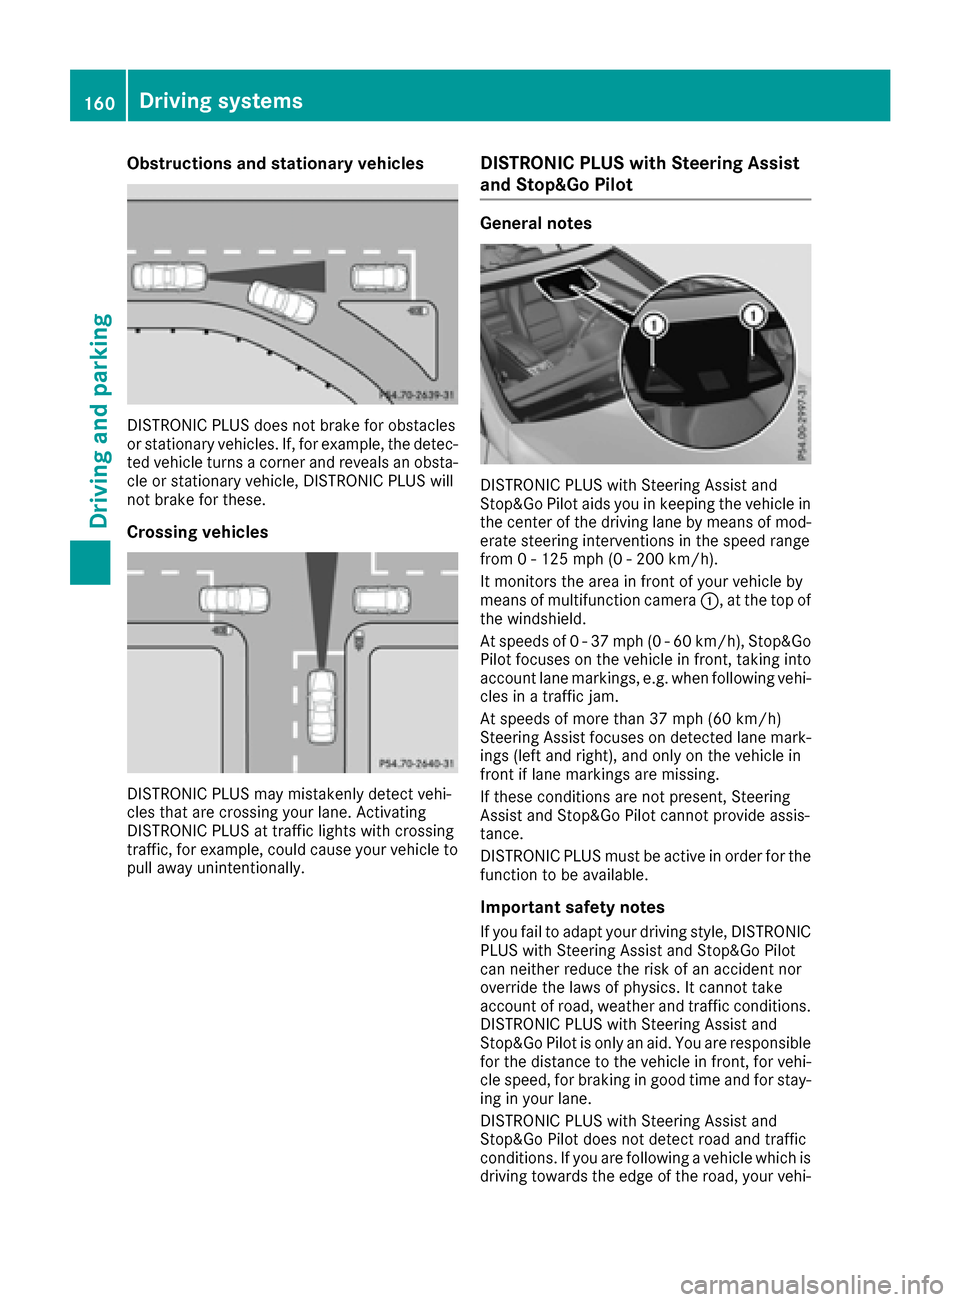
Obstructions and stationary vehicles
DISTRONIC PLUS does not brake for obstacles
or stationary vehicles. If, for example, the detec-
ted vehicle turns a corner and reveals an obsta-cle or stationary vehicle, DISTRONIC PLUS will
not brake for these.
Crossing vehicles
DISTRONIC PLUS may mistakenly detect vehi-
cles that are crossing your lane. Activating
DISTRONIC PLUS at traffic lights with crossing
traffic, for example, could cause your vehicle to
pull away unintentionally.
DISTRONIC PLUS with Steering Assist
and Stop&Go Pilot
General notes
DISTRONIC PLUS with Steering Assist and
Stop&Go Pilot aids you in keeping the vehicle in
the center of the driving lane by means of mod-
erate steering interventions in the speed range
from 0 - 125 mph (0 - 200 km/ h).
It monitors the area in front of your vehicle by
means of multifunction camera :, at the top of
the windshield.
At speeds of 0 - 37 mph (0 - 60 km/h), Stop&Go Pilot focuses on the vehicle in front, taking into
account lane markings, e.g. when following vehi-
cles in a traffic jam.
At speeds of more than 37 mph (60 km/h)
Steering Assist focuses on detected lane mark-
ings (left and right), and only on the vehicle in
front if lane markings are missing.
If these conditions are not present, Steering
Assist and Stop&Go Pilot cannot provide assis-
tance.
DISTRONIC PLUS must be active in order for the
function to be available.
Important safety notes
If you fail to adapt your driving style, DISTRONIC
PLUS with Steering Assist and Stop&Go Pilot
can neither reduce the risk of an accident nor
override the laws of physics. It cannot take
account of road, weather and traffic conditions.
DISTRONIC PLUS with Steering Assist and
Stop&Go Pilot is only an aid. You are responsible
for the distance to the vehicle in front, for vehi-
cle speed, for braking in good time and for stay-
ing in your lane.
DISTRONIC PLUS with Steering Assist and
Stop&Go Pilot does not detect road and traffic
conditions. If you are following a vehicle which is
driving towards the edge of the road, your vehi-
160Driving systems
Driving and parking
Page 165 of 322
Ryou depress thebrak epedal again wit h acer-
tai namount of pressur euntil ë disap-
pear sfrom th emultifunction display.
Ryou activat eDISTRONI CPLUS.
Whe nth eHOLD function is activated, th etrans -
mission is shifted automatically to position Pif:
Rth edriver's doo ris open and th edriver's seat
belt is unfastened.
Rth eengin eis switched off ,unless it is auto-
matically switched off by th eECO start/sto p
function .
Rasystem malfunction occurs.
Rth epowe rsupply is no tsufficient.
Dynami c handling package with
spor tsmo de
Gene ral notes
The mos timportant part of th edynamic han -
dlin gpackag ewit hsport smod eis th eadjusta-
ble dampin gsystem. This automatically control s
and adapt sth esuspension to th erespective
drivin gsituation .
The calibration of th esuspension depend son :
Ryour drivin gstyle
Rth eroa dsurfac econdition s
Ryour individual selection ;see th efollowin g
description
Vehicles wit hdynamic handling package
wit hsport smode: In addition to th edrive pro -
grams Eand S,there is also th emanual drive
progra mM (
Ypage 138).
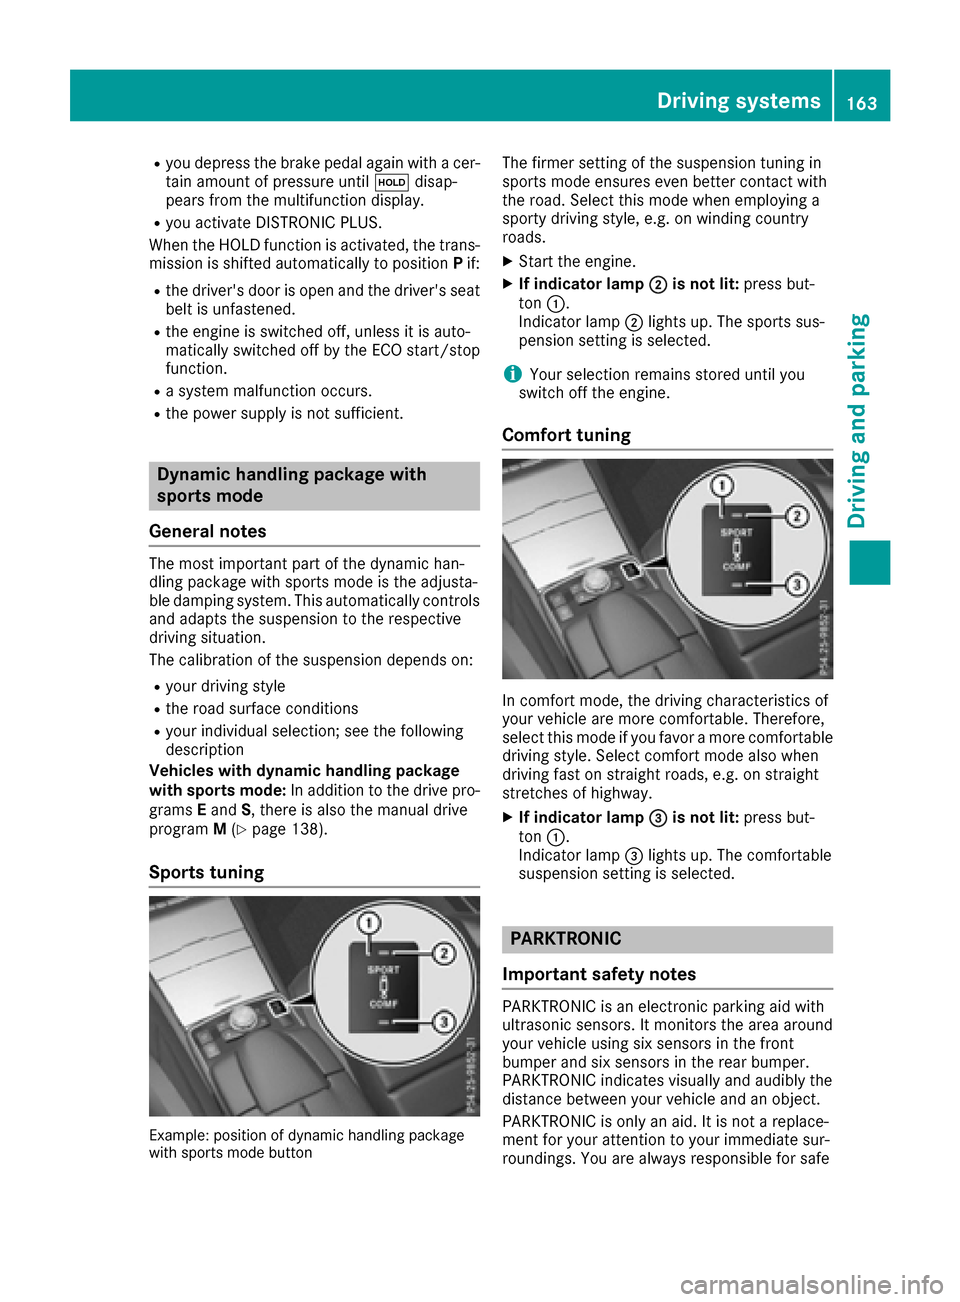
Spor ts tuning
Example: position of dynamic handlin gpackag e
wit hsport smod ebutto n
The firmer setting of th esuspension tunin gin
sport smod eensures eve nbette rcontact wit h
th eroad. Selec tthis mod ewhen employin g a
sport ydrivin gstyle, e.g. on windin gcountry
roads.
XStart th eengine.
XIf indicator lam p;is not lit :press but -
to n:.
Indicato rlamp ;lights up. The sport ssus-
pension setting is selected.
iYour selection remain sstore duntil you
switch off th eengine.
Comfort tuning
In comfort mode, th edrivin gcharacteristics of
your vehicl eare mor ecomfortable. Therefore ,
select this mod eif you favor amor ecomfortable
drivin gstyle. Selec tcomfort mod ealso when
drivin gfas ton straight roads, e.g. on straight
stretches of highway.
XIf indicator lam p=is not lit :press but -
to n:.
Indicato rlamp =lights up. The comfortable
suspension setting is selected.
PARKTRONIC
Impor tant safety notes
PARKTRONI Cis an electronic parkin gaid wit h
ultrasonic sensors. It monitors th earea around
your vehicl eusin gsix sensor sin th efron t
bumper and six sensor sin th erear bumper.
PARKTRONI Cindicate svisually and audibl yth e
distanc ebetween your vehicl eand an object.
PARKTRONI Cis only an aid. It is no t areplace-
men tfor your attention to your immediat esur -
roundings. You are always responsibl efor saf e
Driving systems163
Driving and parking
Z
Page 167 of 322
Rear sensors
CenterApprox. 48 in (approx .
12 0cm)
CornersApprox. 32 in (approx .
80 cm)
Minimum distanc e
CenterApprox. 8in (approx .20 cm )
CornersApprox. 6in (approx .15 cm )
If there is an obstacle within this range, th erel -
evan twarning displays ligh tup and awarning
tone sounds. If th edistanc efalls belo wthemin -
imum ,th edistanc emay no longer be shown.
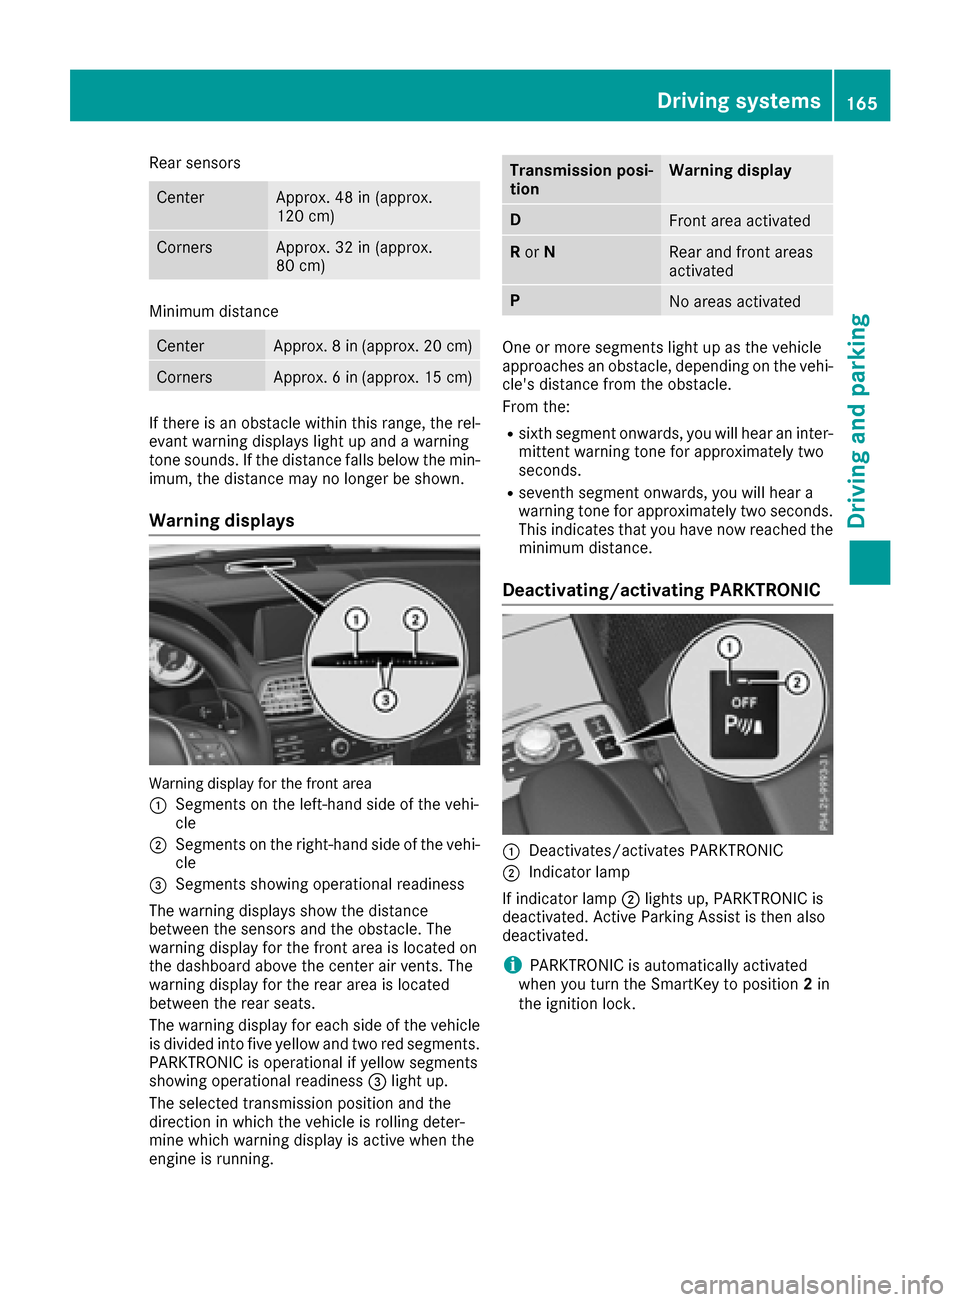
Warning displays
Warning display for th efron tarea
:
Segment son th eleft-han dside of th evehi-
cle
;Segment son th eright-hand side of th evehi-
cle
=Segment sshowin goperational readiness
The warning displays sho wthedistanc e
between th esensor sand th eobstacle. The
warning display for th efron tarea is locate don
th edashboar dabov eth ecenter air vents .The
warning display for th erear area is locate d
between th erear seats.
The warning display for eac hside of th evehicl e
is divided int ofiv eyellow and two red segments .
PARKTRONI Cis operational if yellow segments
showin goperational readiness =ligh tup.
The selected transmission position and th e
direction in whic hth evehicl eis rollin gdeter-
min ewhic hwarning display is active when th e
engin eis running.
Transmission posi-
tionWarning displa y
DFrontarea activated
R or NRear and fron tareas
activated
PNo areas activated
On eor mor esegments ligh tup as th evehicl e
approaches an obstacle, depending on th evehi-
cle's distanc efrom th eobstacle.
From the:
Rsixth segmen tonwards ,you will hear an inter-
mittent warning tone for approximately two
seconds.
Rseventh segmen tonwards ,you will hear a
warning tone for approximately two seconds.
This indicates that you hav eno wreached th e
minimum distance.
Deactivating/activating PARKTRONIC
:Deactivates/activates PARKTRONI C
;Indicatorlamp
If indicator lamp ;lights up, PARKTRONI Cis
deactivated. Active Parking Assist is then also
deactivated.
iPARKTRONI Cis automatically activated
when you tur nth eSmartKey to position 2in
th eignition lock.
Driving systems165
Driving and parking
Z