lights MERCEDES-BENZ E-Class CABRIOLET 2016 C207 User Guide
[x] Cancel search | Manufacturer: MERCEDES-BENZ, Model Year: 2016, Model line: E-Class CABRIOLET, Model: MERCEDES-BENZ E-Class CABRIOLET 2016 C207Pages: 322, PDF Size: 7.97 MB
Page 52 of 322
bled in accordance with the person in the
front-passenger seat
Rthe front-passenger seat has been moved
back as far back as possible.
Rthe person is seated correctly.
Make sure, both before and during the jour-
ney, that the status of the front-passenger
front air bag is correct.
GWARNING
If you secure a child in a child restraint system on the front-passenger seat and the
PASSENGER AIR BAG OFF indicator lamp is
off, the front-passenger front air bag can
deploy in the event of an accident. The child
could be struck by the air bag. This poses an
increased risk of injury or even fatal injury.
Make sure that the front-passenger front air
bag has been disabled. The PASSENGER AIR
BAG OFF indicator lamp must be lit.
GWARNING
If you secure a child in a forward-facing child
restraint system on the front-passenger seat
and you position the front-passenger seat too close to the dashboard, in the event of an
accident, the child could:
Rcome into contact with the vehicle's inte-
rior if the PASSENGER AIR BAG OFF indi-
cator lamp is lit, for example
Rbe struck by the air bag if the PASSENGER
AIR BAG OFF indicator lamp is off
This poses an increased risk of injury or even fatal injury.
Move the front-passenger seat as far back as
possible. Always make sure that the shoulder belt strap is correctly routed from the vehicle
seat-belt extender to the shoulder belt guide
on the child restraint system. The shoulder
belt strap must be routed forwards and down-
wards from the retracted vehicle seat-belt
extender. If necessary, adjust the front-
passenger seat accordingly. Always observe
the child restraint system manufacturer's
installation instructions. If OCS detects that:
Rthe front-passenger seat is not occupied, the
PASSENGER AIR BAG OFF indicator lamp
lights up continuously after the system's self-
diagnosis test. This indicates that the front-
passenger front air bag is deactivated.
Rthe front-passenger seat is occupied by a
child aged up to twelve months in a standard
child restraint system, the PASSENGER AIR
BAG OFF indicator lamp lights up continu-
ously after the system's self-diagnosis test.
This indicates that the front-passenger front
air bag is deactivated.
In the case of a twelve-month-old child in a
standard child restraint system, the
PASSENGER AIR BAG OFF indicator lamp may
go out after the system's self-diagnosis test.
This indicates that the front-passenger front
air bag is activated. Categorization is depend- ent on the type of child restraint system and
the stature of the child, for example. In this
case, always in
stall the child restraint system
on a suitable rear seat.
Rthe front-passenger seat is occupied by a per-
son of smaller stature (e.g. a teenager or a
small adult), the PASSENGER AIR BAG OFF
indicator lamp lights up continuously or goes
off after the system's self-diagnosis test
depending on the categorization.
-If the PASSENGER AIR BAG OFF indicator
lamp is off, position the front-passenger
seat as far back as possible. Alternatively, a
person of smaller stature can sit on a rear
seat.
-If the PASSENGER AIR BAG OFF indicator
lamp lights up, a person of smaller stature
should not sit on the front-passenger seat.
Rthe front-passenger seat is occupied by an
adult or a person of an appropriate size, the
PASSENGER AIR BAG OFF indicator lamp
goes out after the system's self-diagnosis
test. This indicates that the front-passenger
front air bag is activated.
If children are traveling in the vehicle, be sure to
observe the notes on "Children in the vehicle"
(
Ypage 57).
If the OCS is malfunctioning, both the red 6
restraint system warning lamp in the instrument
cluster and the PASSENGER AIR BAG OFF indi-
cator lamp light up simultaneously. In this case,
the front-passenger air bag is deactivated and
does not deploy during an accident. Have the
system checked by qualified technicians as
50Occupant safety
Safety
Page 54 of 322
Problems with the Occupant Classification System (OCS)
Be sure to observe the notes on "System self-test" (Ypage 51).
ProblemPossible causes/consequences andMSolutions
The PASSENGER AIR
BAG OFF indicator lamp
lights up and remains lit,
even though the front-
passenger seat is occu-
pied by an adult or a per-
son of a stature corre-
sponding to that of an
adult.The classification of the person on the front-passenger seat is incor-
rect.
XMake sure the conditions for a correct classification of the person
on the front-passenger seat are met (Ypage 49).
XIf the PASSENGER AIR BAG OFF indicator lamp remains lit, the front-
passenger seat may not be used.
XHave OCS checked as soon as possible at an authorized Mercedes- Benz Center.
The PASSENGER AIR
BAG OFF indicator lamp
does not light up and/or
does not stay on.
The front-passenger seat
is:
Runoccupied
Roccupied with the
weight of a child up to
twelve months old in a
child restraint system
OCS is malfunctioning.
XMake sure there is nothing between the seat cushion and the child
seat.
XMake sure that the entire base of the child restraint system rests on
the seat cushion of the front-passenger seat. The backrest of the
forward-facing child restraint system must lie as flat as possible
against the backrest of the front-passenger seat. If necessary,
adjust the position of the front-passenger seat.
XWhen installing the child restraint system, make sure that the seat belt is tight. Do not pull the seat belt tight using the front-passenger
seat adjustment. This could result in the seat belt and the child
restraint system being pulled too tightly.
XCheck for correct installation of the child restraint system.
Make sure that the head restraint does not apply a load to the child
restraint system. If necessary, adjust the head restraint accord-
ingly.
XMake sure that no objects are applying additional weight onto the
seat.
XIf the PASSENGER AIR BAG OFF indicator lamp remains off, do not
install a child restraint system on the front-passenger seat. It is
recommended that you install the child restraint system on a suit-
able rear seat.
XHave OCS checked as soon as possible at an authorized Mercedes-
Benz Center.
Roll bar
GDANGER
If the roll bar has developed a malfunction, it
may not function, e.g. in the event of an acci- dent. The roll bars may then not protect the
vehicle occupants as intended. This poses an
increased risk of injury or even fatal injury.
Have roll bars checked immediately at a quali-
fied specialist workshop.
GWARNING
Risk of injury if the roll bar is triggered.
Ensure that the movement area of the rear
head restraints is kept clear.
The roll bars are under the rear head restraints.
They extend if systems detect that the vehicle is
in danger of rollover. Thus the rear head
restraints also extend automatically.
Once the roll bars are extended, you can no lon-
ger lower the rear head restraints. An open soft
52Occupant safety
Safety
Page 55 of 322
top can no longer be closed. In this case, visit
the nearest qualified specialist workshop.
Deployment of Emergency Tensioning
Devices and air bags
Important safety notes
GWARNING
The air bag parts are hot after an air bag has
been deployed. There is a risk of injury.
Do not touch the air bag parts. Have a
deployed air bag replaced at a qualified spe-
cialist workshop as soon as possible.
GWARNING
A deployed air bag no longer offers any pro-
tection and cannot provide the intended pro-
tection in an accident. There is an increased
risk of injury.
Have the vehicle towed to a qualified special-
ist workshop in order to have a deployed air
bag replaced.
It is important for your safety and that of your
passenger to have deployed air bags replaced
and to have any malfunctioning air bags
repaired. This will help to make sure the air bags
continue to perform their protective function for
the vehicle occupants in the event of a crash.
GWARNING
Pyrotechnic Emergency Tensioning Devices
that have been deployed are no longer opera-
tional and are unable to perform their inten-
ded protective function. This poses an
increased risk of injury or even fatal injury.
Therefore, have pyrotechnic Emergency Ten-
sioning Devices which have been triggered
immediately replaced at a qualified specialist workshop.
An electric motor is used by PRE-SAFE
®to trig-
ger the tightening of the seat belt in hazardous
situations. This procedure is reversible.
If Emergency Tensioning Devices are triggered
or air bags are deployed, you will hear a bang,
and a small amount of powder may also be released. The
6restraint system warning
lamp lights up.
Only in rare cases will the bang affect your hear-
ing. The powder that is released generally does
not constitute a health hazard, but it may cause
short-term breathing difficulties in people with
asthma or other respiratory problems. Provided
it is safe to do so, you should leave the vehicle
immediately or open the window in order to pre-
vent breathing difficulties.
Air bags and pyrotechni c Eme
rgency Tensioning
Devices (ETDs) contain perchlorate material,
which may require special handling and regard
for the environment. National guidelines must
be observed during disposal. In California, see
www.dtsc.ca.gov/HazardousWaste/
Perchlorate/index.cfm.
Method of operation
During the first stage of a collision, the restraint
system control unit evaluates important physi-
cal data relating to vehicle deceleration or accel-
eration, such as:
Rduration
Rdirection
Rintensity
Based on the evaluation of this data, the
restraint system control unit triggers the Emer-
gency Tensioning Devices during a frontal or
rear collision.
An Emergency Tensioning Device can only be
triggered, if:
Rthe ignition is switched on
Rthe components of the restraint system are
operational. You can find further information
under: "Restraint system warning lamp"
(
Ypage 40)
Rthe belt tongue is engaged in the buckle on
the respective front-passenger seat
The Emergency Tensioning Devices in the rear
compartment are triggered independently of the
lock status of the seat belts.
If the restraint system control unit detects a
more severe accident, further components of
the restraint system are activated independ-
ently of each other in certain frontal collision
situations:
RFront air bags and driver's knee bag
RHead bag, if the system determines that
deployment can offer additional protection to that provided by the seat belt
Occupant safety53
Safety
Z
Page 64 of 322
weather conditions and maintain a safe distance
from the vehicle in front. Drive carefully.
The driving safety systems described only work
as effectively as possible when there is ade-
quate contact between the tires and the road
surface. Please pay special attention to the
notes on tires, recommended minimum tire
tread depths, etc. (
Ypage 285).
In wintry driving conditions, always use winter
tires (M+S tires) and if necessary, snow chains.
Only in this way will the driving safety systems
described in this section work as effectively as
possible.
ABS (Anti-lock Braking System)
General information
ABS regulates brake pressure in such a way that
the wheels do not lock when you brake. This
allows you to continue steering the vehicle when
braking.
The ! ABS warning lamp in the instrument
cluster lights up when the ignition is switched
on. It goes out when the engine is running.
ABS works from a speed of about 5 mph
(8 km/h), regardless of road-surface conditions.
ABS works on slippery surfaces, even when you
only brake gently.
Important safety notes
iObserve the "Important safety notes" sec-
tion (Ypage 61).
GWARNING
If ABS is faulty, the wheels could lock when
braking. The steerability and braking charac-
teristics may be severely impaired. Addition-
ally, further driving safety systems are deac-
tivated. There is an increased danger of skid-
ding and accidents.
Drive on carefully. Have ABS checked imme-
diately at a qualified specialist workshop.
When ABS is malfunctioning, other systems,
including driving safety systems, will also
become inoperative. Observe the information
on the ABS warning lamp (
Ypage 227) and dis-
play messages which may be shown in the
instrument cluster (
Ypage 203).
Braking
XIf ABS intervenes: continue to depress the
brake pedal vigorously until the braking sit-
uation is over.
XTo make a full brake application: depress
the brake pedal with full force.
If ABS intervenes when braking, you will feel a
pulsing in the brake pedal.
The pulsating brake pedal can be an indication
of hazardous road conditions, and functions as a
reminder to take extra care while driving.
BAS (Brake Assist System)
General information
BAS operates in emergency braking situations.
If you depress the brake pedal quickly, BAS
automatically boosts the braking force, thus
shortening the stopping distance.
Important safety notes
iObserve the "Important safety notes" sec-
tion (Ypage 61).
GWARNING
If BAS is malfunctioning, the braking distance
in an emergency braking situation is
increased. There is a risk of an accident.
In an emergency braking situation, depress
the brake pedal with full force. ABS prevents
the wheels from locking.
Braking
XKeep the brake pedal firmly depressed until
the emergency braking situation is over.
ABS prevents the wheels from locking.
The brakes will function as usual once you
release the brake pedal. BAS is deactivated.
BAS PLUS (Brake Assist PLUS) with
Cross-Traffic Assist
General information
BAS PLUS can help you to minimize the risk of a
collision with a vehicle or a pedestrian and
reduce the effects of such a collision. If BAS
62Driving safety systems
Safety
Page 69 of 322
ESP®assists the driver when pulling away on
wet or slippery roads. ESP®can also stabilize
the vehicle during braking.
ETS (Electronic Traction System)
ETS traction control is part of ESP®.
Traction control brakes the drive wheels indi-
vidually if they spin. This enables you to pull
away and accelerate on slippery surfaces, for
example if the road surface is slippery on one
side. In addition, more drive torque is transfer-
red to the wheel or wheels with traction.
Traction control remains active, even if you
deactivate ESP
®.
Important safety notes
iObserve the "Important safety notes" sec-
tion (Ypage 61).
GWARNING
If ESP
®is malfunctioning, ESP®is unable to
stabilize the vehicle. Additionally, further driv-
ing safety systems are deactivated. This
increases the risk of skidding and an accident.
Drive on carefully. Have ESP
®checked at a
qualified specialist workshop.
When towing the vehicle with the rear axle
raised, observe the notes on ESP
®
(Ypage 282).
If the å ESP®OFF warning lamp lights up
continuously, then ESP®is deactivated.
If the ÷ ESP®warning lamp and the å
ESP®OFF warning lamp are lit continuously,
ESP®is not available due to a malfunction.
Observe the information on warning lamps
(
Ypage 227) and display messages which may
be shown in the instrument cluster
(
Ypage 203).
iOnly use wheels with the recommended tire
sizes. Only then will ESP®function properly.
Characteristics of ESP®
General information
If the ÷ ESP warning lamp goes out before
beginning the journey, ESP®is automatically
active. If ESP
®intervenes, the
÷ESP®warning lamp
flashes in the instrument cluster.
If ESP
®intervenes:
XDo not deactivate ESP®under any circum-
stances.
XOnly depress the accelerator pedal as far as
necessary when pulling away.
XAdapt your driving style to suit the prevailing
road and weather conditions.
ECO start/stop function
The ECO start/stop function switches the
engine off automatically when the vehicle stops
moving. The engine starts automatically when
the driver wants to pull away again. ESP
®
remains in its previously selected status. Exam-
ple: if ESP®was deactivated before the engine
was switched off, ESP®remains deactivated
when the engine is switched on again.
Deactivating/activating ESP®
Important safety notes
You can select between the following states of
ESP®:
RESP®is activated.
RESP®is deactivated.
GWARNING
If you deactivate ESP
®, ESP®no longer sta-
bilizes the vehicle. There is an increased risk
of skidding and an accident.
Only deactivate ESP
®in the situations descri-
bed in the following.
It may be best to deactivate ESP
®in the follow-
ing situations:
Rwhen using snow chains
Rin deep snow
Ron sand or gravel
iActivate ESP®as soon as the situations
described above no longer apply. ESP®will
otherwise not be able to stabilize the vehicle if
the vehicle starts to skid or a wheel starts to
spin.
!Avoid spinning the driven wheels for an
extended period with ESP®deactivated. You
could otherwise damage the drivetrain.
Driving safet ysystem s67
Safety
Z
Page 70 of 322
Deactivating/activating ESP®
You can deactivateor activat eES P®via th eon -
boar dcomputer (Ypage 196).
ESP®deactivated :
The å ESP®OF Fwarnin glamp in th einstru-
men tcluster lights up.
ESP
®activated :
The å ESP®OF Fwarnin glamp in th einstru-
men tcluster goe sout .
Characteristics when ESP®is deactivate d
If ESP®is deactivated and on eor mor ewheels
start to spin ,th e÷ ESP®warnin glamp in th e
instrumen tcluster flashes .In suc hsituations,
ES P
®will no tstabiliz eth evehicle.
If you deactivat eES P®:
RESP®no longer improves drivin gstability.
REngin etorque is no longer limite dand th e
drive wheels are able to spin .
The spinning of th ewheels result sin acutting
action fo rbette rtraction on loos esurfaces.
RTraction control is still activated.
RCOLLISION PREVENTION ASSIST is no longer
available; no ris it activated if you brak efirmly
wit hassistanc efrom ES P
®.
RPRE-SAF E®is no longer available, no ris it
activated if you brak efirmly and ES P®inter-
venes.
RPRE-SAF E®Brake is no longer available, it is
also no tactivated if you brak efirmly and ES P®
intervenes.
RESP®still provides support when you brak e
firmly.
ESP®trailer stabilization
General information
If your vehicle/trailer combination begin sto
swerve, ES P®assistsyou in this situation .ES P®
slows th evehicl edown by brakin gand limiting
th eengin eoutput until th evehicle/trailer com-
bination has stabilized.
Important safet ynotes
GWARNIN G
If roa dand weather condition sare poor,
trailer stabilization will no tbe able to preven t
th evehicle/trailer combination from swerv-
ing. Trailer swit h a highcenter of gravit ycan
ti p ove rbefore ES P®can detec tthis. There is
a ris kof an accident.
Always adapt your drivin gstyle to th eprevail -
in g roa dand weather conditions.
If your vehicl ewit htrailer (vehicle/trailer com-
bination )begin sto lurch, you can only stabiliz e
th evehicle/trailer combination by depressin g
th ebrak efirmly.
ES P
®trailer stabilization is active abov espeeds
of about 65 km/h.
ES P
®trailer stabilization doe sno twor kif ES P®
is deactivated or disabled because of amalfunc -
tion .
EBD (electronic brak eforce distribu-
tion)
General information
EB Dmonitors and control sth ebrak epressur e
on th erea rwheels to improv edrivin gstabilit y
while braking.
Important safet ynotes
iObserv eth e"Importan tsafet ynotes" sec -
tion fo rdrivin gsafet ysystems (Ypage 61).
GWARNIN G
If EB Dis malfunctioning, th erea rwheels can
lock, e.g. under full braking. This increase sth e
ris kof skiddin gand an accident.
You should therefore adapt your drivin gstyle
to th edifferen thandlin gcharacteristics .Hav e
th ebrak esystem checke dat aqualified spe -
cialist workshop .
Observ einformation regarding indicato rand
warnin glamp s (
Ypage 227) as well as display
message s (Ypage 204).
ADAPTIVE BRAKE
i
Observ eth e"Importan tsafet ynotes" sec -
tion (Ypage 61).
ADAPTIV EBRAKE enhance sbrakin gsafet yand
offer sincrease dbrakin gcomfort .In addition to
68Driving safety systems
Safety
Page 76 of 322
tions of KEYLESS-GO with those of a conven-
tional SmartKey. Unlock the vehicle by using
KEYLESS-GO, for instance, and lock it using the
&button on the SmartKey.
When locking or unlocking with KEYLESS-GO,
the distance between the SmartKey and the cor-
responding door handle must not be greater
than 3 ft (1 m).
A check which periodically establishes a radio
connection between the vehicle and the Smart-
Key determines whether a valid SmartKey is in
the vehicle. This occurs, for example:
Rwhen the external door handles are touched
Rwhen starting the engine
Rwhile the vehicle is in motion
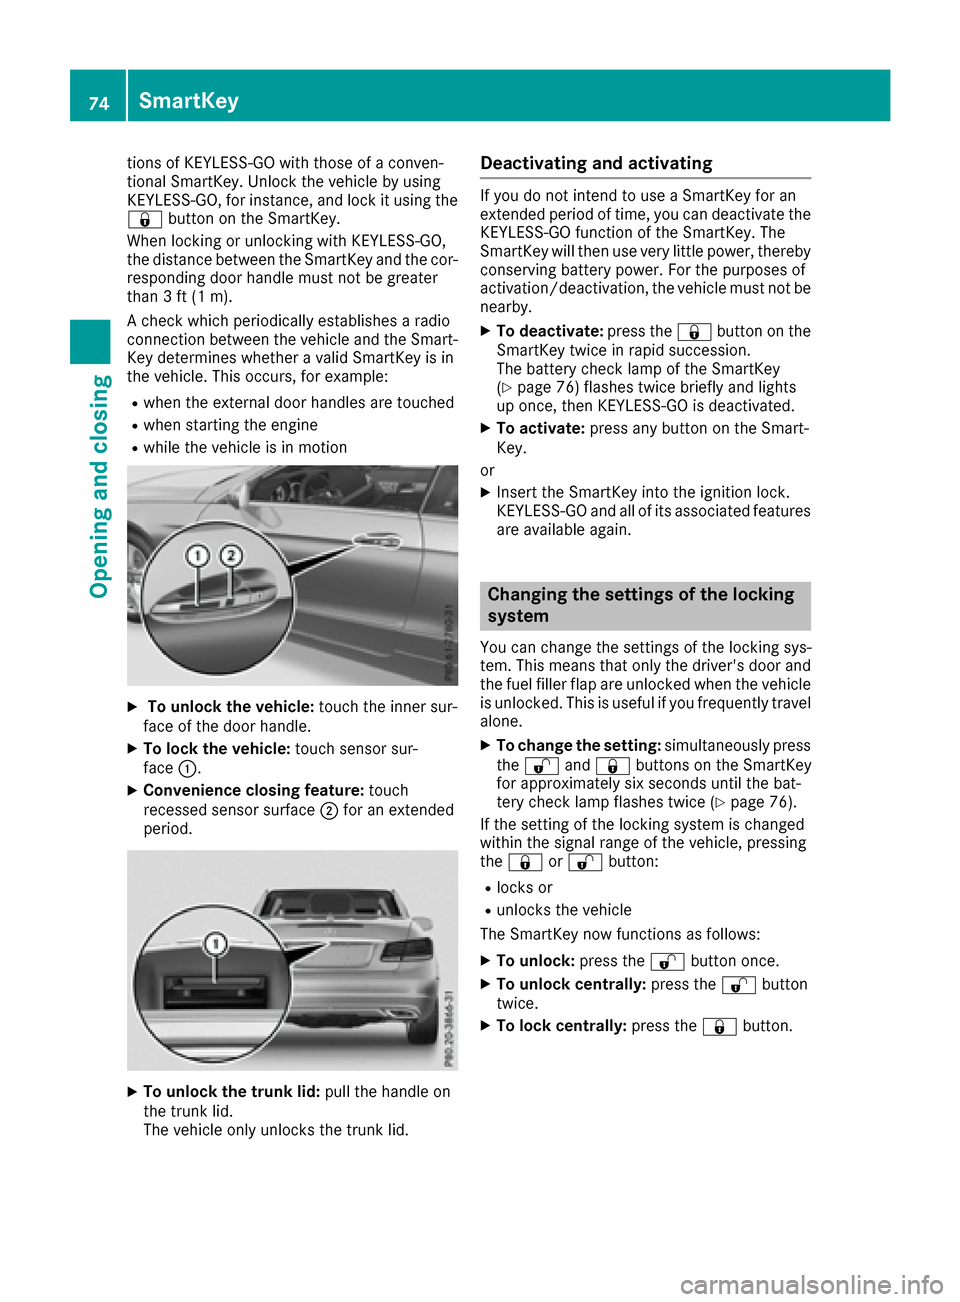
XTo unlock the vehicle: touch the inner sur-
face of the door handle.
XTo lock the vehicle: touch sensor sur-
face :.
XConvenience closing feature: touch
recessed sensor surface ;for an extended
period.
XTo unlock the trunk lid: pull the handle on
the trunk lid.
The vehicle only unlocks the trunk lid.
Deactivating and activating
If you do not intend to use a SmartKey for an
extended period of time, you can deactivate the
KEYLESS-GO function of the SmartKey. The
SmartKey will then use very little power, thereby
conserving battery power. For the purposes of
activation/deactivation, the vehicle must not be
nearby.
XTo deactivate: press the&button on the
SmartKey twice in rapid succession.
The battery check lamp of the SmartKey
(
Ypage 76) flashes twice briefly and lights
up once, then KEYLESS-GO is deactivated.
XTo activate: press any button on the Smart-
Key.
or
XInsert the SmartKey into the ignition lock.
KEYLESS-GO and all of its associated features
are available again.
Changing the settings of the locking
system
You can change the settings of the locking sys-
tem. This means that only the driver's door and
the fuel filler flap are unlocked when the vehicle
is unlocked. This is useful if you frequently travel
alone.
XTo change the setting: simultaneously press
the % and& buttons on the SmartKey
for approximately six seconds until the bat-
tery check lamp flashes twice (
Ypage 76).
If the setting of the locking system is changed
within the signal range of the vehicle, pressing
the & or% button:
Rlocks or
Runlocks the vehicle
The SmartKey now functions as follows:
XTo unlock: press the%button once.
XTo unlock centrally: press the%button
twice.
XTo lock centrally: press the&button.
74SmartKey
Opening and closing
Page 78 of 322
Mercedes-Benz recommends that you have the
batteries replaced at a qualified specialist work-
shop.
Checking the battery
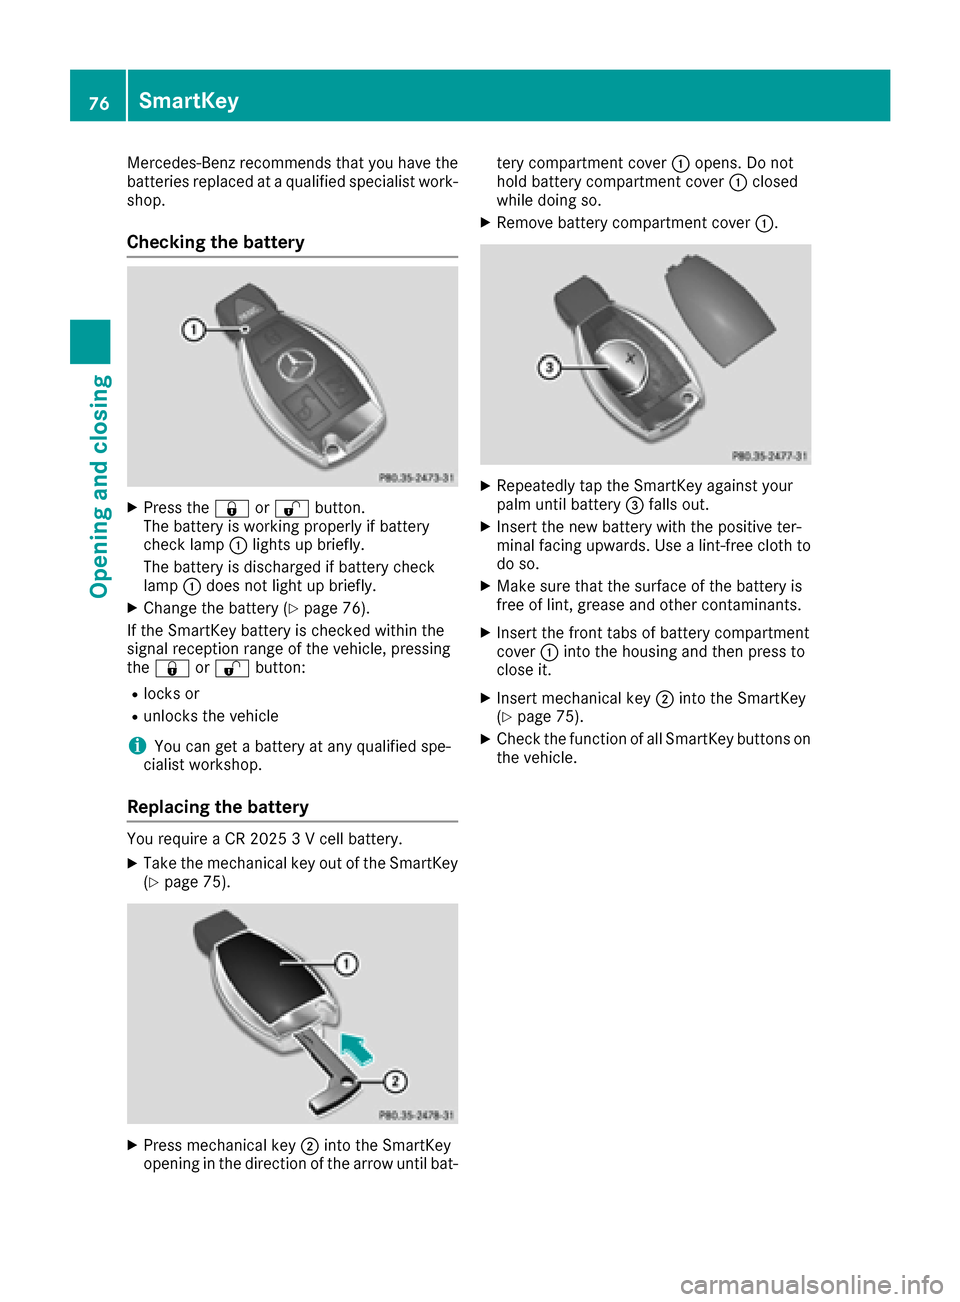
XPress the&or% button.
The battery is working properly if battery
check lamp :lights up briefly.
The battery is discharged if battery check
lamp :does not light up briefly.
XChange the battery (Ypage 76).
If the SmartKey battery is checked within the
signal reception range of the vehicle, pressing
the & or% button:
Rlocks or
Runlocks the vehicle
iYou can get a battery at any qualified spe-
cialist workshop.
Replacing the battery
You require a CR 2025 3 V cell battery.
XTake the mechanical key out of the SmartKey
(Ypage 75).
XPress mechanical key ;into the SmartKey
opening in the direction of the arrow until bat- tery compartment cover
:opens. Do not
hold battery compartment cover :closed
while doing so.
XRemove battery compartment cover :.
XRepeatedly tap the SmartKey against your
palm until battery=falls out.
XInsert the new battery with the positive ter-
minal facing upwards. Use a lint-free cloth to
do so.
XMake sure that the surface of the battery is
free of lint, grease and other contaminants.
XInsert the front tabs of battery compartment
cover :into the housing and then press to
close it.
XInsert mechanical key ;into the SmartKey
(Ypage 75).
XCheck the function of all SmartKey buttons on
the vehicle.
76SmartKey
Opening and closing
Page 105 of 322
The electrically adjustable steering wheel can
still be adjusted when there is no SmartKey in
the ignition lock.
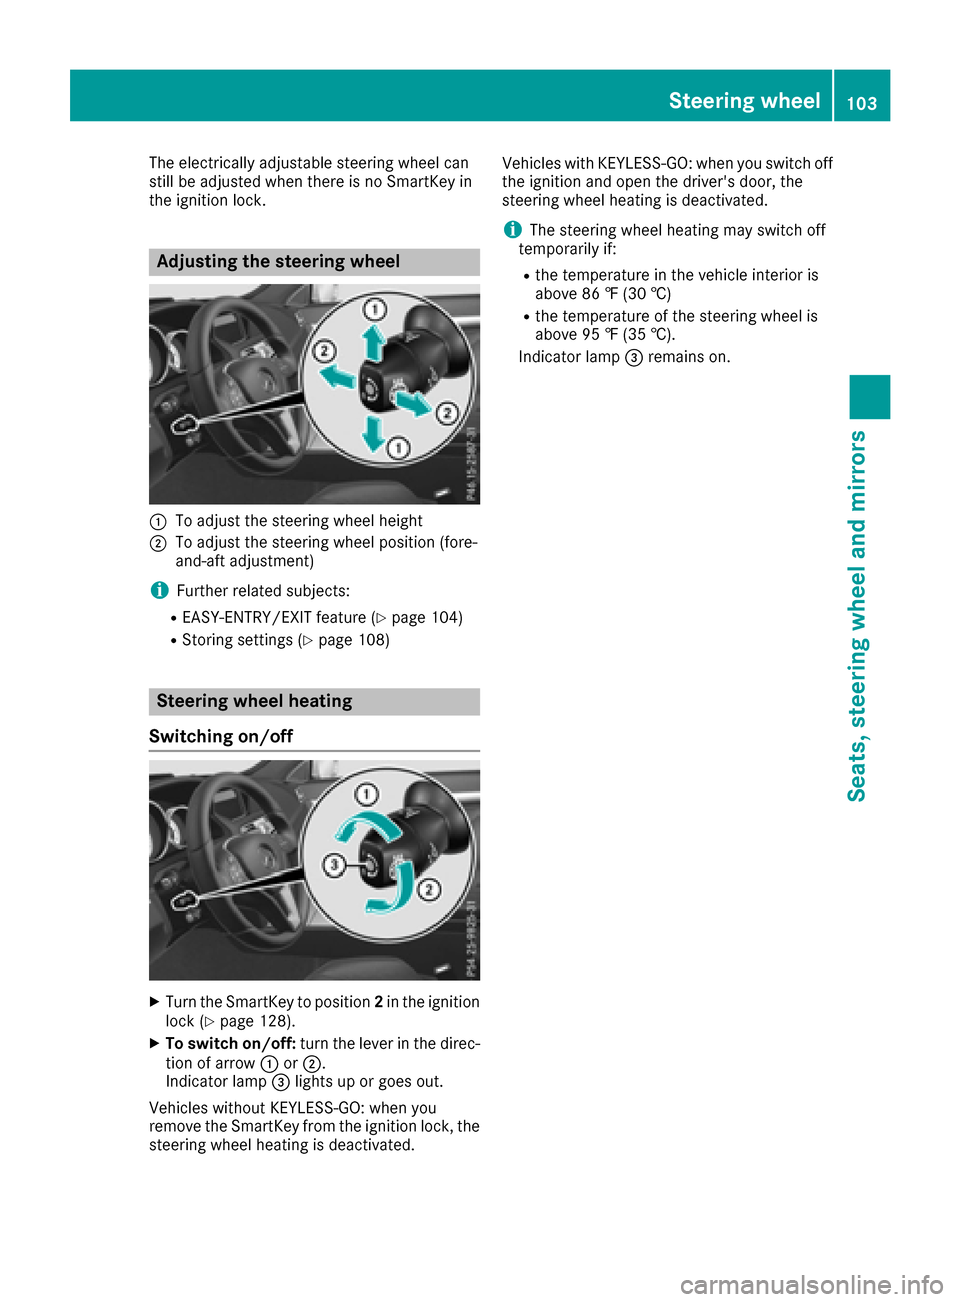
Adjusting the steering wheel
:To adjust the steering wheel height
;To adjust the steering wheel position (fore-
and-aft adjustment)
iFurther related subjects:
REASY-ENTRY/EXIT feature (Ypage 104)
RStoring settings (Ypage 108)
Steering wheel heating
Switching on/off
XTurn the SmartKey to position 2in the ignition
lock (Ypage 128).
XTo switch on/off: turn the lever in the direc-
tion of arrow :or;.
Indicator lamp =lights up or goes out.
Vehicles without KEYLESS-GO: when you
remove the SmartKey from the ignition lock, the
steering wheel heating is deactivated. Vehicles with KEYLESS-GO: when you switch off
the ignition and open the driver's door, the
steering wheel heating is deactivated.
iThe steering wheel heating may switch off
temporarily if:
Rthe temperature in the vehicle interior is
above 86 ‡ (30 †)
Rthe temperature of the steering wheel is
above 95 ‡ (35 †).
Indicator lamp =remains on.
Steering wheel103
Seats, steering wheel and mirrors
Z
Page 107 of 322
The last position of the steering wheel is stored
when you switch off the ignition or when you
store the setting with the memory function
(
Ypage 108).
Crash-responsive EASY-EXIT feature
If the crash-responsive EASY-EXIT feature is trig-
gered in an accident, the steering column will
move upwards when the driver's door is opened. This occurs irrespective of the position of the
SmartKey in the ignition lock. This makes it eas-
ier to exit the vehicle and rescue the occupants.
The crash-responsive EASY-EXIT feature is only
operational if the EASY-EXIT/ENTRY feature is
activated in the on-board computer
(
Ypage 200).
Mirrors
Rear-view mirror
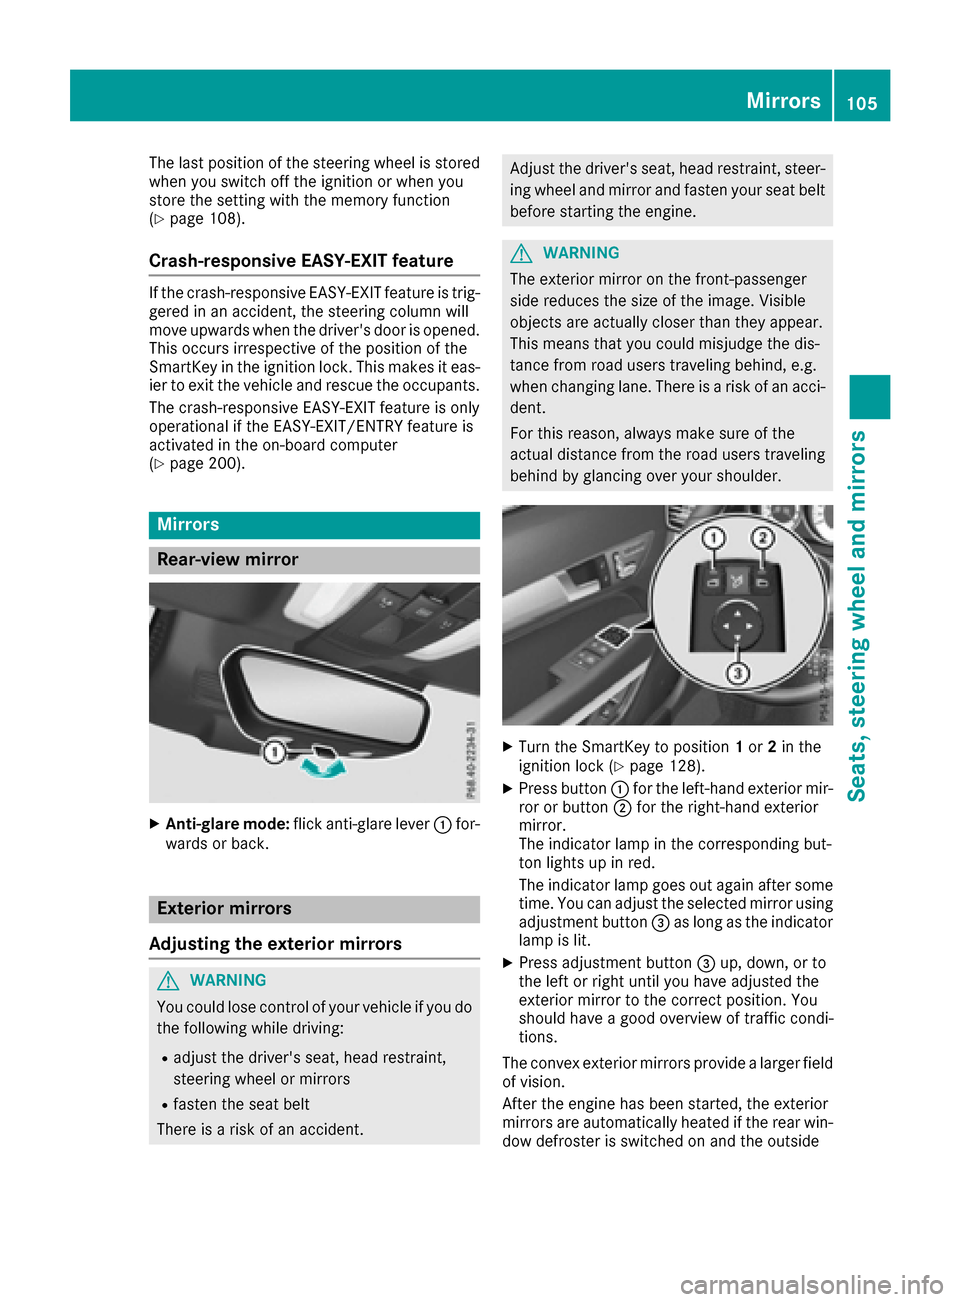
XAnti-glare mode: flick anti-glare lever :for-
wards or back.
Exterior mirrors
Adjusting the exterior mirrors
GWARNING
You could lose control of your vehicle if you do the following while driving:
Radjust the driver's seat, head restraint,
steering wheel or mirrors
Rfasten the seat belt
There is a risk of an accident.
Adjust the driver's seat, head restraint, steer- ing wheel and mirror and fasten your seat belt
before starting the engine.
GWARNING
The exterior mirror on the front-passenger
side reduces the size of the image. Visible
objects are actually closer than they appear.
This means that you could misjudge the dis-
tance from road users traveling behind, e.g.
when changing lane. There is a risk of an acci-
dent.
For this reason, always make sure of the
actual distance from the road users traveling
behind by glancing over your shoulder.
XTurn the SmartKey to position 1or 2in the
ignition lock (Ypage 128).
XPress button :for the left-hand exterior mir-
ror or button ;for the right-hand exterior
mirror.
The indicator lamp in the corresponding but-
ton lights up in red.
The indicator lamp goes out again after some
time. You can adjust the selected mirror using
adjustment button =as long as the indicator
lamp is lit.
XPress adjustment button =up, down, or to
the left or right until you have adjusted the
exterior mirror to the correct position. You
should have a good overview of traffic condi-
tions.
The convex exterior mirrors provide a larger field
of vision.
After the engine has been started, the exterior
mirrors are automatically heated if the rear win-
dow defroster is switched on and the outside
Mirrors105
Seats, steering wheel and mirrors
Z