tow MERCEDES-BENZ E-Class CABRIOLET 2016 C207 Owner's Manual
[x] Cancel search | Manufacturer: MERCEDES-BENZ, Model Year: 2016, Model line: E-Class CABRIOLET, Model: MERCEDES-BENZ E-Class CABRIOLET 2016 C207Pages: 322, PDF Size: 7.97 MB
Page 4 of 322
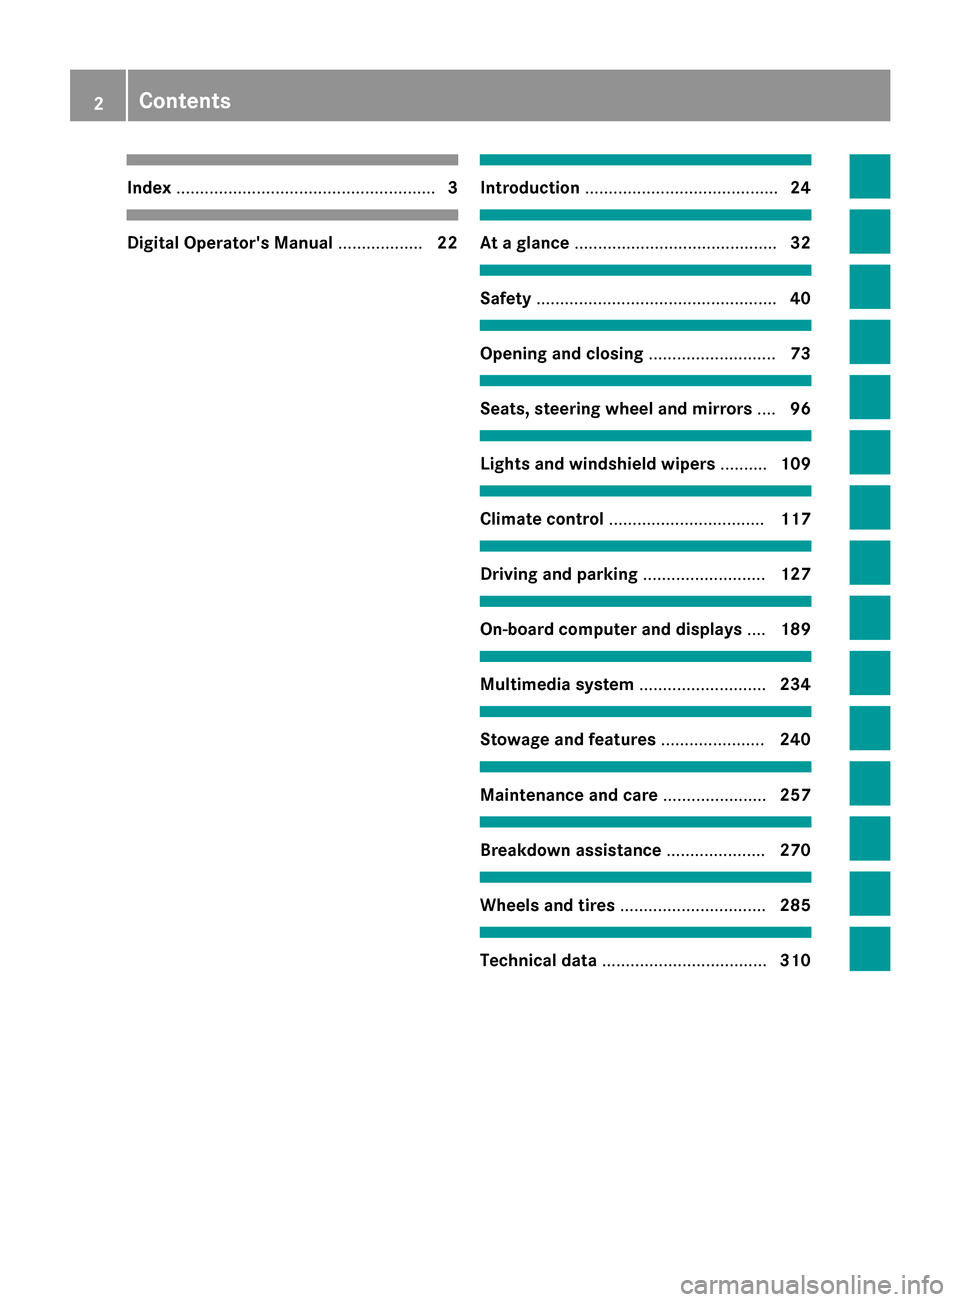
Index....................................................... 3
Digital Operator's Manual..................22
Introduction ......................................... 24
At a glance........................................... 32
Safety................................................... 40
Opening and closing...........................73
Seats, steering wheel and mirrors ....96
Lights and windshield wipers ..........109
Climate control ................................. 117
Driving and parking..........................127
On-board computer and displays ....189
Multimedia system ...........................234
Stowage and features ......................240
Maintenance and care ......................257
Breakdown assistance .....................270
Wheels and tires ............................... 285
Technical data................................... 310
2Contents
Page 11 of 322
Emergency spare wheelGeneral notes ................................ 308
Important safety notes .................. 308
Removing ...................................... .309
Storage location ............................ 309
Stowing .......................................... 309
Technical data ............................... 308
Emergency Tensioning Devices
Activation ......................................... 53
Emissions control
Service and warranty information .... 25
Engine
Check Engine warning lamp ........... 230
Display message ............................ 212
ECO start/stop function ................ 131
Engine number ............................... 312
Irregular running ............................ 133
Jump-starting ................................. 278
Starting problems .......................... 133
Starting the engine with the
SmartKey ....................................... 130
Starting with KEYLESS-GO ............. 130
Switching off .................................. 145
Tow-starting (vehicle) ..................... 282
Engine electronics
Problem (malfunction) ................... 133
Engine jump starting
see Jump starting (engine)
Engine oil
Adding ...........................................2 59
Additives ........................................ 315
Checking the oil level ..................... 258
Checking the oil level using the
dipstick .......................................... 258
Display message ............................ 213
Filling capacity ............................... 315
Notes about oil grades ................... 315
Notes on oil level/consumption .... 258
Entering an address
see also Digital Operator's Man-
ual ..................................................2 34
ESP
®(Electronic Stability Pro-
gram)
Characteristics ................................. 67
Deactivating/activating ................. 196
Deactivating/activating (notes) ....... 67
Display message ............................ 203
Fu
nction/notes ................................ 66 General notes .................................. 66
Important safety information ........... 67
Trailer stabilization ........................... 68
Warning lamp ................................. 227
ETS/4ETS (Electronic Traction Sys-
tem) ...................................................... 67
Exhaust check ................................... 147
Exhaust pipe (cleaning instruc-
tions) ..................................................2 67
Exterior lighting
Setting options .............................. 109
see Lights
Exterior mirrors
Adjusting ....................................... 105
Dipping (automatic) ....................... 106
Folding in when locking (on-board
computer) ...................................... 201
Folding in/out (automatically) ....... 106
Folding in/out (electrically) ........... 106
Out of position (troubleshooting) ... 106
Setting ........................................... 106
Storing settings (memory func-
tion) ............................................... 108
Storing the parking position .......... 107
F
FavoritesOverview ........................................ 236
Filler cap
see Refueling
Flat tire
MOExtended tires .......................... 270
Preparing the vehicle ..................... 270
TIREFIT kit ...................................... 271
see Emergency spare wheel
Floormats ........................................... 255
Frequencies
Mobile phone ................................. 310
Two-way radio ................................ 310
Fuel
Consumption statistics .................. 192
Displaying the current consump-
tion ................................................ 192
Displaying the range ...................... 192
Driving tips .................................... 146
Flexible fuel vehicles ...................... 314
Fuel gauge ....................................... 33
Index9
Page 19 of 322
SMSsee also Digital Operator's Man-
ual .................................................. 234
Snow chains ...................................... 287
Sockets
General notes ................................ 245
Rear compartment .........................2 46
Soft top
AIRCAP ............................................ 92
Cleaning ......................................... 264
Closing manually in an emer-
gency ............................................... 87
Display message ............................ 223
Important safety notes .................... 85
Installing/removing the AIRCAP
wind screen ..................................... 93
Opening/closing (SmartKey) ........... 87
Opening/closing (with soft-top
switch) ............................................. 86
Problem (malfunction) ..................... 95
Relocking ......................................... 91
wind screen ..................................... 91
Soft-top switch ....................................8 6
Sound
Switching on/off ........................... 235
Special seat belt retractor .................. 57
Specialist workshop ............................28
Speed, controlling
see Cruise control
Speedometer
Digital ............................................ 192
In the Instrument cluster ................. 33
Segments ...................................... 189
Selecting the display unit ............... 198
Standing lamps
Display message ............................2 11
Switching on/off ........................... 110
Start/stop function
see ECO start/stop function
Starting (engine) ................................ 129
STEER CONTROL .................................. 71
Steering
Display message ............................ 222
Steering Assist and Stop&Go Pilot
(DISTRONIC PLUS)
Activating/deactivating ................. 197
Display message ............................ 218 Steering assistant
STEER CON-
TROL
see STEER CONTROL
Steering wheel
Adjusting (electrically) ................... 103
Button overview ............................... 34
Buttons (on-board computer) ......... 190
Cleaning ......................................... 268
Important safety notes .................. 102
Paddle shifters ............................... 138
Steering wheel heating .................. 103
Storing settings (memory func-
tion) ............................................... 108
Steering wheel heating
Problem (malfunction) ................... 104
Switching on/off ........................... 103
Steering wheel paddle shifters ........138
Stowage areas ................................... 240
Stowage compartments
Armrest (under) .............................2 41
Center console .............................. 241
Cup holders ................................... 243
Glove box ....................................... 241
Important safety information ......... 240
Stowage net ................................... 242
Under driver's seat/front-
passenger seat .............................. 241
Stowage net ....................................... 242
Stowage well beneath the trunk
floor .................................................... 243
Summer tires ..................................... 287
Sun visor ............................................ 244
Surround lighting (on-board com-
puter) .................................................. 199
Switching air-recirculation mode
on/off ................................................. 125
Switching on media mode
Via the device list .......................... 239
T
Tachometer ........................................ 189
Tail lamps
Display message ............................ 211
Tank
see Fuel tank
Tank content
Fuel gauge ....................................... 33
Index17
Page 21 of 322
Replacing...................................... .303
Service life ..................................... 286
Sidewall (definition) ....................... 303
Speed rating (definition) ................ 302
Storing ...........................................3 04
Structure and characteristics
(definition) ..................................... 301
Temperature .................................. 298
TIN (Tire Identification Number)
(definition) ..................................... 303
Tire bead (definition) ......................3 03
Tire pressure (definition) ................ 303
Tire pressures (recommended) ...... 302
Tire size (data) ............................... 307
Tire size designation, load-bearing
capacity, speed rating .................... 298
Tire tread ....................................... 286
Tire tread (definition) ..................... 303
Total load limit (definition) ............. 303
Traction ......................................... 297
Traction (definition) ....................... 303
Tread wear ..................................... 297
Uniform Tire Quality Grading
Standards ...................................... 297
Uniform Tire Quality Grading
Standards (definition) .................... 301
Wear indicator (definition) ............. 303
Wheel and tire combination ........... 307
Wheel rim (definition) .................... 302
see Flat tire
Tow-starting
Emergency engine starting ............ 282
Important safety notes .................. 280
Towing a trailer
ESP
®(Electronic Stability Pro-
gram) ............................................... 68
Towing away
Important safety guidelines ........... 280
Installing the towing eye ................ 281
Removing the towing eye ............... 281
Transporting the vehicle ................ 282
With both axles on the ground ....... 281
With the rear axle raised ................ 282
Towing eye ......................................... 270
Traffic reports
see al so Di
gital Operator's Man-
ual .................................................. 234 Traffic Sign Assist
Display message ............................ 214
Function/notes ............................. 179
Important safety notes .................. 179
Instrument cluster display ............. 179
Transfer case ..................................... 141
Transmission
see Automatic transmission
Transmission position display ......... 134
Transmission position display
(DIRECT SELECT lever) ...................... 134
Transporting the vehicle .................. 282
Trim pieces (cleaning instruc-
tions) .................................................. 268
Trip computer (on-board com-
puter) .................................................. 192
Trip odometer
Calling up ....................................... 191
Resetting (on-board computer) ...... 192
Trunk
Emergency release .......................... 81
Important safety notes .................... 80
Locking separately ........................... 81
Opening (automatically from
inside) .............................................. 81
Opening/closing (manually from
outside) ............................................ 80
Trunk lid
Display message ............................ 222
Opening dimensions ...................... 317
Trunk load (maximum) ...................... 317
Trunk partition
Display message ............................ 222
General notes .................................. 91
Opening/closing .............................. 91
Turn signals
Display message ............................ 211
Switching on/off ........................... 110
Two-way radio
Frequencies ................................... 310
Installation ..................................... 310
Transmission output (maximum) .... 310
Type identification plate
see Vehicle identification plate
Index19
Page 22 of 322
U
UnlockingEmergency unlocking ...................... .80
From inside the vehicle (central
unlocking button) ............................. 79
USB devices
Connecting to the Media Inter-
face ............................................... 239
V
Vanity mirror (in the sun visor) ........ 244
Vehicle
Correct use ...................................... 28
Data acquisition ............................... 29
Display message ............................ 220
Equipment ....................................... 25
Individual settings .......................... 198
Limited Warranty ............................. 29
Loading .......................................... 294
Locking (in an emergency) ............... 80
Locking (SmartKey) .......................... 73
Lowering ........................................ 307
Maintenance .................................... 26
Parking for a long period ................ 146
Pulling away ................................... 130
Raising ........................................... 305
Reporting problems ......................... 28
Securing from rolling away ............ 304
Towing away .................................. 280
Transporting .................................. 282
Unlocking (in an emergency) ........... 80
Unlocking (SmartKey) ...................... 73
Vehicle data ................................... 317
Vehicle data ....................................... 317
Vehicle dimensions ........................... 317
Vehicle emergency locking ................ 80
Vehicle identification number
see VIN
Vehicle identification plate .............. 311
Vehicle tool kit .................................. 270
Video
Operating the DVD ......................... 194
see also Digital Operator's Man-
ual .................................................. 234
VIN
Seat ............................................... 312 Type plate ...................................... 311
Voice Control System
see Separate operating instructions
W
Warning and indicator lampsABS ................................................ 227
Brakes ........................................... 226
Check Engine ................................. 230
Coolant .......................................... 230
Distance warning ........................... 232
ESP
®.............................................. 227
ESP®OFF ....................................... 228
Fuel tank ........................................ 230
General notes ................................ 224
Overview .......................................... 33
PASSENGER AIR BAG OFF ............... 41
Reserve fuel ................................... 230
Restraint system ............................ 229
Seat belt ........................................ 225
Tire pressure monitor .................... 233
Warranty .............................................. 25
Washer fluid
Display message ............................ 223
Wheel and tire combinations
Tires ............................................... 307
Wheel bolt tightening torque ........... 307
Wheel chock ...................................... 304
Wheels
Changing a wheel .......................... 303
Checking ........................................ 285
Cleaning ......................................... 265
Emergency spare wheel ................. 308
Important safety notes .................. 285
Information on driving .................... 285
Interchanging/changing ................ 303
Mounting a new wheel ................... 306
Mounting a wheel .......................... 304
Removing a wheel .......................... 306
Storing ........................................... 304
Tightening torque ........................... 307
Wheel size/tire size ....................... 307
Wind deflector (cleaning instruc-
tions) .................................................. 265
Wind screen ......................................... 91
Wind screen (cleaning instruc-
tions) .................................................. 265
20Index
Page 30 of 322
Diagnostics connection
The diagnosticsconnection is only intended fo r
th econnection of diagnostic equipmen tat a
qualified specialis tworkshop .
GWARNING
If you connec tequipmen tto th ediagnostic s
connection in th evehicle, it may affec tth e
operation of th evehicle systems .As aresult ,
th eoperatin gsafet yof th evehicle could be
affected. There is aris kof an accident.
Do no tconnec tany equipmen tto adiagnos-
tics connection in th evehicle.
GWARNING
Objects in th edriver's footwell can restric tth e
peda ltrave lor obstruct adepressed pedal.
The operatin gand road safet yof th evehicle is
jeopardized. There is aris kof an accident.
Mak esur ethat all objects in th evehicle are
stowed correctly, and that they canno tente r
th edriver's footwell. Install th efloormat s
securely and as specifie din order to ensur e
sufficien tclearanc efo rth epedals. Do no tuse
loose floormat sand do no tplac efloormat son
to pof on eanother.
!If th eengin eis switched of fand equipmen t
on th ediagnostic sconnection is used ,th e
starter battery may discharge.
Connectin gequipmen tto th ediagnostic scon-
nection can lead to emission smonitorin ginfor-
mation bein greset ,fo rexample. Thi smay lead
to th evehicle failin gto mee tth erequirements of
th enext emission stest durin gth emain inspec-
tion .
Qualified specialist workshop
An authorized Mercedes-Ben zCente ris aquali-
fie dspecialis tworkshop .It has th enecessary
specialis tknowledge ,tools and qualification sto
correctl ycarry out th ewor krequire don your
vehicle. Thi sis especially th ecas efo rwor krel -
evant to safety.
Observ eth enote sin th eMaintenance Booklet .Always hav
eth efollowin gwor kcarrie dout at an
authorized Mercedes-Ben zCenter:
Rwor krelevant to safet y
Rserviceand maintenance wor k
Rrepair work
Ralterations, installation wor kand modifica-
tion s
Rworkon electronic component s
Correct use
If you remov eany warnin gstickers ,you or oth-
ers could fail to recogniz ecertain dangers.
Leave warnin gstickers in position .
Observ eth efollowin ginformation when drivin g
your vehicle:
Rth esafet ynote sin this manual
Rth evehicle technical dat a
Rtraffic rulesand regulation s
Rlaws and safetystandard spertainin gto moto r
vehicles
Problem swit hyou rvehicle
If you should experience aproblem wit hyour
vehicle, particularly on ethat you believe may
affec tit s saf eoperation ,we urg eyou to contact
an authorized Mercedes-Ben zCente rimmedi-
ately to hav eth eproblem diagnosed and recti -
fied. If th eproblem is no tresolved to your sat -
isfaction ,please discus sth eproblem again wit h
a Mercedes-Ben zCente ror contact us at on eof
th efollowin gaddresses.
In th eUSA
Customer Assistanc eCente r
Mercedes-Ben zUSA, LL C
On eMercedes Drive
Montvale, NJ 07645-0350
In Canad a
Customer Relation sDepartmen t
Mercedes-Ben zCanada, Inc.
98 Vanderhoo fAvenue
Toronto ,Ontario M4 G4C9
Reporting safet ydefect s
USAonly:
28Operating safety
Introduction
Page 39 of 322
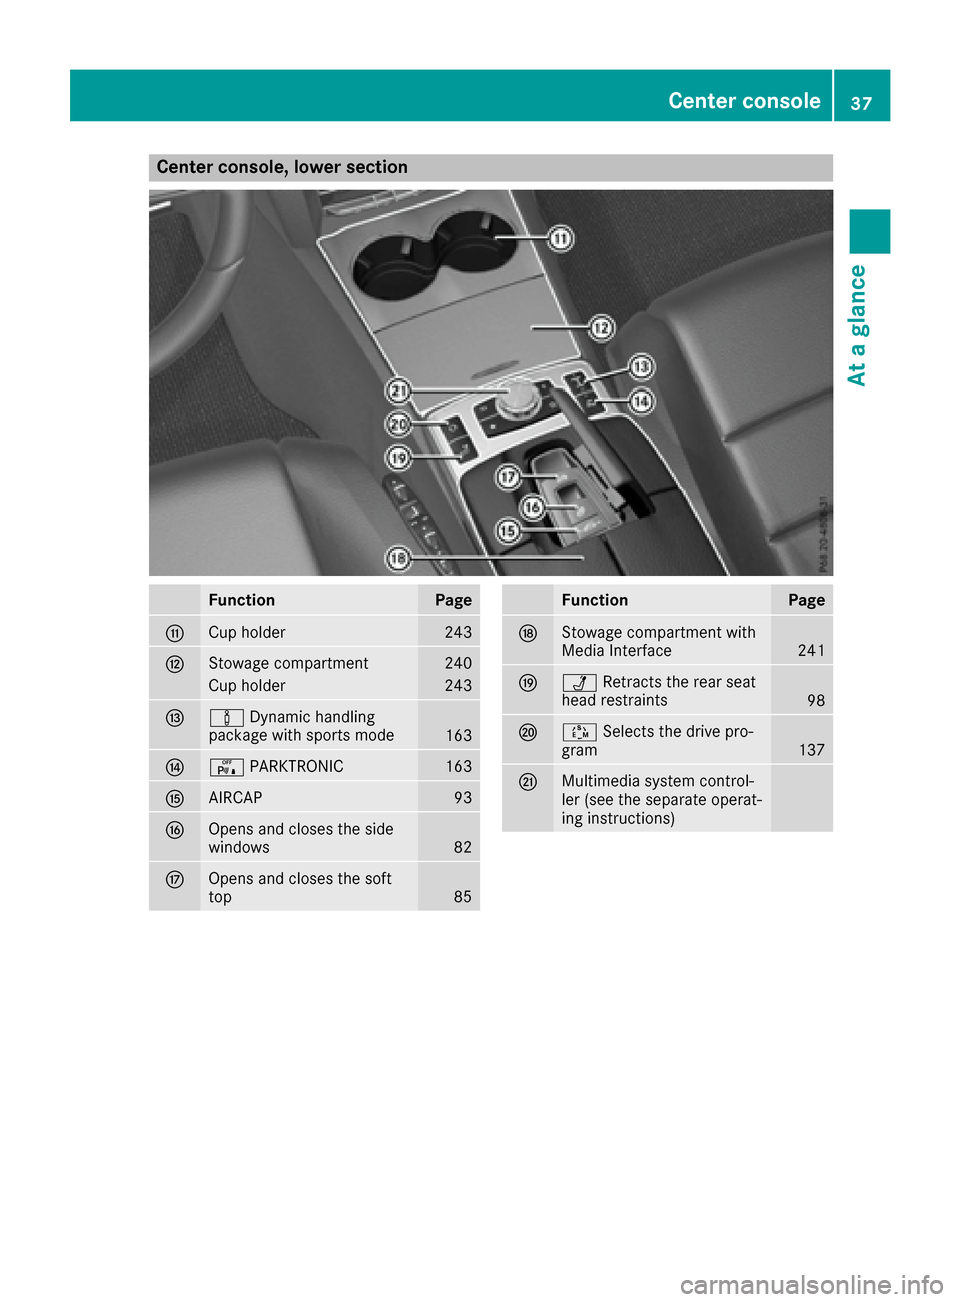
Center console, lower section
FunctionPage
GCup holder243
HStowage compartment240
Cup holder243
IàDynamic handling
package with sports mode163
Jc PARKTRONIC163
KAIRCAP93
LOpens and closes the side
windows82
MOpens and closes the soft
top85
FunctionPage
NStowage compartment with
Media Interface241
OÜRetracts the rear seat
head restraints98
PÚ Selects the drive pro-
gram137
QMultimedia system control-
ler (see the separate operat-
ing instructions)
Center console37
At a glance
Page 45 of 322
system manufacturer's installation and oper-
ating instructions
Rbe sure to observe the instructions and safety
notes on the "Occupant classification system(OCS)" (
Ypage 48)
GWARNING
The seat belts may not perform their intended protective function if:
Rthey are damaged, modified, extremely
dirty, bleach or dyed
Rthe seat belt buckle is damaged or
extremely dirty
Rthe Emergency Tensioning Devices, belt
anchorages or inertia reels have been modi-
fied
Seat belts may sustain non-visible damage in an accident, e.g. due to glass splinters. Modi-
fied or damaged seat belts may tear or fail,
e.g. in an accident. Modified Emergency Ten-
sioning Devices could accidentally trigger or
fail to deploy when necessary. This poses an
increased risk of injury or even fatal injury.
Never modify the seat belts, Emergency Ten-
sioning Devices, belt anchorages or inertia
reels. Make sure that the seat belts are
undamaged, not worn out and clean. Follow-
ing an accident, have the seat belts checked
immediately at a qualified specialist work-
shop.
Only use seat belts that have been approved for
your vehicle by Mercedes-Benz.
Proper use of the seat belts
Pay attention to the safety notes about the seat
belt (Ypage 42).
All vehicle occupants must fasten the seat belt
correctly before setting off. Make sure that all
occupants are wearing their seat belts correctly
for the entire journey.
When fastening the seat belt, make sure that:
RThe seat belt tongue is inserted into the belt
buckle that belongs to the seat.
RThe seat belt is tightened across your body.
Avoid wearing bulky clothing, e.g. a winter
coat.
RThe seat belt is not twisted. Only then can the forces produced in the
event of an accident be evenly distributed
across the belt.
RThe shoulder section of the belt must always
be routed across the center of the shoulder.
The shoulder section of the belt should not
come into contact with your neck and must
not be routed under the arm.
RThe lap belt must be taut and as low as pos-
sible over your lap.
The lap belt must always pass across your hip
joints and never across your stomach or
abdomen. Pregnant women must take partic-
ular care. If necessary, the lap belt can be
pushed down across the hip joints and pulled
tight using the shoulder section.
RThe seat belt is not routed over sharp, pointed
or fragile objects.
If these items are on or in your clothing, e.g.
eyeglasses, pens, keys, etc., stow these items
in a more suitable location.
ROnly one person should use each seat belt at
any one time.
On no account should babies or children
travel sitting on the lap of another vehicle
occupant. During an accident, they could be
crushed between the occupant and seat belt.
RObjects are not secured with a seat belt if the
seat belt is being used by one of the vehicle’s
occupants.
Also make sure that there are no objects, e.g.
cushions, between the occupant and the seat.
Seat belts are solely intended for the protection
and restraint of the vehicle occupants. To
secure objects, luggage or loads, always
observe the "Loading guidelines" (
Ypage 240).
Fastening a seat belt
Observe the safety notes on the seat belt
(Ypage 42) and the notes on correct use of seat
belts (Ypage 43).
GWARNING
If the seat-belt extender is extended during
the journey, the seat belt is not fitted properly
on the body. The seat belt can then no longer
perform its intended protective function. This poses an increased risk of injury or even fatal
injury.
Occupant safety43
Safety
Z
Page 55 of 322
top can no longer be closed. In this case, visit
the nearest qualified specialist workshop.
Deployment of Emergency Tensioning
Devices and air bags
Important safety notes
GWARNING
The air bag parts are hot after an air bag has
been deployed. There is a risk of injury.
Do not touch the air bag parts. Have a
deployed air bag replaced at a qualified spe-
cialist workshop as soon as possible.
GWARNING
A deployed air bag no longer offers any pro-
tection and cannot provide the intended pro-
tection in an accident. There is an increased
risk of injury.
Have the vehicle towed to a qualified special-
ist workshop in order to have a deployed air
bag replaced.
It is important for your safety and that of your
passenger to have deployed air bags replaced
and to have any malfunctioning air bags
repaired. This will help to make sure the air bags
continue to perform their protective function for
the vehicle occupants in the event of a crash.
GWARNING
Pyrotechnic Emergency Tensioning Devices
that have been deployed are no longer opera-
tional and are unable to perform their inten-
ded protective function. This poses an
increased risk of injury or even fatal injury.
Therefore, have pyrotechnic Emergency Ten-
sioning Devices which have been triggered
immediately replaced at a qualified specialist workshop.
An electric motor is used by PRE-SAFE
®to trig-
ger the tightening of the seat belt in hazardous
situations. This procedure is reversible.
If Emergency Tensioning Devices are triggered
or air bags are deployed, you will hear a bang,
and a small amount of powder may also be released. The
6restraint system warning
lamp lights up.
Only in rare cases will the bang affect your hear-
ing. The powder that is released generally does
not constitute a health hazard, but it may cause
short-term breathing difficulties in people with
asthma or other respiratory problems. Provided
it is safe to do so, you should leave the vehicle
immediately or open the window in order to pre-
vent breathing difficulties.
Air bags and pyrotechni c Eme
rgency Tensioning
Devices (ETDs) contain perchlorate material,
which may require special handling and regard
for the environment. National guidelines must
be observed during disposal. In California, see
www.dtsc.ca.gov/HazardousWaste/
Perchlorate/index.cfm.
Method of operation
During the first stage of a collision, the restraint
system control unit evaluates important physi-
cal data relating to vehicle deceleration or accel-
eration, such as:
Rduration
Rdirection
Rintensity
Based on the evaluation of this data, the
restraint system control unit triggers the Emer-
gency Tensioning Devices during a frontal or
rear collision.
An Emergency Tensioning Device can only be
triggered, if:
Rthe ignition is switched on
Rthe components of the restraint system are
operational. You can find further information
under: "Restraint system warning lamp"
(
Ypage 40)
Rthe belt tongue is engaged in the buckle on
the respective front-passenger seat
The Emergency Tensioning Devices in the rear
compartment are triggered independently of the
lock status of the seat belts.
If the restraint system control unit detects a
more severe accident, further components of
the restraint system are activated independ-
ently of each other in certain frontal collision
situations:
RFront air bags and driver's knee bag
RHead bag, if the system determines that
deployment can offer additional protection to that provided by the seat belt
Occupant safety53
Safety
Z
Page 60 of 322
Installing a child restraint system:
XAlways comply with the child restraint system
manufacturer's installation instructions.
XPull the front seat belt smoothly out of the
seat-belt extender and the rear seat belt out
of the belt outlet.
XEngage the seat belt tongue in the belt buckle.
Activating the special seat belt retractor:
XPull the seat belt out fully and let the inertia
reel retract it again.
While the seat belt is retracting, you should
hear a ratcheting sound. The special seat belt
retractor is activated.
XPush the child seat restraint system down so
that the seat belt is tight and does not loosen.
Removing a child restraint system and deacti-
vating the special seat belt retractor:
XAlways comply with the child restraint system
manufacturer's installation instructions.
XPress the release button of the belt buckle,
hold the belt tongue firmly and guide it back to
the seat-belt extender in the front and the belt
outlet in the rear.
The special seat belt retractor is deactivated.
Child restraint system
The use of seat belts and child restraint systems
is required by law in:
Rall 50 states
Rthe U.S. territories
Rthe District of Columbia
Rall Canadian provinces
You can obtain further information about the
correct child restraint system from any author-
ized Mercedes-Benz Center.
GWARNING
If the child restraint system is installed incor-
rectly on a suitable seat, it cannot protect as
intended. The child cannot then be restrained
in the event of an accident, heavy braking or
sudden changes of direction. There is an
increased risk of injury, possibly even fatal.
Make sure that you observe the child restraint
system manufacturer's installation instruc-
tions and the notes on use. Please ensure,
that the base of the child restraint system is
always resting completely on the seat cush-
ion. Never place objects, e.g. cushions, under or behind the child restraint system. Only use
child restraint systems with the original cover
designed for them. Only replace damaged
covers with genuine covers.
GWARNING
If the child restraint system is installed incor-
rectly or is not secured, it can come loose in
the event of an accident, heavy braking or a
sudden change in direction. The child
restraint system could be thrown about, strik-
ing vehicle occupants. There is an increased
risk of injury, possibly even fatal.
Always install child restraint systems prop-
erly, even if they are not being used. Make
sure that you observe the child restraint sys-
tem manufacturer's installation instructions.
You will find further information on stowing
objects, luggage or loads under "Loading guide-
lines" (
Ypage 240).
GWARNING
Child restraint systems or their securing sys-
tems which have been damaged or subjected
to a load in an accident can no longer protect
as intended. The child cannot then be
restrained in the event of an accident, heavy
braking or sudden changes of direction. There is an increased risk of injury, possibly even
fatal.
Replace child restraint systems which have
been damaged or subjected to a load in an
accident as soon as possible. Have the secur-
ing systems on the child restraint system
checked at a qualified specialist workshop,
before you install a child restraint system
again.
The securing systems of child restraint systems
are:
Rthe seat belt system
Rthe LATCH-type (ISOFIX) securing rings
If it is absolutely necessary to carry a child on
the front-passenger seat, be sure to observe the
information on the "Occupant Classification
58Children in the vehicle
Safety