top MERCEDES-BENZ E-Class CABRIOLET 2017 A207 Owner's Guide
[x] Cancel search | Manufacturer: MERCEDES-BENZ, Model Year: 2017, Model line: E-Class CABRIOLET, Model: MERCEDES-BENZ E-Class CABRIOLET 2017 A207Pages: 322, PDF Size: 7.97 MB
Page 59 of 322
Children in the vehicle
Important safety notes
Accident statistics show that children secured
in the rear seats are safer than children secured
in the front-passenger seat. For this reason,
Mercedes-Benz strongly advises that you install
a child restraint system on a rear seat. Children are generally better protected there.
If a child younger than twelve years old and
under 5 ft (1.50 m) in height is traveling in the
vehicle:
Ralways secure the child in a child restraint
system suitable for Mercedes-Benz vehicles.
The child restraint system must be appropri-
ate to the age, weight and size of the child
Rbe sure to observe the instructions and safety
notes in this section in addition to the child
restraint system manufacturer's installation
instructions
Rbe sure to observe the instructions and safetynotes on the "Occupant classification system
(OCS)" (
Ypage 48)
GWARNING
If you leave children unsupervised in the vehi-
cle, they could set it in motion by, for example:
Rrelease the parking brake.
Rshift the automatic transmission out of the
parking position P.
Rstart the engine.
In addition, they may operate vehicle equip-
ment and become trapped. There is a risk of
an accident and injury.
When leaving the vehicle, always take the
SmartKey with you and lock the vehicle. Never
leave children unsupervised in the vehicle.
GWARNING
If persons, particularly children are subjected to prolonged exposure to extreme heat or
cold, there is a risk of injury, possibly even
fatal. Never leave children unattended in the
vehicle.
GWARNING
If the child restraint system is subjected to
direct sunlight, parts may get very hot. Chil-
dren may burn themselves on these parts,
particularly on the metal parts of the child
restraint system. There is a risk of injury.
If you leave the vehicle, taking the child with
you, always ensure that the child restraint
system is not exposed to direct sunlight. Pro- tect it with a blanket, for example. If the child
restraint system has been exposed to direct
sunlight, let it cool down before securing the
child in it. Never leave children unattended in
the vehicle.
Always ensure that all vehicle occupants have
their seat belts fastened correctly and are sitting
properly. Particular attention must be paid to
children.
Observe the safety notes on the seat belt
(
Ypage 42 )and the notes on correct use of seat
belts (Ypage 43).
A booster seat may be necessary to achieve
proper seat belt positioning for children over
41 lb s(18 kg) until they reach a height where a
three-point seat belt can be properly fastened
without a booster seat.
Special seat belt retractor
GWARNING
If the seat belt is released while driving, the
child restraint system will no longer be
secured properly. The special seat belt retrac- tor is disabled and the inertia real draws in a
portion of the seat belt. The seat belt cannot
be immediately refastened. There is an
increased risk of injury, possibly even fatal.
Stop the vehicle immediately, paying atten-
tion to road and traffic conditions. Reactivate
the special seat belt retractor and secure the
child restraint system properly.
All seat belts except the driver's seat belt are
equipped with a special seat belt retractor.
When activated, the special seat belt retractor
ensures that the seat belt will not slacken once
the child restraint system has been secured.
Children in the vehicle57
Safety
Z
Page 61 of 322
System (OCS)" (Ypage 48). There you will also
find information on deactivating the front-
passenger front air bag.
All child restraint systems must meet the fol-
lowing standards:
RU.S. Federal Motor Vehicle Safety Standards
213 and 225
RCanadian Motor Vehicle Safety Standards
213 and 210.2
Confirmation that the child restraint system cor-
responds to the standards can be found on an
instruction label on the child restraint system.
This confirmation can also be found in the instal-
lation instructions that are included with the
child restraint system.
Observe the warning labels in the vehicle inte-
rior and on the child restraint system.
LATCH-type (ISOFIX) child seat secur-
ing system
GWARNING
LATCH-type (ISOFIX) child restraint systems
do not offer sufficient protective effect for
children whose weight is greater than 48 lbs
(22 kg) who are secured using the safety belt integrated in the child restraint system. In the
event of an accident, a child might not be
restrained correctly. This poses an increased
risk of injury or even fatal injury.
If the child weighs more than 48 lbs (22 kg),
only use LATCH-type (ISOFIX) child restraint
systems with which the child is also secured
with the vehicle seat belt. Also secure the
child restraint system with the Top Tether
belt, if available.
Always comply with the manufacturer's instal-
lation and operating instructions for the child
restraint system used.
Before every trip, make sure that the LATCH-
type (ISOFIX) child restraint system is engaged
correctly in both LATCH-type (ISOFIX) securing
rings
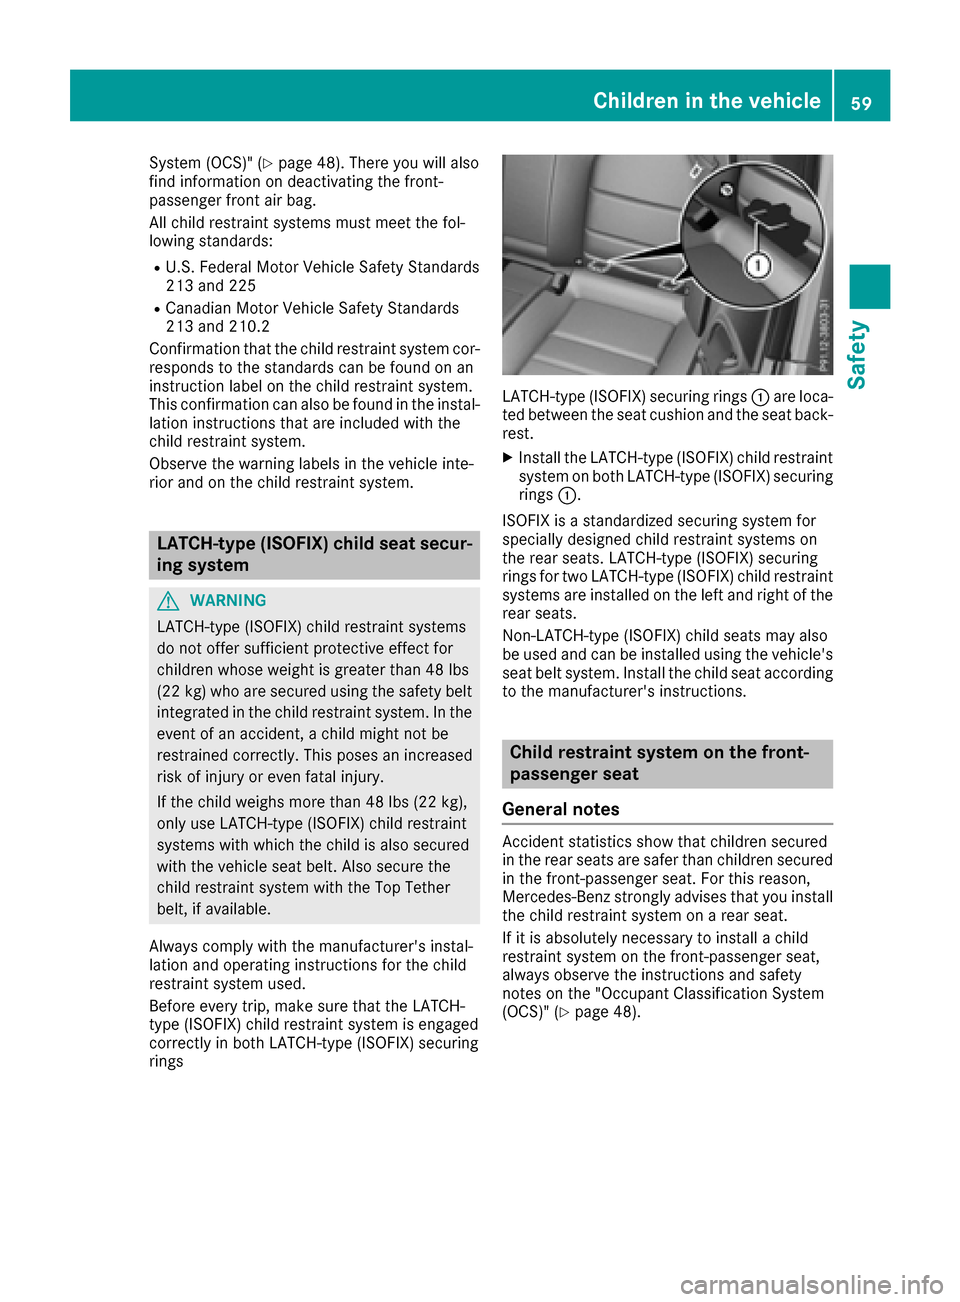
LATCH-type (ISOFIX) securing rings :are loca-
ted between the seat cushion and the seat back-
rest.
XInstall the LATCH-type (ISOFIX) child restraint system on both LATCH-type (ISOFIX) securing
rings :.
ISOFIX is a standardized securing system for
specially designed child restraint systems on
the rear seats. LATCH-type (ISOFIX) securing
rings for two LATCH-type (ISOFIX) child restraint
systems are installed on the left and right of the rear seats.
Non-LATCH-type (ISOFIX) child seats may also
be used and can be installed using the vehicle's
seat belt system. Install the child seat according
to the manufacturer's instructions.
Child restraint system on the front-
passenger seat
General notes
Accident statistics show that children secured
in the rear seats are safer than children secured
in the front-passenger seat. For this reason,
Mercedes-Benz strongly advises that you install
the child restraint system on a rear seat.
If it is absolutely necessary to install a child
restraint system on the front-passenger seat,
always observe the instructions and safety
notes on the "Occupant Classification System
(OCS)" (
Ypage 48).
Children in the vehicle59
Safety
Z
Page 64 of 322
weather conditions and maintain a safe distance
from the vehicle in front. Drive carefully.
The driving safety systems described only work
as effectively as possible when there is ade-
quate contact between the tires and the road
surface. Please pay special attention to the
notes on tires, recommended minimum tire
tread depths, etc. (
Ypage 285).
In wintry driving conditions, always use winter
tires (M+S tires) and if necessary, snow chains.
Only in this way will the driving safety systems
described in this section work as effectively as
possible.
ABS (Anti-lock Braking System)
General information
ABS regulates brake pressure in such a way that
the wheels do not lock when you brake. This
allows you to continue steering the vehicle when
braking.
The ! ABS warning lamp in the instrument
cluster lights up when the ignition is switched
on. It goes out when the engine is running.
ABS works from a speed of about 5 mph
(8 km/h), regardless of road-surface conditions.
ABS works on slippery surfaces, even when you
only brake gently.
Important safety notes
iObserve the "Important safety notes" sec-
tion (Ypage 61).
GWARNING
If ABS is faulty, the wheels could lock when
braking. The steerability and braking charac-
teristics may be severely impaired. Addition-
ally, further driving safety systems are deac-
tivated. There is an increased danger of skid-
ding and accidents.
Drive on carefully. Have ABS checked imme-
diately at a qualified specialist workshop.
When ABS is malfunctioning, other systems,
including driving safety systems, will also
become inoperative. Observe the information
on the ABS warning lamp (
Ypage 227) and dis-
play messages which may be shown in the
instrument cluster (
Ypage 203).
Braking
XIf ABS intervenes: continue to depress the
brake pedal vigorously until the braking sit-
uation is over.
XTo make a full brake application: depress
the brake pedal with full force.
If ABS intervenes when braking, you will feel a
pulsing in the brake pedal.
The pulsating brake pedal can be an indication
of hazardous road conditions, and functions as a
reminder to take extra care while driving.
BAS (Brake Assist System)
General information
BAS operates in emergency braking situations.
If you depress the brake pedal quickly, BAS
automatically boosts the braking force, thus
shortening the stopping distance.
Important safety notes
iObserve the "Important safety notes" sec-
tion (Ypage 61).
GWARNING
If BAS is malfunctioning, the braking distance
in an emergency braking situation is
increased. There is a risk of an accident.
In an emergency braking situation, depress
the brake pedal with full force. ABS prevents
the wheels from locking.
Braking
XKeep the brake pedal firmly depressed until
the emergency braking situation is over.
ABS prevents the wheels from locking.
The brakes will function as usual once you
release the brake pedal. BAS is deactivated.
BAS PLUS (Brake Assist PLUS) with
Cross-Traffic Assist
General information
BAS PLUS can help you to minimize the risk of a
collision with a vehicle or a pedestrian and
reduce the effects of such a collision. If BAS
62Driving safety systems
Safety
Page 66 of 322
workshop. This also applies to collisions at slow
speeds where there is no visible damage to the
front of the vehicle.
Following damage to the windshield, have the
configuration and operation of the camera sys-
tem checked at a qualified specialist workshop.
Function
To avoid a collision, BAS PLUS calculates the
brake force necessary if:
Ryou approach an obstacle, and
RBAS PLUS has detected a risk of collision
When driving at a speed under 20 mph
(30 km/h): if you depress the brake pedal, BAS
PLUS is activated. The increase in brake pres-
sure will be carried out at the last possible
moment.
When driving at a speed above 20 mph
(30 km/h): if you depress the brake pedal
sharply, BAS PLUS automatically raises the
brake pressure to a value adapted to the traffic
situation.
BAS PLUS provides braking assistance in haz-
ardous situations with vehicles in front within a
speed range between 4 mph (7 km/h) and
155 mph (250 km/h).
Up to a speed of approximately 44 mph
(70 km/h), BAS PLUS may react to:
Rstationary objects in the path of your vehicle,
e.g. stopped or parked vehicles
Rpedestrians in the path of your vehicle
Robstacles crossing your path, which move in
the detection range of the sensors and are
recognized by them
iIf BAS PLUS demands particularly high brak-
ing force, preventative passenger protection
measures (PRE-SAFE
®) are activated simulta-
neously.
XKeep the brake pedal depressed until the
emergency braking situation is over.
ABS prevents the wheels from locking.
BAS PLUS is deactivated and the brakes func-
tion as usual, if:
Ryou release the brake pedal.
Rthere is no longer a risk of collision.
Rno obstacle is detected in front of your vehi-
cle.
Ryou depress the accelerator pedal.
Ryou activate kickdown.
COLLISION PREVENTION ASSIST
PLUS
General information
iObserve the "Important safety notes" sec-
tion (Ypage 61).
COLLISION PREVENTION ASSIST PLUS consists
of a distance warning function with an autono-
mous braking function and adaptive Brake
Assist.
COLLISION PREVENTION ASSIST PLUS can help
you to minimize the risk of a front-end collision
with a vehicle ahead or reduce the effects of
such a collision.
If COLLISION PREVENTION ASSIST PLUS
detects that there is a risk of a collision, you will
be warned visually and acoustically. If you do not
react to the visual and audible collision warning,
autonomous braking can be initiated in critical
situations. If you apply the brake yourself in a
critical situation, the COLLISION PREVENTION
ASSIST PLUS adaptive Brake Assist assists you.
Important safety notes
In particular, the detection of obstacles can be
impaired if:
Rthere is dirt on the sensors or anything else
covering the sensors
Rthere is snow or heavy rain
Rthere is interference by other radar sources
Rthere are strong radar reflections, for exam-
ple in parking garages
Ra narrow vehicle is traveling in front, e.g. a
motorbike
Ra vehicle is traveling in front on a different line
Rnew vehicles or after a service on the COLLI-
SION PREVENTION ASSIST PLUS system
Observe the notes in the section on breaking-
in (
Ypage 127).
Following damage to the front end of the vehicle,
have the configuration and operation of the
radar sensor checked at a qualified specialist
workshop. This also applies to collisions at slow
speeds where there is no visible damage to the
front of the vehicle.
64Driving safety systems
Safety
Page 67 of 322

Activating/deactivating
The COLLISION PREVENTION ASSIST PLUSis
automatically active after switching on th eigni-
tion .
You can activat eor deactivat eCOLLISION PRE -
VENTION ASSIST PLU Sin th eon-board com-
puter (
Ypage 197). When deactivated, th edis-
tance warning function and th eautonomous
braking function are also deactivated.
If COLLISION PREVENTION ASSIST PLU Sis
deactivated, th eæ symbol appear sin th e
assistanc egraphic sdisplay.
Distance warning function
Genera linformation
The distanc ewarning function can help you to
minimiz eth eris kof afront-en dcollision wit h a
vehicl eahead or reduce th eeffects of suc h a
collision .If th edistanc ewarning function
detects that there is aris kof acollision ,you will
be warned visually and acoustically.
Important safety notes
iObserv eth e"Importan tsafet ynotes" sec -
tion for drivin gsafet ysystems (Ypage 61).
GWARNIN G
The distanc ewarning function does no treact:
Rto people or animals
Rto oncomin gvehicles
Rto crossing traffic
Rwhen cornering
Thus ,th edistanc ewarning function canno t
provid e awarning in all critical situations.
There is aris kof an accident.
Always pay careful attention to th etraffic sit -
uation and be read yto brake.
GWARNIN G
The distanc ewarning function canno talways
clearly identify objects and complex traffic
situations.
In suc hcases, th edistanc ewarning function
may:
Rgiv ean unnecessary warning
Rno tgiv e a warning
There is aris kof an accident.
Always pay careful attention to th etraffic sit -
uation and do no trel ysolely on th edistanc e
warning function .
Function
Starting ataspee dof around 4mph (7 km/h),
th edistanc ewarning function warn syou if you
rapidly approac h avehicl ein front. An intermit -
tent warning tone will then sound, and th e·
distanc ewarning lamp will ligh tup in th einstru-
men tcluster.
XBrake immediately in order to increas eth e
distanc efrom th evehicl ein front.
or
XTak eevasive action ,provided it is saf eto do
so.
Due to th enature of th esystem, particularly
complicated but non-critical drivin gcondition s
may also caus eth esystem to display awarning .
Wit hth ehelp of th eradar sensor system, th e
distanc ewarning function can detec tobstacles
that are in th epat hof your vehicl efor an exten-
ded period of time.
Up to aspee dof around 44 mph (70 km/h), th e
distanc ewarning function can also reac tto sta-
tionary obstacles, suc has stoppe dor parked
vehicles.
Aut onom ous braking function
If thedriver does no treac tto th edistanc ewarn -
ing signal in acritical situation ,COLLISION PRE -
VENTION ASSIST PLU Scan assist wit hth e
autonomous braking function .
The autonomous braking function :
Rgives thedriver mor etime to reac tto critical
drivin gsituation s
Rcan help th edriver to avoi dan acciden tor
Rreduce sth eeffects of an acciden t
The autonomous braking function is available in
th efollowin gspee dranges :
Rfrom4mph (7 km/h) to approx .65 mph
(10 5km/ h)for moving objects
Rfrom 4 mph (7 km/h) to approx. 31 mph
(50 km/h) for stationary objects
Due to the nature of the system, particularly
complicated but non-critical driving conditions
may also cause the Autonomous Braking Func-
tion to intervene.
Driving safety systems65
Safety
Z
Page 69 of 322
ESP®assists the driver when pulling away on
wet or slippery roads. ESP®can also stabilize
the vehicle during braking.
ETS (Electronic Traction System)
ETS traction control is part of ESP®.
Traction control brakes the drive wheels indi-
vidually if they spin. This enables you to pull
away and accelerate on slippery surfaces, for
example if the road surface is slippery on one
side. In addition, more drive torque is transfer-
red to the wheel or wheels with traction.
Traction control remains active, even if you
deactivate ESP
®.
Important safety notes
iObserve the "Important safety notes" sec-
tion (Ypage 61).
GWARNING
If ESP
®is malfunctioning, ESP®is unable to
stabilize the vehicle. Additionally, further driv-
ing safety systems are deactivated. This
increases the risk of skidding and an accident.
Drive on carefully. Have ESP
®checked at a
qualified specialist workshop.
When towing the vehicle with the rear axle
raised, observe the notes on ESP
®
(Ypage 282).
If the å ESP®OFF warning lamp lights up
continuously, then ESP®is deactivated.
If the ÷ ESP®warning lamp and the å
ESP®OFF warning lamp are lit continuously,
ESP®is not available due to a malfunction.
Observe the information on warning lamps
(
Ypage 227) and display messages which may
be shown in the instrument cluster
(
Ypage 203).
iOnly use wheels with the recommended tire
sizes. Only then will ESP®function properly.
Characteristics of ESP®
General information
If the ÷ ESP warning lamp goes out before
beginning the journey, ESP®is automatically
active. If ESP
®intervenes, the
÷ESP®warning lamp
flashes in the instrument cluster.
If ESP
®intervenes:
XDo not deactivate ESP®under any circum-
stances.
XOnly depress the accelerator pedal as far as
necessary when pulling away.
XAdapt your driving style to suit the prevailing
road and weather conditions.
ECO start/stop function
The ECO start/stop function switches the
engine off automatically when the vehicle stops
moving. The engine starts automatically when
the driver wants to pull away again. ESP
®
remains in its previously selected status. Exam-
ple: if ESP®was deactivated before the engine
was switched off, ESP®remains deactivated
when the engine is switched on again.
Deactivating/activating ESP®
Important safety notes
You can select between the following states of
ESP®:
RESP®is activated.
RESP®is deactivated.
GWARNING
If you deactivate ESP
®, ESP®no longer sta-
bilizes the vehicle. There is an increased risk
of skidding and an accident.
Only deactivate ESP
®in the situations descri-
bed in the following.
It may be best to deactivate ESP
®in the follow-
ing situations:
Rwhen using snow chains
Rin deep snow
Ron sand or gravel
iActivate ESP®as soon as the situations
described above no longer apply. ESP®will
otherwise not be able to stabilize the vehicle if
the vehicle starts to skid or a wheel starts to
spin.
!Avoid spinning the driven wheels for an
extended period with ESP®deactivated. You
could otherwise damage the drivetrain.
Driving safet ysystem s67
Safety
Z
Page 72 of 322
Always pay careful attention to the traffic sit-uation and be ready to brake.
In the event of snowfall or heavy rain, the rec-
ognition can be impaired.
Recognition by the radar sensor system is also
impaired if:
Rthere is dirt on the sensors or anything else
covering the sensors
Rthere is interference by other radar sources
Rthere are strong radar reflections, for exam-
ple in parking garages
Ra narrow vehicle is traveling in front, e.g. a
motorbike
Ra vehicle is traveling in front on a different line
relative to the center of your vehicle
Recognition by the camera system is also
impaired in the event of:
Rdirt on the camera or if the camera is covered
Rglare on the camera system, e.g. from the sun being low in the sky
Rdarkness
Ror if:
-pedestrians move quickly, e.g. into the path
of the vehicle
-the camera system no longer recognizes a
pedestrian as a person due to special cloth-ing or other objects
-a pedestrian is concealed by other objects
-the typical outline of a person is not distin-
guishable from the background
Following damage to the front end of the vehicle,
have the configuration and operation of the
radar sensors checked at a qualified specialist
workshop . T
his also applies to collisions at slow
speeds where there is no visible damage to the
front of the vehicle.
Following damage to the windshield, have the
configuration and operation of the camera sys-
tem checked at a qualified specialist workshop.
Function
XTo activate/deactivate: activate or deacti-
vate PRE-SAFE®Brake in the on-board com-
puter (Ypage 197).
If the PRE-SAFE®Brake is not activated, the
æ symbol appears in the multifunction dis-
play. Starting at a speed of around 4 mph (7 km/h),
this function warns you if you rapidly approach a
vehicle in front. An intermittent warning tone
will then sound and the
·distance warning
lamp will light up in the instrument cluster.
XBrake immediately to defuse the situation.
or
XTake evasive action provided it is safe to do
so.
PRE-SAFE
®Brake can also brake the vehicle
automatically under the following conditions:
Rthe driver and front-passenger have their seat
belts fastened
and
Rthe vehicle speed is between approximately
4 mph (7 km/h) and 124 mph (200 km/h)
At speeds of up to approximately 44 mph
(70 km/h) PRE-SAFE
®Brake can also detect:
Rstationary objects in the path of your vehicle,
e.g. stopped or parked vehicles
Rpedestrians in the path of your vehicle
iIf there is an increased risk of a collision,
preventive passenger protection measures
(PRE-SAFE
®) are triggered (Ypage 55).
If the risk of collision with the vehicle in front
remains and you do not bra ke, ta
ke evasive
action or accelerate significantly, the vehicle
may perform automatic emergency braking, up
to the point of full brake application. Automatic
emergency braking is not performed until imme-
diately prior to an imminent accident.
You can prevent the intervention of the PRE-
SAFE
®Brake at any time by:
Rdepressing the accelerator pedal further.
Ractivating kickdown.
Rreleasing the brake pedal.
The braking action of PRE-SAFE®Brake is ended
automatically if:
Ryou maneuver to avoid the obstacle.
Rthere is no longer a risk of collision.
Rthere is no longer an obstacle detected in
front of your vehicle.
70Driving safety systems
Safety
Page 73 of 322
STEER CONTROL
General information
STEER CONTROL helps you by transmitting a
noticeable steering force to the steering wheel
in the direction required for vehicle stabilization.
This steering assistance is provided in particular
if:
RESP®is deactivated
Rboth right wheels or both left wheels are on a
slippery road surface when you brake heavily
Rthe vehicle starts to skid
Important safety notes
iObserve the "Important safety notes" sec-
tion (Ypage 61).
No steering support is provided by STEER CON- TROL, if:
RESP®is malfunctioning.
Rthe lighting is faulty.
Power steering will, however, continue to func-
tion.
Protection against theft
Immobilizer
The immobilizer prevents your vehicle from
being started without the correct SmartKey.
XTo activate with the SmartKey: remove the
SmartKey from the ignition lock.
XTo activate with KEYLESS-GO: switch the
ignition off and open the driver's door.
XTo deactivate: switch on the ignition.
When leaving the vehicle, always take the
SmartKey with you and lock the vehicle. Anyone
can start the engine if a valid SmartKey has been
left inside the vehicle.
iThe immobilizer is always deactivated when
you start the engine.
In the event that the engine cannot be started
(yet the vehicle's battery is charged), the sys-
tem is not operational. Contact an authorized
Mercedes-Benz Center or call
1-800-FOR-MERCedes (in the USA) or
1-800-387-0100 (in Canada).
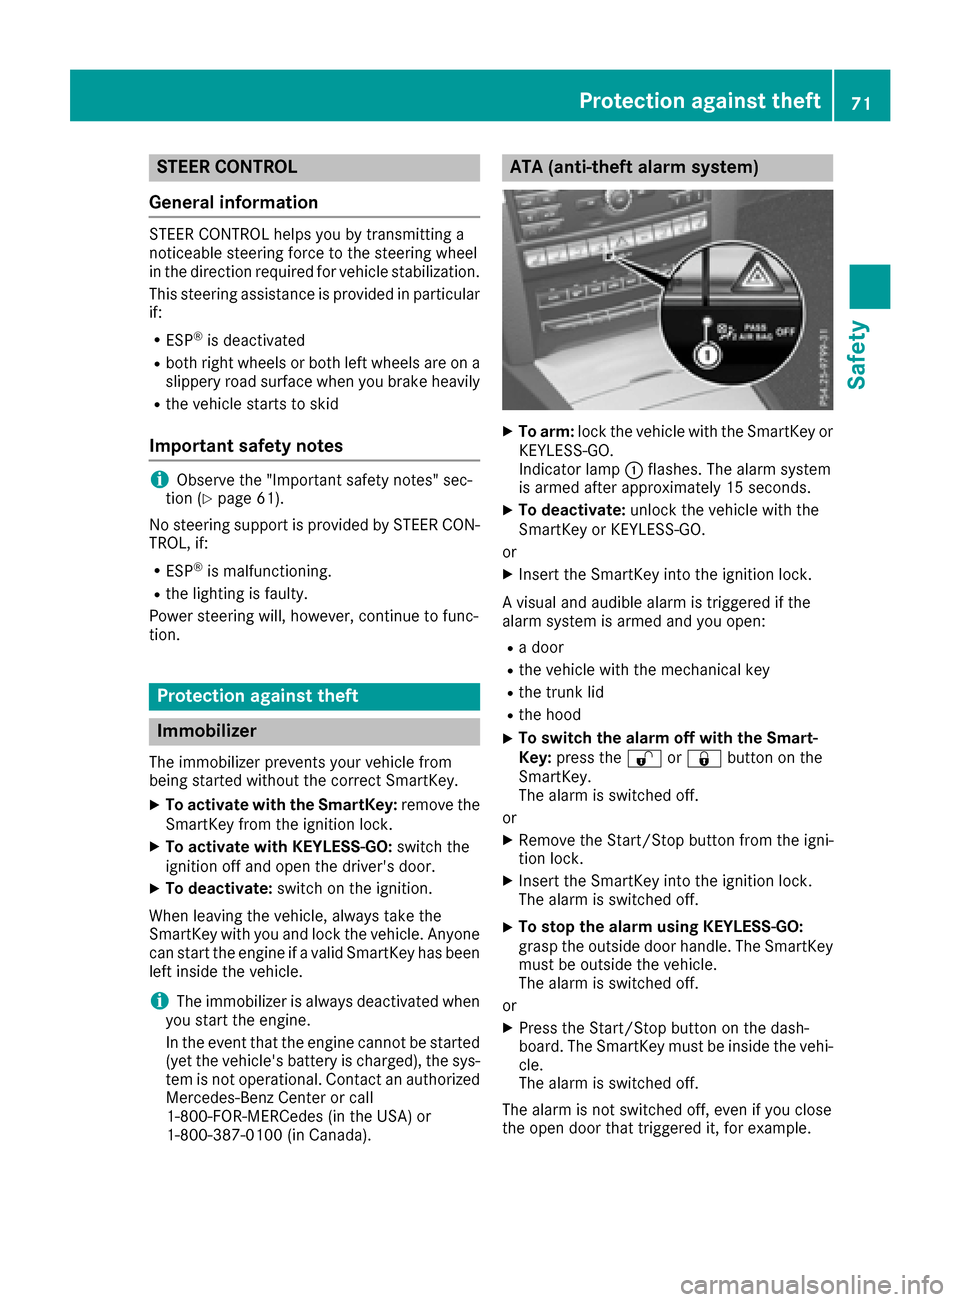
ATA (anti-theft alarm system)
XTo arm: lock the vehicle with the SmartKey or
KEYLESS-GO.
Indicator lamp :flashes. The alarm system
is armed after approximately 15 seconds.
XTo deactivate: unlock the vehicle with the
SmartKey or KEYLESS-GO.
or
XInsert the SmartKey into the ignition lock.
A visual and audible alarm is triggered if the
alarm system is armed and you open:
Ra door
Rthe vehicle with the mechanical key
Rthe trunk lid
Rthe hood
XTo switch the alarm off with the Smart-
Key: press the %or& button on the
SmartKey.
The alarm is switched off.
or
XRemove the Start/Stop button from the igni-
tion lock.
XInsert the SmartKey into the ignition lock.
The alarm is switched off.
XTo stop the alarm using KEYLESS-GO:
grasp the outside door handle. The SmartKey
must be outside the vehicle.
The alarm is switched off.
or
XPress the Start/Stop button on the dash-
board. The SmartKey must be inside the vehi-
cle.
The alarm is switched off.
The alarm is not switched off, even if you close
the open door that triggered it, for example.
Protection against theft71
Safety
Z
Page 85 of 322

Make sure that no body parts are in close
proximity during the closing procedure. If
someone becomes trapped, press the switch
to open the side window again.
Opening and closing the side win-
dows
The switches for all side windows are located onthe driver's door. There is also a switch on the
front-passenger door as well as on the doors in
the rear compartment on the left and right-hand
sides for the respective side window.
The switches on the driver's door take prece-
dence.
:Front left
;Front right
=Rear right
?Rear left
XTurn the SmartKey to position 1or 2in the
ignition lock.
XTo open manually: press and hold the cor-
responding switch.
XTo open fully: press the switch beyond the
point of resistance and release it.
Automatic operation is started.
XTo close manually: pull and hold the corre-
sponding switch.
XTo close fully: pull the corresponding switch
beyond the pressure point.
Automatic operation is started.
XTo interrupt automatic operation: press/
pull the corresponding switch again.
You can start automatic operation when open-
ing and closing the front door windows and
when opening the rear door windows. To do so,
briefly press or pull the switch to beyond the point of resistance in the relevant direction. You
can stop automatic operation by pressing or
pulling again.
You can continue to operate the side windows
after you switch off the engine or remove the
SmartKey. This function is available for up to five
minutes or until the driver's or front-passenger
door is opened.
When the override feature for the side windows
is activated, the side windows cannot be oper-
ated from the rear (
Ypage 61).
Opening and closing all side windows
Using the switch on the center console
GWARNING
While opening the side windows, body parts in
the closing area could become trapped. There is a risk of injury.
Make sure that no body parts are in close
proximity during the closing procedure. If
somebody becomes trapped, release the
switch or press the switch down to open the
side window again.
You can use the switch on the center console to
close all side windows simultaneously.
XOpen the cover in the lower center console.
The switch for all side windows is under the
cover.
XTo open all side windows: press switch:
to the point of resistance.
XTo open all side windows fully: press
switch :beyond the point of resistance.
XTo close all side windows: pull switch:.
Side windows83
Opening and closing
Z
Page 86 of 322
Using the SmartKey
GWARNING
While closing the side windows, body parts in
the closing area could become trapped. There is a risk of injury.
When closing make sure that no parts of the
body are in the closing area. If somebody
becomes trapped, release the switch or press
the switch to open the side window again.
You can use the SmartKey to open or close all
side windows simultaneously. The SmartKey
must be near the door handle.
XClose the soft top (Ypage 86).
XOpen the trunk partition (Ypage 91).
XTo open all side windows: press the%
button on the SmartKey until the side win-
dows are fully opened.
XTo interrupt the opening procedure:
release the %button.
XTo close all side windows: press the&
button on the SmartKey until the side win-
dows are fully closed.
XTo interrupt the closing procedure: release
the & button.
Convenience closing with KEYLESS-GO
GWARNING
When using the convenience closing feature,
parts of the body could be trapped in the clos-
ing area when a side window is being closed.
There is a risk of injury.
Observe the complete closing procedure
when the convenience closing feature is oper-
ating. Make sure that no body parts are in
close proximity during the closing procedure.
Proceed as follows if someone is trapped:
XRelease recessed sensor surface on the door
handle.
XImmediately pull and hold the door handle
and keep the door handle pulled.
The side windows open.
With KEYLESS-GO you can close all side win-
dows simultaneously. The KEYLESS-GO key
must be outside the vehicle. All the doors must
be closed.
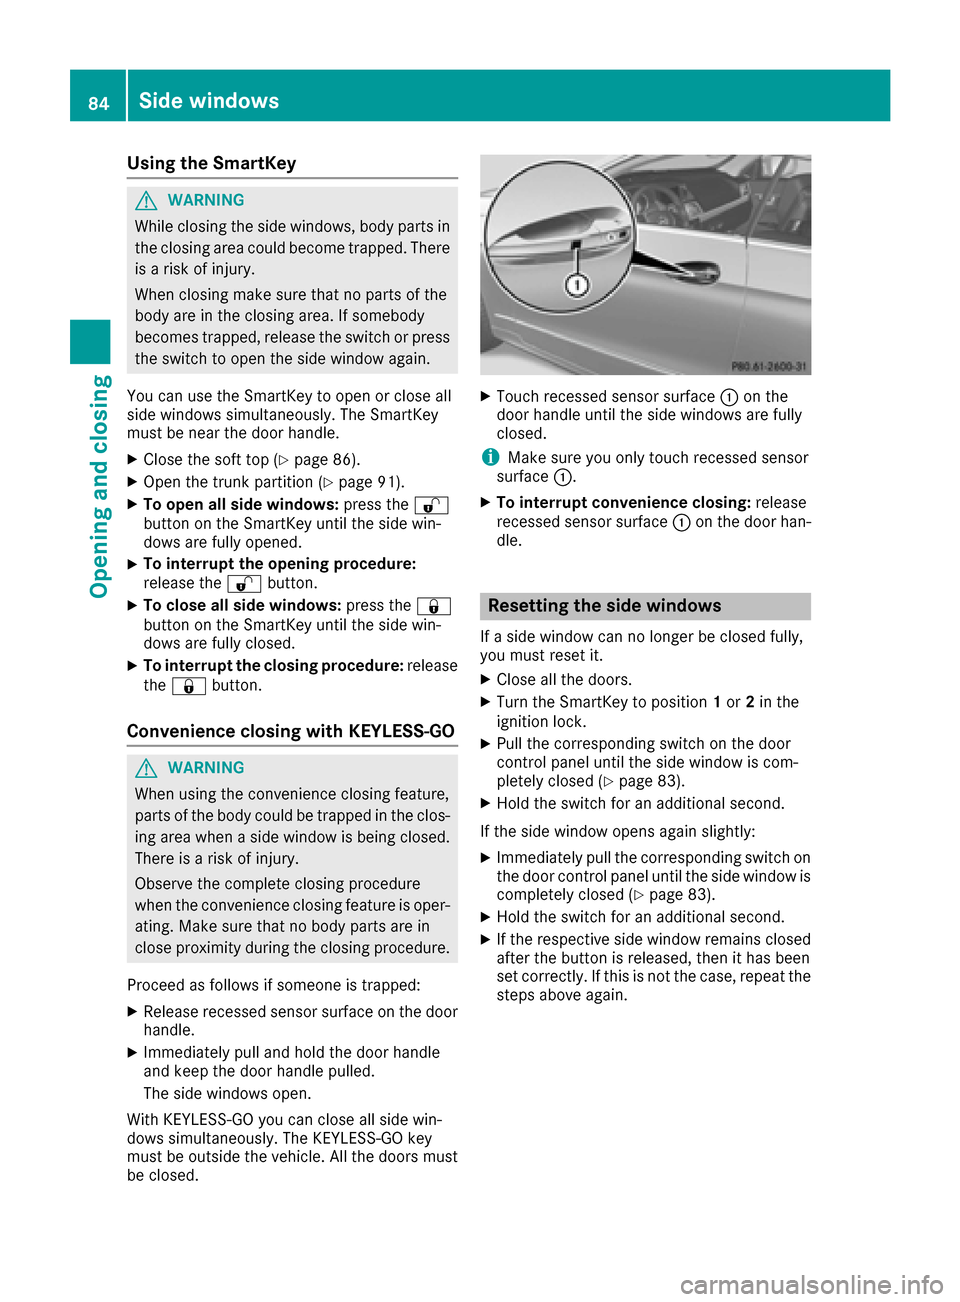
XTouch recessed sensor surface :on the
door handle until the side windows are fully
closed.
iMake sure you only touch recessed sensor
surface :.
XTo interrupt convenience closing: release
recessed sensor surface :on the door han-
dle.
Resetting the side windows
If a side window can no longer be closed fully,
you must reset it.
XClose all the doors.
XTurn the SmartKey to position 1or 2in the
ignition lock.
XPull the corresponding switch on the door
control panel until the side window is com-
pletely closed (
Ypage 83).
XHold the switch for an additional second.
If the side window opens again slightly:
XImmediately pull the corresponding switch on
the door control panel until the side window is
completely closed (
Ypage 83).
XHold the switch for an additional second.
XIf the respective side window remains closed
after the button is released, then it has been
set correctly. If this is not the case, repeat the
steps above again.
84Side windows
Opening and closing