warning light MERCEDES-BENZ E-Class CABRIOLET 2017 A207 Owner's Guide
[x] Cancel search | Manufacturer: MERCEDES-BENZ, Model Year: 2017, Model line: E-Class CABRIOLET, Model: MERCEDES-BENZ E-Class CABRIOLET 2017 A207Pages: 322, PDF Size: 7.97 MB
Page 69 of 322
ESP®assists the driver when pulling away on
wet or slippery roads. ESP®can also stabilize
the vehicle during braking.
ETS (Electronic Traction System)
ETS traction control is part of ESP®.
Traction control brakes the drive wheels indi-
vidually if they spin. This enables you to pull
away and accelerate on slippery surfaces, for
example if the road surface is slippery on one
side. In addition, more drive torque is transfer-
red to the wheel or wheels with traction.
Traction control remains active, even if you
deactivate ESP
®.
Important safety notes
iObserve the "Important safety notes" sec-
tion (Ypage 61).
GWARNING
If ESP
®is malfunctioning, ESP®is unable to
stabilize the vehicle. Additionally, further driv-
ing safety systems are deactivated. This
increases the risk of skidding and an accident.
Drive on carefully. Have ESP
®checked at a
qualified specialist workshop.
When towing the vehicle with the rear axle
raised, observe the notes on ESP
®
(Ypage 282).
If the å ESP®OFF warning lamp lights up
continuously, then ESP®is deactivated.
If the ÷ ESP®warning lamp and the å
ESP®OFF warning lamp are lit continuously,
ESP®is not available due to a malfunction.
Observe the information on warning lamps
(
Ypage 227) and display messages which may
be shown in the instrument cluster
(
Ypage 203).
iOnly use wheels with the recommended tire
sizes. Only then will ESP®function properly.
Characteristics of ESP®
General information
If the ÷ ESP warning lamp goes out before
beginning the journey, ESP®is automatically
active. If ESP
®intervenes, the
÷ESP®warning lamp
flashes in the instrument cluster.
If ESP
®intervenes:
XDo not deactivate ESP®under any circum-
stances.
XOnly depress the accelerator pedal as far as
necessary when pulling away.
XAdapt your driving style to suit the prevailing
road and weather conditions.
ECO start/stop function
The ECO start/stop function switches the
engine off automatically when the vehicle stops
moving. The engine starts automatically when
the driver wants to pull away again. ESP
®
remains in its previously selected status. Exam-
ple: if ESP®was deactivated before the engine
was switched off, ESP®remains deactivated
when the engine is switched on again.
Deactivating/activating ESP®
Important safety notes
You can select between the following states of
ESP®:
RESP®is activated.
RESP®is deactivated.
GWARNING
If you deactivate ESP
®, ESP®no longer sta-
bilizes the vehicle. There is an increased risk
of skidding and an accident.
Only deactivate ESP
®in the situations descri-
bed in the following.
It may be best to deactivate ESP
®in the follow-
ing situations:
Rwhen using snow chains
Rin deep snow
Ron sand or gravel
iActivate ESP®as soon as the situations
described above no longer apply. ESP®will
otherwise not be able to stabilize the vehicle if
the vehicle starts to skid or a wheel starts to
spin.
!Avoid spinning the driven wheels for an
extended period with ESP®deactivated. You
could otherwise damage the drivetrain.
Driving safet ysystem s67
Safety
Z
Page 72 of 322
Always pay careful attention to the traffic sit-uation and be ready to brake.
In the event of snowfall or heavy rain, the rec-
ognition can be impaired.
Recognition by the radar sensor system is also
impaired if:
Rthere is dirt on the sensors or anything else
covering the sensors
Rthere is interference by other radar sources
Rthere are strong radar reflections, for exam-
ple in parking garages
Ra narrow vehicle is traveling in front, e.g. a
motorbike
Ra vehicle is traveling in front on a different line
relative to the center of your vehicle
Recognition by the camera system is also
impaired in the event of:
Rdirt on the camera or if the camera is covered
Rglare on the camera system, e.g. from the sun being low in the sky
Rdarkness
Ror if:
-pedestrians move quickly, e.g. into the path
of the vehicle
-the camera system no longer recognizes a
pedestrian as a person due to special cloth-ing or other objects
-a pedestrian is concealed by other objects
-the typical outline of a person is not distin-
guishable from the background
Following damage to the front end of the vehicle,
have the configuration and operation of the
radar sensors checked at a qualified specialist
workshop . T
his also applies to collisions at slow
speeds where there is no visible damage to the
front of the vehicle.
Following damage to the windshield, have the
configuration and operation of the camera sys-
tem checked at a qualified specialist workshop.
Function
XTo activate/deactivate: activate or deacti-
vate PRE-SAFE®Brake in the on-board com-
puter (Ypage 197).
If the PRE-SAFE®Brake is not activated, the
æ symbol appears in the multifunction dis-
play. Starting at a speed of around 4 mph (7 km/h),
this function warns you if you rapidly approach a
vehicle in front. An intermittent warning tone
will then sound and the
·distance warning
lamp will light up in the instrument cluster.
XBrake immediately to defuse the situation.
or
XTake evasive action provided it is safe to do
so.
PRE-SAFE
®Brake can also brake the vehicle
automatically under the following conditions:
Rthe driver and front-passenger have their seat
belts fastened
and
Rthe vehicle speed is between approximately
4 mph (7 km/h) and 124 mph (200 km/h)
At speeds of up to approximately 44 mph
(70 km/h) PRE-SAFE
®Brake can also detect:
Rstationary objects in the path of your vehicle,
e.g. stopped or parked vehicles
Rpedestrians in the path of your vehicle
iIf there is an increased risk of a collision,
preventive passenger protection measures
(PRE-SAFE
®) are triggered (Ypage 55).
If the risk of collision with the vehicle in front
remains and you do not bra ke, ta
ke evasive
action or accelerate significantly, the vehicle
may perform automatic emergency braking, up
to the point of full brake application. Automatic
emergency braking is not performed until imme-
diately prior to an imminent accident.
You can prevent the intervention of the PRE-
SAFE
®Brake at any time by:
Rdepressing the accelerator pedal further.
Ractivating kickdown.
Rreleasing the brake pedal.
The braking action of PRE-SAFE®Brake is ended
automatically if:
Ryou maneuver to avoid the obstacle.
Rthere is no longer a risk of collision.
Rthere is no longer an obstacle detected in
front of your vehicle.
70Driving safety systems
Safety
Page 75 of 322
SmartKey
Important safety notes
GWARNING
If children are left unsupervised in the vehicle,
they could:
Ropen the doors, thus endangering other
people or road users.
Rget out and disrupt traffic.
Roperate the vehicle's equipment.
Additionally, children could set the vehicle in
motion if, for example, they:
Rrelease the parking brake.
Rshifting the automatic transmission out of
park position P
RStart the engine.
There is a risk of an accident and injury.
When leaving the vehicle, always take the
SmartKey with you and lock the vehicle. Never
leave children or animals unattended in the
vehicle. Always keep the SmartKey out of
reach of children.
GWARNING
If you attach heavy or large objects to the
SmartKey, the SmartKey could be uninten-
tionally turned in the ignition lock. This could
cause the engine to be switched off. There is a risk of an accident.
Do not attach any heavy or large objects to the
SmartKey. Remove any bulky key rings before
inserting the SmartKey into the ignition lock.
!Keep the SmartKey away from strong mag-
netic fields. Otherwise, the remote control
function could be affected.
Strong magnetic fields can occur in the vicin-
ity of powerful electrical installations.
Do not keep the SmartKey:
Rwith electronic devices, e.g. a mobile phone
or another SmartKey.
Rwith metallic objects, e.g. coins or metal foil.
Rinside metallic objects, e.g. a metal case.
This can affect the functionality of the Smart- Key.
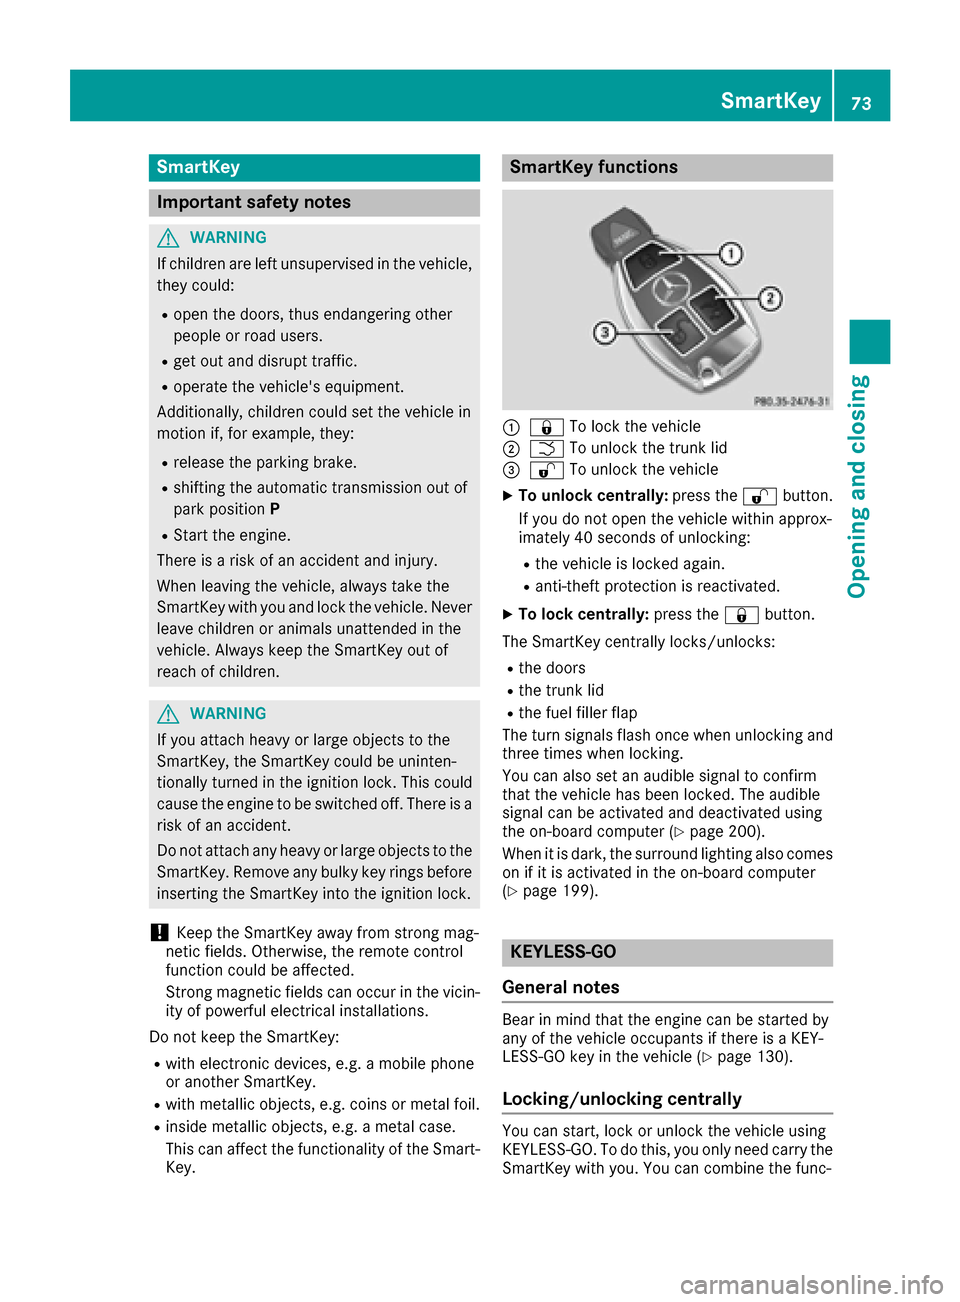
SmartKey functions
:& To lock the vehicle
;FTo unlock the trunk lid
=%To unlock the vehicle
XTo unlock centrally: press the%button.
If you do not open the vehicle within approx-
imately 40 seconds of unlocking:
Rthe vehicle is locked again.
Ranti-theft protection is reactivated.
XTo lock centrally: press the&button.
The SmartKey centrally locks/unlocks:
Rthe doors
Rthe trunk lid
Rthe fuel filler flap
The turn signals flash once when unlocking and
three times when locking.
You can also set an audible signal to confirm
that the vehicle has been locked. The audible
signal can be activated and deactivated using
the on-board computer (
Ypage 200).
When it is dark, the surround lighting also comes
on if it is activated in the on-board computer
(
Ypage 199).
KEYLESS-GO
General notes
Bear in mind that the engine can be started by
any of the vehicle occupants if there is a KEY-
LESS-GO key in the vehicle (
Ypage 130).
Locking/unlocking centrally
You can start, lock or unlock the vehicle using
KEYLESS-GO. To do this, you only need carry the
SmartKey with you. You can combine the func-
SmartKey73
Opening and closing
Z
Page 80 of 322
ProblemPossible causes/consequences andMSolutions
The engine cannot be
started using the Smart-
Key.The on-board voltage is too low.
XSwitch off non-essential consumers, e.g. seat heating or interior
lighting, and try to start the engine again.
If this does not work:
XCheck the starter battery and charge it if necessary (Ypage 276).
or
XJump-start the vehicle (Ypage 278).
or
XConsult a qualified specialist workshop.
The engine cannot be
started using KEYLESS-
GO. The SmartKey is in
the vehicle.The vehicle is locked.
XUnlock the vehicle and try to start the vehicle again.
There is interference from a powerful source of radio waves.
XStart your vehicle with the SmartKey in the ignition lock.
You have lost a Smart-
Key.XHave the SmartKey deactivated at a qualified specialist workshop.
XReport the loss immediately to the vehicle insurers.
XIf necessary, have the locks changed as well.
You have lost the
mechanical key.XReport the loss immediately to the vehicle insurers.
XIf necessary, have the locks changed as well.
Doors
Important safety notes
GWARNING
If children are left unsupervised in the vehicle,
they could:
Ropen the doors, thus endangering other
people or road users.
Rget out and disrupt traffic.
Roperate the vehicle's equipment.
Additionally, children could set the vehicle in
motion if, for example, they:
Rrelease the parking brake.
Rshifting the automatic transmission out of
park position P
RStart the engine.
There is a risk of an accident and injury.
When leaving the vehicle, always take the
SmartKey with you and lock the vehicle. Never
leave children or animals unattended in the
vehicle. Always keep the SmartKey out of
reach of children.
Unlocking and opening doors from
the inside
!
The side windows will not open/close if the
battery is discharged or if the side windows
have iced up. It will then not be possible to
close the door. Do not attempt to force the
door closed. You could otherwise damage the
door or the side window.
78Doors
Opening and closing
Page 84 of 322
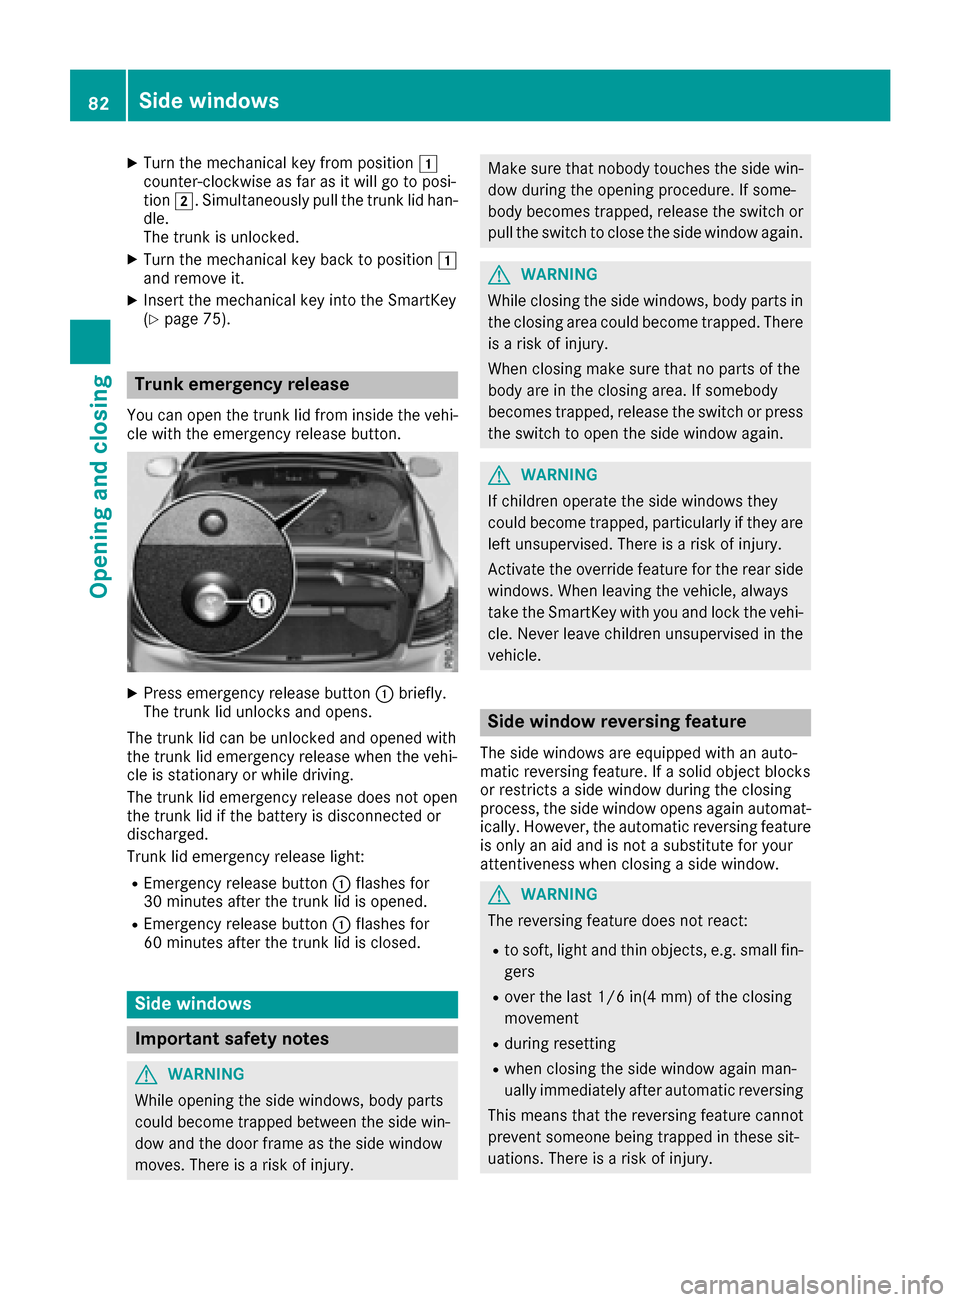
XTurn the mechanical key from position1
counter-clockwise as far as it will go to posi-
tion 2. Simultaneously pull the trunk lid han-
dle.
The trunk is unlocked.
XTurn the mechanical key back to position 1
and remove it.
XInsert the mechanical key into the SmartKey
(Ypage 75).
Trunk emergency release
You can open the trunk lid from inside the vehi-
cle with the emergency release button.
XPress emergency release button :briefly.
The trunk lid unlocks and opens.
The trunk lid can be unlocked and opened with
the trunk lid emergency release when the vehi-
cle is stationary or while driving.
The trunk lid emergency release does not open
the trunk lid if the battery is disconnected or
discharged.
Trunk lid emergency release light:
REmergency release button :flashes for
30 minutes after the trunk lid is opened.
REmergency release button :flashes for
60 minutes after the trunk lid is closed.
Side windows
Important safety notes
GWARNING
While opening the side windows, body parts
could become trapped between the side win-
dow and the door frame as the side window
moves. There is a risk of injury.
Make sure that nobody touches the side win- dow during the opening procedure. If some-
body becomes trapped, release the switch or
pull the switch to close the side window again.
GWARNING
While closing the side windows, body parts in
the closing area could become trapped. There is a risk of injury.
When closing make sure that no parts of the
body are in the closing area. If somebody
becomes trapped, release the switch or press
the switch to open the side window again.
GWARNING
If children operate the side windows they
could become trapped, particularly if they are left unsupervised. There is a risk of injury.
Activate the override feature for the rear side
windows. When leaving the vehicle, always
take the SmartKey with you and lock the vehi-
cle. Never leave children unsupervised in the
vehicle.
Side window reversing feature
The side windows are equipped with an auto-
matic reversing feature. If a solid object blocks
or restricts a side window during the closing
process, the side window opens again automat-
ically. However, the automatic reversing feature
is only an aid and is not a substitute for your
attentiveness when closing a side window.
GWARNING
The reversing feature does not react:
Rto soft, light and thin objects, e.g. small fin-
gers
Rover the last 1/6 in(4 mm) of the closing
movement
Rduring resetting
Rwhen closing the side window again man-
ually immediately after automatic reversing
This means that the reversing feature cannot
prevent someone being trapped in these sit-
uations. There is a risk of injury.
82Side windows
Opening and closing
Page 86 of 322
Using the SmartKey
GWARNING
While closing the side windows, body parts in
the closing area could become trapped. There is a risk of injury.
When closing make sure that no parts of the
body are in the closing area. If somebody
becomes trapped, release the switch or press
the switch to open the side window again.
You can use the SmartKey to open or close all
side windows simultaneously. The SmartKey
must be near the door handle.
XClose the soft top (Ypage 86).
XOpen the trunk partition (Ypage 91).
XTo open all side windows: press the%
button on the SmartKey until the side win-
dows are fully opened.
XTo interrupt the opening procedure:
release the %button.
XTo close all side windows: press the&
button on the SmartKey until the side win-
dows are fully closed.
XTo interrupt the closing procedure: release
the & button.
Convenience closing with KEYLESS-GO
GWARNING
When using the convenience closing feature,
parts of the body could be trapped in the clos-
ing area when a side window is being closed.
There is a risk of injury.
Observe the complete closing procedure
when the convenience closing feature is oper-
ating. Make sure that no body parts are in
close proximity during the closing procedure.
Proceed as follows if someone is trapped:
XRelease recessed sensor surface on the door
handle.
XImmediately pull and hold the door handle
and keep the door handle pulled.
The side windows open.
With KEYLESS-GO you can close all side win-
dows simultaneously. The KEYLESS-GO key
must be outside the vehicle. All the doors must
be closed.
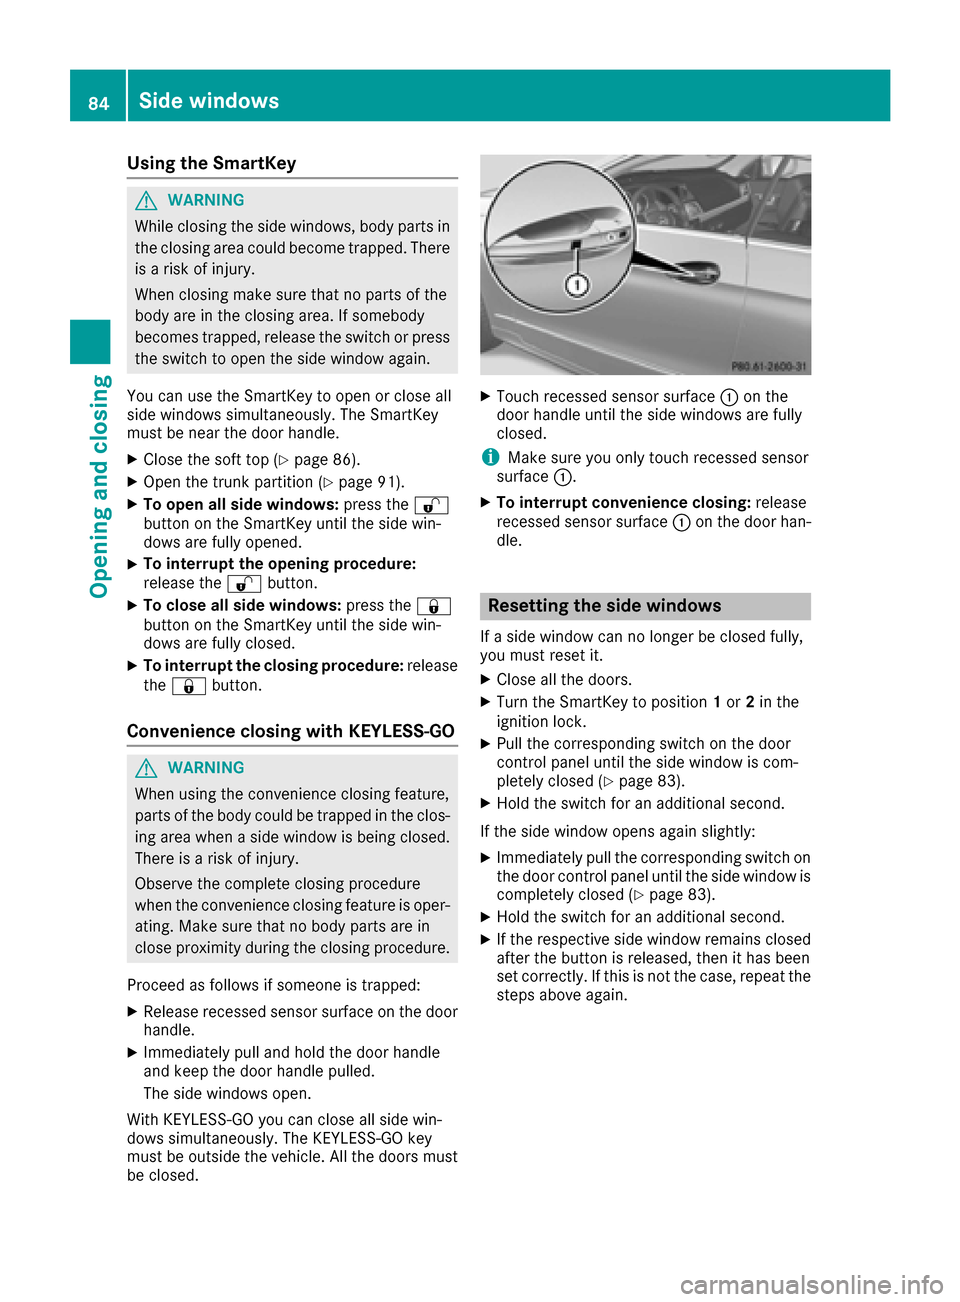
XTouch recessed sensor surface :on the
door handle until the side windows are fully
closed.
iMake sure you only touch recessed sensor
surface :.
XTo interrupt convenience closing: release
recessed sensor surface :on the door han-
dle.
Resetting the side windows
If a side window can no longer be closed fully,
you must reset it.
XClose all the doors.
XTurn the SmartKey to position 1or 2in the
ignition lock.
XPull the corresponding switch on the door
control panel until the side window is com-
pletely closed (
Ypage 83).
XHold the switch for an additional second.
If the side window opens again slightly:
XImmediately pull the corresponding switch on
the door control panel until the side window is
completely closed (
Ypage 83).
XHold the switch for an additional second.
XIf the respective side window remains closed
after the button is released, then it has been
set correctly. If this is not the case, repeat the
steps above again.
84Side windows
Opening and closing
Page 87 of 322
Problems with the side windows
GWARNING
If you close a side window again immediately after it has been blocked or reset, the side window
closes with increased or maximum force. The reversing feature is then not active. Parts of the
body could be trapped in the closing area in the process. This poses an increased risk of injury or
even fatal injury.
Make sure that no parts of the body are in the closing area. To stop the closing process, release
the switch or push the switch again to reopen the side window.
ProblemPossible causes/consequences and MSolutions
A side window cannot be
closed because it is
blocked by objects, e.g.
leaves in the window
guide.XRemove the objects.
XClose the side window.
A side window cannot be
closed and you cannot
see the cause.If a side window is obstructed during closing and reopens again
slightly:
XImmediately after the window blocks, pull the corresponding switch
again until the side window has closed.
The side window is closed with increased force.
If a side window is obstructed again during closing and reopens again slightly:
XImmediately after the window blocks, pull the corresponding switchagain until the side window has closed.
The side window is closed without the automatic reversing feature.
Soft top
Important safety notes
GWARNING
If you do not fully open/close the soft top, the
soft-top hydraulics depressurize after a short
time. This causes the soft top to lower unex-
pectedly and may cause you or others to be
trapped. There is a risk of injury.
Always open or close the soft top completely.
!Never sit on the soft-top compartment
cover or stow heavy objects there. You will
otherwise damage the soft top and soft-top
compartment cover of the vehicle.
!When opening and closing the soft top,
make sure that:
Rthere is sufficient clearance above it, as the soft top swings upwards.
Rthe trunk partition is closed.
Rthe trunk is only loaded to below the trunk
partition.
Rthe trunk partition is not pushed up by the
load.
Rthe trunk lid is closed.
Rthere are no objects on the soft-top com-
partment cover
Rthe fabric is not dirty, wet or frozen.
You could otherwise damage the soft top,
trunk and other parts of the vehicle.
Vehicle height when opening/closing the soft
top (
Ypage 317).
Soft top85
Opening and closing
Z
Page 94 of 322
backrest could collide with the wind screen
here.
The wind screen protects against wind when
driving with the soft top open. It is secured
above the rear bench seats. For this reason, only
the driver and the front passenger can travel in
the vehicle when the wind screen is installed.
XWhen installing the wind screen, use lateral
brackets:.
Observe the manufacturer's installation
instructions.
AIRCAP
Important safety notes
GWARNING
When retracting the AIRCAP, persons could
become caught in the moving mechanism.
There is a risk of injury.
Ensure that persons do not hold onto the
upper frame of the windshield and do not
touch the AIRCAP wind deflector.
With AIRCAP, four people can travel comfortably
with the soft top open. AIRCAP reduces the draft
for the driver and passengers in both the front
and the rear compartment in a vehicle with the
soft top down.
AIRCAP has the following components:
Ra wind deflector between the windshield and
the soft top
Ran AIRCAP wind screen between the two head
restraints on the rear bench seat
You can open or close AIRCAP either when the
vehicle is stationary or when driving up to a
speed of 100 mph (160 km/ h).
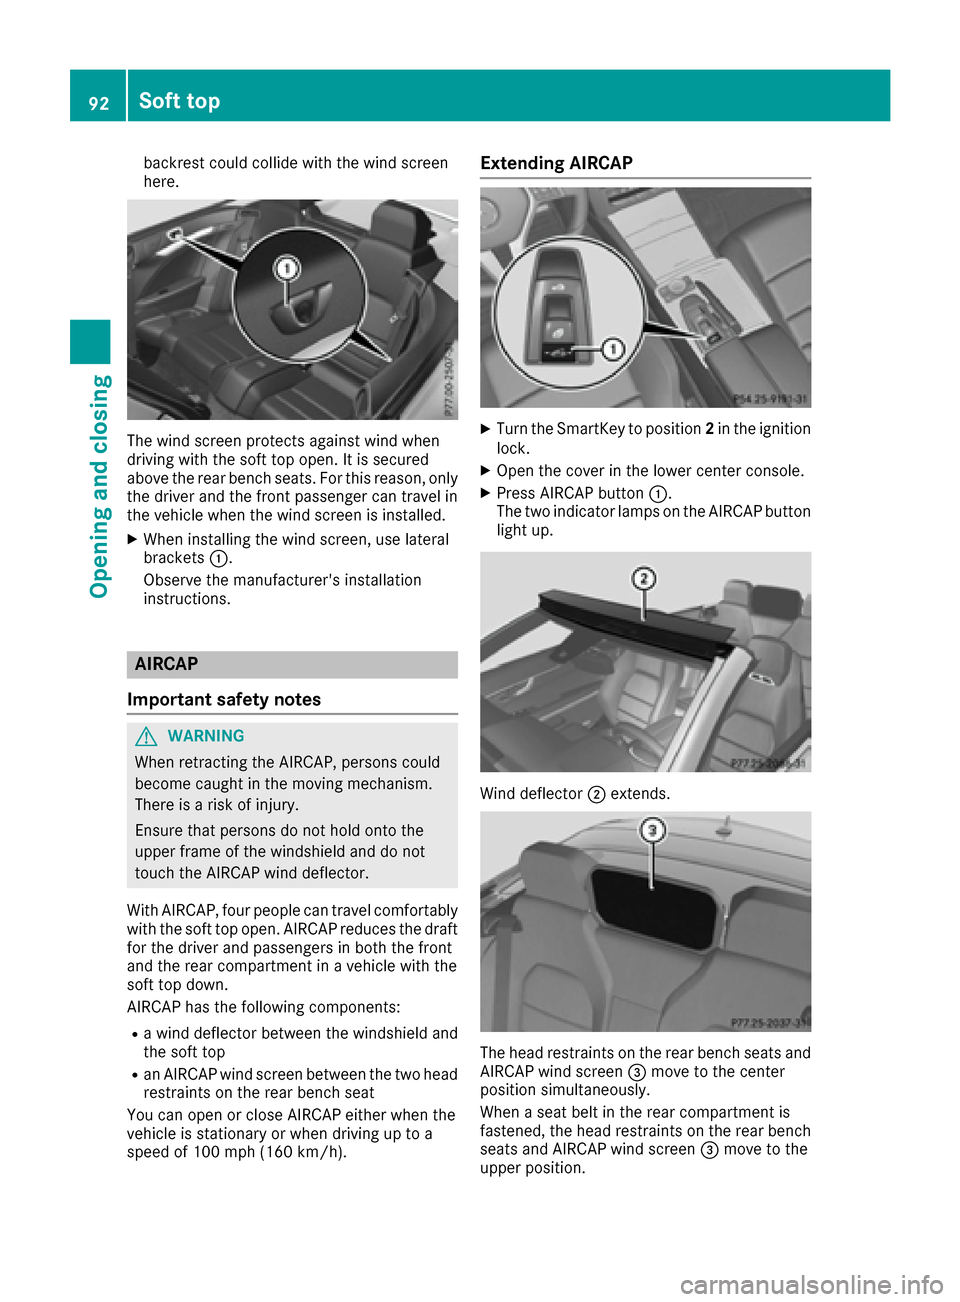
Extending AIRCAP
XTurn the SmartKey to position 2in the ignition
lock.
XOpen the cover in the lower center console.
XPress AIRCAP button :.
The two indicator lamps on the AIRCAP button light up.
Wind deflector ;extends.
The head restraints on the rear bench seats and
AIRCAP wind screen =move to the center
position simultaneously.
When a seat belt in the rear compartment is
fastened, the head restraints on the rear bench seats and AIRCAP wind screen =move to the
upper position.
92Soft top
Opening and closing
Page 98 of 322
Correct driver's seat position
GWARNING
You could lose control of your vehicle if you do the following while driving:
Radjust the driver's seat, head restraint,
steering wheel or mirrors
Rfasten the seat belt
There is a risk of an accident.
Adjust the driver's seat, head restraint, steer-
ing wheel and mirror and fasten your seat belt before starting the engine.
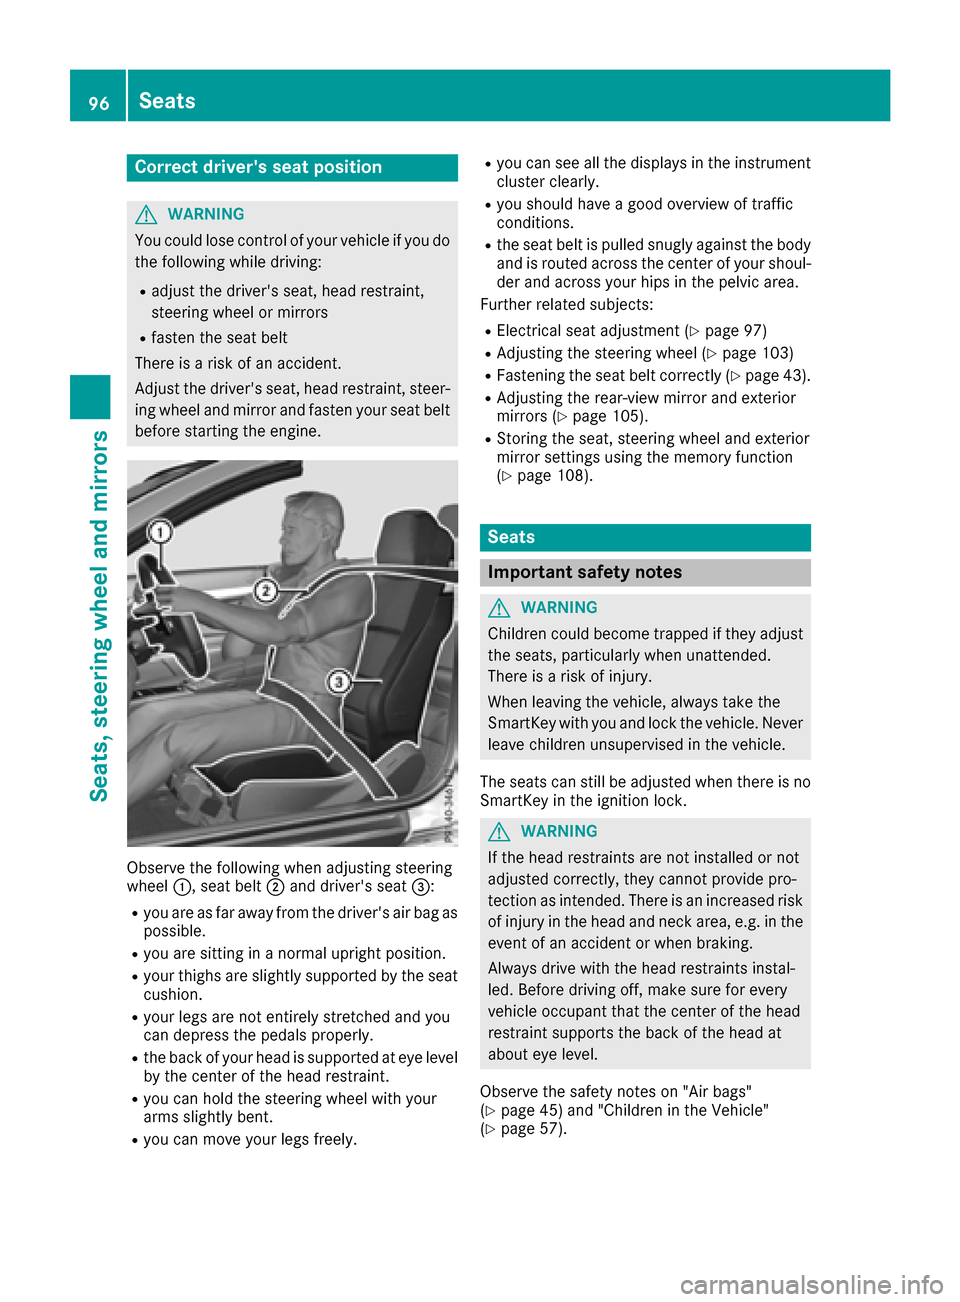
Observe the following when adjusting steering
wheel :, seat belt ;and driver's seat =:
Ryou are as far away from the driver's air bag as
possible.
Ryou are sitting in a normal upright position.
Ryour thighs are slightly supported by the seat
cushion.
Ryour legs are not entirely stretched and you
can depress the pedals properly.
Rthe back of your head is supported at eye level
by the center of the head restraint.
Ryou can hold the steering wheel with your
arms slightly bent.
Ryou can move your legs freely.
Ryou can see all the displays in the instrument
cluster clearly.
Ryou should have a good overview of traffic
conditions.
Rthe seat belt is pulled snugly against the bodyand is routed across the center of your shoul-
der and across your hips in the pelvic area.
Further related subjects:
RElectrical seat adjustment (Ypage 97)
RAdjusting the steering wheel (Ypage 103)
RFastening the seat belt correctly (Ypage 43).
RAdjusting the rear-view mirror and exterior
mirrors (Ypage 105).
RStoring the seat, steering wheel and exterior
mirror settings using the memory function
(
Ypage 108).
Seats
Important safety notes
GWARNING
Children could become trapped if they adjust
the seats, particularly when unattended.
There is a risk of injury.
When leaving the vehicle, always take the
SmartKey with you and lock the vehicle. Never
leave children unsupervised in the vehicle.
The seats can still be adjusted when there is no
SmartKey in the ignition lock.
GWARNING
If the head restraints are not installed or not
adjusted correctly, they cannot provide pro-
tection as intended. There is an increased risk
of injury in the head and neck area, e.g. in the event of an accident or when braking.
Always drive with the head restraints instal-
led. Before driving off, make sure for every
vehicle occupant that the center of the head
restraint supports the back of the head at
about eye level.
Observe the safety notes on "Air bags"
(
Ypage 45) and "Children in the Vehicle"
(Ypage 57).
96Seats
Seats, steering wheel and mirrors
Page 99 of 322
GWARNING
You could lose control of your vehicle if you do the following while driving:
Radjust the driver's seat, head restraint,
steering wheel or mirrors
Rfasten the seat belt
There is a risk of an accident.
Adjust the driver's seat, head restraint, steer-
ing wheel and mirror and fasten your seat belt before starting the engine.
GWARNING
If you adjust the seat height carelessly, you or
other vehicle occupants could be trapped and
thereby injured. Children in particular could
accidentally press the electrical seat adjust-
ment buttons and become trapped. There is a
risk of injury.
While moving the seats, make sure that your
hands or other body parts do not get under the
lever assembly of the seat adjustment sys-
tem.
GWARNING
When you adjust a seat, you or other vehicle
occupants could become trapped, e.g. on the seat guide rail. There is a risk of injury.
Make sure when adjusting a seat that no one
has any body parts in the sweep of the seat.
!To avoid damage to the seats and the seat
heating, observe the following information:
Rkeep liquids from spilling on the seats. If
liquid is spilled on the seats, dry them as
soon as possible.
Rif the seat covers are damp or wet, do not
switch on the seat heating. The seat heat-
ing should also not be used to dry the seats.
Rclean the seat covers as recommended;
see "Interior care".
Rdo not transport heavy loads on the seats.
Do not place sharp objects on the seat
cushions, e.g. knives, nails or tools. The
seats should only be occupied by passen-
gers, if possible.
Rwhen the seat heating is in operation, do
not cover the seats with insulating materi- als, e.g. blankets, coats, bags, seat covers,
child seats or booster seats.
!Make sure that there are no objects in the
footwell under or behind the seats when mov-
ing the seats back. There is a risk that the
seats and/or the objects could be damaged.
iThe head restraints in the front seats are
installed with the NECK-PRO system
(
Ypage 55). For this reason, it is not possible
to remove the head restraints from the front
seats.
For more information, contact a qualified spe-
cialist workshop.
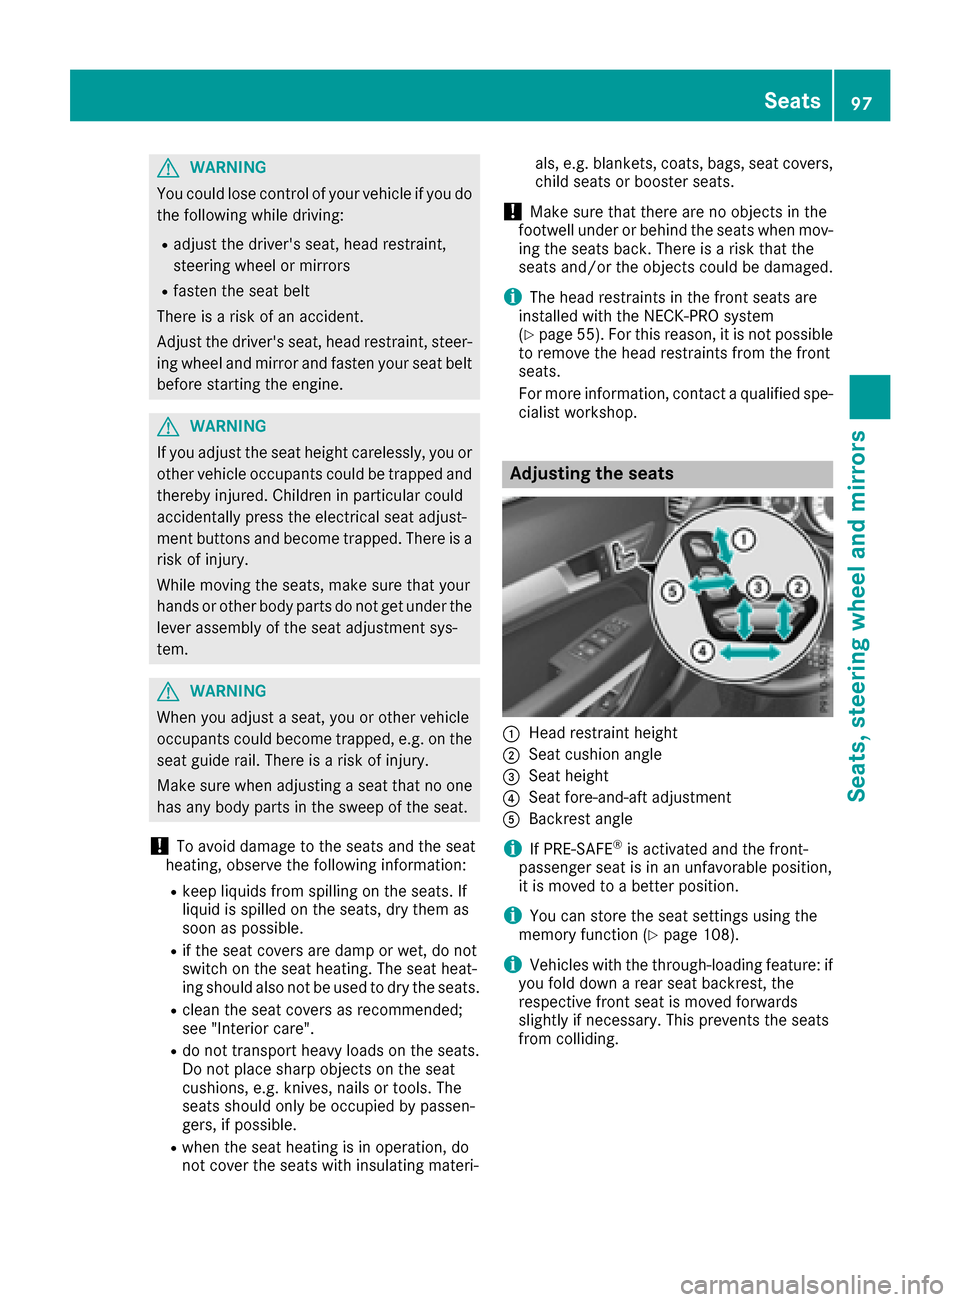
Adjusting the seats
:Head restraint height
;Seat cushion angle
=Seat height
?Seat fore-and-aft adjustment
ABackrest angle
iIf PRE-SAFE®is activated and the front-
passenger seat is in an unfavorable position,
it is moved to a better position.
iYou can store the seat settings using the
memory function (Ypage 108).
iVehicles with the through-loading feature: if
you fold down a rear seat backrest, the
respective front seat is moved forwards
slightly if necessary. This prevents the seats
from colliding.
Seats97
Seats, steering wheel and mirrors
Z