ECO mode MERCEDES-BENZ E-Class CABRIOLET 2017 A207 Owner's Manual
[x] Cancel search | Manufacturer: MERCEDES-BENZ, Model Year: 2017, Model line: E-Class CABRIOLET, Model: MERCEDES-BENZ E-Class CABRIOLET 2017 A207Pages: 322, PDF Size: 7.97 MB
Page 6 of 322
Alarm systemsee ATA (Anti-Theft Alarm system)
Anti-lock braking system
see ABS (Anti-lock Braking System)
Anti-Theft Alarm system
see ATA (Anti-Theft Alarm system)
Asht ray.............................................. .244
Assistance display (on-board com-
puter) ..................................................1 96
Assistance menu (on-board com-
puter) ..................................................1 96
ASSYST PLUS
Displaying a service message ........2 61
Hiding a service message .............. 261
Resetting the service interval dis-
play ................................................ 261
Service message ............................ 260
Special service requirements ......... 261
ATA (Anti-Theft Alarm system)
Activating/deactivating ................... 71
Function ...........................................7 1
Switching off the alarm .................... 71
ATTENTION ASSIST
Activating/deactivating ................. 197
Display message ............................ 214
Function/notes ............................. 177
Audio 20
Switching on/off ........................... 235
Audio system
see separate operating instructions
Authorized Mercedes-Benz Center
see Qualified specialist workshop
Authorized workshop
see Qualified specialist workshop
AUTO lights
Display message ............................ 211
see Lights
Automatic car wash (care) ............... 262
Automatic engine start (ECO start/
stop function) .................................... 131
Automatic engine switch-off (ECO
start/stop function) .......................... 131
Automatic headlamp mode .............. 109
Automatic transmission
Accelerator pedal position ............. 136
Automatic drive program ............... 138
Chang ing g
ear ............................... 136 DIRECT SELECT lever ..................... 134
Display message ............................ 220
Drive program display .................... 134
Driving tips .................................... 136
Emergency running mode .............. 141
Engaging drive position .................. 135
Engaging neutral ............................ 135
Engaging park position automati-
cally ............................................... 135
Engaging reverse gear ................... 135
Engaging the park position ............ 134
Kickdown ....................................... 137
Manual drive program .................... 138
Manual drive program (vehicles
with Sports package AMG) ............ 139
Overview ........................................ 134
Problem (malfunction) ................... 141
Program selector button ................ 137
Pulling away ................................... 130
Starting the engine ........................ 130
Steering wheel paddle shifters ...... 138
Transmission position display
(DIRECT SELECT lever) ................... 134
Transmission positions .................. 136
Automatic transmission emer-
gency mode ....................................... 141
B
Back button ....................................... 235
Bag hook ............................................ 242
BAS (Brake Assist System) ................. 62
BAS PLUS (Brake Assist System
PLUS) with Cross-Traffic Assist
Function/notes ................................ 62
BAS PLUS with Cross-Traffic Assist
(Brake Assist PLUS with Cross-
Traffic Assist)
Important safety notes .................... 63
Battery (SmartKey)
Checking .......................................... 76
Important safety notes .................... 75
Replacing ......................................... 76
Battery (vehicle)
Charging ........................................ 276
Display message ............................ 213
Important safety notes .................. 274
Jump starting ................................. 278
4Index
Page 10 of 322
COLLISION PREVENTION AS SIST
PLUS ................................................ 64
Distance warning function .............. .65
EBD (electronic brake force distri-
bution) ............................................. 68
ESP
®(Electronic Stability Pro-
gram) ............................................... 66
Important safety information ........... 61
Overview .......................................... 61
PRE-SAFE
®Brake ............................. 69
STEER CONTROL ............................. 71
Driving systems
360°camera .................................. 174
Active Blind Spot Assist ................. 183
Active Driving Assistance pack-
age .................................................1 83
Active Lane Keeping Assist ............ 186
Active Parking Assist ..................... 166
ATTENTION ASSIST ........................ 177
Blind Spot Assist ............................ 180
Cruise control ................................ 151
Display message ............................ 214
DISTRONIC PLUS ........................... 153
DISTRONIC PLUS with Steering
Assist and Stop&Go Pilot ...............1 60
Dynamic handling package with
sports mode .................................. 163
HOLD function ............................... 162
Lane Keeping Assist ......................1 82
Lane Tracking package .................. 180
PARKTRONIC ................................. 163
Rear view camera .......................... 170
Traffic Sign Assist .......................... 179
Driving tips
Automatic transmission ................. 136
Brakes ...........................................1 48
Break-in period .............................. 127
Downhill gradient ........................... 148
Drinking and driving ....................... 147
Driving in winter .............................1 50
Driving on flooded roads ................ 150
Driving on wet roads ......................1 49
Exhaust check ............................... 147
Fuel ..................... ........................... 146
G
eneral .......................................... 146
Hydroplaning ................................. 149
Icy road surfaces ........................... 150 Limited braking efficiency on sal-
ted roads ....................................... 149
Snow chains .................................. 287
Wet road surface ........................... 148
DVD video
Operating (on-board computer) ..... 194
see also Digital Operator's Man-
ual ..................................................2 34
Dynamic handling package with
sports mode ....................................... 163
E
E10
see Fuel
EASY-ENTRY feature
Activating/deactivating ................. 200
Function/notes .............................1 04
EASY-EXIT feature
Crash-responsive ........................... 105
Function/notes .............................1 04
Switching on/off ........................... 200
EBD (electronic brake force distri-
bution)
Display message ............................ 204
Function/notes ................................ 68
ECO display
Function/notes .............................1 47
On-board computer ....................... 192
ECO start/stop function
Automatic engine start .................. 131
Automatic engine switch-off .......... 131
Deactivating/activating ................. 132
General information ....................... 131
Important safety notes .................. 131
Introduction ................................... 131
Electronic Stability Program
see ESP
®(Electronic Stability Program)
Emergency
Automatic measures after an acci-
dent ................................................. 56
Emergency closing
Soft top ............................................ 87
Emergency release
Driver's door ....................................8 0
Trunk ............................................... 82
Vehicle ............................................. 80
8Index
Page 19 of 322
SMSsee also Digital Operator's Man-
ual .................................................. 234
Snow chains ...................................... 287
Sockets
General notes ................................ 245
Rear compartment .........................2 46
Soft top
AIRCAP ............................................ 92
Cleaning ......................................... 264
Closing manually in an emer-
gency ............................................... 87
Display message ............................ 223
Important safety notes .................... 85
Installing/removing the AIRCAP
wind screen ..................................... 93
Opening/closing (SmartKey) ........... 87
Opening/closing (with soft-top
switch) ............................................. 86
Problem (malfunction) ..................... 95
Relocking ......................................... 91
wind screen ..................................... 91
Soft-top switch ....................................8 6
Sound
Switching on/off ........................... 235
Special seat belt retractor .................. 57
Specialist workshop ............................28
Speed, controlling
see Cruise control
Speedometer
Digital ............................................ 192
In the Instrument cluster ................. 33
Segments ...................................... 189
Selecting the display unit ............... 198
Standing lamps
Display message ............................2 11
Switching on/off ........................... 110
Start/stop function
see ECO start/stop function
Starting (engine) ................................ 129
STEER CONTROL .................................. 71
Steering
Display message ............................ 222
Steering Assist and Stop&Go Pilot
(DISTRONIC PLUS)
Activating/deactivating ................. 197
Display message ............................ 218 Steering assistant
STEER CON-
TROL
see STEER CONTROL
Steering wheel
Adjusting (electrically) ................... 103
Button overview ............................... 34
Buttons (on-board computer) ......... 190
Cleaning ......................................... 268
Important safety notes .................. 102
Paddle shifters ............................... 138
Steering wheel heating .................. 103
Storing settings (memory func-
tion) ............................................... 108
Steering wheel heating
Problem (malfunction) ................... 104
Switching on/off ........................... 103
Steering wheel paddle shifters ........138
Stowage areas ................................... 240
Stowage compartments
Armrest (under) .............................2 41
Center console .............................. 241
Cup holders ................................... 243
Glove box ....................................... 241
Important safety information ......... 240
Stowage net ................................... 242
Under driver's seat/front-
passenger seat .............................. 241
Stowage net ....................................... 242
Stowage well beneath the trunk
floor .................................................... 243
Summer tires ..................................... 287
Sun visor ............................................ 244
Surround lighting (on-board com-
puter) .................................................. 199
Switching air-recirculation mode
on/off ................................................. 125
Switching on media mode
Via the device list .......................... 239
T
Tachometer ........................................ 189
Tail lamps
Display message ............................ 211
Tank
see Fuel tank
Tank content
Fuel gauge ....................................... 33
Index17
Page 28 of 322
have directly notified Mercedes-Benz USA,
LLC in writing of the need for its repair.
(2) the same substantial defect or malfunction of a less serious nature than category (1)
has been subject to repair four or more
times and you have directly notified
Mercedes-Benz in writing of the need for its
repair.
(3) the vehicle is out of service by reason of repair of the same or different substantial
defects or malfunctions for a cumulative
total of more than 30 calendar days.
Please send your written notice to:
Mercedes-Benz USA, LLC
Customer Assistance Center
One Mercedes Drive
Montvale, NJ 07645-0350
Maintenance
The Service and Warranty Booklet describes all
the necessary maintenance work which should
be done at regular intervals.
Always have the Service and Warranty Booklet
with you when you bring the vehicle to an
authorized Mercedes-Benz Center. The service
advisor will record every service for you in the
Service and Warranty Booklet.
Roadside Assistance
The Mercedes-Benz Roadside Assistance Pro-
gram offers technical help in the event of a
breakdown. Calls to the toll-free Roadside Assis-
tance Hotline are answered by our agents 24
hours a day, 365 days a year.
1-800-FOR-MERCedes(1-800-367-6372)
(USA)
1-800-387-0100 (Canada)
For additional information, refer to the
Mercedes-Benz Roadside Assistance Program
brochure (USA) or the "Roadside Assistance"
section in the Service and Warranty booklet
(Canada). You will find both in your vehicle lit-
erature portfolio.
Change of address or change of own-
ership
In the event of a change of address, please send us the "Notification of Address Change" in the
Service and Guarantee booklet or simply call the
Mercedes-Benz Customer Assistance Center
(USA) at the hotline number
1-800-FOR-MERCedes(1-800-367-6372) or
Customer Service Center (Canada) at
1-800-387-0100. This will assist us in contact-
ing you in a timely manner should the need arise.
If you sell your Mercedes, please leave the entire
literature in the vehicle so that it is available to
the next owner.
If you have purchased a used car, please send us the "Notification of Used Car Purchase" in the
Service and Guarantee booklet or simply call the
Mercedes-Benz Customer Assistance Center
(USA) at the hotline number
1-800-FOR-MERCedes(1-800-367-6372) or
Customer Service (Canada) at 1-800-387-0100.
Vehicle operation outside the USA
and Canada
If you plan to operate your vehicle in foreign
countries, please be aware that:
Rservice facilities or replacement parts may
not be readily available.
Runleaded fuel for vehicles with a catalytic
converter may not be available. Leaded fuel
may cause damage to the catalytic converter.
Rthe fuel may have a considerably lower octane
rating. Unsuitable fuel can cause engine dam-
age.
Some Mercedes-Benz models are available for
delivery in Europe through our European Deliv-
ery Program. For details, consult an authorized
Mercedes-Benz Center or write to one of the
following addresses.
In the USA
Mercedes-Benz USA, LLC
European Delivery Department
One Mercedes Drive
Montvale, NJ 07645-0350
In Canada
Mercedes-Benz Canada, Inc.
European Delivery Department
98 Vanderhoof Avenue
Toronto, Ontario M4G 4C9
26Service and vehicle operation
Introduction
Page 109 of 322
RImmediately change out of clothing which
has come into contact with electrolyte.
RIf an allergic reaction occurs, seek medical
attention immediately.
The rear-view mirror and the exterior mirror on
the driver's side automatically go into anti-glare
mode if the following conditions are met simul-
taneously:
Rthe ignition is switched on and
Rincident light from headlamps strikes the sen-
sor in the rear-view mirror
The mirrors do not go into anti-glare mode if
reverse gear is engaged.
Parking position for the exterior mir-
ror on the front-passenger side
Setting and storing the parking position
You can position the front-passenger side exte-
rior mirror in such a way that you can see the
rear wheel on that side as soon as you engage
reverse gear. You can store this position.
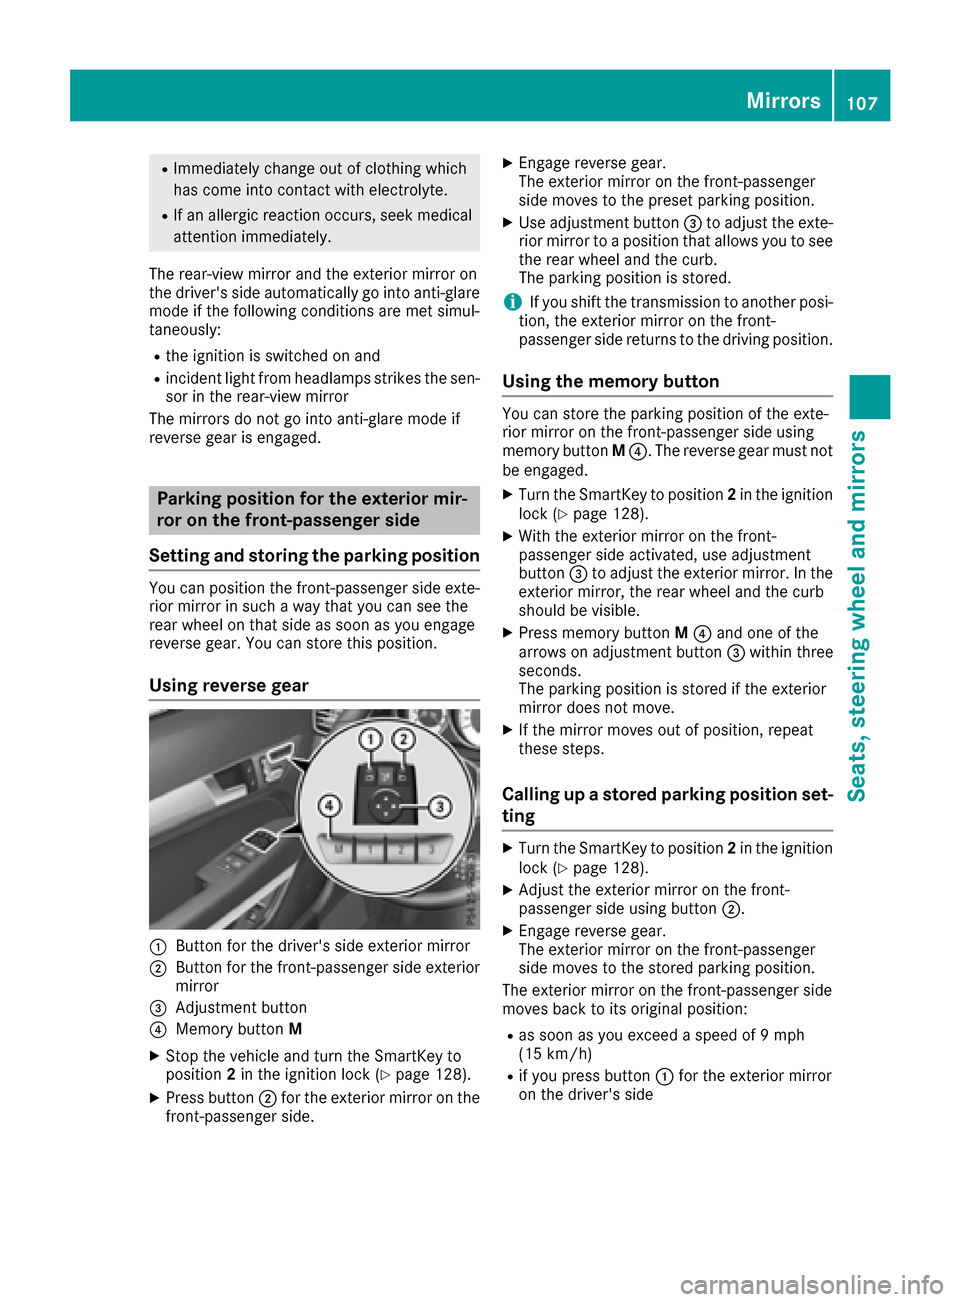
Using reverse gear
:Button for the driver's side exterior mirror
;Button for the front-passenger side exterior
mirror
=Adjustment button
?Memory button M
XStop the vehicle and turn the SmartKey to
position2in the ignition lock (Ypage 128).
XPress button ;for the exterior mirror on the
front-passenger side.
XEngage reverse gear.
The exterior mirror on the front-passenger
side moves to the preset parking position.
XUse adjustment button =to adjust the exte-
rior mirror to a position that allows you to see
the rear wheel and the curb.
The parking position is stored.
iIf you shift the transmission to another posi-
tion, the exterior mirror on the front-
passenger side returns to the driving position.
Using the memory button
You can store the parking position of the exte-
rior mirror on the front-passenger side using
memory button M?. The reverse gear must not
be engaged.
XTurn the SmartKey to position 2in the ignition
lock (Ypage 128).
XWith the exterior mirror on the front-
passenger side activated, use adjustment
button =to adjust the exterior mirror. In the
exterior mirror, the rear wheel and the curb
should be visible.
XPress memory button M? and one of the
arrows on adjustment button =within three
seconds.
The parking position is stored if the exterior
mirror does not move.
XIf the mirror moves out of position, repeat
these steps.
Calling up a stored parking position set-
ting
XTurn the SmartKey to position 2in the ignition
lock (Ypage 128).
XAdjust the exterior mirror on the front-
passenger side using button ;.
XEngage reverse gear.
The exterior mirror on the front-passenger
side moves to the stored parking position.
The exterior mirror on the front-passenger side
moves back to its original position:
Ras soon as you exceed a speed of 9 mph
(15 km/h)
Rif you press button :for the exterior mirror
on the driver's side
Mirrors107
Seats, steering wheel and mirrors
Z
Page 111 of 322
Exterior lighting
General notes
For reasons of safety, Mercedes-Benz recom-
mends that you drive with the lights switched on
even during the daytime. Therefore, your vehicle
is equipped with special daytime running lamps.
In some countries, operation of the headlamps
varies due to legal requirements and self-
imposed obligations.
If you wish to drive during the daytime without
lights, switch off the daytime running lamps
function in the on-board computer
(
Ypage 199).
Setting the exterior lighting
Setting options
Exterior lighting can be set using:
Rthe light switch
Rthe combination switch (Ypage 110)
Rthe on-board computer (Ypage 199)
Light switch
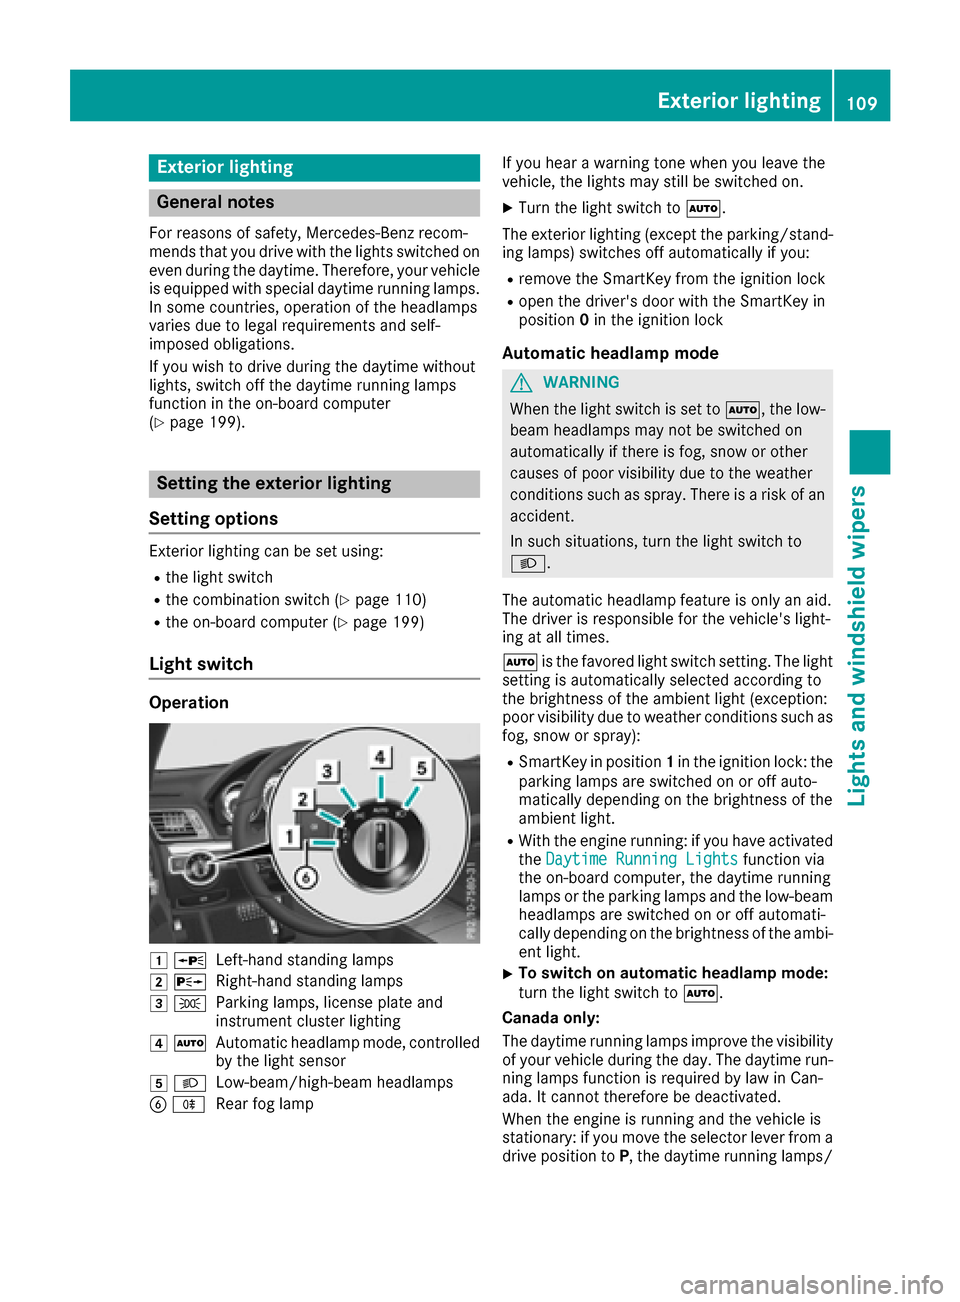
Operation
1 WLeft-hand standing lamps
2XRight-hand standing lamps
3TParking lamps, license plate and
instrument cluster lighting
4ÃAutomatic headlamp mode, controlled
by the light sensor
5 LLow-beam/high-beam headlamps
BRRear fog lamp If you hear a warning tone when you leave the
vehicle, the lights may still be switched on.
XTurn the light switch to
Ã.
The exterior lighting (except the parking/stand-
ing lamps) switches off automatically if you:
Rremove the SmartKey from the ignition lock
Ropen the driver's door with the SmartKey in
position 0in the ignition lock
Automatic headlamp mode
GWARNING
When the light switch is set to Ã, the low-
beam headlamps may not be switched on
automatically if there is fog, snow or other
causes of poor visibility due to the weather
conditions such as spray. There is a risk of an
accident.
In such situations, turn the light switch to
L.
The automatic headlamp feature is only an aid.
The driver is responsible for the vehicle's light-
ing at all times.
à is the favored light switch setting. The light
setting is automatically selected according to
the brightness of the ambient light (exception:
poor visibility due to weather conditions such as
fog, snow or spray):
RSmartKey in position 1in the ignition lock: the
parking lamps are switched on or off auto-
matically depending on the brightness of the
ambient light.
RWith the engine running: if you have activated
the Daytime Running Lightsfunction via
the on-board computer, the daytime running
lamps or the parking lamps and the low-beam
headlamps are switched on or off automati-
cally depending on the brightness of the ambi- ent light.
XTo switch on automatic headlamp mode:
turn the light switch to Ã.
Canada only:
The daytime running lamps improve the visibility
of your vehicle during the day. The daytime run- ning lamps function is required by law in Can-
ada. It cannot therefore be deactivated.
When the engine is running and the vehicle is
stationary: if you move the selector lever from a
drive position to P, the daytime running lamps/
Exterior lighting109
Lights and windshield wipers
Z
Page 119 of 322
Overview of climate control systems
General notes
Observe the settings recommended on the fol-
lowing pages. The windows could otherwise fog
up.
To prevent the windows from fogging up:
Rswitch off climate control only briefly
Rswitch on air-recirculation mode only briefly
Rswitch on the cooling with air dehumidifica-
tion function
Rswitch on the defrost windshield function
briefly, if required
Climate control regulates the temperature and
the humidity in the vehicle interior and filters
undesirable substances out of the air.
Climate control can only be operated when the
engine is running. Optimum operation is only
achieved with the side windows and roof closed.
The residual heat function can only be activated
or deactivated with the ignition switched off
(
Ypage 125).
iWhen the weather is warm, ventilate the
vehicle for a brief period. This will speed up
the cooling process and the desired interior
temperature will be reached more quickly.
iThe integrated filter filters out most parti-
cles of dust and soot and completely filters
out pollen. It also reduces gaseous pollutants
and odors. A clogged filter reduces the
amount of air supplied to the vehicle interior.
For this reason, you should always observe
the interval for replacing the filter, which is
specified in the Maintenance Booklet. As it
depends on environmental conditions, e.g.
heavy air pollution, the interval may be
shorter than stated in the Maintenance Book- let.
iIt is possible that the residual heat function
may be activated automatically an hour after
the SmartKey is removed. The vehicle is then ventilated for 30 minutes to dry the automatic
climate control.
Overview of climate control systems117
Climate control
Page 122 of 322
Optimum use of automatic climate
control
Climate control system
Below, you can find a number of notes and rec-
ommendations to help you use climate control
optimally.
The 3-zone automatic climate control is only
available on vehicles for Canada.
RActivate climate control using the Ãand
¿ buttons. The indicator lamps above the
à and¿ buttons light up.
RVehicles with 3-zone automatic climate con-
trol: in automatic mode, you can also set the
climate mode (FOCUS, MEDIUM or DIFFUSE).
The MEDIUM level is recommended.
RSet the temperature to 72 ‡ (22 †).
ROnly use the "Windshield defrosting" function
briefly until the windshield is clear again.
ROnly use air-recirculation mode briefly, e.g. if
there are unpleasant outside odors or when in
a tunnel. The windows could otherwise fog up, since no fresh air is drawn into the vehicle in
air-recirculation mode.
RUse the ZONE function to adopt the temper-
ature settings on the driver's side for the
front-passenger side and the rear compart-
ment as well. The indicator lamp above the
á button goes out.
RVehicles with 3-zone automatic climate con-
trol: use the residual heat function if you want
to heat or ventilate the vehicle interior when
the ignition is switched off. The residual heat
function can only be activated or deactivated with the ignition switched off.
RIf you change the settings of the climate con-
trol system, the climate status display
appears for approximately three seconds at
the bottom of the screen in the multimedia
system display. You will see the current set-
tings of the various climate control functions.
ECO start/stop function
During automatic engine switch-off, the climate
control system only operates at a reduced capa-
city. If you require the full climate control output,
you can switch off the ECO start/stop function
by pressing the ECO button (
Ypage 132).
Operating the climate control sys-
tems
Activating/deactivating climate con-
trol
General notes
When the climate control is switched off, the air
supply and air circulation are also switched off.
The windows could fog up. Therefore, switch off
climate control only briefly
iActivate climate control primarily using the
à button (Ypage 121).
Activating/deactivating
XTurn the SmartKey to position 2in the ignition
lock (Ypage 128).
XTo activate: press theÃbutton.
The indicator lamp above the Ãbutton
lights up. Airflow and air distribution are set to
automatic mode.
XTo deactivate: press the^button.
The indicator lamp above the ^button
lights up.
120Operating the climate control systems
Climate control
Page 132 of 322
GWARNING
Flammable materials introduced through
environmental influence or by animals can
ignite if in contact with the exhaust system or
parts of the engine that heat up. There is a risk
of fire.
Carry out regular checks to make sure that
there are no flammable foreign materials in
the engine compartment or in the exhaust
system.
General notes
iThe catalytic converter is preheated for up
to 30 seconds after a cold start. The sound of the engine may change during this time.
Automatic transmission
XShift the transmission to position P.
The transmission position display in the mul-
tifunction display shows P.
iYou can start the engine in transmission
position Pand N.
Starting procedure with the SmartKey
iTo start the engine using the SmartKey
instead of KEYLESS-GO, pull the Start/Stop
button out of the ignition lock.
XTurn the SmartKey to position 3in the ignition
lock and release it as soon as the engine is
running (
Ypage 128).
Using KEYLESS-GO to start the engine
iThe Start/Stop button can be used to start
the vehicle manually without inserting the
SmartKey into the ignition lock. The Start/
Stop button must be inserted in the ignition
lock and the SmartKey must be in the vehicle.
This mode for starting the engine operates
independently of the ECO start/stop auto-
matic engine start function.
XDepress the brake pedal and keep it
depressed.
XPress the Start/Stop button once
(Ypage 128).
The engine starts.
Pulling away
General notes
GWARNING
If the engine speed is above the idling speed
and you engage transmission position Dor R,
the vehicle could pull away suddenly. There is
a risk of an accident.
When engaging transmission position Dor R,
always firmly depress the brake pedal and do not simultaneously accelerate.
!If a warning tone sounds and the ReleasePark. Brakemessage appears in the multi-
function display, the parking brake is still
applied. Release the parking brake.
Depress the accelerator carefully when pulling
away.
The vehicle locks centrally once you have pulled
away. The locking knobs in the doors drop down.
You can open the doors from the inside at any
time.
You can also deactivate the automatic locking
feature (
Ypage 200).
It is only possible to shift the transmission from
position Pto the desired position if you depress
the brake pedal. If you do not depress the brake
pedal, the DIRECT SELECT lever can still be
moved but the parking lock remains engaged.
iUpshifts take place at higher engine speeds
after a cold start. This helps the catalytic con-
verter to reach its operating temperature
more quickly.
Hill start assist
Hill start assist helps you when pulling away for-
wards or in reverse on an uphill gradient. It holds
the vehicle for a short time after you have
removed your foot from the brake pedal. This
gives you enough time to move your foot from
the brake pedal to the accelerator pedal and to
depress it before the vehicle begins to roll.
GWARNING
After a short time, hill start assist will no lon-
ger brake your vehicle and it could roll away.
There is a risk of an accident and injury.
130Driving
Driving and parking
Page 143 of 322
Problems with the transmission
ProblemPossible causes/consequences andMSolutions
The transmission has
problems shifting gear.The transmission is losing oil.
XHave the transmission checked at a qualified specialist workshop
immediately.
The acceleration ability
is deteriorating.
The transmission no lon-
ger changes gear.The transmission is in emergency mode.
It is only possible to shift intosecondgear and reverse gear.
XStop the vehicle.
XShift the transmission to position P.
XSwitch off the engine.
XWait at least ten seconds before restarting the engine.
XShift the transmission to positionDor R.
If D is selected, the transmission shifts into secondgear; ifRis
selected, the transmission shifts into reverse gear.
XHave the transmission checked at a qualified specialist workshop
immediately.
Transfer case
This section is only valid for vehicles with 4-
wheel drive (4MATIC). Power is always trans-
mitted to both axles.
!Performance tests may only be carried out
on a 2-axle dynamometer. The brake system
or transfer case could otherwise be damaged. Contact a qualified specialist workshop for a
performance test.
!If the parking brake is being tested on a
brake dynamometer, the ignition must be
switched off (SmartKey or Start/Stop button
in position 0or 1), as ESP
®will otherwise
automatically intervene. The brake system
could otherwise be damaged.
!Vehicles with 4MATIC must not be towed
with either the front or the rear axle raised, as
doing so will damage the transmission.
Refueling
Important safety notes
GWARNING
Fuel is highly flammable. If you handle fuel
incorrectly, there is a risk of fire and explo-
sion.
You must avoid fire, open flames, creating
sparks and smoking. Switch off the engine
and, if applicable, the auxiliary heating before refueling.
GWARNING
Fuel is poisonous and hazardous to health.
There is a risk of injury.
You must make sure that fuel does not come into contact with your skin, eyes or clothing
and that it is not swallowed. Do not inhale fuel
vapors. Keep fuel away from children.
If you or others come into contact with fuel,
observe the following:
RWash away fuel from skin immediately
using soap and water.
RIf fuel comes into contact with your eyes,
immediately rinse them thoroughly with
clean water. Seek medical assistance with-
out delay.
RIf fuel is swallowed, seek medical assis-
tance without delay. Do not induce vomit-
ing.
RImmediately change out of clothing which
has come into contact with fuel.
Refueling141
Driving and parking
Z