spare tire MERCEDES-BENZ E-Class CABRIOLET 2017 A207 Owner's Manual
[x] Cancel search | Manufacturer: MERCEDES-BENZ, Model Year: 2017, Model line: E-Class CABRIOLET, Model: MERCEDES-BENZ E-Class CABRIOLET 2017 A207Pages: 322, PDF Size: 7.97 MB
Page 11 of 322
Emergency spare wheelGeneral notes ................................ 308
Important safety notes .................. 308
Removing ...................................... .309
Storage location ............................ 309
Stowing .......................................... 309
Technical data ............................... 308
Emergency Tensioning Devices
Activation ......................................... 53
Emissions control
Service and warranty information .... 25
Engine
Check Engine warning lamp ........... 230
Display message ............................ 212
ECO start/stop function ................ 131
Engine number ............................... 312
Irregular running ............................ 133
Jump-starting ................................. 278
Starting problems .......................... 133
Starting the engine with the
SmartKey ....................................... 130
Starting with KEYLESS-GO ............. 130
Switching off .................................. 145
Tow-starting (vehicle) ..................... 282
Engine electronics
Problem (malfunction) ................... 133
Engine jump starting
see Jump starting (engine)
Engine oil
Adding ...........................................2 59
Additives ........................................ 315
Checking the oil level ..................... 258
Checking the oil level using the
dipstick .......................................... 258
Display message ............................ 213
Filling capacity ............................... 315
Notes about oil grades ................... 315
Notes on oil level/consumption .... 258
Entering an address
see also Digital Operator's Man-
ual ..................................................2 34
ESP
®(Electronic Stability Pro-
gram)
Characteristics ................................. 67
Deactivating/activating ................. 196
Deactivating/activating (notes) ....... 67
Display message ............................ 203
Fu
nction/notes ................................ 66 General notes .................................. 66
Important safety information ........... 67
Trailer stabilization ........................... 68
Warning lamp ................................. 227
ETS/4ETS (Electronic Traction Sys-
tem) ...................................................... 67
Exhaust check ................................... 147
Exhaust pipe (cleaning instruc-
tions) ..................................................2 67
Exterior lighting
Setting options .............................. 109
see Lights
Exterior mirrors
Adjusting ....................................... 105
Dipping (automatic) ....................... 106
Folding in when locking (on-board
computer) ...................................... 201
Folding in/out (automatically) ....... 106
Folding in/out (electrically) ........... 106
Out of position (troubleshooting) ... 106
Setting ........................................... 106
Storing settings (memory func-
tion) ............................................... 108
Storing the parking position .......... 107
F
FavoritesOverview ........................................ 236
Filler cap
see Refueling
Flat tire
MOExtended tires .......................... 270
Preparing the vehicle ..................... 270
TIREFIT kit ...................................... 271
see Emergency spare wheel
Floormats ........................................... 255
Frequencies
Mobile phone ................................. 310
Two-way radio ................................ 310
Fuel
Consumption statistics .................. 192
Displaying the current consump-
tion ................................................ 192
Displaying the range ...................... 192
Driving tips .................................... 146
Flexible fuel vehicles ...................... 314
Fuel gauge ....................................... 33
Index9
Page 20 of 322
Technical dataCapacities ...................................... 312
Emergency spare wheel ................. 308
Information .................................... 310
Tires/wheels ................................. 307
Vehicle data ................................... 317
Telephone
Accepting a call (multifunction
steering wheel) .............................. 195
Authorizing a mobile phone (con-
necting) ......................................... 238
Connecting a mobile phone (gen-
eral information) ............................ 237
Display message ............................ 222
Menu (on-board computer) ............ 195
Number from the phone book ........ 195
Redialing ........................................ 196
Rejecting/ending a call ................. 195
see also Digital Operator's Man-
ual .................................................. 234
Switching between mobile
phones ........................................... 239
Temperature
Coolant .......................................... 189
Outside temperature ...................... 189
Setting (climate control) ................ 122
Through-loading feature ................... 242
Tire pressure
Calling up (on-board computer) ..... 291
Checking manually ........................ 291
Display message ............................ 219
Maximum ....................................... 291
Not reached (TIREFIT) .................... 273
Notes ............................................. 290
Reached (TIREFIT) .......................... 273
Recommended ............................... 288
Tire pressure monitor
Checking the tire pressure elec-
tronically ........................................ 293
Function/notes ............................. 291
General notes ................................ 291
Important safety notes .................. 292
Restarting ...................................... 293
Warning lamp ................................. 233
Warning message .......................... 293
Tire-change tool kit ........................... 270
TIREFIT kit .......................................... 271
Important safety notes .................. 271 Tire pressure not reached .............. 273
Tire pressure reached .................... 273
Tires
Aspect ratio (definition) ................. 302
Average weight of the veh icle
o
ccupants (definition) .................... 301
Bar (definition) ............................... 301
Changing a wheel .......................... 303
Characteristics .............................. 301
Checking ........................................ 285
Curb weight (definition) ................. 302
Definition of terms ......................... 301
Direction of rotation ...................... 304
Display message ............................ 219
Distribution of the vehicle occu-
pants (definition) ............................ 303
DOT (Department of Transporta-
tion) (definition) ............................. 301
DOT, Tire Identification Number
(TIN) ............................................... 301
GAWR (Gross Axle Weight Rating)
(definition) ..................................... 302
GVW (Gross Vehicle Weight) (def-
inition) ........................................... 302
GVWR (Gross Vehicle Weight Rat-
ing) (definition) .............................. 302
Important safety notes .................. 285
Increased vehicle weight due to
optional equipment (definition) ...... 302
Information on driving .................... 285
Kilopascal (kPa) (definition) ........... 302
Labeling (overview) ........................ 298
Load bearing index (definition) ...... 303
Load index ..................................... 300
Load index (definition) ................... 302
Maximum load on a tire (defini-
tion) ............................................... 302
Maximum loaded vehicle weight
(definition) ..................................... 302
Maximum permissible tire pres-
sure (definition) ............................. 302
Maximum tire load ......................... 300
Maximum tire load (definition) ....... 302
MOExtended tires .......................... 287
Optional equipment weight (defi-
nition) ............................................ 303
PSI (pounds per square inch) (def-
inition) ........................................... 302
18Index
Page 22 of 322
U
UnlockingEmergency unlocking ...................... .80
From inside the vehicle (central
unlocking button) ............................. 79
USB devices
Connecting to the Media Inter-
face ............................................... 239
V
Vanity mirror (in the sun visor) ........ 244
Vehicle
Correct use ...................................... 28
Data acquisition ............................... 29
Display message ............................ 220
Equipment ....................................... 25
Individual settings .......................... 198
Limited Warranty ............................. 29
Loading .......................................... 294
Locking (in an emergency) ............... 80
Locking (SmartKey) .......................... 73
Lowering ........................................ 307
Maintenance .................................... 26
Parking for a long period ................ 146
Pulling away ................................... 130
Raising ........................................... 305
Reporting problems ......................... 28
Securing from rolling away ............ 304
Towing away .................................. 280
Transporting .................................. 282
Unlocking (in an emergency) ........... 80
Unlocking (SmartKey) ...................... 73
Vehicle data ................................... 317
Vehicle data ....................................... 317
Vehicle dimensions ........................... 317
Vehicle emergency locking ................ 80
Vehicle identification number
see VIN
Vehicle identification plate .............. 311
Vehicle tool kit .................................. 270
Video
Operating the DVD ......................... 194
see also Digital Operator's Man-
ual .................................................. 234
VIN
Seat ............................................... 312 Type plate ...................................... 311
Voice Control System
see Separate operating instructions
W
Warning and indicator lampsABS ................................................ 227
Brakes ........................................... 226
Check Engine ................................. 230
Coolant .......................................... 230
Distance warning ........................... 232
ESP
®.............................................. 227
ESP®OFF ....................................... 228
Fuel tank ........................................ 230
General notes ................................ 224
Overview .......................................... 33
PASSENGER AIR BAG OFF ............... 41
Reserve fuel ................................... 230
Restraint system ............................ 229
Seat belt ........................................ 225
Tire pressure monitor .................... 233
Warranty .............................................. 25
Washer fluid
Display message ............................ 223
Wheel and tire combinations
Tires ............................................... 307
Wheel bolt tightening torque ........... 307
Wheel chock ...................................... 304
Wheels
Changing a wheel .......................... 303
Checking ........................................ 285
Cleaning ......................................... 265
Emergency spare wheel ................. 308
Important safety notes .................. 285
Information on driving .................... 285
Interchanging/changing ................ 303
Mounting a new wheel ................... 306
Mounting a wheel .......................... 304
Removing a wheel .......................... 306
Storing ........................................... 304
Tightening torque ........................... 307
Wheel size/tire size ....................... 307
Wind deflector (cleaning instruc-
tions) .................................................. 265
Wind screen ......................................... 91
Wind screen (cleaning instruc-
tions) .................................................. 265
20Index
Page 272 of 322
Where will I find...?
Vehicle tool kit
General notes
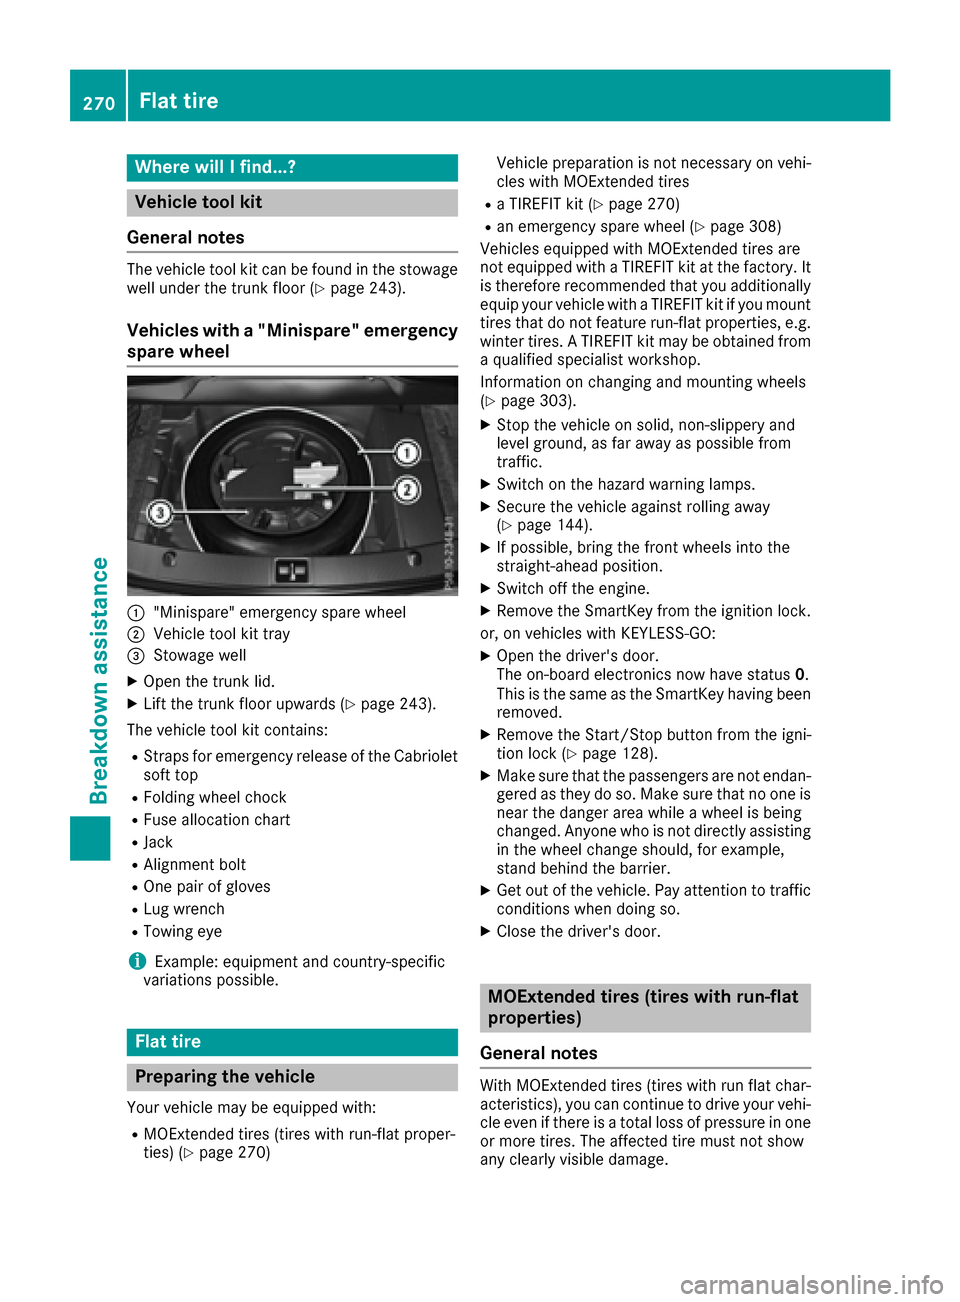
The vehicle tool kit can be found in the stowage
well under the trunk floor (Ypage 243).
Vehicles with a "Minispare" emergency
spare wheel
:"Minispare" emergency spare wheel
;Vehicle tool kit tray
=Stowage well
XOpen the trunk lid.
XLift the trunk floor upwards (Ypage 243).
The vehicle tool kit contains:
RStraps for emergency release of the Cabriolet
soft top
RFolding wheel chock
RFuse allocation chart
RJack
RAlignment bolt
ROne pair of gloves
RLug wrench
RTowing eye
iExample: equipment and country-specific
variations possible.
Flat tire
Preparing the vehicle
Your vehicle may be equipped with:
RMOExtended tires (tires with run-flat proper-
ties) (Ypage 270) Vehicle preparation is not necessary on vehi-
cles with MOExtended tires
Ra TIREFIT kit (Ypage 270)
Ran emergency spare wheel (Ypage 308)
Vehicles equipped with MOExtended tires are
not equipped with a TIREFIT kit at the factory. It
is therefore recommended that you additionally
equip your vehicle with a TIREFIT kit if you mount
tires that do not feature run-flat properties, e.g.
winter tires. A TIREFIT kit may be obtained from
a qualified specialist workshop.
Information on changing and mounting wheels
(
Ypage 303).
XStop the vehicle on solid, non-slippery and
level ground, as far away as possible from
traffic.
XSwitch on the hazard warning lamps.
XSecure the vehicle against rolling away
(Ypage 144).
XIf possible, bring the front wheels into the
straight-ahead position.
XSwitch off the engine.
XRemove the SmartKey from the ignition lock.
or, on vehicles with KEYLESS‑GO:
XOpen the driver's door.
The on-board electronics now have status 0.
This is the same as the SmartKey having been
removed.
XRemove the Start/Stop button from the igni-
tion lock (Ypage 128).
XMake sure that the passengers are not endan-
gered as they do so. Make sure that no one is near the danger area while a wheel is being
changed. Anyone who is not directly assisting
in the wheel change should, for example,
stand behind the barrier.
XGet out of the vehicle. Pay attention to traffic
conditions when doing so.
XClose the driver's door.
MOExtended tires (tires with run-flat
properties)
General notes
With MOExtended tires (tires with run flat char-
acteristics), you can continue to drive your vehi-
cle even if there is a total loss of pressure in one
or more tires. The affected tire must not show
any clearly visible damage.
270Flat tire
Breakdown assistance
Page 288 of 322
Check wheels and tires for damage at least once
a month. Check wheels and tires afterdriving
off-road or on rough roads. Damaged wheels
can cause a loss of tire pressure. Pay particular
attention to damage such as:
Rcuts inthe tires
Rpunctures
Rtears inthe tires
Rbulges on tires
Rdeformation or severe corrosion on wheels
Regularly check the tire tread depth and the
condition of the tread across the whole width of
the tire (
Ypage 286). Ifnecessary, turn the
front wheels to full lock inorder to inspect the
inner sideof the tire surface.
All wheels must have a valve cap to protect the valve against dirtand moisture. Do not mount
anything onto the valve other than the standard
valve cap or other valve caps approved by
Mercedes-Benz for your veh icle. Do not use any
other valve caps or systems, e.g. tire pressure
monitoring systems.
Regularly check the pressure of all the tires par-
ticularly prior to long tr ips.Adjust the tire pres-
sure as necessary (
Ypage 288).
Observe the notes on the emergency spare
wheel (
Ypage 308).
The service lifeof tires depends, among other
things, on the foll owing factors:
Rdriving style
Rtire pressure
Rdistance covered
Notes on tire tread
GWAR NING
In suff icient tire tread willreduce tire traction.
The tire isno longer abletodissipat e water.
This means that on wet road surfaces, the risk
of hydroplaning increases, inparticular where
speed isnot adapted to suit the driving con-
dit ions. There isa risk of acc ident.
If the tire pressure istoo high or too low,tires
may exhibit diff erent levelsof wear at differ-
ent locations on the tire tread. Thus, you
should regularly check the tread depth and
the condition of the tread across the entire
widt h of all tires.
Minimum tire tread depth for:
RSummer tires: âin(3 mm)
RM+S tires: ãin(4 mm)
For safety reasons, replace the tires before
the legally prescribe d limit for the minimum
tire tread depth is reached.
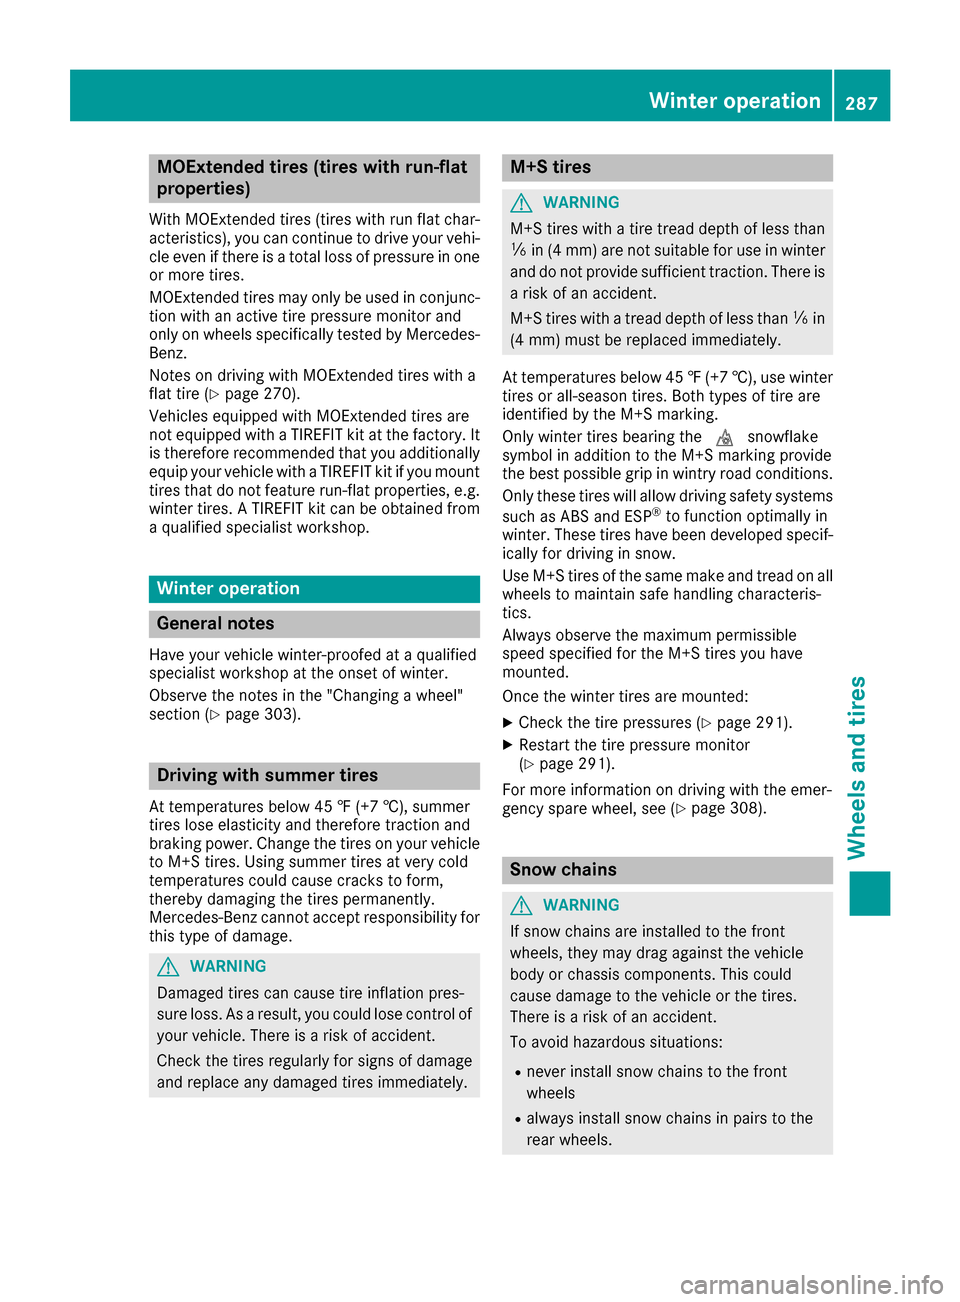
Marking :shows where the bar indicator
(arrow) for tread wear is integrated into the tire
tread.
Treadwear indicators (TWI) are required by law. Six indicators are positioned on the tire tread.
They are vis ibleonce a tread depth of approx-
imately áin (1.6 mm) has been reached. If this
is the case, the tire isso worn that it must be
replaced.
Selecting, mounting and replacing
tires
ROnly mount tires and wheels of the same type
and make.
Exception: itis permissible to install a differ-
ent type or make in the event of a flat tire.
Observe the "MOExtended tires (tires with
run-flat characteristics" section (
Ypage 270).
ROnly mount tires of the correct size onto the
wheels.
RBreak in new tires at moderate speeds for the
first 60 miles(100 km). They only reach their
full performance after this distance.
RDo not drive with tires which have too little
tread depth, as this significantly reduces the
traction on wet roads (hydroplaning).
RReplace the tires after six years at the latest,
regardless of wear.
Observe the notes on the emergency spare
wheel (
Ypage 308).
286Operation
Wheels and tires
Page 289 of 322
MOExtended tires (tires with run-flat
properties)
With MOExtended tires (tires with run flat char-
acteristics), you can continue to drive your vehi-
cle even if there is a total loss of pressure in one
or more tires.
MOExtended tires may only be used in conjunc-
tion with an active tire pressure monitor and
only on wheels specifically tested by Mercedes- Benz.
Notes on driving with MOExtended tires with a
flat tire (
Ypage 270).
Vehicles equipped with MOExtended tires are
not equipped with a TIREFIT kit at the factory. It
is therefore recommended that you additionally
equip your vehicle with a TIREFIT kit if you mount tires that do not feature run-flat properties, e.g.
winter tires. A TIREFIT kit can be obtained from
a qualified specialist workshop.
Winter operation
General notes
Have your vehicle winter-proofed at a qualified
specialist workshop at the onset of winter.
Observe the notes in the "Changing a wheel"
section (
Ypage 303).
Driving with summer tires
At temperatures below 45 ‡ (+7 †), summer
tires lose elasticity and therefore traction and
braking power. Change the tires on your vehicle
to M+S tires. Using summer tires at very cold
temperatures could cause cracks to form,
thereby damaging the tires permanently.
Mercedes-Benz cannot accept responsibility for
this type of damage.
GWARNING
Damaged tires can cause tire inflation pres-
sure loss. As a result, you could lose control of
your vehicle. There is a risk of accident.
Check the tires regularly for signs of damage
and replace any damaged tires immediately.
M+S tires
GWARNING
M+S tires with a tire tread depth of less than
ã in (4 mm) are not suitable for use in winter
and do not provide sufficient traction. There is
a risk of an accident.
M+S tires with a tread depth of less than ãin
(4 mm) must be replaced immediately.
At temperatures below 45 ‡(+7 †), use winter
tires or all-season tires. Both types of tire are
identified by the M+S marking.
Only winter tires bearing the isnowflake
symbol in addition to the M+S marking provide
the best possible grip in wintry road conditions.
Only these tires will allow driving safety systems
such as ABS and ESP
®to function optimally in
winter. These tires have been developed specif-
ically for driving in snow.
Use M+S tires of the same make and tread on all
wheels to maintain safe handling characteris-
tics.
Always observe the maximum permissible
speed specified for the M+S tires you have
mounted.
Once the winter tires are mounted:
XCheck the tire pressures (Ypage 291).
XRestart the tire pressure monitor
(Ypage 291).
For more information on driving with the emer-
gency spare wheel, see (
Ypage 308).
Snow chains
GWARNING
If snow chains are installed to the front
wheels, they may drag against the vehicle
body or chassis components. This could
cause damage to the vehicle or the tires.
There is a risk of an accident.
To avoid hazardous situations:
Rnever install snow chains to the front
wheels
Ralways install snow chains in pairs to the
rear wheels.
Winter operation287
Wheels and tires
Z
Page 290 of 322
!On some tire sizes there is not enough space
for snow chains. To avoid damage to the vehi- cle or tires, observe the "Wheel and tire com-
binations" section under "Tires and wheels".
!Vehicles with steel wheels: if you mount
snow chains on steel wheels, you may dam-
age the hub caps. Remove the hub caps from the relevant wheels before mounting the
snow chains.
For safety reasons, Mercedes-Benz recom-
mends that you only use snow chains that have
been specially approved for your vehicle by
Mercedes-Benz, or are of a corresponding
standard of quality. For more information,
please contact a qualified specialist workshop.
If you intend to mount snow chains, please bear
the following points in mind:
RSnow chains may not be mounted on all
wheel/tire combinations. Permissible wheel-
tire combinations (
Ypage 307).
ROnly use snow chains when driving on roads
completely covered by snow. Remove the
snow chains as soon as possible when you
come to a road that is not snow-covered.
RLocal regulations may restrict the use of snow
chains. Observe the appropriate regulations if
you wish to mount snow chains.
RDo not exceed the maximum permissible
speed of 30 mph (50 km/h).
iYou may wish to deactivate ESP®when pull-
ing away with snow chains installed
(
Ypage 196). You can thereby allow the
wheels to spin in a controlled manner, ach-
ieving an increased driving force (cutting
action).
For more information on driving with the emer-
gency spare wheel, see (
Ypage 308).
Tire pressure
Tire pressure specifications
Important safety notes
GWARNING
Underinflated or overinflated tires pose the
following risks:
Rthe tires may burst, especially as the load
and vehicle speed increase.
Rthe tires may wear excessively and/or
unevenly, which may greatly impair tire
traction.
Rthe driving characteristics, as well as steer-
ing and braking, may be greatly impaired.
There is a risk of an accident.
Follow recommended tire inflation pressures
and check the pressure of all the tires includ-
ing the spare wheel:
Rmonthly, at least
Rif the load changes
Rbefore beginning a long journey
Runder different operating conditions, e.g.
off-road driving
If necessary, correct the tire pressure.
The data on the Tire and Loading Information
placard and tire pressure table shown here are
examples. Tire pressure specifications are vehi-
cle-specific and may deviate from the data
shown here. The tire pressure specifications
that are valid for your vehicle can be found on
the Tire and Loading Information placard and
tire pressure table on the vehicle.
General notes
The recommended tire pressures for the tires
mounted at the factory can be found on the
labels described here.
Operation with an emergency spare wheel:
information on operation with an emergency
spare wheel can be found in the general notes in
the "Emergency spare wheel" section
(
Ypage 308).
Further information on tire pressures can be
obtained at a qualified specialist workshop.
288Tire pressure
Wheels and tires
Page 295 of 322
In addition to the warning lamp, a message
appears in the multifunction display. Observe
the information on display messages
(
Ypage 219).
It may take up to ten minutes for a malfunction of the tire pressure monitor to be indicated. A
malfunction will be indicated by the tire pres-
sure warning lamp flashing for approximately
one minute and then remaining lit. When the
malfunction has been rectified, the tire pressure
warning lamp goes out after a few minutes of
driving.
The tire pressure values indicated by the on-
board computer may differ from those meas-
ured at a gas station with a pressure gauge. The
tire pressures shown by the on-board computer
refer to those measured at sea level. At high
altitudes, the tire pressure values indicated by a
pressure gauge are higher than those shown by the on-board computer. In this case, do not
reduce the tire pressures.
The operation of the tire pressure monitor can
be affected by interference from radio transmit-
ting equipment (e.g. radio headphones, two-way
radios) that may be being operated in or near the vehicle.
Checking the tire pressure electroni-
cally
XMake sure that the SmartKey is in position 2
in the ignition lock (Ypage 128).
XPress the =or; button on the steering
wheel to select the Servicemenu.
XPress the9or: button to select
Tire Pressure.
XPress the abutton.
The current tire pressure of each tire is shown
in the multifunction display.
If the vehicle has been parked for over
20 minutes, the Tire pressures will be
displayed after driving a few minutesmessage appears.
After a teach-in process, the tire pressure mon-
itor automatically detects new wheels or new
sensors. As long as a clear allocation of the tire
pressure value to the individual wheels is not
possible, theTire
PressureMonitorActivedisplay message is shown instead of the tire
pressure display. The tire pressures are already
being monitored.
If an emergency spare wheel is mounted, the
system may continue to show the tire pressure of the wheel that has been removed for a few
minutes. If this occurs, note that the value dis-
played for the position where the spare wheel is
mounted is not the same as the current tire
pressure of the emergency spare wheel.
Tire pressure monitor warning mes-
sages
If the tire pressure monitor detects a pressure
loss in one or more tires, a warning message is
shown in the multifunction display. The yellow
tire pressure warning lamp then lights up.
RIf the Correct Tire Pressuremessage
appears in the multifunction display, the tire
pressure in at least one tire is too low. The tire pressure must be corrected when the oppor-
tunity arises.
RIf the Check Tiresmessage appears in the
multifunction display, the tire pressure in one
or more tires has dropped significantly. The
tires must be checked.
RIf the WarningTireMalfunctionmessage
appears in the multifunction display, the tire
pressure in one or more tires is dropping sud-
denly. The tires must be checked.
Observe the instructions and safety notes in the
display messages in the "Tires" section
(
Ypage 219).
If the wheel positions on the vehicle are rotated,
the tire pressures may be displayed for the
wrong positions for a short time. This is rectified after a few minutes of driving, and the tire pres-
sures are displayed for the correct positions.
Restarting the tire pressure monitor
When you restart the tire pressure monitor, all
existing warning messages are deleted and the
warning lamps go out. The monitor uses the cur-
rently set tire pressures as the reference valuesfor monitoring. In most cases, the tire pressure
monitor will automatically detect the new refer-
ence values after you have changed the tire
pressure. However, you can also define refer-
ence values manually as described here. The tire
pressure monitor then monitors the new tire
pressure values.
XSet the tire pressure to the value recommen- ded for the corresponding driving situation on
the Tire and Loading Information placard on
the driver's side B-pillar (
Ypage 288).
Tire pressure293
Wheels and tires
Z
Page 304 of 322
following specifications from the U.S. govern-
ment. The ratings are molded into the sidewall of
the tire.
Recommended tire pressures
The recommended tire pressure applies to the
tires mounted at the factory.
The Tire and Loading Information placard con-
tains the recommended tire pressures for cold
tires on a fully loaded vehicle and for the maxi-
mum permissible vehicle speed.
The tire pressure table contains the recommen-ded pressures for cold tires for various operat-
ing conditions, i.e. differing load and speed con-
ditions.
Increased vehicle weight due to optional
equipment
The combined weight of all standard and
optional equipment available for the vehicle,
regardless of whether it is actually installed on
the vehicle or not.
Rim
This is the part of the wheel on which the tire is
mounted.
GAWR (Gross Axle Weight Rating)
The GAWR is the maximum gross axle weight
rating. The actual load on an axle must never
exceed the gross axle weight rating. The gross
axle weight rating can be found on the vehicle
identification plate on the B-pillar on the driver's
side.
Speed rating
The speed rating is part of the tire identification. It specifies the speed range for which the tire is
approved.
GVW (Gross Vehicle Weight)
The gross vehicle weight includes the weight of
the vehicle including fuel, tools, the spare wheel,
accessories installed, occupants, luggage and
the drawbar noseweight, if applicable. The gross
vehicle weight must not exceed the gross vehi-
cle weight rating GVWR as specified on the vehi-
cle identification plate on the B-pillar on the
driver's side.
GVWR (Gross Vehicle Weight Rating)
The GVWR is the maximum permissible gross
weight of a fully loaded vehicle (the weight of the
vehicle including all accessories, occupants, fuel, luggage and the drawbar noseweight, if
applicable). The gross vehicle weight rating is
specified on the vehicle identification plate on
the B-pillar on the driver's side.
Maximum loaded vehicle weight
The maximum weight is the sum of:
Rthe curb weight of the vehicle
Rthe weight of the accessories
Rthe load limit
Rthe weight of the factory installed optional
equipment
Kilopascal (kPa)
Metric unit for tire pressure. 6.9 kPa corre-
sponds to 1 psi. Another unit for tire pressure is
bar. 100 kilopascals (kPa) are the equivalent of
1 bar.
Load index
In addition to the load-bearing index, the load
index may also be imprinted on the sidewall of
the tire. This specifies the load-bearing capacity
more precisely.
Curb weight
The weight of a vehicle with standard equipment
including the maximum capacity of fuel, oil and
coolant. It also includes the air-conditioning sys-
tem and optional equipment if these are instal-
led in the vehicle, but does not include passen-
gers or luggage.
Maximum load rating
The maximum tire load is the maximum permis-
sible weight in kilograms or lbs for which a tire is
approved.
Maximum permissible tire pressure
Maximum permissible tire pressure for one tire.
Maximum load on one tire
Maximum load on one tire. This is calculated by
dividing the maximum axle load of one axle by
two.
PSI (pounds per square inch)
A standard unit of measure for tire pressure.
Aspect ratio
Relationship between tire height and tire width
in percent.
302All about wheels and tires
Wheels and tires
Page 305 of 322
tire pressure
Pressure inside the tire applying an outward
force to every square inch of the tire's surface.
The tire pressure is specified in pounds per
square inch (psi), in kilopascal (kPa) or in bar.
The tire pressure should only be corrected when
the tires are cold.
Cold tire pressure
The tires are cold:
Rif the vehicle has been parked with the tires
out of direct sunlight for at least three hours
and
Rif the vehicle has not been driven further than
1 mile (1.6 km)
Tread
The part of the tire that comes into contact with
the road.
Bead
The tire bead ensures that the tire sits securely
on the wheel. There are several steel wires in thebead to prevent the tire from coming loose from
the wheel rim.
Sidewall
The part of the tire between the tread and the
bead.
Weight of optional extras
The combined weight of those optional extras
that weigh more than the replaced standard
parts and more than 2.3 kg (5 lbs). These
optional extras, such as high-performance
brakes, level control, a roof rack or a high-per-
formance battery, are not included in the curb
weight and the weight of the accessories.
TIN (Tire Identification Number)
This is a unique identifier which can be used by
a tire manuf acturer to identify tires, for example
for a product recall, and thus identify the pur-
chasers. The TIN is made up of the manufactur- er's identity code, tire size, tire type code and
the manufacturing date.
Load bearing index
The load bearing index (also load index) is a code
that contains the maximum load bearing capa-
city of a tire.
Traction
Traction is the result of friction between the tires
and the road surface.
Treadwear indicators
Narrow bars (tread wear bars) that are distrib-
uted over the tire tread. If the tire tread is level
with the bars, the wear limit of áin (1.6 mm)
has been reached.
Occupant distribution
The distribution of occupants in a vehicle at their
designated seating positions.
Total load limit
Nominal load and luggage load plus 68 kg
(150 lbs) multiplied by the number of seats in
the vehicle.
Changing a wheel
Flat tire
The "Breakdown assistance" section
(Ypage 270 )contains information and notes on
how to deal with a flat tire. Information on driv-
ing with MOExtended tires in the event of a flat
tire can be found under "MOExtended tires (tires
with run-flat characteristics" (
Ypage 270).
Vehicle with emergency spare wheel: in the
event of a flat tire, the emergency spare wheel is
mounted as described under "Mounting a
wheel" (
Ypage 304).
Rotating the wheels
GWARNING
Interchanging the front and rear wheels may
severely impair the driving characteristics if
the wheels or tires have different dimensions. The wheel brakes or suspension components
may also be damaged. There is a risk of acci-
dent.
Rotate front and rear wheels only if the wheels and tires are of the same dimensions.
!On vehicles equipped with a tire pressure
monitor, electronic components are located
in the wheel.
Changing a wheel303
Wheels and tires
Z