heater MERCEDES-BENZ E-CLASS CABRIOLET 2017 Owners Manual
[x] Cancel search | Manufacturer: MERCEDES-BENZ, Model Year: 2017, Model line: E-CLASS CABRIOLET, Model: MERCEDES-BENZ E-CLASS CABRIOLET 2017Pages: 521, PDF Size: 10.64 MB
Page 17 of 521
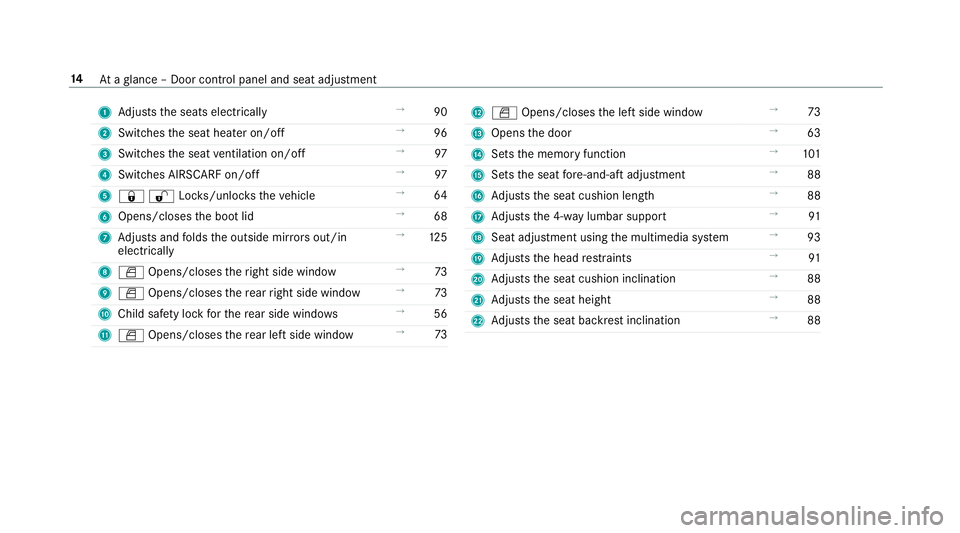
1
Adjusts the seats electrically →
90
2 Switches the seat heater on/off →
96
3 Switches the seat ventilation on/o ff →
97
4 Switches AIRSCARF on/off →
97
5 &%Loc ks/unloc kstheve hicle →
64
6 Opens/closes the boot lid →
68
7 Adjusts and folds the outside mir rors out/in
electrically →
12 5
8 W Opens/closes theright side window →
73
9 W Opens/closes there ar right side window →
73
A Child saf ety lock forth ere ar side wind ows →
56
B W Opens/closes there ar left side wind ow→
73 C
W Opens/closes the left side window →
73
D Opens the door →
63
E Sets the memory function →
101
F Sets the seat fore -and-aft adjustment →
88
G Adjusts the seat cushion length →
88
H Adjusts the 4-w aylumbar support →
91
I Seat adjustment using the multimedia sy stem →
93
J Adjusts the head restra ints →
91
K Adjusts the seat cushion inclination →
88
L Adjusts the seat height →
88
M Adjusts the seat backrest inclination →
88 14
Ataglance – Door control panel and seat adjustment
Page 99 of 521
#
Tofold back: swing back the seat backrest
horizon tally.
If th e seat backrest is not engaged, this will
be shown on the multifunction display in the
instrument clus ter.A wa rning tone also
sounds.
The seat mo ves automatically tothestored
position.
If th e pr evious seat position can no longer be
set, e.g. because of luggage in there ar foot we ll
or af ter occupants ha veentered there ar of the
ve hicle: #
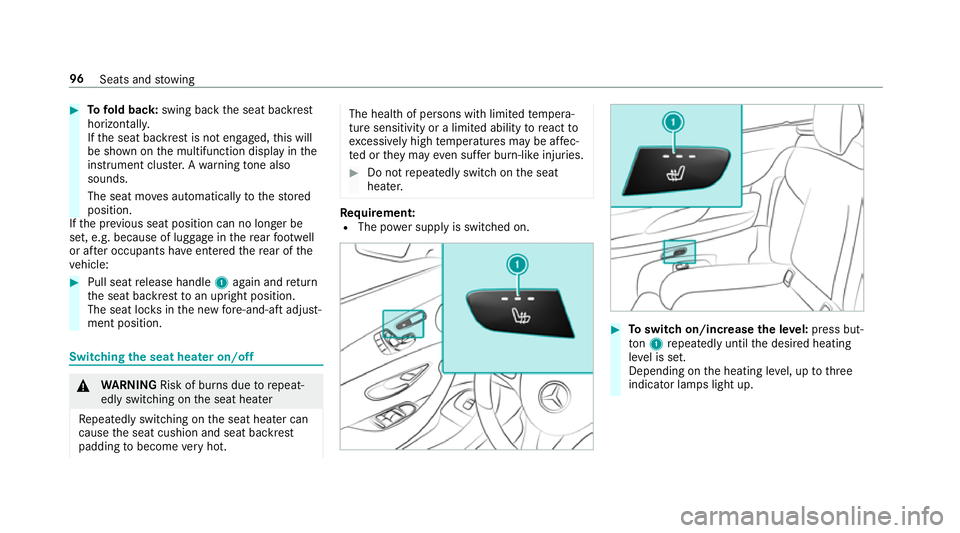
Pull seat release handle 1again and return
th e seat backrest toan upright position.
The seat loc ksinthe new fore -and-aft adjust‐
ment position. Switching the seat hea
ter on/o ff &
WARNING Risk of bu rns due torepeat‐
edly switching on the seat heater
Re peatedly switching on the seat heater can
cause the seat cushion and seat backrest
padding tobecome very hot. The health of persons with limited
temp era‐
ture sensitivity or a limited ability toreact to
exc essively high temp eratures may be af fec‐
te d or they may even suf fer burn-like injuries. #
Do not repeatedly switch on the seat
heater. Re
quirement:
R The po wer supp lyis switched on. #
Toswitch on/increase the le vel:press but‐
to n1 repeatedly until the desired heating
le ve l is set.
Depending on the heating le vel, up tothree
indicator lamps light up. 96
Seats and stowing
Page 100 of 521
#
Toswitch off/reduce the le vel:press but‐
to n1 repeatedly until the desired heating
le ve l is set.
If all indicator lamps are off, the seat heater
is switched off.
% The seat heater automatically switches down
from theth re e heating le vels af ter 8, 10and
20 minutes until the seat heater is switched
off. Setting
the panel heating Multimedia sy
stem:
, Vehicle .
î Vehicle set-
tings .
Panel heating
When the seat heater is switched on, the armr‐
ests in theve hicle as well as the cent reconsole
can be hea ted using this function.
Setting options #
Select Front only orOff. Switching
the seat ventilation on/off Re
quirement:
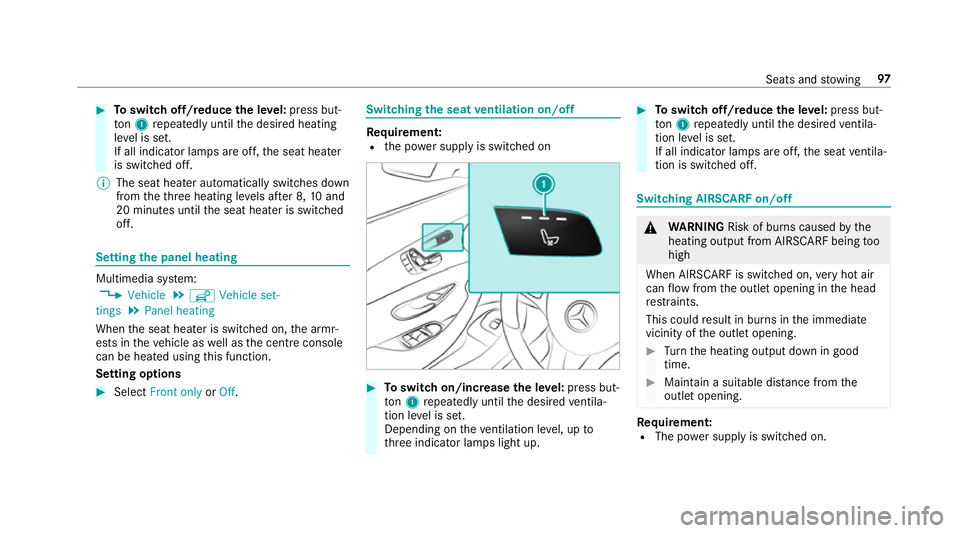
R the po wer supp lyis switched on #
Toswitch on/increase the le vel:press but‐
to n1 repeatedly until the desired ventila‐
tion le vel is set.
Depending on theve ntilation le vel, up to
th re e indicator lamps light up. #
Toswitch off/reduce the le vel:press but‐
to n1 repeatedly until the desired ventila‐
tion le vel is set.
If all indicator lamps are off, the seat ventila‐
tion is switched off. Switching AIRSCARF on/o
ff &
WARNING Risk of bu rns caused bythe
heating output from AIRSCARF being too
high
When AIRSCARF is switched on, very hot air
can flow from the outlet opening in the head
re stra ints.
This could result in burns in the immediate
vicinity of the outlet opening. #
Turn the heating output down in good
time. #
Maintain a suitable dis tance from the
outlet opening. Re
quirement:
R The po wer supp lyis switched on. Seats and
stowing 97
Page 103 of 521
Switching
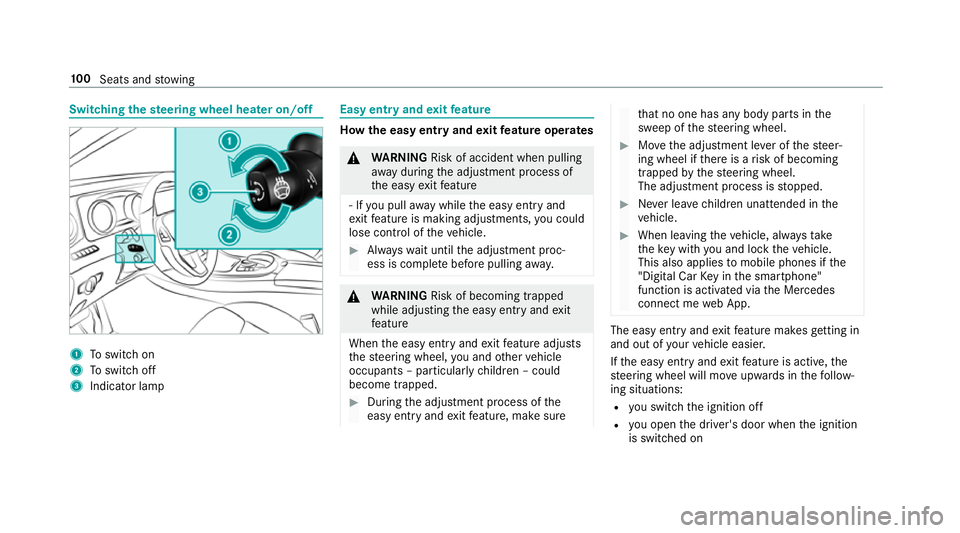
thest eering wheel heater on/off 1
Toswitch on
2 Toswitch off
3 Indicator lamp Easy entry and
exitfeature How
the easy entry and exitfeature operates &
WARNING Risk of accident when pulling
aw ay during the adjustment process of
th e easy exitfeature
‑ If you pull away while the easy entry and
ex itfeature is making adjustments, you could
lose cont rol of theve hicle. #
Alw ayswa it until the adjustment proc‐
ess is comple tebefore pulling away. &
WARNING Risk of becoming trapped
while adjusting the easy entry andexit
fe ature
When the easy entry andexitfeature adjusts
th esteering wheel, you and other vehicle
occupants – particularly children – could
become trapped. #
During the adjustment process of the
easy entry andexitfeature, make sure th
at no one has any body parts in the
sweep of thesteering wheel. #
Movethe adjustment le ver of thesteer‐
ing wheel if there is a risk of becoming
trapped bythesteering wheel.
The adjustment process is stopped. #
Never lea vechildren unat tended in the
ve hicle. #
When leaving theve hicle, alw aysta ke
th eke y with you and lock theve hicle.
This also applies tomobile phones if the
"Digital Car Key in the smartphone"
function is activated via the Mercedes
connect me web App. The easy ent
ryand exitfeature makes getting in
and out of your vehicle easier.
If th e easy entry andexitfeature is active, the
st eering wheel will mo veupwards in thefo llow‐
ing situations:
R you swit chthe ignition off
R you open the driver's door when the ignition
is switched on 100
Seats and stowing
Page 132 of 521
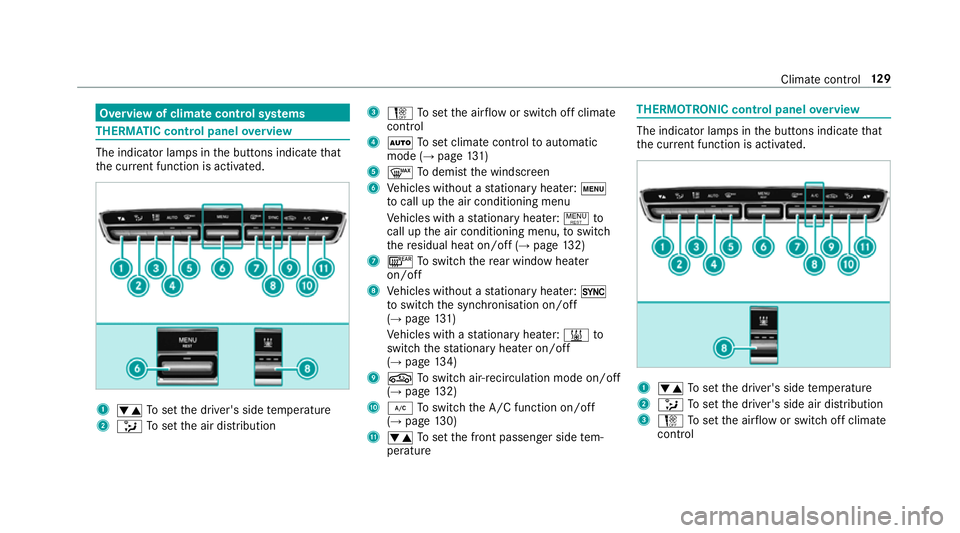
Overview of climate control sy
stems THERM
ATIC cont rol panel overview The indicator lamps in
the buttons indicate that
th e cur rent function is acti vated. 1
w Toset the driver's side temp erature
2 _ Toset the air distribution 3
H Toset the air flow or switch off climate
control
4 Ã Toset climate contro lto automatic
mode (→ page131)
5 ¬ Todemist the windscreen
6 Vehicles without a stationary heater: t
to call up the air conditioning menu
Ve hicles with a stationary heater: !to
call up the air conditioning menu, toswitch
th ere sidual heat on/off (→ page132)
7 ¤ Toswitch there ar wind owheater
on/off
8 Vehicles without a stationary heater: 0
to switch the synchronisation on/off
(→ page 131)
Ve hicles with a stationary heater: &to
switch thest ationary heater on/off
(→ page 134)
9 g Toswitch air-recirculation mode on/off
(→ page 132)
A ¿ Toswitch the A/C function on/off
(→ page 130)
B w Toset the front passenger side tem‐
perature THERMOTRONIC control panel
overview The indicator lamps in
the buttons indicate that
th e cur rent function is acti vated. 1
w Toset the driver's side temp erature
2 _ Toset the driver's side air distribution
3 H Toset the air flow or switch off climate
control Climate cont
rol12 9
Page 133 of 521
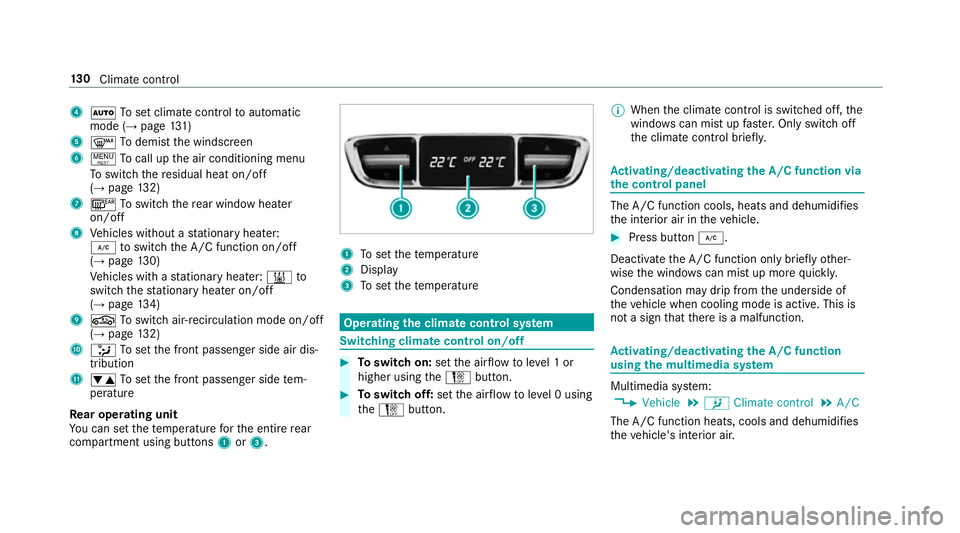
4
à Toset climate contro lto automatic
mode (→ page131)
5 ¬ Todemist the windscreen
6 ! Tocall up the air conditioning menu
To switch there sidual heat on/off
(→ page 132)
7 ¤ Toswitch there ar wind owheater
on/off
8 Vehicles without a stationary heater:
¿ toswitch the A/C function on/off
(→ page 130)
Ve hicles with a stationary heater: &to
switch thest ationary heater on/off
(→ page 134)
9 g Toswitch air-recirculation mode on/off
(→ page 132)
A _ Toset the front passenger side air dis‐
tribution
B w Toset the front passenger side tem‐
perature
Re ar operating unit
Yo u can set thete mp erature forth e entire rear
compartment using buttons 1or3. 1
Toset thete mp erature
2 Display
3 Toset thete mp erature Operating
the clima tecont rol sy stem Switching clima
tecont rol on/off #
Toswitch on: setthe air flow toleve l 1 or
higher using theH button. #
Toswitch off: setthe air flow toleve l 0 using
th eH button. %
When the climate control is switched off, the
windo wscan mist up faster. Only switch off
th e climate control brief ly. Ac
tivating/deactivating the A/C function via
the control panel The A/C function cools, heats and dehumidifies
th
e interior air in theve hicle. #
Press button ¿.
Deactivate the A/C function only briefly other‐
wise the windo wscan mist up more quickl y.
Condensation may drip from the underside of
th eve hicle when cooling mode is active. This is
not a sign that there is a malfunction. Ac
tivating/deactivating the A/C function
using the multimedia sy stem Multimedia sy
stem:
, Vehicle .
b Climate control .
A/C
The A/C function heats, cools and dehumidifies
th eve hicle's interior air. 13 0
Climate cont rol
Page 137 of 521
Dispose of
thege nuine Mercedes-Benz interior
pe rfume flacon when it is em pty and do not refill
it.
Re fillable flacon #
Unscr ew the cap of the em ptyflacon. #
Filltheflacon with a maximum of 15ml. #
Screw the cap back on totheflacon.
Alw aysre fill th e em ptyre fillable flacon with the
same perfume. Obser vethe separate informa‐
tion sheet attached totheflacon. St
ationary heater/ventilation Fu
nction of thest ationary heater/stationary
ve ntilation
R The air in theve hicle interior is heated or
ve ntilated tothe set temp erature.
R The air in theve hicle interior cannot be
cooled down totemp eratures below the out‐
side temp erature.
R Ifth e outside temp erature changes, ventila‐
tion mode au tomatical lyswitches toheating mode or from heating mode
toventilation
mode.
The stationary heater and theex haust gas outlet
are situated at theright-hand front wheel.
Switching thest ationary heater/stationary
ve ntilation on/off via the control panel &
DANG ER Risk of fata l injury due topoi‐
sonous exhaust gases
If th eta ilpipe is bloc ked or suf ficient ventila‐
tion is not possible, poisonous exhaust gases
such as carbon monoxide may enter theve hi‐
cle. This is the case in enclosed spaces or if
th eve hicle gets stuck in sn ow,fo rex ample. #
Alw ays switch thest ationary heater off
in enclosed spaces without an air
ex traction sy stems, e.g. in garage s. #
Keep theta ilpipe and the area around
th eve hicle free from snow when the
engine or thest ationary heater are run‐
ning. #
Open a window on the windward side of
th eve hicle toensure an adequate sup‐
ply of fresh air. &
WARNING Risk offire due tohot station‐
ary heater components
When thest ationary heater is swit ched on,
parts of theve hicle can become very hot,
e.g. theex haust sy stem.
Flammable materials such as lea ves, grass or
twigs may ignite if they come into contact
wi th:
R hot parts of theex haust sy stem
R theex haust gas itself #
When thest ationary heater is swit ched
on, make sure that:
R hot vehicle parts do not come into
contact with flammable materials
R theex haust gas can flow out of the
ta ilpipe unhindered
R theex haust gas does not come into
contact with flammable materials 134
Climate cont rol
Page 138 of 521
*
NO
TEBattery discharge caused bysta‐
tionary heater or stationary ventilation
operation Ope
rating thest ationary heater or stationary
ve ntilation drains the batter y. #
After heating or ventilating theve hicle
twice, drive for a longer period of time. Re
quirement:
R The fuel tank is filled toat least reser vefuel
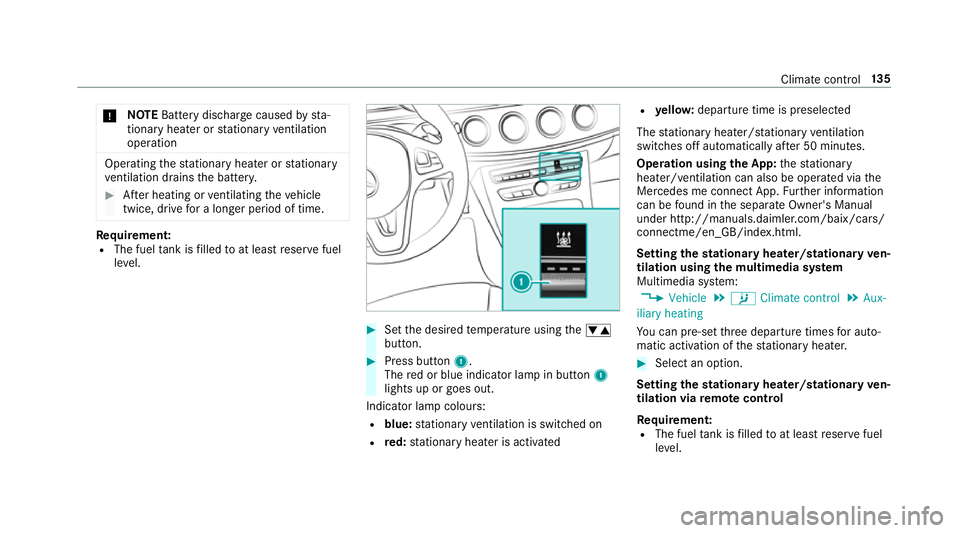
le ve l. #
Set the desired temp erature using thew
button. #
Press button 1.
The red or blue indicator lamp in button 1
lights up or goes out.
Indicator lamp colours: R blue: stationary ventilation is switched on
R red: stationary heater is activated R
yello w: departure time is preselected
The stationary heater/ stationary ventilation
switches off au tomatically af ter 50 minutes.
Operation using the App: thest ationary
heater/ ventilation can also be operated via the
Mercedes me connect App. Further information
can be found in the separate Owner's Manual
under http://manuals.daimler.com/baix/cars/
connectme/en_GB/index.html.
Setting thest ationary heater/stationary ven‐
tilation using the multimedia sy stem
Multimedia sy stem:
, Vehicle .
b Climate control .
Aux-
iliary heating
Yo u can pre-set thre e departure times for auto‐
matic activation of thest ationary heater. #
Select an option.
Setting thest ationary heater/stationary ven‐
tilation via remo tecont rol
Re quirement:
R The fuel tank is filled toat least reser vefuel
le ve l. Climate control
13 5
Page 139 of 521
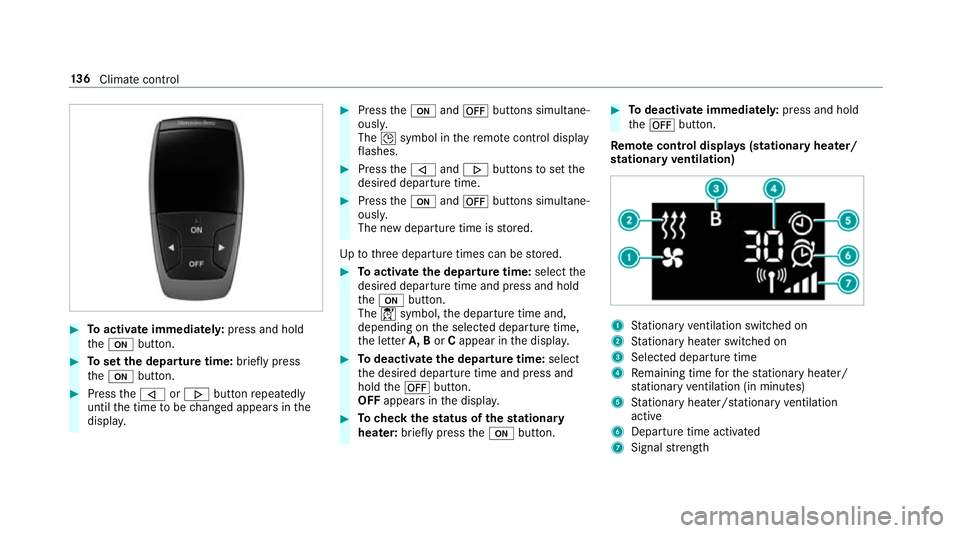
#
Toactivate immediatel y:press and hold
th eu button. #
Toset the departu retime: briefly press
th eu button. #
Press the, or. button repeatedly
until the time tobe changed appears in the
displa y. #
Press theu and^ buttons simultane‐
ousl y.
The Îsymbol in there mo tecontrol displ ay
fl ashes. #
Press the, and. buttons toset the
desired departure time. #
Press theu and^ buttons simultane‐
ousl y.
The new departure time is stored.
Up tothre e departure times can be stored. #
Toactivate the departu retime: select the
desired departure time and press and hold
th eu button.
The Ísymbol, the departure time and,
depending on the selected departure time,
th e letter A, BorCappear in the displa y. #
Todeactivate the departure time: select
th e desired departure time and press and
hold the^ button.
OFF appears in the displa y. #
Tocheck thest atus of thest ationary
heater: briefly press theu button. #
Todeactivate immediatel y:press and hold
th e^ button.
Re mo tecont rol displa ys(stationary heater/
st ationary ventilation) 1
Stationary ventilation switched on
2 Stationary heater swit ched on
3 Selected departure time
4 Remaining time forth est ationary heater/
st ationary ventilation (in minu tes)
5 Stationary heater/ stationary ventilation
acti ve
6 Departure time acti vated
7 Signal stre ngth 13 6
Climate cont rol
Page 140 of 521
Fu
rther possible displa ys:
R Time: activated departure time.
R Zero minutes: theru nning time forth est a‐
tionary heater is inc reased, as the engine has
not yetre ached operating temp erature when
it is star ted.
R OFF: thest ationary heater/ stationary venti‐
lation is switched off.
Re placing the remo tecont rol bat tery (sta‐
tiona ryheater) &
DANG ER Serious damage tohealth
caused byswallowing batteries
Batteries contain toxic and cor rosive sub‐
st ances. Swallowing bat teries may cause
serious damage tohealth.
There is a risk of fata l injur y. #
Keep batteries out of there ach of chil‐
dren. #
If batteries are swallo wed, seek medical
attention immediately. +
ENVIRONMEN
TALNO TEEnvironmental
dama gedue toimproper disposal of bat‐
te ries Batteries conta
intoxic and cor ro‐
sive subs tances. #
Ta
ke dischar ged batteries to a
qu alified specialist workshop or to a
collection point for used batteries. Re
quirement:
R A CR2450 lithium battery is requ ired when
re placing the batter y. #
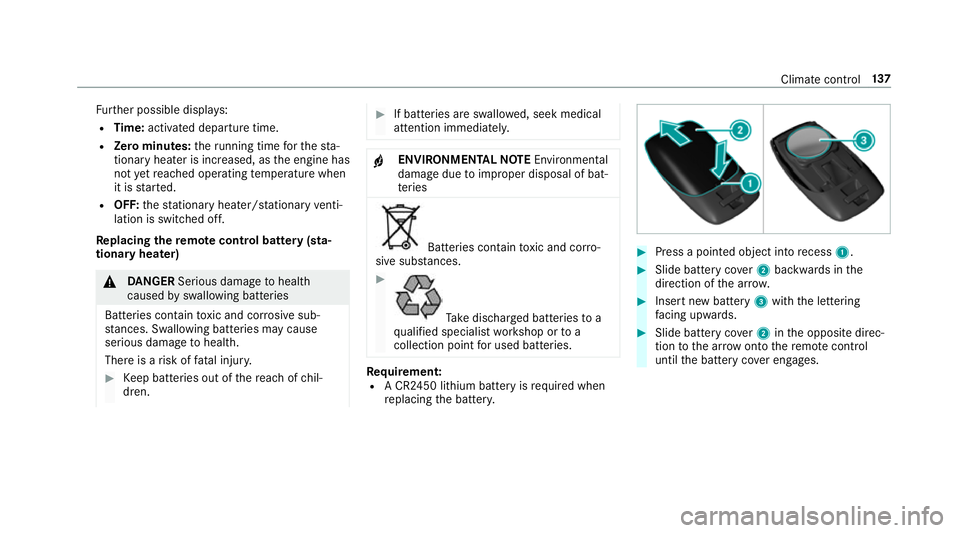
Press a pointed object into recess 1. #
Slide battery co ver2 backwards in the
direction of the ar row. #
Insert new battery 3with the lettering
fa cing up wards. #
Slide battery co ver2 inthe opposite direc‐
tion tothe ar row onto there mo tecontrol
until the battery co ver engages. Climate control
137