dimensions MERCEDES-BENZ E-CLASS CABRIOLET 2018 Owners Manual
[x] Cancel search | Manufacturer: MERCEDES-BENZ, Model Year: 2018, Model line: E-CLASS CABRIOLET, Model: MERCEDES-BENZ E-CLASS CABRIOLET 2018Pages: 589, PDF Size: 10.56 MB
Page 230 of 589
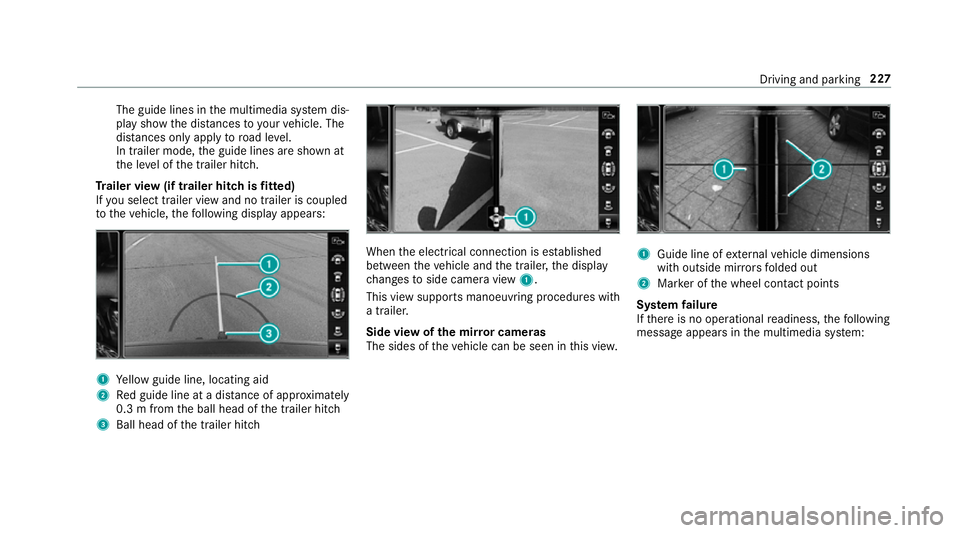
The guide lines in
the multimedia sy stem dis‐
play show the dis tances toyour vehicle. The
dis tances only apply toroad le vel.
In trailer mode, the guide lines are shown at
th e le vel of the trailer hitch.
Tr ailer view (if trailer hitch is fitted)
If yo u select trailer view and no trailer is coupled
to theve hicle, thefo llowing display appears: 1
Yellow guide line, locating aid
2 Red guide line at a dis tance of appr oximately
0.3 m from the ball head of the trailer hitch
3 Ball head of the trailer hitch When
the electrical connection is es tablished
between theve hicle and the trailer, the display
ch anges toside camera view 1.
This view supports manoeuvring procedures with
a trailer.
Side view of the mir ror cameras
The sides of theve hicle can be seen in this vie w. 1
Guide line of extern al vehicle dimensions
with outside mir rors folded out
2 Marker of the wheel conta ct points
Sy stem failure
If th ere is no operational readiness, thefo llowing
message appears in the multimedia sy stem: Driving and parking
227
Page 403 of 589
*
NO
TEDama gedue tounsuitable car
wa sh #
Before driving into a car wash make
sure that the car wash is suitable for
th eve hicle dimensions. #
Ensure there is suf ficient ground clear‐
ance between the underbody and the
guide rails of the car wash. #
Ensure that the clearance width of the
car wash, in particular the width of the
guide rails, is suf ficient. To
avo id damage to yourvehicle when using a
car wash, ensure thefo llowing beforehand:
R toavoid possible water ingress in theve hicle,
it is preferable touse car washes which allow
th e high-pressure pre-cleaning tobe deacti‐
va ted (specification forth e cabriolet pro‐
gram).
R it is imperative toavo id a subsequent hot-
wa x treatment.
R remo vetheke y in order toensure that the
wind deflector on the windscreen retracts. R
Active Dis tance Assi stDISTRONIC and the
HOLD function are deactivated.
R the 360° Camera or there ve rsing camera is
switched off.
R the side windo wsand soft top are closed
comple tely.
R the blo werfo rth eve ntilation/heating is
switched off.
R the windscreen wiper switch is in position
g.
R theke y is at a minimum dis tance of 3 m
aw ay from theve hicle, otherwise the boot lid
could open unintentionall y.
R in car washes with a con veyo r sy stem: neu‐
tral iis engaged.
% In car washes with a con veyo r sy stem: if you
wo uld like tolea vetheve hicle while it is
being washed, make sure theke y is located
in theve hicle. The jgear is otherwise
automatically engaged.
% If, af terth e car wash, youre mo vethewax
from the windscreen and wiper rubbers, this will pr
event smearing and reduce wiper
noise. Information on using a high-p
ressure cleaner &
WARNING Risk of an accident when
using high-pressure cleane rswith circu‐
lar jet nozzles
The wate r jet of a circular jet nozzle (dirt
grinder) can cause extern ally invisible dam‐
age tothe tyres or chassis parts.
Components damaged in this wa y may unex‐
pec tedly fail. #
Do not use high-pressure cleaners with
circular jet nozzles toclean theve hicle. #
Have damaged tyres or chassis parts
re placed immediatel y. To
avo id damage to yourvehicle, obser vethefo l‐
lowing when using a high-pressure cleaner:
R keep theke y at least 3 m away from theve hi‐
cle. Otherwise the boot lid could open unin‐
te ntional ly. 400
Maintenance and care
Page 446 of 589
On-board computer:
Service Tyres #
Swipe down wards on Touch Control on the
left-hand side of thesteering wheel.
The Run Flat Indicator activeRestart: press
Touch Control message is shown in the mul‐
tifunction displa y.
Re start the tyre pressure loss warning sy stem in
th efo llowing situations:
R The tyre pressure has changed.
R The wheels or tyres ha vebeen changed or
newly fitted. #
Tobegin restart, press Touch Control on the
left-hand side of thesteering wheel.
The Tyre pressure now OK? message is
shown in the multifunction displa y.#
Select Yes. #
Toconfirm restart, press Touch Control on
th e left-hand side of thesteering wheel.
The Run Flat Indicator restarted message is
shown in the multifunction displa y. Af
teryo u ha vedriven for a few minutes, the
tyre pressu reloss warning sy stem monitors
th e set tyre pressures of all the tyres.
Be sure toalso obse rveth efo llowing fur ther
re lated subjects:
R Notes on tyre pressure (→ page 436) Wheel
change Note
s on selecting, fitting and replacing
tyres Mercedes
-AMG vehicles: observeth e no tes in
th e Supplement. Otherwise, you may failto rec‐
ognise dangers.
Yo u can ask for information rega rding permit ted
wheel/tyre combinations at a Mercedes-Benz
Service Cent re. &
WARNING Risk of accident due toincor‐
re ct dimensions of wheels and tyres
If wheels and tyres of the wrong size are
used, the wheel brakes or wheel suspension
components may become damaged. #
Alw aysre place wheels and tyres with
th ose that fulfil the specifications of the
original part.
When replacing wheels, make sure tofit the
cor rect:
R Designation
R Type
When replacing tyres, make sure tofit the
cor rect:
R Designation
R Manufactu rer
R Type &
WARNING Risk of inju rythro ugh exceed‐
ing the specified tyre load-bearing capa‐
city or the permissible speed rating
Exceeding the specified tyre load-bearing
capacity or the permissible speed rating may
lead totyre dama geand tothe tyres bur st‐
ing. Wheels and tyres
443
Page 449 of 589
R
Obser vethe maximum permissible speed for
th e M+S tyres fitted.
If th is is below theve hicle's maximum speed,
th is must be indicated byan appropriate
label in the driver's field of vision.
R Run in new tyres at moderate speeds forthe
fi rs t10 0 km.
R Replace the tyres af ter six years at the latest,
re ga rdless of wear.
R When replacing with tyres that do not
fe ature run-flat characteristics: vehicles
with MOExtended tyres are not equipped
with a TIREFIT kit at thefa ctor y.Equip the
ve hicle with a TIREFIT kit af terre placing with
tyres that do not feature run-flat characteris‐
tics, e.g. winter tyres.
Fo r more information on wheels and tyres, con‐
ta ct a qualified specialist workshop.
Be sure toalso obse rveth efo llowing fur ther
re lated subjects:
R Notes on tyre pressure (→ page 436)
R Tyre pressure table (→ page 437) R
Notes on the emer gency spa rewheel
(→ page 453) Note
s on inter changing wheels &
WARNING Risk of inju rythro ugh dif fer‐
ent wheel sizes
Inter changing the front and rear wheels if the
wheels or tyres ha vediffere nt dimensions
may se verely impair the driving characteris‐
tics.
The disk brakes or wheel suspension compo‐
nents may also be damaged. #
Rotate front and rear wheels on lyifthe
wheels and tyres are of the same
dimensions. Inter
changing the front and rear wheels if the
wheels or tyres ha vediffere nt dimensions can
re nder thege neral operating pe rmit in valid. The
wear pat tern s on the front and rear wheels
dif fer:
R Front wheels wear more on the shoulder of
th e tyre
R Rear wheels wear more in the cent reofthe
tyre
On vehicles with the same front and rear wheel
size, you can inter change the wheels every
5,000 to10,000 km, depending on thewe ar.
Ensure the direction of rotation is maintained for
th e wheels.
It is imperative toobser vethe instructions and
saf ety no tes on "Changing a wheel" when doing
so Preparing theve hicle for a wheel
ch ange( →page 447). Note
s onstoring wheels When
storing wheels, obser vethefo llowing
no tes:
R Afterre moving wheels, store them in a cool,
dry and preferably dark place.
R Protect the tyres from conta ct withoil,
grease or fuel. 446
Wheels and tyres
Page 456 of 589
#
Vehicles with a tyre pressure monitoring
sy stem: restart the tyre pressure monitoring
sy stem (→ page 439).
Exception: the new wheel is an emer gency
spa rewheel.
Make sure toobser vethefo llowing fur ther rela‐
te d subjec t:
R Notes on tyre pressure (→ page 436)Emer
gency spare wheel Note
s onthe emer gency spare wheel &
WARNING Risk of accident caused by
incor rect wheel and tyre dimensions
The wheel or tyre size and the tyre type of
th e emer gency spa rewheel or spare wheel
and the wheel tobe replaced may dif fer.
Mounting an emer gency spa rewheel/spare
wheel may se verely impair the driving char‐
acteristics.
To preve nt hazardous situations: #
Adapt your driving style according lyand
drive carefull y. #
Neverfit more than one emer gency
spa rewheel or spare wheel that dif fers
in size. #
Only use an emer gency spa rewheel or
spare wheel of a dif fere nt size brie fly. #
Do not switch off ESP ®
. #
Have the emer gency spa rewheel or
spare wheel of a dif fere nt size replaced
at the nearest qualified specialist work‐
shop. The new wheel must ha vethe
cor rect dimensions. Check
the tyre pressure of the emer gency spa re
wheel fitted. Co rrect the pressure as necessar y.
The maximum permissible speed with an emer‐
ge ncy spa rewheel fitted is 80 km/h.
Do not fit th e emer gency spa rewheel with sn ow
ch ains.
Re place the emer gency spa rewheel af ter six
ye ars at the latest, rega rdless of wear. %
Ve
hicles with a tyre pressure loss warn‐
ing sy stem: If an emer gency spa rewheel is
fi tted the tyre pressure loss warning sy stem
cann otfunction reliabl y.Only restart the sys‐
te m again when the emer gency spa rewheel
has been replaced with a new wheel.
Ve hicles with a tyre pressure monitoring
sy stem: If an emer gency spa rewheel is fit‐
te dth e tyre pressure monitoring sy stem can‐
not function reliabl y.Only restart the sy stem
again when the emer gency spa rewheel has
been replaced with a new wheel.
Ve hicles with a tyre pressure monitoring
sy stem: For a few minutes af ter an emer‐
ge ncy spa rewheel is fitted, the sy stem may
st ill display the tyre pressure of there mo ved
wheel.
Be sure toalso obse rveth efo llowing fur ther
re lated subjects:
R Notes on tyre pressure (→ page 436)
R Tyre pressure table (→ page 437) Wheels and tyres
453
Page 471 of 589
&
WARNING ‑ Risk of fire and injury due to
windscreen washer concentrate
Wi ndsc reen washer concentrate is highly
fl ammable. It could ignite if it comes into
con tact wi thhot engine component parts or
th eex haust sy stem. #
Make sure that no windsc reen washer
concentrate spills out next tothefiller
opening. *
NO
TEDama getotheex terior lighting
due tounsuitable windsc reen washer
fl uid Uns
uitable windsc reen washer fluids may
damage the plastic sur face of theex terior
lighting. #
Only use windscreen washer fluids
which are also suitable for use on plas‐
tic sur faces, e.g. MB SummerFit or MB
Wi nterFit. *
NO
TEBlocked spr aynozzles caused by
mixing windscreen washer fluids #
Do not mix MB SummerFit and MB Win‐
te rFit with other windscreen washer flu‐
ids. Do not use distilled or de-ionised
water asthefill
le ve l sensor may be triggered er roneously.
Re commended windscreen washer fluid:
R Abo vefreezing point: e.g. MB SummerFit
R Below freezing point: e.g. MB WinterFit
Fo rth e cor rect mixing ratio, referto the informa‐
tion on the antif reeze contai ner.
Mix thewa sher fluid with the windscreen washer
fl uid all year round. Ve
hicle data Ve
hicle dimensions The heights speci
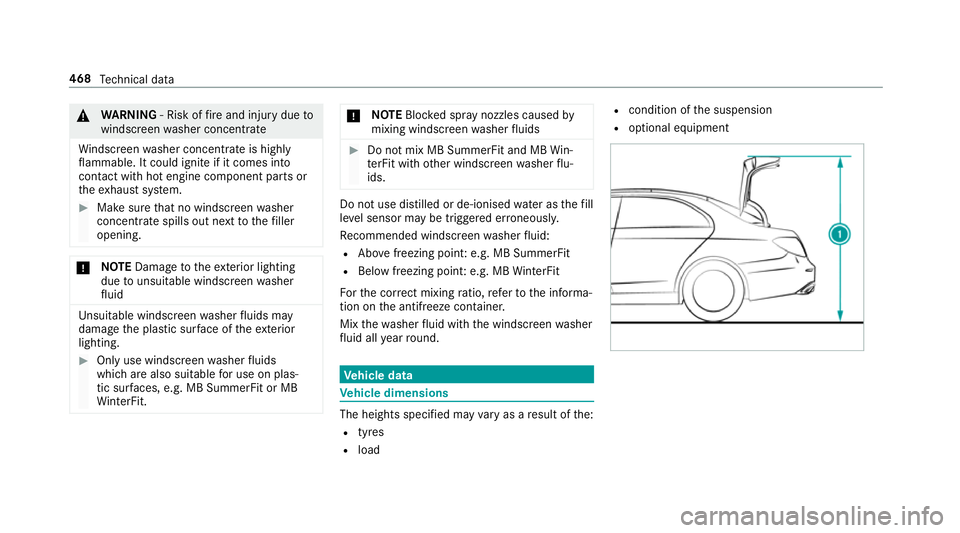
fied may vary as a result of the:
R tyres
R load R
condition of the suspension
R optional equipment 468
Tech nical da ta
Page 472 of 589
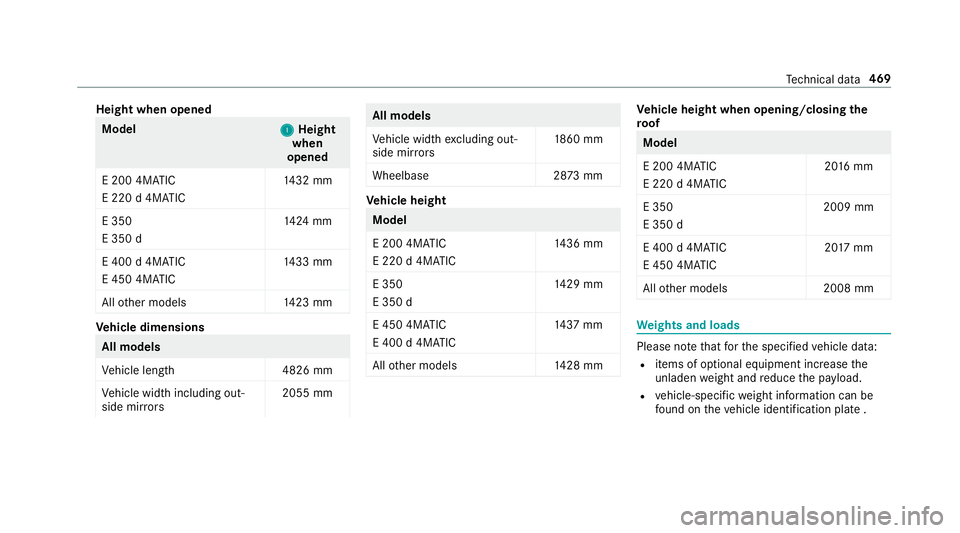
Height when opened
Model
1 1Height
when
opened
E 200 4MATIC
E 220 d 4MATIC 14
32 mm
E 350
E 350 d 14
24 mm
E 400 d 4MATIC
E 450 4MATIC 14
33 mm
All other models 1423 mm Ve
hicle dimensions All models
Ve
hicle lengt h4 826 mm
Ve hicle width including out‐
side mir rors 2055 mm All models
Ve
hicle width excluding out‐
side mir rors 18
60 mm
Wheelbase 2873 mm Ve
hicle height Model
E 200 4MATIC
E 220 d 4MATIC
14
36 mm
E 350
E 350 d 14
29 mm
E 450 4MATIC
E 400 d 4MATIC 14
37 mm
All other models 1428 mm Ve
hicle height when opening/closing the
ro of Model
E 200 4MATIC
E 220 d 4MATIC
20
16 mm
E 350
E 350 d 2009 mm
E 400 d 4MATIC
E 450 4MATIC 20
17 mm
All other models 2008 mm We
ights and loads Please no
tethat forth e specified vehicle data:
R items of optional equipment increase the
unladen weight and reduce the pa yload.
R vehicle-specific weight information can be
fo und on theve hicle identification plate . Te
ch nical da ta469
Page 473 of 589
Tr
ailer hitch Gene
ral no tes on the trailer hit ch Not all models can be used
for trailer operation
(→ page 245).
Modi fications tothe engine cooling sy stem may
be necessar y,depending on theve hicle model.
The retrofitting of a trailer hitch is only pe rmissi‐
ble if a towing capacity is specified in your vehi‐
cle documents.
Fu rther information can be obtained at a quali‐
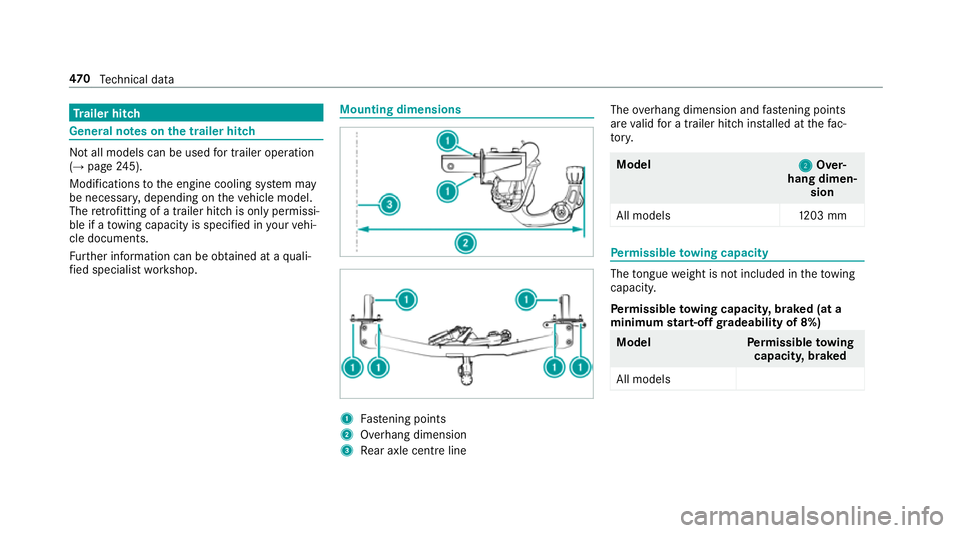
fi ed specialist workshop. Mounting dimensions
1
Fastening points
2 Overhang dimension
3 Rear axle centre line The
overhang dimension and fastening points
are valid for a trailer hitch ins talled at thefa c‐
to ry. Model
2 2Over‐
hang dimen‐ sion
All model s1 203 mm Pe
rm issible towing capacity The
tongue weight is not included in theto wing
capacity.
Pe rm issible towing capacit y,braked (at a
minimum start-off gradeability of 8%) Model
Perm issible towing
capacit y,braked
All models 47 0
Tech nical da ta
Page 548 of 589
Overview ..............................................3
74
Sea rching for a track ........................... 376
Sea rching for and auth orisingthe
device .................................................. 375
Selecting a media pl ayer ...................... 376
Switching device via NFC ..................... 376
Boot lid Activating/deactivating theta ilgate
opening limiter ...................................... 84
Closing .................................................. 82
HANDS-FREE ACCESS .......................... .82
Locking separa tely ................................ 83
Opening ................................................. 81
Opening dimensions ............................4 68
Boot separator Closing ................................................. .91
Opening .................................................91
Brake Assi stSystem
see BAS (Brake Assi stSystem)
Brake fluid
No tes .................................................. 466
Brake forc e distribution
EBD (Elect ronic Brake forc e Distribu‐
tion) ..................................................... 19 2Brakes
ABS (Anti-lock Braking Sy stem) ........... 187
Ac tive Brake Assi st.............................. 19 3
Ad aptive brake lights .......................... .198
BA S (Brake Assi stSystem) .................. 188
Driving tips ........................................... 161
EBD (Electronic Brake forc e Distribu‐
tion) ..................................................... 19 2
HOLD function .................................... .214
Limited braking ef fect (salt-trea ted
ro ads) .................................................. .161
New/replaced brakepads/brake
discs .................................................... 16 0
Ru nning-in no tes ..................................1 60
Braking assi stance
see BAS (Brake Assi stSystem)
Breakdown Overview of the help functions .............. 16
To w- starting ........................................ .431
To wing away ........................................ 427
Tr ansporting theve hicle ......................4 29
Wheel change ...................................... 447
Breakdown see Flat tyre Breakdown assistance call
see Mercedes me connect
Burmes ter®
sur round sound sy stem .....3 89
Ad justing the balance/fader ............... 390
Ad justing the sound focus ................... 390
Ad justing treble, mid-range and bass
settings ............................................... 390
Au tomatic volume adjustment ............ .390
Calling up the sound menu .................. 389
Information .......................................... 389
Switching the sur round sound on/off
............................................................ .390
Buttons Steering wheel .................................... 253 C
Call list Making a call ....................................... 342
Overview ............................................. 342
Calling up the sound menu
Burmes ter®
sur round sound sy stem ... 389
Calls ..........................................................3 38
Ac cepting ............................................ 338
Ac tivating functions du ring a call ........ 339 Index
545
Page 577 of 589
Setting
the time and date automati‐
cally ..................................................... 291
Setting the time zone .......................... 291
Setting the time/date form at .............. 291
Swit ching transmission of theve hicle
position on/off .................................... 292
Sy stem settings
see Blue tooth®
see Data import/export
see Language
see Software update
see Wi-Fi T
Ta ilpipes (Care) ........................................ 407
Ta ke -back of end-of-life vehicles .............. 19
Pr otection of the environment ............... 19
Ta nk content
Ad Blue ®
............................................... 464
Fu el ..................................................... 463
Re ser ve(fuel) ...................................... 463
Te ch nical data
Axle load (trailer operation) ................. 471
Fa stening points (trailer hitch) .............4 70Information .......................................... 455
Mounting dimensions (trailer hitch) ..... 470
No tes (trailer hitch) ............................. 470
Overhang dimension (trailer hitch) ...... 470
To ngue weight ...................................... 471
To wing capacity (trailer operation) ...... 470
Ty re pressure monitoring sy stem ........ 440
Ve hicle identification plate .................. 457
Te lephone ........................................ .262, 331
Ac tivating functions du ring a call ........ 339
Business telephony settings ................ 336
Call and ringtone volume .................... .338
Calls with se veral participants ............ .339
Connecting a mobile phone (busi‐
ness telephony) .................................. .334
Connecting a mobile phone (Near
Field Communication (NFC)) .............. .337
Connecting a mobile phone (Pass‐
ke y) .................................................... .332
Connecting a mobile phone (Secu re
Simple Pairing) .................................... 332
De-authorising a mobile phone ............ 337
Disconnecting a mobile phone ............ 337
Importing con tacts .............................. 341
Importing contacts (o verview) ............ .341 Incoming call during an
existing call .... 339
Information .......................................... 332
Inter changing mobile phones .............. 336
Locking theve hicle (mobile phone) .......77
Menu (on-board computer) .................. 262
Mobile phone voice recognition .......... 338
No tes .................................................. 330
Operating modes ................................. 332
Re ception and transmission volume .... 338
St arting theve hicle (mobile phone) ..... 15 8
Switching mobile phones (Near Field
Communication (NFC)) ........................ 337
Symbols for business telephony .......... 335
Te lephone menu overview ...................3 31
Te lephone operation ............................ 338
Un locking theve hicle (mobile phone) ....77
Using a SIM card for business tel‐
ephony ................................................ 334
Using Near Field Communication
(NFC) .................................................. .337
Vo ice commands (LINGU ATRO NIC) ...... 274
Wi reless charging (mobile phone) ........ 12 5
Te lephone
see Second telephone 574
Index