wind MERCEDES-BENZ E-Class COUPE 2011 C207 Owner's Guide
[x] Cancel search | Manufacturer: MERCEDES-BENZ, Model Year: 2011, Model line: E-Class COUPE, Model: MERCEDES-BENZ E-Class COUPE 2011 C207Pages: 344, PDF Size: 14.06 MB
Page 93 of 344
Opening and closing with the key
Important safety notes
GRisk of injury
Make sure nobody can be trapped or injured
by moving parts such as the soft-top linkage
or soft-top compartment cover when opening
or closing the soft top.
If there is a risk of entrapment, immediately
release the % or & button on the
SmartKey. The soft-top mechanism stops
immediately.
Opening and closing
iThe key must be near the handle of the
driver's door.
XPoint the tip of the SmartKey at the driver's
door handle.
XTo open: press and hold the % button
on the key until the soft top is fully opened.
The Convertible Top in Operation
message appears in the multifunction
display. The seat ventilation is switched on.
The rear side windows open.
XTo close: press and hold the & button
on the key until the soft top is fully closed.
The Convertible Top in Operation
message appears in the multifunction
display. The soft top and the side windows
close.
Closing the soft top manually
If the soft top cannot be closed automatically,
check the following points:
Ris the trunk partition engaged
(Y page 96)?
Rare the head restraints on the rear bench
seats extended?
Ris the trunk lid closed?
Ris the on-board voltage sufficient?
Start the engine if necessary.
If automatic operation still does not work, the
soft top can be closed manually.
This work must be performed by two persons.
iClosing the soft top manually is a
complex, technically demanding process
which requires a great deal of force. Only
close the soft top manually in extreme
emergencies. In these situations, it is
better to get in touch with a qualified
specialist workshop, e.g. an authorized
Mercedes-Benz Center.
GRisk of injury
Remove wristwatches and any jewelry such
as rings or bracelets. You could otherwise get
caught, be injured and damage the vehicle.
Always grip the soft top at the indicated
gripping points when closing the soft top
manually. You could otherwise be injured.
XDepress the parking brake.XOpen the side windows.XLower the head restraints (automatically
(Y page 109) or manually (Y page 109)).
XRemove the key from the ignition lock.XOpen the trunk.XTake the two straps out of the vehicle tool
kit (Y page 287).
XTake the Allen key out of the Operator's
Manual wallet and keep it with you.
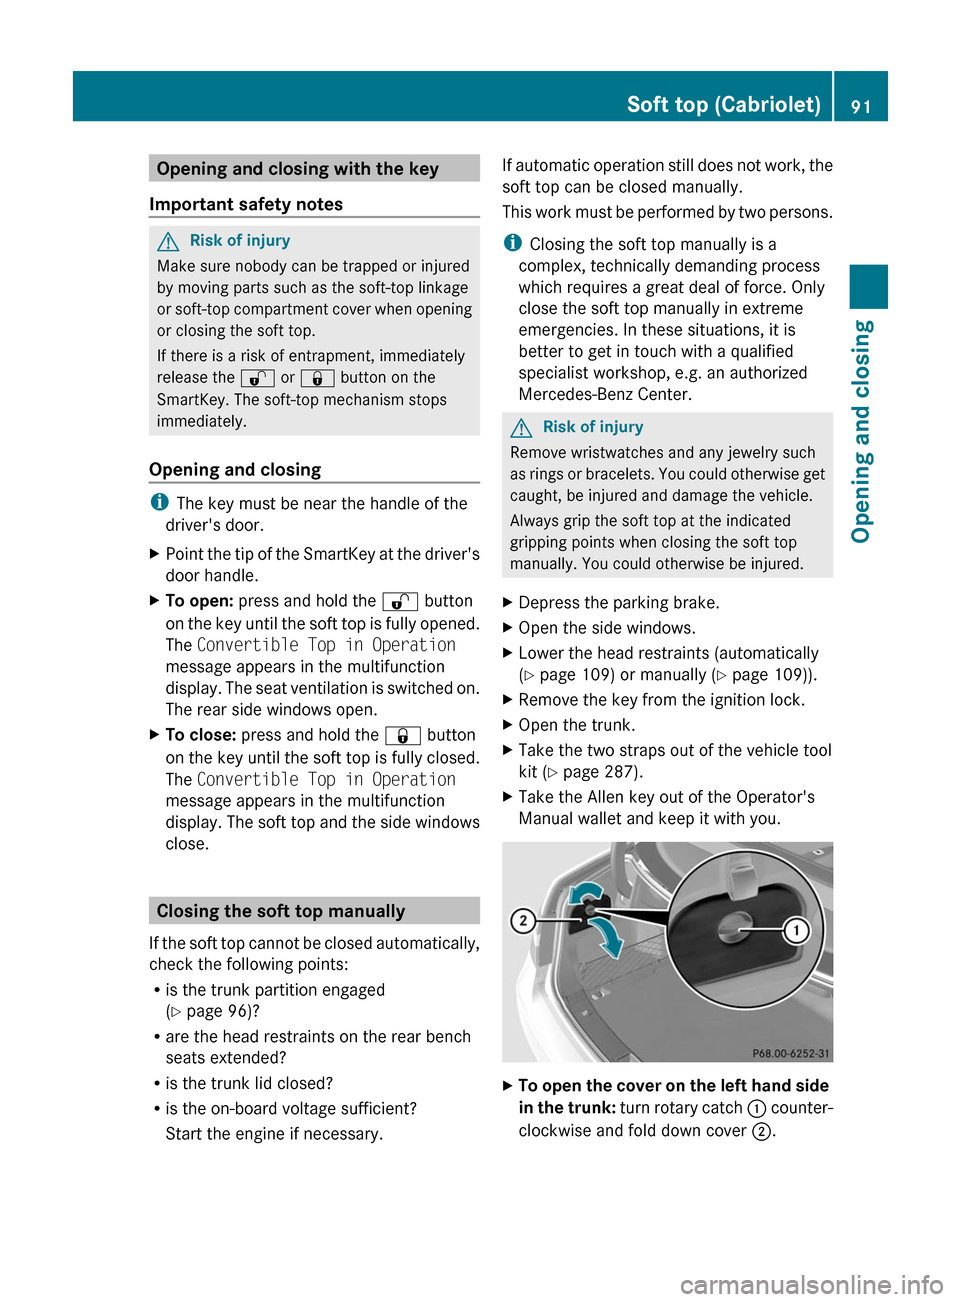
XTo open the cover on the left hand side
in the trunk: turn rotary catch : counter-
clockwise and fold down cover ;.
Soft top (Cabriolet)91Opening and closingBA 207 USA, CA Edition B 2011; 1; 3, en-USd2sboikeVersion: 3.0.3.62010-05-20T10:38:09+02:00 - Seite 91Z
Page 96 of 344

GRisk of injury
Do not reach between the cover halves and
the hinges. You could otherwise become
trapped.
XReach under the tip of soft top G in the
soft-top compartment from the right-hand
and left-hand sides.XLift the soft top out of the soft-top
compartment and guide it forwards in the
direction of the arrow onto windshield
frame H.ITo openJTo lockXPull off the cover of the roof lock behind the
overhead control panel.XInsert the Allen key into the roof lock.XTurn the Allen key clockwise I as far as
possible.
! Make sure the Allen key is turned counter-
clockwise as far as possible during the
following step. The soft top may otherwise
not be fully locked.
XTurn the Allen key counter-clockwise J as
far as possible.
The soft top is now pre-locked on the
windshield frame.XMove material tensioning frame K to an
upright position.
! Make sure the soft-top compartment
cover does not collide with the material
tensioning frame during the following step.
XLower soft-top compartment cover L.94Soft top (Cabriolet)Opening and closing
BA 207 USA, CA Edition B 2011; 1; 3, en-USd2sboikeVersion: 3.0.3.62010-05-20T10:38:09+02:00 - Seite 94
Page 98 of 344
You can lock the soft top again if it is not
locked fully.XStop the vehicle immediately, paying
attention to road and traffic conditions.XTurn the key to position 2 in the ignition
lock.XPress the soft-top switch.
Trunk partition
General notes
The trunk partition can be used to cover
luggage and loads in the trunk.
The soft top can only be opened when the
trunk partition is closed.
! To avoid damaging the soft top or load
when folding back the soft top, observe the
following:
R when the trunk partition is open, do not
place any objects in or behind the net on
the side that are so long they could
obstruct the trunk partition or damage
the opened soft top.
R make sure that the cargo does not push
the trunk partition upwards.
Opening and closing
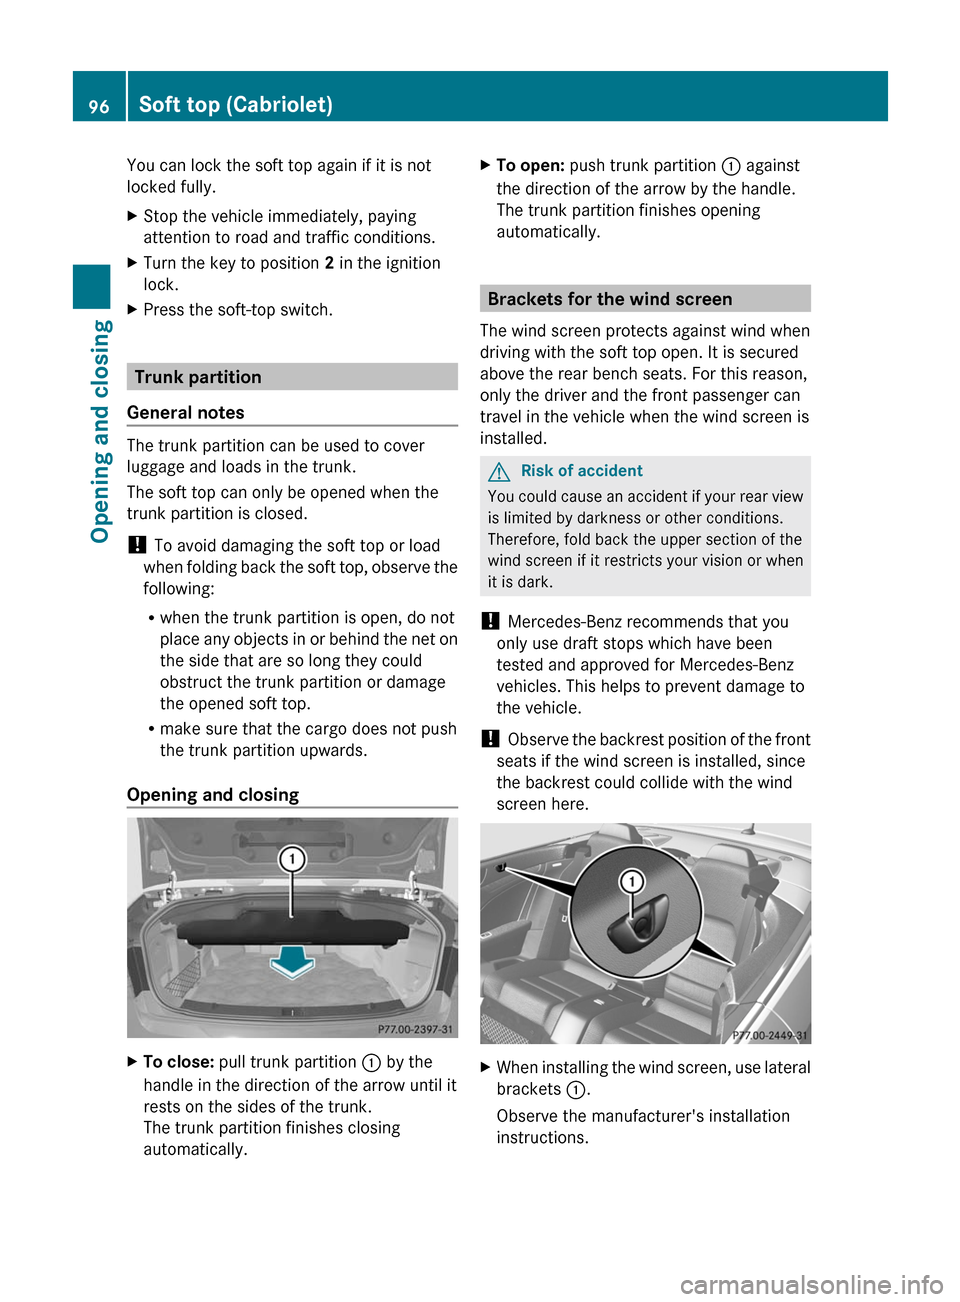
XTo close: pull trunk partition : by the
handle in the direction of the arrow until it
rests on the sides of the trunk.
The trunk partition finishes closing
automatically.XTo open: push trunk partition : against
the direction of the arrow by the handle.
The trunk partition finishes opening
automatically.
Brackets for the wind screen
The wind screen protects against wind when
driving with the soft top open. It is secured
above the rear bench seats. For this reason,
only the driver and the front passenger can
travel in the vehicle when the wind screen is
installed.
GRisk of accident
You could cause an accident if your rear view
is limited by darkness or other conditions.
Therefore, fold back the upper section of the
wind screen if it restricts your vision or when
it is dark.
! Mercedes-Benz recommends that you
only use draft stops which have been
tested and approved for Mercedes-Benz
vehicles. This helps to prevent damage to
the vehicle.
! Observe the backrest position of the front
seats if the wind screen is installed, since
the backrest could collide with the wind
screen here.
XWhen installing the wind screen, use lateral
brackets :.
Observe the manufacturer's installation
instructions.96Soft top (Cabriolet)Opening and closing
BA 207 USA, CA Edition B 2011; 1; 3, en-USd2sboikeVersion: 3.0.3.62010-05-20T10:38:09+02:00 - Seite 96
Page 99 of 344
AIRCAP
General notes
With AIRCAP, four people can travel
comfortably with the soft top down. AIRCAP
reduces the draft for the driver and
passengers in both the front and the rear
compartment in a vehicle with the soft top
down. You can open or close AIRCAP either
when the vehicle is stationary or when driving
up to a speed of 160 km/h.
AIRCAP has the following components:
Ra wind deflector between the windshield
and the soft top
Ran AIRCAP wind screen between the two
head restraints on the rear bench seat
GRisk of injury
When extending and retracting AIRCAP, make
sure that no one can become trapped. If there
is a risk of entrapment, press the button again
to retract AIRCAP again.
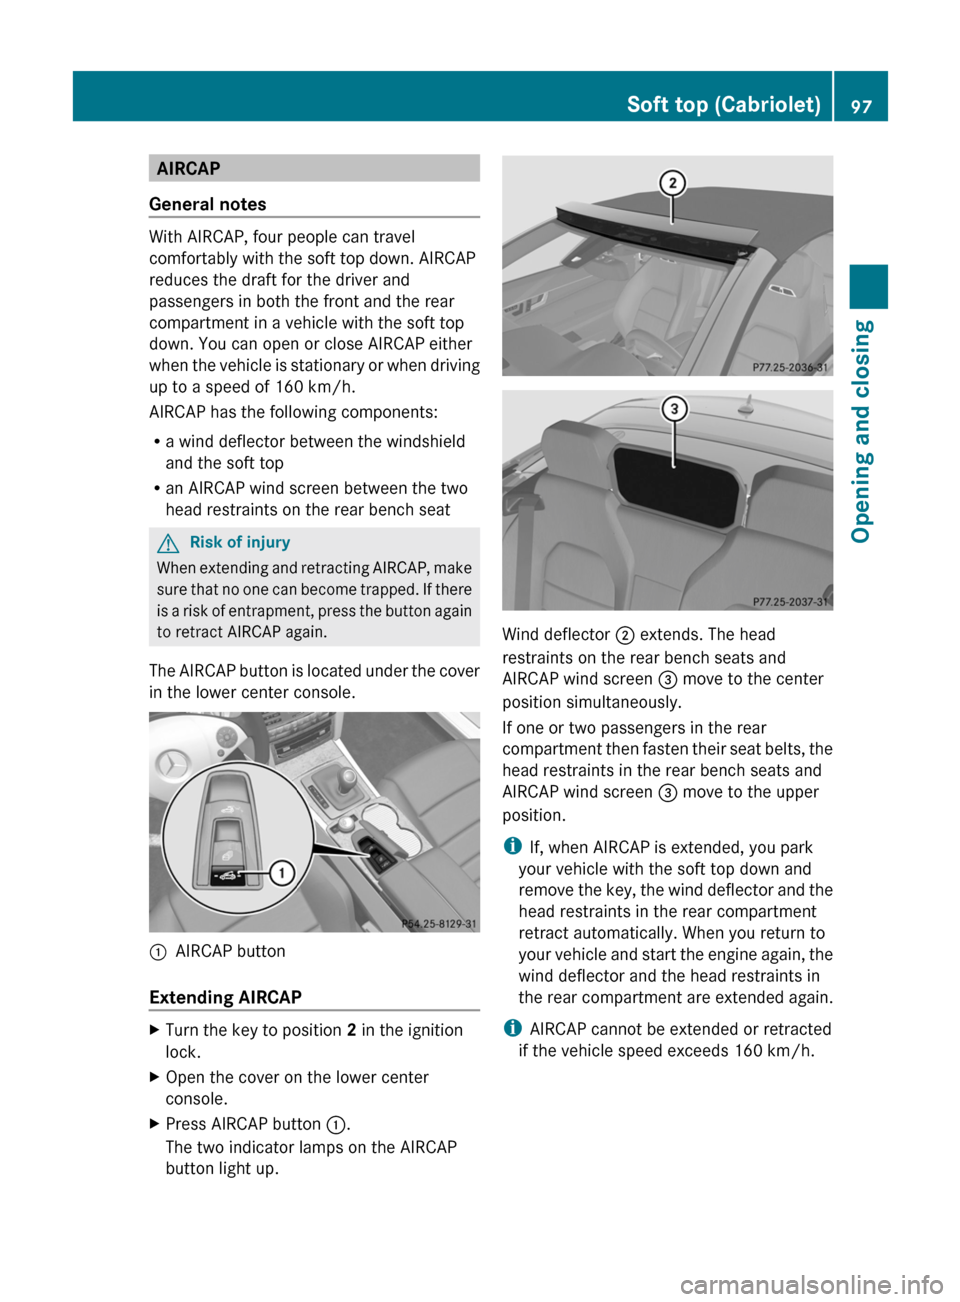
The AIRCAP button is located under the cover
in the lower center console.
:AIRCAP button
Extending AIRCAP
XTurn the key to position 2 in the ignition
lock.
XOpen the cover on the lower center
console.
XPress AIRCAP button :.
The two indicator lamps on the AIRCAP
button light up.
Wind deflector ; extends. The head
restraints on the rear bench seats and
AIRCAP wind screen = move to the center
position simultaneously.
If one or two passengers in the rear
compartment then fasten their seat belts, the
head restraints in the rear bench seats and
AIRCAP wind screen = move to the upper
position.
iIf, when AIRCAP is extended, you park
your vehicle with the soft top down and
remove the key, the wind deflector and the
head restraints in the rear compartment
retract automatically. When you return to
your vehicle and start the engine again, the
wind deflector and the head restraints in
the rear compartment are extended again.
iAIRCAP cannot be extended or retracted
if the vehicle speed exceeds 160 km/h.
Soft top (Cabriolet)97Opening and closingBA 207 USA, CA Edition B 2011; 1; 3, en-USd2sboikeVersion: 3.0.3.62010-05-20T10:38:09+02:00 - Seite 97Z
Page 100 of 344
Retracting AIRCAPXTurn the key to position 2 in the ignition
lock.XOpen the cover on the lower center
console.XPress AIRCAP button :.
The two indicator lamps on the AIRCAP
button go out. Wind deflector ; retracts.
The head restraints on the rear bench seats
and AIRCAP wind screen = move to the
lowest position simultaneously.
i If there are passengers wearing seat belts
in the rear compartment, the head
restraints on the rear bench seats and the
AIRCAP wind screen remain in the upper
position.
Retracting the head restraints on the
rear bench seats from the driver's seat
To improve the rear view, you can retract the
head restraints on the rear bench seats
individually ( Y page 109). The wind deflector
remains in its current position.
Installing and removing the AIRCAP
wind screen
Preparation
You will need a 4 mm Allen key to install/
remove the AIRCAP wind screen.
Before installing or removing the AIRCAP
wind screen:
XTurn the key to position 2 in the ignition
lock.XOpen the folding roof fully ( Y page 90).XExtend the head restraints in the rear
compartment fully ( Y page 109).Removing
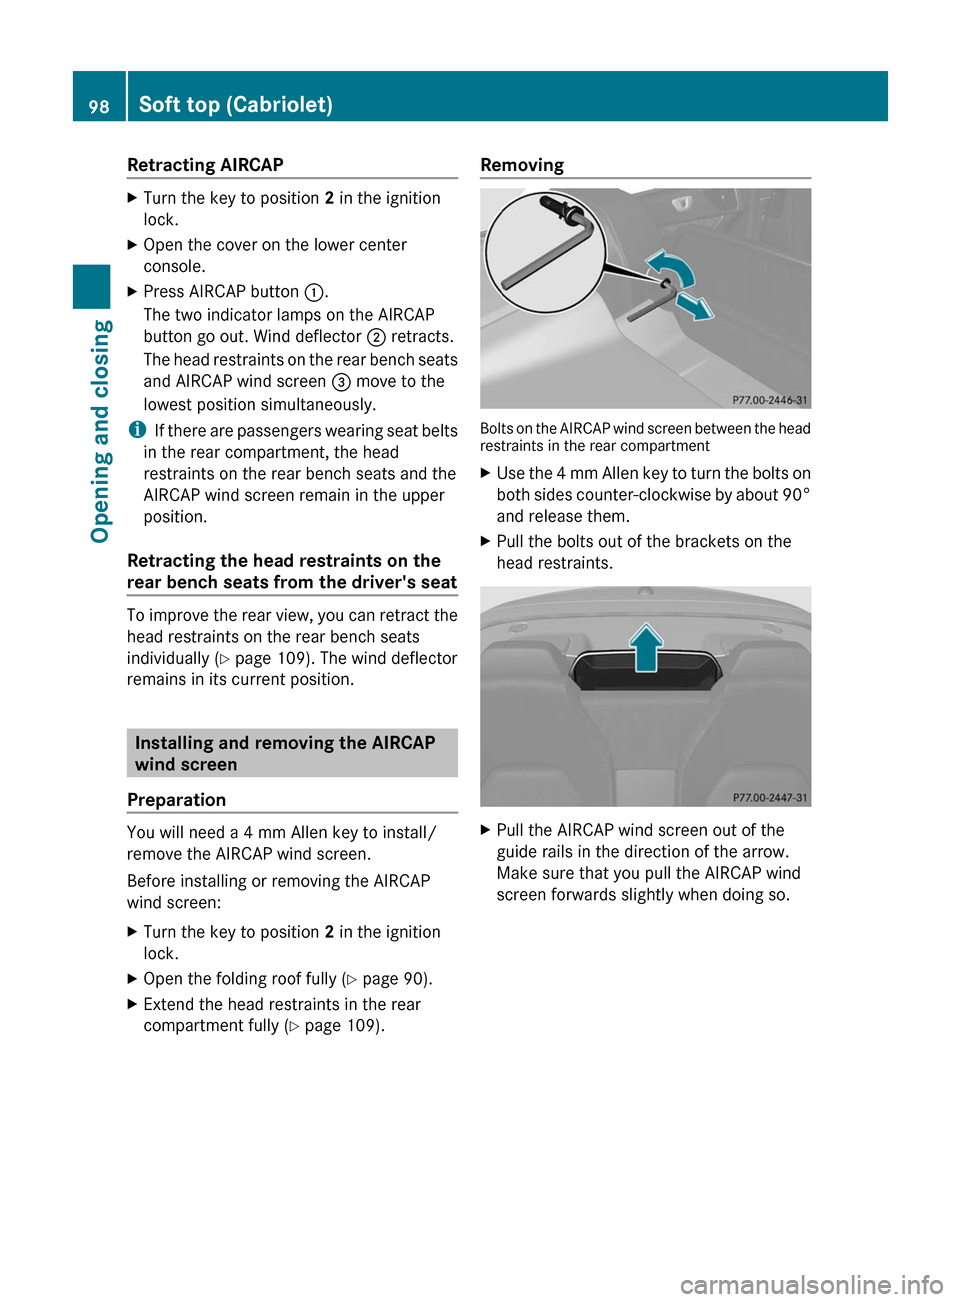
Bolts on the AIRCAP wind screen between the head
restraints in the rear compartment
XUse the 4 mm Allen key to turn the bolts on
both sides counter-clockwise by about 90°
and release them.XPull the bolts out of the brackets on the
head restraints.XPull the AIRCAP wind screen out of the
guide rails in the direction of the arrow.
Make sure that you pull the AIRCAP wind
screen forwards slightly when doing so.98Soft top (Cabriolet)Opening and closing
BA 207 USA, CA Edition B 2011; 1; 3, en-USd2sboikeVersion: 3.0.3.62010-05-20T10:38:09+02:00 - Seite 98
Page 101 of 344
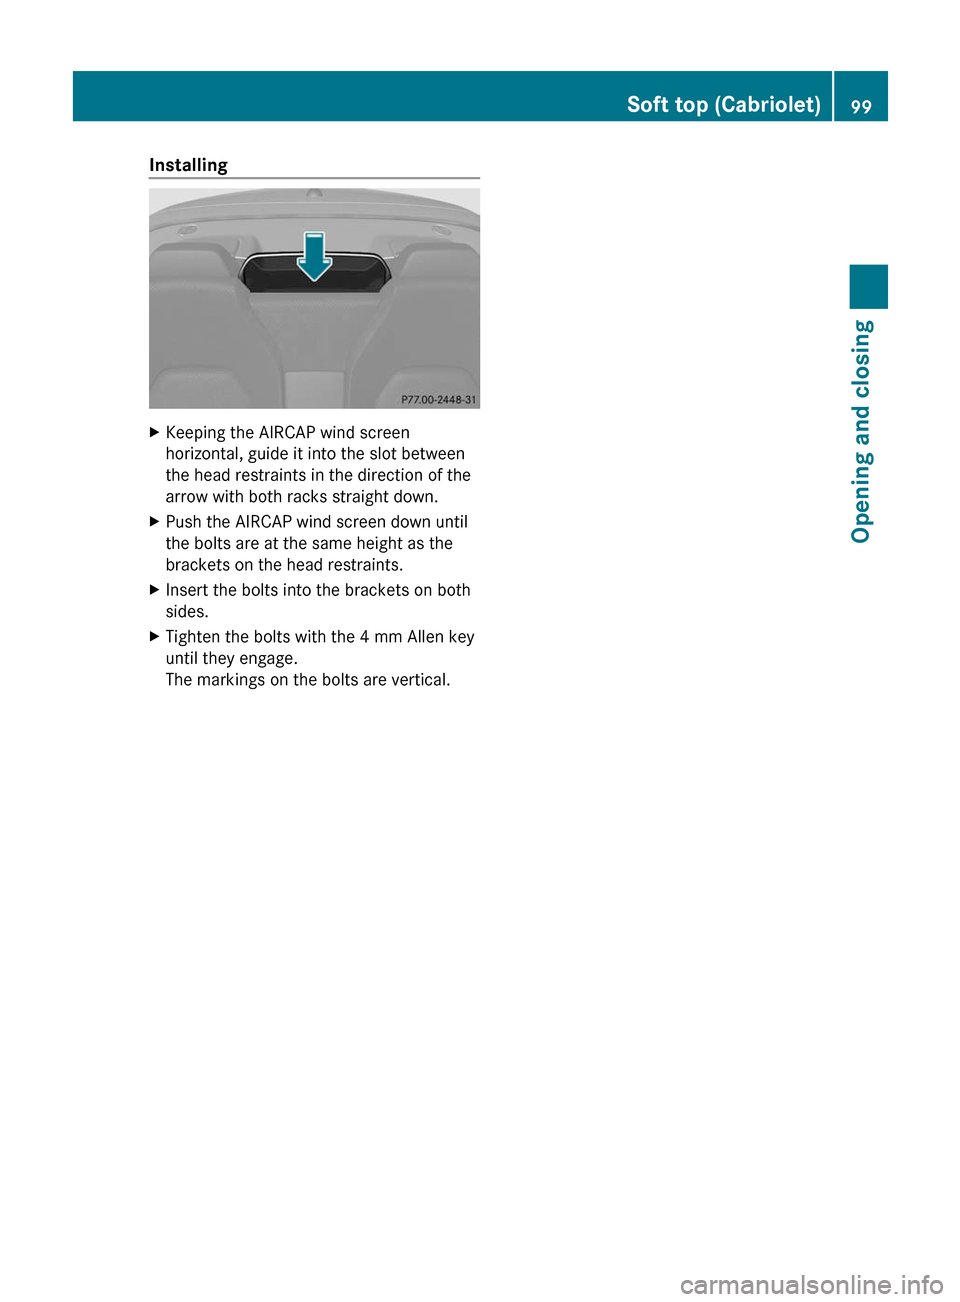
InstallingXKeeping the AIRCAP wind screen
horizontal, guide it into the slot between
the head restraints in the direction of the
arrow with both racks straight down.XPush the AIRCAP wind screen down until
the bolts are at the same height as the
brackets on the head restraints.XInsert the bolts into the brackets on both
sides.XTighten the bolts with the 4 mm Allen key
until they engage.
The markings on the bolts are vertical.Soft top (Cabriolet)99Opening and closingBA 207 USA, CA Edition B 2011; 1; 3, en-USd2sboikeVersion: 3.0.3.62010-05-20T10:38:09+02:00 - Seite 99Z
Page 104 of 344
damaged if water enters the vehicle
interior.
i Resonance noises can occur in addition
to the usual airflow noises when the sliding
sunroof is open. They are caused by minor
pressure fluctuations in the vehicle interior.
Change the position of the sliding sunroof
or open a side window slightly to reduce or
eliminate these noises.
Operating the panorama sliding
sunroof
Opening and closing
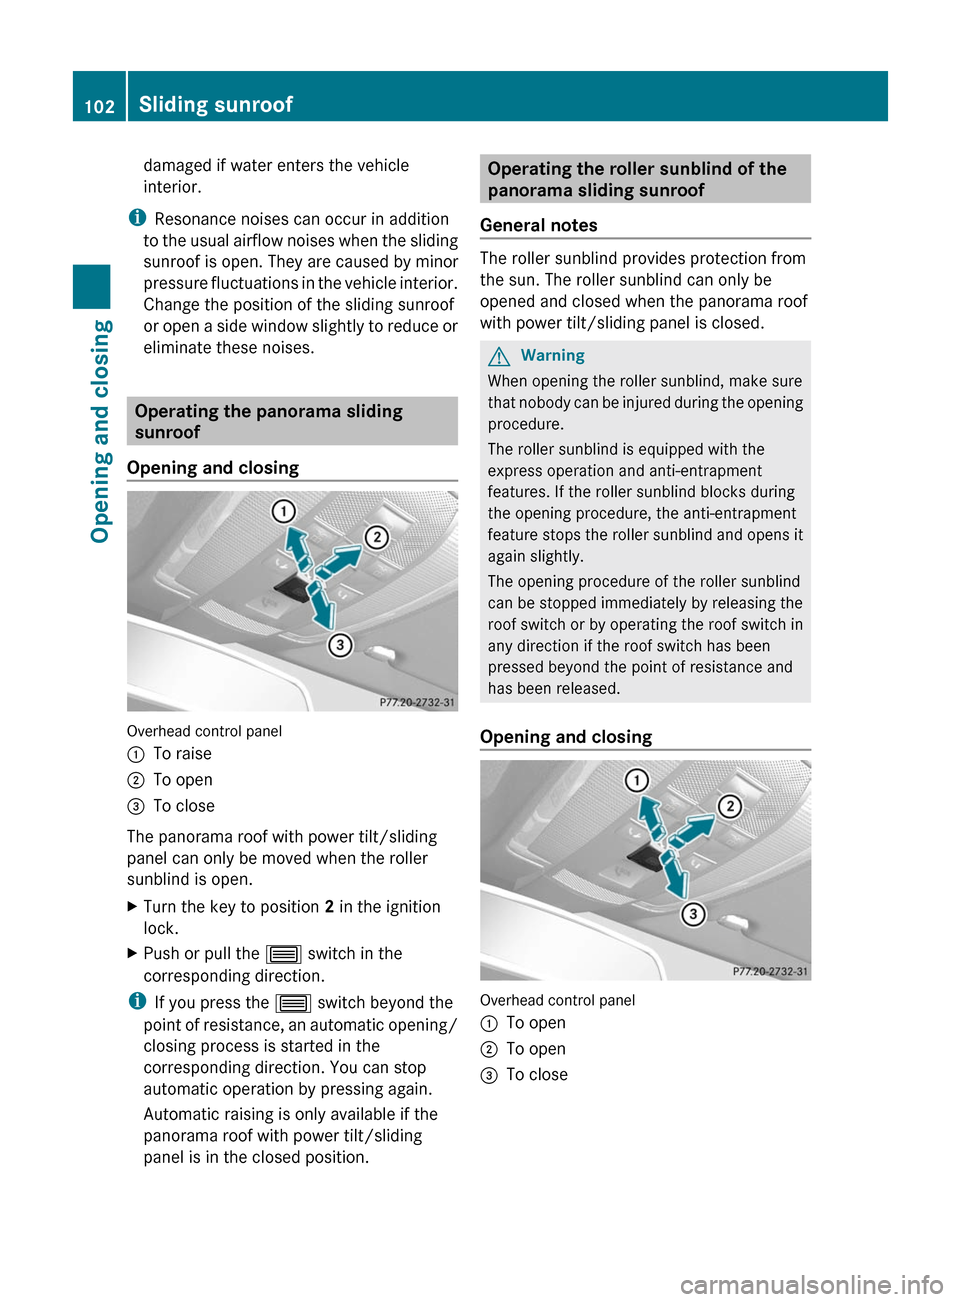
Overhead control panel
:To raise;To open=To close
The panorama roof with power tilt/sliding
panel can only be moved when the roller
sunblind is open.
XTurn the key to position 2 in the ignition
lock.XPush or pull the 3 switch in the
corresponding direction.
i If you press the 3 switch beyond the
point of resistance, an automatic opening/
closing process is started in the
corresponding direction. You can stop
automatic operation by pressing again.
Automatic raising is only available if the
panorama roof with power tilt/sliding
panel is in the closed position.
Operating the roller sunblind of the
panorama sliding sunroof
General notes
The roller sunblind provides protection from
the sun. The roller sunblind can only be
opened and closed when the panorama roof
with power tilt/sliding panel is closed.
GWarning
When opening the roller sunblind, make sure
that nobody can be injured during the opening
procedure.
The roller sunblind is equipped with the
express operation and anti-entrapment
features. If the roller sunblind blocks during
the opening procedure, the anti-entrapment
feature stops the roller sunblind and opens it
again slightly.
The opening procedure of the roller sunblind
can be stopped immediately by releasing the
roof switch or by operating the roof switch in
any direction if the roof switch has been
pressed beyond the point of resistance and
has been released.
Opening and closing
Overhead control panel
:To open;To open=To close102Sliding sunroofOpening and closing
BA 207 USA, CA Edition B 2011; 1; 3, en-USd2sboikeVersion: 3.0.3.62010-05-20T10:38:09+02:00 - Seite 102
Page 114 of 344
Problems with the seat heating
The seat heating has switched itself off
prematurely or cannot be switched on. The
vehicle's electrical system voltage is too low
because too many electrical consumers are
switched on.
XSwitch off electrical consumers which you
do not need, such as the rear window
defroster or interior lighting.
Switching the seat ventilation on/off
Switching on/off
The three blue indicator lamps in the buttons
indicate the ventilation level you have
selected.
iIf the battery voltage is too low, the seat
ventilation may switch off.
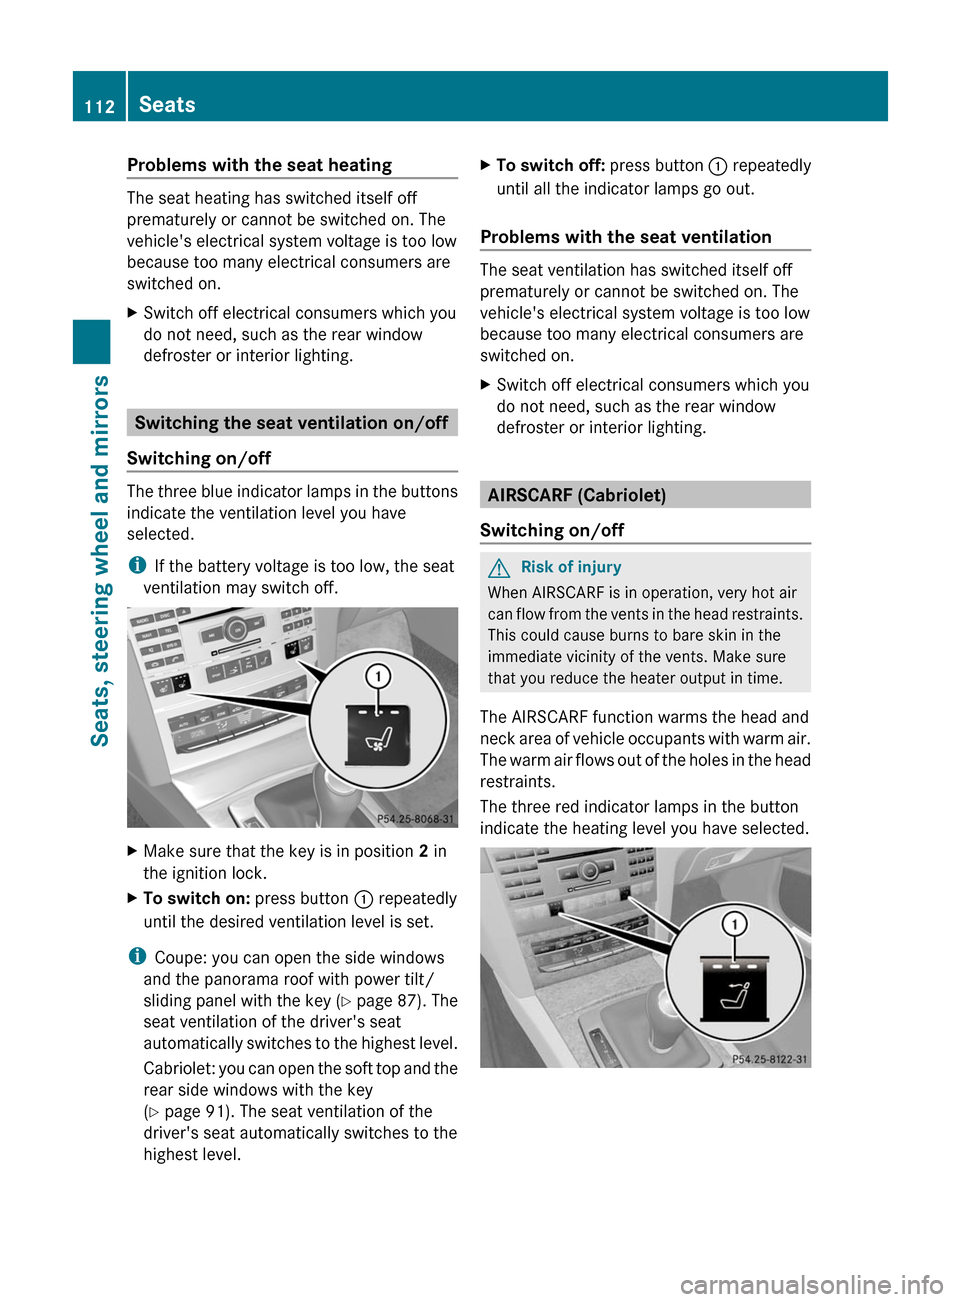
XMake sure that the key is in position 2 in
the ignition lock.
XTo switch on: press button : repeatedly
until the desired ventilation level is set.
iCoupe: you can open the side windows
and the panorama roof with power tilt/
sliding panel with the key (Y page 87). The
seat ventilation of the driver's seat
automatically switches to the highest level.
Cabriolet: you can open the soft top and the
rear side windows with the key
(Y page 91). The seat ventilation of the
driver's seat automatically switches to the
highest level.
XTo switch off: press button : repeatedly
until all the indicator lamps go out.
Problems with the seat ventilation
The seat ventilation has switched itself off
prematurely or cannot be switched on. The
vehicle's electrical system voltage is too low
because too many electrical consumers are
switched on.
XSwitch off electrical consumers which you
do not need, such as the rear window
defroster or interior lighting.
AIRSCARF (Cabriolet)
Switching on/off
GRisk of injury
When AIRSCARF is in operation, very hot air
can flow from the vents in the head restraints.
This could cause burns to bare skin in the
immediate vicinity of the vents. Make sure
that you reduce the heater output in time.
The AIRSCARF function warms the head and
neck area of vehicle occupants with warm air.
The warm air flows out of the holes in the head
restraints.
The three red indicator lamps in the button
indicate the heating level you have selected.
112SeatsSeats, steering wheel and mirrors
BA 207 USA, CA Edition B 2011; 1; 3, en-USd2sboikeVersion: 3.0.3.62010-05-20T10:38:09+02:00 - Seite 112
Page 116 of 344
iThe steering wheel only moves upwards if
it has not already reached the upper end
stop.
The steering wheel is moved to the last
selected position when:
Rthe driver's door is closed, and
Ryou insert the key into the ignition lock.
or
Rin vehicles with KEYLESS-GO, you press the
Start/Stop button once.
When you close the driver's door with the
ignition switched on, the steering wheel is
also automatically moved to the previously
set position.
The last position of the steering wheel is
stored after each manual setting or when you
store the setting with the memory function
(Y page 116).
You can activate and deactivate the EASY-
ENTRY/EXIT feature in the on-board
computer (Y page 211).
GWarning
Let the system complete the adjustment
procedure before setting the vehicle in
motion. All steering wheel adjustment must
be completed before setting the vehicle in
motion. Driving off with the steering wheel
still adjusting could cause the driver to lose
control of the vehicle.
iIf the crash-responsive EASY-EXIT feature
is triggered in an accident, the steering
column will move upwards when the
driver's door is opened. This occurs
irrespective of the position of the key in the
ignition lock. This makes it easier to exit the
vehicle and rescue the occupants.
The crash-responsive EASY-EXIT feature is
only operational after an accident if the
EASY-EXIT/ENTRY feature is activated in
the on-board computer.
Mirrors
Rear-view mirror
Rear-view mirror (manual anti-glare)
XAnti-glare mode: flick anti-glare
switch : forwards or back.
Exterior mirrors
Adjusting the exterior mirrors
GWarning
Exercise care when using the passenger-side
exterior rear view mirror. The mirror surface
is convex (outwardly curved surface for a
wider field of view). Objects in mirror are
closer than they appear. Check your interior
rear view mirror and glance over your
shoulder before changing lanes.
The exterior mirrors are automatically heated
if the rear window heating is switched on and
the outside temperature is low.
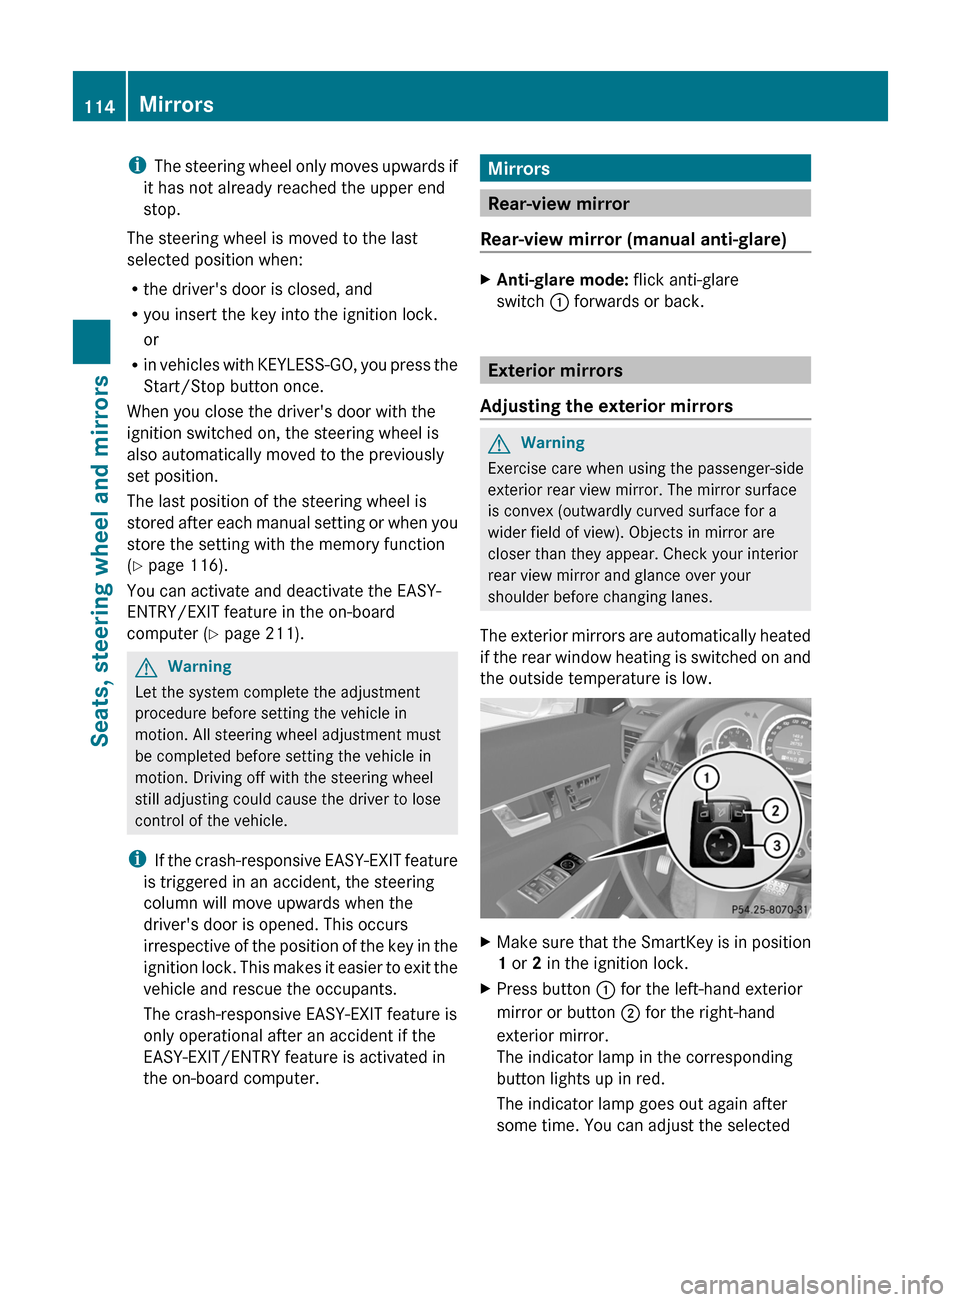
XMake sure that the SmartKey is in position
1 or 2 in the ignition lock.
XPress button : for the left-hand exterior
mirror or button ; for the right-hand
exterior mirror.
The indicator lamp in the corresponding
button lights up in red.
The indicator lamp goes out again after
some time. You can adjust the selected
114MirrorsSeats, steering wheel and mirrors
BA 207 USA, CA Edition B 2011; 1; 3, en-USd2sboikeVersion: 3.0.3.62010-05-20T10:38:09+02:00 - Seite 114
Page 117 of 344
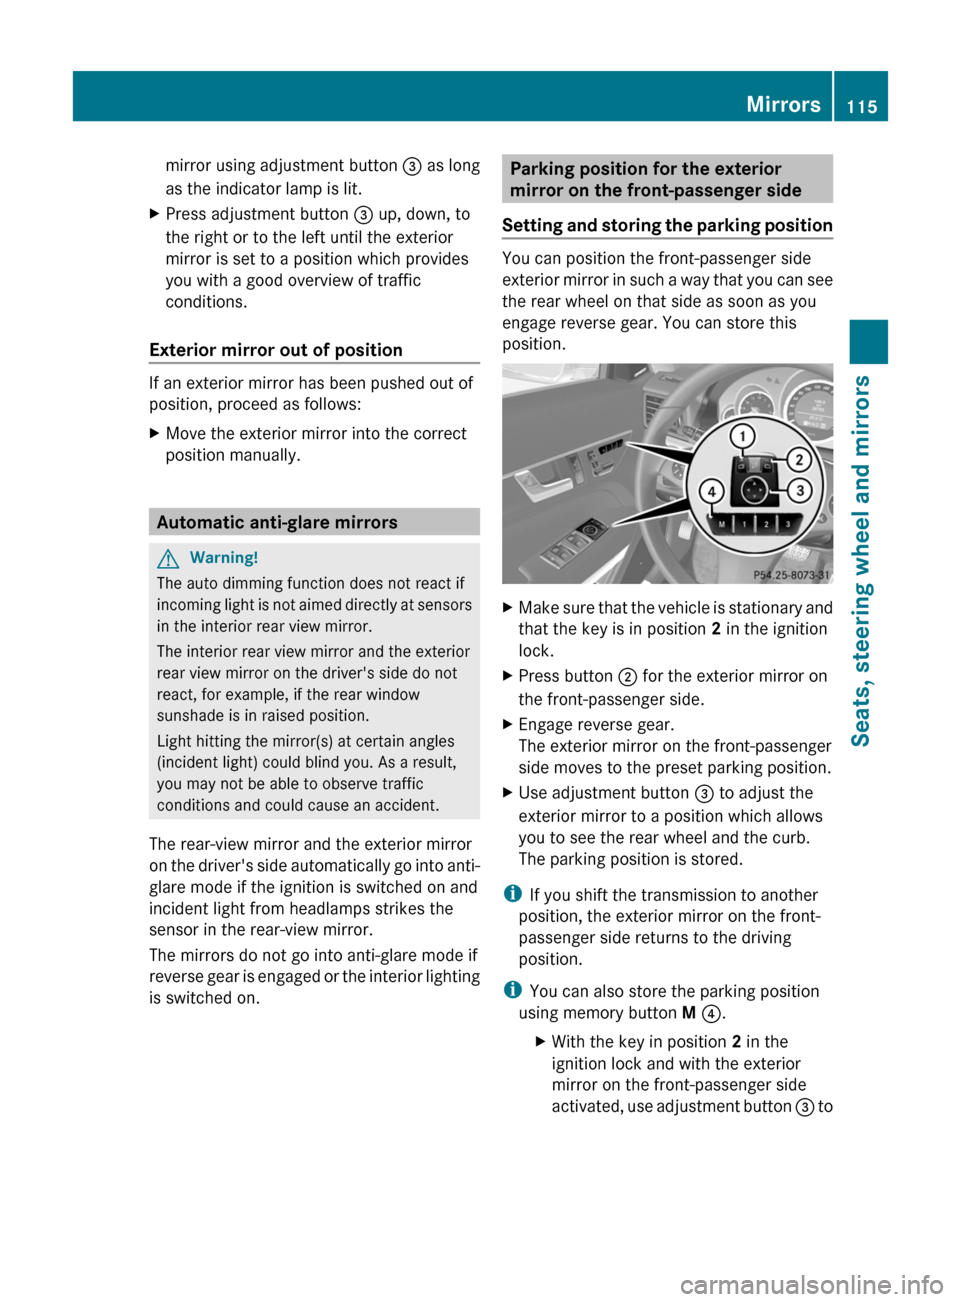
mirror using adjustment button = as long
as the indicator lamp is lit.
XPress adjustment button = up, down, to
the right or to the left until the exterior
mirror is set to a position which provides
you with a good overview of traffic
conditions.
Exterior mirror out of position
If an exterior mirror has been pushed out of
position, proceed as follows:
XMove the exterior mirror into the correct
position manually.
Automatic anti-glare mirrors
GWarning!
The auto dimming function does not react if
incoming light is not aimed directly at sensors
in the interior rear view mirror.
The interior rear view mirror and the exterior
rear view mirror on the driver's side do not
react, for example, if the rear window
sunshade is in raised position.
Light hitting the mirror(s) at certain angles
(incident light) could blind you. As a result,
you may not be able to observe traffic
conditions and could cause an accident.
The rear-view mirror and the exterior mirror
on the driver's side automatically go into anti-
glare mode if the ignition is switched on and
incident light from headlamps strikes the
sensor in the rear-view mirror.
The mirrors do not go into anti-glare mode if
reverse gear is engaged or the interior lighting
is switched on.
Parking position for the exterior
mirror on the front-passenger side
Setting and storing the parking position
You can position the front-passenger side
exterior mirror in such a way that you can see
the rear wheel on that side as soon as you
engage reverse gear. You can store this
position.
XMake sure that the vehicle is stationary and
that the key is in position 2 in the ignition
lock.
XPress button ; for the exterior mirror on
the front-passenger side.
XEngage reverse gear.
The exterior mirror on the front-passenger
side moves to the preset parking position.
XUse adjustment button = to adjust the
exterior mirror to a position which allows
you to see the rear wheel and the curb.
The parking position is stored.
iIf you shift the transmission to another
position, the exterior mirror on the front-
passenger side returns to the driving
position.
iYou can also store the parking position
using memory button M ?.
XWith the key in position 2 in the
ignition lock and with the exterior
mirror on the front-passenger side
activated, use adjustment button = to
Mirrors115Seats, steering wheel and mirrorsBA 207 USA, CA Edition B 2011; 1; 3, en-USd2sboikeVersion: 3.0.3.62010-05-20T10:38:09+02:00 - Seite 115Z