wind MERCEDES-BENZ E-Class COUPE 2011 C207 Repair Manual
[x] Cancel search | Manufacturer: MERCEDES-BENZ, Model Year: 2011, Model line: E-Class COUPE, Model: MERCEDES-BENZ E-Class COUPE 2011 C207Pages: 344, PDF Size: 14.06 MB
Page 145 of 344
The climate control system switches to the
following functions:
R cooling with air dehumidification on
R high airflow 13
R high temperature 13
R air distribution to the windshield and
front side windows
R air-recirculation mode offXTo deactivate: press the ¬ button.
The indicator lamp above the ¬ button
goes out. The previously selected settings
come into effect again. The cooling with air
dehumidification function remains on. Air-
recirculation mode remains deactivated.
or
XPress the à button.
The indicator lamp above the ¬ button
goes out. Airflow and air distribution are set
to automatic mode.
or
XDual-zone automatic climate control:
press switch E or H up or down
( Y page 135).
3-zone automatic climate control: press
switch F or J up or down ( Y page 137).
or
XDual-zone automatic climate control:
press switch G up or down ( Y page 135).
3-zone automatic climate control: press
switch H up or down ( Y page 137).
Maximum cooling MAX COOL
The MAX COOL function is only available in
vehicles for the USA.
MAX COOL is only operational when the
engine is running.
When you activate MAX COOL, climate
control switches to the following functions:
R maximum cooling
R maximum airflow
R air-recirculation mode onXTo activate: press the Ù button.
The indicator lamp above the button lights
up.XTo deactivate: press the Ù button
again.
The indicator lamp goes out. The previously
selected settings come into effect again.
Defrosting the windows
Windows fogged up on the inside
XActivate the "cooling with air
dehumidification" function ¿.XActivate automatic mode Ã.XIf the windows continue to fog up, activate
the defrosting function ( Y page 142).
i
You should only select this setting until
the windshield is clear again.
Windows fogged up on the outside
XSwitch on the windshield wipers.Xdual-zone automatic climate control:
press switch F up or down ( Y page 135)
until the P or O symbol appears in
the display.X3-zone automatic climate control: press
switch I up or down (Y page 137) until the
P or O symbol appears in the
display.
i You should only select this setting until
the windshield is clear again.
13 Depending on the outside temperature.Operating the control systems143Climate controlBA 207 USA, CA Edition B 2011; 1; 3, en-USd2sboikeVersion: 3.0.3.62010-05-20T10:38:09+02:00 - Seite 143Z
Page 146 of 344
Rear window heating
Activating/deactivatingGWarning
Any accumulation of snow and ice should be
removed from the rear window before driving.
Visibility could otherwise be impaired,
endangering you and others.
The rear window heating has a high current
draw. You should therefore switch it off as
soon as the window is clear as it only switches
off automatically after several minutes.
If the battery voltage is too low, the rear
window heating may switch off.
XTurn the SmartKey to position 2 in the
ignition lock.XPress the ¤ button.
The indicator lamp above the ¤ button
lights up or goes out.
Problems with the rear window heating
The rear window heating has deactivated
itself prematurely or cannot be activated.
XSwitch off any consumers that are not
required, e.g. reading lamps or interior
lighting.
When the battery is sufficiently charged,
the rear window heating is activated again
automatically.
Activating/deactivating air-
recirculation mode
You can deactivate the flow of fresh air if
unpleasant odors are entering the vehicle
from outside. The air already inside the
vehicle will then be recirculated.
The operation of the air-recirculation mode is
the same for all control panels.
GWarning
Fogged windows impair visibility,
endangering you and others. If the windows
begin to fog on the inside, switching off the
air recirculation mode immediately should
clear interior window fogging. If interior
window fogging persists, make sure the air
conditioning is activated, or press the ¬
button.XTurn the SmartKey to position 2 in the
ignition lock.XTo activate: press the g button.
The indicator lamp above the g button
lights up.
i Air-recirculation mode is activated
automatically at high outside
temperatures. When air-recirculation mode
is activated automatically, the indicator
lamp above the g button is not lit.
Outside air is added after about 30
minutes.
XTo deactivate: press the g button.
The indicator lamp above the g button
goes out.
i Air-recirculation mode switches off
automatically:
R after approximately five minutes if
outside temperatures are under about
41 ‡ (5 †)
R after approximately five minutes if
cooling with air dehumidification is
deactivated
R after approximately 30 minutes if outside
temperatures are over about
41 ‡ (5 †)
Switching the residual heat on/off
Only 3-zone automatic climate control in
vehicles in Canada features the "residual
heat" function.
It is possible to make use of the residual heat
of the engine to continue heating the
stationary vehicle for up to 30 minutes after
the engine has been switched off. The heating
time depends on the temperature that has
been set.
144Operating the control systemsClimate control
BA 207 USA, CA Edition B 2011; 1; 3, en-USd2sboikeVersion: 3.0.3.62010-05-20T10:38:09+02:00 - Seite 144
Page 147 of 344
Coupe: the "residual heat" function only
works optimally when the side windows and
panorama roof with power tilt/sliding panel
are closed.
Cabriolet: the "residual heat" function only
works optimally when the soft top is closed.
iThe blower will run at a low speed
regardless of the airflow setting.
iIf you activate the "residual heat" function
at high temperatures, only the ventilation
will be activated. The blower runs at
medium speed.
iIt is possible that the "residual heat"
function may be activated automatically an
hour after the SmartKey is removed. The
vehicle is then ventilated for 30 minutes to
dry the air-conditioning system.
XTurn the SmartKey to position 0 in the
ignition lock or remove it.
XTo switch on: press the Ì button.
The indicator lamp above the Ì button
lights up.
XTo switch off: press the Ì button.
The indicator lamp above button Ì goes
out.
iResidual heat is deactivated
automatically:
Rafter about 30 minutes
Rwhen the ignition is switched on
Rif the battery voltage drops
Rif the coolant temperature is too low
Setting the air vents
Important safety notes
GWarning
When operating the climate control, the air
that enters the passenger compartment
through the air vents can be very hot or very
cold (depending on the set temperature). This
could cause burns or frostbite to unprotected
skin in the immediate area of the air vents.
Always keep sufficient distance between
unprotected parts of the body and the air
vents. If necessary, use the air distribution
adjustment to direct the air to air vents in the
vehicle interior that are not in the immediate
area of unprotected skin.
In order to ensure the direct flow of fresh air
through the air vents into the vehicle interior,
please observe the following notes:
Rkeep the air inlet between the windshield
and the hood free of blockages, such as ice,
snow or leaves
Rnever cover the vents or air inlet and outlet
grilles in the vehicle interior.
iFor virtually draft-free ventilation, adjust
the sliders of the air vents to the center
position.
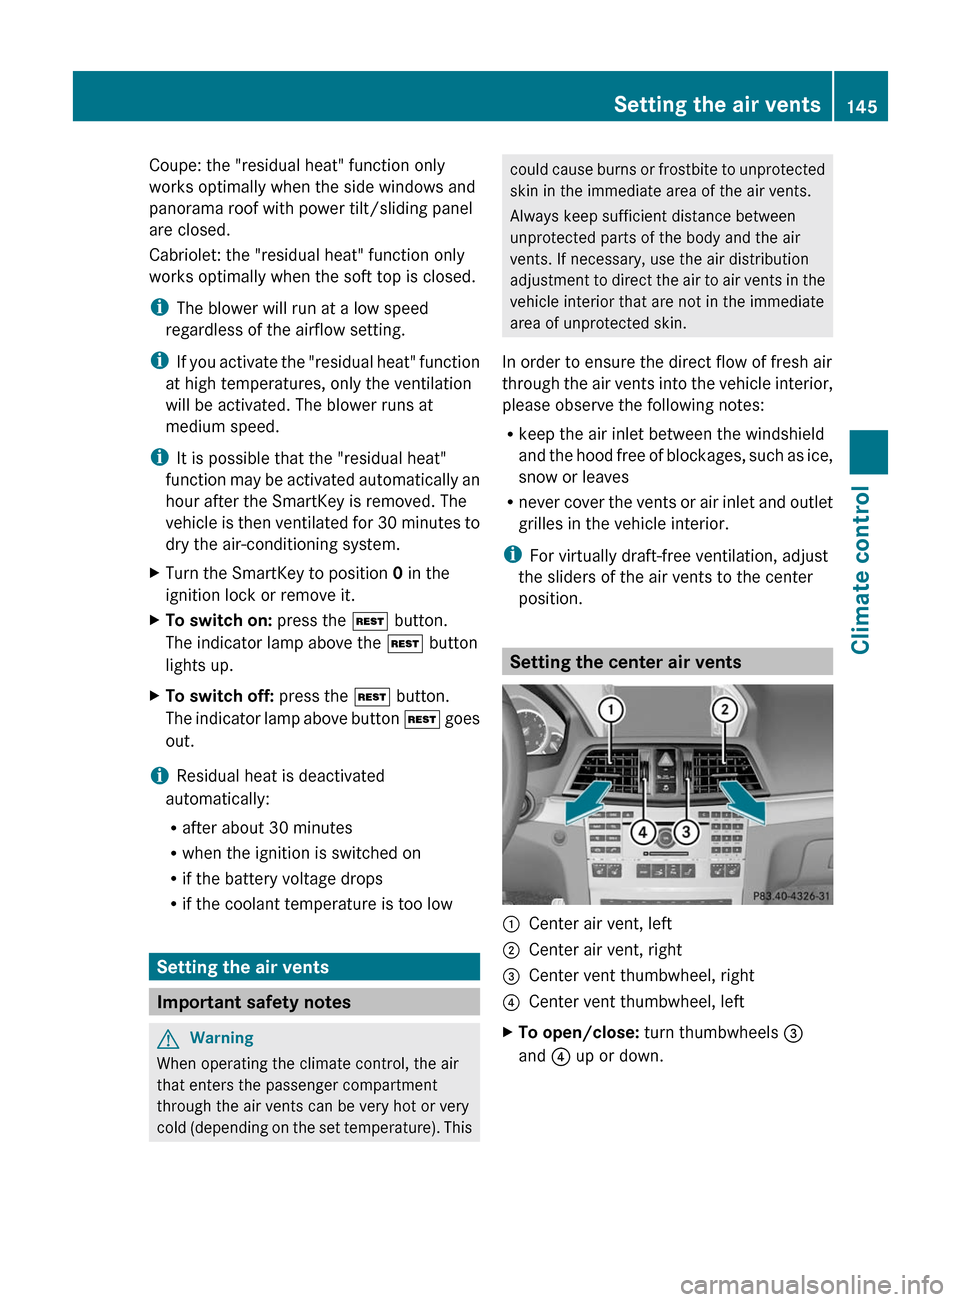
Setting the center air vents
:Center air vent, left;Center air vent, right=Center vent thumbwheel, right?Center vent thumbwheel, leftXTo open/close: turn thumbwheels =
and ? up or down.
Setting the air vents145Climate controlBA 207 USA, CA Edition B 2011; 1; 3, en-USd2sboikeVersion: 3.0.3.62010-05-20T10:38:09+02:00 - Seite 145Z
Page 148 of 344
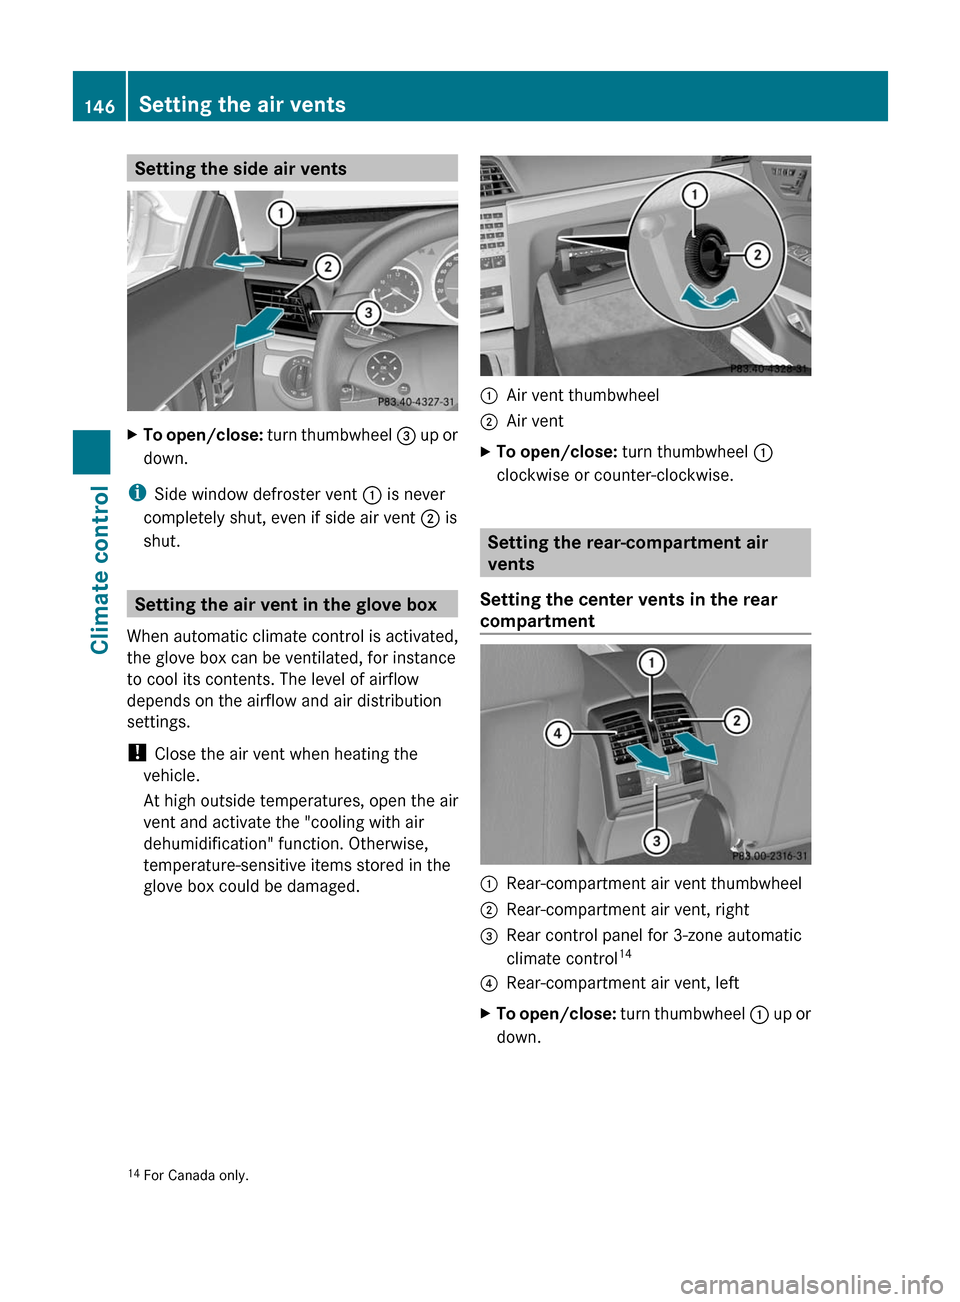
Setting the side air ventsXTo open/close: turn thumbwheel = up or
down.
iSide window defroster vent : is never
completely shut, even if side air vent ; is
shut.
Setting the air vent in the glove box
When automatic climate control is activated,
the glove box can be ventilated, for instance
to cool its contents. The level of airflow
depends on the airflow and air distribution
settings.
! Close the air vent when heating the
vehicle.
At high outside temperatures, open the air
vent and activate the "cooling with air
dehumidification" function. Otherwise,
temperature-sensitive items stored in the
glove box could be damaged.
:Air vent thumbwheel;Air ventXTo open/close: turn thumbwheel :
clockwise or counter-clockwise.
Setting the rear-compartment air
vents
Setting the center vents in the rear
compartment
:Rear-compartment air vent thumbwheel;Rear-compartment air vent, right=Rear control panel for 3-zone automatic
climate control14?Rear-compartment air vent, leftXTo open/close: turn thumbwheel : up or
down.14For Canada only.146Setting the air ventsClimate control
BA 207 USA, CA Edition B 2011; 1; 3, en-USd2sboikeVersion: 3.0.3.62010-05-20T10:38:09+02:00 - Seite 146
Page 153 of 344
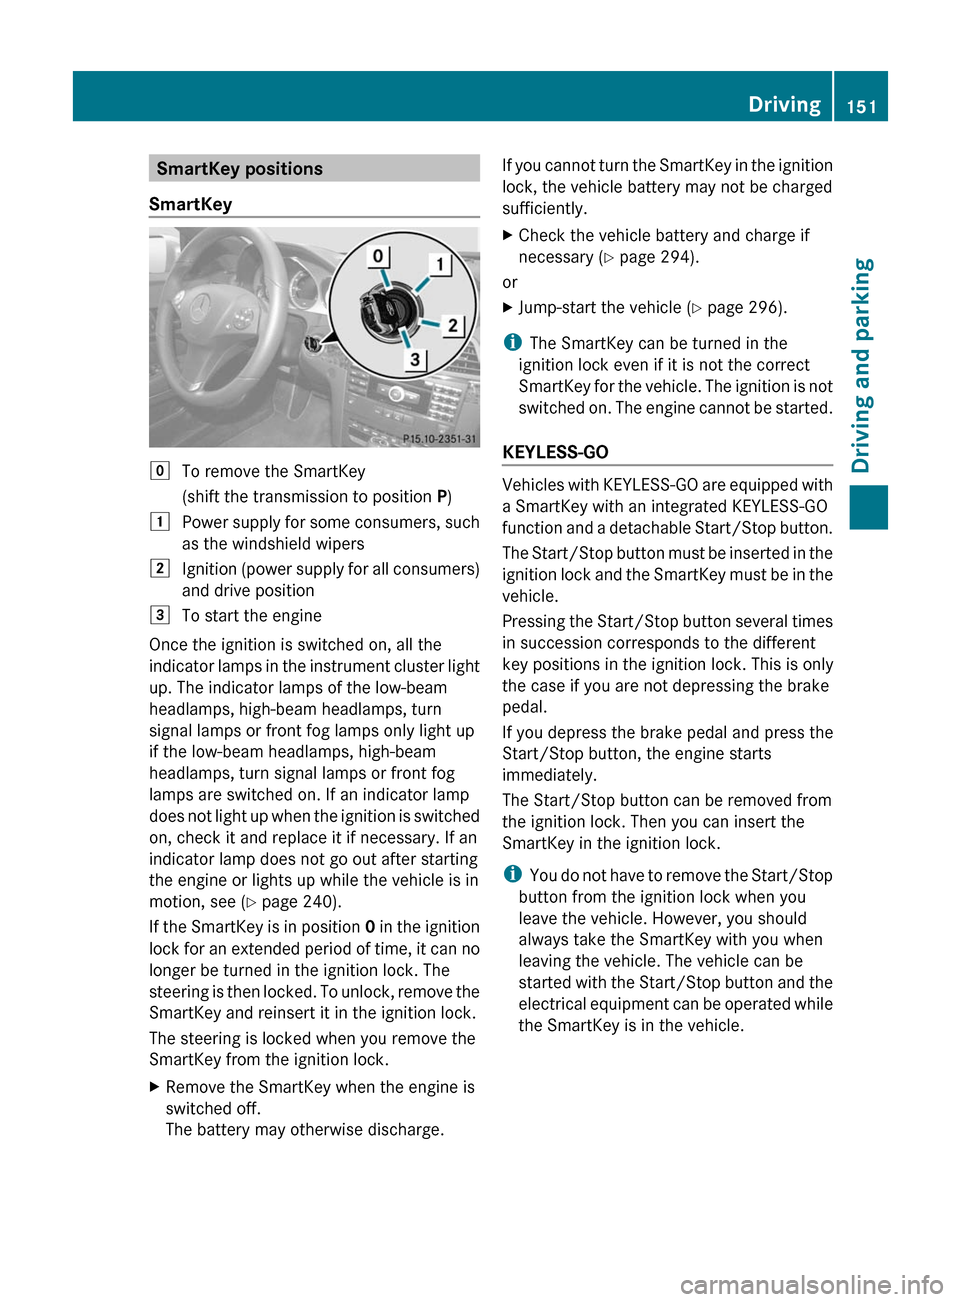
SmartKey positions
SmartKeygTo remove the SmartKey
(shift the transmission to position P)1Power supply for some consumers, such
as the windshield wipers2Ignition (power supply for all consumers)
and drive position3To start the engine
Once the ignition is switched on, all the
indicator lamps in the instrument cluster light
up. The indicator lamps of the low-beam
headlamps, high-beam headlamps, turn
signal lamps or front fog lamps only light up
if the low-beam headlamps, high-beam
headlamps, turn signal lamps or front fog
lamps are switched on. If an indicator lamp
does not light up when the ignition is switched
on, check it and replace it if necessary. If an
indicator lamp does not go out after starting
the engine or lights up while the vehicle is in
motion, see ( Y page 240).
If the SmartKey is in position 0 in the ignition
lock for an extended period of time, it can no
longer be turned in the ignition lock. The
steering is then locked. To unlock, remove the
SmartKey and reinsert it in the ignition lock.
The steering is locked when you remove the
SmartKey from the ignition lock.
XRemove the SmartKey when the engine is
switched off.
The battery may otherwise discharge.If you cannot turn the SmartKey in the ignition
lock, the vehicle battery may not be charged
sufficiently.XCheck the vehicle battery and charge if
necessary ( Y page 294).
or
XJump-start the vehicle ( Y page 296).
i
The SmartKey can be turned in the
ignition lock even if it is not the correct
SmartKey for the vehicle. The ignition is not
switched on. The engine cannot be started.
KEYLESS-GO
Vehicles with KEYLESS-GO are equipped with
a SmartKey with an integrated KEYLESS-GO
function and a detachable Start/Stop button.
The Start/Stop button must be inserted in the
ignition lock and the SmartKey must be in the
vehicle.
Pressing the Start/Stop button several times
in succession corresponds to the different
key positions in the ignition lock. This is only
the case if you are not depressing the brake
pedal.
If you depress the brake pedal and press the
Start/Stop button, the engine starts
immediately.
The Start/Stop button can be removed from
the ignition lock. Then you can insert the
SmartKey in the ignition lock.
i You do not have to remove the Start/Stop
button from the ignition lock when you
leave the vehicle. However, you should
always take the SmartKey with you when
leaving the vehicle. The vehicle can be
started with the Start/Stop button and the
electrical equipment can be operated while
the SmartKey is in the vehicle.
Driving151Driving and parkingBA 207 USA, CA Edition B 2011; 1; 3, en-USd2sboikeVersion: 3.0.3.62010-05-20T10:38:09+02:00 - Seite 151Z
Page 154 of 344
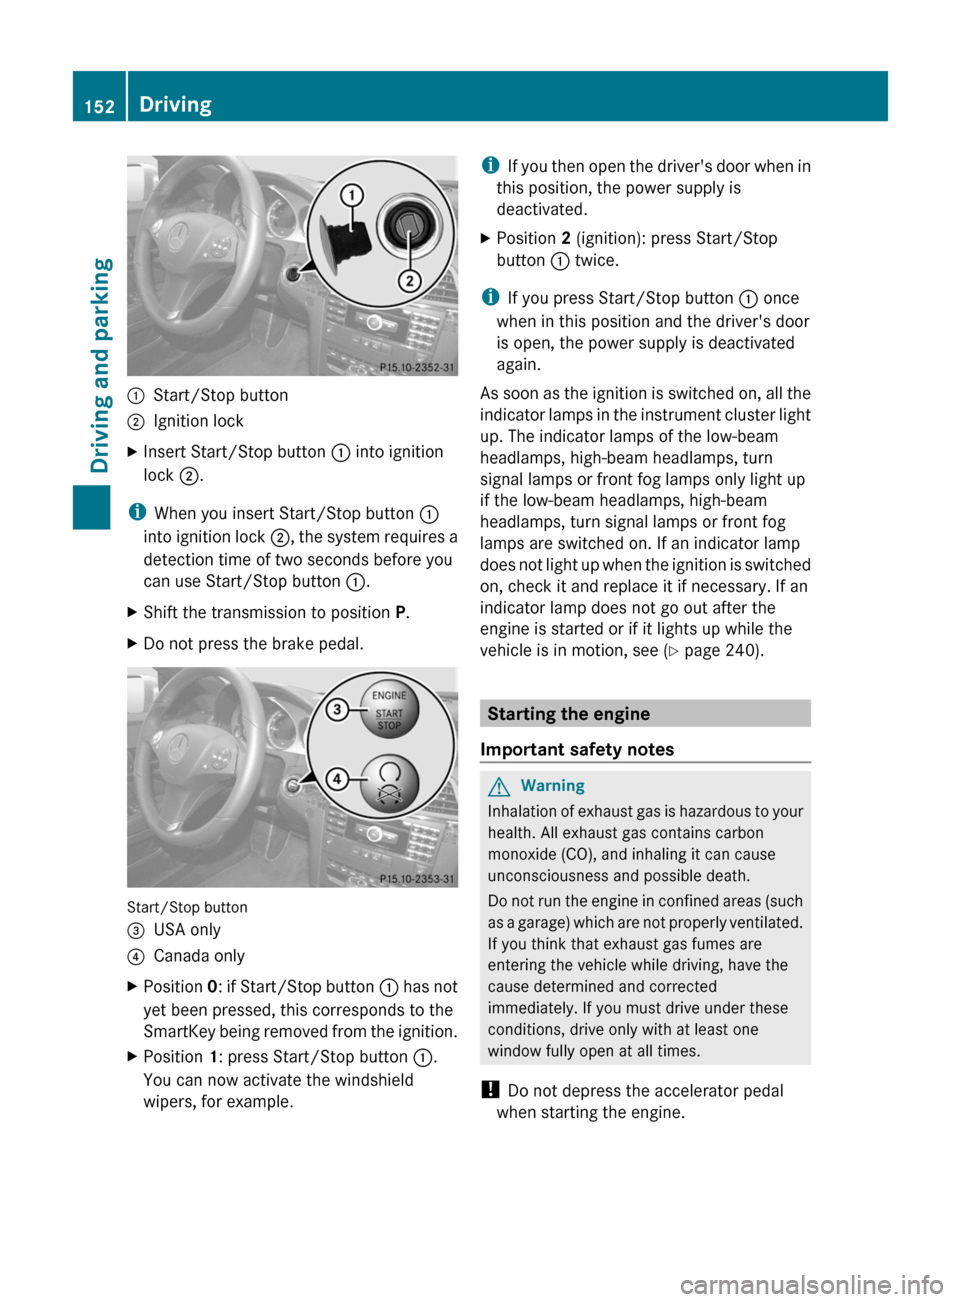
:Start/Stop button;Ignition lockXInsert Start/Stop button : into ignition
lock ;.
i
When you insert Start/Stop button :
into ignition lock ;, the system requires a
detection time of two seconds before you
can use Start/Stop button :.
XShift the transmission to position P.XDo not press the brake pedal.
Start/Stop button
=USA only?Canada onlyXPosition 0: if Start/Stop button : has not
yet been pressed, this corresponds to the
SmartKey being removed from the ignition.XPosition 1: press Start/Stop button :.
You can now activate the windshield
wipers, for example.i If you then open the driver's door when in
this position, the power supply is
deactivated.XPosition 2 (ignition): press Start/Stop
button : twice.
i
If you press Start/Stop button : once
when in this position and the driver's door
is open, the power supply is deactivated
again.
As soon as the ignition is switched on, all the
indicator lamps in the instrument cluster light
up. The indicator lamps of the low-beam
headlamps, high-beam headlamps, turn
signal lamps or front fog lamps only light up
if the low-beam headlamps, high-beam
headlamps, turn signal lamps or front fog
lamps are switched on. If an indicator lamp
does not light up when the ignition is switched
on, check it and replace it if necessary. If an
indicator lamp does not go out after the
engine is started or if it lights up while the
vehicle is in motion, see ( Y page 240).
Starting the engine
Important safety notes
GWarning
Inhalation of exhaust gas is hazardous to your
health. All exhaust gas contains carbon
monoxide (CO), and inhaling it can cause
unconsciousness and possible death.
Do not run the engine in confined areas (such
as a garage) which are not properly ventilated.
If you think that exhaust gas fumes are
entering the vehicle while driving, have the
cause determined and corrected
immediately. If you must drive under these
conditions, drive only with at least one
window fully open at all times.
! Do not depress the accelerator pedal
when starting the engine.
152DrivingDriving and parking
BA 207 USA, CA Edition B 2011; 1; 3, en-USd2sboikeVersion: 3.0.3.62010-05-20T10:38:09+02:00 - Seite 152
Page 170 of 344
Do not turn off the engine while the vehicle is
in motion.
Exhaust checkGWarning
Inhalation of exhaust gas is hazardous to your
health. All exhaust gas contains carbon
monoxide (CO), and inhaling it can cause
unconsciousness and possible death.
Do not run the engine in confined areas (such
as a garage) which are not properly ventilated.
If you think that exhaust gas fumes are
entering the vehicle while driving, have the
cause determined and corrected
immediately. If you must drive under these
conditions, drive only with at least one
window fully open at all times.
Certain engine systems are designed to keep
the level of poisonous components in exhaust
fumes within legal limits.
These systems only work optimally if they are
maintained exactly in accordance with the
manufacturer's specifications. For this
reason, all work on the engine must be carried
out by qualified and authorized Mercedes-
Benz technicians.
The engine settings must not be changed in
any circumstances. Furthermore, all specific
service work must be carried out at regular
intervals and in accordance with the
Mercedes-Benz service requirements. Details
can be found in the Service Booklet.
Brakes
Important safety notes
GWarning
On slippery road surfaces, never downshift in
order to obtain braking action. This could
result in drive wheel slip and reduced vehicle
control. Your vehicle's ABS will not prevent
this type of loss of control.
GWarning
Make sure that you do not endanger other
road users when you apply the brakes.
Downhill gradients
! On long and steep gradients, you must
reduce the cargo on the brakes by shifting
to a lower gear in good time. This allows
you to take advantage of engine braking
and helps you to avoid overheating the
brakes and wearing them out excessively.
When you take advantage of engine
braking, a drive wheel may not turn for
some time, e.g. on a slippery road surface.
This could cause damage to the drive train.
Such damage is not covered by the
Mercedes-Benz warranty.
Heavy and light loads
GWarning
Depressing the brake pedal constantly results
in excessive and premature wear to the brake
pads.
It may also cause the brakes to overheat,
seriously impairing their effectiveness. It may
then not be possible to stop the vehicle in
sufficient time to avoid an accident.
If the brakes have been subjected to a heavy
cargo, do not stop the vehicle immediately,
but drive on for a short while. This allows the
airflow to cool the brakes more quickly.
Wet roads
GWarning
After driving in heavy rain for some time
without applying the brakes or through water
deep enough to wet brake components, the
first braking action may be somewhat
reduced. You have to depress the brake pedal
more firmly. Maintain a safe distance from
vehicles in front.
After driving on a wet road or having the
vehicle washed, brake firmly while paying
168Driving tipsDriving and parking
BA 207 USA, CA Edition B 2011; 1; 3, en-USd2sboikeVersion: 3.0.3.62010-05-20T10:38:09+02:00 - Seite 168
Page 173 of 344
ROnly use snow chains when driving on an
area completely covered by snow. Do not
exceed the maximum permissible speed of
30 mph (50 km/h). Remove the snow
chains as soon as possible when you are no
longer driving on snow-covered roads.
R Local regulations may restrict the use of
snow chains. Applicable regulations must
be observed if you wish to mount snow
chains.
R Snow chains must not be mounted on
emergency spare wheels.
If you intend to mount snow chains, please
bear the following points in mind:
R you may not attach snow chains to all
wheel-tire combinations; see the "Tires and
wheels" section in the "Technical data"
chapter.
R mount snow chains only in pairs and only
on the rear wheels. Observe the
manufacturer's installation instructions.
! If snow chains are mounted on the front
wheels, the snow chains could grind
against the bodywork or components of the
chassis. This could result in damage to the
vehicle or the tires.
! Vehicles with steel wheels
If you wish to mount snow chains to steel
wheels, make sure that you remove the
respective wheels' hubcaps first. The
hubcaps may otherwise be damaged.
i You may wish to deactivate
ESP ®
(Y page 66) when pulling away with
snow chains installed. This way you can
allow the wheels to spin in a controlled
manner, achieving an increased driving
force (cutting action).
Slippery road surfacesGWarning
If the vehicle becomes stuck in snow, make
sure snow is kept clear of the exhaust pipe
and from around the vehicle with the engine
running. Otherwise, deadly carbon monoxide
(CO) gases may enter vehicle interior
resulting in unconsciousness and death.
To assure sufficient fresh air ventilation, open
a window slightly on the side of the vehicle
not facing the wind.GWarning!
The outside temperature indicator is not
designed to serve as an ice-warning device
and is therefore unsuitable for that purpose.
Indicated temperatures just above the
freezing point do not guarantee that the road
surface is free of ice. The road may still be icy,
especially in wooded areas or on bridges.
GWarning
On slippery road surfaces, never downshift in
order to obtain braking action. This could
result in drive wheel slip and reduced vehicle
control. Your vehicle's ABS will not prevent
this type of loss of control.
You should drive particularly carefully on
slippery road surfaces. Avoid sudden
acceleration, steering and braking
maneuvers. Do not use cruise control or
DISTRONIC PLUS.
If the vehicle threatens to skid or cannot be
stopped when moving at low speed:
XShift the transmission to position N.
i
For more information on driving with
snow chains, see ( Y page 170).
GWarning
Make sure that you do not endanger other
road users when you apply the brakes.
Driving abroad
An extensive Mercedes-Benz Service network
is also available in other countries. The
Service Hotline's current telephone numbers
for use when you are abroad are to be found
in the "Service24h" section of the Service
Booklet.
Driving tips171Driving and parkingBA 207 USA, CA Edition B 2011; 1; 3, en-USd2sboikeVersion: 3.0.3.62010-05-20T10:38:09+02:00 - Seite 171Z
Page 174 of 344
Driving systems
Cruise control
Important safety notes
Cruise control maintains a constant road
speed for you. It brakes automatically in order
to avoid exceeding the set speed. On long and
steep downhill gradients, especially if the
vehicle is laden, you must select shift range
1 , 2 or 3 in good time. By doing so, you will
make use of the braking effect of the engine,
which relieves the load on the brake system
and prevents the brakes from overheating
and wearing too quickly.
Use cruise control only if road and traffic
conditions make it appropriate to maintain a
steady speed for a prolonged period. You can
store any road speed above 20 mph
(30 km/h).
GWarning
The cruise control is a convenience system
designed to assist the driver during vehicle
operation. The driver is and must always
remain responsible for the vehicle's speed
and for safe brake operation.
Only use the cruise control if the road, traffic,
and weather conditions make it advisable to
travel at a constant speed.
R The use of the cruise control can be
dangerous on winding roads or in heavy
traffic because conditions do not allow safe
driving at a constant speed.
R The use of the cruise control can be
dangerous on slippery roads. Rapid
changes in tire traction can result in wheel
spin and loss of control.
R Deactivate the cruise control when driving
in fog.
The "Resume" function should only be
operated if the driver is fully aware of the
previously set speed and wishes to resume
this particular preset speed.
GWarning!
The cruise control brakes automatically so
that the set speed is not exceeded.
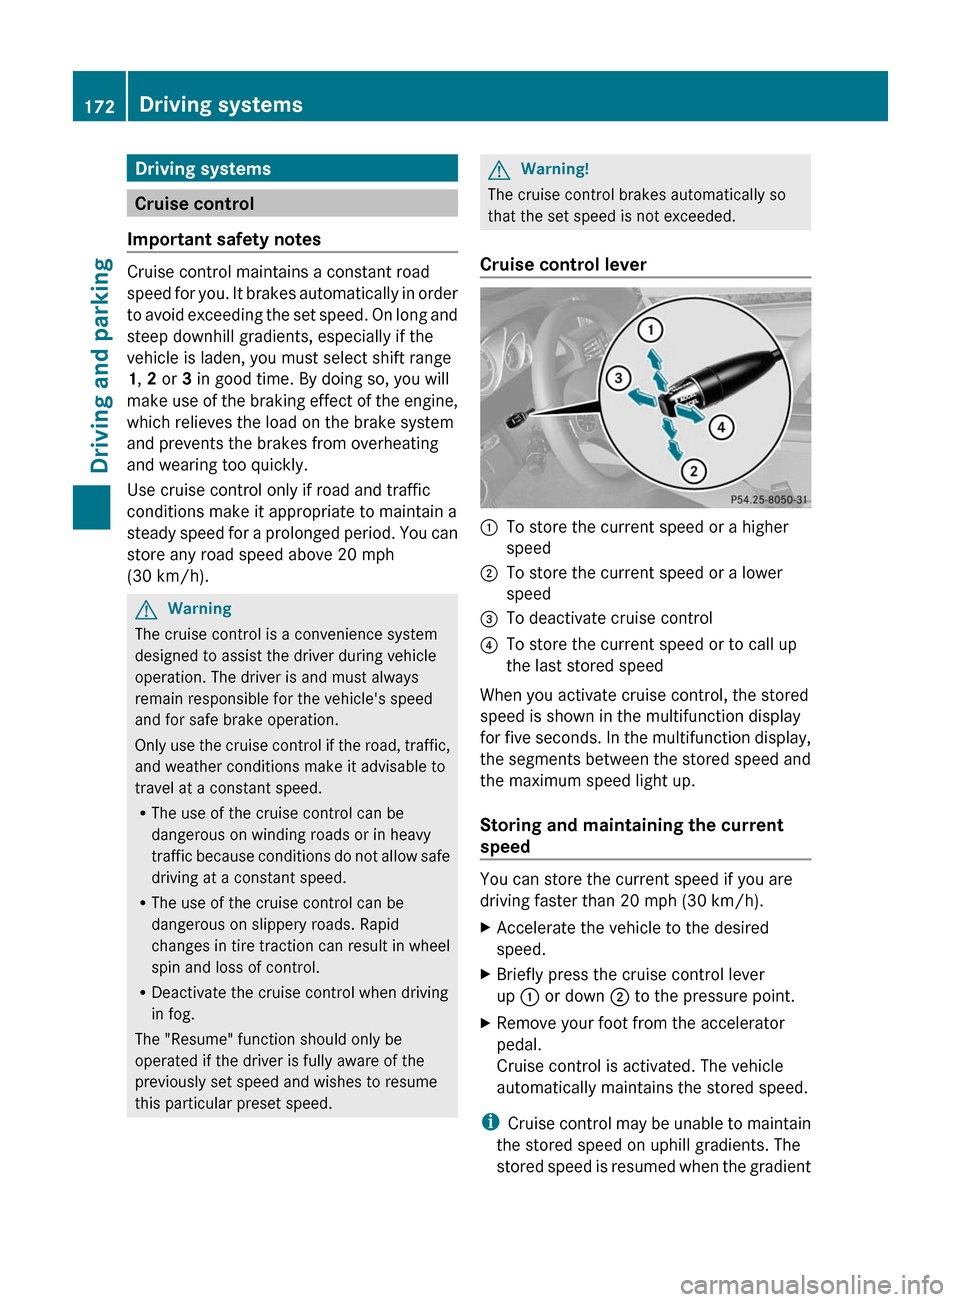
Cruise control lever
:To store the current speed or a higher
speed;To store the current speed or a lower
speed=To deactivate cruise control?To store the current speed or to call up
the last stored speed
When you activate cruise control, the stored
speed is shown in the multifunction display
for five seconds. In the multifunction display,
the segments between the stored speed and
the maximum speed light up.
Storing and maintaining the current
speed
You can store the current speed if you are
driving faster than 20 mph (30 km/h).
XAccelerate the vehicle to the desired
speed.XBriefly press the cruise control lever
up : or down ; to the pressure point.XRemove your foot from the accelerator
pedal.
Cruise control is activated. The vehicle
automatically maintains the stored speed.
i Cruise control may be unable to maintain
the stored speed on uphill gradients. The
stored speed is resumed when the gradient
172Driving systemsDriving and parking
BA 207 USA, CA Edition B 2011; 1; 3, en-USd2sboikeVersion: 3.0.3.62010-05-20T10:38:09+02:00 - Seite 172
Page 177 of 344
It is the driver's responsibility at all times to
be attentive to the road, weather and traffic
conditions. Additionally, the driver must
provide the steering, braking and other driving
inputs necessary to remain in control of the
vehicle.
High-frequency sources such as toll stations,
speed measuring systems etc. can cause the
DISTRONIC PLUS system to temporarily
cease functioning.GWarning!
The DISTRONIC PLUS cannot take road and
traffic conditions into account. Only use the
DISTRONIC PLUS if the road, weather and
traffic conditions make it advisable to travel
at a constant speed.
GWarning!
Use of the DISTRONIC PLUS can be
dangerous on slippery roads. Rapid changes
in tire traction can result in wheel spin and
loss of control.
The DISTRONIC PLUS does not function in
adverse sight and distance conditions. Do not
use the DISTRONIC PLUS during conditions of
fog, heavy rain, snow or sleet.
GWarning!
The DISTRONIC PLUS cannot take weather
conditions into account. Switch off the
DISTRONIC PLUS or do not switch it on if:
R roads are slippery or covered with snow or
ice. The wheels could lose traction while
braking or accelerating, and the vehicle
could skid.
R the DISTRONIC PLUS system sensor covers
are dirty or visibility is diminished due to
snow, rain or fog, for example. The distance
control system functionality could be
impaired.
Always pay attention to surrounding traffic
conditions even while the DISTRONIC PLUS is
switched on. Otherwise, you may not be able
to recognize dangerous situations until it is
too late. This could cause an accident in which
you and/or others could be injured.GWarning!
The "Resume" function should only be
operated if the driver is fully aware of the
previously set speed and wishes to resume
this particular preset speed.
GWarning
Your undivided attention to street and traffic
conditions is necessary at all times whether
DISTRONIC PLUS is active or not.
The use of DISTRONIC PLUS can be
dangerous on winding roads or in heavy traffic
because conditions do not allow safe driving
at a constant speed.
DISTRONIC PLUS does not react to stationary
objects on the road (for example, a vehicle
stopped in traffic or an abandoned vehicle).
DISTRONIC PLUS likewise does not react to
oncoming vehicles.
Deactivate DISTRONIC PLUS:
R when changing to the right lane, if the
vehicles in the left lane are driving slower
R when driving into a filter lane or an
expressway exit
R in complex driving situations, for example
at roadworks on an expressway
In these situations DISTRONIC PLUS will
maintain the set speed if it is not deactivated.
DISTRONIC PLUS is intended only for
maintaining a set speed and a set distance
from the objects moving in front of the
vehicle.
GWarning!
An intermittent warning sounds and the
distance warning lamp · in the instrument
cluster is illuminated if the DISTRONIC PLUS
system calculates that the distance to the
vehicle ahead and your vehicle's current
speed indicate that the DISTRONIC PLUS will
not be capable of slowing the vehicle
sufficiently to maintain the preset following
Driving systems175Driving and parkingBA 207 USA, CA Edition B 2011; 1; 3, en-USd2sboikeVersion: 3.0.3.62010-05-20T10:38:09+02:00 - Seite 175Z