fuel cap MERCEDES-BENZ E-Class COUPE 2011 C207 Owner's Manual
[x] Cancel search | Manufacturer: MERCEDES-BENZ, Model Year: 2011, Model line: E-Class COUPE, Model: MERCEDES-BENZ E-Class COUPE 2011 C207Pages: 344, PDF Size: 14.06 MB
Page 11 of 344
Premium-grade unleaded gasoline . 336
Refueling ........................................ 162
Specifications ................................ 336
Troubleshooting ............................. 165
Fuel consumption
Current (on-board computer) .........202
Notes ............................................. 167
Fuel filler cap (display message) ..... 229
Fuel filler flap Opening/closing ....... 163
Fuel level Calling up the range (on-board
computer) ...................................... 202
Fuses
Dashboard fuse box .......................300
Fuse allocation chart .....................300
Fuse box in the engine
compartment ................................. 301
Fuse box in the trunk .....................301
Notes ............................................. 300
G
Garage door opener Clearing the memory .....................268
Notes ............................................. 265
Opening/closing the garage door ..267
Programming the remote control ...265
Gear or selector lever (cleaning
guidelines) ......................................... 283
Genuine Mercedes-Benz parts ......... 332
Genuine wood trim and trim strips
(cleaning instructions) ...................... 283
Glove box ........................................... 250
H
Head bags ............................................ 40
Head bags ........................................ 40
Headlamp cleaning system .............. 124
Adding washer fluid .......................275
Notes ............................................. 339
Headlamp mode (daytime driving)
see Daytime running lamps
Headlamps
Cleaning ......................................... 282
Misting up ...................................... 125
Head level heating
AIRSCARF ...................................... 112
Head restraint
Lowering manually (rear) ...............109
Head restraints
Adjusting (electrically) ...................108
Adjusting (rear) .............................. 109
see NECK-PRO head restraints
Heating
see Climate control
High beam flasher ............................. 124
Hill start assist .................................. 154
HOLD function Display message ............................ 229
Function/notes ............................. 184
Hood
Closing ........................................... 273
Display message ............................ 237
Opening ......................................... 272
Hydroplaning ..................................... 170
I
Immobilizer .......................................... 70
Indicator and warning lamps DISTRONIC PLUS ........................... 247
Installing/removing the AIRCAP
wind screen ......................................... 98
Instrument cluster Overview .......................................... 26
Submenu (on-board computer) ......208
Warning and indicator lamps ...........27
Instrument cluster lighting ................ 26
Instrument lighting see Instrument cluster lighting
Interior lighting
Automatic control ..........................125
Delayed switch-off (on-board
computer) ...................................... 210
Emergency lighting ........................126
Manual control ............................... 126
Reading lamp ................................. 125
J
Jack Storage location ............................ 287
Using ............................................. 290
Jump-starting ..................................... 296
Index9BA 207 USA, CA Edition B 2011; 1; 3, en-USd2sboikeVersion: 3.0.3.62010-05-20T10:38:09+02:00 - Seite 9
Page 15 of 344
ReportingMalfunctions relevant to safety ........ 21
Reserve fuel
Display message ............................ 229
Warning lamp ................................. 245
Residual heat
Switching on/off ........................... 144
Restraint systems
see SRS
Reversing lamp (display message) .. 225
Roadside Assistance (breakdown) .... 19
Roll bar Display message ............................ 215
Operation ......................................... 50
Roller blind
see Roller sunblind
Roller sunblind
Opening/closing ............................ 102
Panorama roof with power tilt/
sliding panel .................................. 102
Rear window .................................. 256
Roof
see Soft top
Roof carrier ................................ 254, 255
Roof lining and carpets (cleaning
guidelines) ......................................... 284
Route see Route guidance (on-board
computer)
Route guidance (on-board
computer) .......................................... 203
S
Safety Children in the vehicle .....................58
Child restraint systems ....................59
Occupant Classification System
(OCS) ............................................... 42
Overview of occupant safety
systems ........................................... 34
Safety systems
see Driving safety systems
Seat belts
Adjusting the driver's and front-
passenger seat belt .........................56
Automatic comfort-fit feature ..........58
Belt force limiters ............................ 57
Cleaning ......................................... 284
Correct usage .................................. 53
Emergency Tensioning Devices ........ 57
Fastening ......................................... 54
Important safety guidelines .............53
Releasing ......................................... 56
Safety guidelines ............................. 35
Special seat belt retractor ...............61
Switching belt adjustment on/off
(on-board computer) ......................211
Warning lamp ................................. 241
Warning lamp (function) ................... 56
Seat heating
Indicator lamp (Malfunction) ..........112
Seats
Adjusting (electrically) ...................108
Adjusting the 4-way lumbar
support .......................................... 111
Adjusting the head restraint ..........108
Cleaning the cover .........................283
Correct driver's seat position ........106
Important safety notes ..................107
Multicontour seat .......................... 110
Storing settings (memory
function) ........................................ 116
Switching AIRSCARF on/off ..........112
Switching seat heating on/off .......111
Switching the seat ventilation on/
off .................................................. 112
Seat ventilation
Indicator lamp (Malfunction) ..........112
Sensors (cleaning instructions) ....... 282
Service indicator see Service interval display
Service interval display .................... 276
Displaying a service message (on-
board computer) ............................ 277
Service menu (on-board computer) . 208
Service products Brake fluid ..................................... 338
Capacities ...................................... 335
Coolant (engine) ............................ 338
Engine oil ....................................... 337
Fuel ................................................ 335
Important safety notes ..................334
Notes ............................................. 334Index13BA 207 USA, CA Edition B 2011; 1; 3, en-USd2sboikeVersion: 3.0.3.62010-05-20T10:38:09+02:00 - Seite 13
Page 19 of 344
Individual settings (on-board
computer) ...................................... 208
Loading .......................................... 314
Lowering ........................................ 292
Maintenance .................................... 19
Parking up ..................................... 166
Raising ........................................... 290
Reporting problems .........................21
Towing away .................................. 298
Tow-starting ................................... 298
Transporting .................................. 299
Vehicle data
see Technical data
Vehicle identification number
see VIN
Vehicle identification plate .............. 333
Vehicle tool kit .................................. 287
Video (DVD) ........................................ 205
Video DVD (on-board computer) ...... 205
VIN ...................................................... 333
W
Warning and indicator lamps ABS ................................................ 243
Brakes ........................................... 240
Check Engine ................................. 245
Coolant .......................................... 246
ESP ®
.............................................. 243
ESP ®
OFF ....................................... 244
Fuel tank ........................................ 245
Overview .......................................... 27
PASSENGER AIRBAG OFF
indicator lamp (only Canada) ...........47
PASSENGER AIRBAG OFF
indicator lamp (only USA) ................42
Reserve fuel ................................... 245
Seat belt ........................................ 241
SRS ................................................ 244
Tire pressure monitor ....................247
Warranty ............................................ 332
Wheel bolt tightening torque ........... 292
Wheel chock ...................................... 289
Wheels Changing/replacing .......................320
Changing a wheel .......................... 289
Checking ........................................ 305
Cleaning ......................................... 279
Guidelines to be observed .............305
Mounting a wheel .......................... 292
Removing a wheel ..........................291
Tightening torque ........................... 292
Wheel size/tire size .......................327
Wind deflector
see AIRCAP
Wind deflector (cleaning
instructions) ...................................... 280
Window curtain air bag Display message ............................ 216
Operation ......................................... 41
Windows
see Side windows
Windows (cleaning instructions) ..... 281
Wind screen ......................................... 96
Wind screen (cleaning
instructions) ...................................... 280
Windshield Defrosting ...................................... 142
Windshield washer fluid (display
message) ............................................ 238
Windshield washer system Adding washer fluid .......................275
Notes ............................................. 339
Windshield wipers
Important safety notes ..................129
Replacing the wiper blades ............130
Switching on/off ........................... 129
Troubleshooting ............................. 130
Winter operation ............................... 171
Winter tires M+S tires ....................................... 170
Wiper blades
Cleaning ......................................... 281Index17BA 207 USA, CA Edition B 2011; 1; 3, en-USd2sboikeVersion: 3.0.3.62010-05-20T10:38:09+02:00 - Seite 17
Page 165 of 344
GWarning
Overfilling of the fuel tank may create
pressure in the system which could cause a
gas discharge. This could cause the gasoline
to spray back out when removing the fuel
pump nozzle, which could cause personal
injury.
! Do not use diesel to refuel vehicles with a
gasoline engine. Even small amounts of the
wrong fuel result in damage to the fuel
system and engine.
! Do not switch on the ignition if you
accidentally refuel with the wrong fuel.
Otherwise, the fuel will enter the fuel lines.
Notify a qualified specialist workshop and
have the fuel tank and fuel lines drained
completely.
Gasoline
Fuel grade
! You should only refuel with unleaded
premium-grade gasoline as this avoids
damaging the catalytic converter.
If engine running problems are apparent,
have the cause checked immediately and
repaired. Excess unburned fuel can
otherwise enter the catalytic converter,
leading to overheating and possibly
causing a fire.
iOnly refuel with unleaded premium-grade
gasoline with a specified minimum octane
number of 91 (average value of 96 RON/
86 MON).
Usually you will find information about the
fuel grade on the pump. If you cannot find
the label on the gasoline pump, ask the gas
station staff.
You can find further information under
"Fuel" (Y page 335), by consulting an
authorized Mercedes-Benz Center or
visiting http://www.mbusa.com (USA
only).
Refueling
Fuel filler flap
The fuel filler flap is unlocked or locked
automatically when you open or close the
vehicle with the SmartKey or using KEYLESS-
GO.
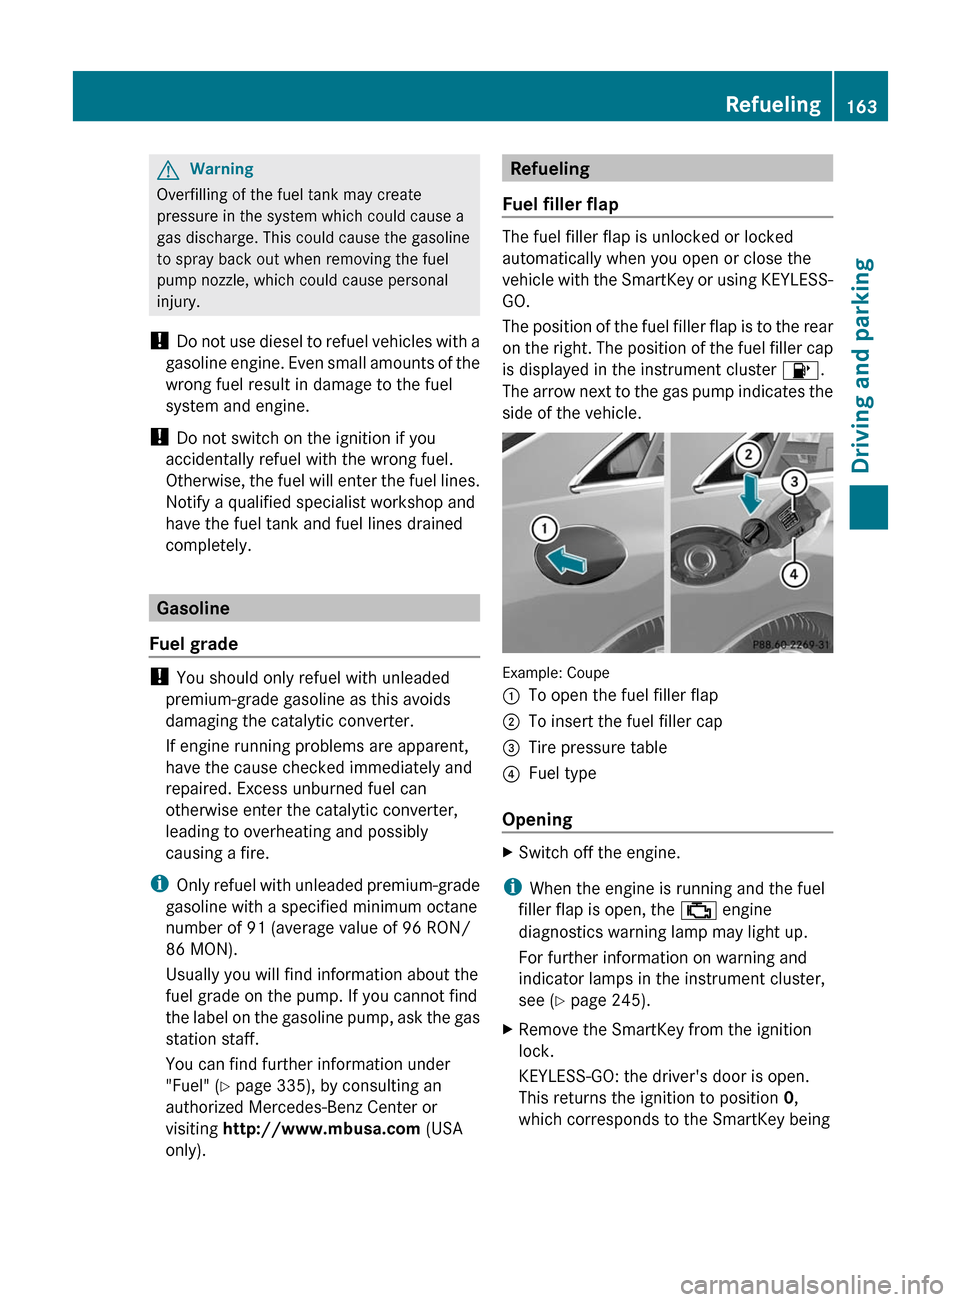
The position of the fuel filler flap is to the rear
on the right. The position of the fuel filler cap
is displayed in the instrument cluster 8.
The arrow next to the gas pump indicates the
side of the vehicle.
Example: Coupe
:To open the fuel filler flap;To insert the fuel filler cap=Tire pressure table?Fuel type
Opening
XSwitch off the engine.
iWhen the engine is running and the fuel
filler flap is open, the ; engine
diagnostics warning lamp may light up.
For further information on warning and
indicator lamps in the instrument cluster,
see (Y page 245).
XRemove the SmartKey from the ignition
lock.
KEYLESS-GO: the driver's door is open.
This returns the ignition to position 0,
which corresponds to the SmartKey being
Refueling163Driving and parkingBA 207 USA, CA Edition B 2011; 1; 3, en-USd2sboikeVersion: 3.0.3.62010-05-20T10:38:09+02:00 - Seite 163Z
Page 166 of 344
removed. The driver's door can be closed
again.XPress the fuel filler flap in the direction of
arrow :.
The fuel filler flap opens slightly.XOpen the fuel filler flap.XTurn the fuel filler cap counter-clockwise
and remove it.XInsert the fuel filler cap into the holder
bracket on the inside of filler flap ;.XCompletely insert the filler neck of the fuel
pump nozzle into the tank and refuel.XOnly fill the tank until the pump nozzle
switches off.
! Overfilling the fuel tank could damage the
fuel system.
Closing
XReplace the fuel filler cap and turn it
clockwise. The fuel filler cap audibly
engages.
i Close the fuel filler flap before locking the
vehicle. A locking pin otherwise prevents
the fuel filler flap from closing after the
vehicle has been locked.
XClose the fuel filler flap.164RefuelingDriving and parking
BA 207 USA, CA Edition B 2011; 1; 3, en-USd2sboikeVersion: 3.0.3.62010-05-20T10:38:09+02:00 - Seite 164
Page 231 of 344
Display messagesPossible causes/consequences and M SolutionsCThere is only a small amount of fuel in the fuel tank.XRefuel at the nearest gas station.8
Fuel Level LowThe fuel level has dropped into the reserve range.XRefuel at the nearest gas station.8
Gas Cap LooseThe fuel system pressure is too low. The fuel filler cap is not closed
correctly or the fuel system is leaking.XCheck that the fuel filler cap is correctly closed.XIf the fuel filler cap is not correctly closed: close the fuel filler
cap.XIf the fuel filler cap is closed: visit a qualified specialist
workshop.
Driving systems
Display messagesPossible causes/consequences and M SolutionsÀ
Attention Assist
Drowsiness
DetectedBased on specific criteria, ATTENTION ASSIST has determined
tiredness or a decrease in attention. A warning tone also sounds.XIf necessary, take a break.
During long journeys, take regular breaks in good time so you get
enough rest.
À
Attention Assist
InoperativeATTENTION ASSIST has failed.XVisit a qualified specialist workshop.HOLD
OffThe HOLD function is deactivated. The vehicle is skidding.
A warning tone also sounds.XReactivate the HOLD function later.A condition for activation is no longer met when the brake pedal
is firmly depressed.
A warning tone also sounds.XCheck the activation conditions for the HOLD function
( Y page 184).Display messages229On-board computer and displaysBA 207 USA, CA Edition B 2011; 1; 3, en-USd2sboikeVersion: 3.0.3.62010-05-20T10:38:09+02:00 - Seite 229Z
Page 247 of 344
GWarning
In the event a malfunction of the SRS is indicated as outlined above, the SRS may not be
operational.
For your safety, we strongly recommend that you contact an authorized Mercedes-Benz Center
immediately to have the system checked. Otherwise the SRS may not be activated when needed
in an accident, which could result in serious or fatal injury, or it might deploy unexpectedly and
unnecessarily which could also result in injury.
Engine
ProblemPossible causes/consequences and M Solutions;
The yellow Check
Engine warning lamp
lights up while the
engine is running.There may be a malfunction, for example:
R in the engine management
R in the fuel injection system
R in the exhaust system
R in the ignition system
R the fuel system
The emission limit values may have been exceeded and the engine
may be breaking in emergency mode.XHave the vehicle checked as soon as possible at a qualified
specialist workshop.
i In some states, you are required by law to visit a qualified
specialist workshop as soon as the Check Engine warning lamp
lights up. If necessary, check whether this is the case in the
state you are in.
8
The yellow reserve fuel
warning lamp flashes
while the engine is
running.The fuel system pressure is too low. The fuel filler cap is not closed
correctly or the fuel system is leaking.XCheck that the fuel filler cap is correctly closed.XIf the fuel filler cap is not correctly closed: close the fuel filler
cap.XIf the fuel filler cap is closed: visit a qualified specialist
workshop.8
The yellow reserve fuel
warning lamp lights up
while the engine is
running. The amount of fuel in the tank has dropped into the reserve range.XRefuel at the nearest gas station.Warning and indicator lamps in the instrument cluster245On-board computer and displaysBA 207 USA, CA Edition B 2011; 1; 3, en-USd2sboikeVersion: 3.0.3.62010-05-20T10:38:09+02:00 - Seite 245Z
Page 309 of 344

pressure can be checked in the on-board
computer.GWarning!
Should the tire pressure drop repeatedly:
R check the tire for foreign bodies.
R check whether the wheel is losing air or the
valve is leaking.
R make sure that only a valve cap approved
by Mercedes-Benz is installed on the tire
valve.
tire pressure that is too low have a negative
effect on vehicle safety, which could lead you
to cause an accident.
Only correct tire pressures when the tires are
cold. The tires are cold when the vehicle has
been parked for at least three hours or has
been driven less than 1 mile (1.6 km) in this
time. The tire temperature changes
depending on the outside temperature, the
vehicle speed and the tire load. A change in
tire temperature of 18 ‡ (10 †) changes the
tire pressure by approximately 10 kPa
(0.1 bar/1.5 psi). Take this into account when
checking the pressure of warm tires and only
correct the tire pressure if it is too low for the
current operating conditions. If you check the
tire pressure when the tires are warm, the
resulting value will be higher than if the tires
were cold. This is normal. Do not reduce the
tire pressure to the value specified for cold
tires. The tire pressure would otherwise be
too low.
Comply with the recommended tire pressure
specifications for cold tires on the Tire and
Load Information placard on the B-pillar on
the driver's side of your vehicle.
i The following data on the Tire and Load
Information placard is given as an example.
Tire pressure specifications are vehicle-
specific and may deviate from the data
shown here. The tire pressures applicable
to your vehicle can be found on the Tire and
Loading Information placard on your
vehicle.
On the Tire and Load Information placard you
will find recommended tire pressure
information : for cold tires on a fully laden
vehicle. The tire pressure information is
applicable to all tires mounted at the factory.
Important notes on tire pressures
GWarning
If the tire pressure drops repeatedly, check
the tires for punctures from foreign objects
and/or whether air is leaking from the valves
or from around the rim.
The tire temperature and pressure increase
when the vehicle is in motion. This is
dependent on the driving speed and the load.
If you wish to drive at high speeds of 100 mph
(160 km/h) or higher when this is allowed,
use the tire pressure table on the inside of the
fuel filler flap to set the correct tire pressures
when the wheels are cold. If the tire pressure
is not set correctly, this can lead to an
excessive build up of heat and a sudden loss
of pressure.
For more information, contact a qualified
specialist workshop, e.g. an authorized
Mercedes-Benz Center.
i Ride comfort may be affected if the tire
pressure is adjusted to the recommended
value for speeds of over 100 mph
(160 km/h).
Make sure that the tire pressure for normal
speeds is adopted again.
Tire pressures307Tires and wheelsBA 207 USA, CA Edition B 2011; 1; 3, en-USd2sboikeVersion: 3.0.3.62010-05-20T10:38:09+02:00 - Seite 307Z
Page 311 of 344
Overinflated tires can:GWarning
Follow recommended tire inflation pressures.
Do not overinflate tires. Overinflated tires can
adversely affect handling and ride comfort,
wear unevenly, increase stopping distance,
and result in sudden deflation (blowout)
because they are more likely to become
punctured or damaged by road debris,
potholes etc.
Overinflated tires can:
R adversely affect handling
R wear excessively and/or unevenly
R be more likely to become damaged
R adversely affect ride comfort
R increase stopping distance
Checking tire pressures
Important safety notes
GWarning
Follow recommended tire inflation pressures.
Do not underinflate tires. Underinflated tires
wear excessively and/or unevenly, adversely
affect handling and fuel economy, and are
more likely to fail from being overheated.
Do not overinflate tires. Overinflated tires can
adversely affect handling and ride comfort,
wear unevenly, increase stopping distance,
and result in sudden deflation (blowout)
because they are more likely to become
punctured or damaged by road debris,
potholes etc.
Do not overload the tires by exceeding the
specified load limit as indicated on the Tire
and Loading Information placard on the
driver's door B-pillar. Overloading the tires
can overheat them, possibly causing a
blowout. Overloading the tires can also result
in handling or steering problems, or brake
failure.
Check the tire pressure at least once a month.
Only check and correct tire pressures when
the tires are cold ( Y page 306).
Checking the tire pressures manually
In order to determine and adjust the tire
pressures, proceed as follows:
XRemove the valve cap of the tire you wish
to check.XPress the tire pressure gauge securely onto
the valve.XRead the tire pressure and compare it with
the recommended value on the Tire and
Loading Information placard on the
B-pillar on the driver's side of your vehicle.XIf necessary, increase the tire pressure to
the recommended value ( Y page 306).XIf the tire pressure is too high, release air
by pressing down the metal pin in the valve
using the tip of a pen, for example. Then,
check the tire pressure again using the tire
pressure gauge.XScrew the valve cap onto the valve.XRepeat the steps for the other tires.
Tire pressure loss warning system
(Canada only)
Important safety notes
While the vehicle is in motion, the tire
pressure loss warning system monitors the
set tire pressure using the rotational speed of
the wheels. This enables the system to detect
significant pressure loss in a tire. If the speed
of rotation of a wheel changes as a result of
a loss of pressure, a corresponding warning
message will appear in the multifunction
display.
GWarning
If the Check Tire Pressure Soon message
appears in the multifunction display, one or
more tires are significantly underinflated.
Stop the vehicle as soon as possible and
inflate the tires to the pressure specified on
Tire pressures309Tires and wheelsBA 207 USA, CA Edition B 2011; 1; 3, en-USd2sboikeVersion: 3.0.3.62010-05-20T10:38:09+02:00 - Seite 309Z
Page 327 of 344
Wheel rim
The part of the wheel on which the tire is
mounted.
GAWR (Gross Axle Weight Rating)
The GAWR is the maximum gross axle weight
rating. The actual load on an axle must never
exceed the gross axle weight rating. The
gross axle weight rating can be found on the
vehicle identification plate on the B-pillar on
the driver's side.
Speed index
The speed index is part of the tire
identification. Specifies the speed range for
which the tire is approved.
GVW (Gross Vehicle Weight)
The gross vehicle weight includes the weight
of the vehicle including fuel, tools, the spare
wheel, accessories installed, occupants,
luggage and the drawbar noseweight if
applicable. The gross vehicle weight must not
exceed the gross vehicle weight rating GVWR
as specified on the vehicle identification plate
on the B-pillar on the driver's side.
GVWR (Gross Vehicle Weight Rating)
The GVWR is the maximum permissible gross
weight of a fully loaded vehicle (the weight of
the vehicle including all accessories,
occupants, fuel, luggage and the drawbar
noseweight if applicable). The gross vehicle
weight rating is specified on the vehicle
identification plate on the B-pillar on the
driver's side.
Maximum weight of the laden vehicle
The maximum weight is the sum of the
unladen weight of the vehicle, the weight of
the accessories, the maximum load and the
weight of the optional equipment installed at
the factory.
Kilopascal (kPa)
Metric unit for tire pressure. 6.9 kPa is the
equivalent of 1 psi. Another unit for tire
pressure is bar. 100 kilopascal (kPa) is the
equivalent of 1 bar.
Load index
In addition to the load bearing index, the load
index may also be imprinted on the sidewall
of the tire. This specifies the load bearing
capacity more precisely.
Unladen weight
The weight of a vehicle with standard
equipment including the maximum capacity
of fuel, oil and coolant. It also includes the air-
conditioning system and optional equipment
if these are installed on the vehicle, but does
not include passengers or luggage.
Maximum tire load
The maximum tire load in kilograms or
pounds is the maximum weight for which a
tire is approved.
Maximum permissible tire pressure
Maximum permissible tire pressure for one
tire.
Maximum load on one tire
Maximum load on one tire. This is calculated
by dividing the maximum axle load of one axle
by two.
Definitions for tires and loading325Tires and wheelsBA 207 USA, CA Edition B 2011; 1; 3, en-USd2sboikeVersion: 3.0.3.62010-05-20T10:38:09+02:00 - Seite 325Z