rear view mirror MERCEDES-BENZ E-Class COUPE 2011 C207 Owner's Manual
[x] Cancel search | Manufacturer: MERCEDES-BENZ, Model Year: 2011, Model line: E-Class COUPE, Model: MERCEDES-BENZ E-Class COUPE 2011 C207Pages: 344, PDF Size: 14.06 MB
Page 13 of 344
Memory card (on-board computer) . 205
Memory function ............................... 116
Menu (on-board computer) Assistance ..................................... 206
Audio ............................................. 204
DISTRONIC PLUS ........................... 180
DVD ............................................... 205
Navigation ..................................... 203
Overview of menus ........................201
Service ........................................... 208
Settings ......................................... 208
Telephone ...................................... 205
Trip ................................................ 202
Message memory (on-board
computer) .......................................... 213
Messages see Display messages
Mirrors
Sun visor ........................................ 256
see Exterior mirrors or Rear-view mirror
MP3
Operating (on-board computer) .....205
see separate operating instructions
Multicontour seat .............................. 110
Multifunction display ........................ 200
Multifunction steering wheel Operating the on-board computer . 199
Overview .......................................... 28
N
Navigation On-board computer .......................203
see separate operating instructions
Neck level heating
see AIRSCARF
NECK-PRO head restraints
Operation ......................................... 51
Resetting after being triggered ........52
Notes on breaking-in a new
vehicle ................................................ 150
O
Occupant Classification System
(OCS) Faults ............................................... 46
Operation ......................................... 42
System self-test ............................... 45
Occupant safety
Children in the vehicle .....................58
System overview .............................. 34
Octane number (fuel) ........................ 336
Odometer ........................................... 202
Oil see Engine oil
On-board computer
Assistance menu ........................... 206
Audio menu ................................... 204
Convenience submenu ..................211
Display messages ..........................213
Factory settings ............................. 212
Important safety notes ..................198
Instrument cluster submenu ..........208
Lighting submenu .......................... 209
Message memory .......................... 213
Navigation menu ............................ 203
Operating video DVD .....................205
Operation ....................................... 199
Overview of menus ........................201
Service menu ................................. 208
Settings menu ............................... 208
Standard display submenu ............202
Telephone menu ............................ 205
Trip menu ...................................... 202
Vehicle submenu ........................... 210
Operating system
see On-board computer
Outside temperature
Display ........................................... 199
Overhead control panel
Overview .......................................... 31
Override feature
Rear side windows ...........................63
P
Paint code number ............................ 333
Paintwork (cleaning instructions) ... 279
Panic alarm .......................................... 63
Index11BA 207 USA, CA Edition B 2011; 1; 3, en-USd2sboikeVersion: 3.0.3.62010-05-20T10:38:09+02:00 - Seite 11
Page 14 of 344
Panorama roof with power tilt/
sliding panel Opening/closing ............................ 102
Resetting ....................................... 103
Parking ............................................... 165
Parking aid Parking Guidance ........................... 189
PARKTRONIC ................................. 186
Rear view camera .......................... 192
Parking brake .................................... 166
Parking Guidance .............................. 189
Display message ............................ 230
Parking lamp (display message) ...... 224
Parking lock Releasing manually (automatic
transmission) ................................. 162
Parking position
Exterior mirror on the front-
passenger side ............................... 115
PARKTRONIC
Activating/deactivating .................187
Function/notes ............................. 186
Malfunction .................................... 189
Problem ......................................... 189
Range of the sensors .....................186
Warning display ............................. 187
PASSENGER AIRBAG OFF indicator
lamp (only Canada) ............................. 47
PASSENGER AIRBAG OFF indicator
lamp (only USA) ................................... 42
Pedals ................................................. 167
Permanent display (on-board
computer) .......................................... 209
Plastic trim (cleaning instructions) . 283
Power washers .................................. 278
Power windows see Side windows
Pre-emptive occupant safety
system
see PRE-SAFE ®
system
PRE-SAFE ®
Brake (vehicles with
DISTRONIC PLUS) Activating/deactivating (on-
board computer) ............................ 207
Function/notes ................................ 68PRE-SAFE ®
Brake (vehicles with
DISTRONIC PLUS) Display message ............................ 215
Warning lamp ................................. 247
PRE-SAFE ®
system
Display message ............................ 214
Operation ......................................... 51
Product information ............................ 18
Program selector button .................. 158
Pulling away Automatic transmission .................153
R
Radar sensor system Display message ............................ 230
Radar sensor system (on-board
computer) .......................................... 211
Radio Changing stations (on-board
computer) ...................................... 204
see separate operating instructions
Range (on-board computer) ............. 202
Rear compartment Setting the air vents ......................146
Setting the temperature ................141
Rear fog lamp (display message) ..... 224
Rear seat backrest Display message ............................ 237
Folding forwards/back ..................252
Rear seat backrest (display
message) ............................................ 237
Rear view camera Function/notes ............................. 192
Rear view camera (cleaning
instructions) ...................................... 282
Rear-view mirror Anti-glare (manual) ........................114
Dipping (automatic) .......................115
Rear window blind ............................ 256
Rear window heating Malfunction .................................... 144
Switching on/off ........................... 144
Refueling ............................................ 162
Remote control Programming (garage door
opener) .......................................... 265
12IndexBA 207 USA, CA Edition B 2011; 1; 3, en-USd2sboikeVersion: 3.0.3.62010-05-20T10:38:09+02:00 - Seite 12
Page 26 of 344
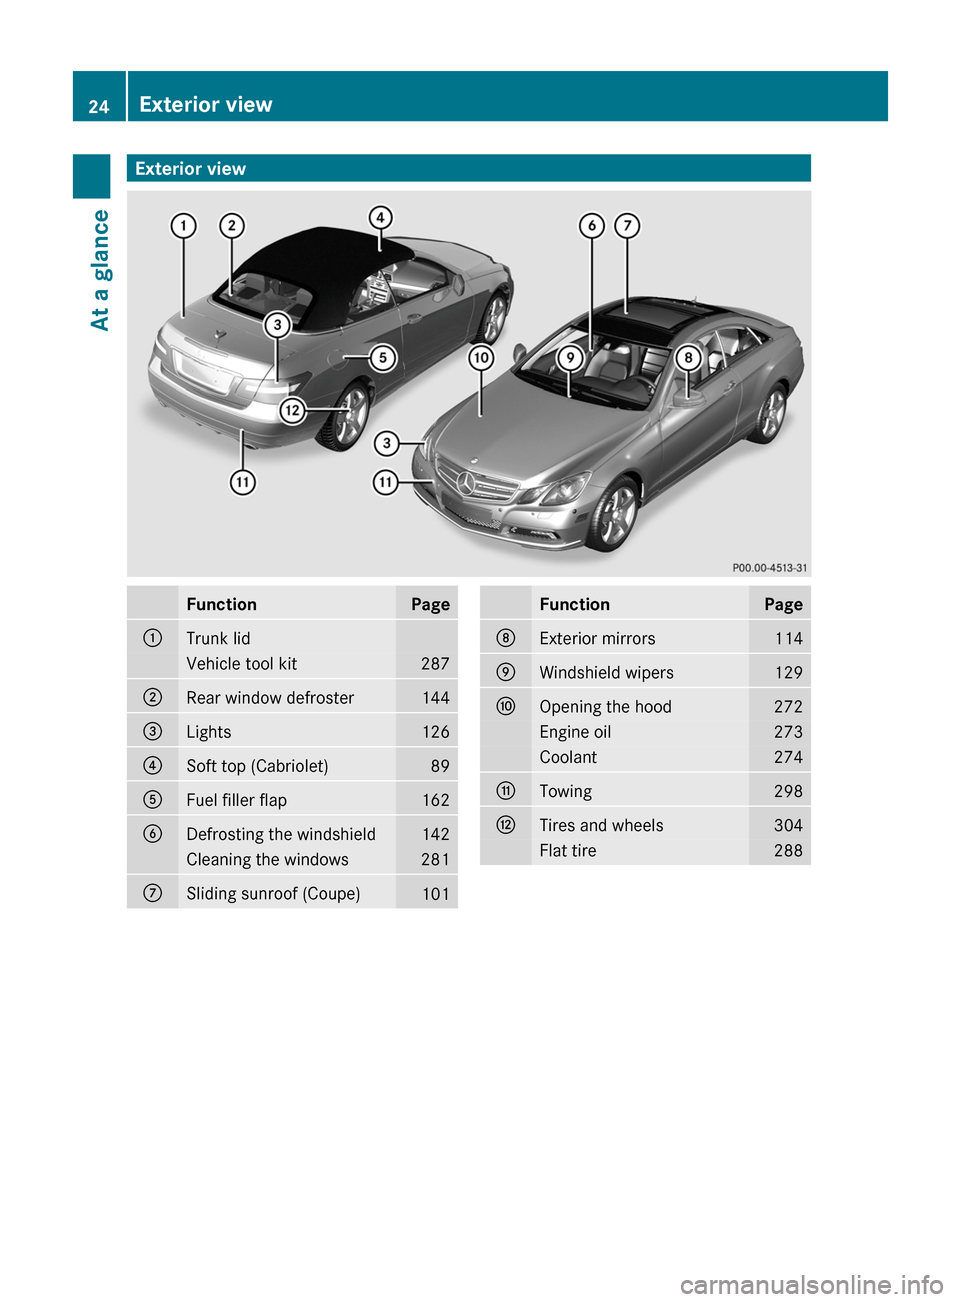
Exterior viewFunctionPage:Trunk lidVehicle tool kit287;Rear window defroster144=Lights126?Soft top (Cabriolet)89AFuel filler flap162BDefrosting the windshield142Cleaning the windows281CSliding sunroof (Coupe)101FunctionPageDExterior mirrors114EWindshield wipers129FOpening the hood272Engine oil273Coolant274GTowing298HTires and wheels304Flat tire28824Exterior viewAt a glance
BA 207 USA, CA Edition B 2011; 1; 3, en-USd2sboikeVersion: 3.0.3.62010-05-20T10:38:09+02:00 - Seite 24
Page 33 of 344
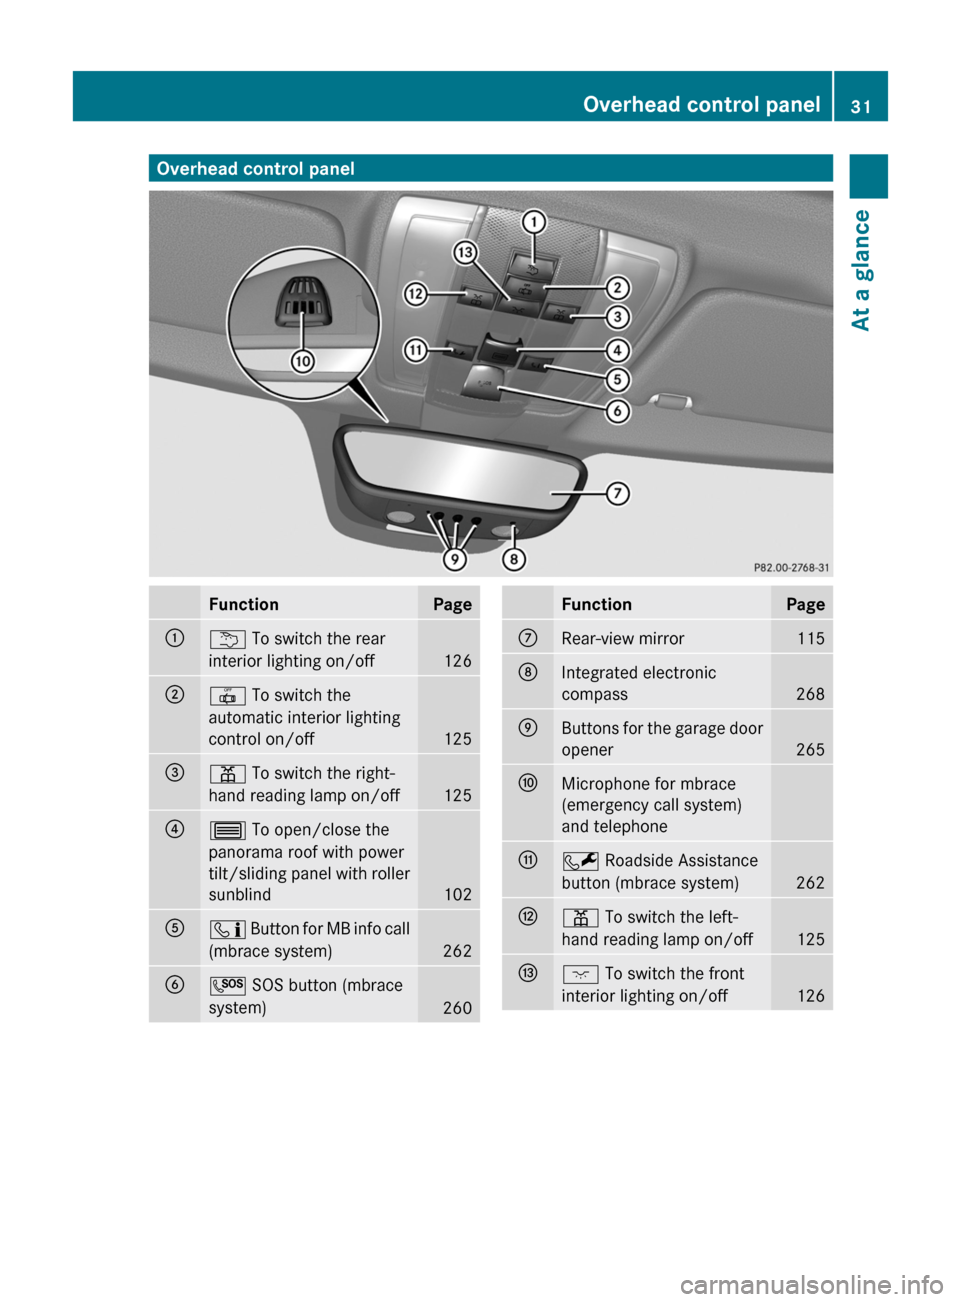
Overhead control panelFunctionPage:u To switch the rear
interior lighting on/off
126
;| To switch the
automatic interior lighting
control on/off
125
=p To switch the right-
hand reading lamp on/off
125
?3 To open/close the
panorama roof with power
tilt/sliding panel with roller
sunblind
102
Aï Button for MB info call
(mbrace system)
262
BG SOS button (mbrace
system)
260
FunctionPageCRear-view mirror115DIntegrated electronic
compass
268
EButtons for the garage door
opener
265
FMicrophone for mbrace
(emergency call system)
and telephoneGF Roadside Assistance
button (mbrace system)
262
Hp To switch the left-
hand reading lamp on/off
125
Ic To switch the front
interior lighting on/off
126
Overhead control panel31At a glanceBA 207 USA, CA Edition B 2011; 1; 3, en-USd2sboikeVersion: 3.0.3.62010-05-20T10:38:09+02:00 - Seite 31
Page 108 of 344
Vehicle equipment
i This manual describes all the standard
and optional equipment of your vehicle
which was available at the time of
purchase. Country-specific differences are
possible. Bear in mind that your vehicle
may not feature all functions described
here. This also refers to safety-related
systems and functions.
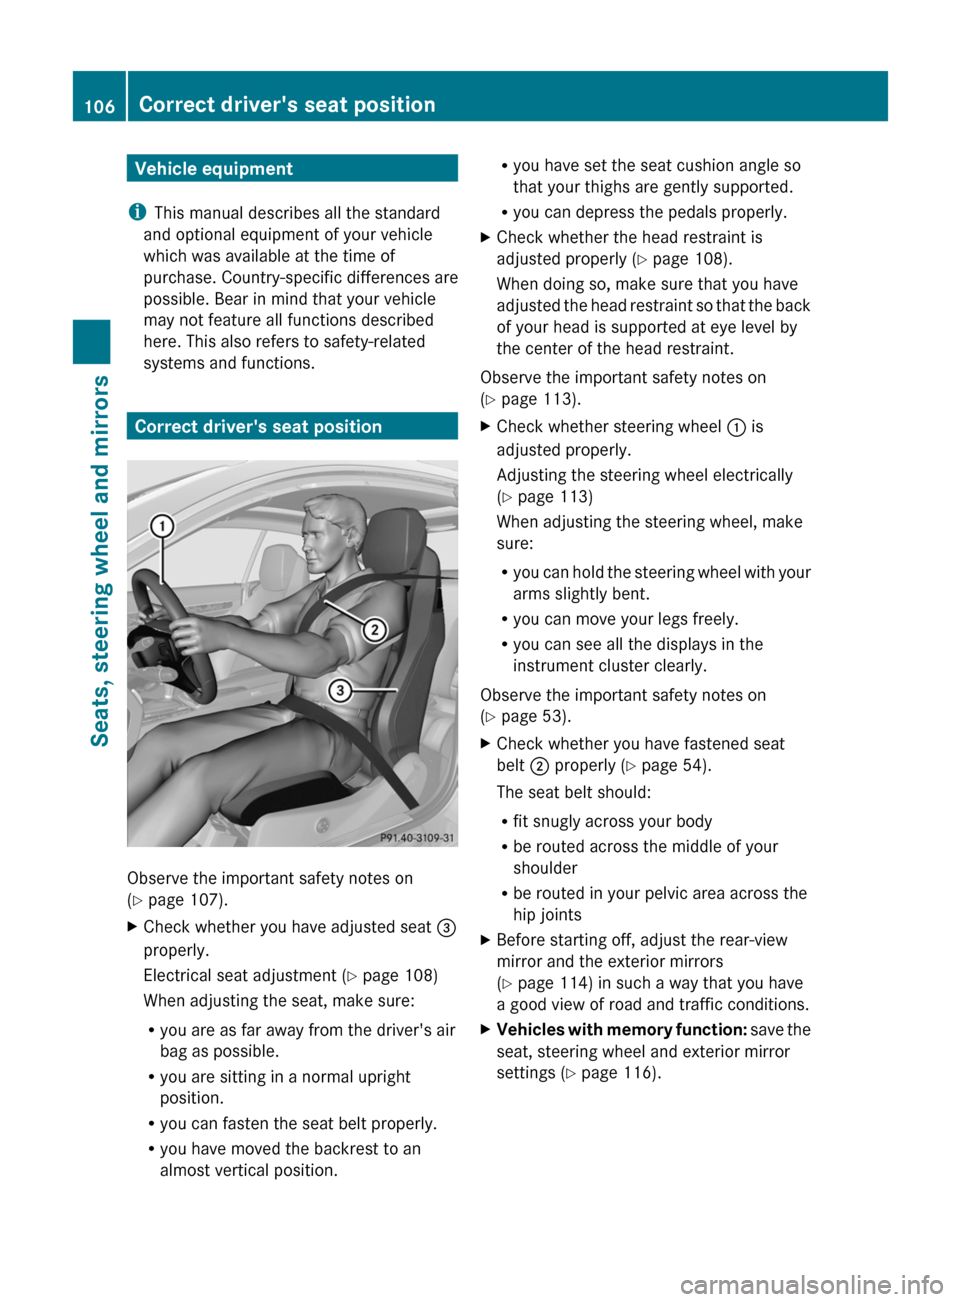
Correct driver's seat position
Observe the important safety notes on
( Y page 107).
XCheck whether you have adjusted seat =
properly.
Electrical seat adjustment ( Y page 108)
When adjusting the seat, make sure:
R you are as far away from the driver's air
bag as possible.
R you are sitting in a normal upright
position.
R you can fasten the seat belt properly.
R you have moved the backrest to an
almost vertical position.R you have set the seat cushion angle so
that your thighs are gently supported.
R you can depress the pedals properly.XCheck whether the head restraint is
adjusted properly ( Y page 108).
When doing so, make sure that you have
adjusted the head restraint so that the back
of your head is supported at eye level by
the center of the head restraint.
Observe the important safety notes on
( Y page 113).
XCheck whether steering wheel : is
adjusted properly.
Adjusting the steering wheel electrically
( Y page 113)
When adjusting the steering wheel, make
sure:
R you can hold the steering wheel with your
arms slightly bent.
R you can move your legs freely.
R you can see all the displays in the
instrument cluster clearly.
Observe the important safety notes on
( Y page 53).
XCheck whether you have fastened seat
belt ; properly ( Y page 54).
The seat belt should:
R fit snugly across your body
R be routed across the middle of your
shoulder
R be routed in your pelvic area across the
hip jointsXBefore starting off, adjust the rear-view
mirror and the exterior mirrors
( Y page 114) in such a way that you have
a good view of road and traffic conditions.XVehicles with memory function: save the
seat, steering wheel and exterior mirror
settings ( Y page 116).106Correct driver's seat positionSeats, steering wheel and mirrors
BA 207 USA, CA Edition B 2011; 1; 3, en-USd2sboikeVersion: 3.0.3.62010-05-20T10:38:09+02:00 - Seite 106
Page 109 of 344
Seats
Important safety notes
GWarning
In order to avoid possible loss of vehicle
control, all seat, head restraint, steering
wheel and rear view mirror adjustments, as
well as fastening of seat belts, must be done
before setting the vehicle in motion.
GWarning
Do not adjust the driver's seat while driving.
Adjusting the seat while driving could cause
the driver to lose control of the vehicle.
Never travel in a moving vehicle with the seat
backrest in an excessively reclined position as
this can be dangerous. You could slide under
the seat belt in a collision. If you slide under
it, the seat belt would apply force at the
abdomen or neck. This could cause serious or
fatal injuries. The seat backrest and seat belts
provide the best restraint when the wearer is
in a position that is as upright as possible and
seat belts are properly positioned on the
body.
GWarning
Your seat belt must be adjusted so that you
can correctly fasten your seat belt.
Observe the following points:
R adjust the seat backrest until your arms are
slightly angled when holding the steering
wheel.
R adjust the seat to a comfortable seating
position that still allows you to reach the
accelerator/brake pedal safely. The
position should be as far back as possible
with the driver still able to operate the
controls properly.
R adjust the head restraint so that it is as
close to the head as possible and the center
of the head restraint supports the back of
the head at eye level.
R never place hands under the seat or near
any moving parts while a seat is being
adjusted.
Failure to do so could result in an accident
and/or serious personal injury.GWarning
The electrically adjustable seats can be
operated at any time. Therefore, do not leave
children unattended in the vehicle, or with
access to an unlocked vehicle. A child's
unsupervised access to a vehicle could result
in an accident and/or serious personal injury.
GWarning!
According to accident statistics, children are
safer when properly restrained in the rear
seating positions than in the front seating
position. Thus, we strongly recommend that
children be placed in the rear seats whenever
possible. Regardless of seating position,
children 12 years old and under must be
seated and properly secured in an
appropriately sized infant restraint, toddler
restraint, or booster seat recommended for
the size and weight of the child. For additional
information, see "Children in the vehicle".
A child's risk of serious or fatal injuries is
significantly increased if the child restraints
are not properly secured in the vehicle and/
or the child is not properly secured in the child
restraint.
GWarning
For your protection, drive only with properly
positioned head restraints.
Adjust the head restraint so that it is as close
to the head as possible and the center of the
head restraint supports the back of the head
at eye level. This will reduce the potential for
injury to the head and neck in the event of an
accident or similar situation.
Seats107Seats, steering wheel and mirrorsBA 207 USA, CA Edition B 2011; 1; 3, en-USd2sboikeVersion: 3.0.3.62010-05-20T10:38:09+02:00 - Seite 107Z
Page 116 of 344
iThe steering wheel only moves upwards if
it has not already reached the upper end
stop.
The steering wheel is moved to the last
selected position when:
Rthe driver's door is closed, and
Ryou insert the key into the ignition lock.
or
Rin vehicles with KEYLESS-GO, you press the
Start/Stop button once.
When you close the driver's door with the
ignition switched on, the steering wheel is
also automatically moved to the previously
set position.
The last position of the steering wheel is
stored after each manual setting or when you
store the setting with the memory function
(Y page 116).
You can activate and deactivate the EASY-
ENTRY/EXIT feature in the on-board
computer (Y page 211).
GWarning
Let the system complete the adjustment
procedure before setting the vehicle in
motion. All steering wheel adjustment must
be completed before setting the vehicle in
motion. Driving off with the steering wheel
still adjusting could cause the driver to lose
control of the vehicle.
iIf the crash-responsive EASY-EXIT feature
is triggered in an accident, the steering
column will move upwards when the
driver's door is opened. This occurs
irrespective of the position of the key in the
ignition lock. This makes it easier to exit the
vehicle and rescue the occupants.
The crash-responsive EASY-EXIT feature is
only operational after an accident if the
EASY-EXIT/ENTRY feature is activated in
the on-board computer.
Mirrors
Rear-view mirror
Rear-view mirror (manual anti-glare)
XAnti-glare mode: flick anti-glare
switch : forwards or back.
Exterior mirrors
Adjusting the exterior mirrors
GWarning
Exercise care when using the passenger-side
exterior rear view mirror. The mirror surface
is convex (outwardly curved surface for a
wider field of view). Objects in mirror are
closer than they appear. Check your interior
rear view mirror and glance over your
shoulder before changing lanes.
The exterior mirrors are automatically heated
if the rear window heating is switched on and
the outside temperature is low.
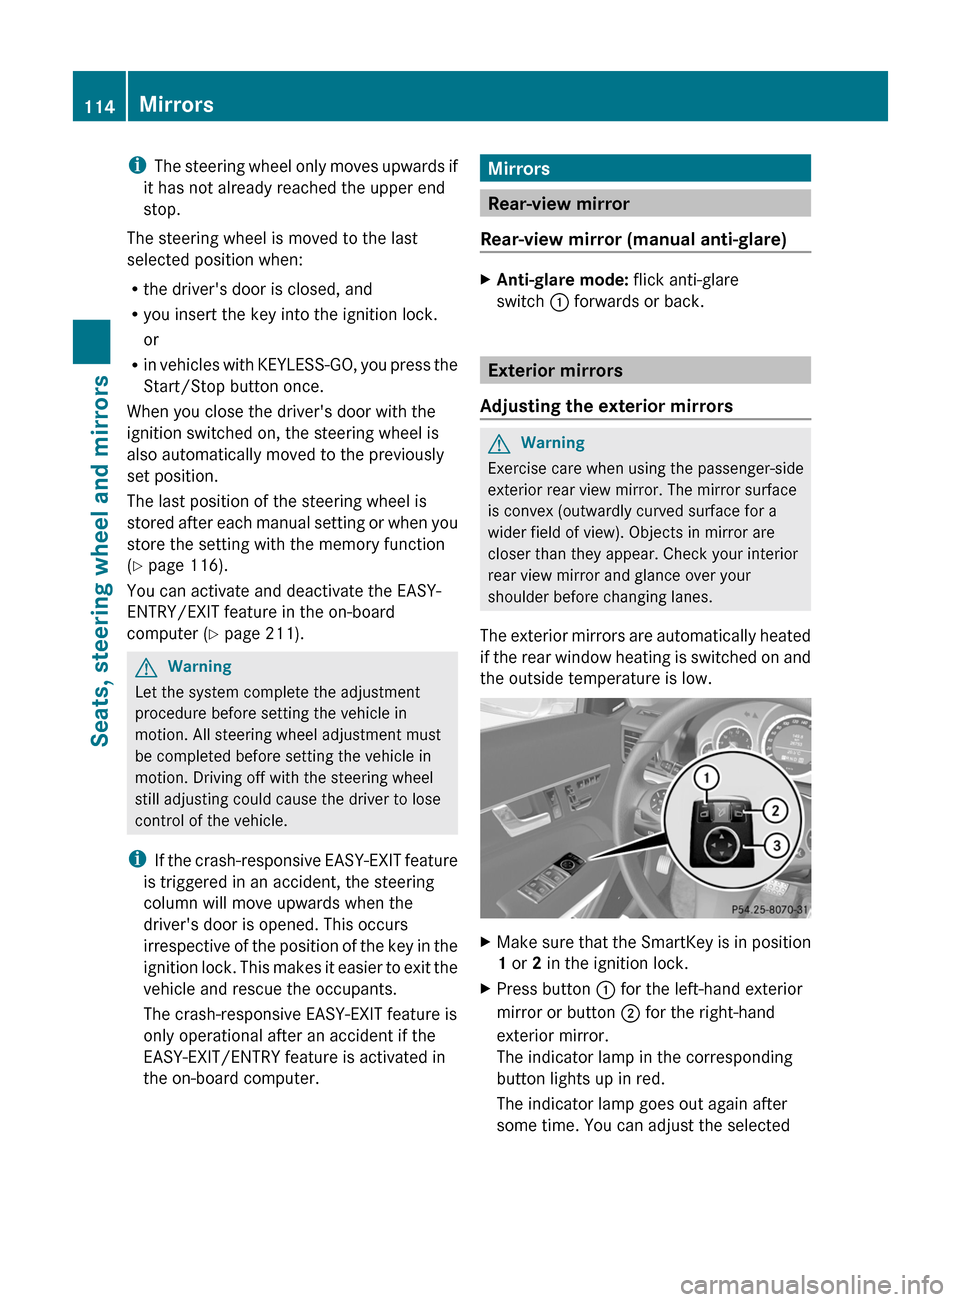
XMake sure that the SmartKey is in position
1 or 2 in the ignition lock.
XPress button : for the left-hand exterior
mirror or button ; for the right-hand
exterior mirror.
The indicator lamp in the corresponding
button lights up in red.
The indicator lamp goes out again after
some time. You can adjust the selected
114MirrorsSeats, steering wheel and mirrors
BA 207 USA, CA Edition B 2011; 1; 3, en-USd2sboikeVersion: 3.0.3.62010-05-20T10:38:09+02:00 - Seite 114
Page 117 of 344
mirror using adjustment button = as long
as the indicator lamp is lit.
XPress adjustment button = up, down, to
the right or to the left until the exterior
mirror is set to a position which provides
you with a good overview of traffic
conditions.
Exterior mirror out of position
If an exterior mirror has been pushed out of
position, proceed as follows:
XMove the exterior mirror into the correct
position manually.
Automatic anti-glare mirrors
GWarning!
The auto dimming function does not react if
incoming light is not aimed directly at sensors
in the interior rear view mirror.
The interior rear view mirror and the exterior
rear view mirror on the driver's side do not
react, for example, if the rear window
sunshade is in raised position.
Light hitting the mirror(s) at certain angles
(incident light) could blind you. As a result,
you may not be able to observe traffic
conditions and could cause an accident.
The rear-view mirror and the exterior mirror
on the driver's side automatically go into anti-
glare mode if the ignition is switched on and
incident light from headlamps strikes the
sensor in the rear-view mirror.
The mirrors do not go into anti-glare mode if
reverse gear is engaged or the interior lighting
is switched on.
Parking position for the exterior
mirror on the front-passenger side
Setting and storing the parking position
You can position the front-passenger side
exterior mirror in such a way that you can see
the rear wheel on that side as soon as you
engage reverse gear. You can store this
position.
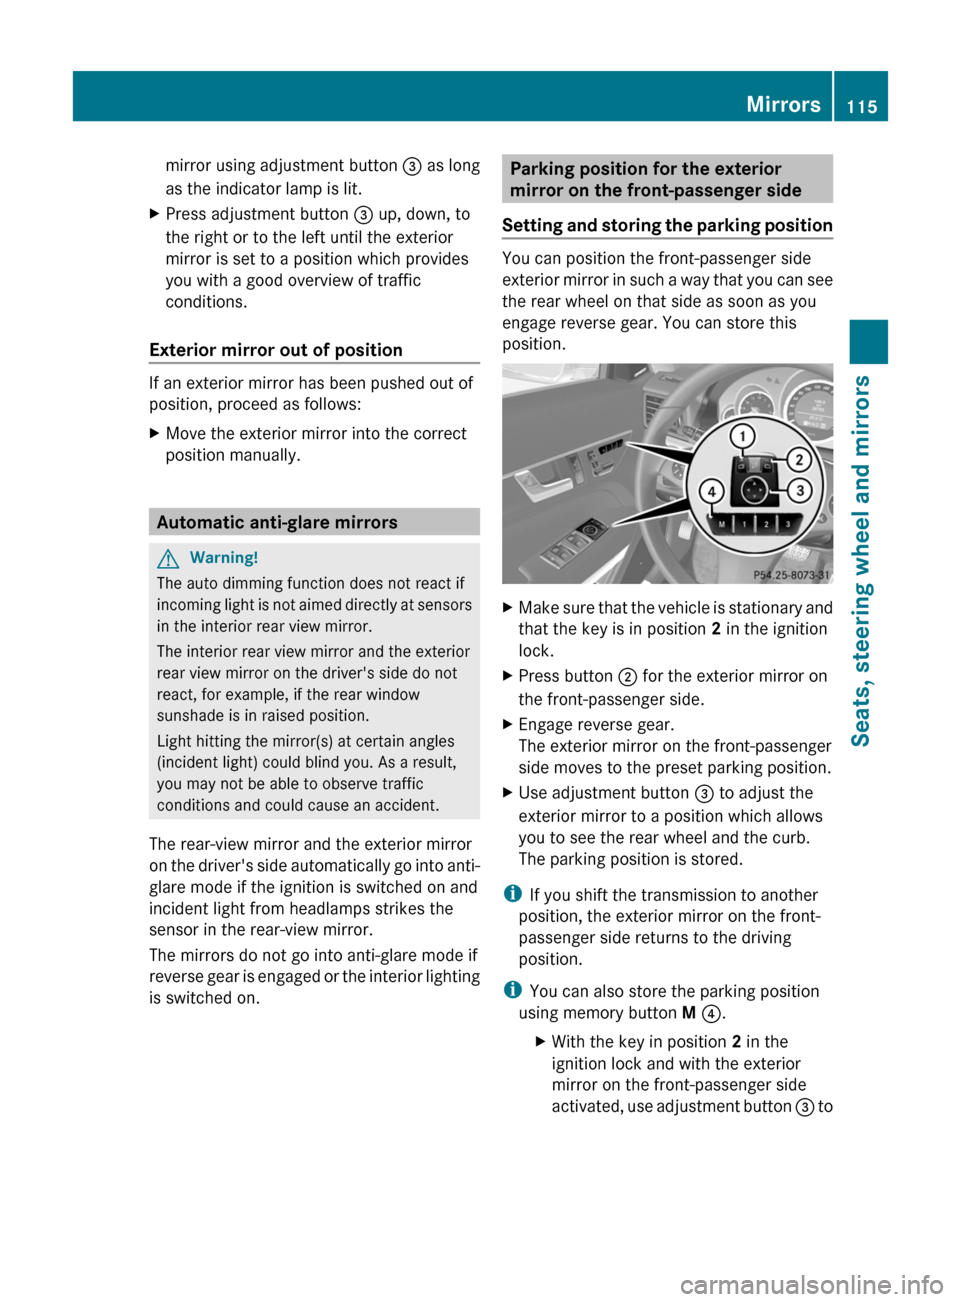
XMake sure that the vehicle is stationary and
that the key is in position 2 in the ignition
lock.
XPress button ; for the exterior mirror on
the front-passenger side.
XEngage reverse gear.
The exterior mirror on the front-passenger
side moves to the preset parking position.
XUse adjustment button = to adjust the
exterior mirror to a position which allows
you to see the rear wheel and the curb.
The parking position is stored.
iIf you shift the transmission to another
position, the exterior mirror on the front-
passenger side returns to the driving
position.
iYou can also store the parking position
using memory button M ?.
XWith the key in position 2 in the
ignition lock and with the exterior
mirror on the front-passenger side
activated, use adjustment button = to
Mirrors115Seats, steering wheel and mirrorsBA 207 USA, CA Edition B 2011; 1; 3, en-USd2sboikeVersion: 3.0.3.62010-05-20T10:38:09+02:00 - Seite 115Z
Page 194 of 344
XTo reverse into the parking space:
maintain the steering wheel angle and
reverse carefully.
XStop as soon as you hear an acoustic
signal, at the latest when PARKTRONIC
sounds the continuous warning tone.
The Parking Guidance Finished
message appears in the multifunction
display and a tone sounds. You may be
asked to steer in a different direction and
then change gear. In this case, further
displays in the multifunction display will
direct you to the final position.
XManeuver if necessary.XAlways observe the warning messages
displayed by PARKTRONIC (Y page 187).
Canceling Parking Guidance
XPress the PARKTRONIC button on the
center console (Y page 187).
Parking Guidance is canceled immediately
and PARKTRONIC is deactivated.
Parking Guidance is canceled automatically if
it is no longer possible to guide you into the
parking space or if a malfunction occurs.
The parking space symbol disappears and the
Parking Guidance canceled message
appears in the multifunction display.
Rear view camera
Important safety notes
The rear view camera is an optical parking aid.
It shows the area behind your vehicle in the
COMAND display.
GWarning!
Make sure no persons or animals are in or
near the area in which you are parking/
maneuvering. Otherwise, they could be
injured.
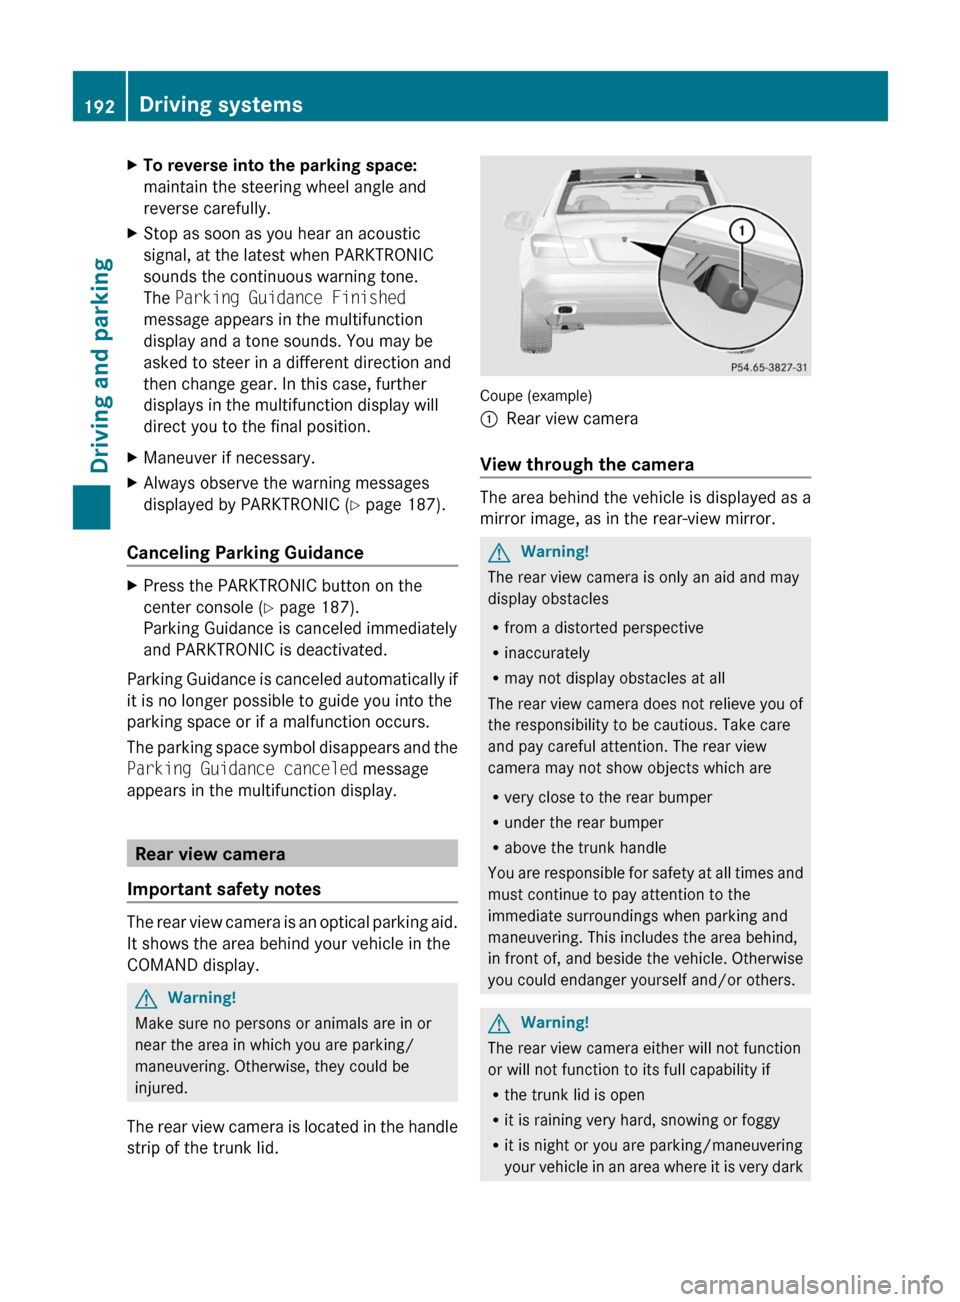
The rear view camera is located in the handle
strip of the trunk lid.
Coupe (example)
:Rear view camera
View through the camera
The area behind the vehicle is displayed as a
mirror image, as in the rear-view mirror.
GWarning!
The rear view camera is only an aid and may
display obstacles
Rfrom a distorted perspective
Rinaccurately
Rmay not display obstacles at all
The rear view camera does not relieve you of
the responsibility to be cautious. Take care
and pay careful attention. The rear view
camera may not show objects which are
Rvery close to the rear bumper
Runder the rear bumper
Rabove the trunk handle
You are responsible for safety at all times and
must continue to pay attention to the
immediate surroundings when parking and
maneuvering. This includes the area behind,
in front of, and beside the vehicle. Otherwise
you could endanger yourself and/or others.
GWarning!
The rear view camera either will not function
or will not function to its full capability if
Rthe trunk lid is open
Rit is raining very hard, snowing or foggy
Rit is night or you are parking/maneuvering
your vehicle in an area where it is very dark
192Driving systemsDriving and parking
BA 207 USA, CA Edition B 2011; 1; 3, en-USd2sboikeVersion: 3.0.3.62010-05-20T10:38:09+02:00 - Seite 192
Page 268 of 344
of the garage door. People could otherwise be
injured by the movement of the door.
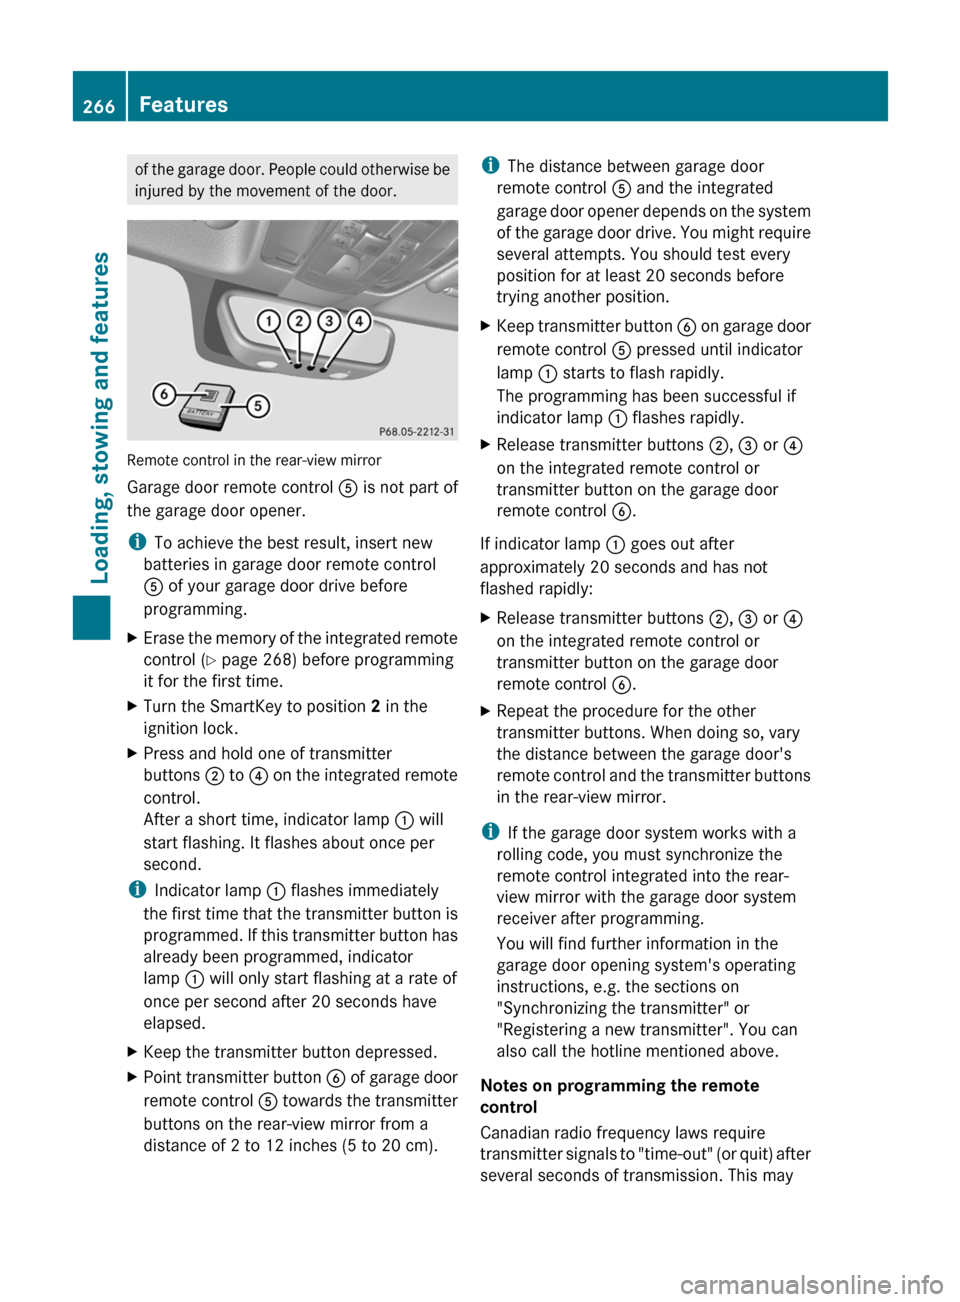
Remote control in the rear-view mirror
Garage door remote control A is not part of
the garage door opener.
i To achieve the best result, insert new
batteries in garage door remote control
A of your garage door drive before
programming.
XErase the memory of the integrated remote
control ( Y page 268) before programming
it for the first time.XTurn the SmartKey to position 2 in the
ignition lock.XPress and hold one of transmitter
buttons ; to ? on the integrated remote
control.
After a short time, indicator lamp : will
start flashing. It flashes about once per
second.
i Indicator lamp : flashes immediately
the first time that the transmitter button is
programmed. If this transmitter button has
already been programmed, indicator
lamp : will only start flashing at a rate of
once per second after 20 seconds have
elapsed.
XKeep the transmitter button depressed.XPoint transmitter button B of garage door
remote control A towards the transmitter
buttons on the rear-view mirror from a
distance of 2 to 12 inches (5 to 20 cm).i The distance between garage door
remote control A and the integrated
garage door opener depends on the system
of the garage door drive. You might require
several attempts. You should test every
position for at least 20 seconds before
trying another position.XKeep transmitter button B on garage door
remote control A pressed until indicator
lamp : starts to flash rapidly.
The programming has been successful if
indicator lamp : flashes rapidly.XRelease transmitter buttons ;, = or ?
on the integrated remote control or
transmitter button on the garage door
remote control B.
If indicator lamp : goes out after
approximately 20 seconds and has not
flashed rapidly:
XRelease transmitter buttons ;, = or ?
on the integrated remote control or
transmitter button on the garage door
remote control B.XRepeat the procedure for the other
transmitter buttons. When doing so, vary
the distance between the garage door's
remote control and the transmitter buttons
in the rear-view mirror.
i If the garage door system works with a
rolling code, you must synchronize the
remote control integrated into the rear-
view mirror with the garage door system
receiver after programming.
You will find further information in the
garage door opening system's operating
instructions, e.g. the sections on
"Synchronizing the transmitter" or
"Registering a new transmitter". You can
also call the hotline mentioned above.
Notes on programming the remote
control
Canadian radio frequency laws require
transmitter signals to "time-out" (or quit) after
several seconds of transmission. This may
266FeaturesLoading, stowing and features
BA 207 USA, CA Edition B 2011; 1; 3, en-USd2sboikeVersion: 3.0.3.62010-05-20T10:38:09+02:00 - Seite 266