MERCEDES-BENZ E-CLASS COUPE 2011 Owners Manual
Manufacturer: MERCEDES-BENZ, Model Year: 2011, Model line: E-CLASS COUPE, Model: MERCEDES-BENZ E-CLASS COUPE 2011Pages: 353, PDF Size: 8.42 MB
Page 231 of 353
aroun
dthe vehicle are displayed in red in
th em ultifunction display.
X Press the abuttontos ave th esetting.
Deactivating delayed switch-off of th eexte-
rior lighting temporarily:
X Before leaving th evehicle ,turn th ekeyto
position 0in th eignition lock.
X Turn th ekeyto position 2in th eignition
loc ka nd back to position 0.
The exterio rlighting delayed switch-off is
deactivated.
Delayed switch-off of the exterior lighting is
reactivated the nex ttim ey ou start the
engine.
Activating/deactivating th einterior light-
ing delayed switch-off
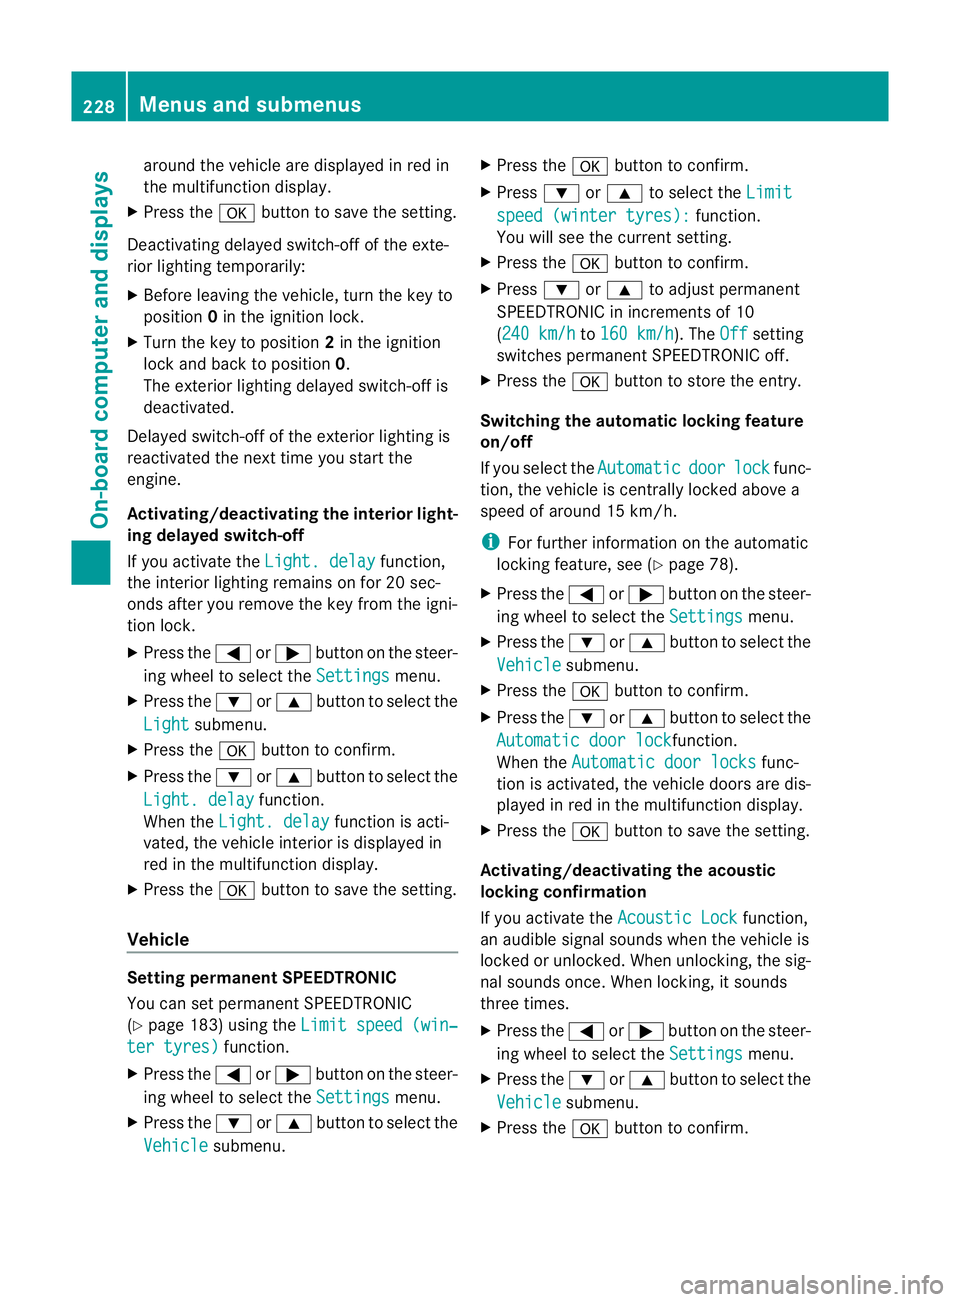
If you activat ethe Light. delay function,
the interior lighting remain sonfor 20 sec-
onds after you remove the key fro mthe igni-
tion lock.
X Press the =or; button on the steer-
ing wheel to selec tthe Settings menu.
X Press the :or9 button to select the
Light submenu.
X Press the abutton to confirm.
X Press the :or9 button to select the
Light. delay function.
When the Light. delay function is acti-
vated, the vehicle interior is displayed in
red in the multifunction display.
X Press the abutton to save the setting.
Vehicle Setting permanent SPEEDTRONIC
You can set permanent SPEEDTRONIC
(Y page 183) using the Limit speed (win‐ter tyres) function.
X Press the =or; button on the steer-
ing wheel to select the Settings menu.
X Press the :or9 button to select the
Vehicle submenu. X
Press the abutton to confirm.
X Press :or9 to select the Limit speed (winter tyres): function.
You will see the current setting.
X Press the abutton to confirm.
X Press :or9 to adjust permanent
SPEEDTRONIC in increments of 10
(240 km/h to
160 km/h ). The
Off setting
switches permanent SPEEDTRONIC off.
X Press the abutton to store the entry.
Switching the automatic locking feature
on/off
If you select the Automatic door lock func-
tion, the vehicle is centrally locked above a
speed of around 15 km/h.
i For further information on the automatic
locking feature, see (Y page 78).
X Press the =or; button on the steer-
ing wheel to select the Settings menu.
X Press the :or9 button to select the
Vehicle submenu.
X Press the abutton to confirm.
X Press the :or9 button to select the
Automatic door lock function.
When the Automatic door locks func-
tion is activated, the vehicle doors are dis-
played in red in the multifunction display.
X Press the abutton to save the setting.
Activating/deactivating the acoustic
locking confirmation
If you activate the Acoustic Lock function,
an audible signal sounds when the vehicle is
locked or unlocked. When unlocking, the sig-
nal sounds once. When locking, it sounds
three times.
X Press the =or; button on the steer-
ing wheel to select the Settings menu.
X Press the :or9 button to select the
Vehicle submenu.
X Press the abutton to confirm. 228
Menus and submenusOn-board computer and displays
Page 232 of 353
X
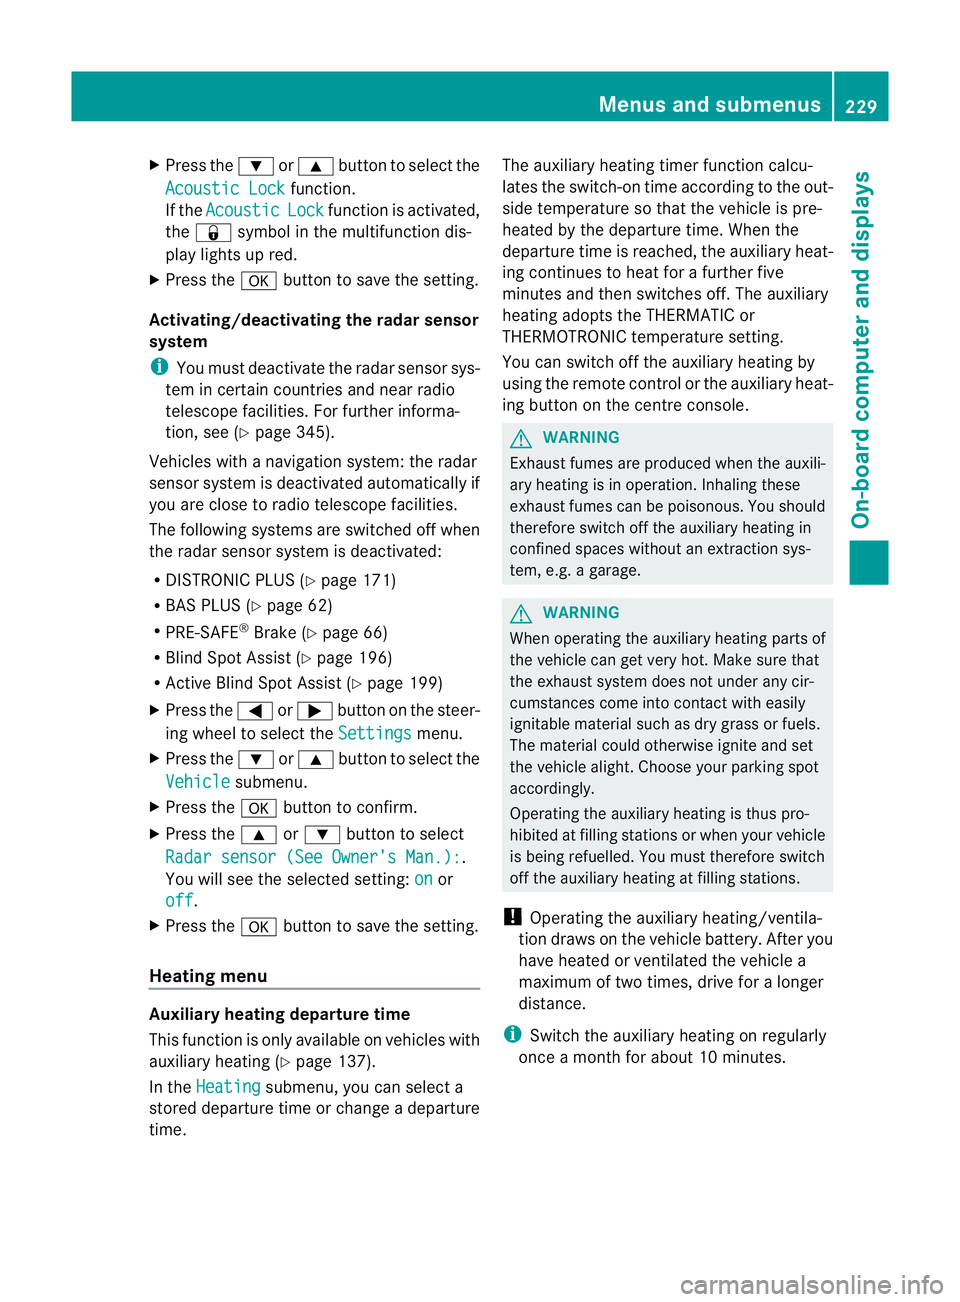
Press the :or9 button to select the
Acoustic Lock function.
If the Acoustic Lock function is activated,
the & symbol in the multifunction dis-
play lights up red.
X Press the abutton to save the setting.
Activating/deactivating the radar sensor
system
i You must deactivate the radar sensor sys-
tem in certain countries and near radio
telescope facilities. For further informa-
tion, see (Y page 345).
Vehicles with anavigation system: the radar
sensor system is deactivated automatically if
you are close to radio telescope facilities.
The following systems are switched off when
the radar sensor system is deactivated:
R DISTRONIC PLUS (Y page 171)
R BAS PLUS (Y page 62)
R PRE-SAFE ®
Brake (Y page 66)
R Blind Spot Assist (Y page 196)
R Active Blind Spot Assist (Y page 199)
X Press the =or; button on the steer-
ing wheel to select the Settings menu.
X Press the :or9 button to select the
Vehicle submenu.
X Press the abutton to confirm.
X Press the 9or: button to select
Radar sensor (See Owner's Man.): .
You will see the selected setting: on or
off .
X Press the abutton to save the setting.
Heating menu Auxiliary heating departuret
ime
This function is only availabl eonvehicles with
auxiliary heating (Y page 137).
In the Heating submenu, you can select a
stored departure time or change adeparture
time. The auxiliary heating timer function calcu-
lates the switch-on time accordin
gtothe out-
side temperature so that the vehicle is pre-
heated by the departure time. When the
departure time is reached, the auxiliary heat-
ing continues to heat for afurther five
minutes and then switches off. The auxiliary
heating adopts the THERMATIC or
THERMOTRONIC temperature setting.
You can switch off the auxiliary heating by
using the remot econtrol or the auxiliary heat-
ing button on the centre console. G
WARNING
Exhaust fumes are produced when the auxili-
ary heating is in operation. Inhaling these
exhaust fumes can be poisonous. You should
therefore switch off the auxiliary heating in
confined spaces without an extraction sys-
tem, e.g. agarage. G
WARNING
When operating the auxiliary heating parts of
the vehicle can get very hot. Make sure that
the exhaust system does not under any cir-
cumstances come into contact with easily
ignitable material such as dry grass or fuels.
The material could otherwise ignite and set
the vehicle alight. Choose your parking spot
accordingly.
Operating the auxiliary heating is thus pro-
hibited at filling station sorwhen your vehicle
is being refuelled. You must therefore switch
off the auxiliary heating at filling stations.
! Operating the auxiliary heating/ventila-
tion draws on the vehicle battery. After you
have heated or ventilated the vehicle a
maximum of two times, drive for alonger
distance.
i Switc hthe auxiliary heating on regularly
once amonthfor about 10 minutes. Menus and submenus
229On-board computer and displays Z
Page 233 of 353
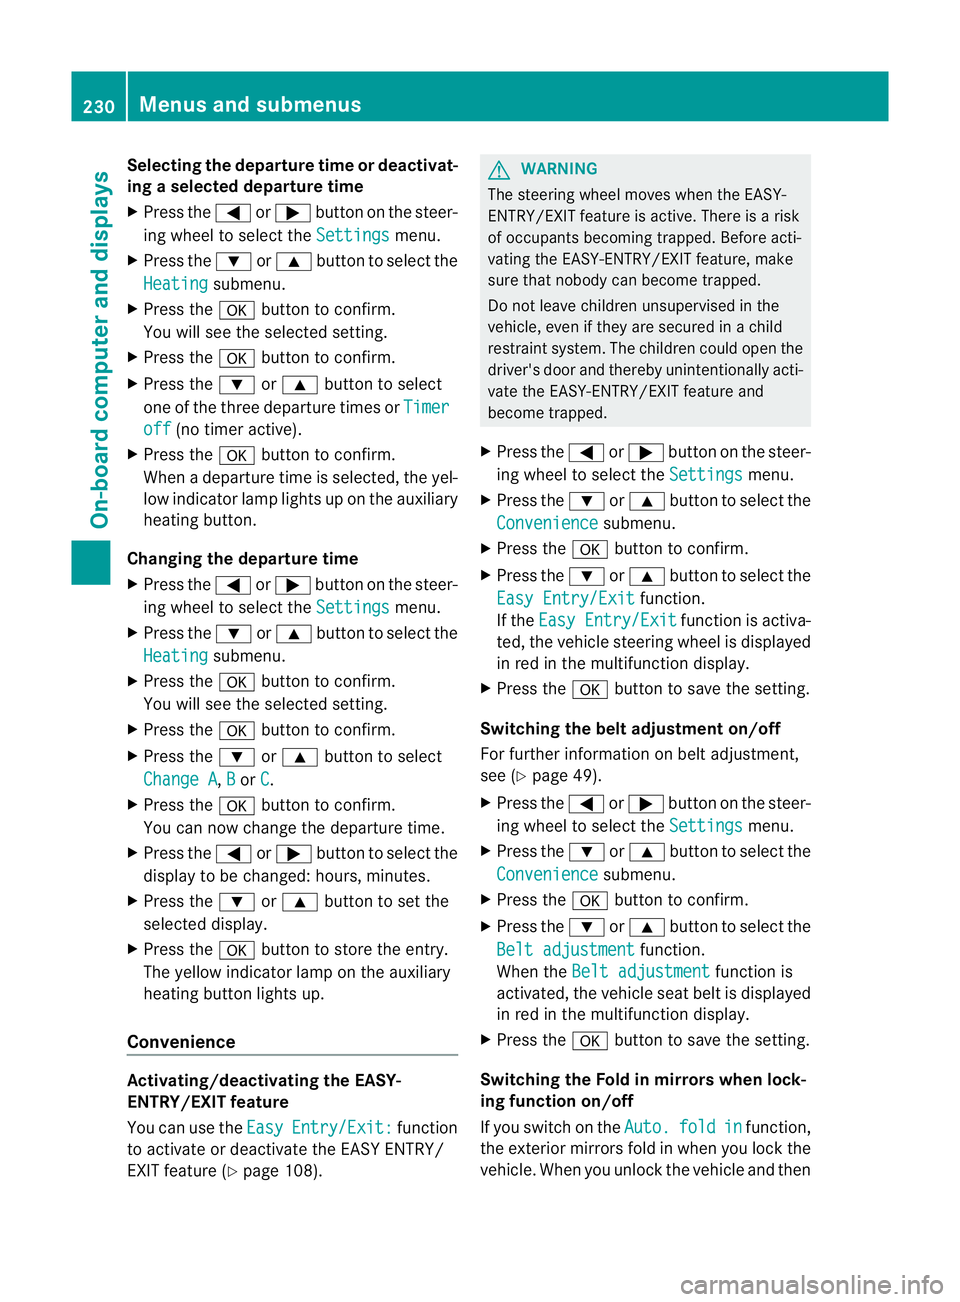
Selecting the departuret
ime or deactivat-
ing aselected departuret ime
X Press the =or; button on the steer-
ing wheel to select the Settings menu.
X Press the :or9 button to select the
Heating submenu.
X Press the abutton to confirm.
You will see the selected setting.
X Press the abutton to confirm.
X Press the :or9 button to select
one of the three departure times or Timeroff (no timer active).
X Press the abutton to confirm.
When adeparture time is selected, the yel-
low indicator lamp lights up on the auxiliary
heating button.
Changing the departuret ime
X Press the =or; button on the steer-
ing wheel to select the Settings menu.
X Press the :or9 button to select the
Heating submenu.
X Press the abutton to confirm.
You will see the selected setting.
X Press the abutton to confirm.
X Press the :or9 button to select
Change A ,
B or
C .
X Press the abutton to confirm.
You can now change the departure time.
X Press the =or; button to select the
display to be changed: hours, minutes.
X Press the :or9 button to set the
selected display.
X Press the abutton to store the entry.
The yellowi ndicator lamp on the auxiliary
heating button lights up.
Convenience Activating/deactivating the EASY-
ENTRY/EXIT feature
You can use the Easy Entry/Exit: function
to activate or deactivate the EASYE NTRY/
EXIT feature (Y page 108). G
WARNING
The steering wheel moves when the EASY-
ENTRY/EXIT feature is active. There is arisk
of occupants becoming trapped. Before acti-
vating the EASY-ENTRY/EXIT feature, make
sure that nobody can become trapped.
Do not leave children unsupervised in the
vehicle, even if they are secured in achild
restraint system. The children could open the
driver's door and thereby unintentionally acti-
vate the EASY-ENTRY/EXIT feature and
become trapped.
X Press the =or; button on the steer-
ing wheel to select the Settings menu.
X Press the :or9 button to select the
Convenience submenu.
X Press the abutton to confirm.
X Press the :or9 button to select the
Easy Entry/Exit function.
If the Easy Entry/Exit function is activa-
ted, the vehicle steering wheel is displayed
in red in the multifunction display.
X Press the abutton to save the setting.
Switching the belt adjustment on/off
For further information on belt adjustment,
see (Y page 49).
X Press the =or; button on the steer-
ing wheel to select the Settings menu.
X Press the :or9 button to select the
Convenience submenu.
X Press the abutton to confirm.
X Press the :or9 button to select the
Belt adjustment function.
When the Belt adjustment function is
activated, the vehicle seat belt is displayed
in red in the multifunction display.
X Press the abutton to save the setting.
Switching the Fold in mirrors when lock-
ing function on/off
If you switch on the Auto. fold in function,
the exterior mirrors fold in when you lock the
vehicle. When you unlock the vehicle and then 230
Menus and submenusOn-board computer and displays
Page 234 of 353
open
adoor, the exterior mirrors fold out
again.
If you have switched the function on and you
fold the exterior mirrors in using the button
on the door (Y page 110), they will not fold
out automatically. The exterior mirrors can
then only be folded out using the button on
the door.
X Press the =or; button on the steer-
ing wheel to select the Settings menu.
X Press the :or9 button to select the
Convenience submenu.
X Press the abutton to confirm.
X Press the :or9 to select the
Auto. fold in function.
If the Auto. fold in function is activated,
the vehicle's exterior mirror is displayed in
red in the multifunction display.
X Press the abutton to save the setting.
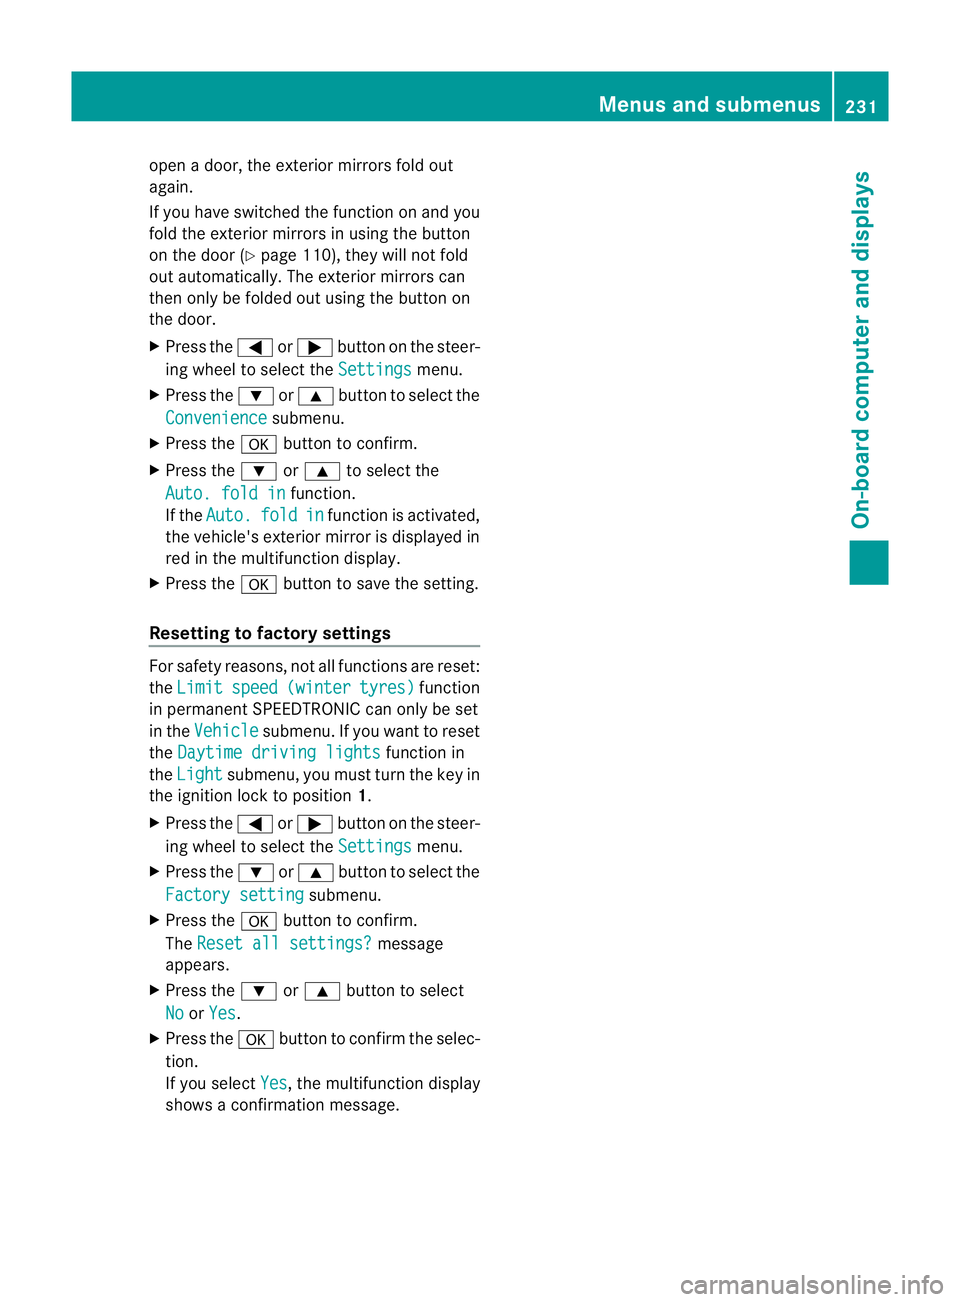
Resetting to factory settings For safety reasons, not all functions are reset:
the Limit speed (winter tyres) function
in permanent SPEEDTRONIC can only be set
in the Vehicle submenu. If you want to reset
the Daytime driving lights function in
the Light submenu, you must turn the key in
the ignition lock to position 1.
X Press the =or; button on the steer-
ing wheel to select the Settings menu.
X Press the :or9 button to select the
Factory setting submenu.
X Press the abutton to confirm.
The Reset all settings? message
appears.
X Press the :or9 button to select
No or
Yes .
X Press the abutton to confirm the selec-
tion.
If you select Yes ,t
he multifunction display
shows aconfirmation message. Menus and submenus
231On-board computer and displays Z
Page 235 of 353
Display messages
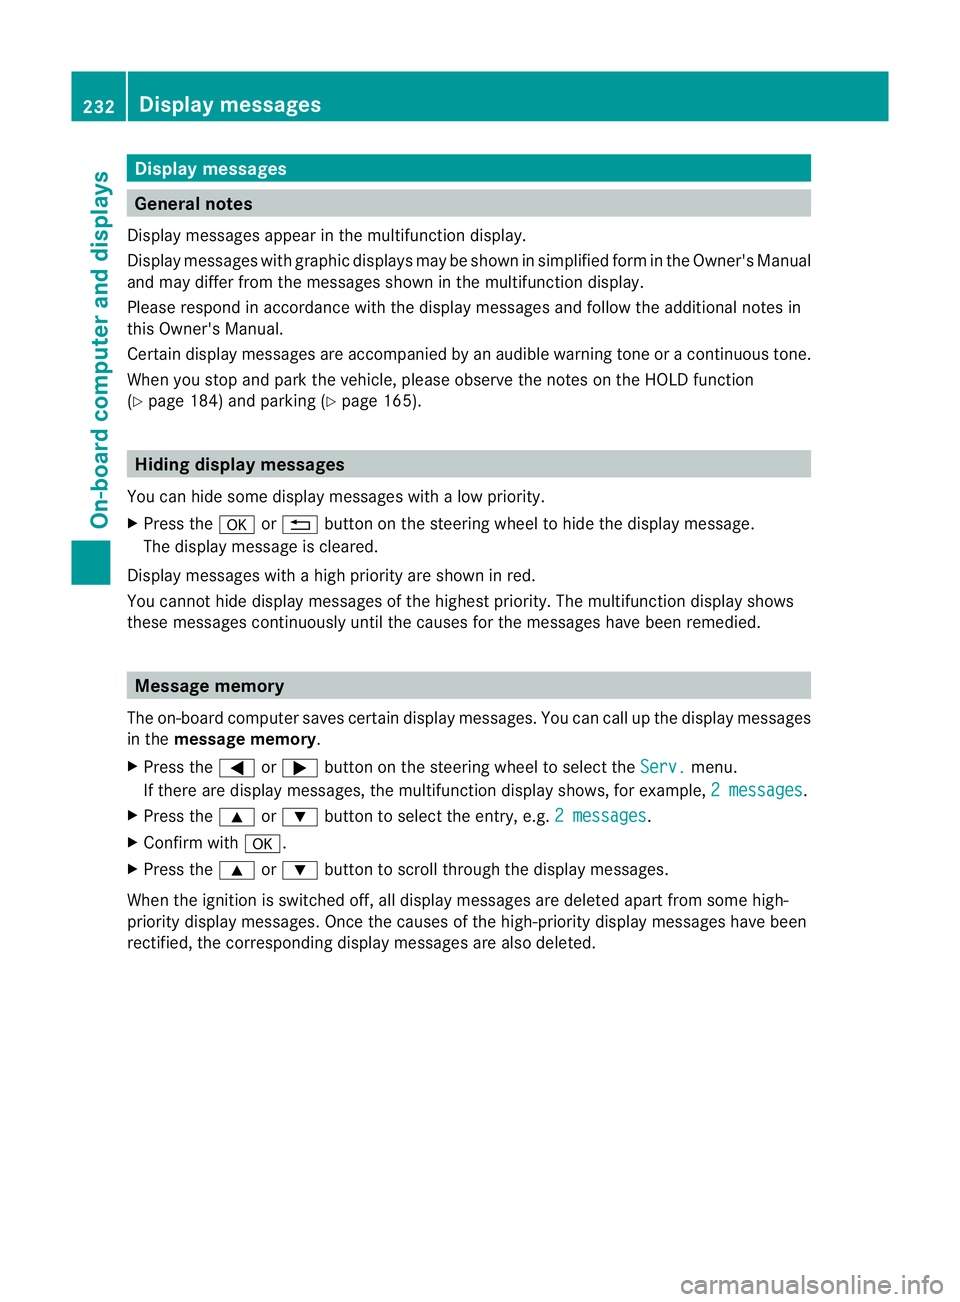
General notes
Display message sappear in th emultifunction display.
Display message swithg raphic displays may be shown in simplified for minthe Owner's Manual
and may differ from the messages shown in the multifunction display.
Please respond in accordance with the displaym essages and follow the additional notes in
this Owner's Manual.
Certain displaym essages are accompanied by an audible warning tone or acontinuous tone.
When you stop and park the vehicle, please observe the notes on the HOLD function
(Y page 184) and parking (Y page 165).Hiding display messages
You can hide some displaym essages withalow priority.
X Press the aor% button on the steering wheel to hide the displaym essage.
The displaym essage is cleared.
Display messages with ahigh priority are shown in red.
You cannot hide displaym essages of the highest priority. The multifunction displays hows
these messages continuously until the causes for the messages have been remedied. Message memory
The on-board computer saves certain displaym essages. You can call up the displaymessages
in the message memory.
X Press the =or; button on the steering wheel to select the Serv. menu.
If there are displaym essages, the multifunction displays hows, for example,2messages .
X Press the 9or: button to select the entry, e.g. 2messages .
X Confirm with a.
X Press the 9or: button to scroll through the displaym essages.
When the ignition is switched off, all displaym essages are deleted apart from some high-
priority displaym essages. Once the causes of the high-priority displaym essages have been
rectified, the corresponding displaym essages are also deleted.232
Display messagesOn-board computer and displays
Page 236 of 353
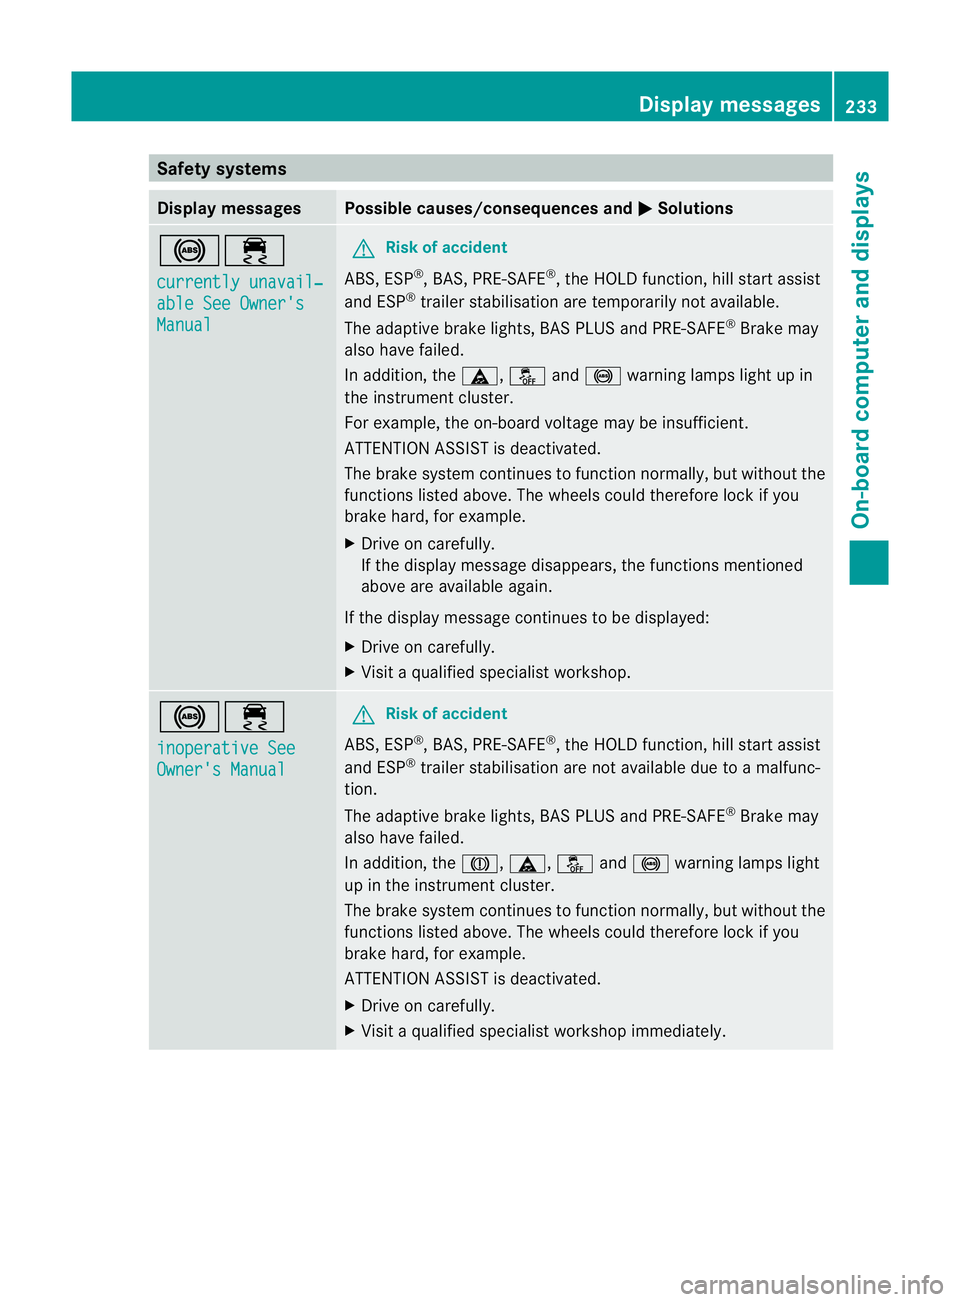
Safety systems
Display messages Possible causes/consequences and
M Solutions
!÷
currently unavail‐
able See Owner's
Manual G
Risk of accident
ABS,E SP®
,B AS ,PRE-SAFE ®
,t he HOLD function, hill start assist
and ESP ®
trailer stabilisation are temporarily not available.
The adaptive brake lights, BAS PLUS and PRE-SAFE ®
Brake may
also have failed.
In addition, the ä,åand! warning lamps light up in
the instrumen tcluster.
For example, the on-board voltage may be insufficient.
ATTENTIONA SSIST is deactivated.
The brake system continues to function normally, but without the
functions listed above. The wheels could therefore lock if you
brake hard, for example.
X Drive on carefully.
If the display message disappears, the functions mentioned
above are available again.
If the display message continues to be displayed:
X Drive on carefully.
X Visit aqualified specialist workshop. !÷
inoperative See
Owner's Manual G
Risk of accident
ABS,E SP®
,B AS ,PRE-SAFE ®
,t he HOLD function, hill start assist
and ESP ®
trailer stabilisation are not available due to amalfunc-
tion.
The adaptive brake lights, BAS PLUS and PRE-SAFE ®
Brake may
also have failed.
In addition, the J,ä,åand! warning lamps light
up in the instrumen tcluster.
The brake system continues to function normally, but without the
functions listed above. The wheels could therefore lock if you
brake hard, for example.
ATTENTION ASSIST is deactivated.
X Drive on carefully.
X Visit aqualified specialist workshop immediately. Display messages
233On-board computer and displays Z
Page 237 of 353
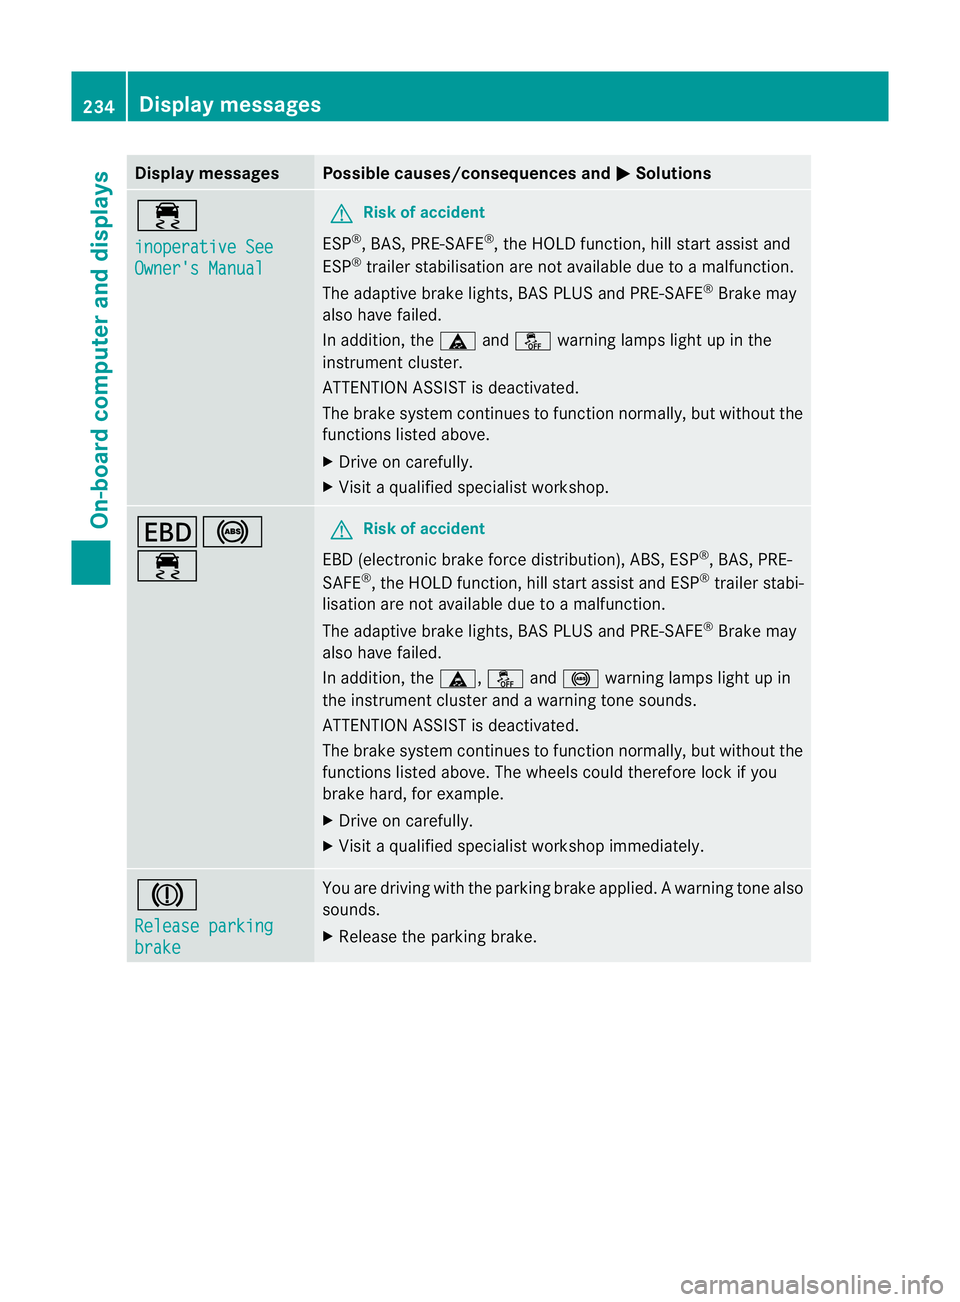
Display messages Possible causes/consequences and
M Solutions
÷
inoperative See
Owner'
sManual G
Risk of accident
ESP ®
,B AS ,PRE-SAFE ®
,t he HOLD function ,hill start assist and
ESP ®
trailer stabilisation are no tavailabled ue toamalfunction.
The adaptive brake lights, BAS PLUS and PRE-SAFE ®
Brake may
alsoh ave failed.
In addition, the äandå warning lamp slight up in the
instrument cluster.
ATTENTION ASSIST is deactivated.
The brake system continues to function normally, but without the
functions listed above.
X Drive on carefully.
X Visi taq ualified specialist workshop. T!
÷ G
Risk of accident
EBD( electronic brake forc edistribution), ABS, ESP ®
,B AS ,PRE-
SAFE ®
,t he HOLD function ,hill start assist and ESP ®
trailer stabi-
lisatio nare not available due to amalfunction.
The adaptive brake lights, BAS PLUS and PRE-SAFE ®
Brake may
alsoh ave failed.
In addition, the ä,åand! warning lamp slight up in
the instrument cluster and awarning tone sounds.
ATTENTION ASSIST is deactivated.
The brake system continues to function normally, but without the
functions listed above. The wheels coul dtherefore lock if you
brake hard ,for example.
X Drive on carefully.
X Visi taq ualified specialist workshop immediately. J
Releas
eparking brake You are drivin
gwith the parkin gbrake applied. Awarning tone also
sounds.
X Release th eparking brake. 234
Display messagesOn-boar
dcomputer and displays
Page 238 of 353
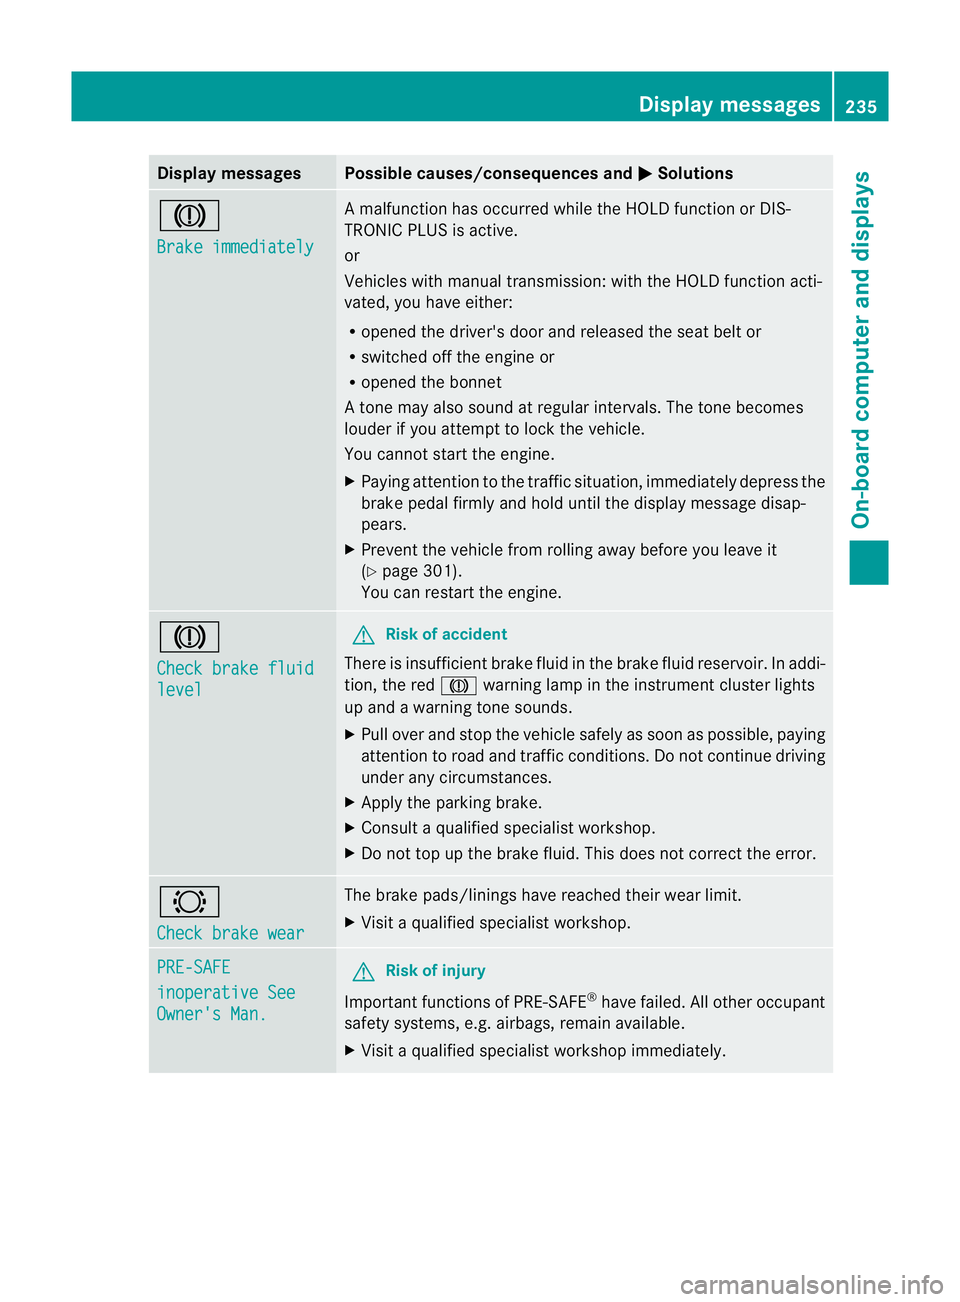
Display messages Possible causes/consequences and
M Solutions
J
Brake immediately Am
alfunction has occurred while th eHOLDf unction or DIS-
TRONIC PLU Sisactive.
or
Vehicles wit hmanual transmission: wit hthe HOLD function acti-
vated, you hav eeither:
R opened th edriver's doo rand released the sea tbelt or
R switched off the engin eor
R opened the bonnet
At one may also sound at regular intervals. The toneb ecomes
louder if you attempt to lock the vehicle.
You cannot start the engine.
X Paying attention to the traffic situation, immediately depress the
brake pedal firmly and hold until the display message disap-
pears.
X Prevent the vehicle from rolling away before you leave it
(Y page 301).
You can restart the engine. J
Check brake fluid
level G
Risk of accident
There is insufficient brake fluid in the brake fluid reservoir. In addi-
tion, the red Jwarning lamp in the instrument cluster lights
up and awarning tone sounds.
X Pullo ver and stop the vehicl esafel yass oon as possible,p aying
attention to road and traffic conditions. Do not continue driving
under any circumstances.
X Apply the parking brake.
X Consult aqualified specialist workshop.
X Do not top up the brake fluid. This does not correct the error. #
Check brake wear The brake pads/linings have reache
dtheir wearl imit.
X Visit aqualified specialist workshop. PRE-SAFE
inoperative See
Owner's Man. G
Risk of injury
Important function sofPRE-SAFE ®
have failed .All other occupant
safet ysystems, e.g. airbags, remain available.
X Visit aqualified specialist workshop immediately. Display messages
235On-board computer and displays Z
Page 239 of 353
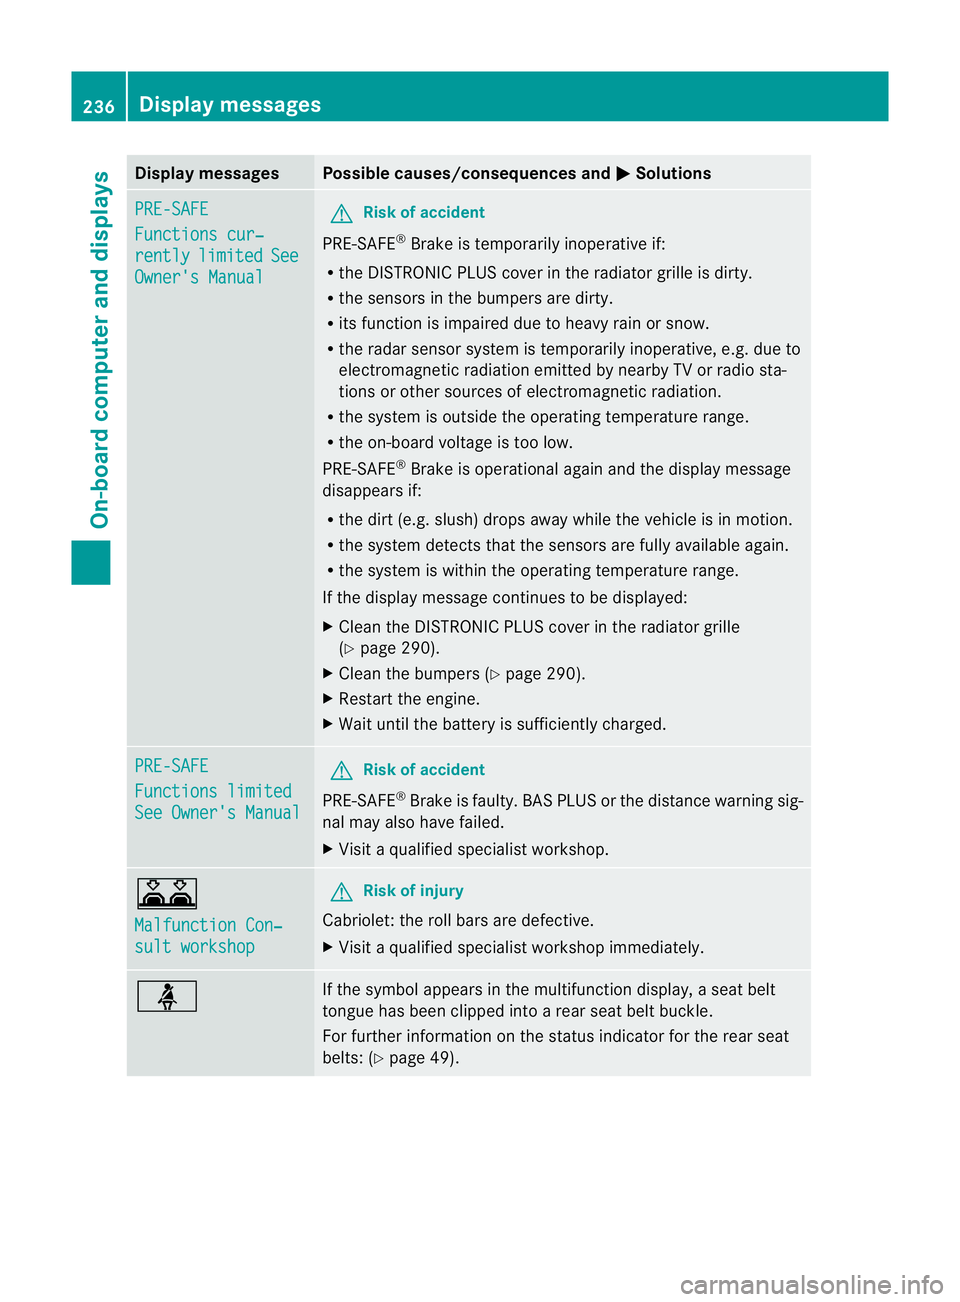
Display messages Possible causes/consequences and
M Solutions
PRE-SAFE
Functions cur‐
rently limited See
Owner'
sManual G
Risk of accident
PRE-SAFE ®
Brake is temporarily inoperative if:
R theD ISTR ONIC PLU Scover in th eradiato rgrille is dirty.
R thes ensor sinthebumpers are dirty.
R itsf unction is impaire ddue to heav yrain or snow.
R ther ada rsensor system is temporarily inoperative, e.g. due to
electromagnetic radiation emitted by nearby TV or radio sta-
tion soro ther sources of electromagnetic radiation.
R the system is outside the operatin gtemperature range.
R the on-board voltage is too low.
PRE-SAFE ®
Brak eiso perational again and the display message
disappears if:
R the dirt (e.g. slush) drops away while the vehicle is in motion.
R the system detects that the sensor sare fully available again.
R the system is within the operatin gtemperature range.
If the display message continues to be displayed:
X Clean the DISTRONIC PLUS cover in the radiator grille
(Y page 290).
X Clean the bumpers (Y page 290).
X Restart the engine.
X Wait until the batter yissufficiently charged. PRE-SAFE
Functions limited
See Owner's Manual G
Risk of accident
PRE-SAFE ®
Brak eisf aulty. BASP LUS or the distance warning sig-
nal may also have failed.
X Visit aqualified specialist workshop. A
Malfunction Con‐
sult workshop G
Risk of injury
Cabriolet: the roll bars are defective.
X Visit aqualified specialist workshop immediately. ü If the symbola
ppears in the multifunction display,as eat belt
tongue has been clipped intoar ear seat belt buckle.
For further information on the status indicator for the rear seat
belts: (Y page 49). 236
Display messagesOn-boar
dcomputer and displays
Page 240 of 353
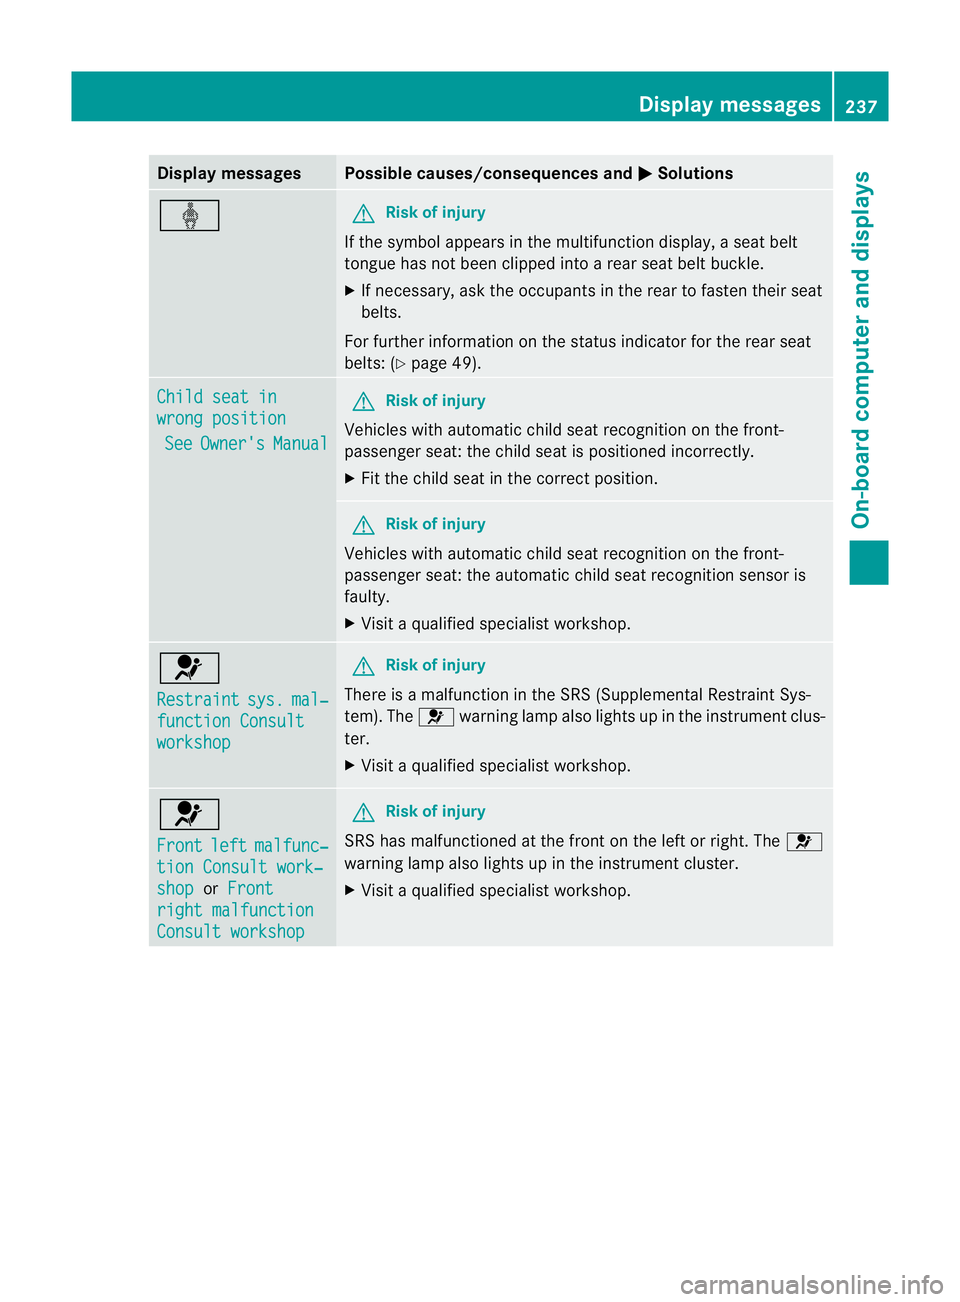
Display messages Possible causes/consequences and
M Solutions
ý G
Risk of injury
If th esymbol appears in th emultifunction display, aseat belt
tongue has not been clipped intoar ear seat belt buckle.
X If necessary, ask the occupants in the rear to fasten their seat
belts.
For further information on the status indicator for the rear seat
belts: (Y page 49). Child seat in
wrong position
See Owner's Manual G
Risk of injury
Vehicles with automatic child seat recognition on the front-
passenger seat: the child seat is positioned incorrectly.
X Fit the child seat in the correct position. G
Risk of injury
Vehicles with automatic child seat recognition on the front-
passenger seat: the automatic child seat recognition sensor is
faulty.
X Visit aqualified specialist workshop. 6
Restraint
sys. mal‐
functio
nConsult workshop G
Risk of injury
There is amalfunction in the SRS (Supplemental Restraint Sys-
tem). The 6warning lamp also lights up in the instrument clus-
ter.
X Visit aqualified specialist workshop. 6
Front
left malfunc‐
tion Consult work‐
shop or
Front right malfunction
Consult workshop G
Risk of injury
SRS has malfunctioned at the fron tonthe left or right. The 6
warning lamp also lights up in the instrument cluster.
X Visit aqualified specialist workshop. Display messages
237On-boardcomputer and displays Z