fuel pressure MERCEDES-BENZ E-CLASS COUPE 2011 Owners Manual
[x] Cancel search | Manufacturer: MERCEDES-BENZ, Model Year: 2011, Model line: E-CLASS COUPE, Model: MERCEDES-BENZ E-CLASS COUPE 2011Pages: 353, PDF Size: 8.42 MB
Page 24 of 353
Protection of the environment
Notes
H
Environmental note
Daimler's declared policy is one of integrated
environmental protection.
The objectives are for the natural resources
which form the basis of our existence on this
planet to be used sparingly and in amanner
which takes the requirements of both nature
and humanity into account.
You too can help to protect the environment
by operating your vehicle in an environmen-
tally responsible manner.
Fuel consumption and the rate of engine,
transmission, brake and tyre wear depend on
the following factors:
R operating condition sofyour vehicle
R your personal driving style
You can influence both factors. You should
bear the following in mind:
Operating conditions:
R avoid short trips as these increase fuel con-
sumption.
R make sure that the tyre pressures are
always correct.
R do not carry any unnecessary weight.
R keep an eye on the vehicle's fuel consump-
tion.
R remove roof racks once you no longer need
them.
R ar egularly serviced vehicle will contribute
to environmental protection. You should
therefore adhere to the service intervals.
R always have maintenance work carried out
at aq ualified specialist workshop, e.g. a
Mercedes-Benz Service Centre.
Personal driving style:
R do not depress the accelerator pedal when
startingt he engine.
R do not warm up the engine with the vehicle
stationary. R
drive carefully and maintain asafe distance
from the vehicle in front.
R avoid frequent, sudden acceleration.
R change gear in good time and use each gear
only up to Ôof its maximum engine speed.
R switch off the engine in stationary traffic. Returning end-of-life vehicles
Mercedes-Benz will take back your
Mercedes-Benz to dispose of it in an environ-
mentally responsible manner, in accordance
with the European Union (EU) End of Life
Vehicles Directive.
The End of Life Vehicles Directive applies to
vehicles with agross vehicle weight of up to
3.5 t, in accordance with national regulations.
For several years, Mercedes-Benz has been
meeting all the legal requirements for a
design which allowsf or recycling and reuse.
There is anetwork of return points and dis-
assembly plants which can recycle your vehi-
cle in an environmentally responsible man-
ner. The options for recycling vehicles and
parts are constantly being developed and
improved. This means that your Mercedes-
Benz will also continue to meet even the
increased recycling quotas in the future in
good time. You can obtain further information
from your national Mercedes-Benz homepage
or your national hotline number. Vehicle equipment
This Owner's Manual describes all models
and all standard and optional equipment of
your vehicle available at the time of publica-
tion of the Owner's Manual. Country-specific
differences are possible. Please note that
your vehicle may not be equipped with all fea-
tures described. This also applies to safety-
relevant systems and functions. The equip-
ment in your vehicle may therefore differ from
that shown in the descriptions and illustra-
tions. All the systems found in your vehicle Introduction
21 Z
Page 166 of 353
Refuelling
Fue lfille rflap The fuel filler flap is unlocked or locked auto-
matically when you open or close the vehicle
with the key or using KEYLESS-GO.
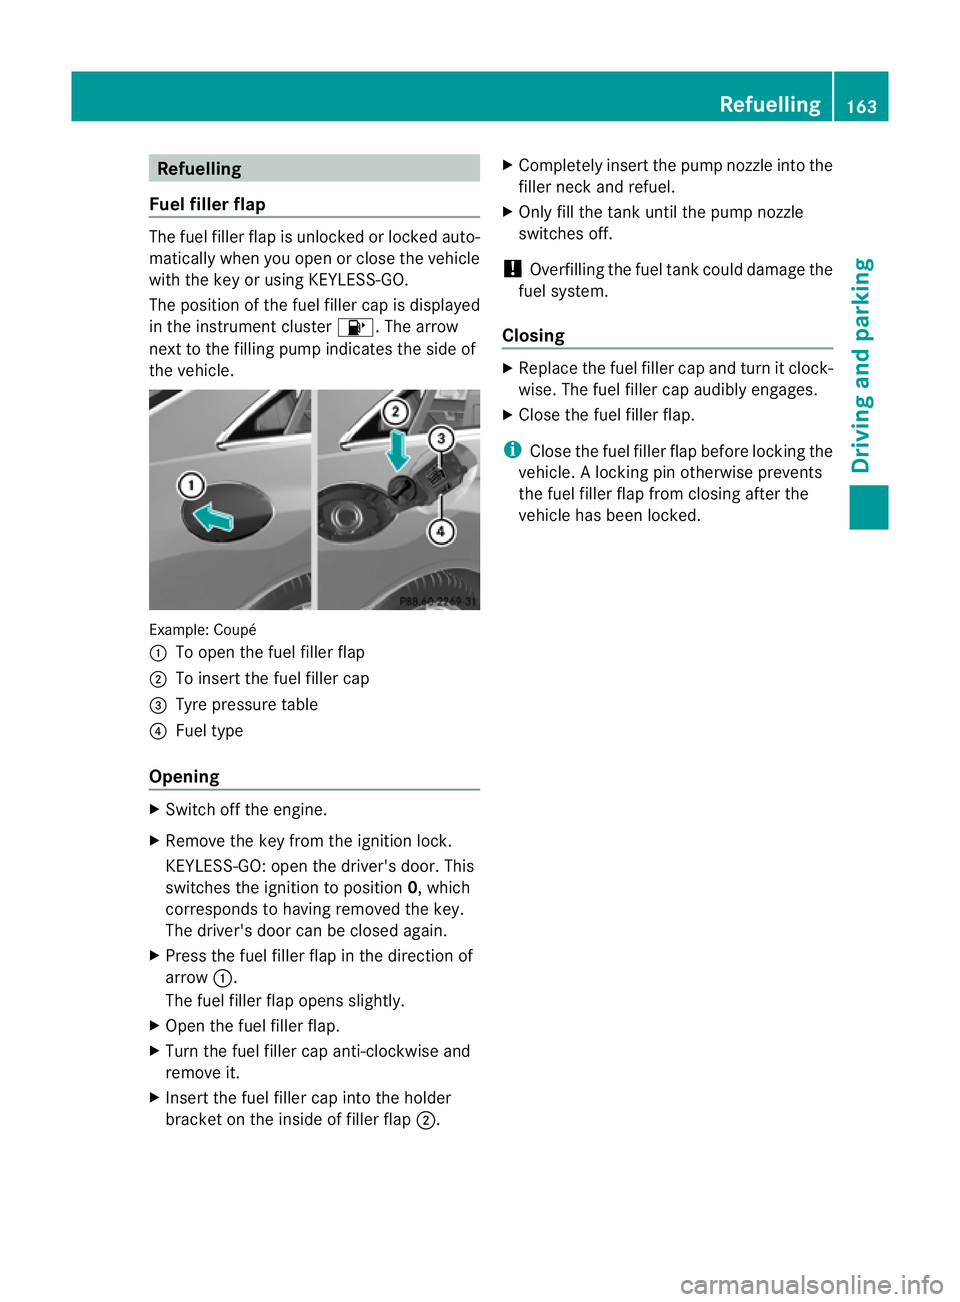
The position of the fuel filler cap is displayed
in the instrumen tcluster 8.T he arrow
next to the filling pump indicates the side of
the vehicle. Example: Coupé
:
To open the fuel filler flap
; To insert the fuel filler cap
= Tyre pressure table
? Fuel type
Opening X
Switch off the engine.
X Remove the key from the ignition lock.
KEYLESS-GO: open the driver's door. This
switches the ignition to position 0,which
corresponds to having removed the key.
The driver's door can be closed again.
X Press the fuel filler flap in the direction of
arrow :.
The fuel filler flap opens slightly.
X Open the fuel filler flap.
X Turn the fuel filler cap anti-clockwise and
remove it.
X Insert the fuel filler cap into the holder
bracket on the inside of filler flap ;.X
Completely insert the pump nozzle into the
filler neck and refuel.
X Only fill the tank until the pump nozzle
switches off.
! Overfilling the fuel tank could damage the
fuel system.
Closing X
Replace the fuel filler cap and turn it clock-
wise. The fuel filler cap audibly engages.
X Close the fuel filler flap.
i Close the fuel filler flap before locking the
vehicle. Alockingp in otherwise prevents
the fuel filler flap from closing after the
vehicle has been locked. Refuelling
163Driving and parking Z
Page 208 of 353
Make sure that the following values are not
exceeded:
R the permissible trailer drawbar noseweight
R the permissible trailer load
R the permissible rear axle load of the towing
vehicle
R the maximum permissible gross vehicle
weight of both the towing vehicle and the
trailer
You will find the applicable permissible val-
ues, which must not be exceeded, in the vehi-
cle documents.
You will find the values approved by the man-
ufacturer on the vehicle identification plates
and those for the towing vehicle in the "Tech-
nical data" section. G
WARNING
If the Check trailer hitch locking mechanism message appears in the multi-
function display while the vehicle is in motion,
pull over immediately and check whether the
ball coupling is correctly engaged. G
WARNING
Always observe the maximum speed permit-
ted in Germany for vehicle/trailer combina-
tions, even in countries where higher speeds
are permitted. This lowers the risk of an acci-
dent. G
WARNING
Never depress the brake pedal continuously
while the vehicle is in motion, e.g. never cause
the brakes to rub by applying constant slight
pedal pressure. This causes the brake system
to overheat, increases the braking distance
and can lead to the brakes failing completely. G
WARNING
On no account should you attempt to draw the
vehicle/trailer combination out by increasing
speed. General information i
When towing atrailer, set the tyre pres-
sure on the rear axle of the towing vehicle
for am aximum load; see the tyre pressure
table in the fuel filler flap (Y page 321).
You will find installation dimensions and loads
in the "Technical data" section
(Y page 343).
The maximum permissible trailer drawbar
noseweight on the ball coupling is 75 kg.
However, the actual noseweight must not
exceed the value given on the trailer tow hitch
and trailer identification plates. The lowest
weight applies.
! Use anoseweight as close as possible to
the maximum permissible noseweight. Do
not use anoseweight of less than 50 kg,
otherwise the trailer may come loose.
Bear in mind that the payload and the rear
axle load are reduced by the actual nose-
weight.
Please note that when towing atrailer, PARK-
TRONIC (Y page 185) and parking guidance
(Y page 189) are only available with limita-
tions, or not at all.
i The height of the ball coupling changes
with the load of the vehicle. If necessary,
use atrailer with aheight-adjustable draw-
bar.
Driving tips i
Observe the notes on ESP ®
trailer stabi-
lisation (Y page 65).
In Germany, the maximum permissible speed
for vehicle/trailer combinations depends on
the type of trailer, and is either 80 km/h or
100 km/h. In some countries, higher maxi-
mum speeds are permissible for vehicle/
trailer combinations. Before beginning the
journey, check the trailer's documents to see
what the maximum permitted speed is.
For certain Mercedes-Ben zvehicles, the max-
imum permissible rear axle load is increased
when towing atrailer. Refer to the "Technical Trailer towing
205Driving and parking Z
Page 290 of 353
High-pressure cleaning equipment
G
WARNING
Do not use high-pressure cleaners with circu-
lar-jet nozzles (dirt grinders) to clea nyour
vehicle, in particular the tyres. You could oth-
erwise damage the tyres and cause an acci-
dent.
! Always maintain adistance of at least
30 cm between the vehicle and the high-
pressure cleaner nozzle. Information about
the correc tdistanc eisavailable fro mthe
equipment manufacturer.
Move the high-pressure cleaner nozzle
around when cleaning your vehicle.
Do not aim directly at any of the following:
R tyres
R door gaps, jointse tc.
R soft top (Cabriolet)
R wind deflector net (Cabriolet)
R electrical components
R battery
R connectors
R lights
R seals
R trim elements
R ventilation slots
Damaged seals or electrical components
can lead to leaks or failures.
Cleaningt he wheels !
Do not use acidic wheel cleaning products
to remove brake dust. This could damage
wheel bolts and brake components.
! Do not park up the vehicle for an extended
period straight after cleaning it, particularly
after having cleaned the wheels with wheel
cleaner. Wheel cleaners could cause
increased corrosion of the brake discs and
brake pads/linings. For this reason, you
should drive for afew minutes after clean-
ing. Braking heats the brake discs and the brake pads/linings, thus drying them. The
vehicle can then be parked up.
Cleaningt he paintwork Scratches, corrosive deposits, areas affected
by corrosion and damage caused by inade-
quate care cannot always be completely
repaired. In such cases, visit aqualified spe-
cialist workshop, e.g. aMercedes-Benz
Service Centre.
X Remove impurities immediately, where
possible, whilst avoiding rubbing too hard.
X Soak insect remains with insect remover
and rinse off the treated areas afterwards.
X Soak bird droppings with water and rinse
off the treated areas afterwards.
X Remove coolant, brake fluid, tree resin,
oils, fuels and greases by rubbing gently
with acloth soaked in petroleum ether or
lighter fluid.
X Use tar remover to remove tar stains.
X Use silicone remover to remove wax.
! Do not affix:
R stickers
R films
R magnetic plates or similar items
to painted surfaces. You could otherwise
damage the paintwork.
Care and treatment of mattp aintwork If your vehicle has
aclear matt finish, observe
the following instructions in order to avoid
damage to the paintwork due to incorrect
care.
These notes also apply to light alloy wheels
with aclear matt finish.
! Never polish the vehicle or the light alloy
wheels. Polishing makes the paintwork
shiny. Care
287Maintenance and care Z
Page 303 of 353
mends that you use
aMercedes-Benz Service
Centre for this purpose. In particular, work
relevant to safety or on safety-related sys-
tems must be carried out at aqualified spe-
cialist workshop.
Tyre pressure of 180 kPa (1.8 bar/
26 psi) is reached X
Press the on/off switch on the tyre inflation
compresso rto0.
The tyre inflation compressor is switched
off.
X Unscrew the filler hose from the valve of
the faulty tyre.
! After use, excess TIREFIT may run out of
the filler hose. This may cause stains.
Therefore, place the filler hose in the plastic
bag which contained the TIREFIT kit.
X Stow the tyre sealant bottle, the tyre infla-
tion compressor and the warning triangle.
X Pull away immediately. G
WARNING
Do not exceed the maximum speed of
80 km/h.
The "max. 80 km/h" label must be affixed in
the driver's field of vision.
The vehicle's handling characteristics may be
affected.
X Stop after driving for approximately ten
minutes and check the tyre pressure with
the tyre inflation compressor. G
WARNING
If the tyre pressure is less than 130 kPa
(1.3 bar/20 psi), the tyre is too severely dam-
aged. Do not drive any further. Consult a
qualified specialist workshop which has the
necessary specialist knowledge and tools to
carry out the work required. Mercedes-Benz
recommends that you use aMercedes-Benz
Service Centr efor this purpose. In particular,
work relevant to safety or on safety-related systems must be carried out at
aqualified
specialist workshop.
X Correct the tyre pressure if it is still at least
130 kPa (1.3 bar/20 psi) (for the values,
see the fuel filler flap).
X To increase the tyrep ressure: switch on
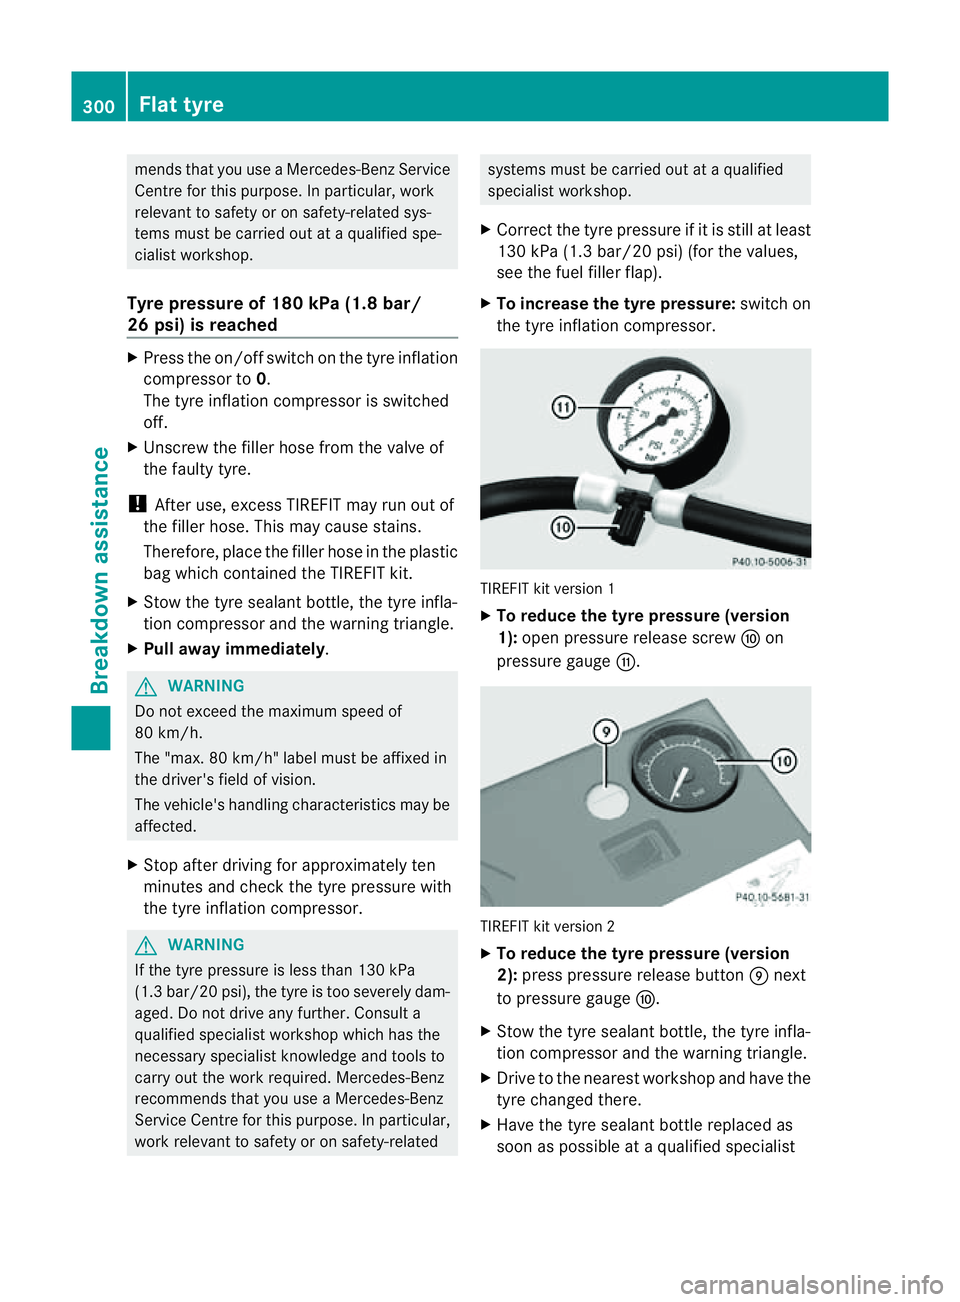
the tyre inflation compressor. TIREFI
Tkit version 1
X To reduce the tyrep ressure (version
1): open pressure release screw Fon
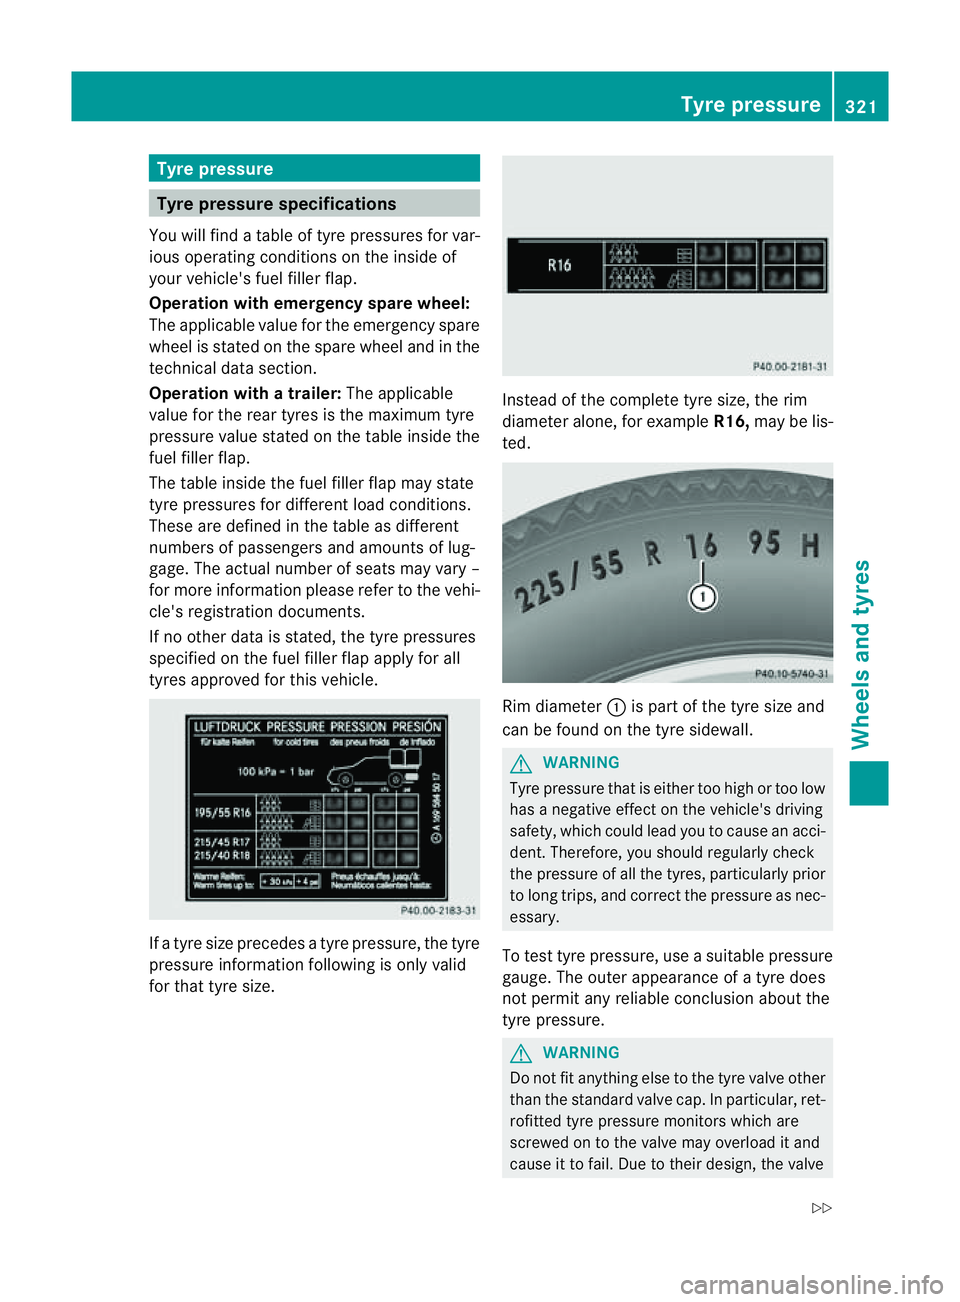
pressure gauge G. TIREFI
Tkit version 2
X To reduce the tyrep ressure (version
2): press pressure release button Enext
to pressure gauge F.
X Stow the tyre sealant bottle, the tyre infla-
tion compressor and the warning triangle.
X Driv etot he nearest workshop and have the
tyre changed there.
X Have the tyre sealant bottle replaced as
soon as possible at aqualified specialist 300
Flat tyreBreakdown assistance
Page 324 of 353
Tyre pressure
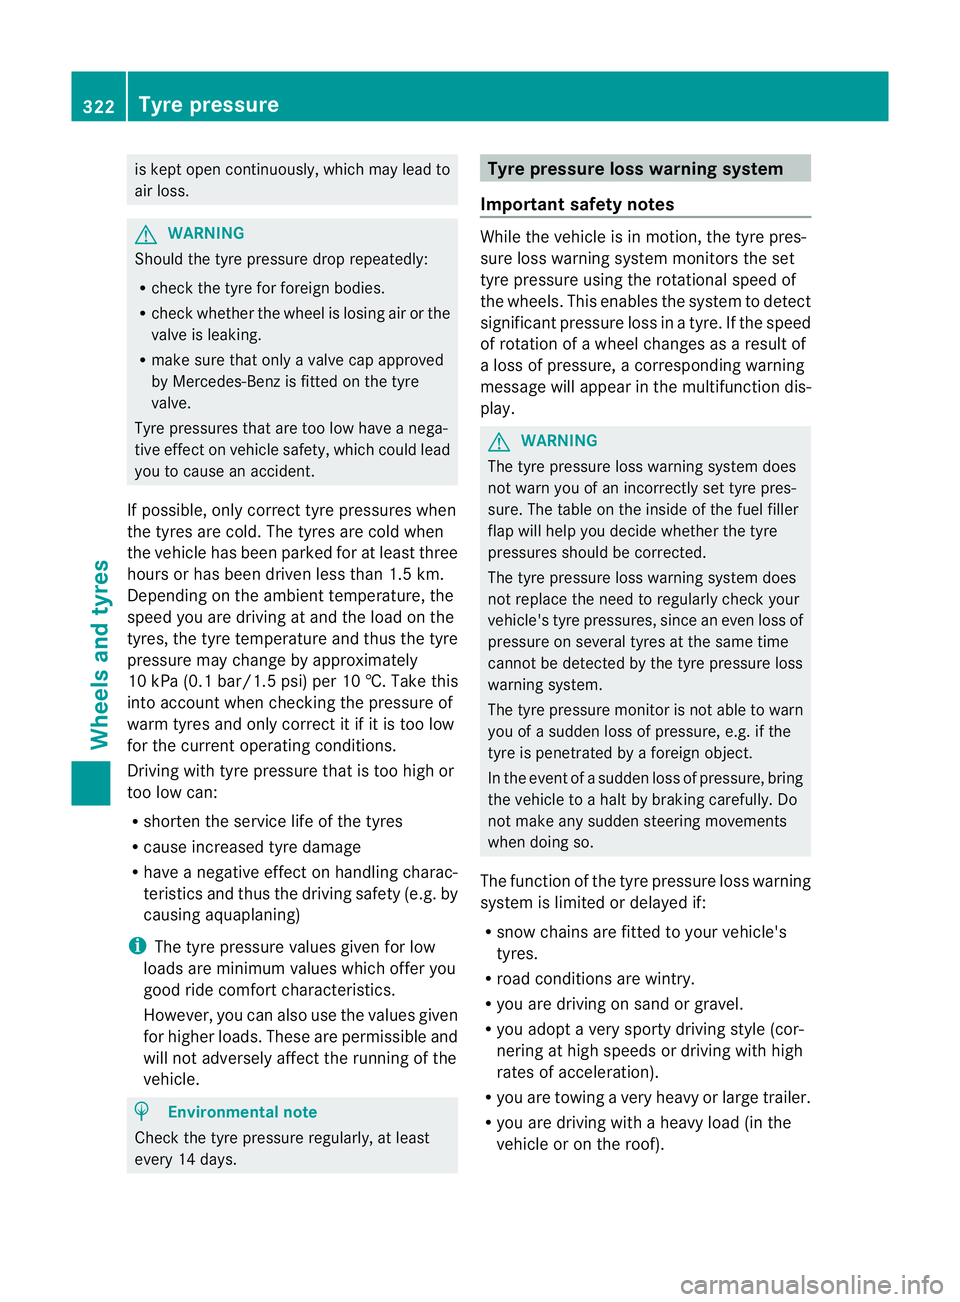
Tyre pressure specifications
Yo uw illf ind atable of tyr epressures for var-
ious operating conditions on the insid eof
your vehicle's fuel fille rflap.
Operation with emergency spare wheel:
The applicable value for the emergency spare
wheel is stated on the spare wheel and in the
technical data section.
Operation with atrailer: The applicable
value for the rear tyre sisthe maximum tyre
pressure value stated on the table insid ethe
fuel filler flap.
The table insid ethe fuel filler flap may state
tyre pressures for differen tload conditions.
These are defined in the table as different
numbers of passengers and amounts of lug-
gage. The actual number of seats may vary –
for more information please refer to the vehi-
cle's registration documents.
If no other data is stated, the tyre pressures
specified on the fuel filler flap apply for all
tyres approved for this vehicle. If
at yre size precedes atyre pressure, the tyre
pressure information following is only valid
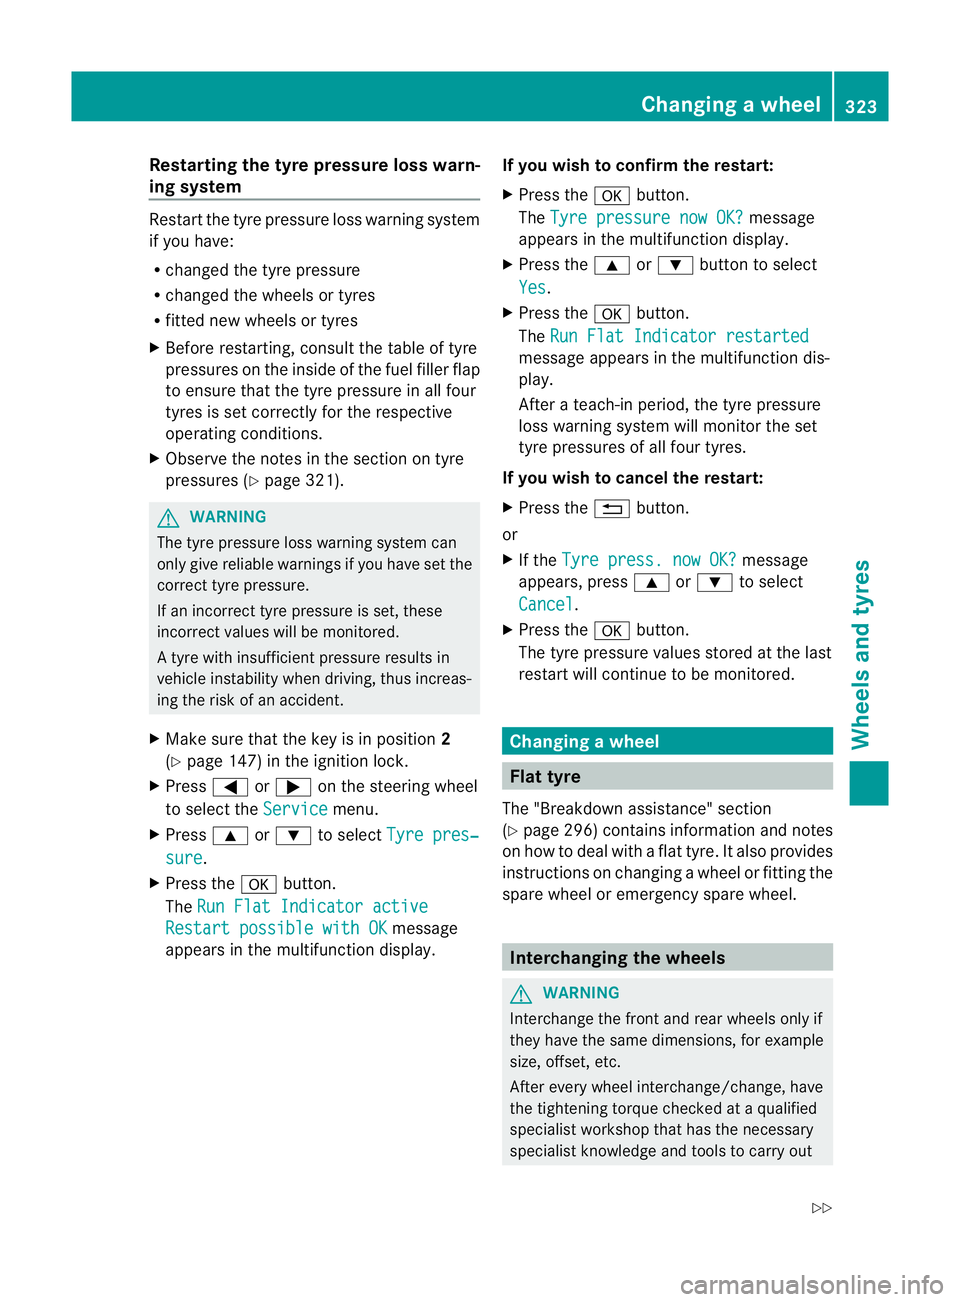
for that tyre size. Instead of the complete tyre size, the rim
diameter alone, for example
R16,may be lis-
ted. Rim diameter
:is part of the tyre size and
can be found on the tyre sidewall. G
WARNING
Tyre pressure that is either too high or too low
has anegative effect on the vehicle's driving
safety, which could lead you to cause an acci-
dent. Therefore, you should regularly check
the pressure of all the tyres, particularly prior
to long trips, and correc tthe pressure as nec-
essary.
To test tyre pressure, use asuitable pressure
gauge. The outer appearance of atyre does
not permit any reliablec onclusion about the
tyre pressure. G
WARNING
Do not fit anything else to the tyre valve other
than the standard valve cap. In particular, ret-
rofitted tyre pressure monitors which are
screwed on to the valve may overload it and
cause it to fail. Due to their design, the valve Tyrep
ressure
321Wheels and tyres
Z
Page 325 of 353
is kept open continuously, which may lead to
air loss. G
WARNING
Should the tyre pressure drop repeatedly:
R chec kthe tyre for foreign bodies.
R check whether the wheel is losing air or the
valve is leaking.
R make sure that only avalve cap approved
by Mercedes-Ben zisfitted on the tyre
valve.
Tyre pressures that are too low have anega-
tive effect on vehicle safety, which could lead
you to cause an accident.
If possible, only correct tyre pressures when
the tyres are cold. The tyres are cold when
the vehicle has been parked for at least three
hours or has been driven less than 1.5 km.
Depending on the ambient temperature, the
speed you are driving at and the load on the
tyres, the tyre temperature and thus the tyre
pressure may change by approximately
10 kPa (0.1 bar/1.5 psi) per 10 †. Take this
into account when checking the pressure of
warm tyres and only correct it if it is too low
for the current operating conditions.
Driving with tyre pressure that is too high or
too low can:
R shorten the service life of the tyres
R cause increased tyre damage
R have anegative effect on handling charac-
teristics and thus the driving safety (e.g. by
causing aquaplaning)
i The tyre pressure values given for low
loads are minimum values which offer you
good ride comfort characteristics.
However, you can also use the values given
for higher loads. These are permissible and
will not adversely affect the running of the
vehicle. H
Environmental note
Check the tyre pressure regularly,atl east
every 14 days. Tyrep
ressur eloss warning system
Important safety notes While the vehicle is in motion, the tyre pres-
sure loss warning system monitors the set
tyre pressure using the rotational speed of
the wheels. This enables the system to detect
significant pressure loss in
atyre. If the speed
of rotation of awheel changes as aresult of
al oss of pressure, acorresponding warning
message will appearint he multifunction dis-
play. G
WARNING
The tyre pressure loss warning system does
not warn you of an incorrectly set tyre pres-
sure. The table on the inside of the fuel filler
flap will help you decide whether the tyre
pressures should be corrected.
The tyre pressure loss warning system does
not replace the need to regularly check your
vehicle's tyre pressures, since an even loss of
pressure on several tyres at the same time
cannot be detected by the tyre pressure loss
warning system.
The tyre pressure monitor is not able to warn
you of asudden loss of pressure, e.g. if the
tyre is penetrated by aforeign object.
In the event of asudden loss of pressure, bring
the vehicle to ahalt by braking carefully. Do
not make any sudden steering movements
when doing so.
The function of the tyre pressure loss warning
system is limited or delayed if:
R snow chains are fitted to your vehicle's
tyres.
R road conditionsa re wintry.
R you are driving on sand or gravel.
R you adopt avery sporty driving style (cor-
nering at high speeds or driving with high
rates of acceleration).
R you are towing avery heavy or large trailer.
R you are driving with aheavy load (in the
vehicle or on the roof). 322
Tyrep
ressureWheels and tyres
Page 326 of 353
Restarting the tyre pressure loss warn-
in gs ystem Restar
tthe tyre pressure loss warning system
if you have:
R changed the tyre pressure
R changed the wheels or tyres
R fitted new wheels or tyres
X Before restarting, consult the table of tyre
pressures on the inside of the fuel filler flap
to ensure that the tyre pressure in all four
tyres is set correctly for the respective
operating conditions.
X Observe the notes in the section on tyre
pressures (Y page 321). G
WARNING
The tyre pressure loss warning system can
only give reliablew arnings if you have set the
correct tyre pressure.
If an incorrectt yre pressure is set, these
incorrectv alues will be monitored.
At yre wit hinsufficien tpressure results in
vehicl einstability when driving, thus increas-
ing the risk of an accident.
X Make sure that the key is in position 2
(Y page1 47) in the ignitio nlock.
X Press =or; on the steering wheel
to select the Service menu.
X Press 9or: to select Tyre pres‐ sure .
X Press the abutton.
The Run Flat Indicato ractive Restart possible with OK message
appears in the multifunction display. If you wishtoc
onfirm the restart:
X Press the abutton.
The Tyre pressure now OK? message
appears in the multifunction display.
X Press the 9or: button to select
Yes .
X Press the abutton.
The Run Flat Indicato rrestarted message appears in the multifunction dis-
play.
After
ateach-in period, the tyre pressure
loss warning system willm onitor the set
tyre pressures of all four tyres.
If you wishtoc ancel the restart:
X Press the %button.
or
X If the Tyre press. now OK? message
appears, press 9or: to select
Cancel .
X Press the abutton.
The tyre pressure values stored at the last
restart willc ontinue to be monitored. Changing
awheel Flat tyre
The "Breakdown assistance" section
(Y pag e296) contains information and notes
on how to dea lwith aflatt yre. It also provides
instruction sonchangin gaw heelorf itting the
spar ewhee lore mergency spar ewheel. Interchangin
gthe wheels G
WARNING
Interchange th efront and rea rwheels only if
they hav ethe sam edimensions ,for example
size, offset, etc.
After every whee linterchange/change, have
the tightening torque checked at aquali fied
specialist worksho pthath as th enecessary
specialist knowledg eand tools to carry out Changing
awheel
323Wheels and tyres
Z
Page 328 of 353
tai
nc haracteristics, e.g. handling, vehicle
noise emissions or fuel consumption ,may
otherwise be adversely affected. In addi-
tion, when driving with aload, tyre dimen-
sion variations could cause the tyres to
come into contact with the bodywork and
axle components.T his could result in dam-
age to the tyres or the vehicle.
Mercedes-Ben zaccepts no liability for
damag eresulting from the us eoftyres,
wheel soraccessorie sothe rthan those tes-
ted and approved.
Further information about tyres, wheels
and approved combinations can be
obtained from any Mercedes-Ben zService
Centre.
! Retreaded tyres are neither tested nor
recommended by Mercedes-Benz, since
previous damage cannot always be detec-
ted on retreaded tyres. As aresult,
Mercedes-Ben zcannot guarante evehicle
safety if retreade dtyres are fitted. Do not
fit used tyres if you have no information
about their previous usage.
! Large wheels :the lower the section width
for acertain wheel size, the lower the ride
comfort is on poor road surfaces. Roll com-
fort and suspension comfort are reduced
and the risk of damage to the wheels and
tyres as aresult of driving over obstacles
increases.
i You will find atable of tyre pressures on
the inside of your vehicle's fuel filler flap.
For further information on tyre pressure,
see (Y page 321).
i Notes on the vehicle equipment –always
fit the vehicle:
R with tyre softhe same size on agiven axle
(left/right)
R with the same type of tyre satagiven
tim e(summer tyres, winter tyres,
MOExtende dtyres) i
Vehicles with MOExtende dtyre sare not
equipped with aTIREFIT kit at the factory.
It is therefore recommende dthat you addi-
tionally equip your vehicle with aTIREFIT kit
if you fit tyre sthat do not feature run-flat
properties ,e.g. winter tyres. ATIREFIT kit
can be obtained fro maMercedes-Benz
Service Centre.
i Overview of abbreviations used in the fol-
lowing tyre tables:
R BA: both axles
R FA: front axle
R RA: rear axle
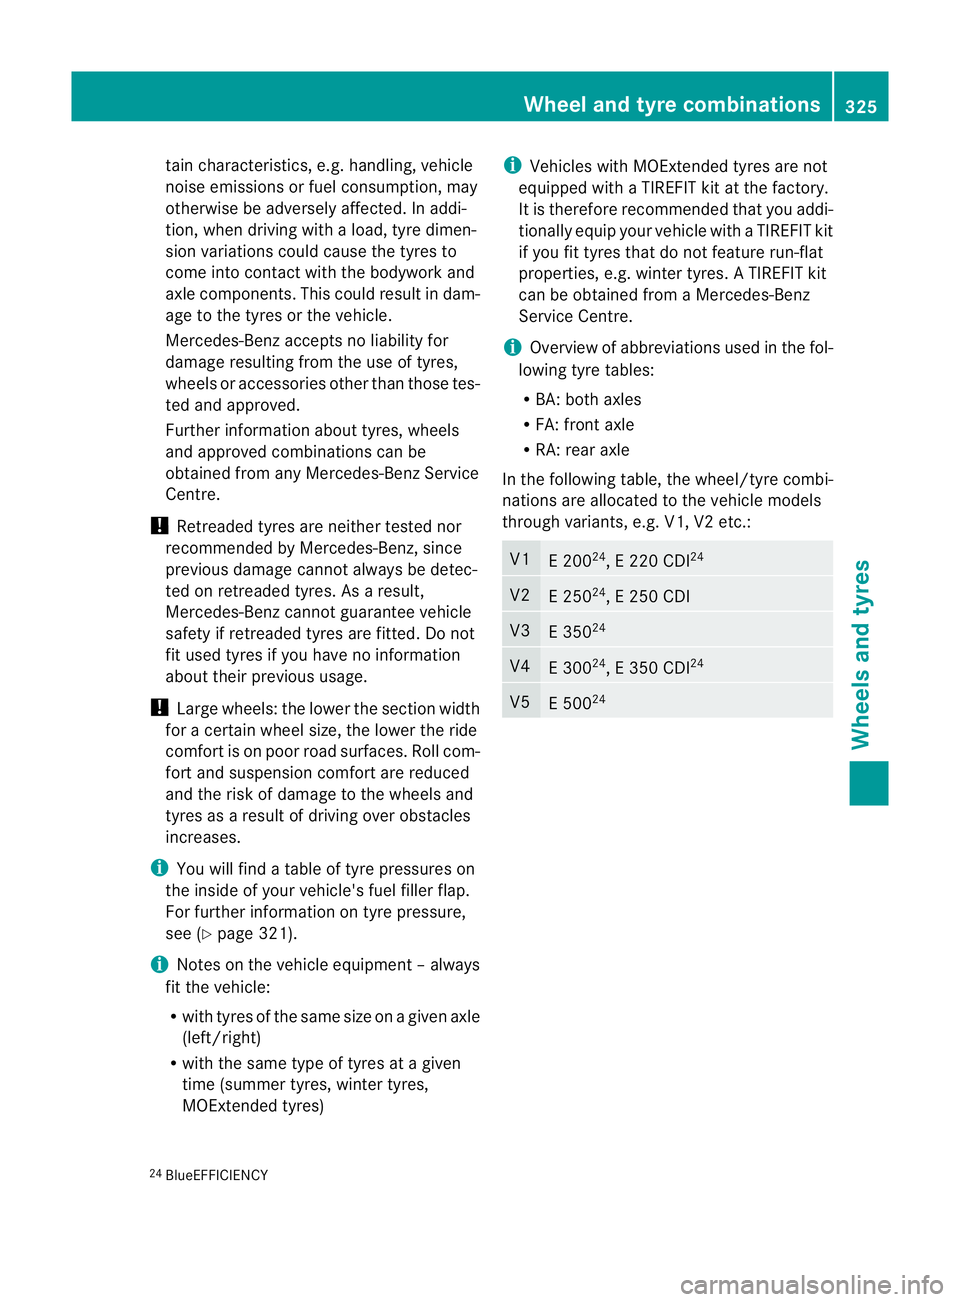
In the following table, the wheel/tyre combi-
nations are allocated to the vehicle models
through variants, e.g. V1, V2 etc.: V1
E2
0024
,E2 20 CDI 24 V2
E2
5024
,E2 50 CDI V3
E3
5024 V4
E3
0024
,E3 50 CDI 24 V5
E5
0024 24
BlueEFFICIENCY Wheel and tyrec
ombinations
325Wheels and tyres Z