stop start MERCEDES-BENZ E-CLASS COUPE 2012 Workshop Manual
[x] Cancel search | Manufacturer: MERCEDES-BENZ, Model Year: 2012, Model line: E-CLASS COUPE, Model: MERCEDES-BENZ E-CLASS COUPE 2012Pages: 389, PDF Size: 9.32 MB
Page 284 of 389
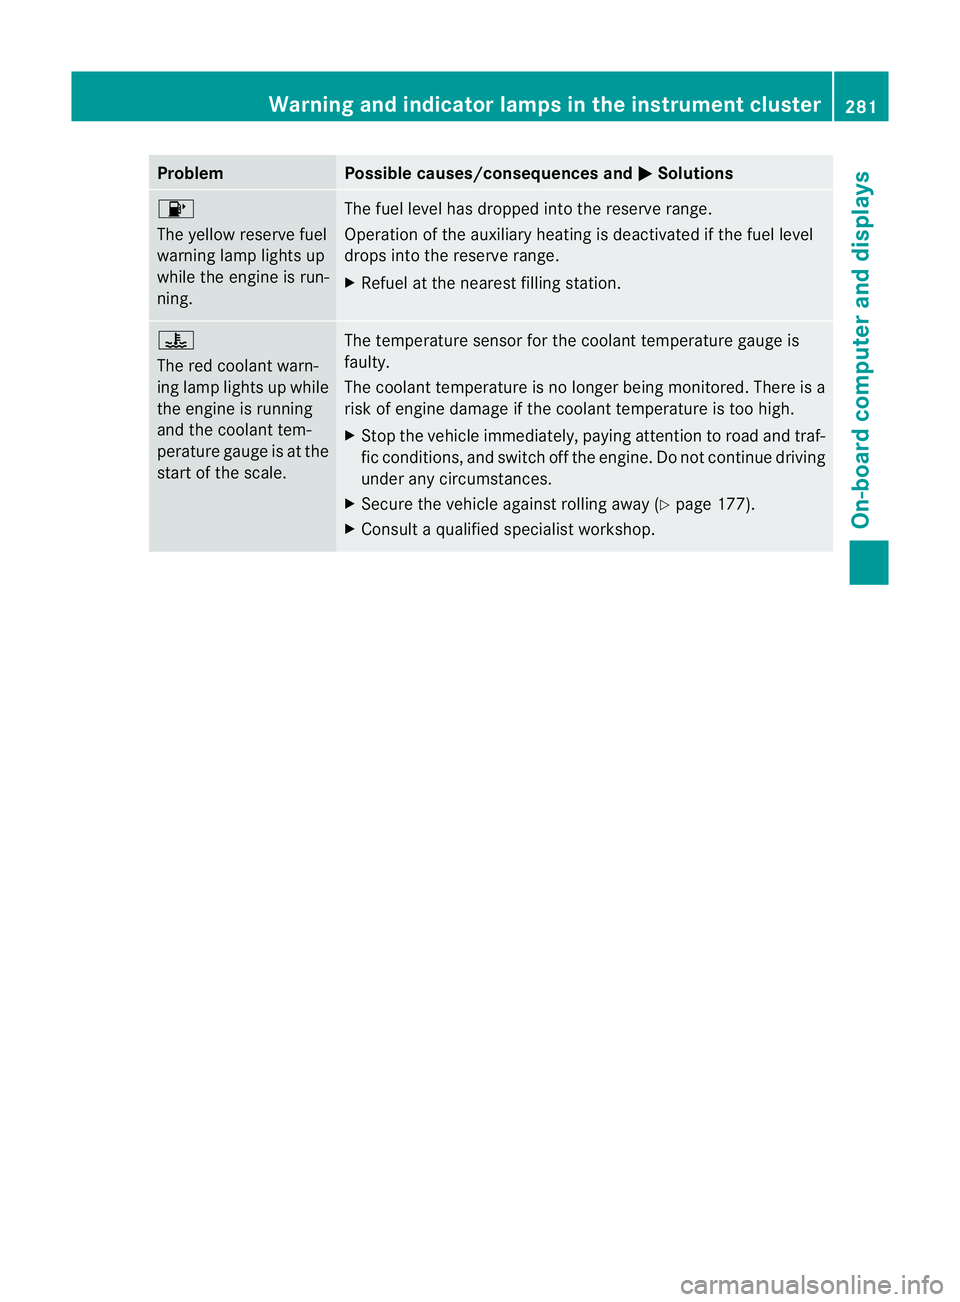
Problem Possible causes/consequences and
M Solutions
8
The yellow reserve fuel
warning lamp lights up
while the engine is run-
ning.
The fuel level has dropped into the reserve range.
Operation of the auxiliary heating is deactivated if the fuel level
drops into the reserve range.
X
Refuel at the nearest filling station. ?
The red coolant warn-
ing lamp lights up while
the engine is running
and the coolant tem-
perature gauge is at the
start of the scale.
The temperature sensor for the coolant temperature gauge is
faulty.
The coolant temperature is no longer being monitored. There is a
risk of engine damage if the coolant temperature is too high.
X
Stop the vehicle immediately, paying attention to road and traf-
fic conditions, and switch off the engine. Do not continue driving
under any circumstances.
X Secure the vehicle against rolling away (Y page 177).
X Consult a qualified specialist workshop. Warning and indicator lamps in the instrument cluster
281On-board computer and displays Z
Page 285 of 389
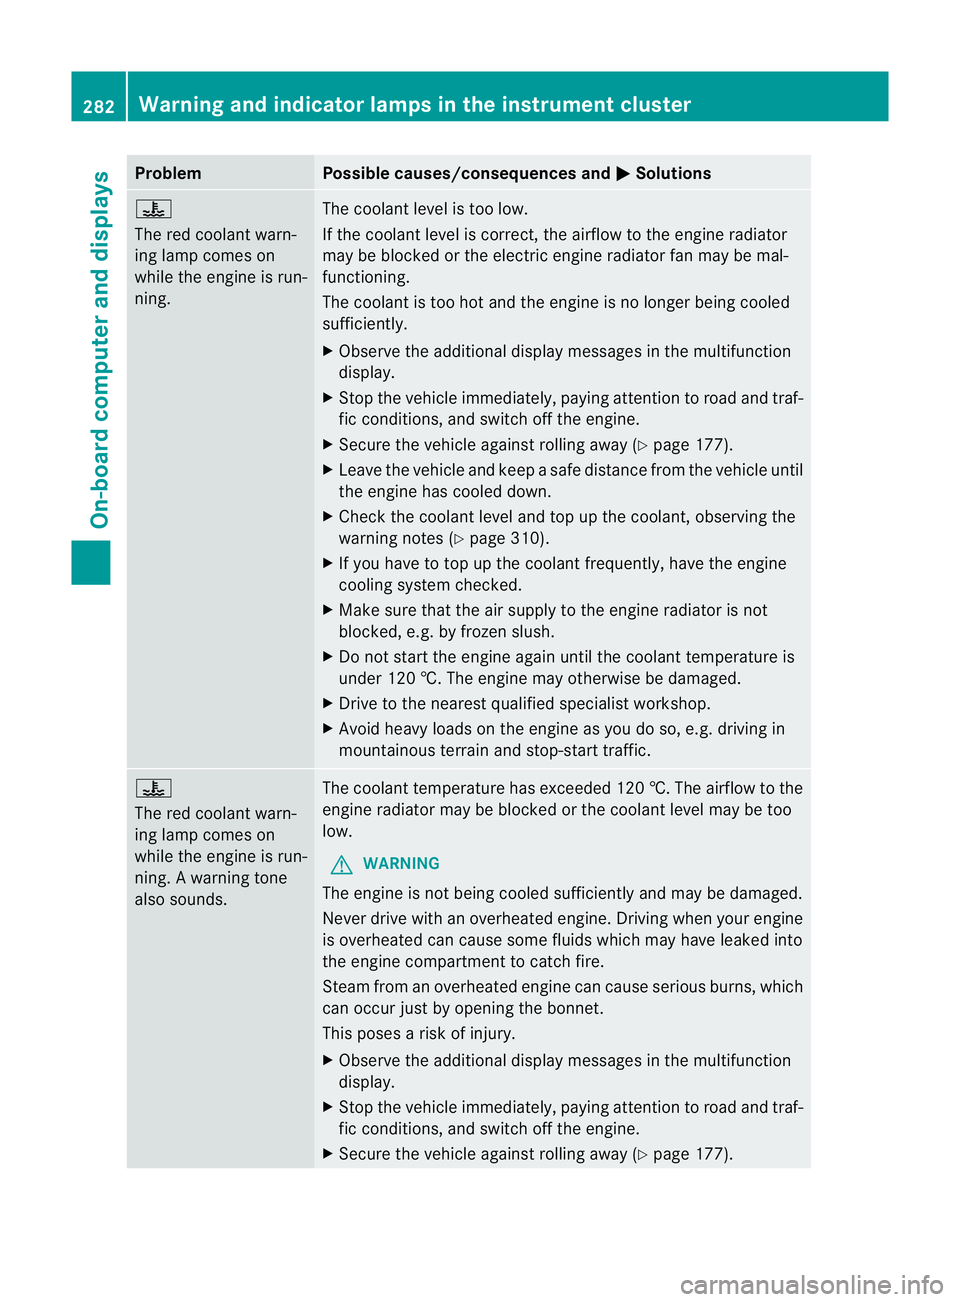
Problem Possible causes/consequences and
M Solutions
?
The red coolant warn-
ing lamp comes on
while the engine is run-
ning.
The coolant level is too low.
If the coolant level is correct, the airflow to the engine radiator
may be blocked or the electric engine radiator fan may be mal-
functioning.
The coolant is too hot and the engine is no longer being cooled
sufficiently.
X
Observe the additional display messages in the multifunction
display.
X Stop the vehicle immediately, paying attention to road and traf-
fic conditions, and switch off the engine.
X Secure the vehicle against rolling away (Y page 177).
X Leave the vehicle and keep a safe distance from the vehicle until
the engine has cooled down.
X Check the coolant level and top up the coolant, observing the
warning notes (Y page 310).
X If you have to top up the coolant frequently, have the engine
cooling system checked.
X Make sure that the air supply to the engine radiator is not
blocked, e.g. by frozen slush.
X Do not start the engine again until the coolant temperature is
under 120 †. The engine may otherwise be damaged.
X Drive to the nearest qualified specialist workshop.
X Avoid heavy loads on the engine as you do so, e.g. driving in
mountainous terrain and stop-start traffic. ?
The red coolant warn-
ing lamp comes on
while the engine is run-
ning. A warning tone
also sounds.
The coolant temperature has exceeded 120 †. The airflow to the
engine radiator may be blocked or the coolant level may be too
low.
G WARNING
The engine is not being cooled sufficiently and may be damaged.
Never drive with an overheated engine. Driving when your engine
is overheated can cause some fluids which may have leaked into
the engine compartment to catch fire.
Steam from an overheated engine can cause serious burns, which
can occur just by opening the bonnet.
This poses a risk of injury.
X Observe the additional display messages in the multifunction
display.
X Stop the vehicle immediately, paying attention to road and traf-
fic conditions, and switch off the engine.
X Secure the vehicle against rolling away (Y page 177).282
Warning and indicator lamps in the instrument clusterOn-board computer and displays
Page 286 of 389
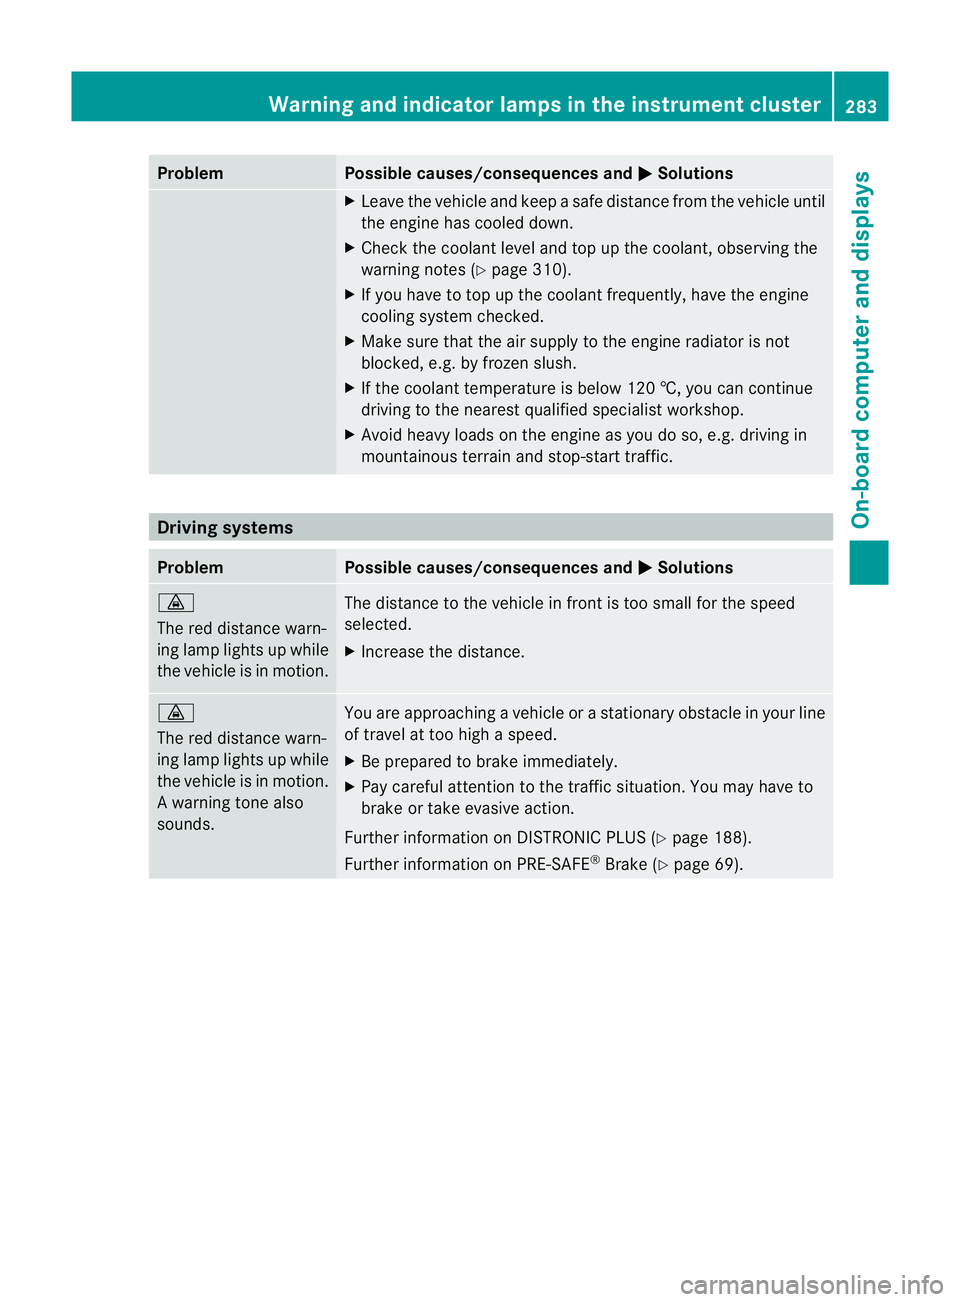
Problem Possible causes/consequences and
M Solutions
X
Leave the vehicle and keep a safe distance from the vehicle until
the engine has cooled down.
X Check the coolant level and top up the coolant, observing the
warning notes (Y page 310).
X If you have to top up the coolant frequently, have the engine
cooling system checked.
X Make sure that the air supply to the engine radiator is not
blocked, e.g. by frozen slush.
X If the coolant temperature is below 120 †, you can continue
driving to the nearest qualified specialist workshop.
X Avoid heavy loads on the engine as you do so, e.g. driving in
mountainous terrain and stop-start traffic. Driving systems
Problem Possible causes/consequences and
M Solutions
·
The red distance warn-
ing lamp lights up while
the vehicle is in motion.
The distance to the vehicle in front is too small for the speed
selected.
X Increase the distance. ·
The red distance warn-
ing lamp lights up while
the vehicle is in motion.
Aw
arning tone also
sounds. You are approaching a vehicle or a stationary obstacle in your line
of travel at too high a speed.
X
Be prepared to brake immediately.
X Pay careful attention to the traffic situation. You may have to
brake or take evasive action.
Further information on DISTRONIC PLUS (Y page 188).
Further information on PRE-SAFE ®
Brake (Y page 69). Warning and indicator lamps in the instrument cluster
283On-board computer and displays Z
Page 313 of 389
Other service products
Checking the coolant level G
WARNING
The cooling system is pressurised. Therefore,
only unscrew the cap once the engine has
cooled down. The coolant temperature gauge
must display less than 70 †.Otherwise, you
could be scalded if hot coolant escapes. X
Park the vehicle on a level surface.
Only check the coolant level if the vehicle
is on a level surface and the engine has
cooled down.
X Turn the key to position 2in the ignition
lock (Y page 159).
On vehicles with KEYLESS-GO, press the
Start/Stop button twice (Y page 159).
X Check the coolant temperature display in
the instrument cluster.
The coolant temperature must be below
70 †.
X Turn the key to position 0(Y page 159) in
the ignition lock.
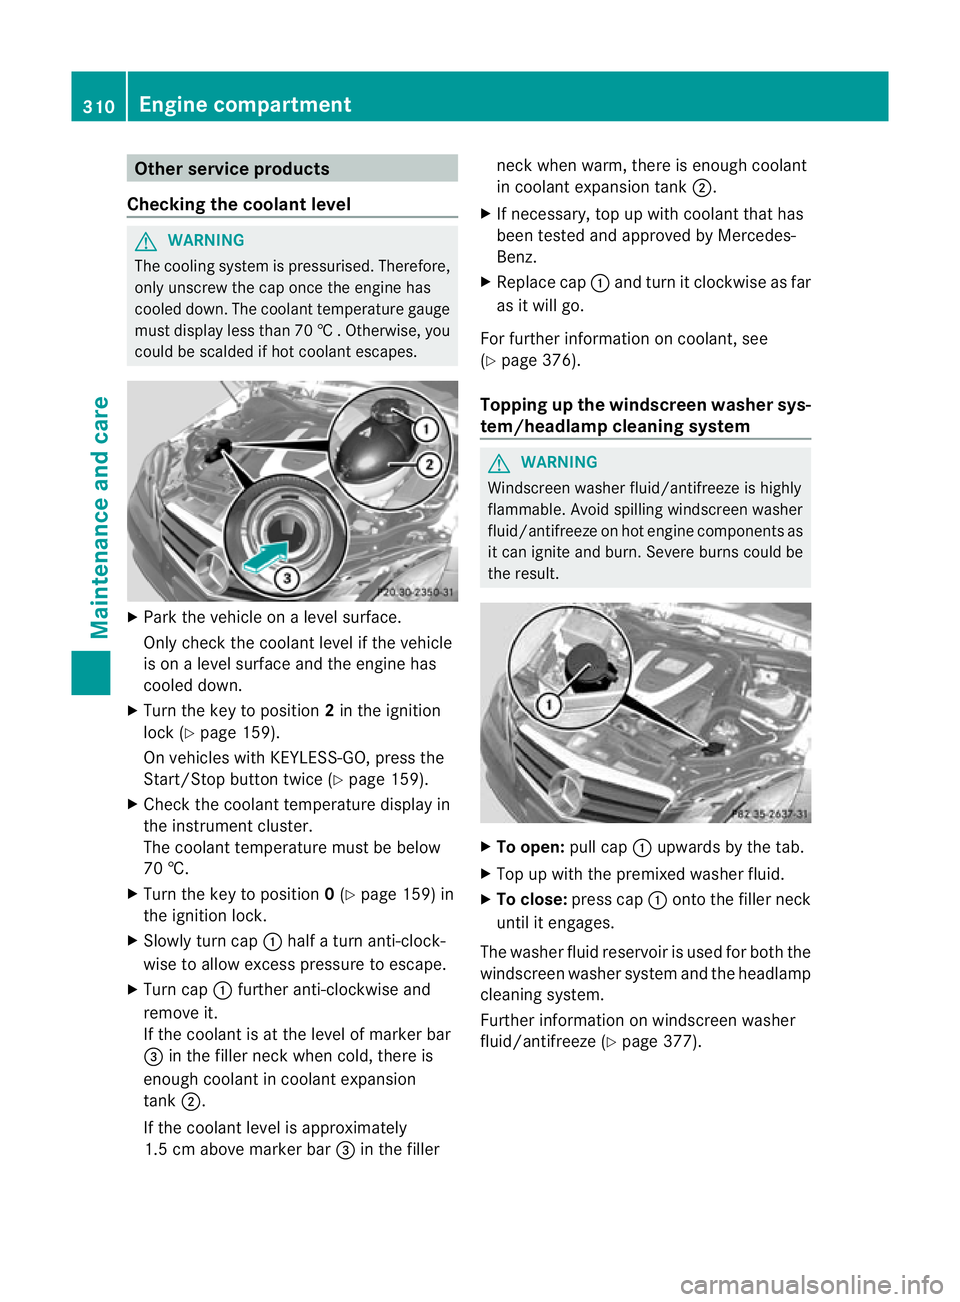
X Slowly tur ncap : half a turn anti-clock-
wise to allow excess pressure to escape.
X Turn cap :further anti-clockwise and
remove it.
If the coolant is at the level of marker bar
= in the fille rneck when cold, there is
enough coolant in coolant expansion
tank ;.
If the coolant level is approximately
1.5 cm above marker bar =in the filler neckw
hen warm, there is enough coolant
in coolant expansion tank ;.
X If necessary, top up with coolant that has
been tested and approved by Mercedes-
Benz.
X Replace cap :and turn it clockwise as far
as it will go.
For further information on coolant, see
(Y page 376).
Topping up the windscreen washer sys-
tem/headlampc leaning system G
WARNING
Windscreen washer fluid/antifreeze is highly
flammable. Avoid spilling windscreen washer
fluid/antifreeze on hot engine components as
it can ignite and burn. Severe burns could be
the result. X
To open: pull cap:upwards by the tab.
X Top up with the premixed washer fluid.
X To close: press cap :onto the filler neck
until it engages.
The washer fluid reservoir is used for both the
windscreen washer syste mand the headlamp
cleaning system.
Further informatio nonwindscreen washer
fluid/antifreeze (Y page 377).310
Engine compartmentMaintenance and care
Page 318 of 389
Cleaning AIRCAP
Cleaning the wind deflector
!
Do no tuse high-pressure cleaning equip-
ment to clean the net.
Cleant he wind deflector on the windscreen
with the soft top closed.
X Apply the parking brake firmly.
X Vehicles with key: turn the key to position
2 (Y page 159) in the ignition lock.
X Vehicles with KEYLESS-GO: press the
Start/Stop button twice (Y page 159).
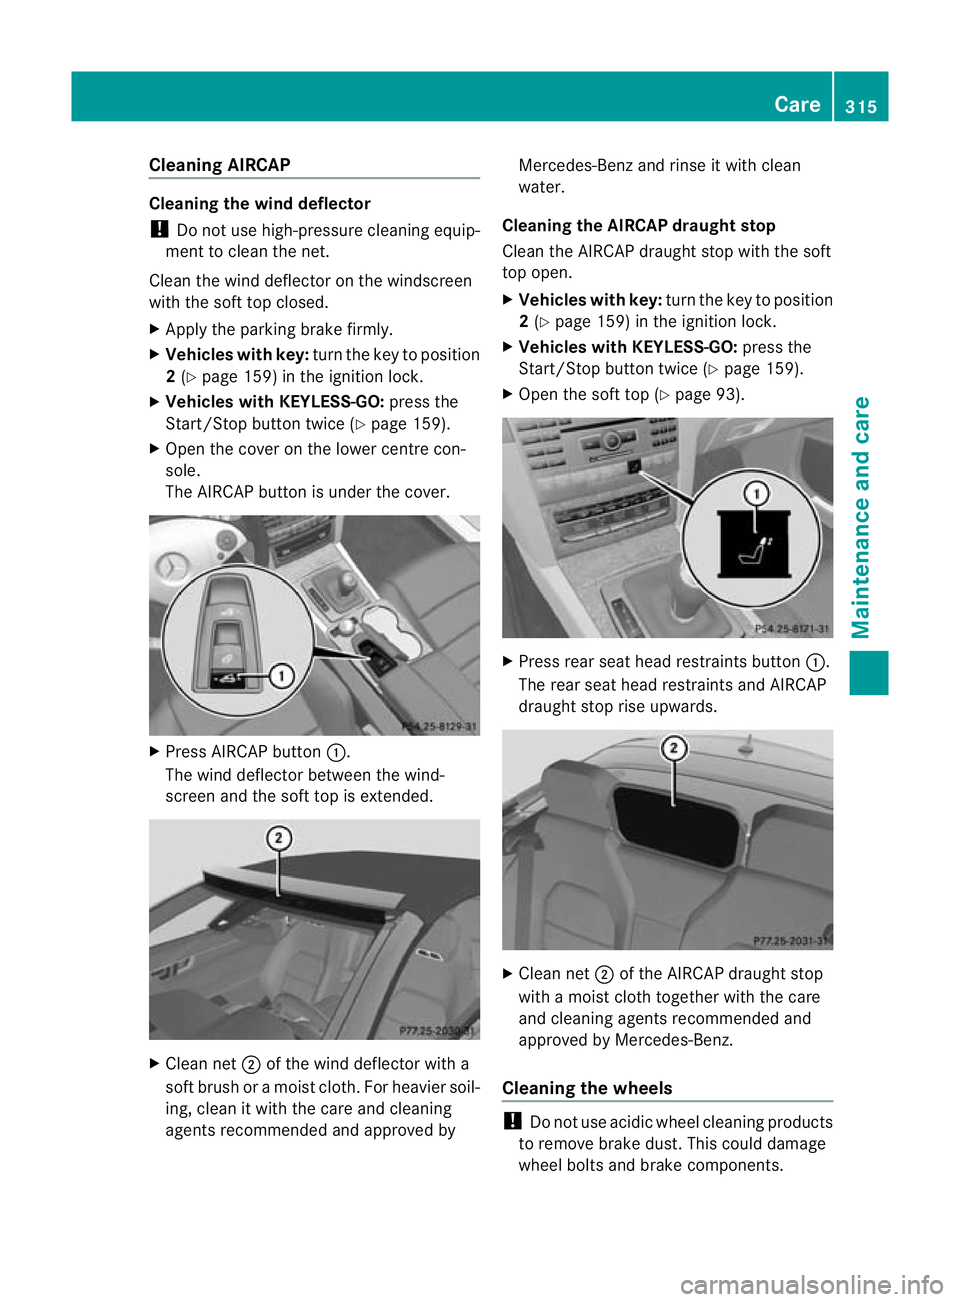
X Open the cover on the lower centre con-
sole.
The AIRCAP button is under the cover. X
Press AIRCAP button :.
The wind deflector between the wind-
screen and the soft top is extended. X
Cleann et; of the wind deflector with a
soft brush or a moist cloth. For heavier soil-
ing, clean it with the care and cleaning
agents recommended and approved by Mercedes-Benza
nd rinse it with clean
water.
Cleaning the AIRCAP draught stop
Clea nthe AIRCAP draught stop with the soft
top open.
X Vehicles with key: turn the key to position
2 (Y page 159) in the ignition lock.
X Vehicles with KEYLESS-GO: press the
Start/Stop button twice (Y page 159).
X Open the soft top (Y page 93). X
Press rear seat head restraints button :.
The rear seat head restraints and AIRCAP
draught stop rise upwards. X
Cleann et; of the AIRCAP draught stop
with a moist cloth together with the care
and cleaning agents recommended and
approved by Mercedes-Benz.
Cleaning the wheels !
Do not use acidic wheel cleaning products
to remove brake dust. This could damage
wheel bolts and brake components. Care
315Maintenance and care Z
Page 319 of 389
!
Do not park up the vehicle for an extended
period straight after cleaning it, particularly
after having cleaned the wheels with wheel
cleaner. Wheel cleaners could cause
increased corrosion of the brake discs and
brake pads/linings. For this reason, you
should drive for a few minutes after clean-
ing. Braking heats the brake discs and the
brake pads/linings, thus drying them. The
vehicle can then be parked up.
Cleaning the windows G
WARNING
Switch off the windscreen wipers and remove
the key from the ignition lock before cleaning
the windscreen or the wiper blades. On vehi-
cles with KEYLESS-GO, press the Start/Stop
button repeatedly until all indicator lamps in
the instrument cluster have gone off. The
windscreen wipers could otherwise move and
injure you.
! Do not use dry cloths, abrasive products,
solvents or cleaning agents containing sol-
vents to clean the inside of the windows.
Do not touch the insides of the windows
with hard objects, e.g. an ice scraper or
ring. There is otherwise a risk of damaging
the windows.
! Cleant he water drainage channels of the
windscreen and the rear window at regular
intervals. Deposits such as leaves, petals
and pollen may under certain circumstan-
ces prevent water from draining away.T his
can lead to corrosion damage and damage
to electronic components.
X Cleant he inside and outside of the win-
dows with a damp cloth and a cleaning
agent that is recommended and approved
by Mercedes-Benz.
Cleaning the wiper blades G
WARNING
Switch off the windscreen wipers and remove
the key from the ignition lock before cleaning the windscreen or the wiper blades. On vehi-
cles with KEYLESS-GO, press the Start/Stop
button repeatedly until all indicator lamps in
the instrument cluster have gone off. The
windscreen wipers could otherwise move and
injure you.
! Do not pull on the wiper blade. Otherwise,
the wiper blade could be damaged.
! Do not clean wiper blades too often and
do not rub them too hard. Otherwise, the
graphite coating could be damaged. This
could cause wiper noise.
! Hold the wiper arm securely when folding
back. The windscreen could be damaged if
the wiper arm hits against it suddenly.
X Fold the wiper arms away from the wind-
screen.
X Carefully clean the wiper blades with a
damp cloth.
X Fold the windscreen wipers back again
before switching on the ignition.
Cleaning the exterior lighting !
Only use cleaning agents or cleaning
cloths that are suitable for plastic lenses.
Unsuitable cleaning agents or cleaning
cloths could scratch or damage the plastic
lenses of the exterior lighting.
X Cleant he plastic lenses of the exterior
lighting using a wet sponge and a mild
cleaning agent, e.g. Mercedes-Ben zcar
shampoo or cleaning cloths.
Mirror turn signal !
Only use cleaning agents or cleaning
cloths that are suitable for plastic lenses.
Unsuitable cleaning agents or cleaning
cloths could scratch or damage the plastic
lenses of the mirror tur nsignals.
X Clean the plasti clenses of the mirror turn
signals in the exterior mirror housing using
a wet sponge and mild cleaning agent, e.g. 316
CareMaintenance and care
Page 327 of 389
The vehicle tool kit contains:
R
Cabriolet: straps for emergency release of
the soft top
R Foldable wheel chock
R Fuse allocation chart
R Jack
R Centring pin
R One pair of gloves
R wheel wrench
R Towing eye Flat tyre
Preparing the vehicle
Information on changing a wheel/fitting
(Y page 346).
Vehicle preparation is not necessary on vehi-
cles with MOExtended tyres.
Your vehicle may be equipped with:
R MOExtended tyres (tyres with run-flat char-
acteristics) (Y page 324)
R a TIREFIT kit (Y page 325)
R an emergency spare wheel (only for certain
countries) (Y page 363)
X Stop the vehicle as far away as possible
from traffic on solid, non-slippery and level
ground.
X Switch on the hazard warning lamps.
X Apply the parking brake.
X Bring the frontw heels into the straight-
ahead position.
X Shift the transmission to position P.
X Switch off the engine.
X Vehicles without KEYLESS-GO: remove
the key from the ignition lock.
X Vehicles with KEYLESS-GO: open the
driver's door.
The on-board electronics have status 0,
which is the same as the key having been
removed. X
Vehicles with KEYLESS-GO: remove the
Start/Stop button from the ignition lock
(Y page 159).
X All occupants must get out of the vehicle.
Make sure that they are not endangered as
they do so.
X Make sure that no one is near the danger
area while a wheel is being changed. Any-
one who is not directly assisting in the
wheel change should, for example, stand
behind the barrier.
X Get out of the vehicle. Pay attention to traf-
fic conditions when doing so.
X Close the driver's door.
X Place the warning triangle a suitable dis-
tance away (Y page 322). Observe legal
requirements. MOExtended tyres (tyres with run-flat
characteristics)
G
WARNING
When driving in emergency mode, the driving
characteristics deteriorate, e.g. when corner-
ing, accelerating quickly and when braking.
There is a risk of accident.
Do not exceed the stated maximum speed.
Avoid abrupt steering and driving manoeu-
vres, and driving over obstacles (kerbs, pot-
holes, off-road). This applies in particular to a
laden vehicle.
Stop driving in emergency mode if:
R you hear banging noises.
R the vehicle starts to shake.
R you see smoke and smell rubber.
R ESP ®
is intervening constantly.
R there are tears in the sidewalls of the tyre.
After driving in emergency mode, have the
wheel rims checked at a qualified specialist
workshop with regard to their further use. The
faulty tyre must be replaced.
With MOExtended tyres (tyres with run-flat
characteristics), you can continue to drive 324
Flat tyreBreakdown assistance
Page 336 of 389
Towing and tow-starting
Important safety notes
G
WARNING
If you tow the vehicle, you must use a rigid
towing ba rif:
R the engine is not running.
R there is a brake system malfunction.
R there is a malfunction in the power supply
or the vehicle's electrical system.
The power assistance for the steering and the
brake force booster do not work when the
engine is not running. You will need more
force to steer and brake, you may have to
depress the brake pedal with maximu mforce.
Before towing away, make sure that the steer-
ing can be moved and is not locked.
If you tow or tow-start another vehicle, its
weight must not exceed the maximum per-
missible gross vehicle weight of your vehicle. G
WARNING
The vehicle is braked when the HOLD function
or DISTRONIC PLUS is activated. Therefore,
deactivate HOLD and DISTRONIC PLUS if the
vehicle is to be towed.
! Only secure the tow rope or towing bar to
the towing eyes. The vehicle may otherwise
be damaged.
! Observe the following points when towing
with a tow rope:
R secure the tow rope on the same side on
both vehicles.
R the tow rope must not be longer than is
legally permitted. It should be marked in
the middle, e.g. with a white cloth
(30 x30c m) so thatothe rroad users are
aware that a vehicle is being towed.
R the tow rope may only be attached to the
towing eyes.
R observe the brake lamps of the towing
vehicle while driving. Always maintain a distance so that the tow rope does not
sag.
R do not use steel cables or chains to tow
your vehicle. The vehicle could be dam-
aged.
! Do not use the towing eye for recovery,
this could damage the vehicle. If in doubt,
recover the vehicle with acrane.
! Pull away smoothly when towing away or
tow-starting a vehicle. If the tractive power
is too high, the vehicles could be damaged.
! On vehicles with KEYLESS-GO, use the
key instead of the Start/Stop button. Turn
the key to position 2in the ignitio nlock and
shift the automatic transmission to N.
Then, turn the key back to 0and leave it in
the ignition lock.
! You may tow the vehicle for a maximum
of 50km. A towing speed of 50 km/h must
not be exceeded.
For towing distances over 50 km, the entire
vehicle must be lifted up and transported.
! If you tow or tow-start another vehicle, its
weight must not exceed the maximu mper-
missible gross vehicle weight of your vehi-
cle.
Information on your vehicle's gross vehicle
weight rating can be found on the vehicle
identification plate (Y page 371).
Observe the legal requirement sfor the rele-
vant countries when towing and tow-starting.
It is better to have the vehicle transported
than to have it towed.
If the vehicle has suffered transmission dam-
age, have it transported on a transporter or
trailer.
When towing a vehicle with an automatic
transmission, the transmission must be in
position N. Towing and tow-starting
333Breakdown assistance Z
Page 337 of 389
The battery must be connected and charged.
Otherwise, you:
R cannot turn the key in the ignition lock to
position 2
R cannot shift the transmission to position
N on vehicles with automatic transmission
Vehicles with automatic transmission:
release the selector lever lock manually to
move it out of position P(Y page 173).
i Deactivate the automatic locking feature
(Y page 84). You could otherwise be locked
out when pushing or towing the vehicle.
Deactivate tow-away protection
(Y page 71) before the vehicle is towed. Fitting/removing the towing eye
Fitting the towing eye G
WARNING
The exhaust tail pipe may be hot. You could
burn yourself if you touch the tail pipe. Be
particularly careful when removing the rear
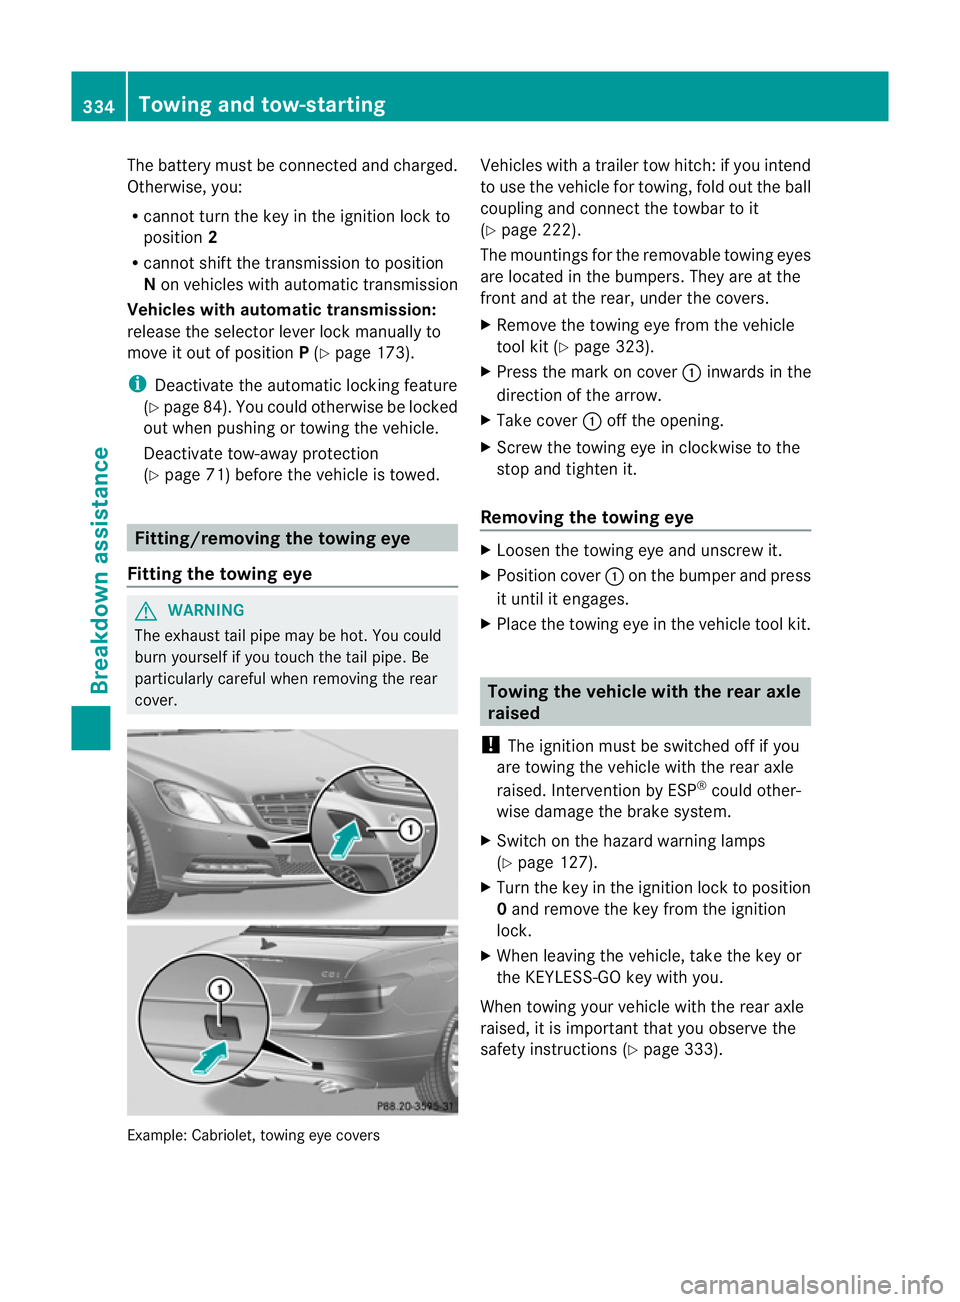
cover. Example: Cabriolet, towing eye covers Vehicles with a trailer tow hitch: if you intend
to use the vehicle for towing, fold out the ball
coupling and connect the towbar to it
(Y
page 222).
The mountings for the removable towing eyes
are located in the bumpers. They are at the
front and at the rear, under the covers.
X Remove the towing eye from the vehicle
tool kit (Y page 323).
X Press the mark on cover :inwards in the
direction of the arrow.
X Take cover :off the opening.
X Screw the towing eye in clockwise to the
stop and tighten it.
Removing the towing eye X
Loosen the towing eye and unscrew it.
X Position cover :on the bumper and press
it until it engages.
X Place the towing eye in the vehicle tool kit. Towing the vehicle with the rear axle
raised
! The ignition must be switched off if you
are towing the vehicle with the rear axle
raised. Intervention by ESP ®
could other-
wise damage the brake system.
X Switch on the hazard warning lamps
(Y page 127).
X Turn the key in the ignition lock to position
0 and remove the key from the ignition
lock.
X When leaving the vehicle, take the key or
the KEYLESS-GO key with you.
When towing your vehicle with the rear axle
raised, it is importan tthat you observe the
safety instructions (Y page 333).334
Towing and tow-startingBreakdown assistance
Page 339 of 389
X
Release the clutch pedal slowly; do not
depress the accelerato rpedal while doing
so.
The engine is started.
X Depress the clutch pedal and shift to neu-
tral.
X Stop at a suitable place.
X Depress the parking brake.
X Remove the rigid towing bar or towing rope.
X Remove the towing eye (Y page 334).
X Switch off the hazard warning lamps.
Before tow-starting the following conditions
must be fulfilled:
R the battery is connected.
R the engine has cooled down.
R the exhaust system has cooled down.
You can find information on "Jump-starting"
at (Y page 331). Electrical fuses
Important safety notes
G
WARNING
Only use fuses that have been approved for
Mercedes-Benz vehicles and which have the
correct fuse rating for the systems con-
cerned. Do not attempt to repair or bridge
faulty fuses. Using fuses which have not been
approved or attempting to repair or bridge
faulty fuses could cause the fuse to be over-
loaded and result in a fire. Have the cause
traced and rectified at a qualified specialist
workshop.
! Only use fuses that have been approved
for Mercedes-Benzv ehicles and which
have the correct fuse rating for the system
concerned. Otherwise, components or sys-
tems could be damaged.
The fuses in your vehicle serve to close down
faulty circuits. If afuse blows, all the compo-
nents on the circuit and their functions stop
operating. Blown fuses must be replace
dwith fuses of
the same rating, which you can recognise by
the colour and fuse rating. The fuse ratings
are listed in the fuse allocation chart.
If the newly inserted fuse also blows, have the
cause traced and rectified at a qualified spe-
cialist workshop, e.g. a Mercedes-Benz
Service Centre. Before replacing a fuse
X Secure the vehicle against rolling away
(Y page 177).
X Switch off all electrical consumers.
X Turn the key to position 0in the ignition
lock and remove it (Y page 159).
or
X On vehicles with KEYLESS-GO, make sure
the ignition is switched off (Y page 159).
All indicator lamps in the instrumen tcluster
must be off.
The fuses are located in various fuse boxes:
R fuse box on the driver's side of the dash-
board
R fuse box in the engine compartmen tonthe
left-hand side of the vehicle, when viewed
in the direction of travel
R fuse box in the boot on the right-hand side
of the vehicle, when viewed in the direction
of travel
The fuse allocation chart is located in the
vehicle tool kit in the stowage compartment
under the boot floor (Y page 323). Dashboard fuse box
! Do not use a pointed object such as a
screwdriver to open the cover in the dash-
board. You could damage the dashboard or
the cover.
! Make sure that no moisture can enter the
fuse box when the cover is open. 336
Electrical fusesBreakdown assistance