key battery MERCEDES-BENZ E-CLASS COUPE 2015 Owner's Manual
[x] Cancel search | Manufacturer: MERCEDES-BENZ, Model Year: 2015, Model line: E-CLASS COUPE, Model: MERCEDES-BENZ E-CLASS COUPE 2015Pages: 345, PDF Size: 11.42 MB
Page 138 of 345
after a cold start. This helps the catalytic con-
verter to reach its operating temperature
more quickly.
Hill start assist Hill start assist helps you when pulling away for-
wards or in reverse on an uphill gradient. It holds the vehicle for a short time after you have
removed your foot from the brake pedal. This
gives you enough time to move your foot from
the brake pedal to the accelerator pedal and
depress it before the vehicle begins to roll. G
WARNING
After a while, hill start assist no longer holds
the vehicle and it may roll away. There is a risk of an accident and injury.
Therefore, quickly move your foot from the
brake pedal to the accelerator pedal. Never
leave the vehicle when it is held by hill start
assist.
Hill start assist is not active if:
R you are pulling away on a level road or a
downhill gradient
R on vehicles with automatic transmission, the
transmission is in position N
R the parking brake is applied
R ESP ®
is malfunctioning ECO start/stop function
Introduction The ECO start/stop function switches the
engine off automatically if the vehicle is stopped
under certain conditions.
When pulling away again, the engine starts auto-
matically. The ECO start/stop function thereby
helps you to reduce the fuel consumption and
emissions of your vehicle.
Important safety notes G
WARNING
If the engine is switched off automatically and you exit the vehicle, the engine is restarted
automatically. The vehicle may begin moving. There is a risk of accident and injury. If you wish to exit the vehicle, always turn off
the ignition and secure the vehicle against
rolling away.
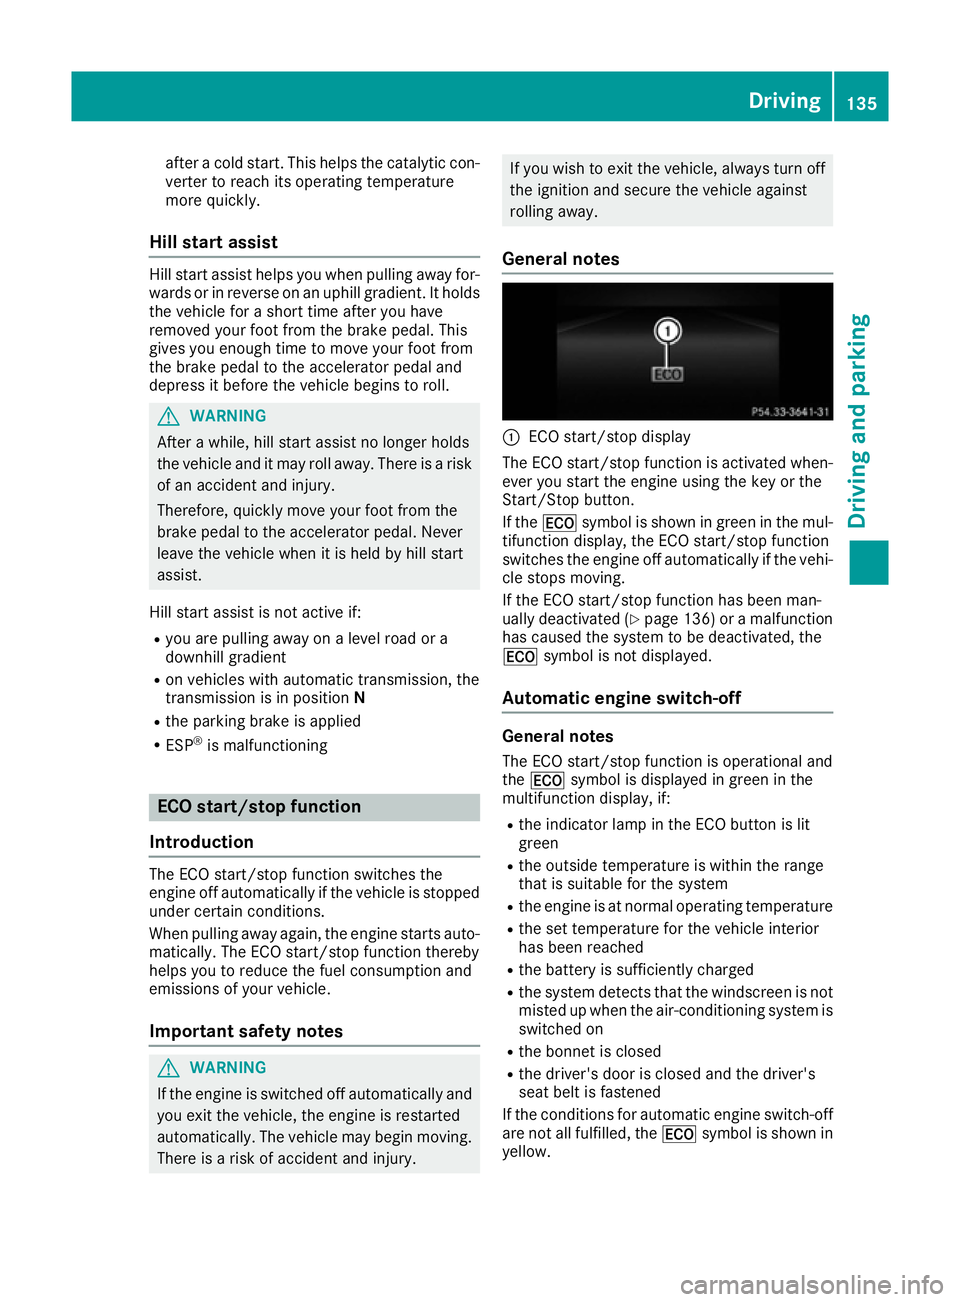
General notes :
ECO start/stop display
The ECO start/stop function is activated when-
ever you start the engine using the key or the
Start/Stop button.
If the ¤ symbol is shown in green in the mul-
tifunction display, the ECO start/stop function
switches the engine off automatically if the vehi- cle stops moving.
If the ECO start/stop function has been man-
ually deactivated (Y page 136) or a malfunction
has caused the system to be deactivated, the
¤ symbol is not displayed.
Automatic engine switch-off General notes
The ECO start/stop function is operational and
the ¤ symbol is displayed in green in the
multifunction display, if:
R the indicator lamp in the ECO button is lit
green
R the outside temperature is within the range
that is suitable for the system
R the engine is at normal operating temperature
R the set temperature for the vehicle interior
has been reached
R the battery is sufficiently charged
R the system detects that the windscreen is not
misted up when the air-conditioning system is switched on
R the bonnet is closed
R the driver's door is closed and the driver's
seat belt is fastened
If the conditions for automatic engine switch-off
are not all fulfilled, the ¤symbol is shown in
yellow. Driving
135Driving and parking Z
Page 141 of 345
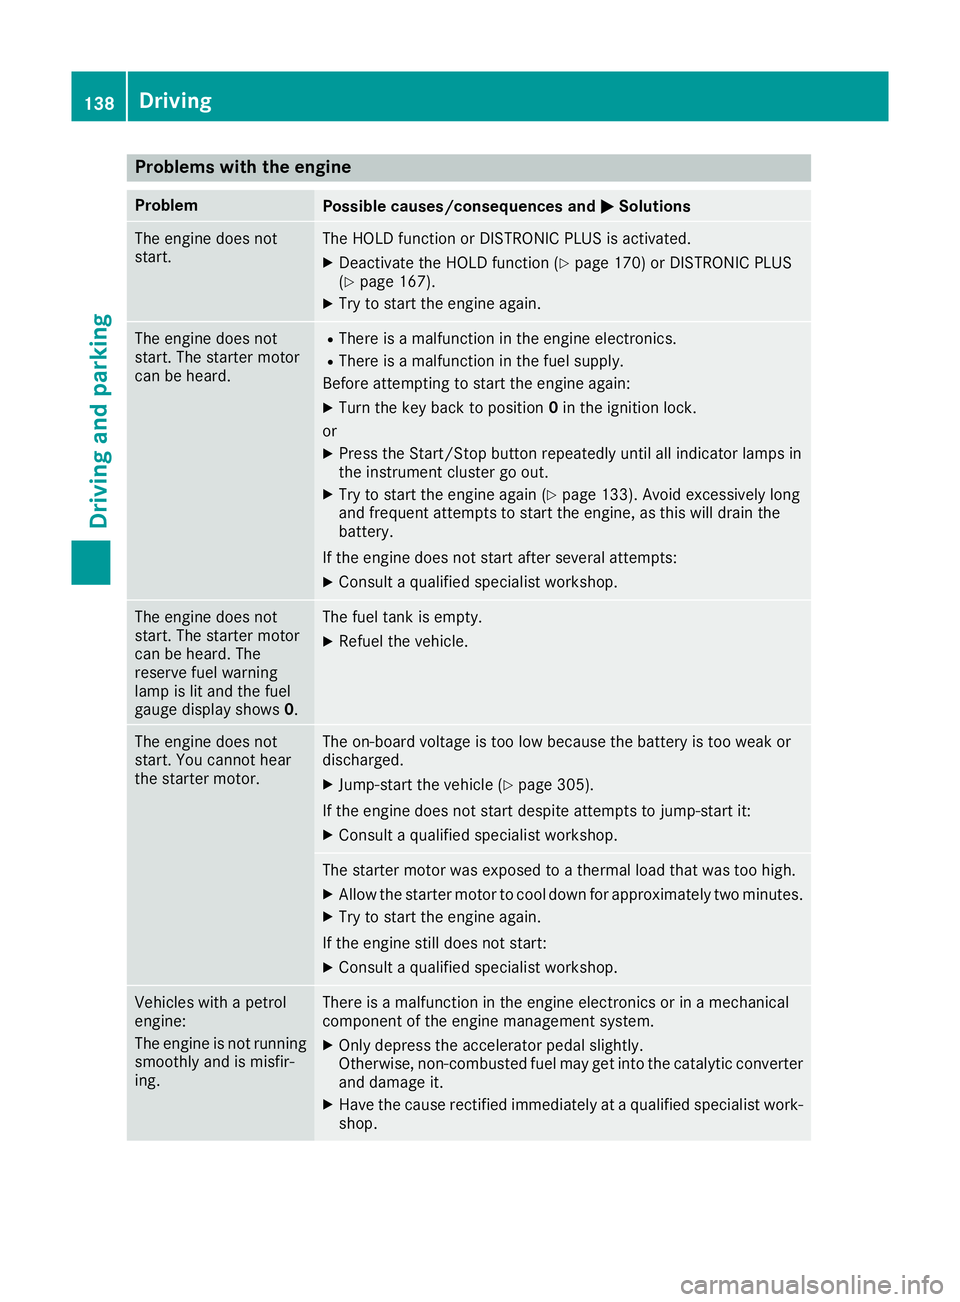
Problems with the engine
Problem
Possible causes/consequences and
M
MSolutions The engine does not
start. The HOLD function or DISTRONIC PLUS is activated.
X Deactivate the HOLD function (Y page 170) or DISTRONIC PLUS
(Y page 167).
X Try to start the engine again. The engine does not
start. The starter motor
can be heard. R
There is a malfunction in the engine electronics.
R There is a malfunction in the fuel supply.
Before attempting to start the engine again:
X Turn the key back to position 0in the ignition lock.
or X Press the Start/Stop button repeatedly until all indicator lamps in
the instrument cluster go out.
X Try to start the engine again (Y page 133). Avoid excessively long
and frequent attempts to start the engine, as this will drain the
battery.
If the engine does not start after several attempts:
X Consult a qualified specialist workshop. The engine does not
start. The starter motor
can be heard. The
reserve fuel warning
lamp is lit and the fuel
gauge display shows
0. The fuel tank is empty.
X Refuel the vehicle. The engine does not
start. You cannot hear
the starter motor. The on-board voltage is too low because the battery is too weak or
discharged.
X Jump-start the vehicle (Y page 305).
If the engine does not start despite attempts to jump-start it:
X Consult a qualified specialist workshop. The starter motor was exposed to a thermal load that was too high.
X Allow the starter motor to cool down for approximately two minutes.
X Try to start the engine again.
If the engine still does not start: X Consult a qualified specialist workshop. Vehicles with a petrol
engine:
The engine is not running
smoothly and is misfir-
ing. There is a malfunction in the engine electronics or in a mechanical
component of the engine management system.
X Only depress the accelerator pedal slightly.
Otherwise, non-combusted fuel may get into the catalytic converter
and damage it.
X Have the cause rectified immediately at a qualified specialist work-
shop. 138
DrivingDriving and parking
Page 153 of 345
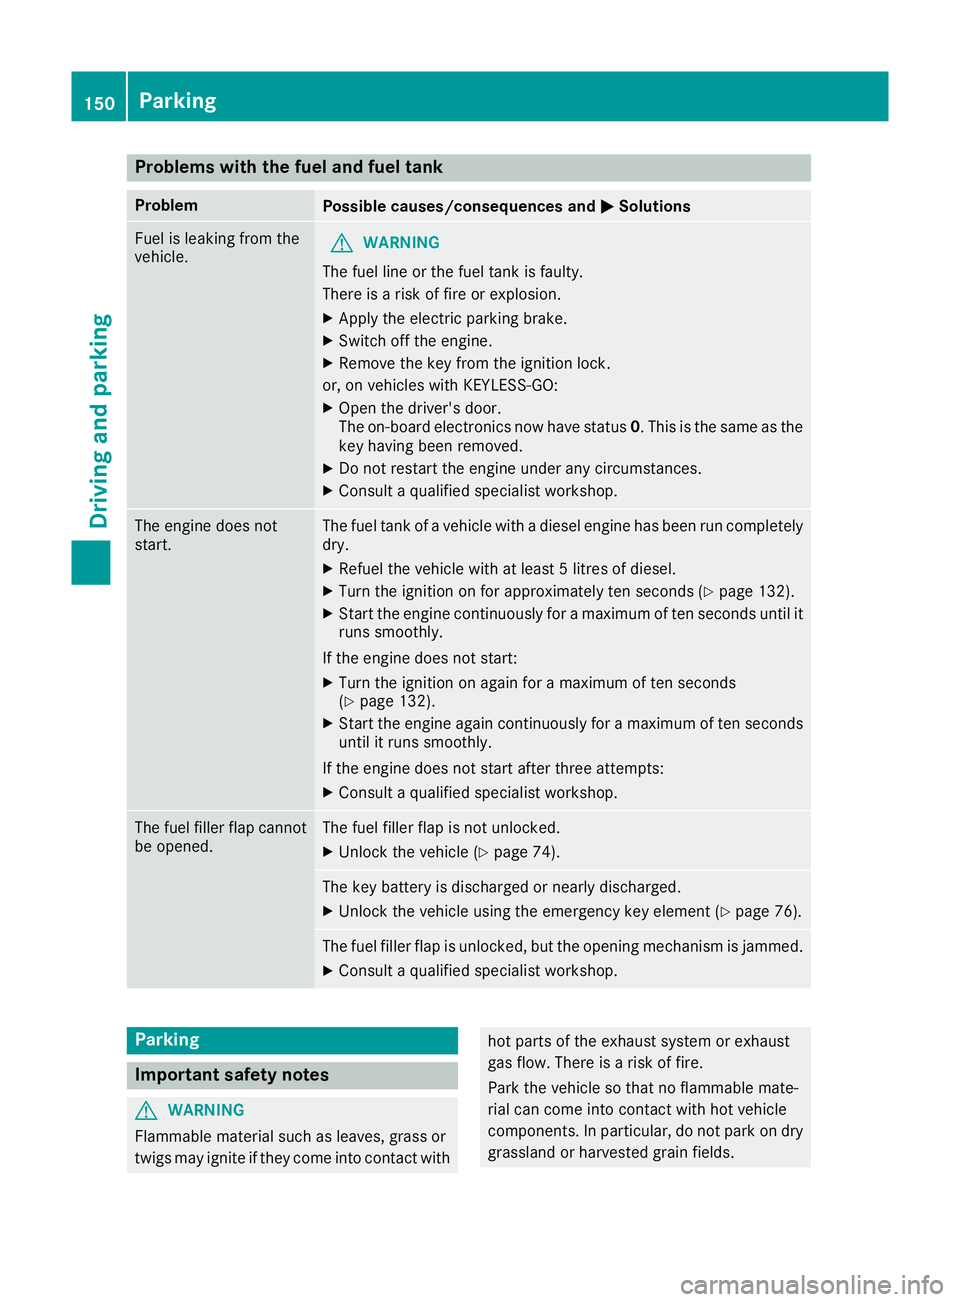
Problems with the fuel and fuel tank
Problem
Possible causes/consequences and
M
MSolutions Fuel is leaking from the
vehicle.
G
WARNING
The fuel line or the fuel tank is faulty.
There is a risk of fire or explosion. X Apply the electric parking brake.
X Switch off the engine.
X Remove the key from the ignition lock.
or, on vehicles with KEYLESS‑GO: X Open the driver's door.
The on-board electronics now have status 0. This is the same as the
key having been removed.
X Do not restart the engine under any circumstances.
X Consult a qualified specialist workshop. The engine does not
start. The fuel tank of a vehicle with a diesel engine has been run completely
dry.
X Refuel the vehicle with at least 5 litres of diesel.
X Turn the ignition on for approximately ten seconds (Y page 132).
X Start the engine continuously for a maximum of ten seconds until it
runs smoothly.
If the engine does not start: X Turn the ignition on again for a maximum of ten seconds
(Y page 132).
X Start the engine again continuously for a maximum of ten seconds
until it runs smoothly.
If the engine does not start after three attempts:
X Consult a qualified specialist workshop. The fuel filler flap cannot
be opened. The fuel filler flap is not unlocked.
X Unlock the vehicle (Y page 74). The key battery is discharged or nearly discharged.
X Unlock the vehicle using the emergency key element (Y page 76).The fuel filler flap is unlocked, but the opening mechanism is jammed.
X Consult a qualified specialist workshop. Parking
Important safety notes
G
WARNING
Flammable material such as leaves, grass or
twigs may ignite if they come into contact with hot parts of the exhaust system or exhaust
gas flow. There is a risk of fire.
Park the vehicle so that no flammable mate-
rial can come into contact with hot vehicle
components. In particular, do not park on dry grassland or harvested grain fields. 150
ParkingDriving and parking
Page 155 of 345
Parking brake
G
WARNING
If you must brake the vehicle with the parking brake, the braking distance is considerably
longer and the wheels could lock. This increa-
ses the risk of skidding and an accident.
Only use the parking brake to brake the vehi- cle when the service brake is faulty. Do not
apply the parking brake too firmly. If the
wheels lock, release the parking brake until
the wheels begin turning again. G
WARNING
If you leave children unattended in the vehi-
cle, they may be able to set the vehicle in
motion if, for example, they:
R release the parking brake
R shift the automatic transmission out of park
position Por shift manual transmission into
neutral
R start the engine
In addition, they may operate vehicle equip-
ment and become trapped. There is a risk of
an accident and injury.
When leaving the vehicle, always take the key with you and lock the vehicle. Never leave
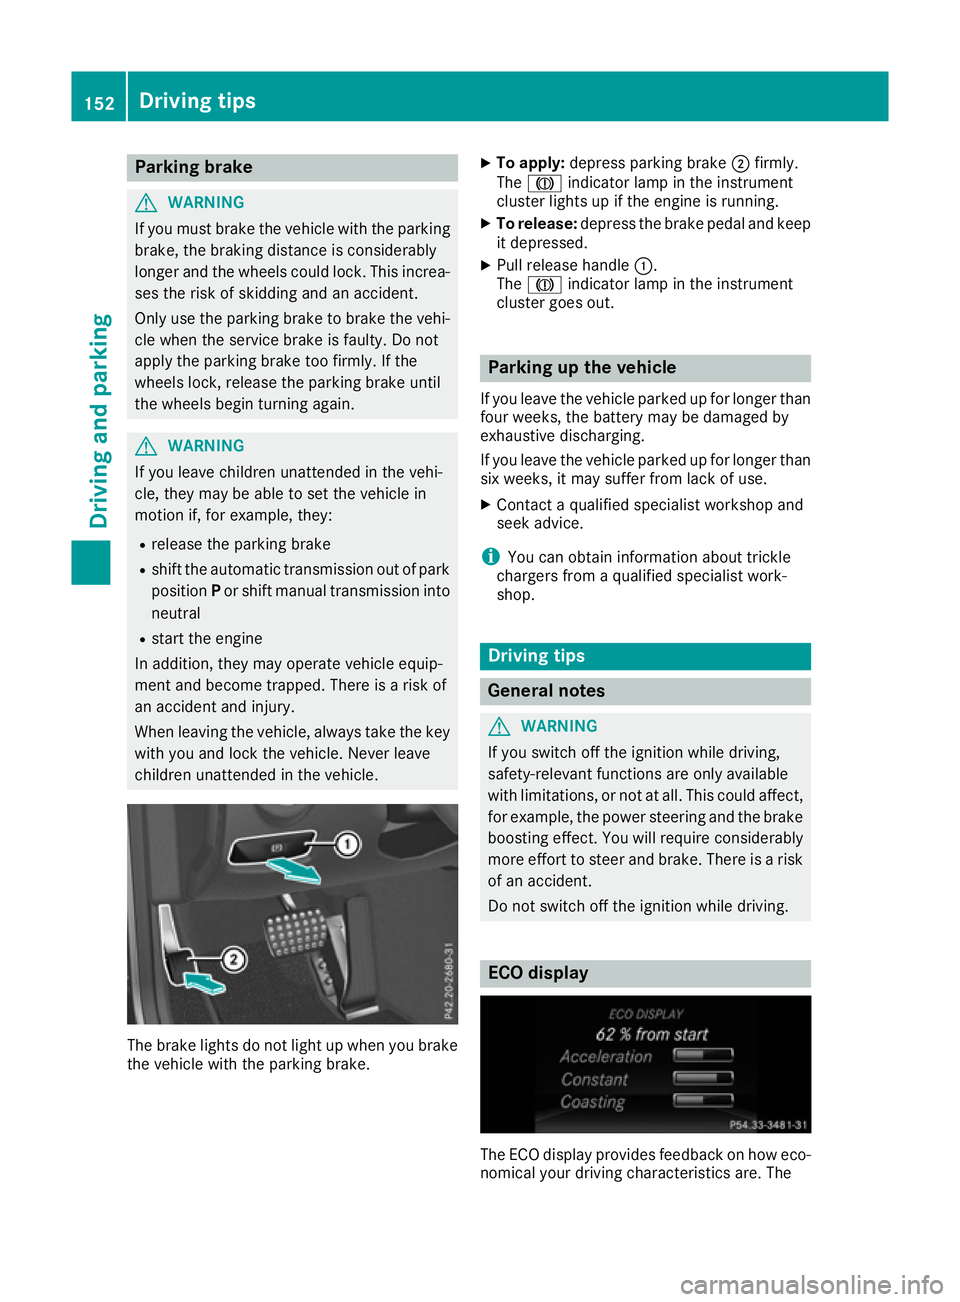
children unattended in the vehicle. The brake lights do not light up when you brake
the vehicle with the parking brake. X
To apply: depress parking brake ;firmly.
The J indicator lamp in the instrument
cluster lights up if the engine is running.
X To release: depress the brake pedal and keep
it depressed.
X Pull release handle :.
The J indicator lamp in the instrument
cluster goes out. Parking up the vehicle
If you leave the vehicle parked up for longer than
four weeks, the battery may be damaged by
exhaustive discharging.
If you leave the vehicle parked up for longer than six weeks, it may suffer from lack of use.
X Contact a qualified specialist workshop and
seek advice.
i You can obtain information about trickle
chargers from a qualified specialist work-
shop. Driving tips
General notes
G
WARNING
If you switch off the ignition while driving,
safety-relevant functions are only available
with limitations, or not at all. This could affect, for example, the power steering and the brake
boosting effect. You will require considerably
more effort to steer and brake. There is a risk of an accident.
Do not switch off the ignition while driving. ECO display
The ECO display provides feedback on how eco-
nomical your driving characteristics are. The 152
Driving tipsDriving and parking
Page 207 of 345
X
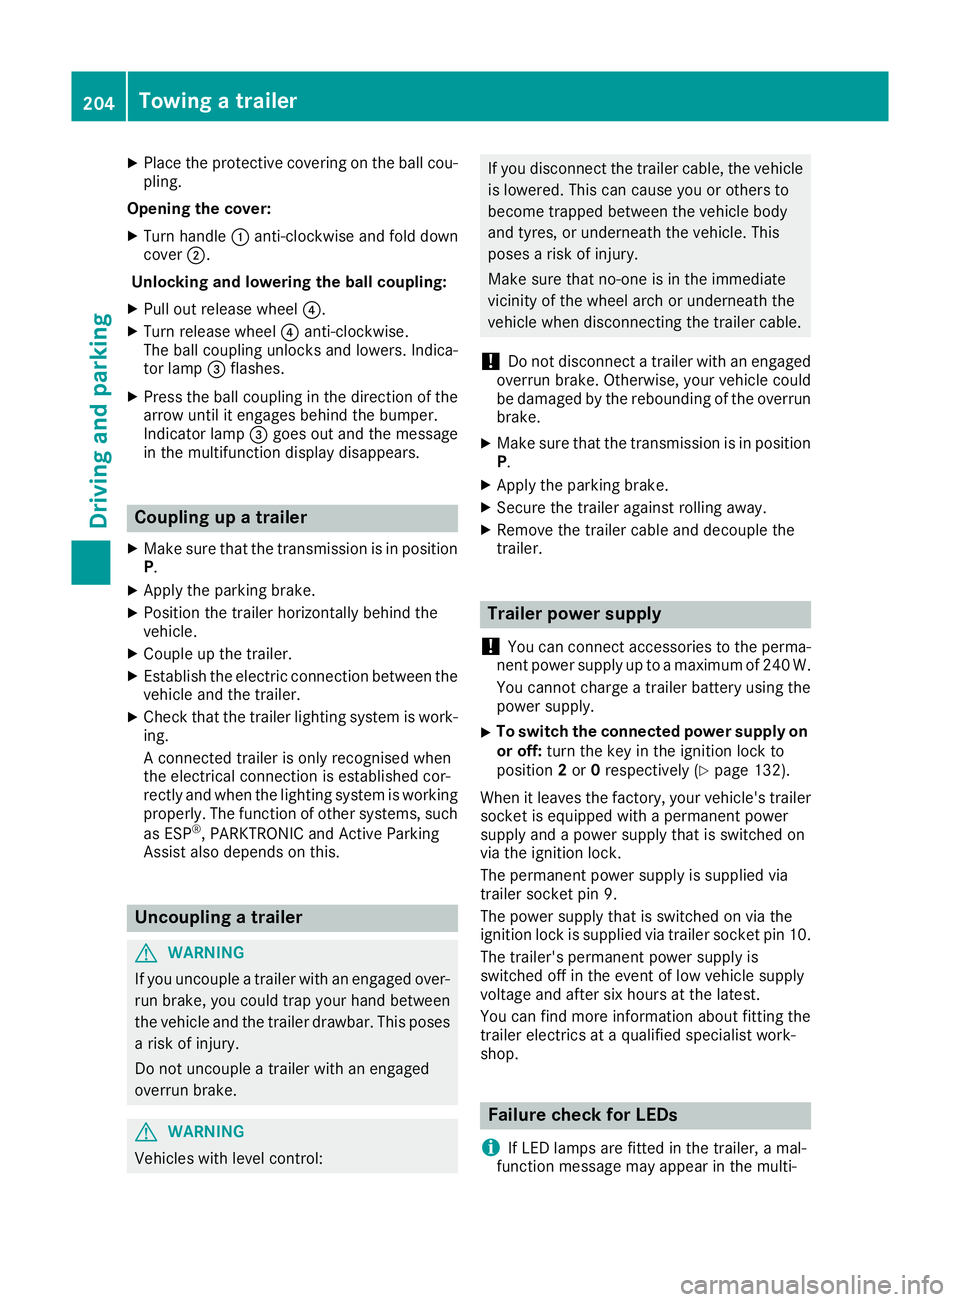
Place the protective covering on the ball cou-
pling.
Opening the cover: X Turn handle :anti-clockwise and fold down
cover ;.
Unlocking and lowering the ball coupling:
X Pull out release wheel ?.
X Turn release wheel ?anti-clockwise.
The ball coupling unlocks and lowers. Indica-
tor lamp =flashes.
X Press the ball coupling in the direction of the
arrow until it engages behind the bumper.
Indicator lamp =goes out and the message
in the multifunction display disappears. Coupling up a trailer
X Make sure that the transmission is in position
P.
X Apply the parking brake.
X Position the trailer horizontally behind the
vehicle.
X Couple up the trailer.
X Establish the electric connection between the
vehicle and the trailer.
X Check that the trailer lighting system is work-
ing.
A connected trailer is only recognised when
the electrical connection is established cor-
rectly and when the lighting system is working
properly. The function of other systems, such
as ESP ®
, PARKTRONIC and Active Parking
Assist also depends on this. Uncoupling a trailer
G
WARNING
If you uncouple a trailer with an engaged over- run brake, you could trap your hand between
the vehicle and the trailer drawbar. This poses a risk of injury.
Do not uncouple a trailer with an engaged
overrun brake. G
WARNING
Vehicles with level control: If you disconnect the trailer cable, the vehicle
is lowered. This can cause you or others to
become trapped between the vehicle body
and tyres, or underneath the vehicle. This
poses a risk of injury.
Make sure that no-one is in the immediate
vicinity of the wheel arch or underneath the
vehicle when disconnecting the trailer cable.
! Do not disconnect a trailer with an engaged
overrun brake. Otherwise, your vehicle could
be damaged by the rebounding of the overrun
brake.
X Make sure that the transmission is in position
P.
X Apply the parking brake.
X Secure the trailer against rolling away.
X Remove the trailer cable and decouple the
trailer. Trailer power supply
! You can connect accessories to the perma-
nent power supply up to a maximum of 240 W.
You cannot charge a trailer battery using the
power supply.
X To switch the connected power supply on
or off: turn the key in the ignition lock to
position 2or 0respectively (Y page 132).
When it leaves the factory, your vehicle's trailer
socket is equipped with a permanent power
supply and a power supply that is switched on
via the ignition lock.
The permanent power supply is supplied via
trailer socket pin 9.
The power supply that is switched on via the
ignition lock is supplied via trailer socket pin 10.
The trailer's permanent power supply is
switched off in the event of low vehicle supply
voltage and after six hours at the latest.
You can find more information about fitting the
trailer electrics at a qualified specialist work-
shop. Failure check for LEDs
i If LED lamps are fitted in the trailer, a mal-
function message may appear in the multi- 204
Towing a trailerDriving and parking
Page 248 of 345

Display messages
Possible causes/consequences and
M
MSolutions Ð
Power steering mal‐ Power steering mal‐
function See Own‐ function See Own‐
er's Manual er's Manual The power steering assistance is faulty.
A warning tone also sounds.
G WARNING
You will need to use more force to steer.
There is a risk of an accident.
X Check whether you are able to apply the extra force required.
X If you are able to steer safely: carefully drive on to a qualified
specialist workshop.
X If you are unable to steer safely: do not drive on. Contact the
nearest qualified specialist workshop. ¥
Top up washer fluid Top up washer fluid The washer fluid level in the washer fluid reservoir has dropped below
the minimum.
X Top up the washer fluid (Y page 287).Key
Display messages
Possible causes/consequences and
M
MSolutions Â
Key Key
does
does not
notbelong
belong
to vehicle
to vehicle You have put the wrong key in the ignition lock.
X Use the correct key. Â
Replace key Replace key The key needs to be replaced.
X Consult a qualified specialist workshop. Â
Change Change
key
keybatteries
batteries The battery of the KEYLESS-GO key is discharged.
X Change the replace (Y page 77).Â
Key not detected Key not detected
(red display message) The KEYLESS-GO key is not in the vehicle.
A warning tone also sounds.
If the engine is switched off, you can no longer lock the vehicle cen-
trally or start the engine.
X Pull over and stop the vehicle safely as soon as possible, paying
attention to road and traffic conditions.
X Secure the vehicle against rolling away (Y page 150).
X Locate the KEYLESS-GO key. Display
messages
245On-board computer and displays Z
Page 277 of 345
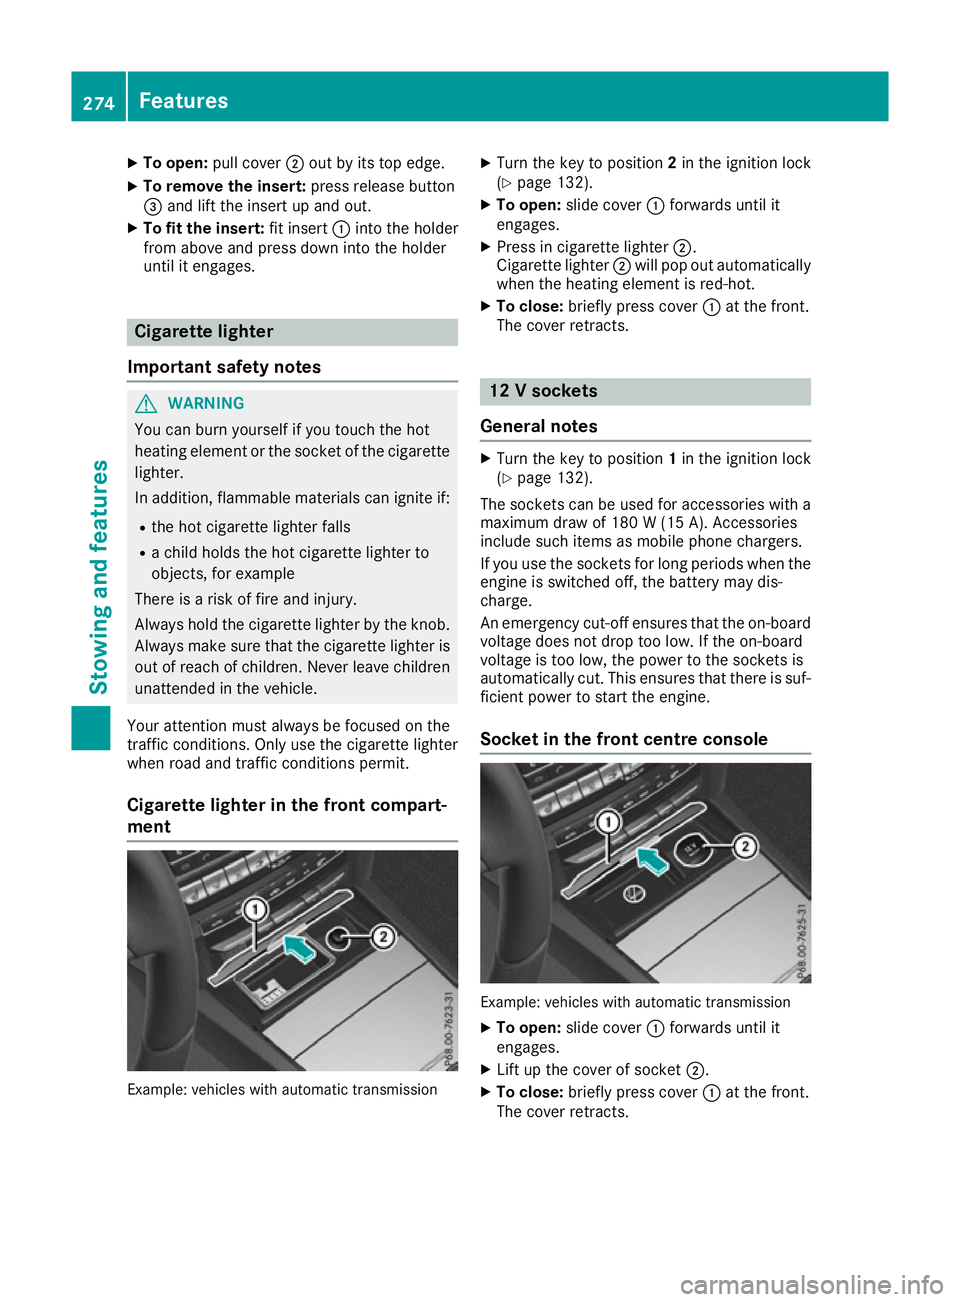
X
To open: pull cover ;out by its top edge.
X To remove the insert: press release button
= and lift the insert up and out.
X To fit the insert: fit insert:into the holder
from above and press down into the holder
until it engages. Cigarette lighter
Important safety notes G
WARNING
You can burn yourself if you touch the hot
heating element or the socket of the cigarette lighter.
In addition, flammable materials can ignite if:
R the hot cigarette lighter falls
R a child holds the hot cigarette lighter to
objects, for example
There is a risk of fire and injury.
Always hold the cigarette lighter by the knob.
Always make sure that the cigarette lighter is
out of reach of children. Never leave children unattended in the vehicle.
Your attention must always be focused on the
traffic conditions. Only use the cigarette lighter when road and traffic conditions permit.
Cigarette lighter in the front compart-
ment Example: vehicles with automatic transmission X
Turn the key to position 2in the ignition lock
(Y page 132).
X To open: slide cover :forwards until it
engages.
X Press in cigarette lighter ;.
Cigarette lighter ;will pop out automatically
when the heating element is red-hot.
X To close: briefly press cover :at the front.
The cover retracts. 12 V sockets
General notes X
Turn the key to position 1in the ignition lock
(Y page 132).
The sockets can be used for accessories with a
maximum draw of 180 W(15 A). Accessories
include such items as mobile phone chargers.
If you use the sockets for long periods when the engine is switched off, the battery may dis-
charge.
An emergency cut-off ensures that the on-boardvoltage does not drop too low. If the on-board
voltage is too low, the power to the sockets is
automatically cut. This ensures that there is suf-
ficient power to start the engine.
Socket in the front centre console Example: vehicles with automatic transmission
X To open: slide cover :forwards until it
engages.
X Lift up the cover of socket ;.
X To close: briefly press cover :at the front.
The cover retracts. 274
FeaturesStowing and fea
tures
Page 307 of 345
occupants from suffering acid burns should the
battery be damaged in the event of an accident.
In order for the battery to achieve the maximum possible service life, it must always be suffi-
ciently charged.
Like other batteries, the vehicle battery may
discharge over time if you do not use the vehicle. In such cases, have the battery disconnected ata qualified specialist workshop. You can also
charge the battery with a charger recommended
by Mercedes-Benz. For more information,
please contact a qualified specialist workshop.
Have the battery charge checked more fre-
quently if you use the vehicle mainly for short
trips or if you leave it standing idle for a lengthy period. Consult a qualified specialist workshop
if you wish to leave your vehicle parked up for a
long period of time.
When you park the vehicle, remove the key if you do not require any electrical consumers. The
vehicle will then use very little energy, thus con- serving battery power.
If the power supply has been interrupted, e.g. if the battery was discharged, you will have to:
R set the clock. Information on setting the clock
can be found in the Digital Owner's Manual.
On vehicles with a multimedia system, the
time is set automatically.
R reset the function for folding the exterior mir-
rors in/out automatically, by folding the mir-
rors out once (Y page 103). Charging the battery
G
WARNING
During charging and jump-starting, explosive
gases can escape from the battery. There is a risk of an explosion.
Particularly avoid fire, naked flames, creating
sparks and smoking. Ensure there is sufficient
ventilation while charging and jump-starting.
Do not lean over a battery. G
WARNING
Battery acid is caustic. There is a risk of injury. Avoid contact with the skin, eyes or clothing.
Do not breathe in any battery gases. Do not
lean over the battery. Keep the batteries out
of the reach of children. Immediately rinse off battery acid thoroughly with plenty of clean
water and seek medical attention at once. G
WARNING
A discharged battery can freeze at tempera-
tures below freezing point. When jump-start-
ing the vehicle or charging the battery, gases can escape from the battery. There is a risk of
an explosion.
Allow the frozen battery to thaw out before
charging it or jump-starting.
! Only use battery chargers with a maximum
charging voltage of 14.8 V.
! Only charge the battery using the jump-start
connection point.
The jump-starting connection point is in the
engine compartment (Y page 305).
X Open the bonnet.
X Connect the battery charger to the positive
terminal and earth point in the same order as
when connecting the donor battery in the
jump-starting procedure (Y page 305).
If the indicator/warning lamps do not light up at
low temperatures, it is very likely that the dis-
charged battery has frozen. In this case, you
may neither charge the battery nor jump-start
the vehicle. The service life of a battery that has been thawed may be reduced. The starting char-
acteristics may be impaired, especially at low
temperatures. Have the thawed battery
checked at a qualified specialist workshop.
Never charge a battery still installed in the vehi-
cle unless a battery charger unit approved by
Mercedes-Benz is being used. A battery charger unit specially adapted for Mercedes-Benz vehi-
cles and tested and approved by Mercedes-
Benz is available as an accessory. This device
permits charging of the battery in position. Con-
tact a Mercedes-Benz Service Centre for infor-
mation and availability. Read the battery charg- er's operating instructions before charging the
battery. 304
Battery (vehicle)Breakdown assistance
Page 309 of 345
Do not use a rapid charging device to start the vehicle. If your vehicle's battery is discharged, the
engine can be jump-started from another vehicle or from a second battery using jump leads.
Observe the following points:
R The battery is not accessible in all vehicles. If the other vehicle's battery is not accessible, jump-
start the vehicle using a second battery or a jump-starting device.
R Vehicles with a petrol engine: only jump-start the vehicle when the engine and exhaust system
are cold.
R Jump-starting may only be performed using batteries with a nominal voltage of 12 V.
R Only use jump leads that have a sufficient cross-section and insulated terminal clamps.
R If the battery is fully discharged, leave the battery that is being used to jump-start connected for
a few minutes before attempting to start. This charges the empty battery a little.
R Make sure that the two vehicles do not touch.
Make sure that:
R The jump leads are not damaged.
R Non-insulated parts of the terminal clamps do not come into contact with other metal parts while
the jump leads are connected to the battery.
R The jump leads cannot come into contact with parts which can move when the engine is running,
such as the V-belt pulley or the fan.
X Firmly depress the parking brake.
X Manual transmission: depress the clutch pedal fully and shift to neutral.
X Automatic transmission: shift the transmission to position P.
X Make sure the ignition is switched off. All indicator lamps in the instrument cluster must be off.
When using the key, turn the key to position 0in the ignition lock and remove it (Y page 132).
X Switch off all electrical consumers, e.g. rear window heating, lighting etc.
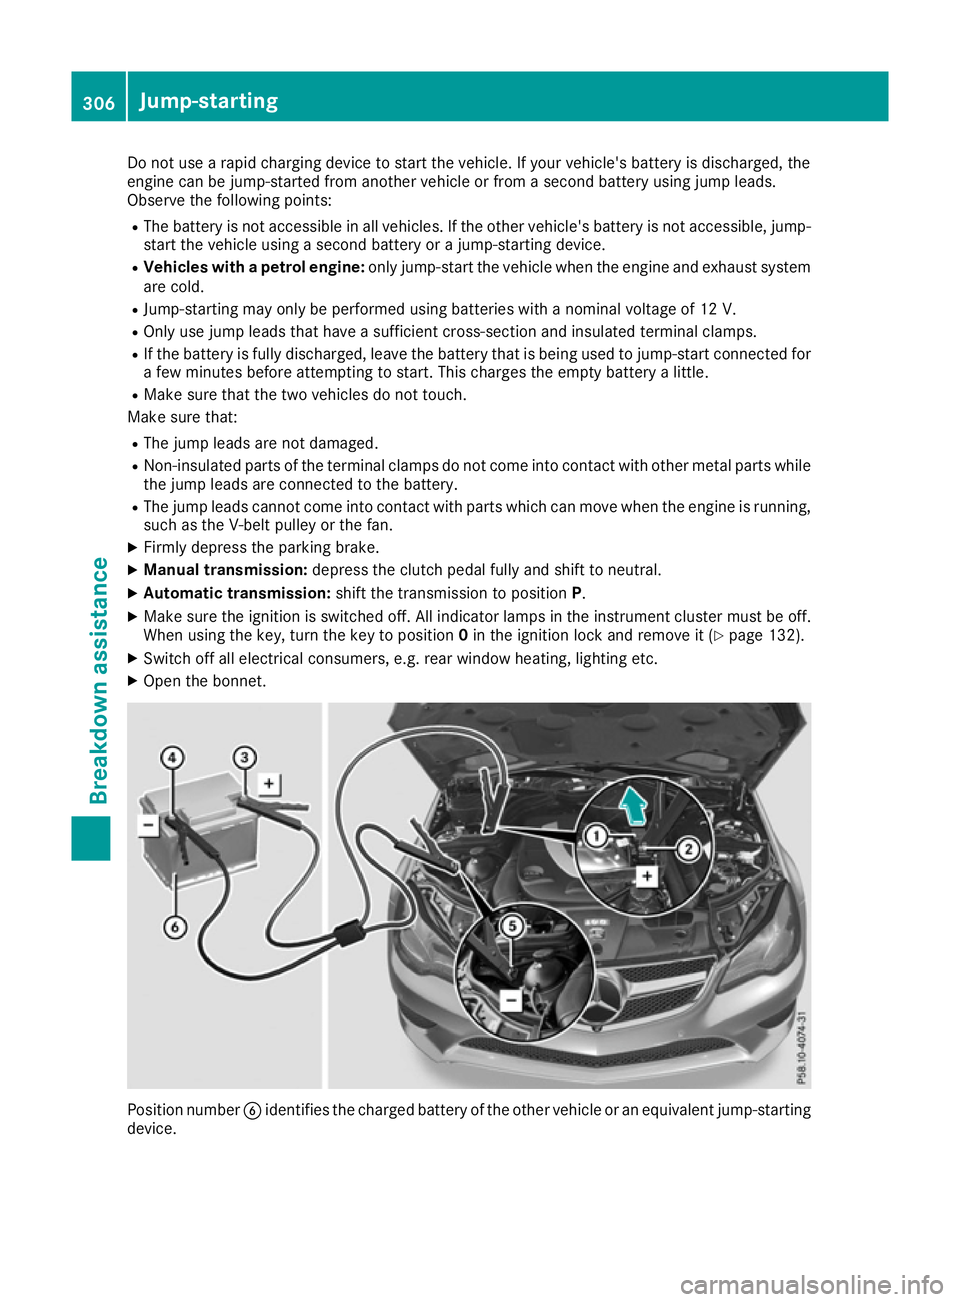
X Open the bonnet. Position number
Bidentifies the charged battery of the other vehicle or an equivalent jump-starting
device. 306
Jump-startingBreakdown assistance
Page 311 of 345
R
Observe the brake lamps of the towing
vehicle while driving. Always maintain a dis-
tance a distance so that the tow rope does not sag.
R Do not use steel cables or chains to tow
your vehicle. You could otherwise damage
the vehicle.
! Do not use the towing eye for recovery, this
could damage the vehicle. If in doubt, recover
the vehicle with a crane.
! Pull away smoothly when towing away or
tow-starting a vehicle. If the tractive power is
too high, the vehicles could be damaged.
! On vehicles with KEYLESS-GO, use the key
instead of the Start/Stop button. Turn the key
to position 2in the ignition lock and shift the
automatic transmission to N. Then, turn the
key back to 0and leave it in the ignition lock.
! You may tow the vehicle for a maximum of
50km. A towing speed of 50 km/h must not
be exceeded.
For towing distances over 50 km, the entire
vehicle must be lifted up and transported.
! If you tow or tow-start another vehicle, its
weight must not exceed the maximum per-
missible gross vehicle weight of your vehicle.
Observe the legal requirements for the relevant
countries when towing and tow-starting.
It is better to have the vehicle transported than
to have it towed.
If the vehicle has suffered transmission damage, have it transported on a transporter or trailer.
When towing away a vehicle with an automatic
transmission, the transmission must be in posi-
tion N.
The battery must be connected and charged.
Otherwise, you:
R cannot turn the key to position 2in the igni-
tion lock
R cannot shift the transmission to position Non
vehicles with automatic transmission
In the event of damage to the electrical sys-
tem
If the battery is defective, the automatic trans-
mission will be locked in position P. To shift the
automatic transmission to position N, you must
provide power to the vehicle's on-board electri- cal system in the same way as when jump-start-
ing (Y page 305). Have the vehicle transported on a transporter or
trailer.
Deactivate the automatic locking feature beforetowing the vehicle (Y page 82). You could oth-
erwise be locked out when pushing or towing
the vehicle.
Deactivate tow-away protection before the vehi- cle is towed away (Y page 72). Fitting/removing the towing eye
Fitting the towing eye G
WARNING
The exhaust tail pipe may be extremely hot.
There is a risk of burning when removing the
rear cover.
Do not touch the exhaust tail pipe. Use
extreme caution when removing the rear
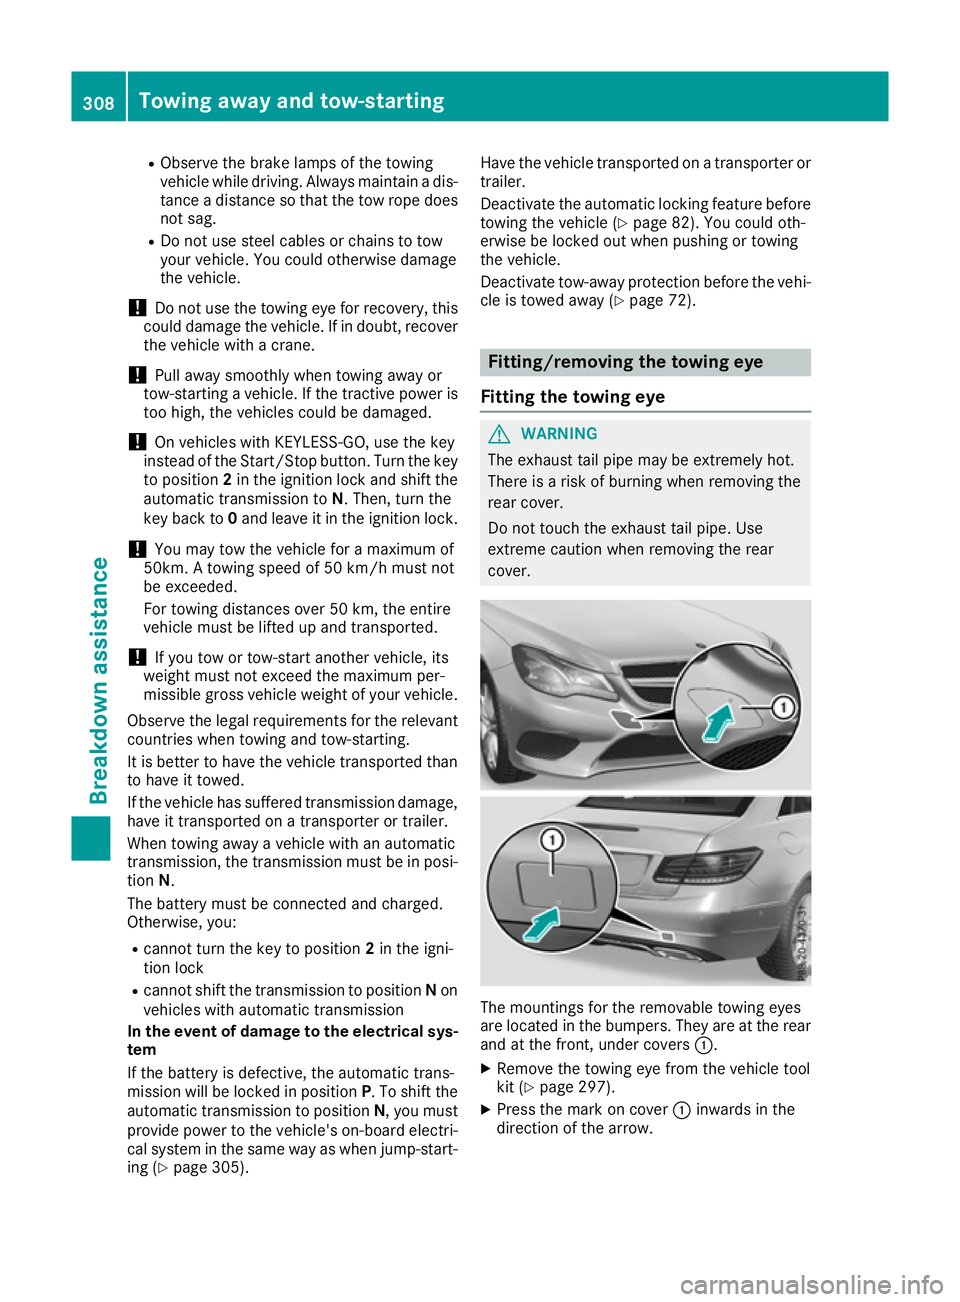
cover. The mountings for the removable towing eyes
are located in the bumpers. They are at the rear
and at the front, under covers :.
X Remove the towing eye from the vehicle tool
kit (Y page 297).
X Press the mark on cover :inwards in the
direction of the arrow. 308
Towing away and tow-startingBreakdown assistance