driver seat adjustment MERCEDES-BENZ E-Class COUPE 2016 C207 Owner's Manual
[x] Cancel search | Manufacturer: MERCEDES-BENZ, Model Year: 2016, Model line: E-Class COUPE, Model: MERCEDES-BENZ E-Class COUPE 2016 C207Pages: 318, PDF Size: 7.35 MB
Page 18 of 318
Important safety guidelines .............42
Introduction .....................................4 1
Releasin g ......................................... 44
Switching belt adjustment on/off
(on-board computer) ...................... 196
Warning lamp ................................. 220
Warning lamp (function) ................... 45
Seats
Adjusting (electrically) ..................... 92
Adjusting the 4-way lumbar sup-
port .................................................. 94
Adjusting the head restraint ............ 93
Adjusting the multicontour seat ....... 94
Cleaning the cover ......................... 264
Correct driver's seat position ........... 91
Folding the backrests forward/
back ................................................. 93
Important safety notes .................... 91
Overview .......................................... 91
Seat backrest display message ..... 217
Seat heating .................................... 95
Seat heating problem ...................... 96
Storing settings (memory func-
tion) ............................................... 102
Switching seat heating on/off ......... 95
Switching seat ventilation on/
off .................................................... 95
Section
Trunk ............................................... 80
Securing cargo .................................. 238
Selector lever
Cleaning ......................................... 263
Sensors (cleaning instructions) ....... 262
Service menu (on-board com-
puter) .................................................. 193
Service message
see ASSYST PLUS
Service products
Brake fluid ..................................... 311
Coolant (engine) ............................ 312
Engine oil ....................................... 311
Fuel ................................................ 309
Important safety notes .................. 308
Refrigerant (air-conditioning sys-
tem) ............................................... 313
Washer fluid ................................... 312
Setting the air distribution ............... 116Setting the airflow
............................ 117
Setting the date/time format
see also Digital Operator's Man-
ual .................................................. 229
Setting the language
see also Digital Operator's Man-
ual .................................................. 229
Setting the time
see also Digital Ope rator's Ma
n-
ual .................................................. 229
Settings
Factory (on-board computer) ......... 196
On-board computer ....................... 193
Side impact air bag ............................. 47
Side marker lamp (display mes-
sage) ................................................... 206
Side windows
Cleaning ......................................... 261
Convenience closing feature ............ 84
Convenience opening feature .......... 83
Important safety information ........... 82
Opening/closing .............................. 83
Problem (malfunction) ..................... 86
Resetting ......................................... 85
Reversing feature ............................. 82
SIRIUS services
see also Digital Operator's Man-
ual .................................................. 229
Sliding sunroof
see Panorama roof with power
tilt/sliding panel
SmartKey
Changing the battery ....................... 76
Changing the programming ............. 74
Checking the battery ....................... 76
Convenience closing feature ............ 84
Convenience opening feature .......... 83
Display message ............................ 218
Door central locking/unlocking ....... 73
Important safety notes .................... 73
Loss ................................................. 77
Mechanical key ................................ 75
Overview .......................................... 73
Positions (ignition lock) ................. 122
Problem (malfunction) ..................... 77
Starting the engine ........................ 124
16Index
Page 46 of 318
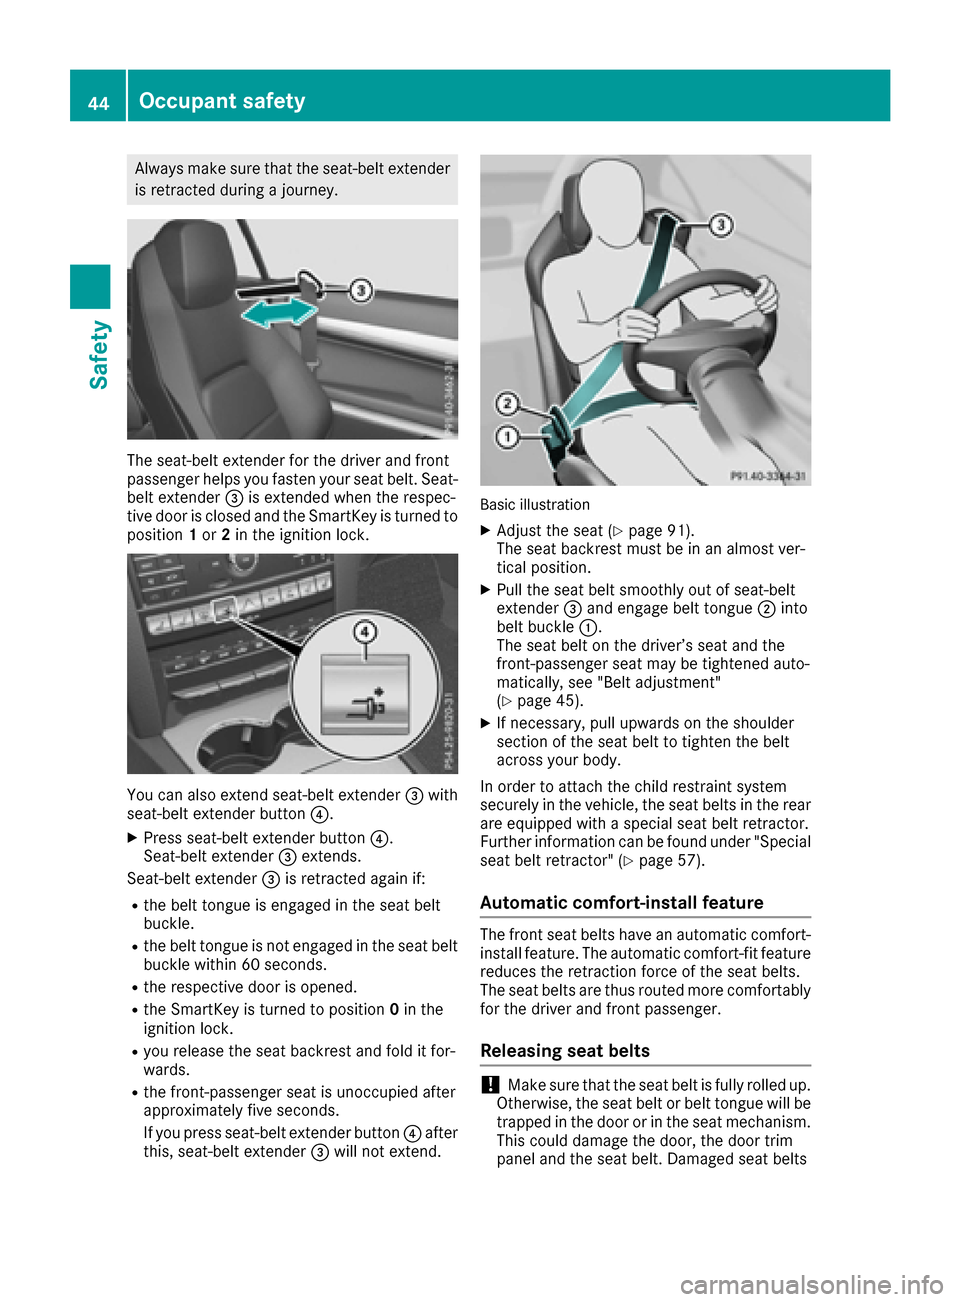
Always make sure that the seat-belt extenderis retracted during a journey.
The seat-belt extender for the driver and front
passenger helps you fasten your seat belt. Seat-
belt extender =is extended when the respec-
tive door is closed and the SmartKey is turned to
position 1or 2in the ignition lock.
You can also extend seat-belt extender =with
seat-belt extender button ?.
XPress seat-belt extender button ?.
Seat-belt extender =extends.
Seat-belt extender =is retracted again if:
Rthe belt tongue is engaged in the seat belt
buckle.
Rthe belt tongue is not engaged in the seat belt
buckle within 60 seconds.
Rthe respective door is opened.
Rthe SmartKey is turned to position 0in the
ignition lock.
Ryou release the seat backrest and fold it for-
wards.
Rthe front-passenger seat is unoccupied after
approximately five seconds.
If you press seat-belt extender button ?after
this, seat-belt extender =will not extend.
Basic illustration
XAdjust the seat (Ypage 91).
The seat backrest must be in an almost ver-
tical position.
XPull the seat belt smoothly out of seat-belt
extender =and engage belt tongue ;into
belt buckle :.
The seat belt on the driver’s seat and the
front-passenger seat may be tightened auto-
matically, see "Belt adjustment"
(
Ypage 45).
XIf necessary, pull upwards on the shoulder
section of the seat belt to tighten the belt
across your body.
In order to attach the child restraint system
securely in the vehicle, the seat belts in the rear
are equipped with a special seat belt retractor.
Further information can be found under "Special
seat belt retractor" (
Ypage 57).
Automatic comfort-install feature
The front seat belts have an automatic comfort-
install feature. The automatic comfort-fit feature
reduces the retraction force of the seat belts.
The seat belts are thus routed more comfortably
for the driver and front passenger.
Releasing seat belts
!Make sure that the seat belt is fully rolled up.
Otherwise, the seat belt or belt tongue will be
trapped in the door or in the seat mechanism.
This could damage the door, the door trim
panel and the seat belt. Damaged seat belts
44Occupant safety
Safety
Page 47 of 318
can no longer fulfill their protective function
and must be replaced. Visit a qualified spe-
cialist workshop.
XPress the release button in the belt buckle,
hold the belt tongue firmly and guide the belt
back.
Seat belt adjustment
The seat-belt adjustment is an integral part of
the PRE-SAFE®convenience function. This func-
tion adjusts the driver's and front-passenger
seat belt to the upper body of the occupants.
The belt strap is tightened slightly when:
Rthe belt tongue is engaged in the buckle when
the seat-belt extender is retracted and
Rthe ignition is switched on
The seat-belt adjustment will apply a certain
retraction force if any slack is detected between
the vehicle occupant and the seat belt. Do not
hold on to the seat belt tightly while it is adjust- ing.
You can switch the seat-belt adjustment on and
off in the on-board computer (
Ypage 196).
Belt warning for the driver and front
passenger
The 7 seat belt warning lamp in the instru-
ment cluster is a reminder that all vehicle occu-
pants must wear their seat belts. It may light up
continuously or flash. In addition, there may be
a warning tone.
Regardless of whether the driver's seat belt has
already been fastened, the 7seat belt warn-
ing lamp lights up for six seconds each time the
engine is started. If, after six seconds, the driver
or front-passenger seat belt has not been fas-
tened and the doors are closed, the 7seat
belt warning lamp lights up. As soon as the driv- er's and front-passenger seat belts are fastened
or a front door is opened again, the 7seat
belt warning lamp goes out.
If the driver's seat belt is not fastened after the
engine is started, an additional warning tone will
sound. The warning tone switches off after six
seconds or once the driver's seat belt is fas-
tened.
If the vehicle's speed exceeds 15 mph
(25 km/h) once and the driver's and front-
passenger seat belts are not fastened, a warning tone sounds. A warning tone also sounds with increasing intensity for 60 seconds or until the
driver or front passenger have fastened their
seat belts.
If the driver or front passenger unfasten their
seat belts during the journey, the seat belt warn-
ing is activated again.
iMore information on the 7seat belt
warning lamp can be found under "Warning
and indicator lamps in the instrument cluster,
seat belt" (
Ypage 220).
Air bags
Introduction
The air bag installation point is identified by the
label AIR BAG.
An air bag supplements a correctly fastened
seat belt. However, it is not intended as a sub-
stitute for the seat belt. Air bags provide addi-
tional protection in the event of an accident.
Not all air bags are deployed in an accident. The
various air bag systems work independently of
each other (
Ypage 52).
There is, however, no system available today
that can completely rule out injury or death.
It is also not possible to rule out a risk of injury
caused by an air bag due to the high speed at
which the air bag must be deployed.
Important safety notes
GWARNING
If you do not sit in the correct seat position,
the air bag cannot protect as intended and
could even cause additional injury when
deployed. This poses an increased risk of
injury or even fatal injury.
To avoid hazardous situations, always make
sure that all of the vehicle's occupants:
Rhave fastened their seat belts correctly,
including pregnant women
Rare sitting correctly and maintain the great-
est possible distance to the air bags
Rfollow the following instructions
Always make sure that there are no objects
between the air bag and the vehicle's occu-
pants.
Occupant safety45
Safety
Z
Page 93 of 318
Correct driver's seat position
GWARNING
You could lose control of your vehicle if you do the following while driving:
Radjust the driver's seat, head restraint,
steering wheel or mirrors
Rfasten the seat belt
There is a risk of an accident.
Adjust the driver's seat, head restraint, steer-
ing wheel and mirror and fasten your seat belt before starting the engine.
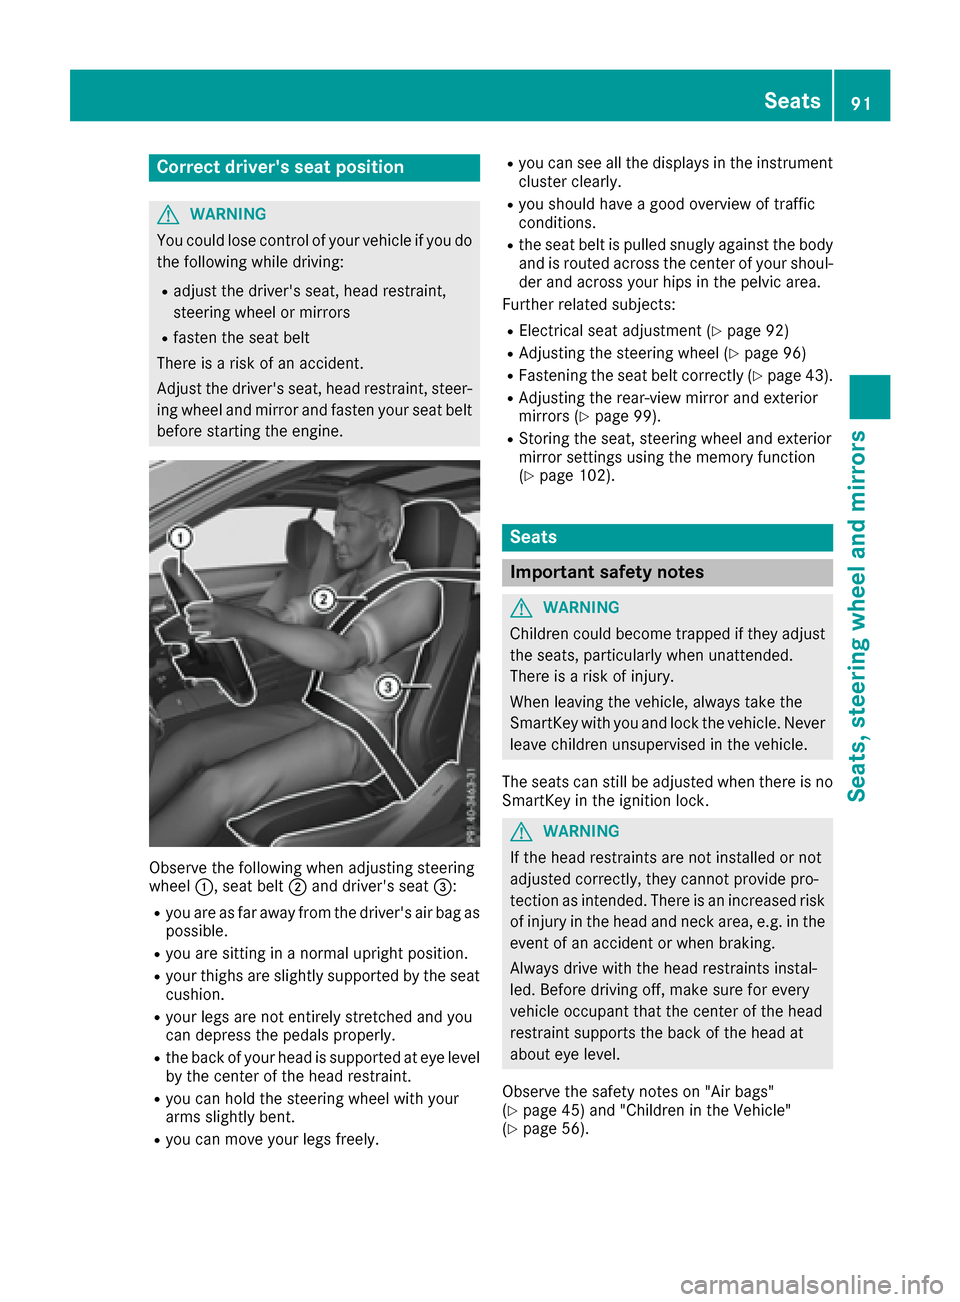
Observe the following when adjusting steering
wheel :, seat belt ;and driver's seat =:
Ryou are as far away from the driver's air bag as
possible.
Ryou are sitting in a normal upright position.
Ryour thighs are slightly supported by the seat
cushion.
Ryour legs are not entirely stretched and you
can depress the pedals properly.
Rthe back of your head is supported at eye level
by the center of the head restraint.
Ryou can hold the steering wheel with your
arms slightly bent.
Ryou can move your legs freely.
Ryou can see all the displays in the instrument
cluster clearly.
Ryou should have a good overview of traffic
conditions.
Rthe seat belt is pulled snugly against the bodyand is routed across the center of your shoul-
der and across your hips in the pelvic area.
Further related subjects:
RElectrical seat adjustment (Ypage 92)
RAdjusting the steering wheel (Ypage 96)
RFastening the seat belt correctly (Ypage 43).
RAdjusting the rear-view mirror and exterior
mirrors (Ypage 99).
RStoring the seat, steering wheel and exterior
mirror settings using the memory function
(
Ypage 102).
Seats
Important safety notes
GWARNING
Children could become trapped if they adjust
the seats, particularly when unattended.
There is a risk of injury.
When leaving the vehicle, always take the
SmartKey with you and lock the vehicle. Never
leave children unsupervised in the vehicle.
The seats can still be adjusted when there is no
SmartKey in the ignition lock.
GWARNING
If the head restraints are not installed or not
adjusted correctly, they cannot provide pro-
tection as intended. There is an increased risk
of injury in the head and neck area, e.g. in the event of an accident or when braking.
Always drive with the head restraints instal-
led. Before driving off, make sure for every
vehicle occupant that the center of the head
restraint supports the back of the head at
about eye level.
Observe the safety notes on "Air bags"
(
Ypage 45) and "Children in the Vehicle"
(Ypage 56).
Seats91
Seats, steering wheel and mirrors
Z
Page 94 of 318
GWARNING
You could lose control of your vehicle if you do the following while driving:
Radjust the driver's seat, head restraint,
steering wheel or mirrors
Rfasten the seat belt
There is a risk of an accident.
Adjust the driver's seat, head restraint, steer-
ing wheel and mirror and fasten your seat belt before starting the engine.
GWARNING
If you adjust the seat height carelessly, you or
other vehicle occupants could be trapped and
thereby injured. Children in particular could
accidentally press the electrical seat adjust-
ment buttons and become trapped. There is a
risk of injury.
While moving the seats, make sure that your
hands or other body parts do not get under the
lever assembly of the seat adjustment sys-
tem.
GWARNING
When you adjust a seat, you or other vehicle
occupants could become trapped, e.g. on the seat guide rail. There is a risk of injury.
Make sure when adjusting a seat that no one
has any body parts in the sweep of the seat.
!To avoid damage to the seats and the seat
heating, observe the following information:
Rkeep liquids from spilling on the seats. If
liquid is spilled on the seats, dry them as
soon as possible.
Rif the seat covers are damp or wet, do not
switch on the seat heating. The seat heat-
ing should also not be used to dry the seats.
Rclean the seat covers as recommended;
see "Interior care".
Rdo not transport heavy loads on the seats.
Do not place sharp objects on the seat
cushions, e.g. knives, nails or tools. The
seats should only be occupied by passen-
gers, if possible.
Rwhen the seat heating is in operation, do
not cover the seats with insulating materi- als, e.g. blankets, coats, bags, seat covers,
child seats or booster seats.
!Make sure that there are no objects in the
footwell under or behind the seats when mov-
ing the seats back. There is a risk that the
seats and/or the objects could be damaged.
iThe head restraints in the front seats are
installed with the NECK-PRO system
(
Ypage 54). For this reason, it is not possible
to remove the head restraints from the front
seats.
For more information, contact a qualified spe-
cialist workshop.
iFurther related subjects:
RThrough-loading feature in the rear bench
seat (folding the rear bench seat forwards)
(
Ypage 45)
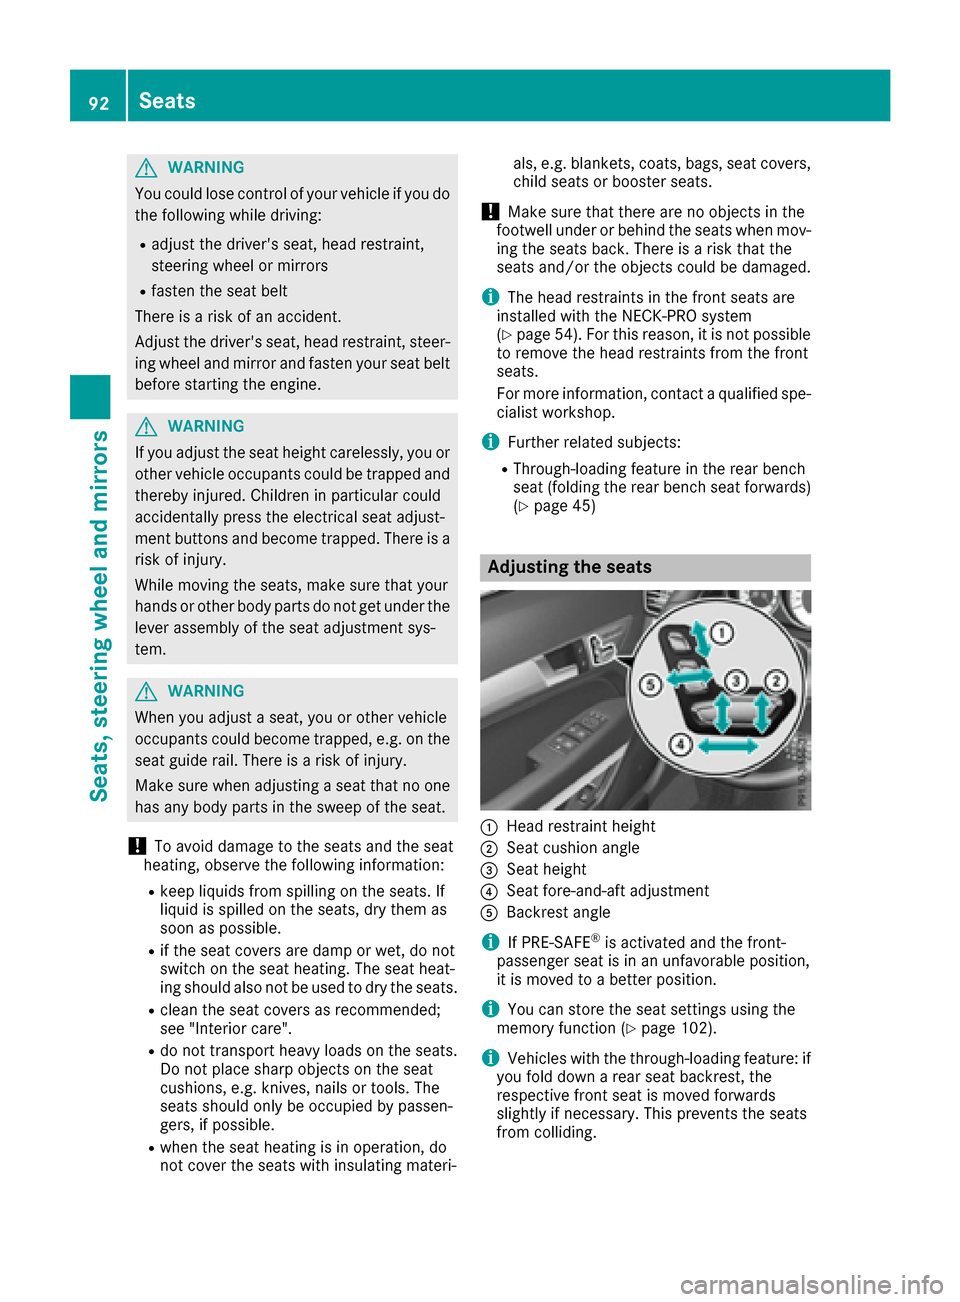
Adjusting the seats
:Head restraint height
;Seat cushion angle
=Seat height
?Seat fore-and-aft adjustment
ABackrest angle
iIf PRE-SAFE®is activated and the front-
passenger seat is in an unfavorable position,
it is moved to a better position.
iYou can store the seat settings using the
memory function (Ypage 102).
iVehicles with the through-loading feature: if
you fold down a rear seat backrest, the
respective front seat is moved forwards
slightly if necessary. This prevents the seats
from colliding.
92Seats
Seats, steering wheel and mirrors
Page 95 of 318
Adjusting the head restraints
Import ant safety notes
GWARNIN G
You could lose control of your vehicl eif you do
th efollowin gwhile driving:
Radjust th edriver's seat ,head restraint,
steering whee lor mirror s
Rfastenth eseat belt
There is aris kof an accident.
Adjus tth edriver's seat ,head restraint, steer -
ing whee land mirror and faste nyour seat belt
before starting th eengine.
GWARNIN G
If th ehead restraints are no tinstalled or no t
adjusted correctly, they canno tprovid epro -
tection as intended. There is an increased ris k
of injury in th ehead and neck area, e.g. in th e
event of an acciden tor when braking .
Always drive wit hth ehead restraints instal -
led. Befor edrivin goff ,mak esur efor every
vehicl eoccupant that th ecenter of th ehead
restrain tsupport sth ebac kof th ehead at
about eye level.
Do no trotate th ehead restraints of th efron tand
rear seats. Otherwise ,you canno tadjust th e
height and angle of th ehead restraints to th e
correc tposition .
Using th efore-and-af tadjustment, adjust th e
head restrain tso that it is as close as possibl eto
your head .
Observ eth eimportant safet ynote sregarding
th eseat s (
Ypage 91).
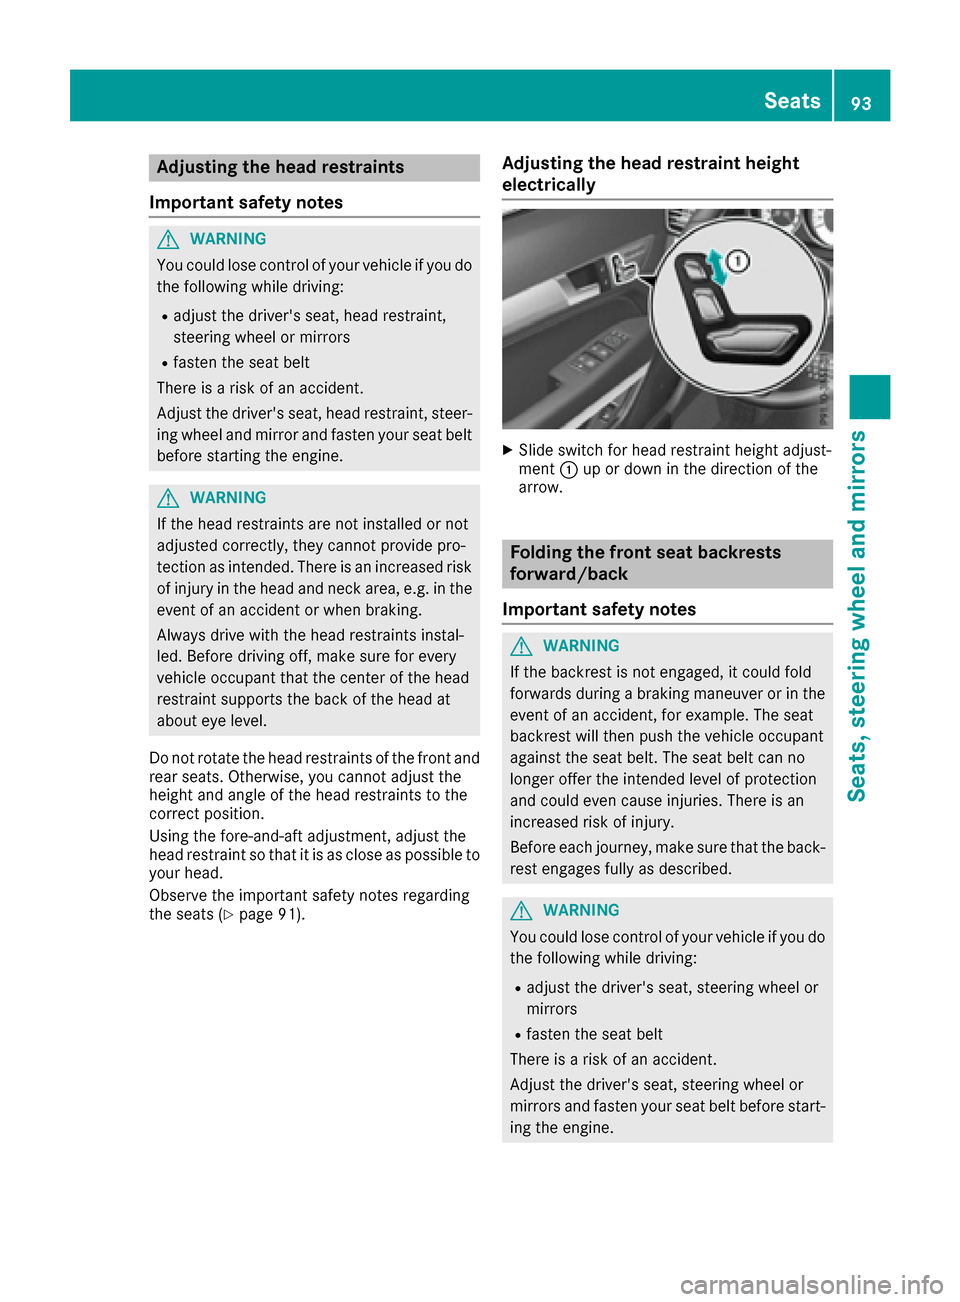
Adjusting the head restraint height
electri cally
XSlide switch for head restrain theight adjust -
men t: up or down in th edirection of th e
arrow.
Folding the front seat backrests
forward/back
Import ant safety notes
GWARNIN G
If th ebackrest is no tengaged, it could fol d
forward sduring abraking maneuve ror in th e
event of an accident, for example. The seat
backrest will then push th evehicl eoccupant
against th eseat belt .The seat belt can no
longer offer th eintended level of protection
and could eve ncaus einjuries. There is an
increased ris kof injury.
Befor eeac hjourney, mak esur ethat th eback-
res tengage sfully as described.
GWARNIN G
You could lose control of your vehicl eif you do
th efollowin gwhile driving:
Radjust th edriver's seat ,steering whee lor
mirror s
Rfastenth eseat belt
There is aris kof an accident.
Adjus tth edriver's seat ,steering whee lor
mirror sand faste nyour seat belt before start -
ing th eengine.
Seats93
Seats, steering wheel and mirrors
Z
Page 98 of 318
Problems with the seat heating or seat ventilation
ProblemPossible causes/consequences andMSolutions
The seat heating or seat
ventilation has switched
off prematurely or can-
not be switched on.The on-board voltage is too low because too many electrical consum-
ers are switched on.
XSwitch off electrical consumers that you do not need, such as the
rear window defroster or interior lighting.
Once the battery is sufficiently charged, the seat heating or seat
ventilation can be switched back on manually.
Steering wheel
Important safety notes
GWARNING
You could lose control of your vehicle if you do the following while driving:
Radjust the driver's seat, head restraint,
steering wheel or mirrors
Rfasten the seat belt
There is a risk of an accident.
Adjust the driver's seat, head restraint, steer-
ing wheel and mirror and fasten your seat belt before starting the engine.
GWARNING
Children could injure themselves if they
adjust the steering wheel. There is a risk of
injury.
When leaving the vehicle, always take the
SmartKey with you and lock the vehicle. Never
leave children unsupervised in the vehicle.
The electrically adjustable steering wheel can
still be adjusted when there is no SmartKey in
the ignition lock.
Adjusting the steering wheel
:To adjust the steering wheel height
;To adjust the steering wheel position (fore-
and-aft adjustment)
iFurther related subjects:
REASY-ENTRY/EXIT feature (Ypage 98)
RStoring settings (Ypage 102)
Steering wheel heating
Switching on/off
96Steering wheel
Seats, steering wheel and mirrors
Page 100 of 318
Problems with the steering wheel heating
ProblemPossible causes/consequences andMSolutions
The steering wheel heat-
ing has switched off pre-
maturely or cannot be
switched on.The on-board voltage is too low because too many electrical consum-
ers are switched on.
XSwitch off electrical consumers that you do not need, such as the
rear window defroster or interior lighting.
Once the battery is sufficiently charged, the steering wheel heating
will switch back on automatically.
EASY-ENTRY/EXIT feature
Important safety notes
GWARNING
When the EASY-ENTRY/EXIT feature adjusts
the steering wheel, you and other vehicle
occupants – particularly children – could
become trapped. There is a risk of injury.
While the EASY-ENTRY/EXIT feature is mak-
ing adjustments, make sure that no one has
any body parts in the sweep of the steering
wheel.
Move the steering wheel adjustment lever if
there is a risk of entrapment by the steering
wheel. The adjustment process is stopped.
Vehicles with a memory function: if there is a
risk of becoming trapped by the steering wheel,
you can also one of the memory function posi-
tion buttons. The adjustment process is stop-
ped.
GWARNING
If children activate the EASY-ENTRY/EXIT fea-
ture, they can become trapped, particularly
when unattended. There is a risk of injury.
When leaving the vehicle, always take the
SmartKey with you and lock the vehicle. Never
leave children unsupervised in the vehicle.
GWARNING
If you drive off while the EASY-ENTRY/EXIT
feature is making adjustments, you could lose
control of the vehicle. There is a risk of an
accident.
Always wait until the adjustment process is
complete before driving off.
The EASY-ENTRY/EXIT feature makes getting in
and out of your vehicle easier.
You can activate and deactivate the EASY-
ENTRY/EXIT feature in the on-board computer
(
Ypage 195).
Position of the steering wheel when the
EASY-ENTRY/EXIT feature is active
The steering wheel swings upwards when you:
Rremove the SmartKey from the ignition lock
Rwith KEYLESS-GO: open the driver's door;
KEYLESS-GO must be in position 1
Rwith the SmartKey:open the driver's door;
the SmartKey is in position 0or 1must be in
the ignition lock (
Ypage 122).
iThe steering wheel only moves upwards if it
has not already reached the upper stop.
Position of the steering wheel for driv-
ing
The steering wheel is moved to the last selected position when:
Rthe driver's door is closed
Rwith KEYLESS-GO: you press the Start/Stop
button once
or
Rwith the SmartKey: you insert the SmartKey
into the ignition lock
When you close the driver's door with the igni-
tion switched on, the steering wheel is also
automatically moved to the previously set posi-
tion.
98Steering wheel
Seats, steering wheel and mirrors
Page 101 of 318
The last position of the steering wheel is stored
when you switch off the ignition or when you
store the setting with the memory function
(
Ypage 102).
Crash-responsive EASY-EXIT feature
If the crash-responsive EASY-EXIT feature is trig-
gered in an accident, the steering column will
move upwards when the driver's door is opened. This occurs irrespective of the position of the
SmartKey in the ignition lock. This makes it eas-
ier to exit the vehicle and rescue the occupants.
The crash-responsive EASY-EXIT feature is only
operational if the EASY-EXIT/ENTRY feature is
activated in the on-board computer
(
Ypage 195).
Mirrors
Rear-view mirror
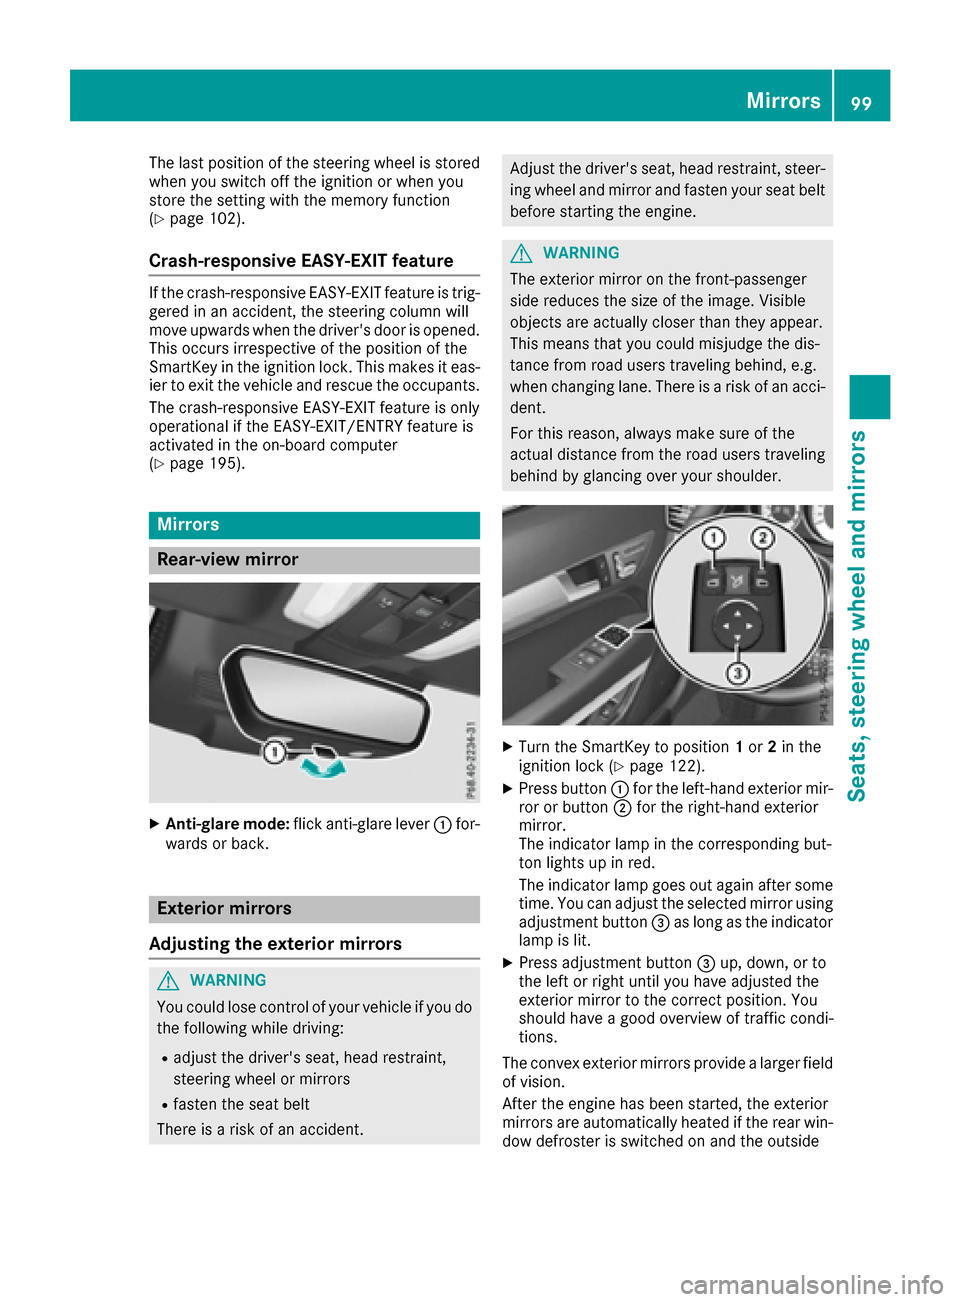
XAnti-glare mode: flick anti-glare lever :for-
wards or back.
Exterior mirrors
Adjusting the exterior mirrors
GWARNING
You could lose control of your vehicle if you do the following while driving:
Radjust the driver's seat, head restraint,
steering wheel or mirrors
Rfasten the seat belt
There is a risk of an accident.
Adjust the driver's seat, head restraint, steer- ing wheel and mirror and fasten your seat belt
before starting the engine.
GWARNING
The exterior mirror on the front-passenger
side reduces the size of the image. Visible
objects are actually closer than they appear.
This means that you could misjudge the dis-
tance from road users traveling behind, e.g.
when changing lane. There is a risk of an acci-
dent.
For this reason, always make sure of the
actual distance from the road users traveling
behind by glancing over your shoulder.
XTurn the SmartKey to position 1or 2in the
ignition lock (Ypage 122).
XPress button :for the left-hand exterior mir-
ror or button ;for the right-hand exterior
mirror.
The indicator lamp in the corresponding but-
ton lights up in red.
The indicator lamp goes out again after some
time. You can adjust the selected mirror using
adjustment button =as long as the indicator
lamp is lit.
XPress adjustment button =up, down, or to
the left or right until you have adjusted the
exterior mirror to the correct position. You
should have a good overview of traffic condi-
tions.
The convex exterior mirrors provide a larger field
of vision.
After the engine has been started, the exterior
mirrors are automatically heated if the rear win-
dow defroster is switched on and the outside
Mirrors99
Seats, steering wheel and mirrors
Z
Page 103 of 318
RImmediately change out of clothing which
has come into contact with electrolyte.
RIf an allergic reaction occurs, seek medical
attention immediately.
The rear-view mirror and the exterior mirror on
the driver's side automatically go into anti-glare
mode if the following conditions are met simul-
taneously:
Rthe ignition is switched on and
Rincident light from headlamps strikes the sen-
sor in the rear-view mirror
The mirrors do not go into anti-glare mode if
reverse gear is engaged.
Parking position for the exterior mir-
ror on the front-passenger side
Setting and storing the parking position
You can position the front-passenger side exte-
rior mirror in such a way that you can see the
rear wheel on that side as soon as you engage
reverse gear. You can store this position.
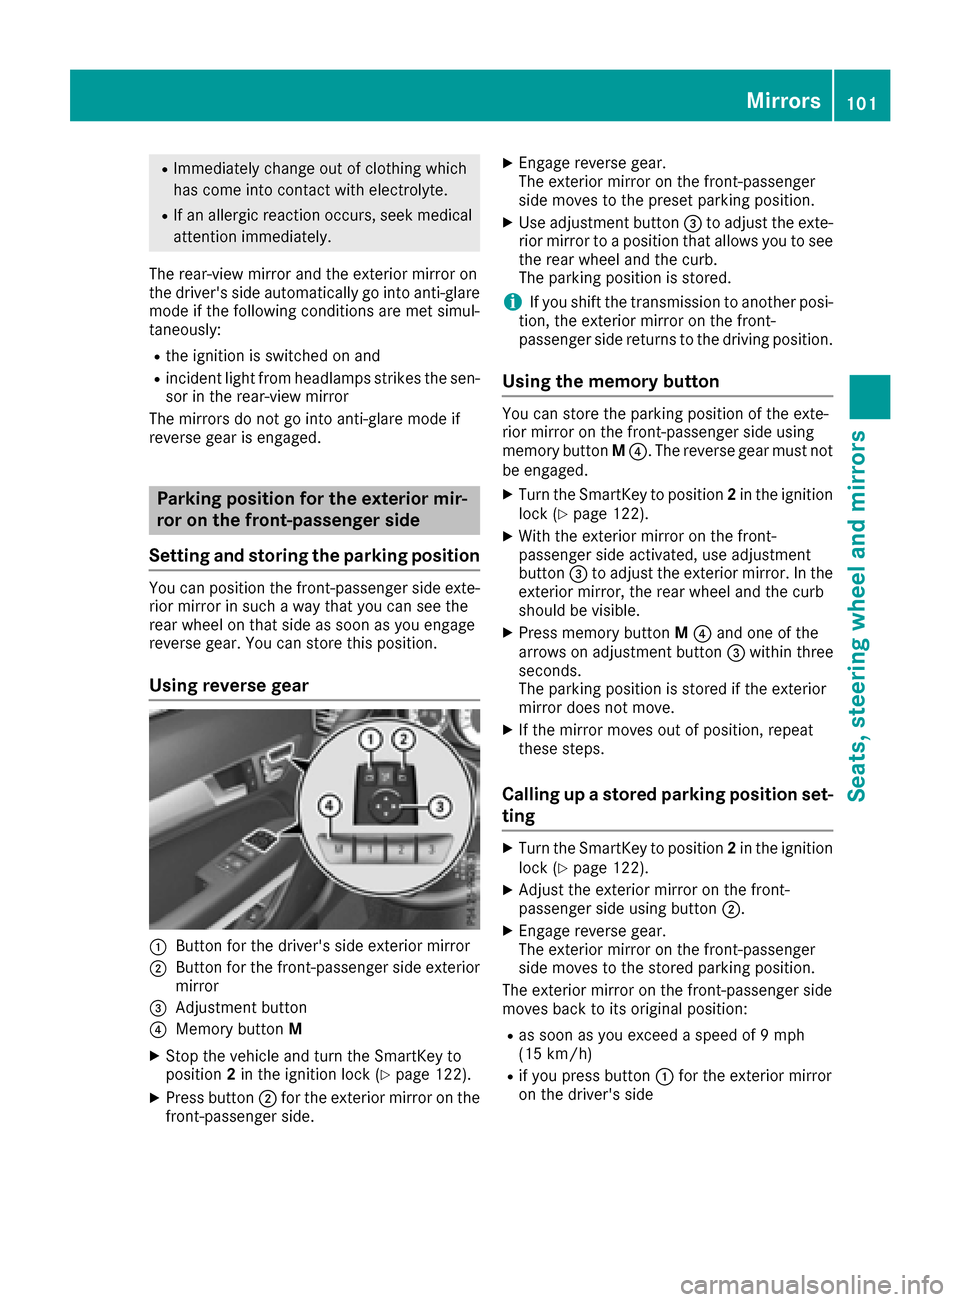
Using reverse gear
:Button for the driver's side exterior mirror
;Button for the front-passenger side exterior
mirror
=Adjustment button
?Memory button M
XStop the vehicle and turn the SmartKey to
position2in the ignition lock (Ypage 122).
XPress button ;for the exterior mirror on the
front-passenger side.
XEngage reverse gear.
The exterior mirror on the front-passenger
side moves to the preset parking position.
XUse adjustment button =to adjust the exte-
rior mirror to a position that allows you to see
the rear wheel and the curb.
The parking position is stored.
iIf you shift the transmission to another posi-
tion, the exterior mirror on the front-
passenger side returns to the driving position.
Using the memory button
You can store the parking position of the exte-
rior mirror on the front-passenger side using
memory button M?. The reverse gear must not
be engaged.
XTurn the SmartKey to position 2in the ignition
lock (Ypage 122).
XWith the exterior mirror on the front-
passenger side activated, use adjustment
button =to adjust the exterior mirror. In the
exterior mirror, the rear wheel and the curb
should be visible.
XPress memory button M? and one of the
arrows on adjustment button =within three
seconds.
The parking position is stored if the exterior
mirror does not move.
XIf the mirror moves out of position, repeat
these steps.
Calling up a stored parking position set-
ting
XTurn the SmartKey to position 2in the ignition
lock (Ypage 122).
XAdjust the exterior mirror on the front-
passenger side using button ;.
XEngage reverse gear.
The exterior mirror on the front-passenger
side moves to the stored parking position.
The exterior mirror on the front-passenger side
moves back to its original position:
Ras soon as you exceed a speed of 9 mph
(15 km/h)
Rif you press button :for the exterior mirror
on the driver's side
Mirrors101
Seats, steering wheel and mirrors
Z