fuses MERCEDES-BENZ E-CLASS COUPE 2018 Owner's Manual
[x] Cancel search | Manufacturer: MERCEDES-BENZ, Model Year: 2018, Model line: E-CLASS COUPE, Model: MERCEDES-BENZ E-CLASS COUPE 2018Pages: 486, PDF Size: 6.31 MB
Page 5 of 486
Drivingand pa rking ................................. 128
Driving ........................................................ 128
DY NA MIC SELECT switch ............................1 35
Au tomatic transmission .............................. 136
Re fueling .................................................... 140
Pa rking ...................................................... .142
Driving and driving saf etysy stems ............ .150
Instrument Display and on-board
comp uter .................................................. 205
Instrument display overview ...................... .205
Overview of the buttons on thesteering
wheel ......................................................... .206
Operating the on-board computer .............. 206
Displa ysinthe multifunction display ......... .208
Ad justing the instrument lighting ............... 208
Menus and submenus ................................ 209
Head-up Display .......................................... 215
Vo ice Control Sy stem ............................... 217
Operating saf ety.......................................... 217
Operation ....................................................2 17
Using Voice Cont rol Sy stem ef fectively ....... 219
Essential voice commands .......................... 219
Multimedia sy stem .................................. 228
Overview and operation .............................. 228
Sy stem settings .......................................... 236
Na vigation .................................................. 243
Te lephone .................................................. .264
Online and Internet functions ..................... 279
Media ......................................................... 286
Ra dio .......................................................... 298
Sound .........................................................3 05
Maintenance and care.............................308
ASS YST PLUS service inter val display ........ 308
Engine compartment .................................. 309
Cleaning and care ...................................... .315
Breakdown assistance ............................322
Emergency .................................................. 322
Flat tire ....................................................... 322
Battery (vehicle) ......................................... 328
To w starting or towing away ....................... 333
Electrical fuses ........................................... 338
Wheels and tires ...................................... 342
Noise or unusual handling characteris‐
tics ............................................................ .342
Re gular checking of wheels and tires ......... 342
No tes on snow chains ................................ 343
Ti re pressure .............................................. 343
Loading theve hicle .................................... 349
Ti re labeling ................................................ 354
Definitions for tires and loading ................. 359
Changing a wheel ....................................... 362
Te ch nical data .......................................... 372
No tes on tech nical da ta.............................. 372
Ve hicle electronics .....................................3 72
Ve hicle identification plate, VIN and
engine number ............................................ 374
Operating fluids .. ........................................ 376
Ve hicle data ................................................ 382
Display messages and warning/indi‐
cator lamps .............................................. 384
Display messages ...................................... .384
Wa rning and indicator lamps ...................... 429
Contents 3
Page 168 of 486
RIf Distance Pilot DISTRONIC is deacti va‐
te d with the cruise control le ver,fo r
ex ample byave hicle occupant or from
outside theve hicle.
RIfth e electrics in the engine compart‐
ment, the battery or the fuses are tam‐
pered with.
RIf th e battery is disconnected.
RIfth eve hicle is accelerated, forex ample
by ave hicle occupant.
#Alw ays deactivate Dis tance Pilot
DISTRONIC and secu retheve hicle to
pr eve nt it from rolling away before you
lea vethe driver's seat.
&
WARNING Risk of accident due to
unkno wnstored speed
If yo u call up thestored speed and this is
lo we rth an your cur rent speed, theve hicle
decelerates.
If yo udo not kn owthestored speed, the
ve hicle could decelerate unexpectedl y.
#Take into account the tra ffic situation
before calling up thestored speed.
#If th estored speed is not known, store
th e desired speed again.
&
WARNING Risk of accident due tounex‐
pecte d acceleration byDis tance Pilot
DISTRONIC
If Dis tance Pilot DISTRONIC no longer
de tects a vehicle in front, it may unexpect‐
edly accelerate tothe speed stored.
RThis speed may be too high for a turning
lane or an exit lane.
RIf driving in theright lane, this speed may
be so high that you pass vehicles driving
on the left (in count ries where tra ffic
drives on theright).
RIf driving in the left lane, this speed may
be so high that you pass vehicles driving
on theright (in countri es where traffic
drives on the left).
Alw ays carefully obser vethe tra ffic condi‐
tions and be ready tobrake at all times.
&
WARNING Risk of accident due toDis‐
ta nce Pilot DISTRONIC pulling away auto‐
matically
If Dis tance Pilot DISTRONIC pe rforms an
automatic driving-off procedure, theve hicle
may accelerate unexpectedl y.
Where necessar y,brake theve hicle yourself
and take evasive action.
&
WARNING Risk of accident due toSpeed
Limit Pilot adapting theve hicle's speed
The speed adop tedby the Speed Limit Pilot
may be too high or incor rect in some individ‐
ual cases, such as:
RInthewe t or in fog
RWhen towing a trailer
Ensure that the driven speed complies with
traf fic re gulations.
16 6
Driving and pa rking
Page 173 of 486
messagetoremind youto take control of the
ve hicle.
The warning message does not appear or disap‐
pears if one of thefo llowing conditions are me t:
RThe driversteers theve hicle.
RThe driver presses a steering wheel button or
operates Touch Control.
Fu nction of Active Eme rgency Stop Assist
If th e driver continues toigno rethe acoustic
wa rning of theAc tive Lane Change Assi st, Dis‐
ta nce Pilot DISTRONIC reduces the speed. If the
driver still does not respond, theve hicle is decel‐
erated in stages toast andstill.
The driver can cancel the deceleration at any
time byper form ing one of thefo llowing actions:
RSt eering
RBraking or accelerating
RPressing a steering wheel button or operat‐
ing Touch Control
RAc tivating or deacti vating Steering Pilot or
Dis tance Pilot DISTRONIC The driver must
beready totake control of the
ve hicle at any time.
Information on Hill Start Assist
Hill Start Assist holds theve hicle when pulling
aw ay on a hill under thefo llowing conditions:
RThe transmission is in position hork.
RThe elect ric park ing brake is released.
&
WARNING Risk of accident and injury
caused bytheve hicle rolling away
Af ter a short time, Hill Start Assist no longe r
holds theve hicle and it can rollaw ay.
#Therefore, swiftly mo veyour foot from
th e brake pedal tothe accelerator
pedal. Ne ver attem pttolea vetheve hi‐
cle if it is being held byHill Start Assist.
HOLD function
HOLD function
The HOLD function holds theve hicle at a stand‐
st ill without requ iring youto depress the brake pedal, such as when pulling
away on steep
slopes.
Sy stem limits
The incline must not be greaterth an 30%.
Ac tivating/deactivating the HOLD function
&
WARNING Risk of an accident due tothe
HOLD function being active when you
lea vetheve hicle
If yo u lea vetheve hicle while only the HOLD
function is braking theve hicle, theve hicle
can rollaw ay inthefo llowing situations:
RIf th ere is a malfunction in the sy stem or
in the po wer supp ly.
RIf th e HOLD function is deactivated by
depressing the accelera tor pedal or the
brake pedal, e.g. byave hicle occupant.
RIfth e electrics in the engine compart‐
ment, the battery or the fuses are tam‐
pered with.
RIf th e battery is disconnected.
Driving and parking 17
1
Page 340 of 486
Installingtheto wing eye
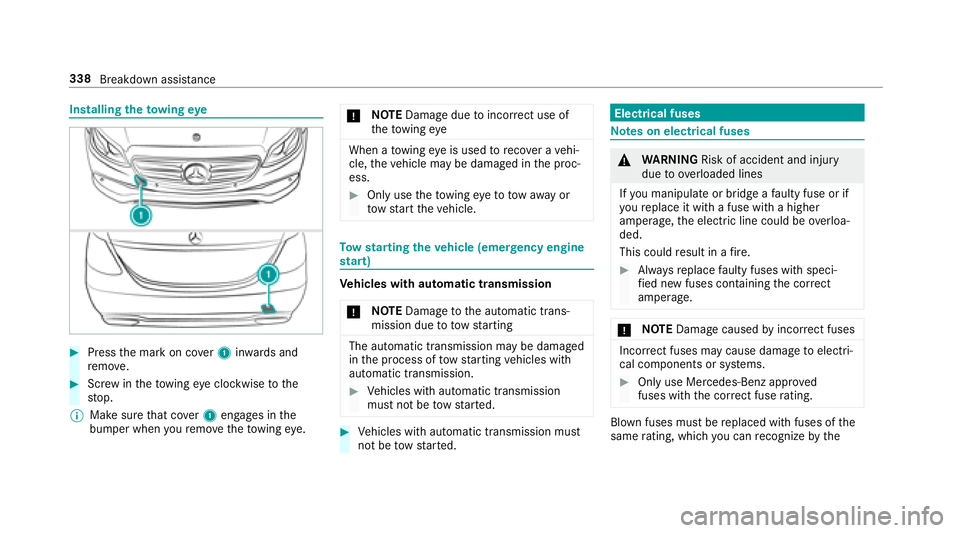
#Press the mark on co ver1 inwa rds and
re mo ve.
#Scr ew intheto wing eyeclockwise tothe
st op.
% Make sure that co ver1 engages in the
bumper when youre mo vetheto wing eye. *
NO
TEDama gedue toincor rect use of
th eto wing eye
When a towing eye is used toreco ver a vehi‐
cle, theve hicle may be damaged in the proc‐
ess.
#Only use theto wing eyeto to waw ay or
to w start theve hicle.
To w starting theve hicle (eme rgency engine
st art)
Ve hicles with automatic transmission
* NO
TEDama getothe automatic trans‐
mission due to towstarting
The automatic transmission may be damaged
in the process of tow starting vehicles with
automatic transmission.
#Ve hicles with automatic transmission
must not be tow star ted.
#Ve hicles with automatic transmission must
not be tow star ted.
Electrical fuses
Note s on electrical fuses
&
WARNING Risk of accident and injury
due to ov erloaded lines
If yo u manipulate or bridge a faulty fuse or if
yo ure place it with a fuse with a higher
amperage, the electric line could be overloa‐
ded.
This could result in a fire .
#Alw aysre place faulty fuses with speci‐
fi ed new fuses conta iningthe cor rect
amperage.
* NO
TEDama gecaused byincor rect fuses
Incor rect fuses may cause damage toelectri‐
cal components or sy stems.
#Only use Mercedes-Benz appr oved
fuses with the cor rect fuse rating.
Blown fuses must bereplaced with fuses of the
same rating, which you can recognize bythe
338
Breakdown assis tance
Page 341 of 486
color and fuserating. The fuse ratings are li sted
in the fuse assignment diagram.
Fu se assignment diag ram: onthe fuse box in
th e trunk (
→page 341).
* NO
TEDama geor malfunctions caused
by moisture
Moisture may cause dama getothe electrical
sy stem or cause it tomalfunction.
#When the fuse box is open, make sure
th at no moisture can enter the fuse
box.
#When closing the fuse box, make sure
th at the seal of the lid is positioned cor‐
re ctly on the fuse box.
If a newly inser ted fuse also blo ws, ha vethe
cause traced and rectified at a qualified special‐
ist workshop.
Ensure thefo llowing before replacing a fuse:
RThe vehicle is secured against rolling away.
RAll electrical consumers are switched off.
RThe ignition is switched off. The electrical fuses are located in
various fuse
bo xes:
RFu se box in the engine compartment on the
driver's side (→page 339)
RFu se box on the driver's side of the cockpit
(→page 340)
RFu se box in the front-passen gerfo ot we ll
(→page 340)
RFu se box in the trunk on theright-hand side
of theve hicle, when vie wed in the direction
of tr avel (
→page 341)
Fuse box in the engine compa rtment
Prerequisites
Observ eth e no tes on electrical fuses
(
→page 338).
Ha ve thefo llowing readily available:
RA dry clo th
RA screwdriver Opening
&
WARNING Risk of injury from usingthe
windshield wipers while the engine hood
is open
When the engine hood is open and the wind‐
shield wipers are set in motion, you can be
trapped bythe wiper linkage.
#Alw ays switch off the windshield wipers
and ignition before opening the engine
hood.
Breakdown assis tance 339
Page 342 of 486
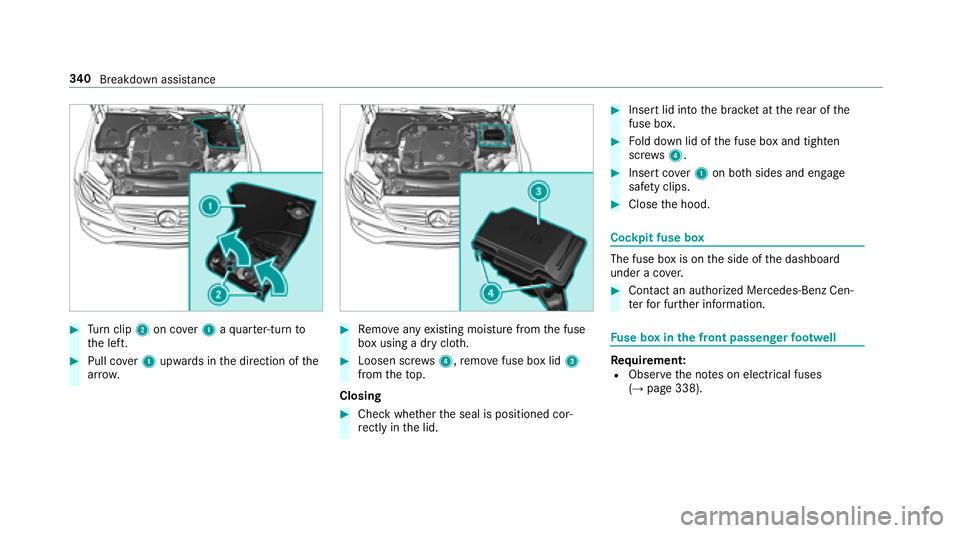
#Turn clip 2on co ver1 aqu arter-turn to
th e left.
#Pull co ver1 upwards in the direction of the
ar row .
#Remo veany existing moisture from the fuse
box using a dry clo th.
#Loosen scr ews4, remo vefuse box lid 3
from theto p.
Closing
#Check whe ther the seal is positioned cor‐
re ctly in the lid.
#Insert lid into the brac ket at there ar of the
fuse box.
#Fo ld down lid of the fuse box and tighten
scr ews4.
#Insert co ver1 on bo thsides and engage
saf etyclips.
#Clos eth e hood.
Cockpit fuse box
The fuse box is on the side of the dashboard
under a co ver.
#Conta ct an au thorized Mercedes-Benz Cen‐
te rfo r fur ther information.
Fu se box in the front passenger foot we ll
Requirement:RObser vethe no tes on electrical fuses
(→page 338).
34 0
Breakdown assis tance
Page 343 of 486
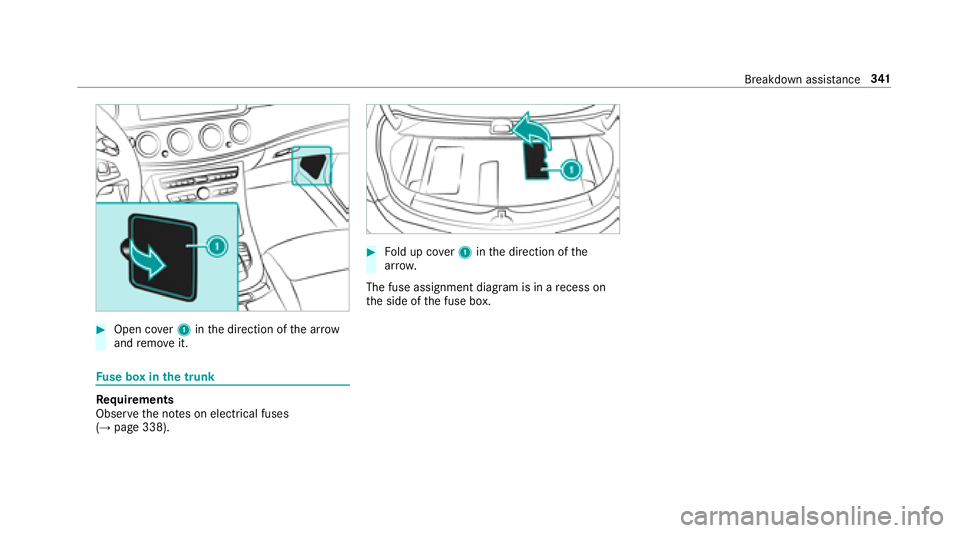
#Open cover1 inthe direction of the ar row
and remo veit.
Fuse box in the trunk
Re quirements
Obser vethe no tes on electrical fuses
(
→page 338).
#Fo ld up co ver1 inthe direction of the
ar row .
The fuse assignment diagram is in a recess on
th e side of the fuse box.
Breakdown assis tance 34
1
Page 462 of 486
E
E10 ............................................................ 377
Easy entry feature
Operation/no tes ................................... 92
Setting ................................................... 92
Easy exitfeature
Operation/no tes ................................... 92
Setting ................................................... 92
EBD (Electronic Brake forc e Distribu‐
tion)
Function/no tes ................................... 155
ECO display Function .............................................. 134
Re setting ..............................................2 11
ECO start/s top function ................. 133, 134
Au tomatic engine start ........................ 133
Au tomatic engine stop .........................1 33
Operation ............................................ 133
Switching off/on ................................. 134
Electric pa rking brake .................... .148, 149
App lying automatically ........................ 148
App lying or releasing manually ............ 149
Emergency braking .............................. 149 Re
leasing automatically ...................... .148
Electric parking brake see Parking
Electrical fuses see Fuses
Electronic Stability Prog ram
see ESP
®(Electronic Stability Prog ram)
Electronics ................................... ............372
Em
er ge ncy
Overview of the help functions .............. 16
Saf etyve st .......................................... 322
Eme rgency braking ................................ .149
Emer gency call sy stem
Mercedes-Benz mbrace
®(USA only) .. .277
Emer gency engine start ......................... 338
Emer gency key
Inserting/removing ............................... 57
Locking a door ....................................... 63
Unlocking a door ................................... 63
Emer gency operation mode
St arting vehicle ................................... 130 Emer
gency release
Tr unk lid (from inside) ............................ 68
Emer gency Tensioning Devices
Ac tivation .............................................. 31
Energy consum ption
Ke y........................................................ 56
Engin e
EC Ostart/ stop function ......................1 33
Engine number ..................................... 374
Jump-s tarting ...................................... 330
St arting (eme rgency operation
mode) .................................................. 130
St arting (smartphone) ........................ .130
St arting (s tart/s top button) .................1 29
Switching off (s tart/s top button) ........ 142
Engine data Displaying .............. ...
...........................
136
Engine hood Opening/closing ................................ .309
Engine number ......................................... 374
Engine oil .................................................. 312
Ad ditives .............................................. 378
Capacity .............................................. 379
460
Index
Page 464 of 486
Function seat
see Door cont rol panel
Fu se insert
see Fuses
Fu ses ........................................................ 338
Assignment diagram ............................3 38
Before changing .................................. 338
Cockpit fuse box ................................ .340
Fu se box in the engine compartment .. 339
Fu se box in the front-passen gerfo ot ‐
we ll ...................................................... 340
Fu se box in the trunk ........................... 341
No tes .................................................. 338
G
Garage door opener Cleari ngthe memory ........................... 146
Opening or closing thega rage door .....1 45
Programming buttons .......................... 143
Ra dio equipment appr oval number ...... 146
Re solving problems ............................. 145
Synchronizing thero lling code ............ .144 Gas
station sear ch
St arting an automatic gasst ation
sear ch................................................. 249
Switching the automatic gasst ation
sear chon/off ...................................... 252
Gasoline ................................................... 377
Gearshift paddles see Steering wheel gearshift paddles
Gears hiftrecommendation ....................139
Genuine parts ............................................ 19
Genuine wood (Care) .............................. .319
Glide mode ............................................... 139
Glo vebox
Air vent ................................................ 126
Glo vecompa rtment
Locking/unlo cking ................................ 95
H
Handbrake see Electric parking brake
Handling characteristics (unusual) ....... 342
HANDS-FREE ACCESS ................................ 66 HANDS-FREE
ACCESS
see Opening the trunk lid using your foot
Hazard warning lights ............................ .110
Head restra int .......................................... .84
Fr ont (adjusting manually) ..................... 84
Re ar passenger compartment
(adjusting) ............................................ .86
Head-up display Activating/deactivating .......................2 16
Ad justing brightness (on-board com‐
pu ter) ................................................... 215
Ad justing display elements (on-board
compu ter) ............................................ 215
Ad justing the position (on-board
computer) ............................................ 215
Fu nction ............................................... 215
Menu (on-board computer) .................. 215
Using the memory function .................. .92
Head-up Display see Menu (on-board computer)
Head-up Display menu see On-board computer
Heating see Climate control
462 Index