ECU MERCEDES-BENZ E-CLASS COUPE 2018 Repair Manual
[x] Cancel search | Manufacturer: MERCEDES-BENZ, Model Year: 2018, Model line: E-CLASS COUPE, Model: MERCEDES-BENZ E-CLASS COUPE 2018Pages: 593, PDF Size: 10.63 MB
Page 423 of 593
Re
moving the fire extinguisher &
WARNING Risk of accident due toan
incor rectly secu redfire extinguisher in
th e driver's foot we ll
A fire extinguisher in the driver's foot we ll
may impede pedal tra vel or block a
depressed pedal.
This jeopardises the operating and road
saf ety of theve hicle.
Moreo ver,th efire extinguisher can be flung
around in the driver's foot we ll and injure the
driver or other vehicle occupants. #
Alw aysst ore and secure thefire extin‐
guisher in the brac ket du ring the jour‐
ne y. #
Do not remo vethefire extinguisher
while driving. #
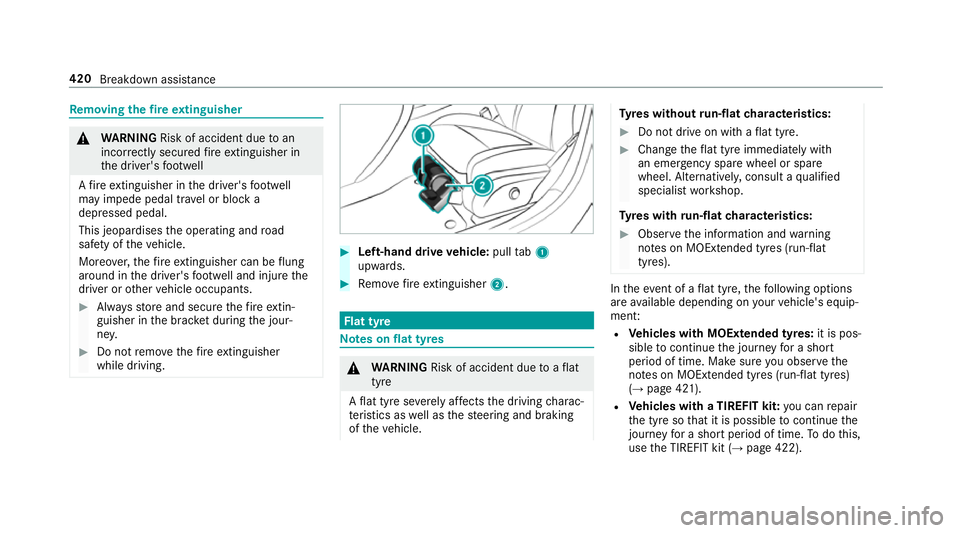
Left-hand drive vehicle: pulltab1
upwards. #
Remo vefire extinguisher 2. Flat tyre
Note
s onflat tyres &
WARNING Risk of accident due toaflat
tyre
A flat tyre se verely affects the driving charac‐
te rist ics as well as thesteering and braking
of theve hicle. Ty
res without run-flat characteristics: #
Do not drive on with a flat tyre. #
Chan getheflat tyre immediately with
an emer gency spa rewheel or spare
wheel. Alternativel y,consult a qualified
specialist workshop.
Ty res with run-flat characteristics: #
Obse rveth e information and warning
no tes on MOExtended tyres (run-flat
tyres). In
theeve nt of a flat tyre, thefo llowing options
are available depending on your vehicle's equip‐
ment:
R Vehicles with MOExtended tyres: it is pos‐
sible tocontinue the journey for a short
period of time. Make sure you obse rvethe
no tes on MOExtended tyres (run-flat tyres)
(→ page 421).
R Vehicles with a TIREFIT kit: you can repair
th e tyre so that it is possible tocontinue the
jou rney for a short period of time. Todo this,
use the TIREFIT kit (→ page 422).420
Breakdown assis tance
Page 433 of 593
All
vehicles
* NO
TEDama gecaused bynumerous or
ex tended attem ptsto start the engine Nume
rous or extended attem ptsto start the
engine may damage the catalytic con verter
due tonon-combu sted fuel. #
Avoid numerous and extended attem pts
to start the engine. Obser
vethefo llowing points during starting
assis tance and when charging the battery:
R Only use undamaged jump lead/charging
cables with a suf ficient cross-section and
insula tedte rm inal clamps.
R Non- insulated parts of thete rm inal clamps
must not come into con tact wi thother me tal
parts while the jump lead/charging cable is
connected tothe battery/jump-s tart connec‐
tion point.
R The jump lead/charging cable must not
come into contact wi thany parts which may
mo vewhen the engine is running. R
Alw ays make sure that nei ther you nor the
battery is elect rostatically charge d.
R Keep away from fire and naked flames.
R Do not lean overth e batter y.
Obser vethe additional following points when
ch arging the battery:
R Only use battery charge rs tested and
appr oved for Mercedes-Benz.
R Read the battery charge r's operating instruc‐
tions before charging the batter y.
Obser vethe additional following points during
st arting assis tance:
R Starting assis tance may only be pr ovided
using batteries with a nominal voltage of
12 V.
R The vehicles must not touch.
R Petrol engine: only acceptstarting assis‐
ta nce if the engine and exhaust sy stem are
cold. St
arting assi stance and charging the12 V
battery Re
quirements:
R The vehicle is secured with the electric park‐
ing brake.
R Vehicles with automatic transmission: the
transmission is in position j.
R The ignition and all electrical consumers are
switched off.
R The bonnet is open. 430
Breakdown assi stance
Page 438 of 593
#
Use a tow bar. #
Make sure that thesteering wheel can
mo vefreely, before towing theve hicle
aw ay. *
NO
TEDama gedue toexcessive tracti ve
po wer If
yo u pull away sharpl y,the tractive po wer
may be too high and theve hicles could be
damaged. #
Pull away slowly and smoo thly. Loading the
vehicle for transport #
Obser vethe no tes on towing away
( → page 433). #
Connect theto w bar totheto wing eye in
order toload theve hicle.
% You can also attach theto w bar tothe trailer
hitch. #
Vehicles with automatic transmission:
shift the automatic transmission toposition
i.
% Ve
hicles with automatic transmission:
th e automatic transmission may be loc ked in
position jintheeve nt of dama getothe
electrical sy stem. Toshift toi , pr ovide the
on-board electrical sy stem with po wer
( → page 430). #
Load theve hicle onto the transpor ter. #
Vehicles with automatic transmission:
shift the automatic transmission toposition
j. #
Use the electric parking brake tosecure the
ve hicle against rolling away. #
Only secure theve hicle bythe wheels. Ve
hicles with ADS PLUS (Adaptive Damping
Sy stem PLUS) &
WARNING Risk of an accident when
transporting vehicles with Adaptive
Damping Sy stem PLUS
The reduced damping forc es on theve hicle
being transpor ted can cause theve hicle/
trailer combination tostart toswing.
As a result, when transporting vehicles with
th eAd aptive Damping Sy stem PLUS, the
ve hicle/trailer combination may start toskid.
Consequentl y,yo u could lose cont rol of your
ve hicle. #
When transporting, ensure that:
R theve hicle has been loaded onto
th e transpor ter cor rectly
R theve hicle is secured at all four
wheels with suitable tensioning
st ra ps
R the maximum permissible speed of
60 km/h is not exceeded when
transporting Breakdown assis
tance 435
Page 439 of 593
*
NO
TEDama getotheve hicle from secur‐
ing it incor rectly #
After loading, theve hicle must be
secured on all four wheels. Otherwise,
th eve hicle could be damaged. #
A minimum dis tance of 20 cm up wards
and 10cm down wards must be kept to
th e transport platform. #
Secure theve hicle on all four wheels af ter
loading.
4MATIC vehicles/ vehicles with automatic
transmission #
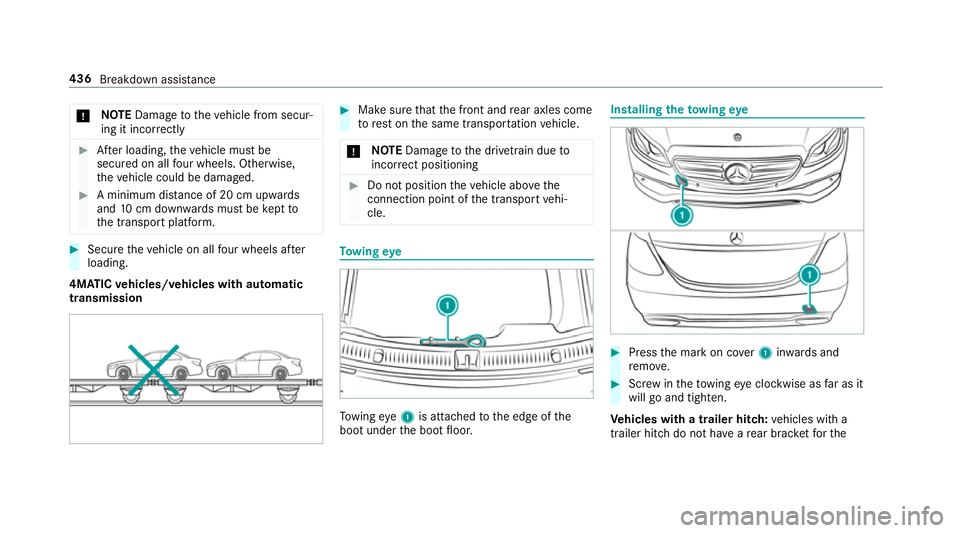
Make sure that the front and rear axles come
to rest on the same transpor tation vehicle.
* NO
TEDama getothe driv etra in due to
incor rect positioning #
Do not position theve hicle abo vethe
connection point of the transport vehi‐
cle. To
wing eye To
wing eye1 is attached tothe edge of the
boot under the boot floor. Installing
theto wing eye #
Press the mark on co ver1 inwa rds and
re mo ve. #
Screw intheto wing eyeclockwise as far as it
will go and tighten.
Ve hicles with a trailer hitch: vehicles with a
trailer hitch do not ha veare ar brac ketfo rthe 436
Breakdown assis tance
Page 441 of 593
#
When the fuse box is open, make sure
th at no moisture can enter the fuse
box. #
When closing the fuse box, make sure
th at the seal of the lid is positioned cor‐
re ctly on the fuse box. If
th e newly inser ted fuse also blo ws, ha vethe
cause traced and rectified at a qualified special‐
ist workshop.
Ensure thefo llowing before replacing a fuse:
R The vehicle is secured against rolling away
R All electrical consumers are switched off
R The ignition is switched off
The electrical fuses are located in various fuse
bo xes:
R Fuse box in the engine compartment on the
driver's side (→ page 438)
R Fuse box on the driver's side of the cockpit
(→ page 439)
R Fuse box in the front passenger foot we ll
(→ page 439) R
Fuse box in the boot on theright-hand side
of theve hicle when vie wed in the direction of
tr ave l (→ page 439) Opening and closing
the fuse box in the
engine compa rtment Re
quirements:
R A dry clo thand a sc rewdriver are available.
Obse rveth e no tes on electrical fuses
(→ page 437).
Opening &
WARNING Risk of inju ryfrom using the
windscreen wipers while the engine bon‐
net is open
When the engine bonn etis open, and the
windscreen wipers are set in motion, you can
be trapped bythe wiper linkage. #
Alw ays switch off the windscreen wip‐
ers and ignition before opening the
engine bonn et. #
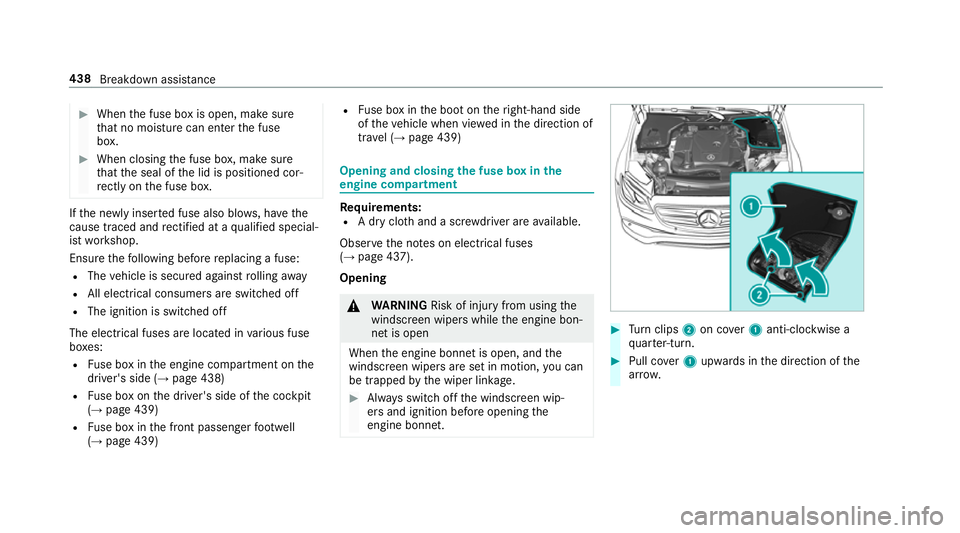
Turn clips 2on co ver1 anti-clockwise a
qu arter-turn. #
Pull co ver1 upwards in the direction of the
ar row. 438
Breakdown assis tance
Page 449 of 593
Ra
dio equipment appr oval of the ty repres‐
sure moni toring sy stem
Ra dio equipment appr oval numbers Countr
yRadio equipment appr oval
number
Ar ge ntina Schrader AG5SP4
Numero de Registro CNC:
H-1 4795
Brazil MODELO:
AG5SP4-D
AN ATEL: 0280-15-8001
Es te equipamento opera em
caráter secundário, is toé, não
te m direito à pr oteção contrain‐
te rferência prejudicial, mesmo de
es tações do mesmo tipo e não
pode causar inter ferê ncia a si ste‐
mas operando em caráter pri‐
mário. Countr
yRadio equipment appr oval
number
European
Union Hereb
y,Schrader Electronics Ltd
declares that thera dio equip‐
ment type "AG5SP4 & MFR" is in
compliance with Directive
20 14 /53/EU.
The full text of the EU declaration
of confo rmity is available at the
fo llowing internet address:
http://www.tpmseuro‐
shop.com/documents/declara‐
tion_conformities
GG4: f = 433.92MHz; Maximum
ef fective radiated P < 10mw
(e.r.p)
MFR recei ver:Category II
Schrader Elect ronics Ltd. 11
Te ch nology Park, Count
ryRadio equipment appr oval
number
Belfast Road, Antrim BT41 1QS,
Nor thern Ireland United Kingdom
Indonesia 38892/SDPPI/20 15
Jordan Kingdom of Jordan Type appr oval
fo rTy re Pressure sensor.
Manufacturer: Schrader Elect ron‐
ics Ltd.
Model: AG5SP4
Ty pe Appr oval Numb er:
TRC/LPD/20 15/21
MFR
Ty pe Appr oval Numb er:
TRC/LPD/20 15/223 446
Wheels and tyres
Page 463 of 593
Re
moving the eme rgency spa rewheel The eme
rgency spare wheel is secured in the
emer gency spa rewheel bag in the boot. #
Obser vethe information on mounting tyres
(→ page 449). #
Open the boot. #
Detach thefast ening stra ps. #
Unhook there taining spring hooks of thefa s‐
te ning stra ps from the brac kets. #
Remo vethe emer gency spa rewheel bag with
th e emer gency spa rewheel. #
Open the emer gency spa rewheel bag and
re mo vethe emer gency spa rewheel. 460
Wheels and tyres
Page 491 of 593
Display messages
Possible causes/consequences and M
MSolutions
Left windowbag malfunc-
tion Consult work-
shop (Example) &
WARNING Risk of inju ryor fata l injury due toa malfunction in the window airbag
The window airbag might be triggered unintentionally or might not be triggered at all in theeve nt of an accident
wi th high deceleration. #
Have the window airbag checked and repaired immediately at a qualified specialist workshop. #
Consult a qualified specialist workshop immediatel y.
Front-passenger airbag
enabled See Owner's Man-
ual *T
he front passenger airbag is enabled while theve hicle is in motion:
R even when a child, a small adult or an object weighing less than the sy stem weight thre shold is located on the
front passenger seat
R even when the front passenger seat is not occupied
The sy stem may de tect objects or forc es that are adding tothewe ight applied tothe seat. &
WARNING Risk of inju ryor fata l injury when using a child restra int sy stem while the front passenger airbag
is enabled
If yo u secure a child in a child restra int sy stem on the front passenger seat and the front passenger airbag is
enabled, the front passenger airbag can deploy in theev ent of an accident.
The child could be stru ck bythe airbag. #
Ensure, bo thbefore and during the journe y,that thest atus of the front passenger airbag is cor rect. 488
Display messages and warning/indicator lamps
Page 528 of 593
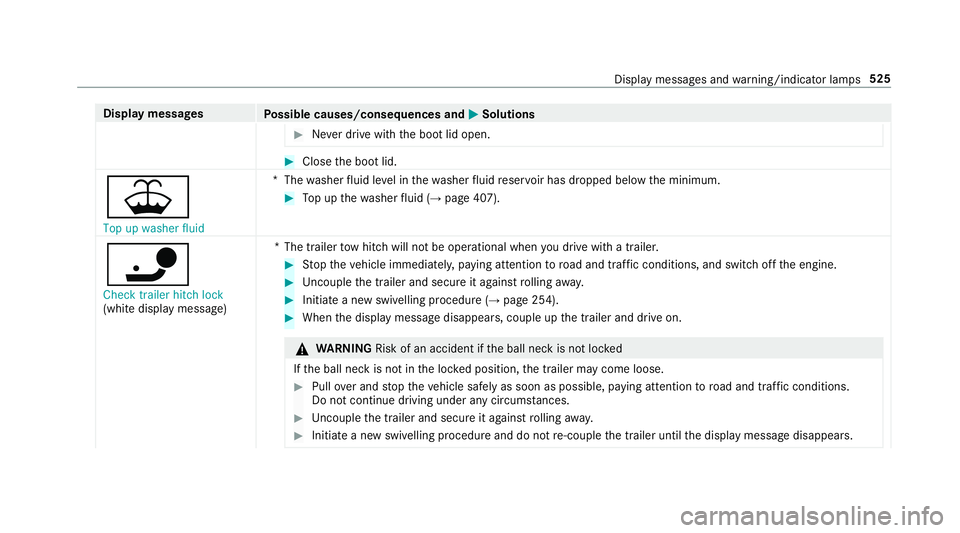
Display messages
Possible causes/consequences and M
MSolutions #
Never drive with the boot lid open. #
Close the boot lid.
¥ Top up washer fluid *T
hewasher fluid le vel in thewa sher fluid reser voir has dropped below the minimum. #
Top up thewa sher fluid (→ page 407).
ï
Check trailer hitch lock
(white displ aymessa ge) *T
he trailer tow hit chwill not be operational when you drive with a trailer. #
Stop theve hicle immediately, paying attention toroad and traf fic conditions, and switch off the engine. #
Uncouple the trailer and secure it against rolling away. #
Initiate a new swivelling procedure (→ page 254). #
When the display message disappears, couple up the trailer and drive on. &
WARNING Risk of an accident if the ball neck is not loc ked
If th e ball neck is not in the loc ked position, the trailer may come loose. #
Pull over and stop theve hicle safely as soon as possible, paying attention toroad and traf fic conditions.
Do not continue driving under any circums tances. #
Uncouple the trailer and secure it against rolling away. #
Initiate a new swivelling procedure and do not re-couple the trailer until the display message disappears. Display messages and
warning/indicator lamps 525
Page 529 of 593
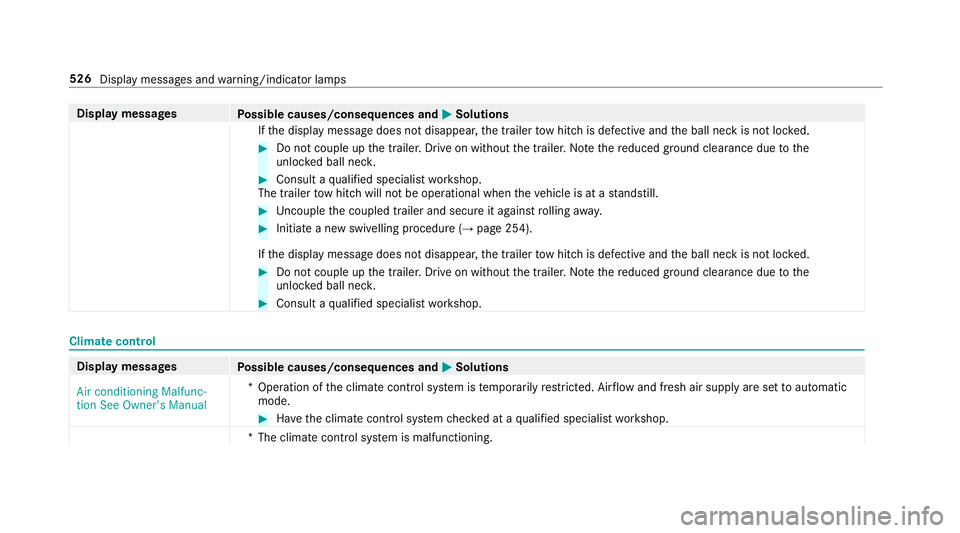
Display messages
Possible causes/consequences and M
MSolutions
If th e display message does not disappear, the trailer tow hit chis defective and the ball neck is not loc ked. #
Do not couple up the trailer. Drive on without the trailer. No tethere duced ground clearance due tothe
unlo cked ball nec k. #
Consult a qualified specialist workshop.
The trailer tow hit chwill not be operational when theve hicle is at a standstill. #
Uncouple the coupled trailer and secure it against rolling away. #
Initiate a new swivelling procedure (→ page 254).
If th e display message does not disappear, the trailer tow hit chis defective and the ball neck is not loc ked. #
Do not couple up the trailer. Drive on without the trailer. No tethere duced ground clearance due tothe
unlo cked ball nec k. #
Consult a qualified specialist workshop. Climate control
Display messages
Possible causes/consequences and M
MSolutions
Air conditioning Malfunc-
tion See Owner's Manual *O
peration of the climate control sy stem is temp orarily restricted. Air flow and fresh air supply are set toautomatic
mode. #
Have the climate control sy stem checked at a qualified specialist workshop.
*T he climate contro l system is malfunctioning. 526
Display messages and warning/indicator lamps