clock MERCEDES-BENZ E-CLASS ESTATE 2008 Owners Manual
[x] Cancel search | Manufacturer: MERCEDES-BENZ, Model Year: 2008, Model line: E-CLASS ESTATE, Model: MERCEDES-BENZ E-CLASS ESTATE 2008Pages: 401, PDF Size: 6.89 MB
Page 30 of 401
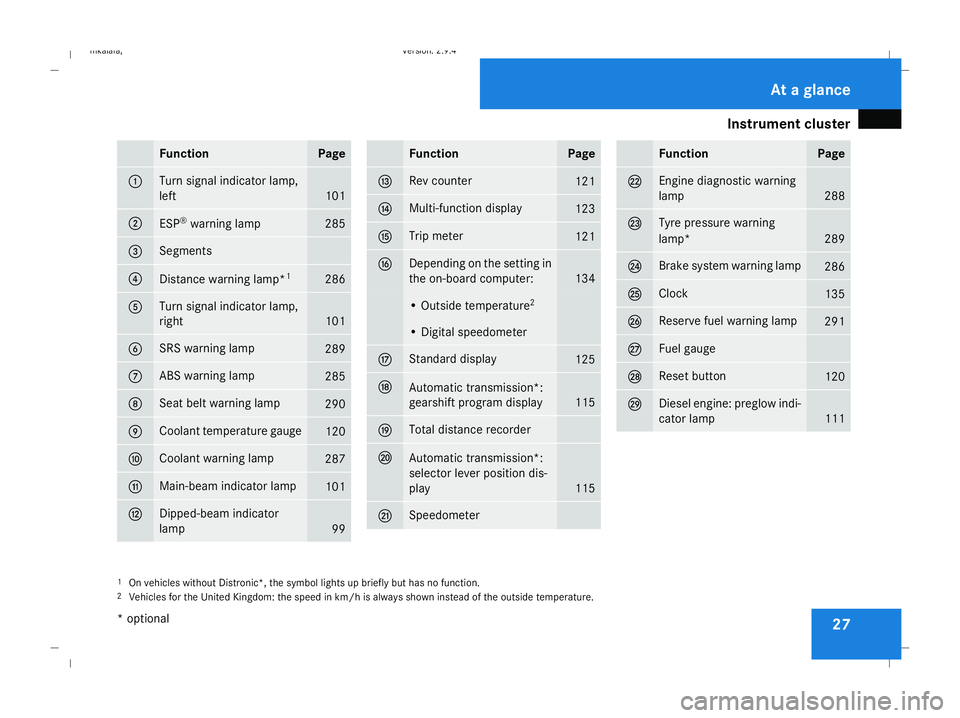
Instrument cluster
27Function Page
1 Turn signal indicator lamp,
left
101
2
ESP
®
warning lamp 285
3 Segments
4
Distance warning lamp*
1 286
5 Turn signal indicator lamp,
right
101
6 SRS warning lamp
289
7 ABS warning lamp
285
8 Seat belt warning lamp
290
9 Coolant temperature gauge
120
a Coolant warning lamp
287
b Main-beam indicator lamp
101
c Dipped-beam indicator
lamp
99 Function Page
d Rev counter
121
e Multi-function display
123
f Trip meter
121
g Depending on the setting in
the on-board computer:
134
• Outside temperature
2 • Digital speedometer
h Standard display
125
j
Automatic transmission*:
gearshift program display
115
k Total distance recorder
l
Automatic transmission*:
selector lever position dis-
play
115
m Speedometer Function Page
n Engine diagnostic warning
lamp
288
o Tyre pressure warning
lamp*
289
p Brake system warning lamp
286
q Clock
135
r Reserve fuel warning lamp
291
s Fuel gauge
t Reset button
120
u Diesel engine: preglow indi-
cator lamp
111
1
On vehicles without Distronic*, the symbol lights up briefly but has no function.
2 Vehicles for the United Kingdom: the speed in km/h is always shown instead of the outside temperature. At a glance
* optional
211_AKB; 2; 5, en-GB
mkalafa,
Version: 2.9.4 2008-02-29T16:57:07+01:00 - Seite 27Dateiname: 6515_3416_02_buchblock.pdf; preflight
Page 32 of 401
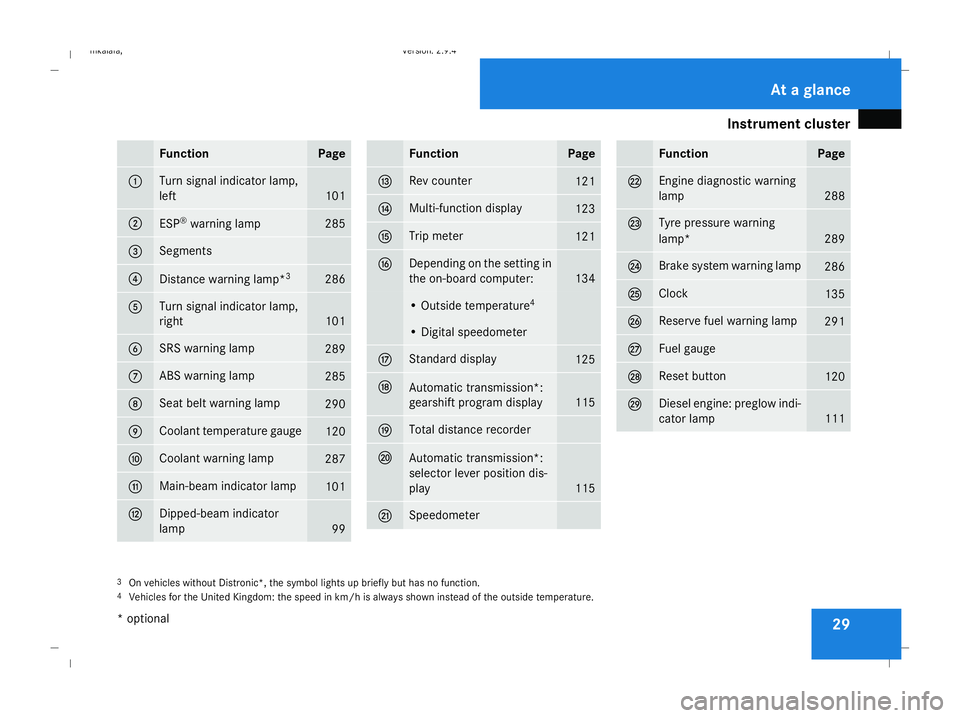
Instrument cluster
29Function Page
1 Turn signal indicator lamp,
left
101
2
ESP
®
warning lamp 285
3 Segments
4
Distance warning lamp*
3 286
5 Turn signal indicator lamp,
right
101
6 SRS warning lamp
289
7 ABS warning lamp
285
8 Seat belt warning lamp
290
9 Coolant temperature gauge
120
a Coolant warning lamp
287
b Main-beam indicator lamp
101
c Dipped-beam indicator
lamp
99 Function Page
d Rev counter
121
e Multi-function display
123
f Trip meter
121
g Depending on the setting in
the on-board computer:
134
• Outside temperature
4 • Digital speedometer
h Standard display
125
j
Automatic transmission*:
gearshift program display
115
k Total distance recorder
l
Automatic transmission*:
selector lever position dis-
play
115
m Speedometer Function Page
n Engine diagnostic warning
lamp
288
o Tyre pressure warning
lamp*
289
p Brake system warning lamp
286
q Clock
135
r Reserve fuel warning lamp
291
s Fuel gauge
t Reset button
120
u Diesel engine: preglow indi-
cator lamp
111
3
On vehicles without Distronic*, the symbol lights up briefly but has no function.
4 Vehicles for the United Kingdom: the speed in km/h is always shown instead of the outside temperature. At a glance
* optional
211_AKB; 2; 5, en-GB
mkalafa,
Version: 2.9.4 2008-02-29T16:57:07+01:00 - Seite 29Dateiname: 6515_3416_02_buchblock.pdf; preflight
Page 76 of 401
Opening and closing
73
X
Insert the emergency key element fully into
the boot lock.
X Turn the emergency key element clockwise
to position %.
X Remove the emergency key element. Boot/luggage compartment (vehicles
with remote boot lid closing feature*)
The remote boot lid closing feature* opens
and closes the boot lid/tailgate automati-
cally. You can stop the automatic opening and
closing procedure at any time:
R Saloon: by pulling or pressing the remote
operating button at the driver's seat
Estate: by pulling the remote operating but-
ton at the driver's seat again
R by pressing the ibutton on the key
R by pulling the handle on the boot lid/tail-
gate
R by pressing the closing button in the boot
lid/tailgate
On Estate vehicles, you will hear a warning
tone as the tailgate is opening or closing. G
Risk of poisoning
Exhaust fumes could enter the vehicle inte-
rior if the engine is running and the boot lid
is open. This could poison you. Therefore,
you should make sure that the boot lid/
tailgate is always closed when the engine
is running. G
Risk of accident
Estate
Do not leave children unsupervised in the
vehicle. They could open the tailgate from
the inside and thereby endanger them-
selves and others.
! The boot lid/tailgate swings upwards and
to the rear when opened. Therefore, make
sure that there is sufficient clearance
above and behind the boot lid/tailgate.
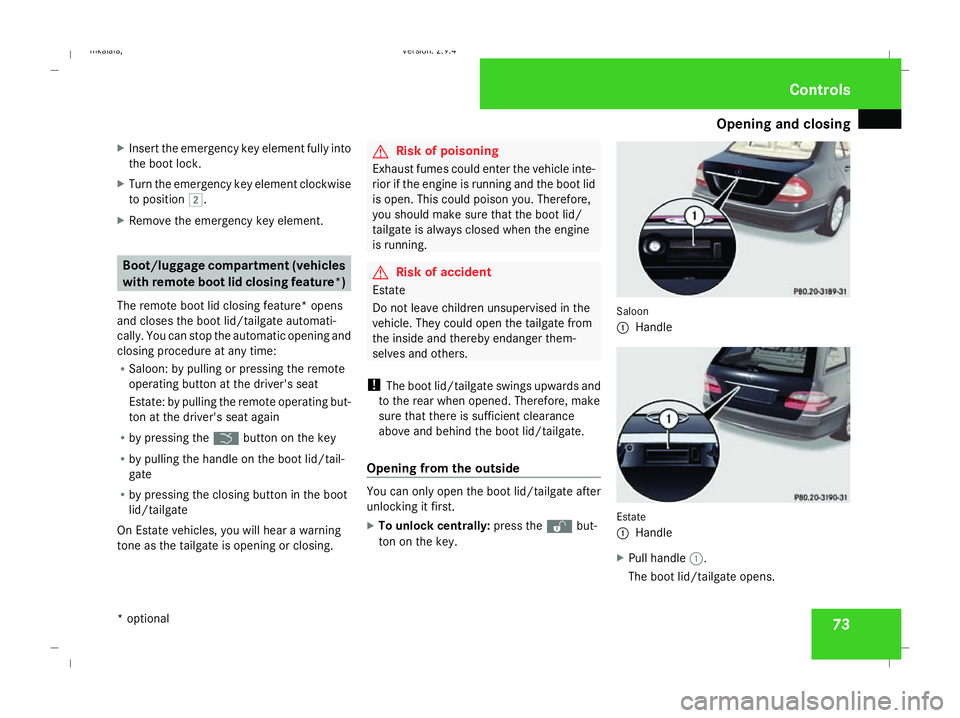
Opening from the outside You can only open the boot lid/tailgate after
unlocking it first.
X
To unlock centrally: press thekbut-
ton on the key. Saloon
1
Handle Estate
1
Handle
X Pull handle 1.
The boot lid/tailgate opens. Controls
* optional
211_AKB; 2; 5, en-GB
mkalafa,
Version: 2.9.4 2008-02-29T16:57:07+01:00 - Seite 73 ZDateiname: 6515_3416_02_buchblock.pdf; preflight
Page 123 of 401
Instrument cluster
120 Instrument cluster
Points to remember
You will find a full overview of the instrument
cluster in the "At a glance" section
(Y page 26). G
Risk of accident
No further messages can be displayed if the
instrument cluster and/or the multi-func-
tion display fails.
This means that you will not see information
about the driving situation, such as the
speed, outside temperature, warning/indi-
cator lamps, display messages or system
failures. The vehicle's handling character-
istics may be affected. Adjust your driving
style and speed accordingly.
Immediately consult a qualified specialist
workshop which has the necessary special-
ist knowledge and tools to carry out the
work required. Mercedes-Benz recom-
mends that you use a Mercedes-Benz
Service Centre for this purpose. In particu-
lar, work relevant to safety or on safety-
related systems must be carried out at a
qualified specialist workshop. Activating the multi-function display
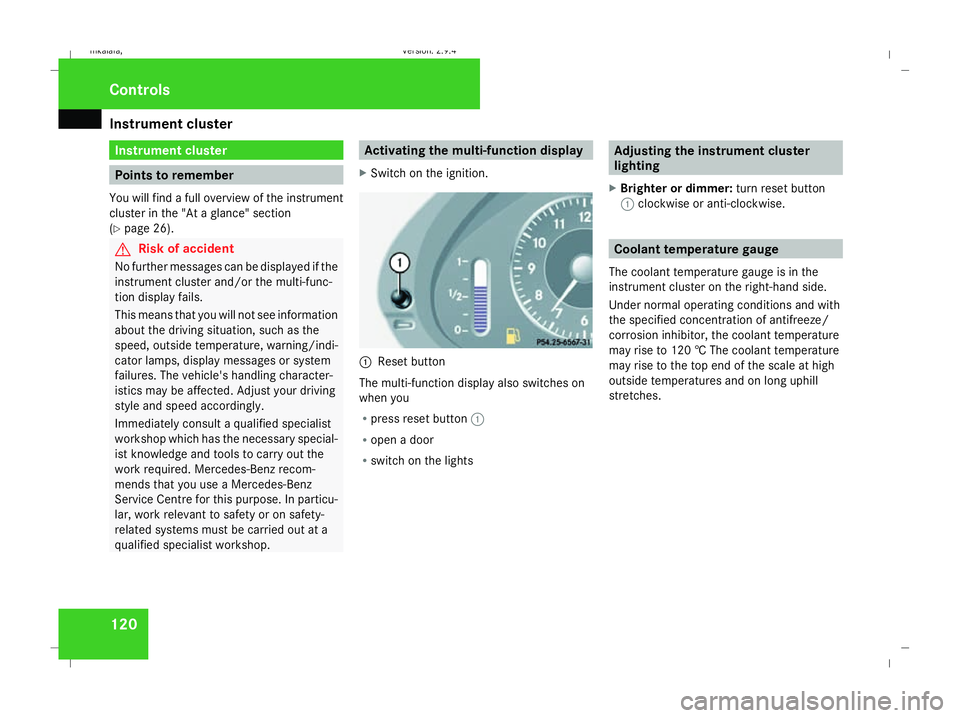
X Switch on the ignition. 1
Reset button
The multi-function display also switches on
when you
R press reset button 1
R open a door
R switch on the lights Adjusting the instrument cluster
lighting
X Brighter or dimmer: turn reset button
1 clockwise or anti-clockwise. Coolant temperature gauge
The coolant temperature gauge is in the
instrument cluster on the right-hand side.
Under normal operating conditions and with
the specified concentration of antifreeze/
corrosion inhibitor, the coolant temperature
may rise to 120 † The coolant temperature
may rise to the top end of the scale at high
outside temperatures and on long uphill
stretches. Controls
211_AKB; 2; 5, en-GB
mkalafa
, Version: 2.9.4 2008-02-29T16:57:07+01:00 - Seite 120Dateiname: 6515_3416_02_buchblock.pdf; preflight
Page 138 of 401
On-board computer
135
X
Press the èor· button to select the
Settings... menu.
X Press the jbutton to call up the selec-
tion of submenus.
X Press the æorç button to select the
Time/Date submenu.
Setting the time
X Use the jbutton to select Clock,
hours Press R to confirm (orClock,
minutes Press R to confirm ).
X Press the æorç button to set a
value.
X Press the reset button on the left of the
instrument cluster.
The set time is stored.
Setting the date
X Press the jbutton to select Set date
Day (orSet date Month orSet date
Year).
X Press the æorç button to set the
values.
X Press the j,èorÿ button to
select a different display. Setting constant headlamp mode If you have set constant headlamp mode and
the light switch is in position MorU,
the side lamps, dipped-beam headlamps and
licence plate lighting are switched on auto-
matically when the engine is running. Turning
the light switch to a different position
switches on the corresponding lights. Make
sure that the light switch is turned to Bor
U if you switch off constant headlamp
mode while driving in the dark.
In countries in which constant headlamp
mode is a legal requirement, Constantis the
factory setting.
X Press the èor· button to select the
Settings... menu.
X Press the jbutton to call up the selec-
tion of submenus.
X Press the æorç button to select the
Lighting submenu.
X Press the jbutton to select Headlamp
mode. X
Press the æorç button to set the
mode for the headlamps to ManualorCon-
stant (constant headlamp mode).
X Press the j,èorÿ button to
select a different display.
Switching the surround lighting on or
off If the surround lighting is switched on, the
following lights will be switched on automat-
ically in the dark after you have unlocked the
vehicle using the key:
R
the side lamps
R the tail lamps
R the licence plate lighting
R the front foglamps
The surround lighting switches off automati-
cally if you open the driver's door or after 40
seconds.
X Press èor· to select the Set-
tings... menu.
X Press the jbutton to call up the selec-
tion of submenus.
X Press the æorç button to select the
Lighting submenu. Controls
211_AKB; 2; 5, en-GB
mkalafa,
Version: 2.9.4
2008-02-29T16:57:07+01:00 - Seite 135 ZDateiname: 6515_3416_02_buchblock.pdf; preflight
Page 174 of 401
Air conditioning
171
4-zone Thermotronic*: the temperature for
each of the four air-conditioning zones can be
set individually. You can set the temperature
separately for the driver's and front-
passenger sides as well as for the left and
right sides of the rear compartment.
Setting the temperature in the front
compartment using 2-zone Thermatic X
Make sure that the key is in position 2in
the ignition lock.
X To increase/reduce: turn thumbwheels
1 and 7clockwise or anti-clockwise
(Y page 164). Only change the temperature
setting in small increments. Start at 22 †.
Setting the temperature in the front
compartment via 4-zone
Thermotronic* X
Make sure that the key is in position 2in
the ignition lock.
X To increase/reduce: press the$or
% button. Only change the temperature
setting in small increments. Start at 22 †.
The set temperature is shown in the 4-zone
Thermotronic* display. Setting the temperature in the rear
compartment via 4-zone
Thermotronic* X
Make sure that the key is in position 2in
the ignition lock.
X Press the ™button.
The 4-zone Thermotronic* display switches
to the rear-compartment air-conditioning
settings.
X To increase/reduce: press the$or
% button. Only change the temperature
setting in small increments. Start at 22 †.
The set temperature is shown in the 4-zone
Thermotronic* display. The 4-zone
Thermotronic* display changes back to the
standard display about five seconds after a
button is pressed.
i You can also return to the standard dis-
play by pressing the ™button again. Setting the rear-compartment temper-
ature via the rear-compartment air con-
ditioning* X
Make sure that the key is in position 2in
the ignition lock.
X To increase/reduce: press the$or
% button. Only change the temperature
setting in small increments. Start at 22 †. Adjusting the air vents
G
Risk of injury
Very hot or very cold air can flow from the
air vents. This could cause burns or frost-
bite to bare skin in the immediate vicinity
of the vents. Keep bare skin away from
these air outlets. If necessary, direct the
airflow away to a different area of the vehi-
cle interior.
Please observe the following notes to ensure
that the air can flow freely through the air
vents:
R Keep the air inlet between the windscreen
and the bonnet free of deposits, such as ice Cont
rols
* optional
211_AKB; 2; 5, en-GB
mkalafa ,V ersion: 2.9.4
2008-02-29T16:57:07+01:00 - Seite 171 ZDateiname: 6515_3416_02_buchblock.pdf; preflight
Page 177 of 401
Air conditioning
174
The symbols for the air distribution have the
following meanings: Symbol Meaning
Z
Directs the airflow through the
centre, the side and the demis-
ter air vents
a
Directs the airflow through the
centre and side air vents
X
Directs the airflow to the entire
vehicle interior
Y
Directs the airflow through the
centre, the side and the foot-
well vents in the front and rear
X
Make sure that the key is in position 2in
the ignition lock.
X Turn thumbwheel 1or7 to the corre-
sponding symbol (Y page 166). The thumb-
wheel can also be turned to the area
between two symbols. Setting the airflow
X Make sure that the key is in position 2in
the ignition lock.
X To increase/reduce: press theQor
· button. Demisting the windscreen
i You should only select the "demisting"
function until the windscreen is clear again.
X Make sure that the key is in position 2in
the ignition lock.
X To activate: press theybutton.
The indicator lamp in the ybutton
comes on.
The system automatically switches to the
following functions:
R cooling with air dehumidification on
R high airflow 29
R high temperature 29
R air distribution to the windscreen and
front side windows
R air-recirculation mode off X
To deactivate: press theybutton.
The indicator lamp in the ybutton goes
out. The previously selected settings come
into effect again. The cooling with air dehu-
midification function remains on. Air-recir-
culation mode remains deactivated.
or
X Press the Ubutton.
The indicator lamp in the ybutton goes
out. Airflow and air distribution are set to
automatic mode.
or
X 2-zone Thermatic: turn thumbwheels1
or 7 clockwise or anti-clockwise
(Y page 164).
or
X 2-zone Thermatic: press theQor
· button.
29 Depending on the outside temperature. Cont
rols
211_AKB; 2; 5, en-GB
mkalafa
,V ersion: 2.9.4
2008-02-29T16:57:07+01:00 - Seite 174 Dateiname: 6515_3416_02_buchblock.pdf; preflight
Page 222 of 401
Refuelling
219
!
If the wrong fuel has been added by mis-
take, do not switch on the ignition. If you
do, the fuel could enter the fuel lines. The
tank and the fuel lines would then have to
be emptied. Inform a qualified specialist
workshop and have the tank and the fuel
lines emptied completely.
When you open or close the vehicle with the
key or KEYLESS GO*, the fuel filler flap is
automatically unlocked or locked.
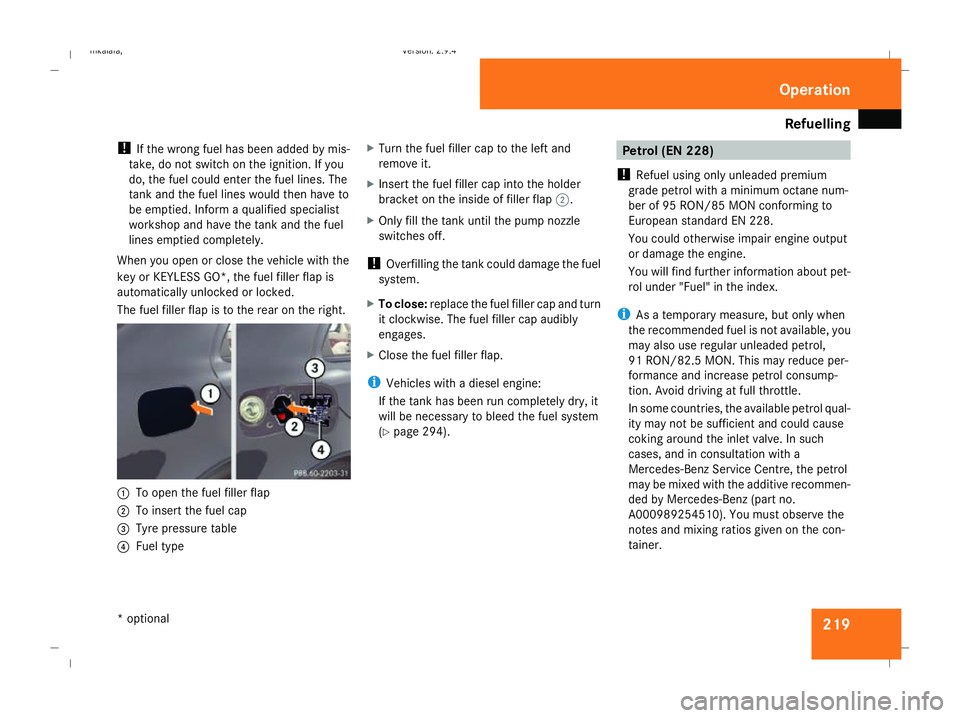
The fuel filler flap is to the rear on the right. 1
To open the fuel filler flap
2 To insert the fuel cap
3 Tyre pressure table
4 Fuel type X
Turn the fuel filler cap to the left and
remove it.
X Insert the fuel filler cap into the holder
bracket on the inside of filler flap 2.
X Only fill the tank until the pump nozzle
switches off.
! Overfilling the tank could damage the fuel
system.
X To close: replace the fuel filler cap and turn
it clockwise. The fuel filler cap audibly
engages.
X Close the fuel filler flap.
i Vehicles with a diesel engine:
If the tank has been run completely dry, it
will be necessary to bleed the fuel system
(Y page 294). Petrol (EN 228)
! Refuel using only unleaded premium
grade petrol with a minimum octane num-
ber of 95 RON/85 MON conforming to
European standard EN 228.
You could otherwise impair engine output
or damage the engine.
You will find further information about pet-
rol under "Fuel" in the index.
i As a temporary measure, but only when
the recommended fuel is not available, you
may also use regular unleaded petrol,
91 RON/82.5 MO N. Thismay reduce per-
formance and increase petrol consump-
tion. Avoid driving at full throttle.
In some countries, the available petrol qual-
ity may not be sufficient and could cause
coking around the inlet valve. In such
cases, and in consultation with a
Mercedes-Benz Service Centre, the petrol
may be mixed with the additive recommen-
ded by Mercedes-Benz (part no.
A000989254510). You must observe the
notes and mixing ratios given on the con-
tainer. Operation
* optional
211_AKB; 2; 5, en-GB
mkalafa,
Version: 2.9.4 2008-02-29T16:57:07+01:00 - Seite 219 ZDateiname: 6515_3416_02_buchblock.pdf; preflight
Page 229 of 401
Engine compartment
226
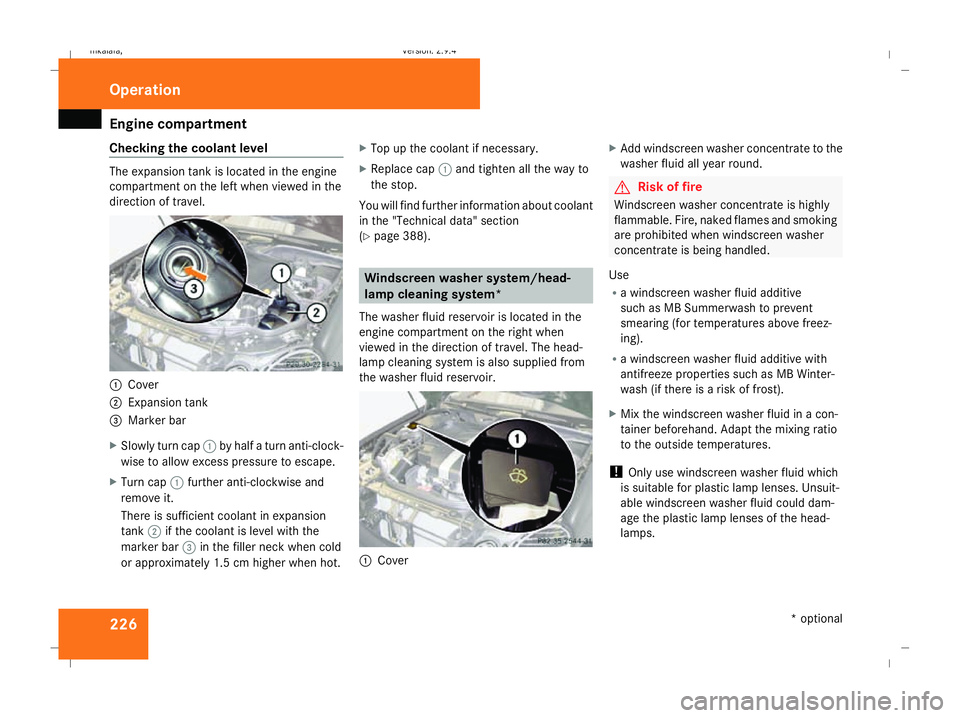
Checking the coolant level The expansion tank is located in the engine
compartment on the left when viewed in the
direction of travel. 1
Cover
2 Expansion tank
3 Marker bar
X Slowly turn cap 1by half a turn anti-clock-
wise to allow excess pressure to escape.
X Turn cap 1further anti-clockwise and
remove it.
There is sufficient coolant in expansion
tank 2if the coolant is level with the
marker bar 3in the filler neck when cold
or approximately 1.5 cm higher when hot. X
Top up the coolant if necessary.
X Replace cap 1and tighten all the way to
the stop.
You will find further information about coolant
in the "Technical data" section
(Y page 388). Windscreen washer system/head-
lamp cleaning system*
The washer fluid reservoir is located in the
engine compartment on the right when
viewed in the direction of travel. The head-
lamp cleaning system is also supplied from
the washer fluid reservoir. 1
Cover X
Add windscreen washer concentrate to the
washer fluid all year round. G
Risk of fire
Windscreen washer concentrate is highly
flammable. Fire, naked flames and smoking
are prohibited when windscreen washer
concentrate is being handled.
Use
R a windscreen washer fluid additive
such as MB Summerwash to prevent
smearing (for temperatures above freez-
ing).
R a windscreen washer fluid additive with
antifreeze properties such as MB Winter-
wash (if there is a risk of frost).
X Mix the windscreen washer fluid in a con-
tainer beforehand. Adapt the mixing ratio
to the outside temperatures.
! Only use windscreen washer fluid which
is suitable for plastic lamp lenses. Unsuit-
able windscreen washer fluid could dam-
age the plastic lamp lenses of the head-
lamps. Operation
* optional
211_AKB; 2; 5, en-GB
mkalafa,
Version: 2.9.4 2008-02-29T16:57:07+01:00 - Seite 226Dateiname: 6515_3416_02_buchblock.pdf; preflight
Page 241 of 401
Driving ab
road 238 Driving on wet roads
If water has accumulated to a certain depth
on the road surface, there is a danger of aqua-
planing occurring, even if:
R you drive at low speeds
R the tyres have adequate tread depth
For this reason, do not drive in tyre ruts, and
brake carefully. Driving on flooded roads
If you have to drive on stretches of road on
which water has collected, please bear in
mind that:
R the maximum permitted still water depth is
25 cm.
R you should drive no faster than at walking
pace.
! Note that vehicles in front or oncoming
vehicles create waves. This could mean
that the maximum permitted water depth
is exceeded.
You must observe these notes, otherwise
damage may occur to the engine, electrics
or transmission. Driving abroad
Points to remember
An extensive Mercedes-Benz Service network
is also available in other countries. You can
obtain the relevant workshop directories
from any Mercedes-Benz Service Centre.
Only low-octane fuel is available in certain
countries.
You can find further information about fuel
grades on (Y page 218). Symmetrical dipped beam
If your journey takes you to countries where
vehicles are driven on the opposite side of the
road to the country in which the vehicle is
registered, your headlamps must be switched
to symmetrical dipped beam. Oncoming traf-
fic will be dazzled less. G
Risk of injury
Vehicles with xenon headlamps*:
Xenon bulbs are under high voltage. You
could get an electric shock and be seriously
or even fatally injured if you touch the elec-
tric contacts on xenon bulbs. Do not, there-
fore, remove the cover on xenon bulbs. Do not change xenon headlamps yourself,
but have them replaced at a qualified spe-
cialist workshop which has the necessary
specialist knowledge and tools to carry out
the work required.
Mercedes-Benz recommends that you use
a Mercedes-Benz Service Centre for this
purpose. In particular, work relevant to
safety or on safety-related systems must be
carried out at a qualified specialist work-
shop.
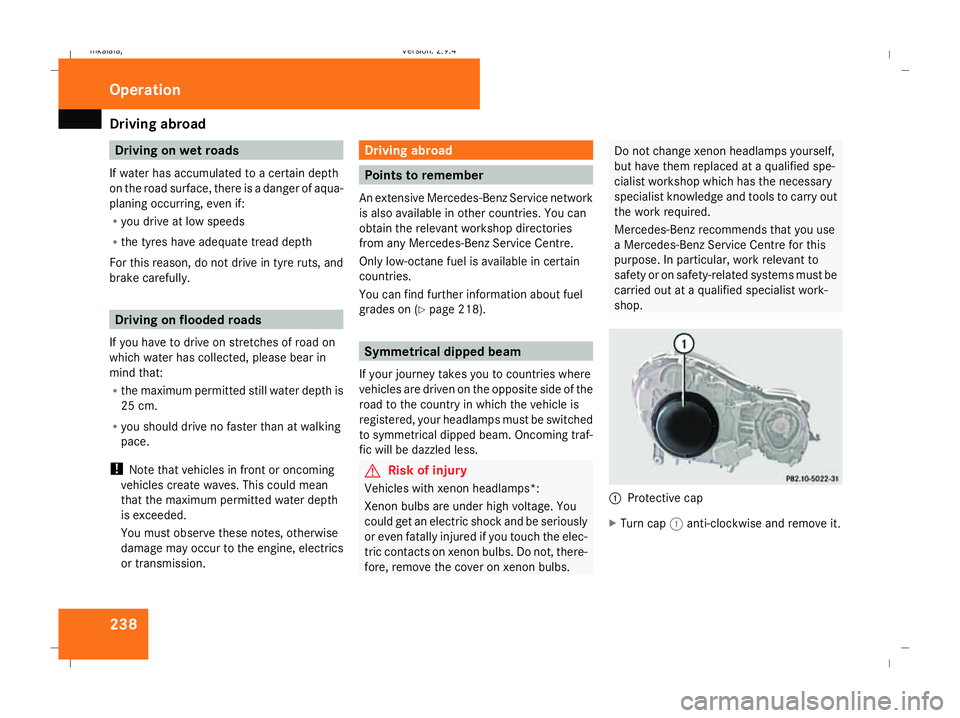
1
Protective cap
X Turn cap 1anti-clockwise and remove it. Operation
211_AKB; 2; 5, en-GB
mkalafa,
Version: 2.9.4 2008-02-29T16:57:07+01:00 - Seite 238Dateiname: 6515_3416_02_buchblock.pdf; preflight