clock MERCEDES-BENZ E-CLASS ESTATE 2009 Owners Manual
[x] Cancel search | Manufacturer: MERCEDES-BENZ, Model Year: 2009, Model line: E-CLASS ESTATE, Model: MERCEDES-BENZ E-CLASS ESTATE 2009Pages: 373, PDF Size: 12.37 MB
Page 30 of 373
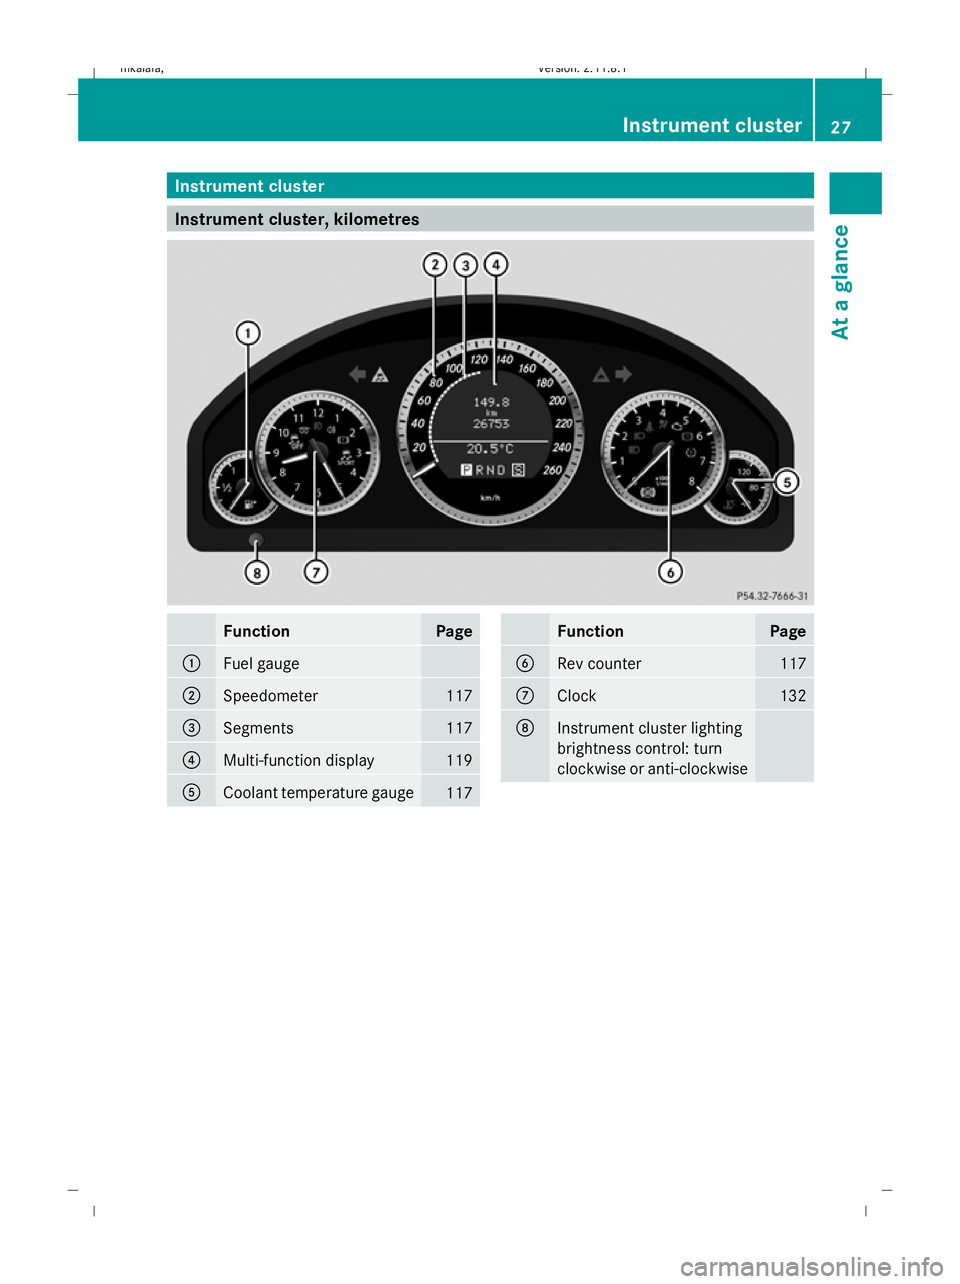
Instrument cluster
Instrument cluster, kilometres
Function Page
:
Fuel gauge
;
Speedometer 117
=
Segments 117
?
Multi-function display 119
A
Coolant temperature gauge
117 Function Page
B
Rev counter 117
C
Clock 132
D
Instrument cluster lighting
brightness control: turn
clockwise or anti-clockwise Instrument cluster
27At a glance
212_AKB; 2; 4, en-GB
mkalafa, Version: 2.11.8.1 2009-05-05T14:17:16+02:00 - Seite 27
Dateiname: 6515346702_buchblock.pdf; erzeugt am 07. May 2009 14:15:30; WK
Page 31 of 373
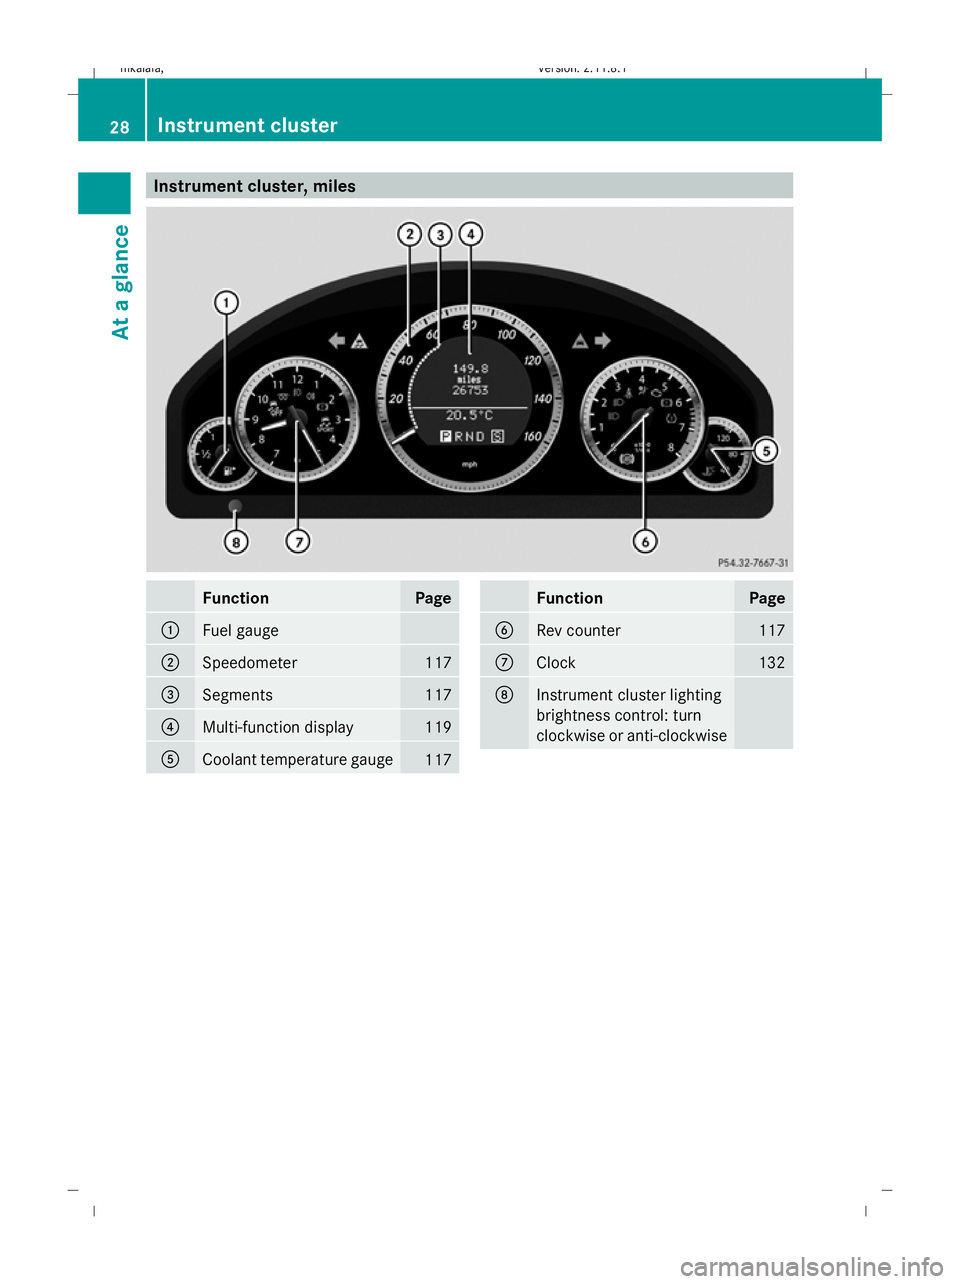
Instrument cluster, miles
Function Page
:
Fuel gauge
;
Speedometer 117
=
Segments 117
?
Multi-function display 119
A
Coolant temperature gauge
117 Function Page
B
Rev counter 117
C
Clock 132
D
Instrument cluster lighting
brightness control: turn
clockwise or anti-clockwise28
Instrument clusterAt a glance
212_AKB; 2; 4, en-GB
mkalafa,
Version: 2.11.8.1
2009-05-05T14:17:16+02:00 - Seite 28
Dateiname: 6515346702_buchblock.pdf; erzeugt am 07. May 2009 14:15:31; WK
Page 76 of 373
X
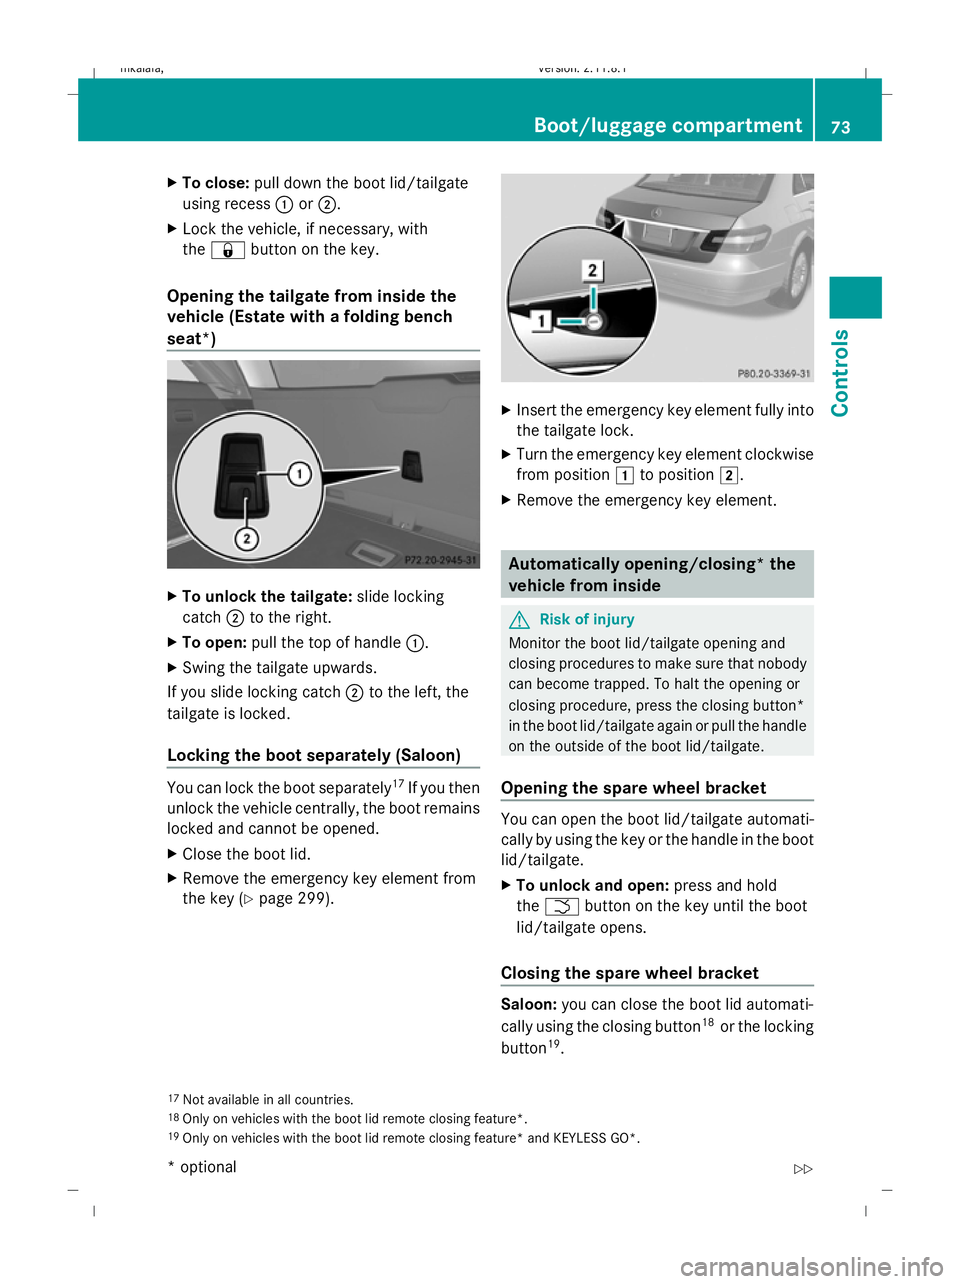
To close: pull down the boot lid/tailgate
using recess :or;.
X Lock the vehicle, if necessary, with
the & button on the key.
Opening the tailgate from inside the
vehicle (Estate with a folding bench
seat*) X
To unlock the tailgate: slide locking
catch ;to the right.
X To open: pull the top of handle :.
X Swing the tailgate upwards.
If you slide locking catch ;to the left, the
tailgate is locked.
Locking the boot separately (Saloon) You can lock the boot separately
17
If you then
unlock the vehicle centrally, the boot remains
locked and cannot be opened.
X Close the boot lid.
X Remove the emergency key element from
the key (Y page 299). X
Insert the emergency key element fully into
the tailgate lock.
X Turn the emergency key element clockwise
from position 1to position 2.
X Remove the emergency key element. Automatically opening/closing* the
vehicle from inside
G
Risk of injury
Monitor the boot lid/tailgate opening and
closing procedures to make sure that nobody
can become trapped. To halt the opening or
closing procedure, press the closing button*
in the boot lid/tailgate again or pull the handle
on the outside of the boot lid/tailgate.
Opening the spare wheel bracket You can open the boot lid/tailgate automati-
cally by using the key or the handle in the boot
lid/tailgate.
X
To unlock and open: press and hold
the F button on the key until the boot
lid/tailgate opens.
Closing the spare wheel bracket Saloon:
you can close the boot lid automati-
cally using the closing button 18
or the locking
button 19
.
17 Not available in all countries.
18 Only on vehicles with the boot lid remote closing feature*.
19 Only on vehicles with the boot lid remote closing feature* and KEYLESS GO*. Boot/luggage compartment
73Controls
* optional
212_AKB; 2; 4, en-GB
mkalafa,
Version: 2.11.8.1 2009-05-05T14:17:16+02:00 - Seite 73 Z
Dateiname: 6515346702_buchblock.pdf; erzeugt am 07. May 2009 14:15:47; WK
Page 119 of 373
the left-hand steering wheel gearshift pad-
dle until the transmission shifts to the opti-
mal gear for the current speed.
X To deactivate: press program selector
button :repeatedly until Cor Sappears
in the display.
Kickdown
i On vehicles with AMG engines, it is not
possible to use kickdown in manual drive
program M.
You can also use kickdown for maximum
acceleration in manual drive program M.
X Depress the accelerator pedal beyond the
pressure point.
The transmission shifts to a lower gear
depending on the engine speed.
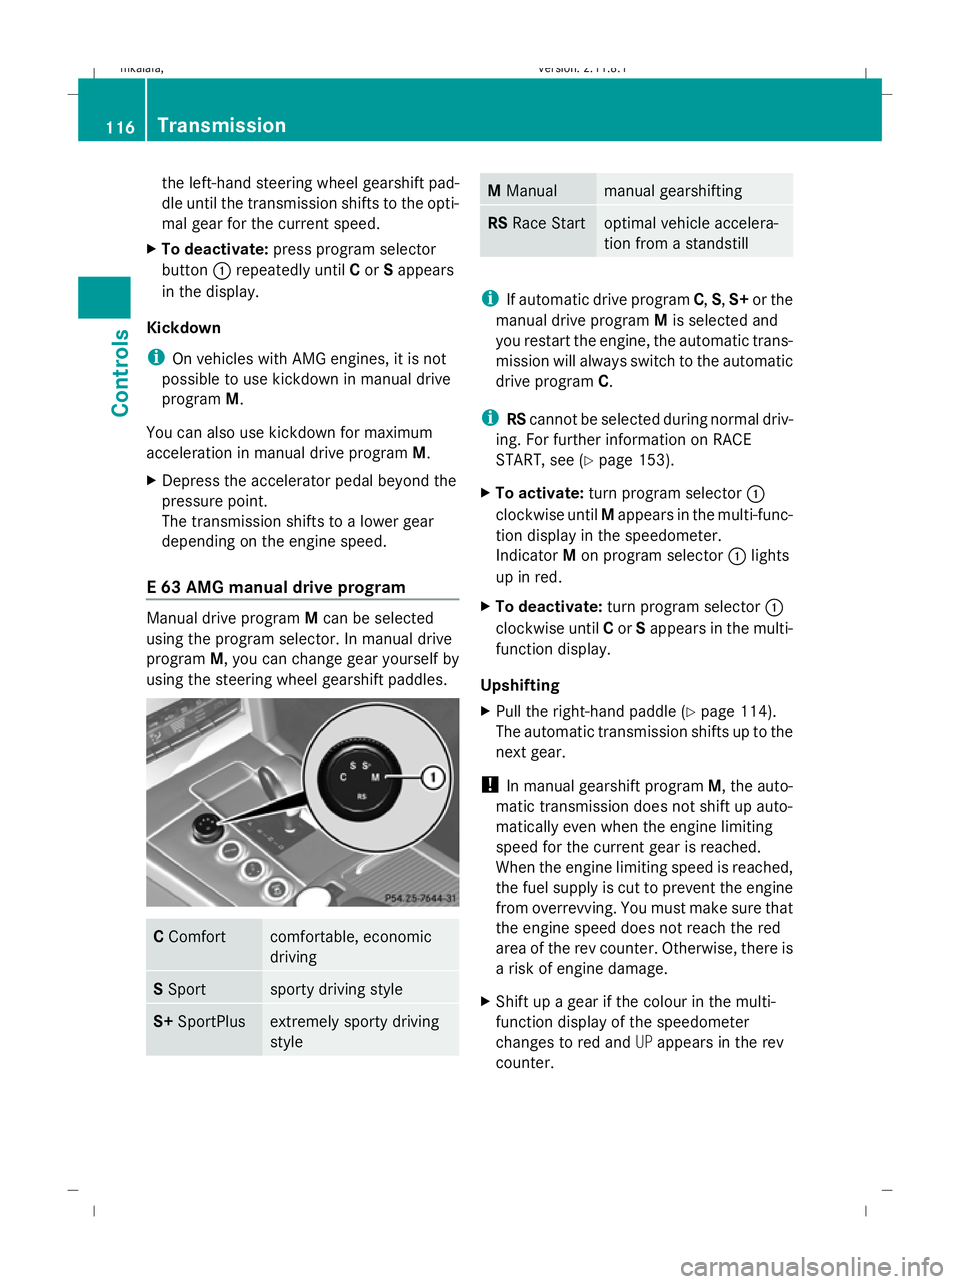
E 63 AMG manual drive program Manual drive program
Mcan be selected
using the program selector. In manual drive
program M, you can change gear yourself by
using the steering wheel gearshift paddles. C
Comfort comfortable, economic
driving
S
Sport sporty driving style
S+
SportPlus extremely sporty driving
style M
Manual manual gearshifting
RS
Race Start optimal vehicle accelera-
tion from a standstill
i
If automatic drive program C,S,S+ or the
manual drive program Mis selected and
you restart the engine, the automatic trans-
mission will always switch to the automatic
drive program C.
i RScannot be selected during normal driv-
ing. For further information on RACE
START, see (Y page 153).
X To activate: turn program selector :
clockwise until Mappears in the multi-func-
tion display in the speedometer.
Indicator Mon program selector :lights
up in red.
X To deactivate: turn program selector :
clockwise until Cor Sappears in the multi-
function display.
Upshifting
X Pull the right-hand paddle (Y page 114).
The automatic transmission shifts up to the
next gear.
! In manual gearshift program M, the auto-
matic transmission does not shift up auto-
matically even when the engine limiting
speed for the current gear is reached.
When the engine limiting speed is reached,
the fuel supply is cut to prevent the engine
from overrevving. You must make sure that
the engine speed does not reach the red
area of the rev counter. Otherwise, there is
a risk of engine damage.
X Shift up a gear if the colour in the multi-
function display of the speedometer
changes to red and UPappears in the rev
counter. 116
TransmissionControls
212_AKB; 2; 4, en-GB
mkalafa
,V ersion: 2.11.8.1
2009-05-05T14:17:16+02:00 - Seite 116
Dateiname: 6515346702_buchblock.pdf; erzeugt am 07. May 2009 14:16:09; WK
Page 156 of 373
message in the multi-function display goes
out. On vehicles with automatic transmis-
sion*, you can also select
P. This deactivates
the HOLD function. RACE START (E 63 AMG)
RACE START enables optimal acceleration
from a standing start with suitable high-grip
road surface conditions. G
Risk of accident
RACE START is only available when ESP ®
Sports mode is activated. ESP ®
Sport stabil-
ises the vehicle in a limited manner if the vehi-
cle starts to skid or when a wheel is spinning.
RACE START should only be used on closed
off circuits. Always adapt your driving style to
suit the prevailing road and weather condi-
tions.
Conditions for activation RACE START can be activated when:
R
the doors are closed
R the engine is running and it has reached an
operating temperature of approximately
80 †. This is the case when the engine oil
temperature lamp in the multi-function dis-
play stops flashing.
R ESP ®
Sport is activated (Y page 62)
R the steering wheel is in the straight-ahead
position
R the vehicle is at rest and the brake pedal is
depressed (left foot)
R the transmission is in position DActivating RACE START X
Depress the brake pedal with your left foot,
and keep it depressed.
X Turn the program selector switch clock-
wise (Y page 116), until the RSlamp lights
up.
The multi-function display shows the RACE
START Confirm: Paddle UP Cancel:
Paddle DOWN message.
i If the conditions for activation are no lon-
ger fulfilled, RACE START is cancelled. The
multi-function display shows the RACE
START cancelled message.
X To cancel: pull the left paddle
(Y page 114).
or
X To confirm: pull the right paddle
(Y page 114).
The multi-function display shows the RACE
START available Depress accelera‐
tor message.
i If you do not depress the accelerator
pedal fully within two seconds, RACE
START is cancelled. The multi-function dis-
play shows the RACE START not possi‐
ble See Owner's Manual message.
X Depress the accelerator pedal fully.
The engine speed rises to approximately
4,000 rpm.
The multi-function display shows the RACE
START Release brake to start mes-
sage.
i If you do not release the brake pedal
within seven seconds, RACE START is can-
celled. The multi-function display shows
the RACE START cancelled message.
X Take your foot off the brake, but keep the
accelerator pedal depressed.
The vehicle pulls away at maximum accel-
eration.
The multi-function display shows the RACE
START active message. Driving systems
153Controls
* optional
212_AKB; 2; 4, en-GB
mkalafa,
Version: 2.11.8.1 2009-05-05T14:17:16+02:00 - Seite 153 Z
Dateiname: 6515346702_buchblock.pdf; erzeugt am 07. May 2009 14:16:21; WK
Page 180 of 373
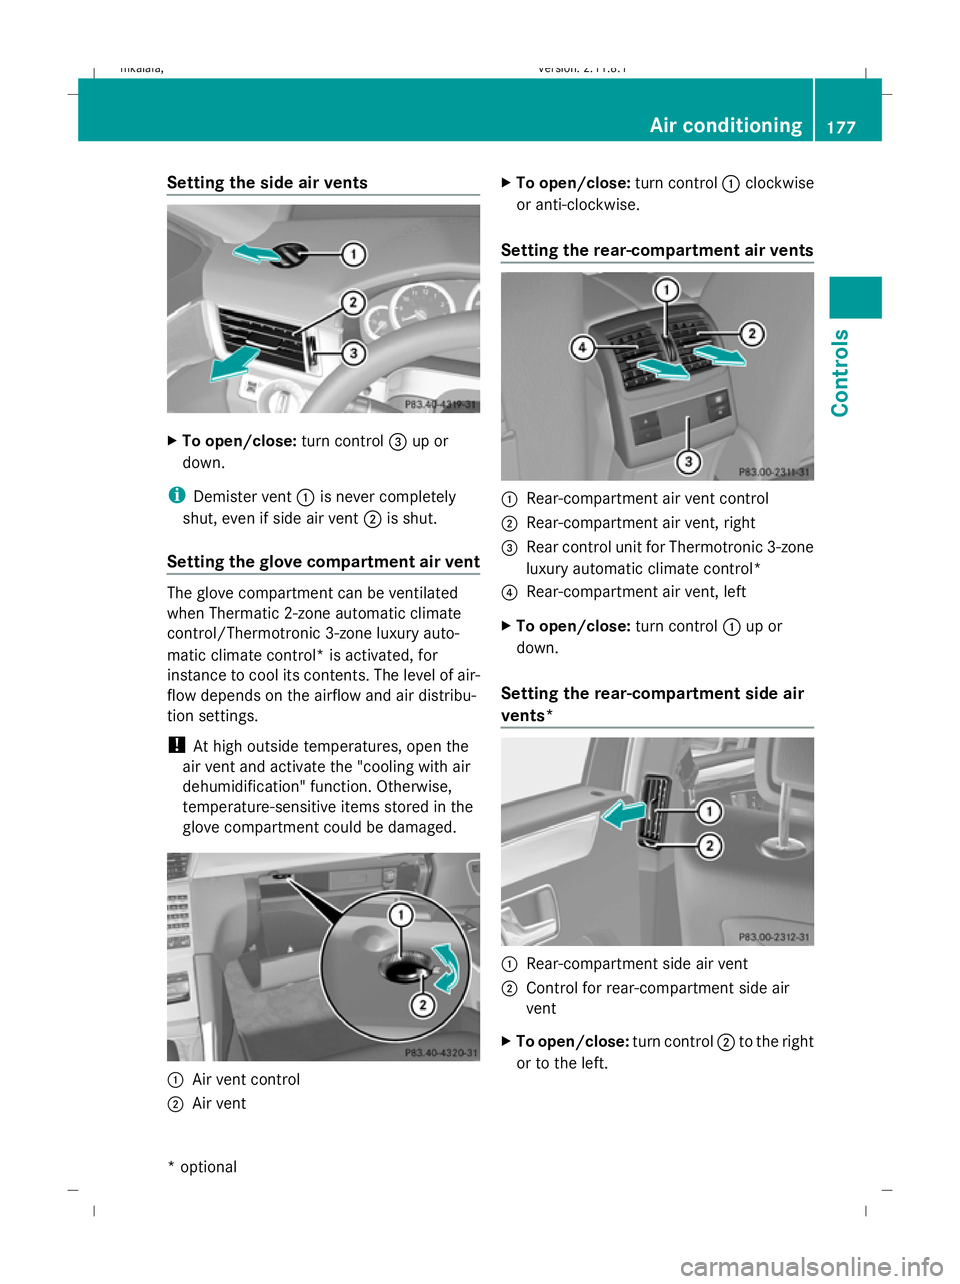
Setting the side air vents
X
To open/close: turn control=up or
down.
i Demister vent :is never completely
shut, even if side air vent ;is shut.
Setting the glove compartment air vent The glove compartment can be ventilated
when Thermatic 2-zone automatic climate
control/Thermotronic 3-zone luxury auto-
matic climate control* is activated, for
instance to cool its contents. The level of air-
flow depends on the airflow and air distribu-
tion settings.
!
At high outside temperatures, open the
air vent and activate the "cooling with air
dehumidification" function. Otherwise,
temperature-sensitive items stored in the
glove compartment could be damaged. :
Air vent control
; Air vent X
To open/close: turn control:clockwise
or anti-clockwise.
Setting the rear-compartment air vents :
Rear-compartment air vent control
; Rear-compartment air vent, right
= Rear control unit for Thermotronic 3-zone
luxury automatic climate control*
? Rear-compartment air vent, left
X To open/close: turn control:up or
down.
Setting the rear-compartment side air
vents* :
Rear-compartment side air vent
; Control for rear-compartment side air
vent
X To open/close: turn control;to the right
or to the left. Air conditioning
177Controls
* optional
212_AKB; 2; 4, en-GB
mkalafa,
Version: 2.11.8.1 2009-05-05T14:17:16+02:00 - Seite 177 Z
Dateiname: 6515346702_buchblock.pdf; erzeugt am 07. May 2009 14:16:30; WK
Page 192 of 373
X
To lock: insert the emergency key element
(Y page 299) into the lock and turn it 90°
clockwise to position 2.
X To unlock: insert the emergency key ele-
ment ( Ypage 299) into the lock and turn
it 90° anti-clockwise to position 1.
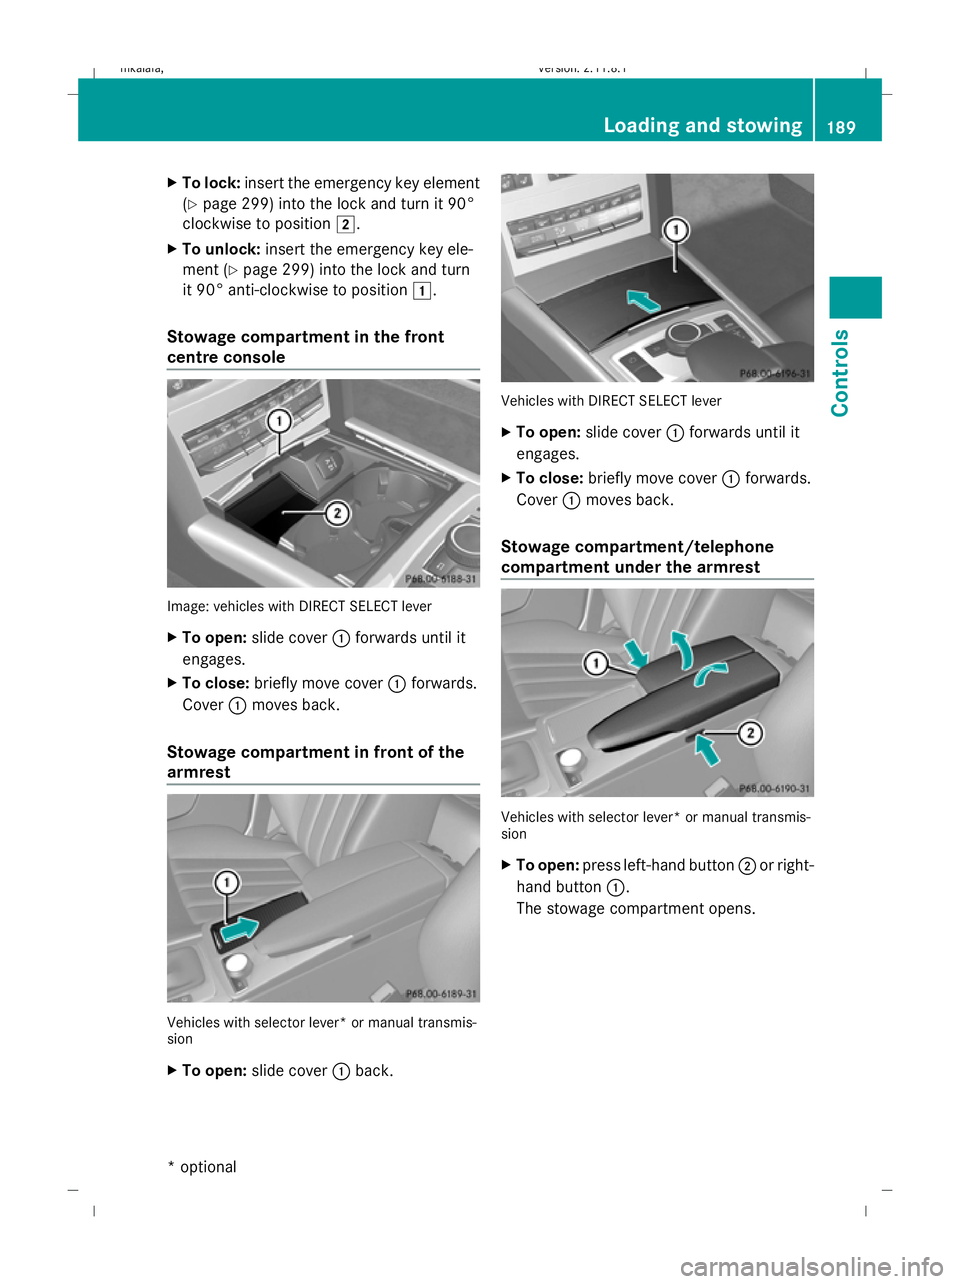
Stowage compartment in the front
centre console Image: vehicles with DIRECT SELECT lever
X
To open: slide cover :forwards until it
engages.
X To close: briefly move cover :forwards.
Cover :moves back.
Stowage compartment in front of the
armrest Vehicles with selector lever* or manual transmis-
sion
X
To open: slide cover :back. Vehicles with DIRECT SELECT lever
X
To open: slide cover :forwards until it
engages.
X To close: briefly move cover :forwards.
Cover :moves back.
Stowage compartment/telephone
compartment under the armrest Vehicles with selector lever* or manual transmis-
sion
X To open: press left-hand button ;or right-
hand button :.
The stowage compartment opens. Loading and stowing
189Controls
* optional
212_AKB; 2; 4, en-GB
mkalafa,
Version: 2.11.8.1 2009-05-05T14:17:16+02:00 - Seite 189 Z
Dateiname: 6515346702_buchblock.pdf; erzeugt am 07. May 2009 14:16:35; WK
Page 205 of 373
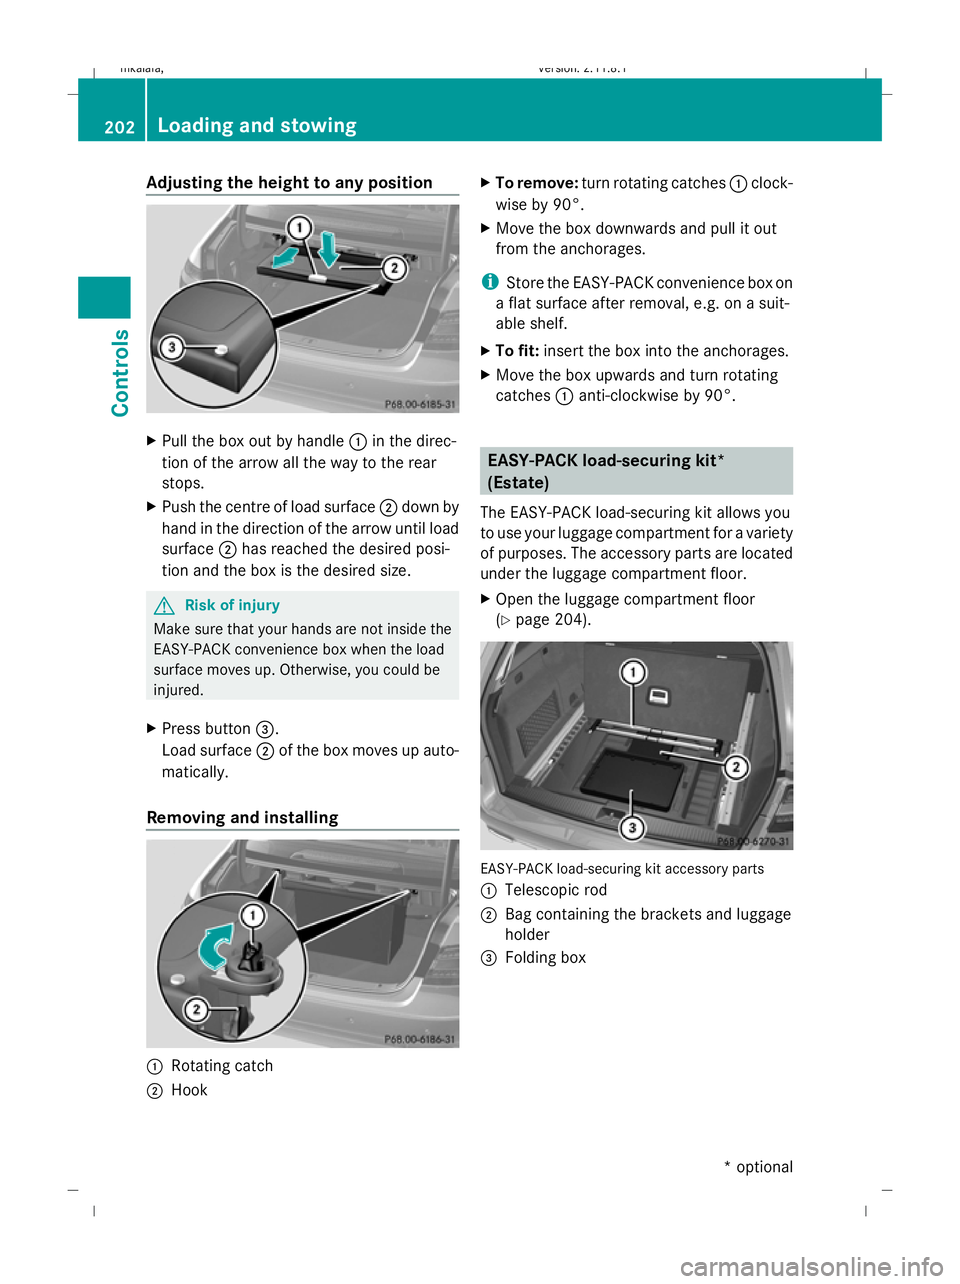
Adjusting the height to any position
X
Pull the box out by handle :in the direc-
tion of the arrow all the way to the rear
stops.
X Push the centre of load surface ;down by
hand in the direction of the arrow until load
surface ;has reached the desired posi-
tion and the box is the desired size. G
Risk of injury
Make sure that your hands are not inside the
EASY-PACK convenience box when the load
surface moves up. Otherwise, you could be
injured.
X Press button =.
Load surface ;of the box moves up auto-
matically.
Removing and installing :
Rotating catch
; Hook X
To remove: turn rotating catches :clock-
wise by 90°.
X Move the box downwards and pull it out
from the anchorages.
i Store the EASY-PACK convenience box on
a flat surface after removal, e.g. on a suit-
able shelf.
X To fit: insert the box into the anchorages.
X Move the box upwards and turn rotating
catches :anti-clockwise by 90°. EASY-PACK load-securing kit*
(Estate)
The EASY-PACK load-securing kit allows you
to use your luggage compartment for a variety
of purposes. The accessory parts are located
under the luggage compartment floor.
X Open the luggage compartment floor
(Y page 204). EASY-PACK load-securing kit accessory parts
:
Telescopic rod
; Bag containing the brackets and luggage
holder
= Folding box 202
Loading and stowingCont
rols
* optional
212_AKB; 2; 4, en-GB
mkalafa
,V ersion: 2.11.8.1
2009-05-05T14:17:16+02:00 - Seite 202
Dateiname: 6515346702_buchblock.pdf; erzeugt am 07. May 2009 14:16:45; WK
Page 220 of 373
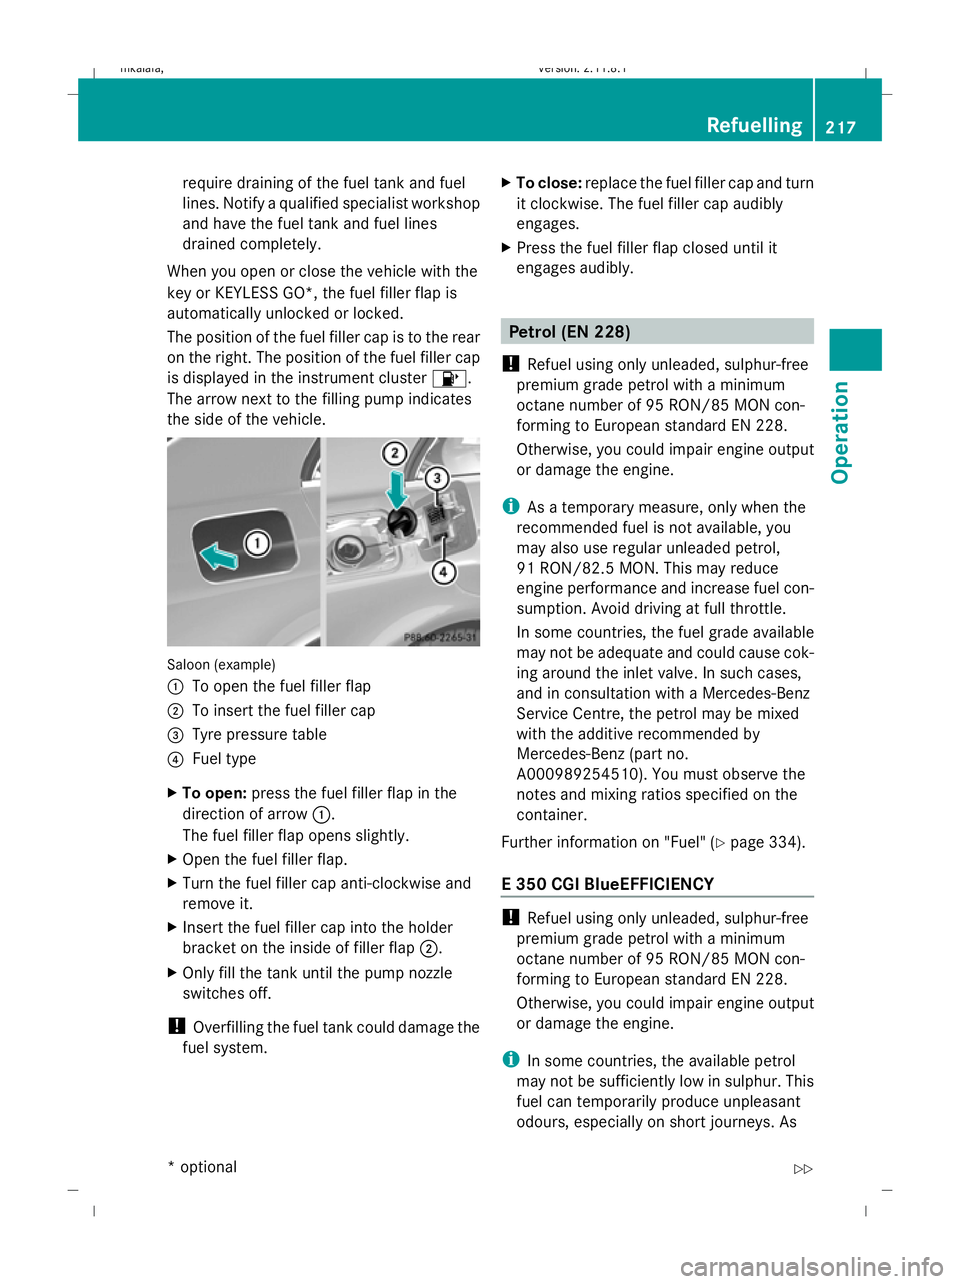
require draining of the fuel tank and fuel
lines. Notify a qualified specialist workshop
and have the fuel tank and fuel lines
drained completely.
When you open or close the vehicle with the
key or KEYLESS GO*, the fuel filler flap is
automatically unlocked or locked.
The position of the fuel filler cap is to the rear
on the right. The position of the fuel filler cap
is displayed in the instrument cluster 8.
The arrow next to the filling pump indicates
the side of the vehicle. Saloon (example)
:
To open the fuel filler flap
; To insert the fuel filler cap
= Tyre pressure table
? Fuel type
X To open: press the fuel filler flap in the
direction of arrow :.
The fuel filler flap opens slightly.
X Open the fuel filler flap.
X Turn the fuel filler cap anti-clockwise and
remove it.
X Insert the fuel filler cap into the holder
bracket on the inside of filler flap ;.
X Only fill the tank until the pump nozzle
switches off.
! Overfilling the fuel tank could damage the
fuel system. X
To close: replace the fuel filler cap and turn
it clockwise. The fuel filler cap audibly
engages.
X Press the fuel filler flap closed until it
engages audibly. Petrol (EN 228)
! Refuel using only unleaded, sulphur-free
premium grade petrol with a minimum
octane number of 95 RON/85 MON con-
forming to European standard EN 228.
Otherwise, you could impair engine output
or damage the engine.
i As a temporary measure, only when the
recommended fuel is not available, you
may also use regular unleaded petrol,
91 RON/82.5 MON. This may reduce
engine performance and increase fuel con-
sumption. Avoid driving at full throttle.
In some countries, the fuel grade available
may not be adequate and could cause cok-
ing around the inlet valve. In such cases,
and in consultation with a Mercedes-Benz
Service Centre, the petrol may be mixed
with the additive recommended by
Mercedes-Benz (part no.
A000989254510). You must observe the
notes and mixing ratios specified on the
container.
Further information on "Fuel" (Y page 334).
E 350 CGI BlueEFFICIENCY !
Refuel using only unleaded, sulphur-free
premium grade petrol with a minimum
octane number of 95 RON/85 MON con-
forming to European standard EN 228.
Otherwise, you could impair engine output
or damage the engine.
i In some countries, the available petrol
may not be sufficiently low in sulphur. This
fuel can temporarily produce unpleasant
odours, especially on short journeys. As Refuelling
217Operation
* optional
212_AKB; 2; 4, en-GB
mkalafa,
Version: 2.11.8.1 2009-05-05T14:17:16+02:00 - Seite 217 Z
Dateiname: 6515346702_buchblock.pdf; erzeugt am 07. May 2009 14:16:54; WK
Page 224 of 373
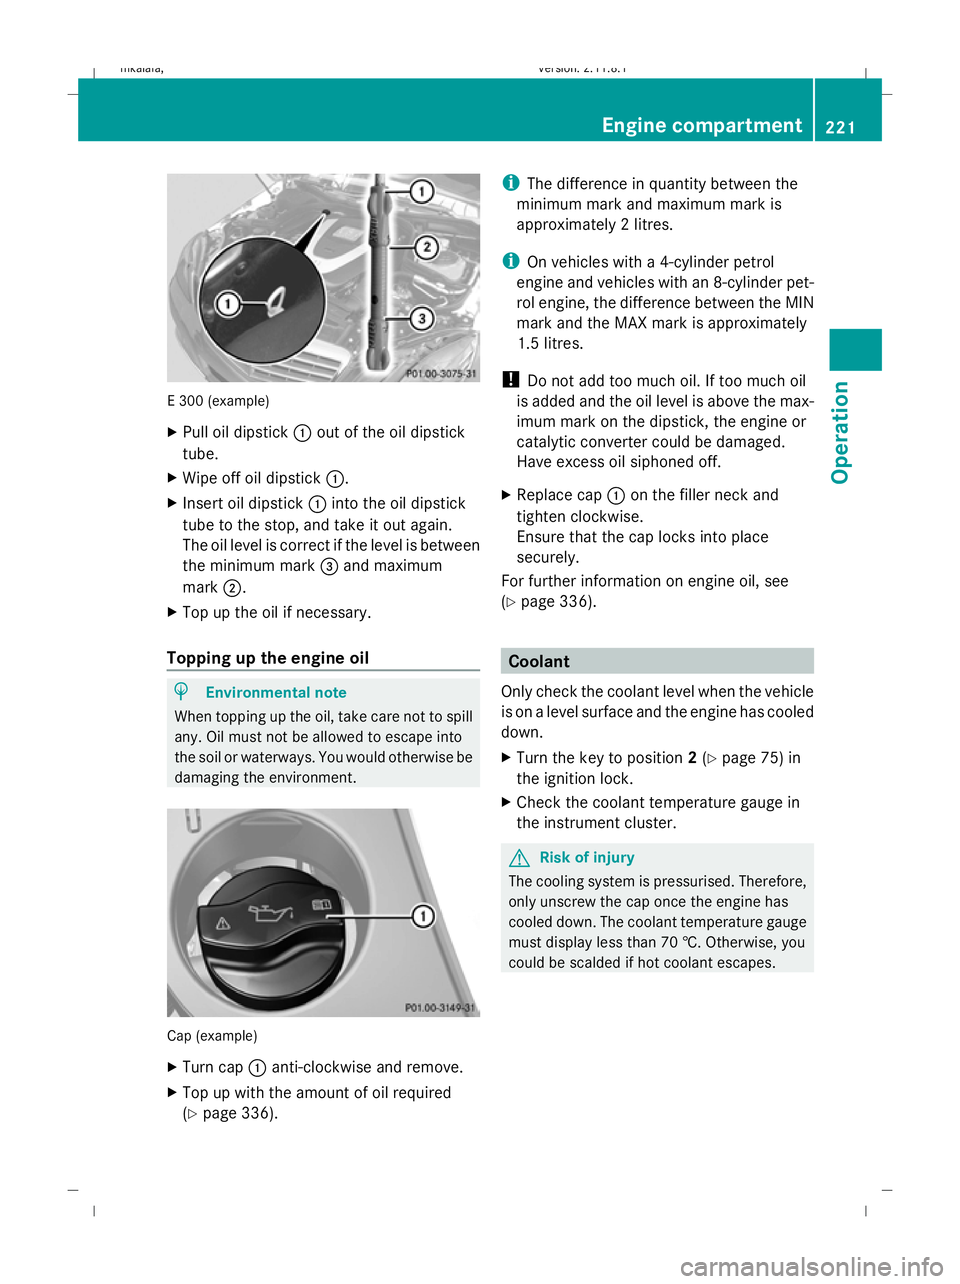
E 300 (example)
X
Pull oil dipstick :out of the oil dipstick
tube.
X Wipe off oil dipstick :.
X Insert oil dipstick :into the oil dipstick
tube to the stop, and take it out again.
The oil level is correct if the level is between
the minimum mark =and maximum
mark ;.
X Top up the oil if necessary.
Topping up the engine oil H
Environmental note
When topping up the oil, take care not to spill
any. Oil must not be allowed to escape into
the soil or waterways. You would otherwise be
damaging the environment. Cap (example)
X
Turn cap :anti-clockwise and remove.
X Top up with the amount of oil required
(Y page 336). i
The difference in quantity between the
minimum mark and maximum mark is
approximately 2 litres.
i On vehicles with a 4-cylinder petrol
engine and vehicles with an 8-cylinder pet-
rol engine, the difference between the MIN
mark and the MAX mark is approximately
1.5 litres.
! Do not add too much oil. If too much oil
is added and the oil level is above the max-
imum mark on the dipstick, the engine or
catalytic converter could be damaged.
Have excess oil siphoned off.
X Replace cap :on the filler neck and
tighten clockwise.
Ensure that the cap locks into place
securely.
For further information on engine oil, see
(Y page 336). Coolant
Only check the coolant level when the vehicle
is on a level surface and the engine has cooled
down.
X Turn the key to position 2(Y page 75) in
the ignition lock.
X Check the coolant temperature gauge in
the instrument cluster. G
Risk of injury
The cooling system is pressurised. Therefore,
only unscrew the cap once the engine has
cooled down. The coolant temperature gauge
must display less than 70 †. Otherwise, you
could be scalded if hot coolant escapes. Engine compartment
221Operation
212_AKB; 2; 4, en-GB
mkalafa, Version: 2.11.8.1 2009-05-05T14:17:16+02:00 - Seite 221 Z
Dateiname: 6515346702_buchblock.pdf; erzeugt am 07. May 2009 14:16:56; WK