mirror MERCEDES-BENZ E-CLASS ESTATE 2011 Service Manual
[x] Cancel search | Manufacturer: MERCEDES-BENZ, Model Year: 2011, Model line: E-CLASS ESTATE, Model: MERCEDES-BENZ E-CLASS ESTATE 2011Pages: 409, PDF Size: 10.47 MB
Page 318 of 409
X
Remove the mobile phone bracke tfrom
sliding adapter :; see the separate mobile
phone bracket fitting instructions.
X Detach sliding adapter :using suitable
tool =and remove. Garage door opener
Important safety notes The HomeLink
®
garage door opener integra-
ted in the rear-view mirror allows you to oper-
ate up to three different door and gate sys-
tems.
i The garage door opener is only available
for certain countries. Observe the legal
requirements for each individual country.
The HomeLink ®
garage door opener is
compatible with most European garage and
gate opener drives. More information on
HomeLink ®
and/or compatible products is
available from:
R any Mercedes-Benz Service Centre
R the HomeLink ®
hotline
(0) 08000 466 354 65 (free of charge )or
+49 (0) 6838 907 277 (charges apply)
R on the Internet at:
http://www.homelink.com
Programming the integrated garage
door opener in the rear-view mirror Programming
G
WARNING
Only press the button on the integrated
garage door opene rifthere are no persons or
objects present within the sweep of the
garage door. Persons could otherwise be
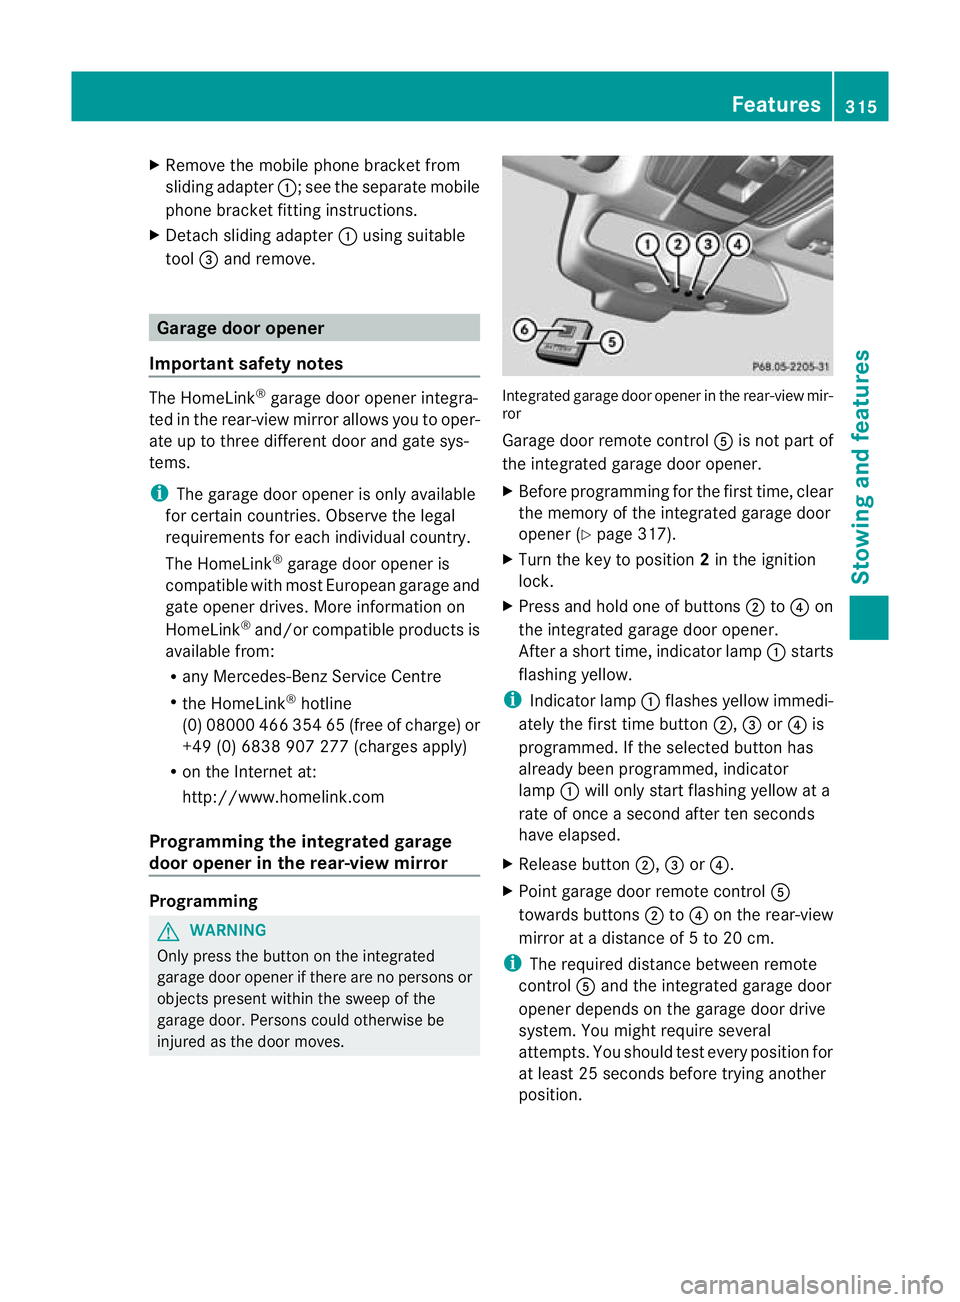
injured as the door moves. Integrated garage door opener in the rear-view mir-
ror
Garage door remote control
Ais not part of
the integrated garage door opener.
X Before programming for the first time, clear
the memory of the integrated garage door
opener (Y page 317).
X Turn the key to position 2in the ignition
lock.
X Press and hold one of buttons ;to? on
the integrated garage door opener.
After a short time, indicator lamp :starts
flashing yellow.
i Indicator lamp :flashes yellow immedi-
ately the first time button ;,=or? is
programmed. If the selected button has
already been programmed, indicator
lamp :will only start flashing yellow at a
rate of once a second after ten seconds
have elapsed.
X Release button ;,=or?.
X Point garage door remote control A
towards buttons ;to? on the rear-view
mirror at a distance of 5 to 20 cm.
i The required distance between remote
control Aand the integrated garage door
opener depends on the garage door drive
system. You might require several
attempts. You should test every position for
at least 25 seconds before trying another
position. Features
315Stowing and features Z
Page 319 of 409
X
Press and hold button Bon remot econtrol
A until indicator lamp :lights up green.
If indicator lamp :lights up green or
flashes, then programming has been suc-
cessful.
X Release button ;,=or? on the inte-
grated garage door opener and button B
on garage door remote control A.
If indicator lamp :lights up red:
X Repeat the programming procedure for the
corresponding button on the rear-view mir-
ror. When doing so, vary the distance
between remote control Aand the rear-
view mirror.
i If the indicator lamp flashes green after
successful programming, the garage door
system is using a rolling code. After pro-
gramming, you must synchronise the
garage door opener integrated in the rear-
view mirror with the receiver of the garage
door system.
Synchronising the rolling code
Your vehicle must be within reach of the
garage door or exterior gate drive. Make sure
that neither your vehicle nor any persons/
objects are present within the sweep of the
door or gate.
Observe the safety notes when performing
the rolling code synchronisation
(Y page 315).
X Turn the key to position 2in the ignition
lock.
X Press the programming button of the door
or gate drive (see the door or gate drive
operating instructions, e.g. under "Pro-
gramming of additional remote controls").
i Usually, you now have 30seconds to ini-
tiate the next step.
X Press previously programmed button ;,
= or? of the integrated garage door
opener until the door starts to move.
The rolling code synchronisation is then
complete. Problems when programming
If you have problems when programming the
integrated garage door opener, please note
the following:
R
Check the transmitter frequency of garage
door drive remote control A.This can usu-
ally be found on the back of the remote
control.
R Change the batteries in garage door remote
control A.This increases the likelihood
that remote control Awill send a strong
and precise signal to the integrated garage
door opener.
R When programming, hold remote control
A at varying distances and angles from the
button that you are programming. Try vari-
ous angles at a distance of between
5 and 30 cm or at the same angle but at
varying distances.
R If there is another remote control for the
same garage door drive, perform the pro-
gramming steps again using this remote
control. Before performing these steps,
make sure that new batteries have been
fitted in garage door drive remote control
A.
R Note that some remote controls transmit
only for a limited period (the indicator lamp
on the remote control goes out). Press but-
ton Bon remote control Aagain before
transmission ends.
R Align the aerial cable of the garage door
opener unit. This can improve signal recep-
tion/transmission.
Opening or closing the garage door Once programmed, the integrated garage
door opener will assume the function of the
garage door system's remote control. Please
also read the operating instructions for the
garage door system. 316
FeaturesStowing and features
Page 333 of 409
X
Clean the plastic lenses of the exterior
lighting using a wet sponge and a mild
cleaning agent, e.g. Mercedes-Ben zcar
shampoo. Or clean the exterior lighting
with cleaning cloths.
Cleaning the mirror turn signals !
Only use cleaning agents or cleaning
cloths that are suitable for plastic lenses.
Unsuitable cleaning agents or cleaning
cloths could scratch or damage the plastic
lenses of the mirror tur nsignals.
X Clean the plastic lenses of the mirror turn
signals using a wet sponge and a mild
cleaning agent, e.g. Mercedes-Ben zcar
shampoo. Cleaning cloths may be used as
well.
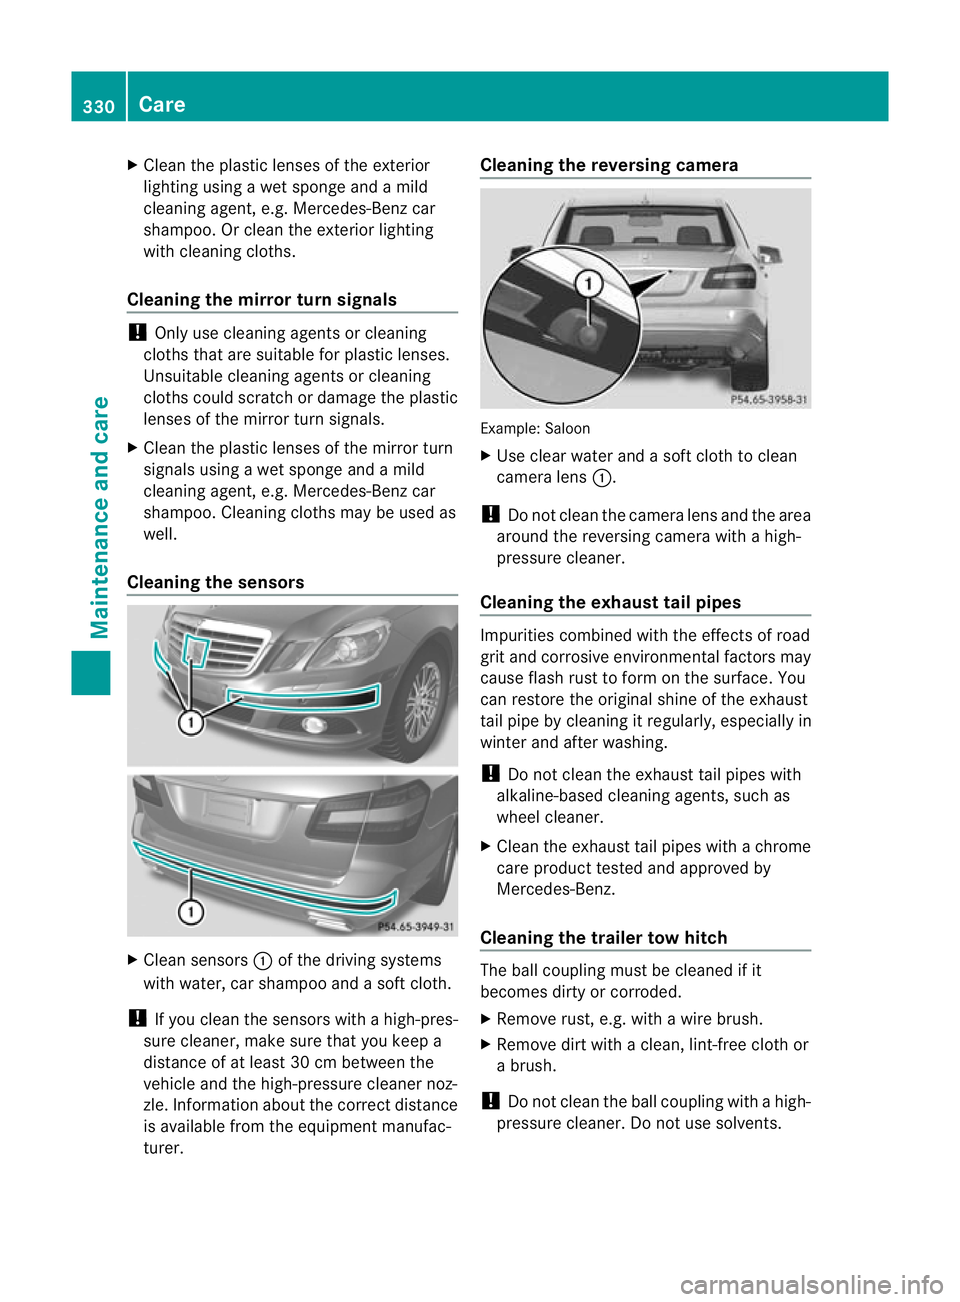
Cleaning the sensors X
Clean sensors :of the driving systems
with water, car shampoo and a sof tcloth.
! If you clean the sensors with a high-pres-
sure cleaner, make sure that you keep a
distance of at least 30 cm between the
vehicle and the high-pressure cleaner noz-
zle. Information about the correct distance
is available fro mthe equipment manufac-
turer. Cleaning the reversing camera
Example: Saloon
X
Use clear water and a soft cloth to clean
camera lens :.
! Do not clean the camera lens and the area
around the reversing camera with a high-
pressure cleaner.
Cleaning the exhaust tail pipes Impurities combined with the effects of road
grit and corrosive environmental factors may
cause flash rust to form on the surface. You
can restore the original shine of the exhaust
tail pipe by cleaning it regularly, especially in
winter and after washing.
!
Do not clean the exhaust tail pipes with
alkaline-based cleaning agents, such as
wheel cleaner.
X Cleant he exhaust tail pipes with a chrome
care product tested and approved by
Mercedes-Benz.
Cleaning the trailer tow hitch The ball coupling must be cleaned if it
becomes dirty or corroded.
X
Remove rust, e.g. with a wire brush.
X Remove dirt with a clean, lint-free cloth or
a brush.
! Do not clean the ball coupling with a high-
pressure cleaner. Do not use solvents. 330
CareMaintenance and care
Page 355 of 409
Disconnecting the battery
! Always disconnec tthe battery in
the order described below. Never swap the
terminal clamps. You may otherwise dam-
age the vehicle electronics.
In vehicles with automatic transmission,
the transmission is locked in position P
after disconnecting the battery. The vehicle
is secured against rolling away.Y ou can
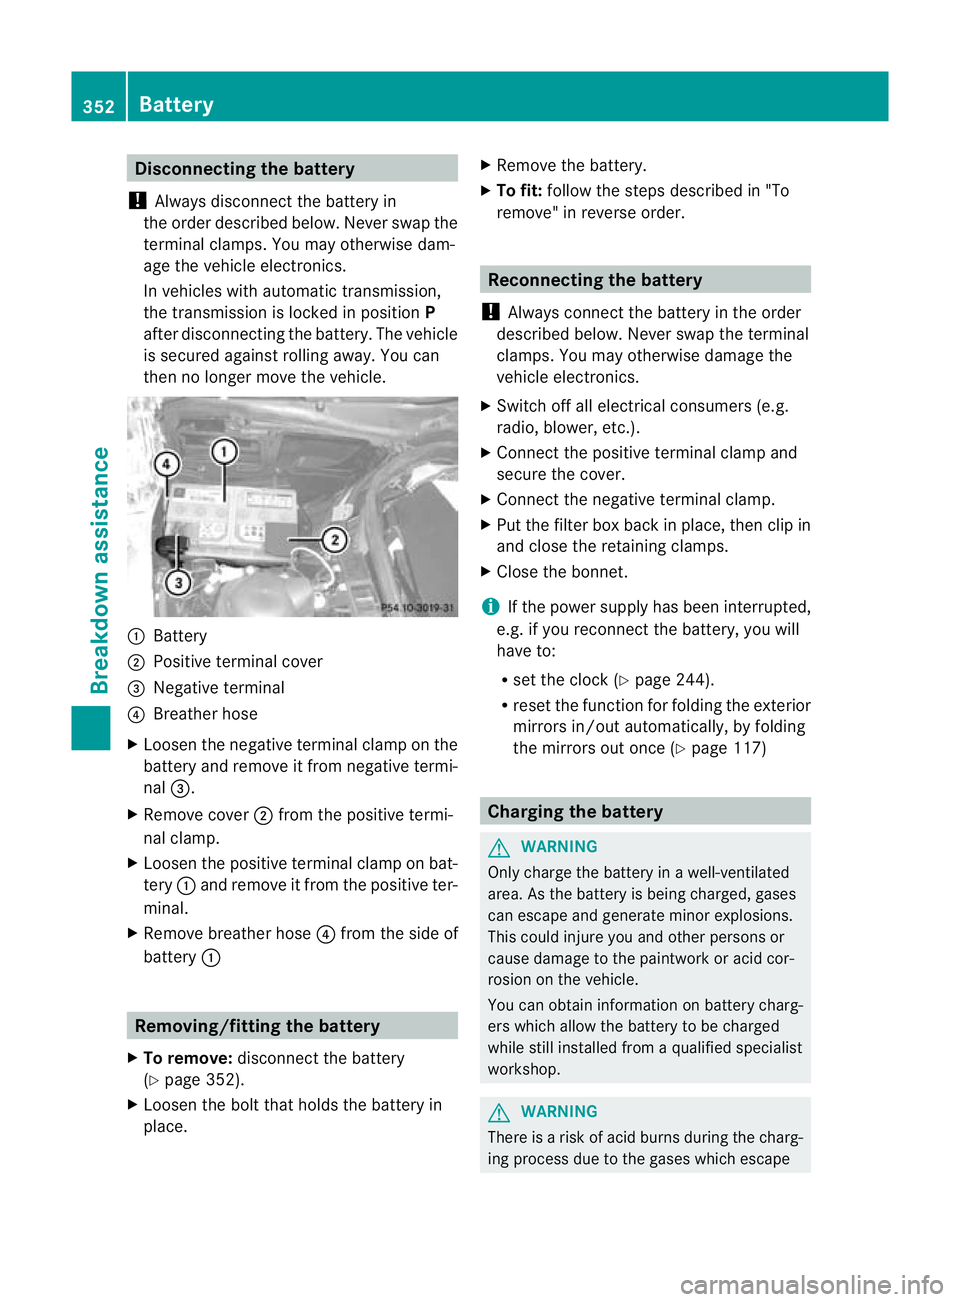
then no longer move the vehicle. :
Battery
; Positive terminal cover
= Negative terminal
? Breather hose
X Loosen the negative terminal clamp on the
battery and remove it from negative termi-
nal =.
X Remove cover ;from the positive termi-
nal clamp.
X Loosen the positive terminal clamp on bat-
tery :and remove it from the positive ter-
minal.
X Remove breather hose ?from the side of
battery : Removing/fitting the battery
X To remove: disconnect the battery
(Y page 352).
X Loosen the bolt that holds the battery in
place. X
Remove the battery.
X To fit: follow the steps described in "To
remove" in reverse order. Reconnecting the battery
! Always connect the battery in the order
described below. Never swap the terminal
clamps. You may otherwise damage the
vehicle electronics.
X Switch off all electrical consumers (e.g.
radio, blower, etc.).
X Connect the positive terminal clamp and
secure the cover.
X Connect the negative terminal clamp.
X Put the filter box back in place, then clip in
and close the retaining clamps.
X Close the bonnet.
i If the power supply has been interrupted,
e.g. if you reconnect the battery, you will
have to:
R set the clock (Y page 244).
R reset the function for folding the exterior
mirrors in/out automatically, by folding
the mirrors out once (Y page 117) Charging the battery
G
WARNING
Only charge the battery in a well-ventilated
area. As the battery is being charged, gases
can escape and generate minor explosions.
This could injure you and other persons or
cause damage to the paintwork or acid cor-
rosion on the vehicle.
You can obtain information on battery charg-
ers which allow the battery to be charged
while still installed from a qualified specialist
workshop. G
WARNING
There is a risk of acid burns during the charg-
ing process due to the gases which escape 352
BatteryBreakdown assistance
Page 395 of 409
X
Dow ntoÒ20 †: mix 1 part MB WinterFit to
1 part water.
X Down to Ò29 †: mix 2 parts MB WinterFit
to 1 part water.
i Add washer fluid concentrate, e.g. MB
SummerFit or MB WinterFit, to the washer
fluid all year round. Vehicle data
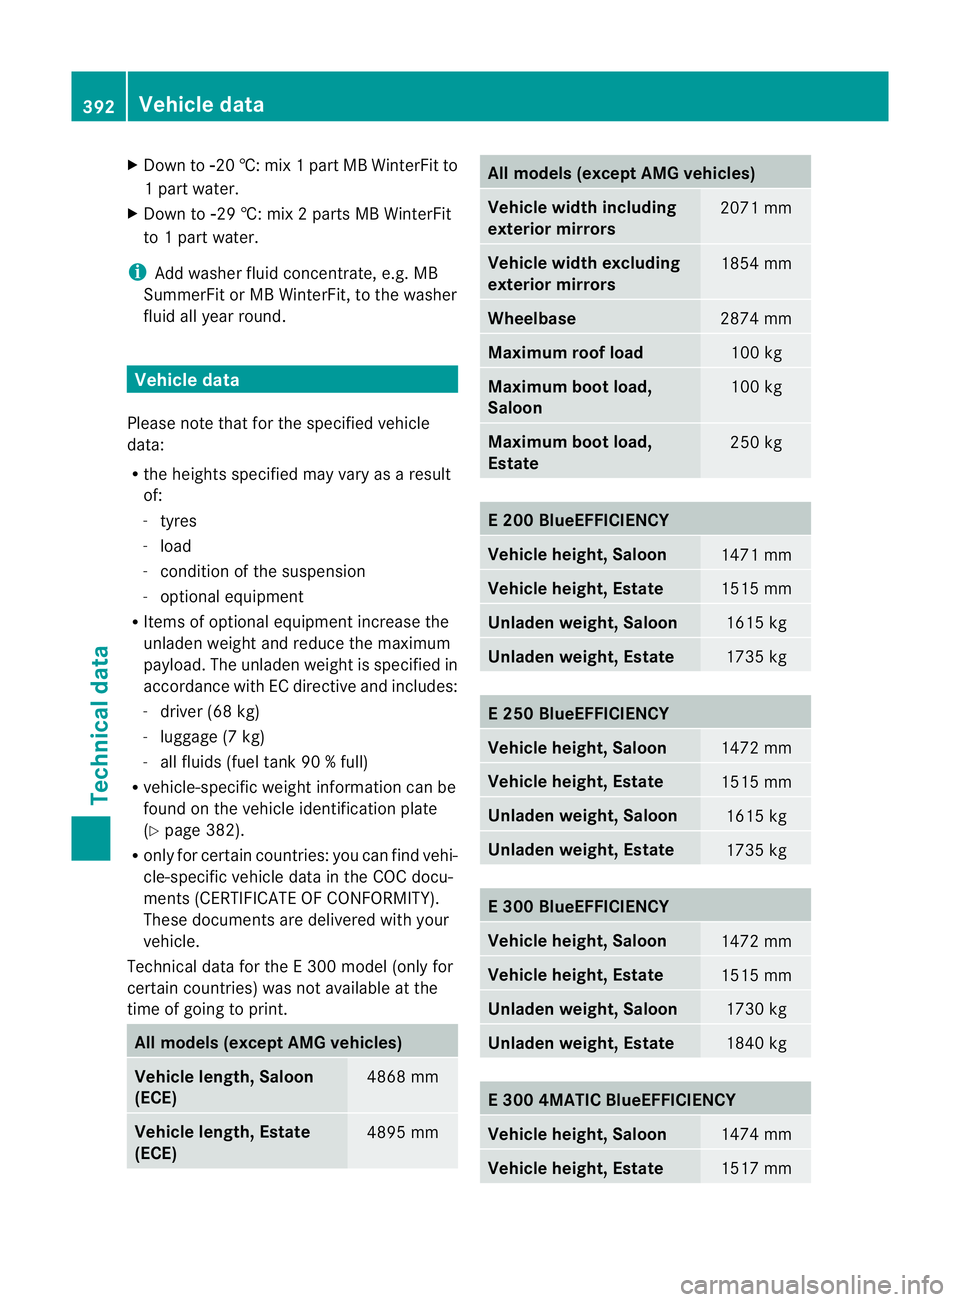
Please note that for the specified vehicle
data:
R the heights specified may vary as a result
of:
-tyres
- load
- condition of the suspension
- optional equipment
R Items of optional equipment increase the
unladen weight and reduce the maximum
payload. The unladen weight is specified in
accordance with EC directive and includes:
-driver (68 kg)
- luggage (7 kg)
- all fluids (fuel tank 90 % full)
R vehicle-specific weight information can be
found on the vehicle identification plate
(Y page 382).
R only for certain countries: you can find vehi-
cle-specific vehicle data in the COC docu-
ments (CERTIFICATE OF CONFORMITY).
These documents are delivered with your
vehicle.
Technical data for the E 300 model (only for
certain countries) was not available at the
time of going to print. All models (except AMG vehicles)
Vehicle length, Saloon
(ECE)
4868 mm
Vehicle length, Estate
(ECE)
4895 mm All models (except AMG vehicles)
Vehicle width including
exterior mirrors
2071 mm
Vehicle width excluding
exterior mirrors
1854 mm
Wheelbase
2874 mm
Maximum roof load
100 kg
Maximum boot load,
Saloon
100 kg
Maximum boot load,
Estate
250 kg
E 200 BlueEFFICIENCY
Vehicle height, Saloon
1471 mm
Vehicle height, Estate
1515 mm
Unladen weight, Saloon
1615 kg
Unladen weight, Estate
1735 kg
E 250 BlueEFFICIENCY
Vehicle height, Saloon
1472 mm
Vehicle height, Estate
1515 mm
Unladen weight, Saloon
1615 kg
Unladen weight, Estate
1735 kg
E 300 BlueEFFICIENCY
Vehicle height, Saloon
1472 mm
Vehicle height, Estate
1515 mm
Unladen weight, Saloon
1730 kg
Unladen weight, Estate
1840 kg
E 300 4MATIC BlueEFFICIENCY
Vehicle height, Saloon
1474 mm
Vehicle height, Estate
1517 mm392
Vehicle dataTechnical data
Page 396 of 409
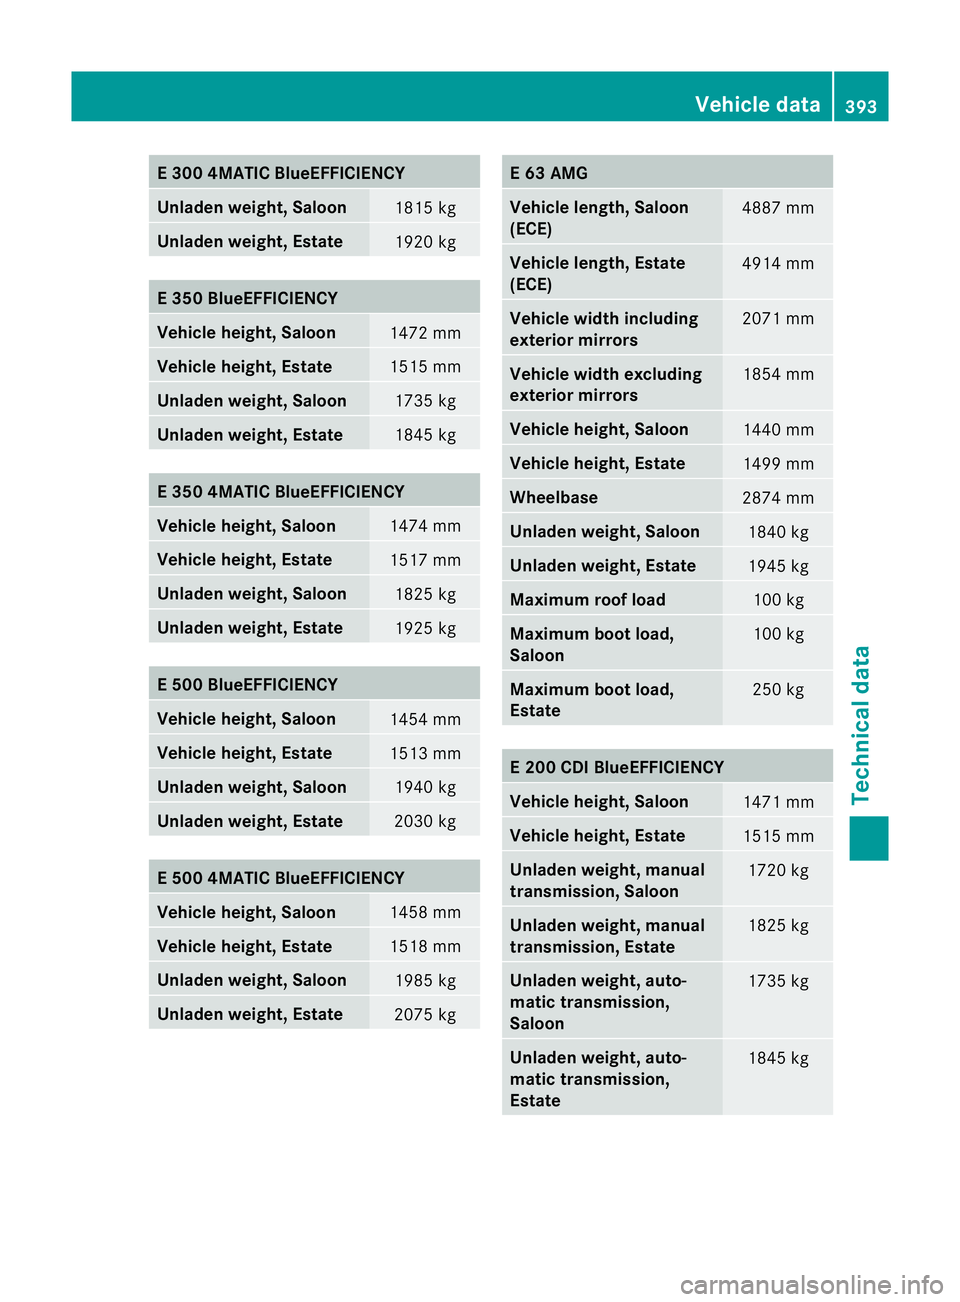
E 300 4MATIC BlueEFFICIENCY
Unladen weight
,Saloon 1815 kg
Unladen weight, Estate
1920 kg
E 350 BlueEFFICIENCY
Vehicle height, Saloon
1472 mm
Vehicle height, Estate
1515 mm
Unladen weight, Saloon
1735 kg
Unladen weight, Estate
1845 kg
E 350 4MATIC BlueEFFICIENCY
Vehicle height, Saloon
1474 mm
Vehicle height, Estate
1517 mm
Unladen weight, Saloon
1825 kg
Unladen weight, Estate
1925 kg
E 500 BlueEFFICIENCY
Vehicle height, Saloon
1454 mm
Vehicle height, Estate
1513 mm
Unladen weight, Saloon
1940 kg
Unladen weight, Estate
2030 kg
E 500 4MATIC BlueEFFICIENCY
Vehicle height, Saloon
1458 mm
Vehicle height, Estate
1518 mm
Unladen weight, Saloon
1985 kg
Unladen weight, Estate
2075 kg E 63 AMG
Vehicle length, Saloon
(ECE)
4887 mm
Vehicle length, Estate
(ECE)
4914 mm
Vehicle width including
exterior mirrors
2071 mm
Vehicle width excluding
exterior mirrors
1854 mm
Vehicle height, Saloon
1440 mm
Vehicle height, Estate
1499 mm
Wheelbase
2874 mm
Unladen weight, Saloon
1840 kg
Unladen weight, Estate
1945 kg
Maximum roof load
100 kg
Maximum boot load,
Saloon
100 kg
Maximum boot load,
Estate
250 kg
E 200 CDI BlueEFFICIENCY
Vehicle height, Saloon
1471 mm
Vehicle height, Estate
1515 mm
Unladen weight, manual
transmission
,Saloon 1720 kg
Unladen weight, manual
transmission
,Estate 1825 kg
Unladen weight, auto-
matic transmission,
Saloon
1735 kg
Unladen weight, auto-
matic transmission,
Estate
1845 kgVehicle data
393Technical data Z