interior lights MERCEDES-BENZ E-CLASS ESTATE 2011 Owners Manual
[x] Cancel search | Manufacturer: MERCEDES-BENZ, Model Year: 2011, Model line: E-CLASS ESTATE, Model: MERCEDES-BENZ E-CLASS ESTATE 2011Pages: 409, PDF Size: 10.47 MB
Page 8 of 409
Assistance men
u(on-board com-
puter) .................................................. 240
ASSYST PLUS see ASSYS TPLUS service interval
display
ASSYST PLUS service interval dis-
play
Displaying service messages .........325
Hiding service messages ...............325
Notes ............................................. 325
Service messages ..........................325
ATA (Anti-Theft Alarm system)
Activating/deactivating ...................77
Function .......................................... .77
Interior motion sensor .....................78
Switching off the alarm ....................77
Tow-away protection ........................ 78
ATTENTIO NASSIST
Activating/deactivating .................242
Display message ............................ 266
Function/notes ............................. 207
Audio menu (on-board computer) ....237
Authorised workshop see Qualified specialist workshop
AUTO lights
Display message ............................ 262
see Lights
Automatic engine start (ECO start/
stop function) .................................... 160
Automatic engine switch-off (ECO
start/stop function) ..........................159
Automatic headlamp mode ..............123
Automatic transmission Accelerator pedal position .............168
Automatic drive program ...............169
Changing gea r............................... 167
DIRECT SELECT leve r..................... 165
Display message ............................ 275
Drive position (ECO start/stop
function) ........................................ 166
Drive program displa y.................... 166
Driving tips .................................... 168
Emergency running mode ..............172
Engaging drive position .................. 166
Engaging neutra l............................ 166
Engaging revers egear ................... 166
Engaging the par kposition ............ 166
Kickdow n....................................... 168Manual drive program
....................170
Neutral (ECO start/stop function) .166
Problem (fault) ............................... 172
Progra mselecto rbutton ................ 168
Pulling away ................................... 158
Releasing the parking lock man-
ually ............................................... 172
Selector leve r................................ 165
Shift range s................................... 169
Starting the engine ........................157
Steering wheel gearshift paddle s... 169
Trailer towing ................................. 168
Transmissio nposition dis-
play ........................................1 65, 166
Transmissio npositions .................. 167
Automatic transmission emer-
gency running mode .........................172
Auxiliary heating Activating/deactivating .................146
Activating/deactivating (on the
centre console ).............................. 146
Display message ............................ 277
Important safety notes ..................145
Problem (display message) ............149
Remote control .............................. 146
Setting ........................................... 247
Setting the departur etime ............ .147
Auxiliary ventilation
Activating/deactivating .................146
Activating/deactivating (on the
centre console ).............................. 146
Problem (display message) ............149
Remote control .............................. 146
Axle load, permissible (traile rtow-
ing) ...................................................... 397 B
Bag hook ............................................ 299
Ball coupling Folding in ....................................... 225
Folding out ..................................... 223
BAS (Brake Assist System) .................70
Basic settings see Settings
BAS PLUS (Brake Assist System
PLUS) .................................................... 70 Index
5
Page 11 of 409
Cockpit
Overview .......................................... 28
see Instrument cluster
Collapsible emergency spare
wheel see Emergency spare wheel
COMAND
see Separate operating instructions
Combination switch ..........................124
Combine dluggage cover and net ....300
Constant headlamp mode see Daytime driving lamps
Consumption statistics (on-board
computer) .......................................... 235
Convenience box ............................... 302
Convenience closing feature ..............96
Convenience opening/closing (air-
recirculation mode) ........................... 144
Convenience opening feature ............96
Coolan t(engine)
Checkin gthe level ......................... 324
Display message ............................ 263
Notes ............................................. 390
Temperature (on-board computer) .249
Temperature gauge ........................ 230
Warning lamp ................................. 285
Cooling
see Climate control
Cornering light function
Display message ............................ 259
Function/notes ............................. 126
Crash-responsive emergency light-
ing ....................................................... 129
Cruise control Cruise control leve r....................... 181
Deactivating ................................... 182
Display message ............................ 272
Driving system ............................... 181
Important safety notes ..................181
LIM indicator lamp .........................181
Selecting ........................................ 182
Setting aspeed .............................. 182
Storing and maintaining current
speed ............................................ .182
Cup holder
Centre console .............................. 307
Folding bench sea t........................ 309Important safety notes
..................307
Rea rcompartmen t......................... 308 D
Dashboard see Cockpit
Data
see Technical data
Date (on-board computer) ................244
Daytime driving lights Display message ............................ 261
Switching on/off (on-board com-
puter) ............................................. 244
Switching on/off (switch) ..............123
Dealership
see Qualified specialist workshop
Delaye dswitch-off
Exterio rlighting (on-board com-
puter )............................................. 245
Interior lighting .............................. 246
Diagnostics connection ......................25
Diesel ................................................. .386
Diesel particle filter ..........................178
Digital speedometer .........................235
Dipped-beam headlamps Changing bulbs .............................. 131
Display message ............................ 259
Setting for driving abroad (sym-
metrical) ........................................ 122
Setting for driving on the right/
left ................................................. 245
Switching on/off ........................... 123
DIRECT SELECTl ever
see Automatic transmission
Displa y(cleaning instructions) ........331
Display message General information .......................253
Hiding (on-board computer) ...........253
KEYLESS-GO .................................. 278
Display messages
ASSYST PLUS service interval dis-
play................................................ 325
Calling up (on-board computer) .....253
Driving systems ............................. 266
Engine ............................................ 263
Key ................................................ 278
Lights ............................................ .259 8
Index
Page 16 of 409
Instrumen
tcluster lighting ................30
Instrument lighting see Instrument cluster lighting
Integrated child seat
ICS padded pla ytable ...................... 62
Important safety guidelines .............60
Side hea drestraints ........................ .63
Storing, IC Spadded play table and
side head restraint s......................... 64
Intelligen tLight System
Activating/deactivatin g................. 244
Display message ............................ 262
Overview ........................................ 125
Setting the dipped-bea mhead-
lamps for driving on the right/left .245
Interior lighting ................................. 128
Automatic control system ..............129
Delayed switch-off (on-board
computer) ...................................... 246
Emergency lighting ........................129
Manual control ............................... 129
Overview ........................................ 128
Reading lamp ................................. 128
Setting the ambient lighting
brightness (on-board computer) ....245
Interior motion sensor ........................78
ISOFIX child seat securing system ....57 J
Jack Storage location ............................ 337
Using ............................................. 345
Jump start (engine)
see Jump starting (engine)
Jump starting (engine) ......................354 K
Key Changing the battery .......................85
Checking the battery .......................85
Convenience closing feature ............96
Convenience opening feature ..........96
Display message ............................ 278
Door central locking/unlocking .......82
Emergency key element ................... 84
Loss ................................................. 87Modifying the programming
.............83
Positions (ignition lock) .................155
Problem (malfunction) .....................87
Starting the engine ........................157
KEYLESS-GO
Convenience closing ........................97
Display message ............................ 278
Locking ............................................ 83
Start/Stop button .......................... 155
Starting the engine ........................157
Unlocking ......................................... 83
Keyp ositions
Key ................................................ 155
KEYLESS GO .................................. 155
Kickdown
Driving tips .................................... 168
Manual drive program ....................171
Kneebag ............................................... 46 L
Lamps see Warning and indicator lamps
Lane-change assistant
see Blind Spot Assist
Lane detection (automatic)
see Lane Keeping Assist
Lane Keeping Assist
Activating/deactivating .................242
Display message ............................ 268
Function/informatio n.................... 214
Lane package ..................................... 212
Lap time (RACETIMER) ......................250
Lashing eyelets ................................. 298
Licence plate lamp (display mes-
sage) ................................................... 261
Lighting see Lights
Lights
Activating/deactivating the Intel-
ligent Ligh tSystem ........................ 244
Activating/deactivating the inte-
rior lighting delayed switch-off .......246
Active light function .......................126
Automatic headlamp mode ............123
Cornering light function .................126
Dipped-bea mheadlamps ............... 123
Display message ............................ 259 Index
13
Page 17 of 409
Driving abroa
d............................... 122
Foglamps ....................................... 123
Foglamps (extended range) ...........126
Hazard warning lamps ...................125
Headlamp flasher ........................... 125
Headlamp range ............................ 124
Ligh tswitc h................................... 122
Main-beam headlamps ................... 125
Motorway mode ............................. 126
Parking lamps ................................ 122
Rea rfoglamp ................................. 123
Setting the ambient lighting
brightness (on-board computer) ....245
Switching Adaptive Highbeam
Assist on/off ................................. 245
Switching the daytime driving
lights on/off (on-board computer) .244
Switching the daytime driving
lights on/off (switch) .....................123
Switching the exterio rlighting
delayed switch-off on/off (on-
board computer )............................ 245
Switching the surround lighting
on/off (on-board computer) ..........245
Turn signals ................................... 124
see Changing bulbs
see Interior lighting
Light sensor (display message) .......262
LIM indicator lamp Cruise control ................................ 181
DISTRONI CPLUS ........................... 186
Variabl eSPEEDTRONIC .................183
Limiting the speed
see SPEEDTRONIC
Loading guidelines ............................290
Loading sill protector ........................ 306
Locking see Centra llocking
Locking (doors)
Automatic ........................................ 89
Emergency locking ........................... 90
From inside (central locking but-
ton) .................................................. 89
Locking centrally
see Centra llocking
Locking verification signal (on-
board computer) ............................... 247
Luggage compartment cover ...........299Luggage compartment enlarge-
ment
................................................... 296
Luggage compartment floor ............305
Luggage holde r(EASY-PACK load-
securing kit) ...................................... .304
Luggage net ....................................... 293
Lumbar support Adjusting ....................................... 110
Adjusting the 4-way lumba rsup-
por t................................................ 110
Luxu ry head restraint .......................107 M
M+S tyres ........................................... 364
Main-beam headlamps Changing bulbs .............................. 131
Display message ............................ 260
Switching Adaptive Highbeam
Assist on/off ................................. 127
Switching on/off ........................... 125
Maintenance
see ASSYST PLUS service interval
display
Manual transmission
Engaging revers egear ................... 164
Gea rlever ...................................... 163
Pulling away ................................... 157
Shifting to neutra l.......................... 164
Shift recommendatio n................... 164
Starting the engine ........................156
Massage function (PULSE) ...............110
Matt finish (cleaning instructions) ..328
Memory card (audio) .........................238
Memory function ............................... 119
Mercedes-Benz Service Centre see Qualified specialist workshop
Message memory (on-board com-
puter) ................................................. .253
Messages see Display messages
Mirrors
see Exterior mirrors
see Rear-view mirror
see Vanity mirror
Mobile phone
Frequencies ................................... 381
Installatio n..................................... 38114
Index
Page 46 of 409
tentionally. For this reason, never make any
modifications to the restraint systems.
Therefore, you must not tampe rwith elec-
tronic components or their software. SRS (Supplemental Restraint System)
Introduction SRS consists of:
R
the 6 SRS warning lamp
R airbags
R airbag control unit (with crash sensors)
R belt tensioners
R belt force limiters
SRS reduces the risk of occupants coming
into contact with the vehicle's interior in the
event of an accident. It can also reduce the
effect of the forces to which occupants are
subjected during an accident.
SRS warning lamp SRS functions are checked regularly when
you switch on the ignition and when the
engine is running. Therefore, malfunctions
can be detected in good time.
The 6 SRS warning lamp in the instrument
cluster lights up when the ignition is switched
on. It goes out no later than a few seconds
after the engine is started. G
WARNING
If SRS is malfunctioning, individual systems
may be triggered unintentionally or might not
be triggered in the event of an accident with
a high rate of vehicle deceleration.
A malfunction has occurred if:
R the 6 SRS warning lamp does not light
up when the ignition is switched on.
R the engine is running and the 6SRS
warning lamp does not go out after a few
seconds.
R the engine is running and the 6SRS
warning lamp lights up again. In this case, have SRS checked immediately
at a qualified specialist workshop.
Triggering of belt tensioners, belt force
limiters and airbags During the firs
tstage of a collision, the airbag
control uni tevaluates important physical
data relating to vehicle deceleratio noraccel-
eration, such as:
R duration
R direction
R magnitude
Based on the evaluation of this data, the air-
bag control uni tpre-emptively triggers the
beltt ensioners in the first stage.
i The fron tbelt tensioners can only be trig-
gered if the seat belt tongues on the front
seats are correctly engaged in the seat belt
buckles.
If there is an even higher rate of vehicle decel-
eration or acceleration in a longitudinal direc-
tion, the fron tairbags are also deployed.
Your vehicle has adaptive, two-stage front air-
bags. The airbag control unit evaluates vehi-
cle deceleration or acceleration in the event
of a collision. In the firs tdeployment stage,
the fron tairbag is filled with enough propel-
lant gas to reduce the risk of injuries. The
front airbag is fully deployed if a second
deploymen tthreshold is exceeded within a
few milliseconds.
The belt tensioner and airbag triggering
thresholds are variable and are adapted to the
rate of deceleration or acceleration of the
vehicle. This process is pre-emptive in nature.
The triggering process must take place in
good time at the start of the collision.
i Airbags are not deployed in all types of
accidents. Also, not all airbags are
deployed together in an accident. The dif-
ferent airbag systems work independently
of each other. Occupant safety
43Safety Z
Page 81 of 409
X
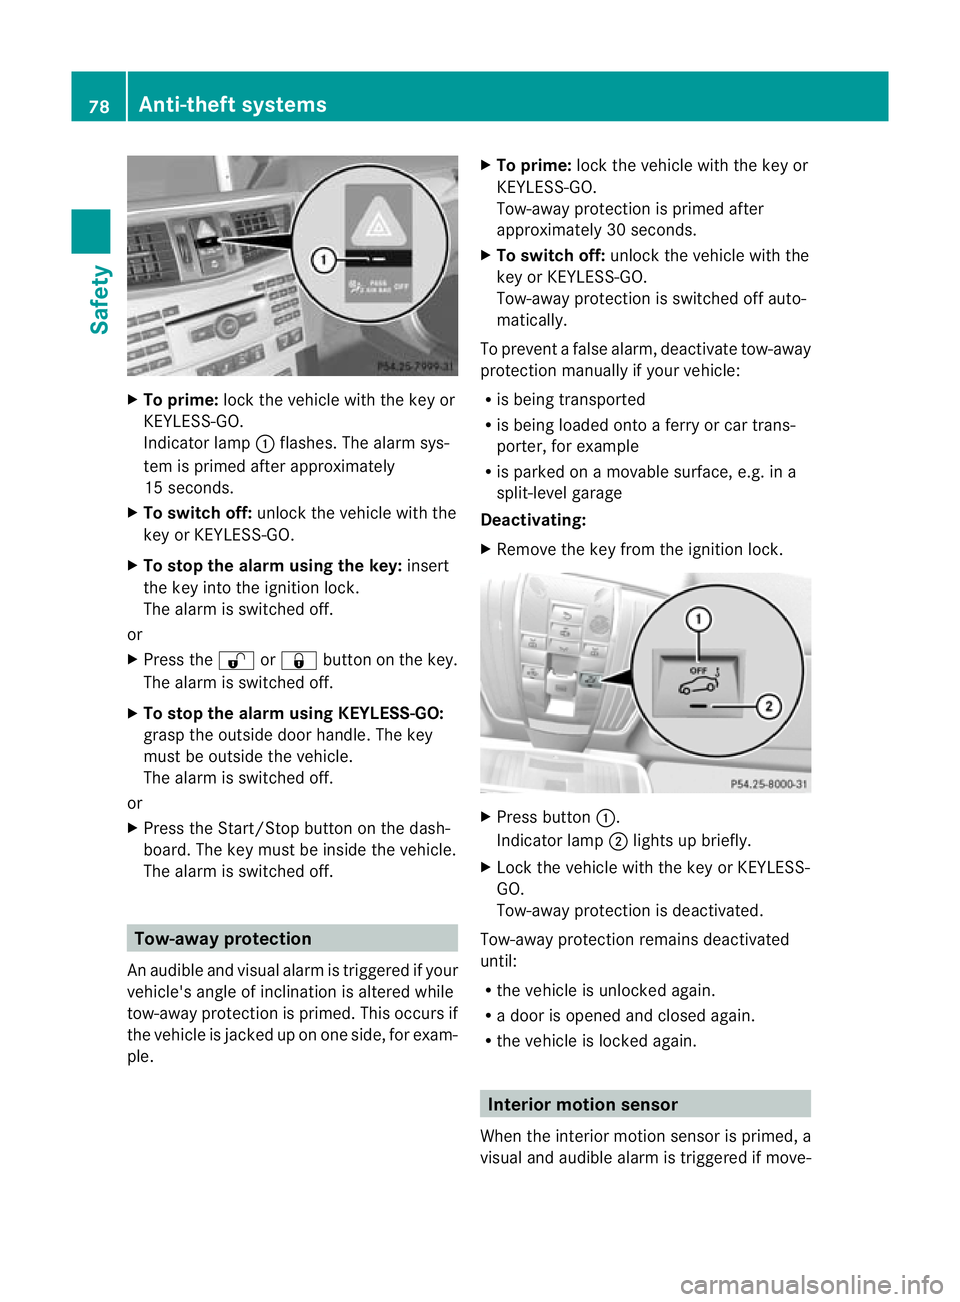
To prime: lock the vehicle with the key or
KEYLESS-GO.
Indicato rlamp :flashes. The alarm sys-
te mi s primed after approximately
15 seconds.
X To switch off: unlock the vehicle with the
key or KEYLESS-GO.
X To stop the alarm using the key: insert
the key into the ignition lock.
The alarm is switched off.
or
X Press the %or& button on the key.
The alarm is switched off.
X To stop the alarm using KEYLESS-GO:
grasp the outside door handle. The key
must be outside the vehicle.
The alarm is switched off.
or
X Press the Start/Stop button on the dash-
board. The key must be inside the vehicle.
The alarm is switched off. Tow-away protection
An audible and visual alarm is triggered if your
vehicle's angle of inclination is altered while
tow-away protection is primed. This occurs if
the vehicle is jacked up on one side, for exam-
ple. X
To prime: lock the vehicle with the key or
KEYLESS-GO.
Tow-away protection is primed after
approximately 30 seconds.
X To switch off: unlock the vehicle with the
key or KEYLESS-GO.
Tow-away protection is switched off auto-
matically.
To prevent a false alarm, deactivate tow-away
protection manually if your vehicle:
R is being transported
R is being loaded onto a ferry or car trans-
porter, for example
R is parked on a movable surface, e.g. in a
split-level garage
Deactivating:
X Remove the key from the ignition lock. X
Press button :.
Indicator lamp ;lights up briefly.
X Lock the vehicle with the key or KEYLESS-
GO.
Tow-away protection is deactivated.
Tow-away protection remains deactivated
until:
R the vehicle is unlocked again.
R a door is opened and closed again.
R the vehicle is locked again. Interior motion sensor
When the interior motion sensor is primed, a
visual and audible alarm is triggered if move- 78
Anti-theft systemsSafety
Page 118 of 409
X
Push release lever :down completely.
The steering column is unlocked.
X Adjust the steering wheel to the desired
position.
X Push release lever :up completely.
The steering column is locked.
X Check if the steering column is locked.
When doing so, try to push the steering
wheel up or down or try to move it in the
fore-and-aft direction. Adjusting the steering wheel electri-
cally
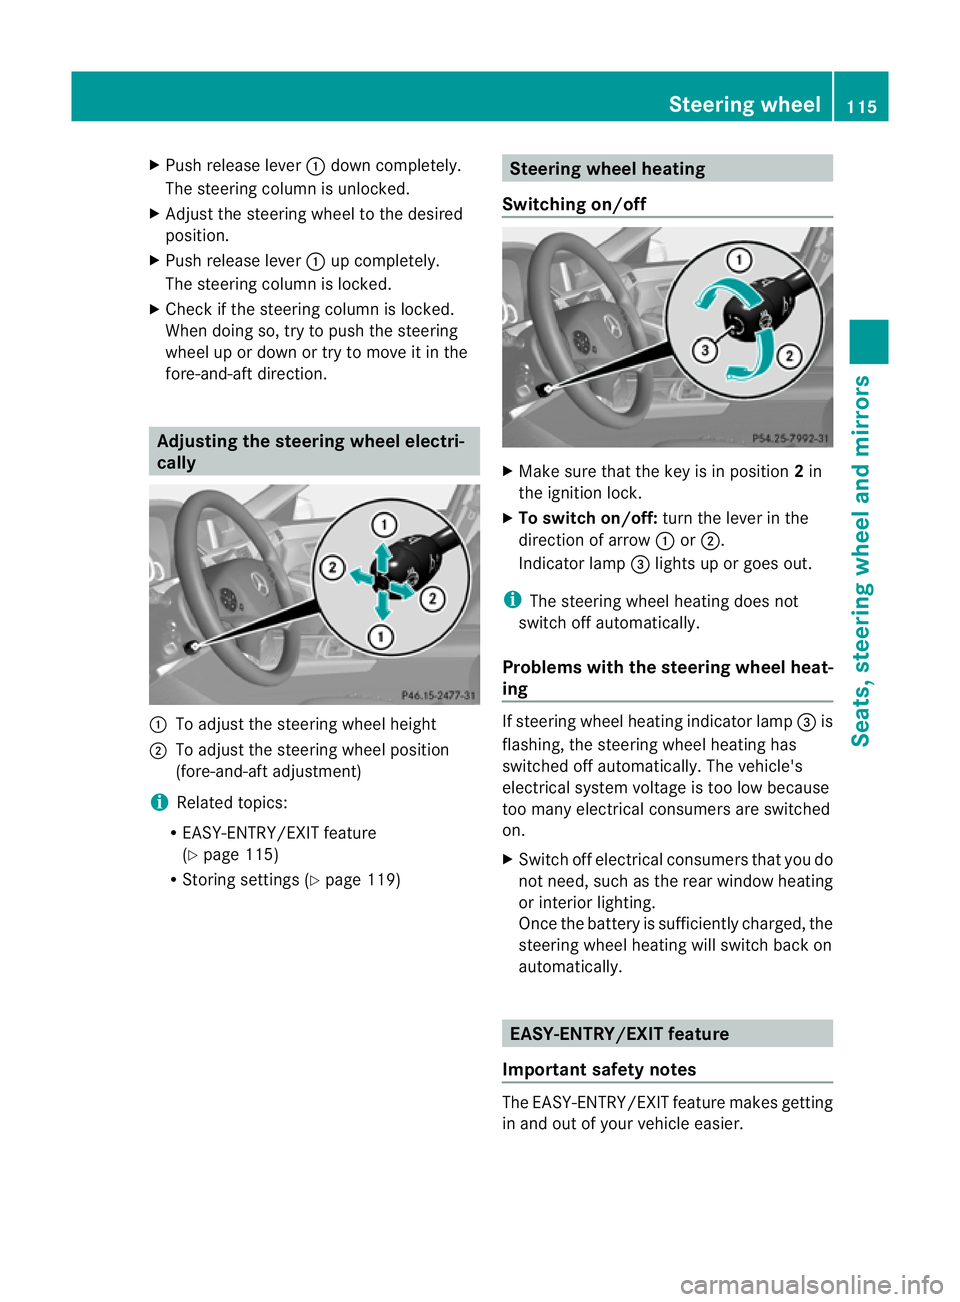
:
To adjust the steering wheel height
; To adjust the steering wheel position
(fore-and-aft adjustment)
i Related topics:
R EASY-ENTRY/EXIT feature
(Y page 115)
R Storing settings (Y page 119) Steering wheel heating
Switching on/off X
Make sure that the key is in position 2in
the ignition lock.
X To switch on/off: turn the lever in the
direction of arrow :or;.
Indicator lamp =lights up or goes out.
i The steering wheel heating does not
switch off automatically.
Problems with the steering wheel heat-
ing If steering wheel heating indicator lamp
=is
flashing, the steering wheel heating has
switched off automatically. The vehicle's
electrical system voltage is too low because
too many electrical consumers are switched
on.
X Switch off electrical consumers that you do
not need, such as the rear window heating
or interior lighting.
Once the battery is sufficiently charged, the
steering wheel heating will switch back on
automatically. EASY-ENTRY/EXIT feature
Important safety notes The EASY-ENTRY/EXIT feature makes getting
in and out of your vehicle easier. Steering wheel
115Seats, steering wheel and mirrors Z
Page 124 of 409
Useful information
............................122
Exterior lighting ................................ 122
Interior lighting ................................. 128
Changing bulbs ................................. 129
Windscreen wipers ...........................132 121Lights and windscreen wipers
Page 131 of 409
The system may not recognise the following
road users:
R road users that have no lighting, e.g. pedes-
trians
R road users that have poor lighting, e.g.
cyclists
R road users whose lighting is not clearly visi-
ble, e.g. road users behind a crash barrier
R on rare occasions :road users that have
lights that may be recognised too late or not
at all
The automatic main-beam headlamps will not
be deactivated, or they may be activated
despite road users travelling in front of or
approaching the vehicle.
Thus, you could cause an accident and injure
yourself and others. Always observe traffic
conditions and, if necessary, dip the lights
manually. Headlamps misted up on the inside
The headlamps may mist up on the inside if
there is high atmospheric humidity.
X Drive with the headlamps switched on.
The level of moisture diminishes, depend-
ing on the length of the journey and the
weather conditions (humidity and temper-
ature).
If the level of moisture does not diminish:
X Have the headlamps checked at a qualified
specialist workshop. Interior lighting
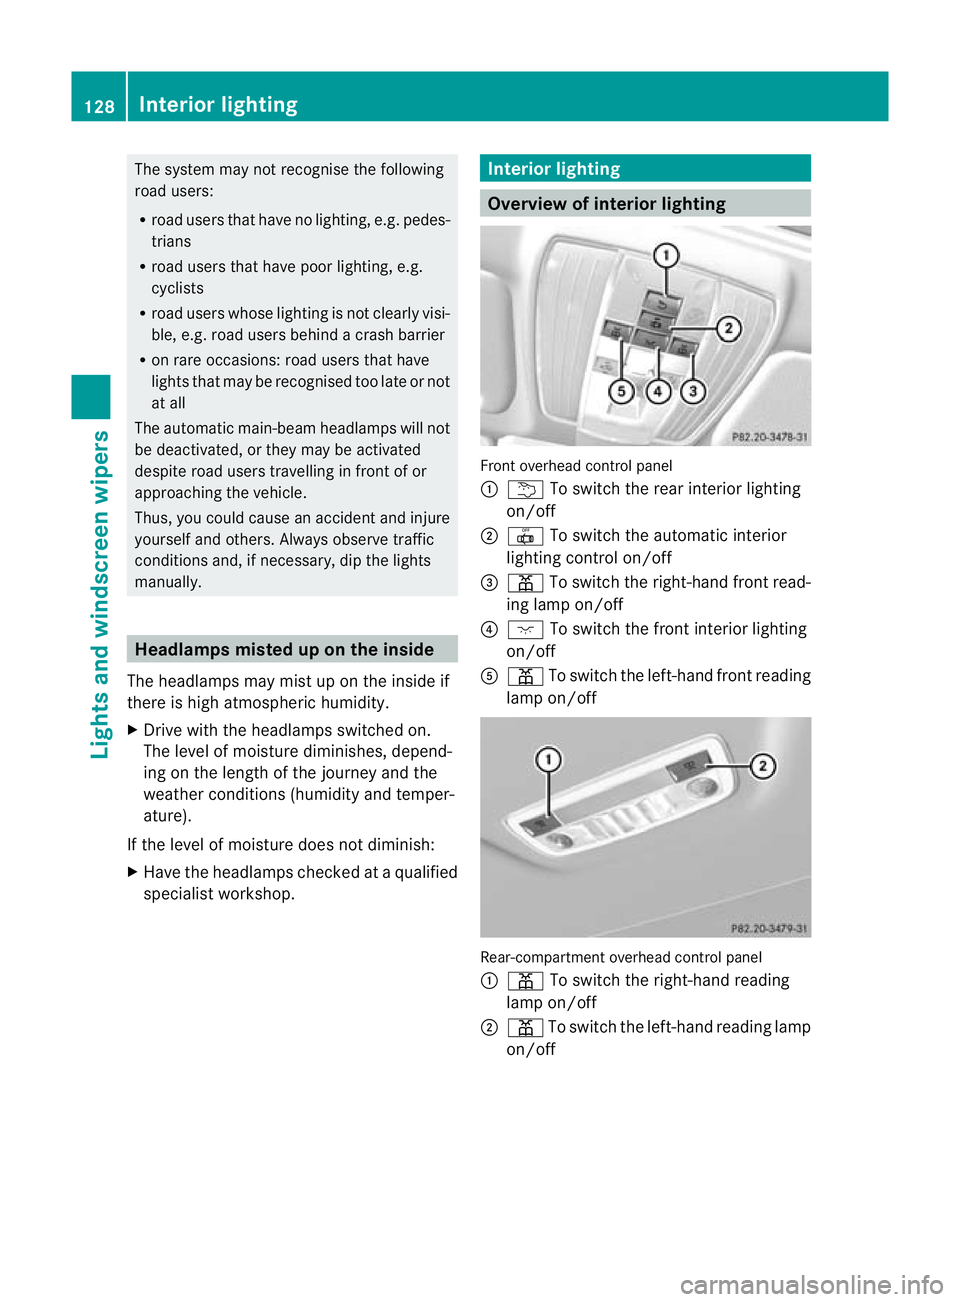
Overview of interior lighting
Front overhead control panel
:
u To switch the rear interior lighting
on/off
; | To switch the automatic interior
lighting control on/off
= p To switch the right-hand front read-
ing lamp on/off
? c To switch the front interior lighting
on/off
A p To switch the left-hand front reading
lamp on/off Rear-compartment overhead control panel
:
p To switch the right-hand reading
lamp on/off
; p To switch the left-hand reading lamp
on/off 128
Interior lightingLights and windscreen wipers
Page 132 of 409
Interior lighting control
Important notes In order to preven
tthe vehicle's battery from
discharging, the interior lighting functions are
automatically deactivated after some time
except for when the key is in position 2in the
ignition lock.
The colour and brightness of the ambient
lighting may be set using the on-board com-
puter (Y page 245).
Automatic interior lighting control X
To switch on/off: press the|button.
When the automatic interior lighting con-
trol is activated, the button is flush with the
overhead control panel.
The interior lighting automatically switches
on if you:
R unlock the vehicle
R open a door
R remove the key from the ignition lock
The interior light is activated for a short while
when the key is removed from the ignition
lock. You can activate this delayed switch-off
using the on-board computer (Y page 246).
Manual interior lighting control X
To switch the front interior lighting on/
off: press the cbutton.
X To switch the rear interior lighting on/
off: press the ubutton.
X To switch the reading lamps on/off:
press the pbutton. Crash-responsive emergency lighting
The interior lighting is activated automatically
if the vehicle is involved in an accident. X
To switch off the crash-responsive
emergency lighting: press the hazard
warning lamp button.
or
X Lock and then unlock the vehicle using the
key. Changing bulbs
Important safety notes
Xenon bulbs G
DANGER
Xenon bulbs are under high voltage. If you
touch the electrical contacts of a xenon bulb,
you could suffer an electric shock and be seri-
ously or even fatally injured. For this reason,
do not remove the cover of xenon bulbs.
Do not change the xenon bulbs yourself, but
have them replaced at a qualified workshop.
If your vehicle is equipped with xenon bulbs,
you can recognise this by the following: the
cone of light from the xenon bulbs moves
from the top to the bottom and back again
when you start the engine. For this to be
observed, the lights must be switched on
before starting the engine.
Bulbs and lamps are an important aspect of
vehicle safety. You must therefore make sure
that these function correctly at all times.
Have the headlamp setting checked regularly.
Other bulbs There are bulbs other than the xenon bulbs
that you cannot replace. Replace only the
bulbs listed (Y
page 130). Have the bulbs that
you cannot replace yourself changed at a
qualified specialist workshop.
If you require assistance changing bulbs, con-
sult a qualified specialist workshop.
Do not touch the glass tube of new bulbs with
your bare hands. Even minor contamination
can burn into the glass surface and reduce
the service life of the bulbs. Always use a lint- Changing bulbs
129Lights and windscreen wipers Z