oil change MERCEDES-BENZ E-CLASS ESTATE 2011 Owners Manual
[x] Cancel search | Manufacturer: MERCEDES-BENZ, Model Year: 2011, Model line: E-CLASS ESTATE, Model: MERCEDES-BENZ E-CLASS ESTATE 2011Pages: 409, PDF Size: 10.47 MB
Page 86 of 409
If you activate the acoustic locking confirma-
tion function you will hear the following,
depending on the date of production of the
vehicle:
R an acoustic signal when locking
or
R one acoustic signal when unlocking and
three when locking
The audible signal can be activated and deac-
tivated using the on-board computer
(Y page 247).
X To unlockc entrally:press the%but-
ton.
If you do not open th evehicle within approx-
imately 40 seconds of unlocking:
R the vehicle is locked again.
R the anti-thef tsystem is primed again.
X To lock centrally: press the&button. KEYLESS-GO
Important notes on the use of KEYLESS-
GO R
Do no tkeep the KEYLESS-GO key together
with:
- electronic devices, e.g. a mobile phone
or another key
- metallic objects, e.g. coins or metal foil
This can affect the functionality of KEY-
LESS-GO.
R Bear in mind that the engine can be started
by any of the vehicle occupants if there is
a KEYLESS-GO key in the vehicle.
Locking and unlocking centrally You can start, lock or unlock the vehicle using
KEYLESS-GO. To do this, you only need carry
the key with you. You can combine the KEY-
LESS-GO functions with those of a conven-
tional key, e.g. using KEYLESS-GO to unlock
and pressing the &button to lock. When locking or unlocking with KEYLESS-GO,
the distance between the key and the corre-
sponding door handle must not be greater
than 1 m.
KEYLESS-GO checks whether a valid key is in
the vehicle by periodically establishing a radio
connection between the vehicle and the key.
This happens:
R
when the external door handles are
touched
R when starting the engine
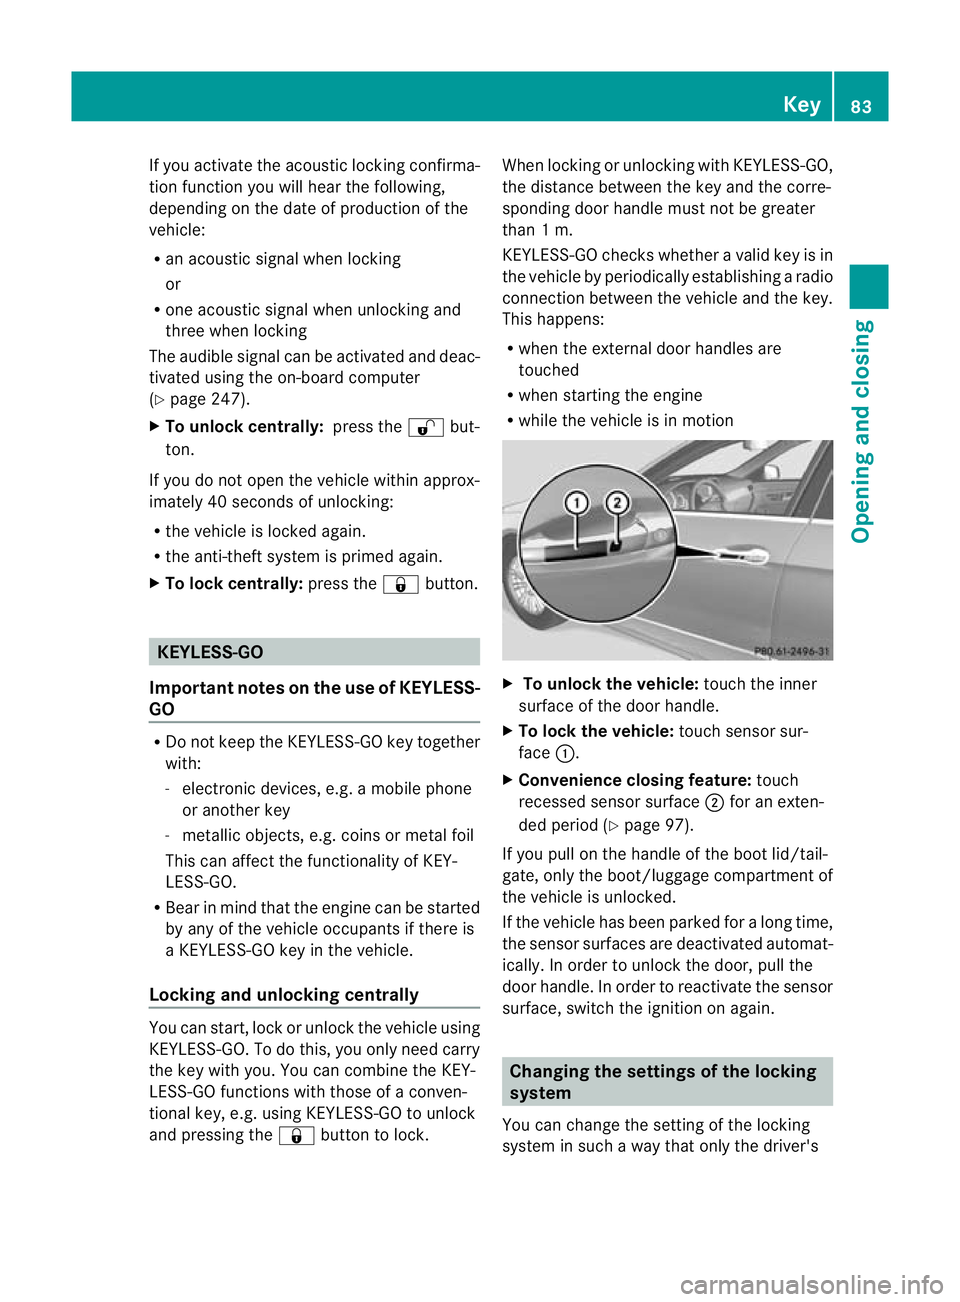
R while the vehicle is in motion X
To unlock the vehicle: touch the inner
surface of the door handle.
X To lock the vehicle: touch sensor sur-
face :.
X Convenience closing feature: touch
recessed sensor surface ;for an exten-
ded period (Y page 97).
If you pull on the handle of the boot lid/tail-
gate, only the boot/luggage compartment of
the vehicle is unlocked.
If the vehicle has been parked for a long time,
the sensor surfaces are deactivated automat-
ically. In order to unlock the door, pull the
door handle. In order to reactivate the sensor
surface, switch the ignition on again. Changing the settings of the locking
system
You can change the setting of the locking
system in such a way that only the driver's Key
83Opening and closing Z
Page 157 of 409
Useful information
i This Owner's Manual describes all models
and all standard and optional equipment
available to your vehicle at the time of pub-
lication of the Owner's Manual. Country-
specific deviations are possible. Please
note that your vehicle may not be equipped
with all features described. This also
applies to safety-relevan tsystems and
functions.
i Please read the information on qualified
specialist workshops (Y page 25).Running-in notes
Important safety notes
G
WARNING
New brake pads/linings only have optimal
braking performance after several hundred
kilometres .Until then, compensate for this by
applying greate rforce to the brake pedal. This
also applies when brake pads/linings or
brake discs have been changed. The first 1,500 km
If you treat the engine with sufficient care
from the very start,y ou will be rewarded with
excellent performance for the remainder of
the engine's life.
R Drive at varying vehicle speeds and engine
speeds for the first 1,500 km.
R Avoid overstraining the vehicle during this
period, e.g. driving at full throttle.
R Change gear in good time, before the rev
counter needle is Ôof the way to the red
area of the rev counter.
R Do not shift down a gear manually in order
to brake. Vehicles with automatic transmission:
R
Try to avoid depressing the accelerator
pedal beyond the point of resistance (kick-
down).
R The shift ranges 3,2or 1should only be
engaged when driving slowly, e.g. when
driving in mountainous terrain.
After 1,500 km, you may gradually bring the
vehicle up to full road and engine speeds.
Additional running-in notes for AMG vehicles:
R Do not drive at speeds above 140 km/h for
the first 1,500 km.
R Only allow the engine to reach a maximum
engine speed of 4,500 rpm briefly.
i You should also observe these notes on
running in if the engine or parts of the drive
train on your vehicle have been replaced. AMG vehicles with rear axle locking
differential
Your vehicle is fitted with a self-locking dif-
ferential on the rear axle. Change the oil after
a running-in period of 3,000 km to improve
protection of the rear axle differential. This oil
change extends the service life of the differ-
ential. Have the oil change carried out at a
qualified specialist workshop. Driving
Important safety notes
G
WARNING
Do not place any objects in the driver's foot-
well. If you use a floormat or carpet in the
driver's footwell, make sure that it is correctly
secured and that there is sufficient clearance
for the pedals.
Do not place several floormats on top of one
another.
Loose objects or the floormats could other-
wise get caught between the pedals if you
accelerate or brake suddenly. You will then 154
DrivingDriving and parking
Page 158 of 409
not be able to brake, declutch or accelerate
as intended. This could lead to accidents and
injury. G
WARNING
Do not change down for additional engine
braking on a slippery roa dsurface. This could
cause the drive wheels to lose their grip and
the vehicle could skid. This could cause you
to lose control of your vehicle and cause an
accident.
! Warm up the engine quickly. Do no tuse
the engine's full performance until it has
reached operating temperature.
Only set the automatic transmission to the
respective drive positions when the vehicle
is stationary.
Where possible, avoid spinning the drive
wheels when pulling away on slippery
roads. Otherwise, you could damage the
drive train.
! AMG vehicles: at low engine oil temper-
atures (below +20 †), the maximum
engine speed is restricted in order to pro-
tect the engine. To protect the engine and
maintain smooth engine operation, avoid
driving at full throttle when the engine is
cold. Key positions
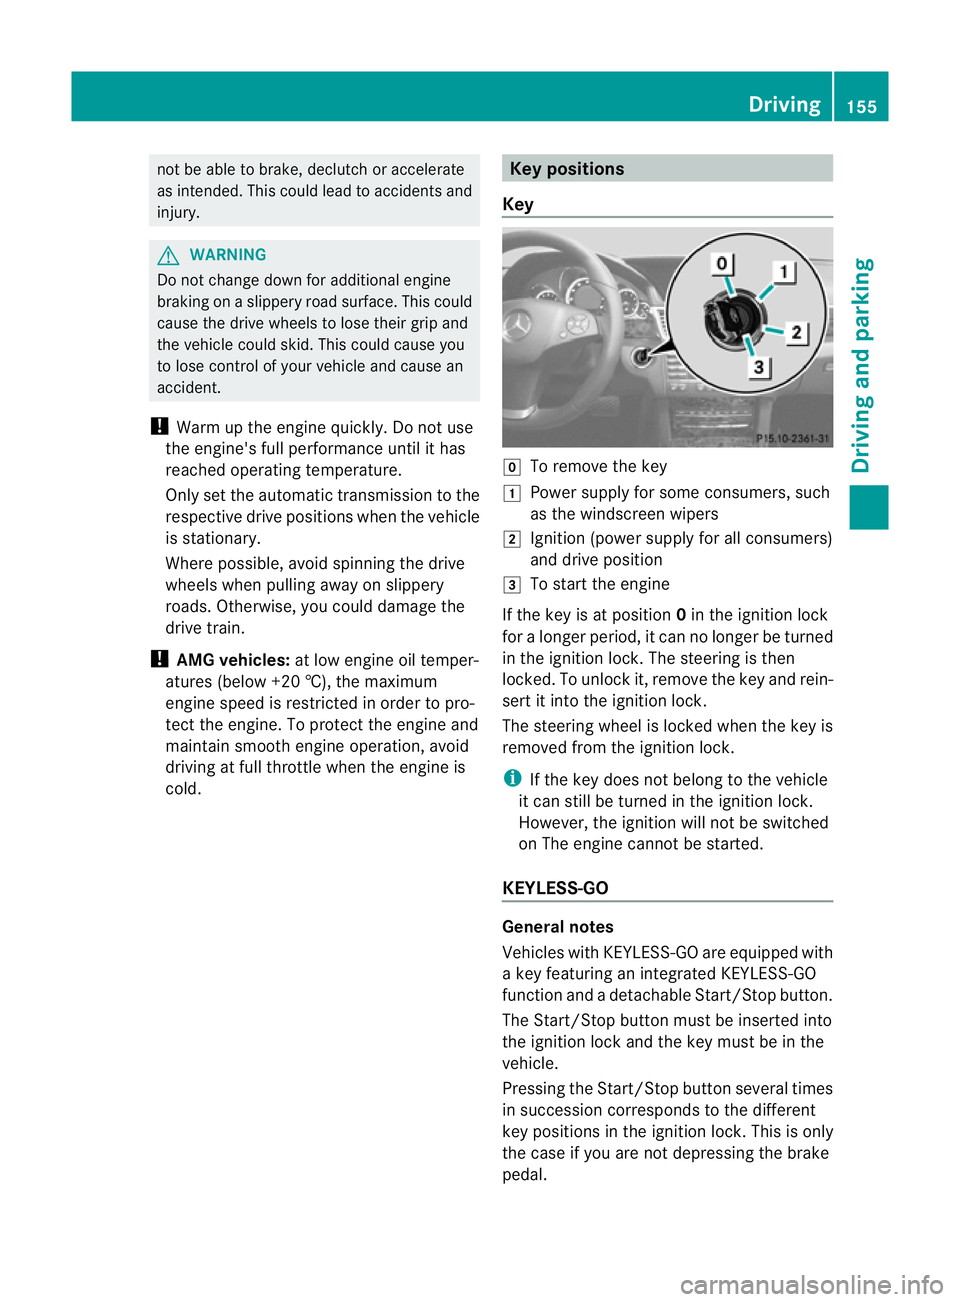
Key g
To remove the key
1 Power supply for some consumers, such
as the windscreen wipers
2 Ignition (power supply for all consumers)
and drive position
3 To start the engine
If the key is at position 0in the ignition lock
for a longer period, it can no longer be turned
in the ignition lock. The steering is then
locked. To unlock it, remove the key and rein-
sert it into the ignition lock.
The steering wheel is locked when the key is
removed from the ignition lock.
i If the key does not belong to the vehicle
it can still be turned in the ignition lock.
However, the ignition will not be switched
on The engine cannot be started.
KEYLESS-GO General notes
Vehicles with KEYLESS-GO are equipped with
a key featuring an integrated KEYLESS-GO
function and a detachable Start/Stop button.
The Start/Stop button must be inserted into
the ignition lock and the key must be in the
vehicle.
Pressing the Start/Stop button several times
in succession corresponds to the different
key positions in the ignition lock. This is only
the case if you are not depressing the brake
pedal. Driving
155Driving and parking Z
Page 175 of 409
Problems with the transmission
Problem Possible causes/consequences and
M Solutions
The transmission has
problems shifting gear. The transmission is losing oil.
X
Have the transmission checked at a qualified specialist work-
shop immediately. The acceleration ability
is deteriorating.
The transmission no
longer changes gear. The transmission is in emergency mode.
It is only possible to shift into
secondgear and reverse gear.
X Stop.
X Shift the transmission to position P.
X Switch off the engine.
X Wait at least 10seconds before restarting the engine.
X Shift the transmission to position Dor R.
If D is selected, the transmission shifts into secondgear; ifRis
selected, the transmission shifts into reverse gear.
X Have the transmission checked at a qualified specialist work-
shop immediately. Releasing the parking lock manually
i The following description does not apply
to vehicles with a DIRECT SELECT lever and
AMG vehicles.
In the event of an electrical fault, it is possible
to release the selector lever lock manually to
move it out of position P, e.g. if you wish to
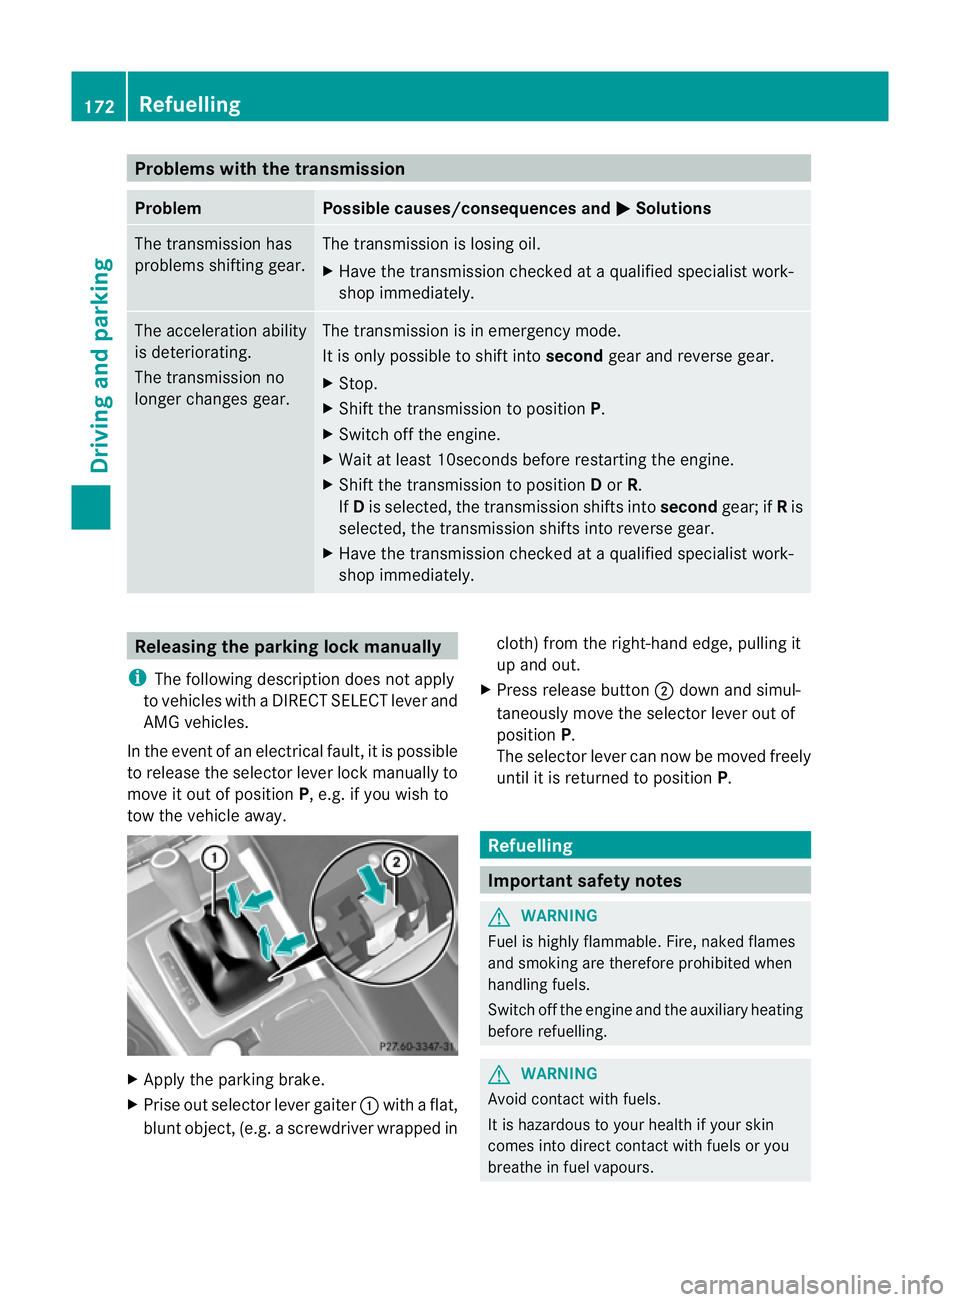
tow the vehicle away. X
Apply the parking brake.
X Prise out selector lever gaiter :with a flat,
blunt object, (e.g. ascrewdriver wrapped in cloth) from the right-hand edge, pulling it
up and out.
X Press release button ;dow nand simul-
taneously move the selecto rlever out of
position P.
The selector lever can now be moved freely
until it is returned to position P. Refuelling
Important safety notes
G
WARNING
Fuel is highly flammable. Fire, naked flames
and smoking are therefore prohibited when
handling fuels.
Switch off the engine and the auxiliary heating
before refuelling. G
WARNING
Avoid contact with fuels.
It is hazardous to your health if your skin
comes into direct contact with fuels or you
breathe in fuel vapours. 172
RefuellingDriving and parking
Page 181 of 409
X
Disconnect the battery ( Ypage 352) or
connect it to a trickle charger.
i You can obtain information about trickle
chargers fro maqualified specialist work-
shop.
If you leave the vehicle parked up for longer
than six weeks, the vehicle may suffer dam-
age as a result of lack of use.
X Visit a qualified specialist workshop and
seek advice. Driving tips
General driving tips
Rolling with the engine switched off G
WARNING
Never switch the engine off while the vehicle
is in motion.
There is no power assistance for the steering
and the service brake when the engine is not
running.
You will require considerably more effor tto
steer and brake, and you could therefore lose
control of the vehicle and cause an accident. Driving short distances
! Vehicles with adiesel particle filter: if
the vehicle is mostly driven for short dis-
tances, it is possible that malfunctions may
occur during the automatic cleaning of the
diesel particle filter. This may lead to fuel
collecting in the engine oil and cause
engine failure. Therefore, if you frequently
drive short distances, you should take a 20
minute trip on a motorway or rural road at
least every 500km. Brakes
Important safety notes G
WARNING
Do not change down for additional engine
braking on a slippery road surface. This could
cause the drive wheels to lose their grip and
the vehicle could skid. G
WARNING
Make sure that other road users are not
endangered by your braking.
Downhill gradients On long and steep downhill gradients, espe-
cially if the vehicle is laden or towing a trailer,
you must shift to a lower gear in good time or,
on vehicles with automatic transmission,
select shift range 1,2or 3.
i This also applies if you have activated
cruise control, SPEEDTRONIC or DIS-
TRONIC PLUS.
This will use the braking effect of the engine,
so less braking will be required to maintain
the speed. This relieves the load on the brake
system and prevents the brakes from over-
heating and wearing too quickly.
Heavy and light loads G
WARNING
Never depress the brake pedal continuously
while the vehicle is in motion, e.g. never cause
the brakes to rub by applying constan tslight
pedal pressure. This causes the brake system
to overheat, increases the braking distance
and can lead to the brakes failing completely.
If the brakes have been subjected to a heavy
load, do not stop the vehicle immediately, but
drive on for a shor twhile. This allows the air-
flow to cool the brakes more quickly.
If the brakes have been used only moderately,
you should occasionally test their effective-
ness. To do this, brake more firmly from a 178
Driving tipsDriving and parking
Page 326 of 409
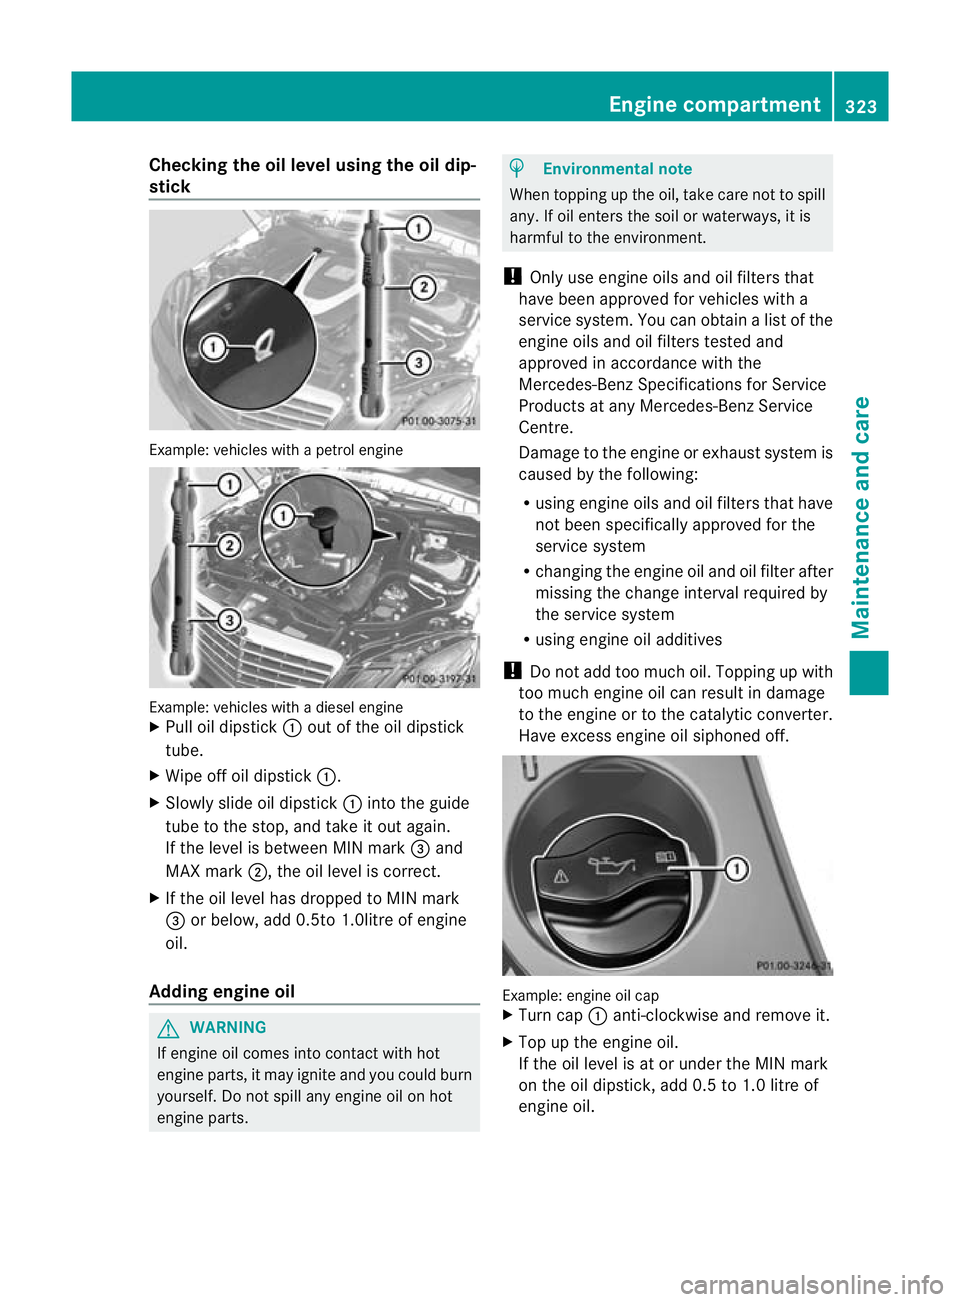
Checking the oil level using the oil dip-
stick Example
:vehicles with a petrol engine Example: vehicles with a diesel engine
X
Pull oil dipstick :out of the oil dipstick
tube.
X Wipe off oil dipstick :.
X Slowly slide oil dipstick :into the guide
tube to the stop, and take it out again.
If the level is between MIN mark =and
MAX mark ;, the oil level is correct.
X If the oil level has dropped to MIN mark
= or below, add 0.5to 1.0litre of engine
oil.
Adding engine oil G
WARNING
If engine oil comes into contact with hot
engine parts, it may ignite and you could burn
yourself. Do not spill any engine oil on hot
engine parts. H
Environmental note
When topping up the oil, take care not to spill
any. If oil enters the soil or waterways, it is
harmful to the environment.
! Only use engine oils and oil filters that
have been approved for vehicles with a
service system. You can obtain a list of the
engine oils and oil filters tested and
approved in accordance with the
Mercedes-Benz Specifications for Service
Products at any Mercedes-Benz Service
Centre.
Damage to the engine or exhaust system is
caused by the following:
R using engine oils and oil filters that have
not been specifically approved for the
service system
R changing the engine oil and oil filter after
missing the change interval required by
the service system
R using engine oil additives
! Do not add too much oil. Topping up with
too much engine oil can result in damage
to the engine or to the catalytic converter.
Have excess engine oil siphoned off. Example: engine oil cap
X
Turn cap :anti-clockwise and remove it.
X Top up the engine oil.
If the oil level is at or under the MIN mark
on the oil dipstick, add 0.5 to 1.0 litre of
engine oil. Engine compartment
323Maintenance and care Z
Page 335 of 409
parts may break away and be thrown around
the interior when an airbag is deployed, which
may result in severe injuries.
! Do not affix the following to plastic surfa-
ces:
R stickers
R films
R scented oil bottles or similar items
You could otherwise damage the plastic.
! Do not allow cosmetics, insec trepellent
or sunscreen to come in contact with the
plastic trim .This maintains the high-quality
look of the surfaces.
X Wipe the plastic trim with a damp, lint-free
cloth, e.g. a microfibre cloth.
X Heavy soiling: use car care and cleaning
products recommended and approved by
Mercedes-Benz.
The surface may change colour tempora-
rily. Wait until the surface is dry again.
Cleaning the steering wheel and gear or
selector lever X
Thoroughly wipe with a damp cloth or use
leather care agents that have been recom-
mended and approved by Mercedes-Benz.
Cleaning wooden trim and trim ele-
ments X
Wipe the wooden trim and trim pieces with
a damp, lint-free cloth, e.g. a microfibre
cloth.
X Heavy soiling: use car care and cleaning
products recommended and approved by
Mercedes-Benz.
! Do not use solvent-based cleaning agents
such as tar remover, wheel cleaners, pol-
ishes or waxes. There is otherwise a risk of
damaging the surface. Cleaning the seat covers !
Do not use microfibre cloths to clean gen-
uine leather, artificial leather or
Alcantara® covers. If used often, these can
damage the cover.
! Observe the following when cleaning:
R clean genuine leather covers carefully
with a damp cloth and then wipe the cov-
ers down with a dry cloth. Make sure that
the leather does not become soaked. It
may otherwise become rough and
cracked. Only use leather care agents
that have been tested and approved by
Mercedes-Benz. You can obtain these
from a qualified specialist workshop.
R clean artificial leather covers with a cloth
moistened with a solution containing 1%
detergent (e.g. washing-up liquid).
R clean cloth covers with a microfibre cloth
moistened with a solution containing 1%
detergent (e.g. washing-up liquid). Rub
carefully and always wipe entire seat sec-
tions to avoid leaving visible lines. Leave
the seat to dry afterwards. Cleaning
results depend on the type of dirt and
how long it has been there.
R clean Alcantara® covers with a damp
cloth. Make sure that you wipe entire
seat sections to avoid leaving visible
lines.
i Note that regular care is essential to
make sure that the appearance and com-
fort of the covers are retained over time.
Cleaning the seat belts X
Use clean, lukewarm water and soap solu-
tion.
! Do not clean the seat belts using chemical
cleaning agents. Do not dry the seat belts
at temperatures above 80 † or in direct
sunlight. 332
CareMaintenance and care
Page 374 of 409
!
On vehicles fitted with a tyre pressure
monitor, electronic components are loca-
ted in the wheel.
Tyre-fitting tools should not be applied in
the area of the valve, as this could damage
the electronic components.
Only have tyres changed at a qualified spe-
cialist workshop. Direction of rotation
Tyres with a specified direction of rotation
have additional benefits, e.g. if there is a risk
of aquaplaning. You will only gain these ben-
efits if the correct direction of rotation is
observed.
An arrow on the sidewall of the tyre indicates
its correct direction of rotation.
You may fit a spare wheel/emergency spare
wheel against the direction of rotation.
Observe the time restriction on use as well as
the speed limitation specified on the emer-
gency spare wheel/spare wheel. Storing wheels
Store wheels that are not being used in a cool,
dry and preferably dark place. Protect the
tyres against oil, grease, petrol and diesel. Cleaning the wheels
G
WARNING
Do not use high-pressure cleaners with circu-
lar-jet nozzles (dirt grinders) to clean your
vehicle, in particular the tyres. You could oth-
erwise damage the tyres and cause an acci-
dent. Wheel and tyre combinations
Points to remember
! For safety reasons, Mercedes-Benz rec-
ommends that you only use tyres and wheels which have been approved by
Mercedes-Benz specifically for your vehi-
cle.
These are specially adapted to the control
systems, such as ABS or ESP
®
and are
marked as follows:
R MO =Mercedes-BenzO riginal
R MOE =Mercedes-BenzO riginal Extended
(tyres featuring run-flat characteristics)
R MO1 =Mercedes-BenzO riginal (only cer-
tain AMG tyres)
Mercedes-Benz Original Extended tyres
may only be used on wheels that have been
specifically approved by Mercedes-Benz.
Only use tyres, wheels or accessories tes-
ted and approved by Mercedes-Benz. Cer-
tain characteristics, e.g. handling, vehicle
noise emissions or fuel consumption, may
otherwise be adversely affected. In addi-
tion, when driving with aload, tyre dimen-
sion variations could cause the tyres to
come into contact with the bodywork and
axle components.T his could result in dam-
age to the tyres or the vehicle.
Mercedes-Ben zaccepts no liability for
damage resulting from the use of tyres,
wheels or accessories othe rthan those tes-
ted and approved.
Further information about wheels, tyres
and approved combinations can be
obtained from any qualified specialist
workshop.
! Large wheels: the lower the section width
for a certain wheel size, the lower the ride
comfort is on poor road surfaces. Roll com-
fort and suspension comfort are reduced
and the risk of damage to the wheels and
tyres as a result of driving over obstacles
increases.
i You will find a table of tyre pressures on
the inside of your vehicle's fuel filler flap.
For further information on tyre pressure,
see (Y page 365). Check tyre pressures
regularly, and only when the tyres are cold. Wheel and tyre combinations
371Wheels and tyres Z
Page 390 of 409
!
Vehicles without adiesel particle fil-
ter: in countries where only diesel fuel with
a high sulphur conten tis available, you will
need to carry out your vehicle's oil change
at shorter intervals. More information
aboutt he interval for oil change can be
obtained from any qualified specialist
workshop.
Usually you will find information about the
fuel grade on the pump. If you cannot find the
label on the petrol pump, ask the filling sta-
tion staff.
Information on refuelling (Y page 172).
Low outside temperatures
In winter months, diesel fuel with an improved
cold flow quality is available. In Europe, the
EN 590 standard defines various climate-
dependent temperature categories. Malfunc-
tions can be avoided by refuelling with diesel
fuel that corresponds to the climatic specifi-
cations outlined in EN 590. At unusually low
outside temperatures, it is possible that the
flow characteristics of the diesel fuel could be
insufficient .Accordingly, diesel fuel from
warmer areas may not be suitable for opera-
tion in colder climati cconditions.
i Further information on country-specific
fuel properties can be obtained from oil
companies, e.g. at filling stations.
Flow improver
To improve the low-temperature resistance of
diesel fuel, a flow improver can be attached.
The effectiveness of a flow improver is not
guaranteed for every fuel.
Only use flow improvers tested and approved
by Mercedes-Benz. During use, please
observe the information on operation.
Correct dosage and sufficient mixing are deci-
sive in improving low-temperature resistance
with the flow improver. Overdosage can
potentially even decrease low-temperature
resistance and must therefore be avoided.
Follow the manufacturer's guidelines on dos-
age. Mix the additive into the diesel in good time,
before the flow characteristics of the diesel
become insufficient. Otherwise, malfunctions
can arise through heating the fuel system,
e.g. through parking in a heated garage.
More information about recommended flow
improvers can be obtained from any qualified
specialist workshop.
Notes on fuel consumption
H
Environmental note
CO 2(carbon dioxide) is the gas which scien-
tists believe to be principally responsible for
global warming (the greenhouse effect). Your
vehicle's CO 2emissions are directly related to
fuel consumption and therefore depend on:
R efficient use of the fuel by the engine
R driving style
R other non-technical factors, such as envi-
ronmental influences or road conditions
You can minimise your vehicle's CO 2emis-
sions by driving carefully and having it serv-
iced regularly.
The vehicle will use more fuel than usual in
the following situations:
R at very low outside temperatures
R in urban traffic
R on short journeys
R in mountainous terrain
i Only for certain countries: you can find
the current consumption and emission val-
ues of your vehicle in the COC documents
(EU CERTIFICATE OF CONFORMITY). These
documents are delivered with your vehicle.
The consumption figures were in each case
based on the currently applicable version:
R for vehicles up to and including the EURO
4s tandard, in accordance with EU Direc-
tive 80/1268/ECC
R for vehicles above the EURO 5standard,
in accordance with Regulatio n(EC) No.
715/2007 Service products and capacities
387Technical data Z
Page 391 of 409
Deviations fro
mthese values may occur
under normal operating conditions. AdBlue
®
Points to remember AdBlue
®
is a non-flammable, non-toxic, col-
ourless, odourless and water-soluble fluid.
High outside temperatures G
WARNING
If you open the AdBlue ®
tank cap, small
amounts of ammonia vapour may be released.
This depends in particular upon the age of the
AdBlue ®
.
Ammonia vapours have a pungent odour and
are particularly irritating to:
R skin
R mucous membranes
R eyes
You may experience a burning sensation in
your eyes, nose and throat, as well as cough-
ing and watering of the eyes.
Do not inhale any ammonia vapours that may
be released. Fill the AdBlue ®
tank only in well-
ventilated areas.
Low outside temperatures AdBlue
®
freezes at a temperature of approx-
imately -11 †. The vehicle is equipped with
an AdBlue ®
preheating system at the factory.
Winter operation can thus be guaranteed
even at temperatures below -11 †.
Additives !
Only use AdBlue ®
in accordance with ISO
22241. Do not use additives with AdBlue ®
and do not dilute AdBlue ®
with water. This
may destroy the BlueTEC exhaust gas after-
treatment system. Purity !
Impurities in AdBlue ®
(e.g. due to other
service products, cleaning agents or dust)
lead to:
R increased emission values
R damage to the catalytic converter
R engine damage
R malfunctions in the BlueTEC ®
exhaust
gas aftertreatment system
Assuring the purity of AdBlue ®
is particularly
important with respect to avoiding malfunc-
tions in the BlueTEC exhaust gas aftertreat-
ment system.
If AdBlue ®
is pumped out of the AdBlue ®
tank,
e.g. during repair work, do not use this fluid
to refill the tank.T he purity of the fluid can no
longer be guaranteed.
Total capacity of the AdBlue ®
tank Model Total capacity
E 350 BlueTEC
24.5 l
Engine oil
Points to remember The quality of the engine oil is decisive for the
function and service life of an engine. After
extensive tests, Mercedes-Ben
zapproves
engine oils that correspond to the current
technical standard.
Therefore, only Mercedes-Benz approved
engine oils may be used in Mercedes-Benz
engines.
Further information on tested and approved
engine oils can be obtained from any
Mercedes-Benz Service Centre. Mercedes-
Ben zrecommends that you have the oil
change carried out at a qualified specialist
workshop. Mercedes-Benza pproval is indica-
ted on the oil container by the inscription "MB
Approval" and the corresponding designa-
tion, e.g. MB Approval 229.51. 388
Service products and capacitiesTechnical data