seats MERCEDES-BENZ E-CLASS ESTATE 2011 Owners Manual
[x] Cancel search | Manufacturer: MERCEDES-BENZ, Model Year: 2011, Model line: E-CLASS ESTATE, Model: MERCEDES-BENZ E-CLASS ESTATE 2011Pages: 409, PDF Size: 10.47 MB
Page 6 of 409
Index
....................................................... 4Introduction
......................................... 23 At
ag lance ........................................... 27 Safety
................................................... 41 Opening and closing
...........................81 Seats, steering wheel and mirrors
..103 Lights and windscreen wipers
.........121 Climate control
................................. 135 Driving and parking
..........................153 On-board computer and displays
....229 Stowing and features
.......................289 Maintenance and care
......................319 Breakdown assistance
.....................335 Wheels and tyres
.............................. 361 Technical data
................................... 379 Contents
3
Page 12 of 409
Safety systems
.............................. 254
Tyres .............................................. 272
Vehicle .......................................... .275
Distance display (on-board com-
puter) ................................................. .241
Distance recorder see Trip meter
Distance warning signal (warning
lamp) .................................................. 287
DISTRONIC PLUS Deactivating ................................... 192
Display message ............................ 270
Displays in the multifunctio ndis-
play ................................................ 191
Drivin gtips .................................... 193
Function/notes ............................. 185
Important safety notes ..................185
Selecting ........................................ 187
Setting the specified minimum
distance ......................................... 191
Warning lamp ................................. 287
Door
Automatic locking (on-board com-
puter) ............................................. 246
Automatic locking (switch) .............. .89
Central locking/unlocking (key) ......82
Control pane l................................... 39
Display message ............................ 276
Emergency locking ........................... 90
Emergency unlocking .......................90
Important safety notes ....................88
Opening (from the inside) ................89
Drinks holder
see Cuph older
Drive program
Automatic ...................................... 169
Display ........................................... 165
Display (DIRECT SELECT lever) ......166
Manual .......................................... .170
Drive program selector .....................168
Driver's door see Door
Driver's seat
see Seats
Drive system
Active Blind Spot Assist .................216Driving abroad
Service24h .................................... 326
Symmetrical dipped bea m............. 122
Driving on flooded roads ..................180
Driving safety system BAS PLUS (Brake Assist System
PLUS) .............................................. .70
Electronic Brake-force Distribu-
tio n.................................................. 75
ESP ®
(Electronic Stability Pro-
gram) ............................................... 72
ETS/4ETS (Electronic Traction
System) ........................................... 72
Important safety guidelines .............69
Driving safety systems
ABS (Anti-lock Braking System) .......70
ADAPTIVE BRAKE ............................. 75
Adaptive brake lamps ......................71
BAS (Brake Assist System) ..............70
Overview .......................................... 69
PRE-SAFE ®
Brake ............................ .75
Driving system
Active Lane Keeping Assist ............218
Driving systems
Active Driving Assistance pack-
age ................................................. 215
AIRMATIC ...................................... 197
AMG RIDE CONTROL sports sus-
pension .......................................... 198
ATTENTION ASSIST ........................207
Blind Spot Assist ............................ 212
Cruise control ................................ 181
Display message ............................ 266
Distronic Plu s................................ 185
HOLD function ............................... 194
Lane Keeping Assist ......................214
Lane package ................................ 212
Nigh tView Assist Plus ...................209
Parking Guidance ........................... 203
PARKTRONI C................................. 200
RAC ESTART (AMG vehicles) ..........196
Reversing camera ..........................206
Speed Limi tAssist ......................... 208
SPEEDTRONIC ............................... 183
Driving tips
AMG cerami cbrakes ..................... 179
Aquaplaning ................................... 180 Index
9
Page 20 of 409
Rear-view mirror
Anti-dazzle mode (automatic) ........118
Dipping (manual )........................... 116
Rear window blind ............................310
Rear window heating Problem (fault) ............................... 143
Switching on/off ........................... 143
Rear window wiper
Switching on/off ........................... 133
Refuelling
Fuel gauge ....................................... 30
Important safety notes ..................172
Refuelling proces s......................... 173
see Fuel
Releasing the parking loc kman-
ually (automatic transmission) ........172
Remote control Auxiliary heating/ventilation .......... 146
Changing the batteries (auxiliary
heating) ......................................... 148
Garage door opene r....................... 315
Programming (garage door
opener) .......................................... 315
Replacing the battery (auxiliary
heating remote control) .................... 148
Reserve (fuel tank) see Fuel
Reserve fuel
Display message ............................ 264
Warning lamp ................................. 285
Residual heat (climate control) ........145
Restraint system see SRS (Supplemental Restraint
System)
Rev counter ........................................ 230
Reverse gear Engaging (automatic transmis-
sion) ............................................... 165
Engaging (manual transmission) ....164
Reversing camera
Cleaning instructions .....................330
Function/notes ............................. 206
Reversing lamp (display message) ..261
Roller blind see Roller sunblind Roller sunblind
Panorama sliding sunroo f.............. 100
Rea rwindow .................................. 310
Roof carrier ........................................ 306
Roof lining and carpets (cleaning
instructions) ...................................... 333
Roof load (maximum) ........................392
Route (navigation) see Route guidance (navigation)
Route guidance (navigation) ............236 S
Safety Childre ninthe vehicle ..................... 53
Child restraint systems ....................53
Safety net .......................................... .301
Attaching ....................................... 301
Safety systems
see Driving safety systems
Seat
Active multicontour sea t................ 109
Folding the backres t(rear com-
partment) forwards/back ..............297
Seat belt
Adjusting the driver's and front-
passenger sea tbelt ......................... 51
Adjusting the height ......................... 51
Belt force limiter .............................. 53
Belt tensione r.................................. 53
Centre rear-compartment sea t........ 52
Cleaning ......................................... 332
Display message ............................ 257
Fastening ......................................... 51
Important safety guidelines .............49
Rea rseat belt status indicator .........52
Releasing ......................................... 52
Switching belt adjustment on/off
(on-board computer) ......................249
Warning lamp ................................. 280
Warning lamp (function) ................... 52
Seats
Adjusting (electrically). ..................106
Adjusting (manually and electri-
cally) .............................................. 106
Adjusting lumba rsuppor t.............. 110
Adjusting the 4-way lumba rsup-
por t................................................ 110 Index
17
Page 46 of 409
tentionally. For this reason, never make any
modifications to the restraint systems.
Therefore, you must not tampe rwith elec-
tronic components or their software. SRS (Supplemental Restraint System)
Introduction SRS consists of:
R
the 6 SRS warning lamp
R airbags
R airbag control unit (with crash sensors)
R belt tensioners
R belt force limiters
SRS reduces the risk of occupants coming
into contact with the vehicle's interior in the
event of an accident. It can also reduce the
effect of the forces to which occupants are
subjected during an accident.
SRS warning lamp SRS functions are checked regularly when
you switch on the ignition and when the
engine is running. Therefore, malfunctions
can be detected in good time.
The 6 SRS warning lamp in the instrument
cluster lights up when the ignition is switched
on. It goes out no later than a few seconds
after the engine is started. G
WARNING
If SRS is malfunctioning, individual systems
may be triggered unintentionally or might not
be triggered in the event of an accident with
a high rate of vehicle deceleration.
A malfunction has occurred if:
R the 6 SRS warning lamp does not light
up when the ignition is switched on.
R the engine is running and the 6SRS
warning lamp does not go out after a few
seconds.
R the engine is running and the 6SRS
warning lamp lights up again. In this case, have SRS checked immediately
at a qualified specialist workshop.
Triggering of belt tensioners, belt force
limiters and airbags During the firs
tstage of a collision, the airbag
control uni tevaluates important physical
data relating to vehicle deceleratio noraccel-
eration, such as:
R duration
R direction
R magnitude
Based on the evaluation of this data, the air-
bag control uni tpre-emptively triggers the
beltt ensioners in the first stage.
i The fron tbelt tensioners can only be trig-
gered if the seat belt tongues on the front
seats are correctly engaged in the seat belt
buckles.
If there is an even higher rate of vehicle decel-
eration or acceleration in a longitudinal direc-
tion, the fron tairbags are also deployed.
Your vehicle has adaptive, two-stage front air-
bags. The airbag control unit evaluates vehi-
cle deceleration or acceleration in the event
of a collision. In the firs tdeployment stage,
the fron tairbag is filled with enough propel-
lant gas to reduce the risk of injuries. The
front airbag is fully deployed if a second
deploymen tthreshold is exceeded within a
few milliseconds.
The belt tensioner and airbag triggering
thresholds are variable and are adapted to the
rate of deceleration or acceleration of the
vehicle. This process is pre-emptive in nature.
The triggering process must take place in
good time at the start of the collision.
i Airbags are not deployed in all types of
accidents. Also, not all airbags are
deployed together in an accident. The dif-
ferent airbag systems work independently
of each other. Occupant safety
43Safety Z
Page 51 of 409
vehicle occupants on the side of the vehicle
on which the impact occurs.
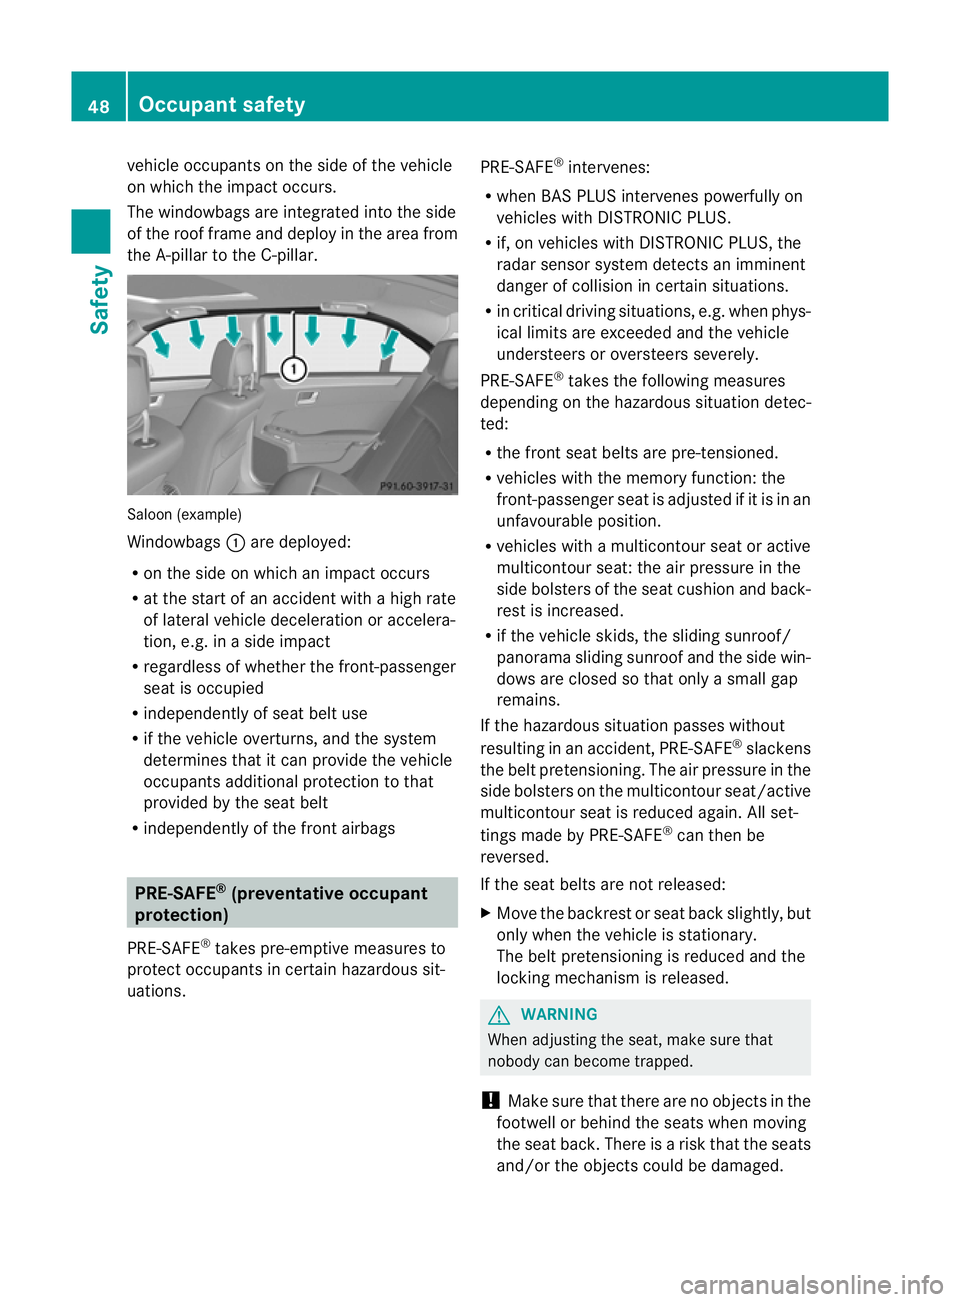
The windowbags are integrated into the side
of the roof frame and deploy in the area from
the A-pillar to the C-pillar.
Saloo
n(example)
Windowbags :are deployed:
R on the side on which an impact occurs
R at the start of an accident with a high rate
of lateral vehicle deceleration or accelera-
tion, e.g. in a side impact
R regardless of whether the front-passenger
seat is occupied
R independently of seat belt use
R if the vehicle overturns, and the system
determines that it can provide the vehicle
occupants additional protection to that
provided by the seat belt
R independently of the fron tairbags PRE-SAFE
®
(preventative occupant
protection)
PRE-SAFE ®
takes pre-emptive measure sto
protect occupants in certain hazardous sit-
uations. PRE-SAFE
®
intervenes:
R when BAS PLUS intervenes powerfully on
vehicles with DISTRONIC PLUS.
R if, on vehicles with DISTRONIC PLUS, the
radar senso rsystem detects an imminent
danger of collision in certain situations.
R in critical driving situations, e.g. when phys-
ical limits are exceeded and the vehicle
understeers or oversteers severely.
PRE-SAFE ®
takes the following measures
depending on the hazardous situation detec-
ted:
R the fron tseat belts are pre-tensioned.
R vehicles with the memory function: the
front-passenger seat is adjusted if it is in an
unfavourable position.
R vehicles with a multicontour seat or active
multicontour seat: the air pressure in the
side bolsters of the seat cushion and back-
rest is increased.
R if the vehicle skids, the sliding sunroof/
panorama sliding sunroof and the side win-
dows are closed so that only a small gap
remains.
If the hazardous situation passes without
resulting in an accident, PRE-SAFE ®
slackens
the belt pretensioning. The air pressure in the
side bolsters on the multicontour seat/active
multicontour seat is reduced again. All set-
tings made by PRE-SAFE ®
can then be
reversed.
If the seat belts are not released:
X Move the backrest or seat back slightly, but
only when the vehicle is stationary.
The belt pretensioning is reduced and the
locking mechanism is released. G
WARNING
When adjusting the seat, make sure that
nobody can become trapped.
! Make sure that there are no objects in the
footwell or behind the seats when moving
the seat back. There is a risk that the seats
and/or the objects could be damaged. 48
Occupant safetySafety
Page 52 of 409
More information about seat-belt adjust-
ment,ac onvenience function integrated into
PRE-SAFE ®
, can be found in the "Seat-belt
adjustment" section (Y page 51).NECK-PRO head restraints
The NECK-PRO head restraints increase pro-
tection to the driver's and front passenger's
head and neck.T o this end, the NECK-PRO
head restraints on the driver's and front-
passenger seats are moved forwards and
upwards in the event of a rear-end collision of
a certain severity. This provides better head
support. G
WARNING
Only use head restraint covers which have
been tested and approved by Mercedes-Benz
for your vehicle model.
The use of non-approved head restraint cov-
ers may prevent NECK-PRO head restraints
from triggering properly. Consequently, the
NECK-PRO head restraints cannot provide the
intended level of protection.
Consult a Mercedes-Benz Service Centre
regarding availability.
If the NECK-PRO head restraints have been
triggered in an accident, reset the NECK-PRO
head restraints on the driver’s and front-
passenger seat (Y page 49). Otherwise, the
additional protection will not be available in
the event of another rear-end collision. You
can recognise when NECK-PRO head
restraints have been triggered by the fact that
they have moved forwards and can no longer
be adjusted. Resetting triggered NECK-PRO head
restraints
Following a rear-end collision, Mercedes-
Benz recommends that you have NECK-PRO
head restraints checked at a qualified spe-
cialist workshop, e.g. a Mercedes-Benz
Service Centre. i
Resetting the NECK-PRO head restraints
requires a lot of strength. If you have diffi-
culty resetting the NECK-PRO head
restraints, have this work carried out at a
qualified specialist workshop, e.g. a
Mercedes-Benz Service Centre. Example: Saloon
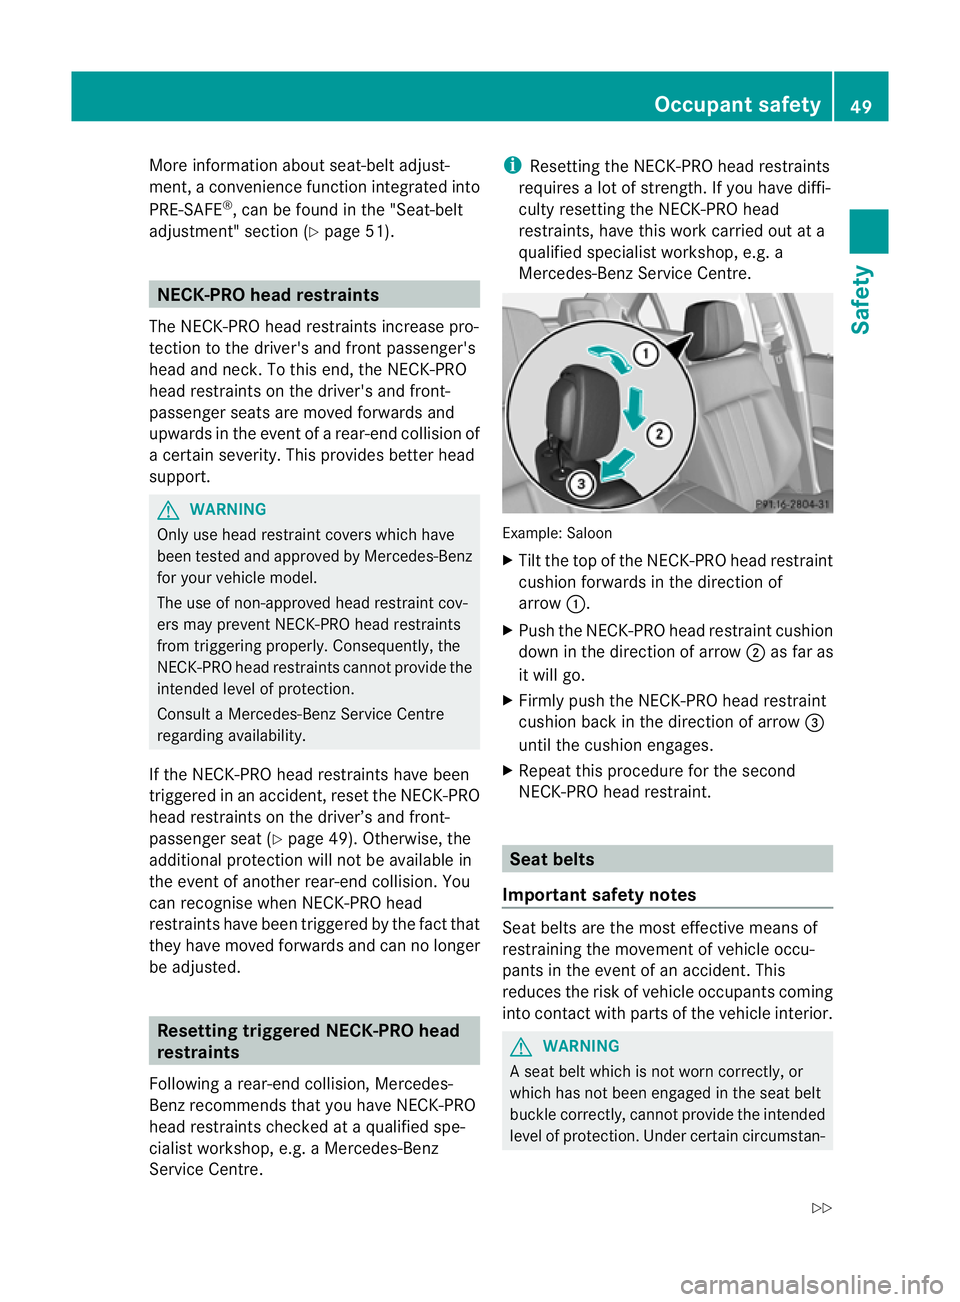
X
Tilt the top of the NECK-PRO head restraint
cushion forwards in the direction of
arrow :.
X Push the NECK-PRO head restraint cushion
down in the direction of arrow ;as far as
it will go.
X Firmly push the NECK-PRO head restraint
cushion back in the direction of arrow =
until the cushion engages.
X Repeat this procedure for the second
NECK-PRO head restraint. Seat belts
Important safety notes Seat belts are the most effective means of
restraining the movement of vehicle occu-
pants in the event of an accident. This
reduces the risk of vehicle occupants coming
into contact with parts of the vehicle interior.
G
WARNING
A seat belt which is not worn correctly, or
which has not been engaged in the seat belt
buckle correctly, cannot provide the intended
level of protection. Under certain circumstan- Occupant safety
49Safety
Z
Page 54 of 409
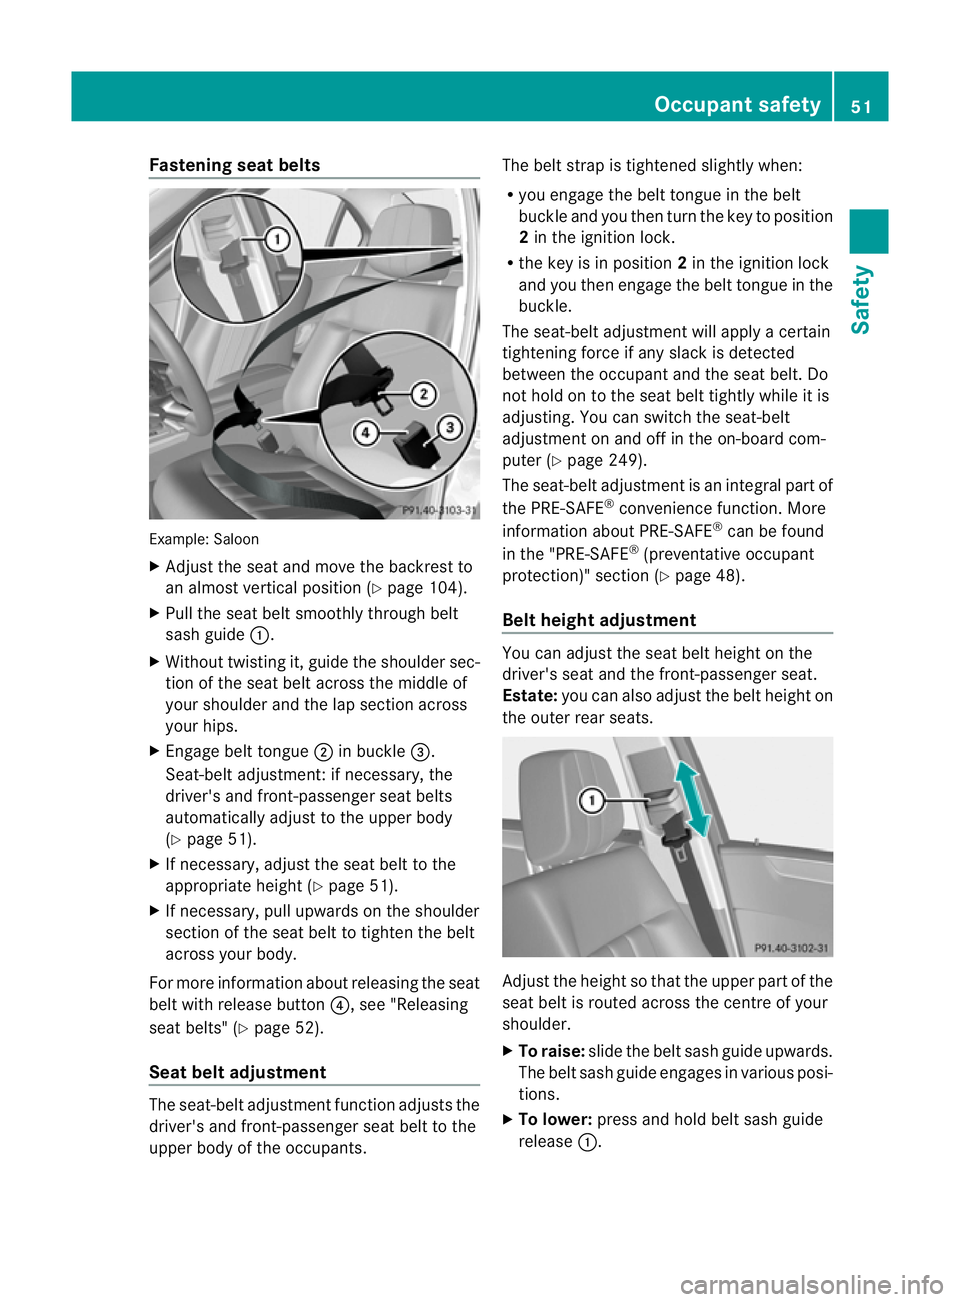
Fastening seat belts
Example: Saloon
X
Adjust the seat and move the backrest to
an almost vertical position (Y page 104).
X Pull the seat belt smoothly through belt
sash guide :.
X Without twisting it, guide the shoulder sec-
tion of the seat belt across the middle of
your shoulder and the lap section across
your hips.
X Engage belt tongue ;in buckle =.
Seat-belt adjustment: if necessary, the
driver's and front-passenger seat belts
automatically adjust to th eupper body
(Y page 51).
X If necessary, adjust the seat belt to the
appropriate height (Y page 51).
X If necessary, pull upwards on the shoulder
section of the seat belt to tighten the belt
across your body.
For more information about releasing the seat
belt with release button ?, see "Releasing
seat belts" (Y page 52).
Seat belt adjustment The seat-belt adjustment function adjusts the
driver's and front-passenger seat belt to the
upper body of the occupants. The belt strap is tightened slightly when:
R
you engage the belt tongue in the belt
buckle and you then turn the key to position
2in the ignition lock.
R the key is in position 2in the ignition lock
and you then engage the belt tongue in the
buckle.
The seat-belt adjustment will apply a certain
tightening force if any slack is detected
between the occupant and the seat belt. Do
not hold on to the seat belt tightly while it is
adjusting. You can switch the seat-belt
adjustment on and off in the on-board com-
puter (Y page 249).
The seat-belt adjustment is an integral part of
the PRE-SAFE ®
convenience function. More
information about PRE-SAFE ®
can be found
in the "PRE-SAFE ®
(preventative occupant
protection)" section (Y page 48).
Belt height adjustment You can adjust the seat belt height on the
driver's seat and the front-passenger seat.
Estate:
you can also adjust the belt height on
the outer rear seats. Adjust the height so that the upper part of the
seat belt is routed across the centre of your
shoulder.
X
To raise: slide the belt sash guide upwards.
The belt sash guide engages in various posi-
tions.
X To lower: press and hold belt sash guide
release :. Occupant safety
51Safety Z
Page 55 of 409
X
Slide the belt sash guide downwards.
X Release belt sash guide release :and
make sure tha tthe belt sash guide has
engaged.
Wearing the rear centre seat belt If the left-hand rear seat backrest is folded
down and back up again, the rear centre seat
belt may lock. The seat belt can then not be
pulled out.
X To release the rear centre seat belt: pull
the seat belt out approximately 20 mm at
the belt outlet on the backrest and then
release it again.
The seat belt is retracted and released.
Releasing seat belts X
Press release button ?(Ypage 51) and
guide belt tongue ;back towards belt
sash guide :.
! Make sure that the seat belt is fully rolled
up. Otherwise, the seat belt or belt tongue
will be trapped in the door or in the seat
mechanism. This could damage the door,
the door trim panel and the seat belt. Dam-
aged seat belts can no longer fulfil their
protective function and must be replaced.
Visit a qualified specialist workshop.
Belt warning for driver and front
passenger The
7 seat belt warning lamp in the instru-
ment cluster is a reminder for all occupants
to fasten their seat belts. It may light up con-
tinuously or flash. In addition, there may be a
warning tone.
The 7 seat belt warning lamp goes out and
the warning tone ceases when the driver and
the front passenger have fastened their seat
belt.
For certain countries only: regardless of
whether the driver and the front passenger
have fastened their seat belts, the 7seat belt warning lamp lights up for six seconds
after the engine is started. It then goes out if
the driver and the front passenger have fas-
tened their seat belts.
i
For more information on the 7seat
belt warning lamp, see "Warning and indi-
cator lamps in the instrumentc luster, seat
belt" (Y page 280).
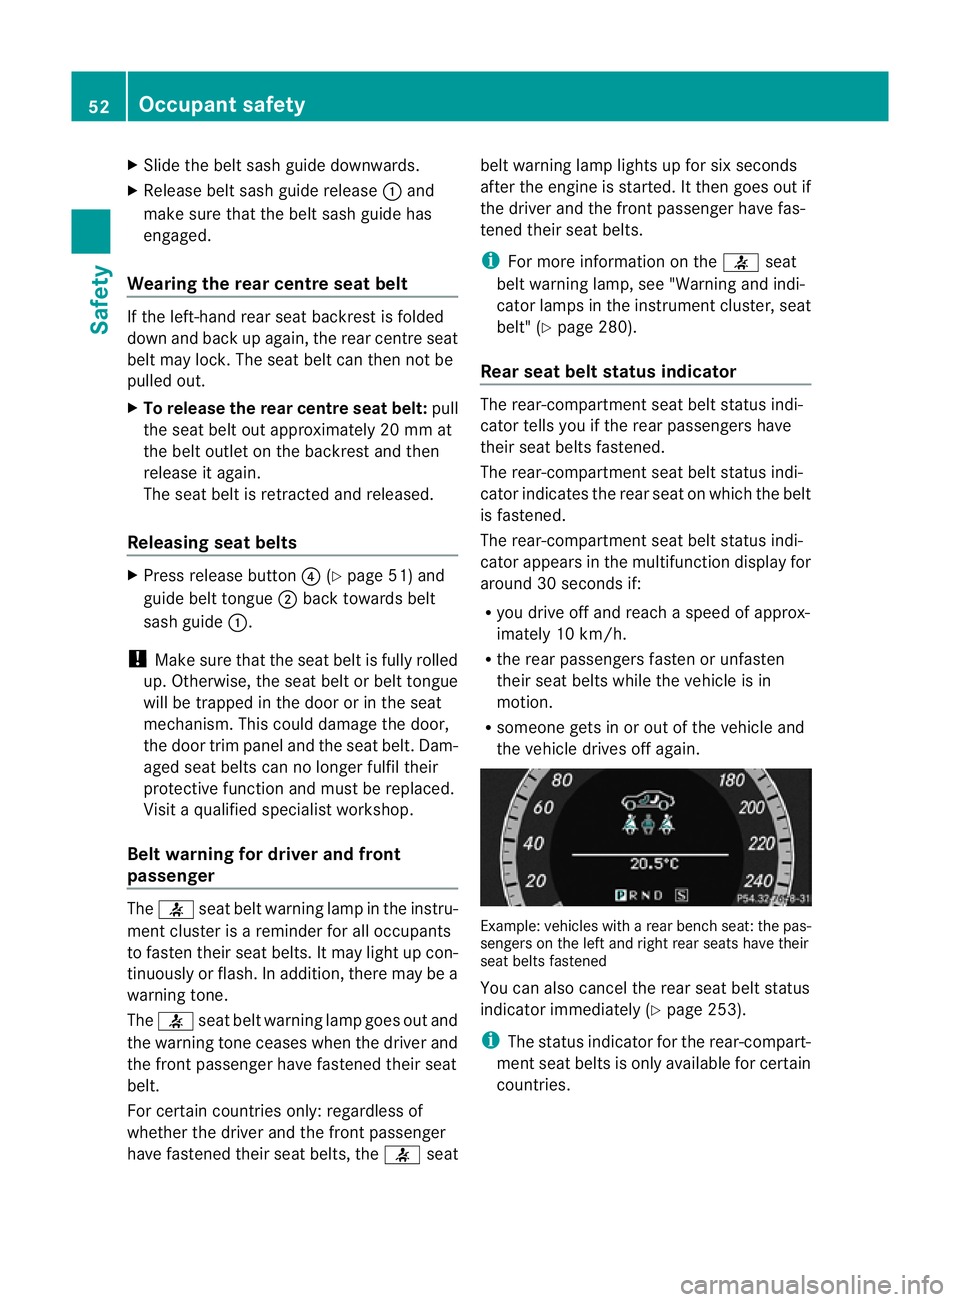
Rear seat belt status indicator The rear-compartmen
tseat belt status indi-
cator tells you if the rear passengers have
their seat belts fastened.
The rear-compartment seat belt status indi-
cator indicates the rear seat on which the belt
is fastened.
The rear-compartment seat belt status indi-
cator appears in the multifunction display for
around 30 seconds if:
R you drive off and reach a speed of approx-
imately 10 km/h.
R the rear passengers fasten or unfasten
their seat belts while the vehicle is in
motion.
R someone gets in or out of the vehicle and
the vehicle drives off again. Example: vehicles with
arear bench seat: the pas-
sengers on the left and right rear seats have their
seat belts fastened
You can also cancel the rear seat belt status
indicato rimmediately (Y page 253).
i The status indicator for the rear-compart-
ment seat belts is only available for certain
countries. 52
Occupant safetySafety
Page 56 of 409
Bel
ttensioners, belt force limiters The fron
tseat belts and the outer seat belts
in the rear are equipped with belt tensioners.
The belt tensioners tighten the seat belts in
an accident, pulling them close against the
body.
Belt tensioners do not correct incorrect seat
positions or incorrectly fastened seat belts.
Belt tensioners do not pull vehicle occupants
back towards the backrest.
If the seat belt is also fitted with a belt force
limiter and this is triggered, the force exerted
by the seat belt on the vehicle occupan tis
reduced.
The belt force limiters on the front seats are
synchronised with the front airbags. They
take on a part of the deceleration force,
resulting in the force exerted on the occupant
being distributed over a greater area.
The beltt ensioners can only be activated
when:
R the ignition is switched on.
R the restraint systems are operational; see
"SRS warning lamp" (Y page 43).
R the belt tongue is engaged in the buckle on
each of the three-poin tseat belts in the
front.
The belt tensioners on the outside seats in the
rear compartment are triggered independ-
ently of the lock status of the seat belts.
The belt tensioners are triggered depending
on the type and severity of an accident:
R if, in the event of a head-on or rear-end col-
lision, the vehicle decelerates or acceler-
ates rapidly in a longitudinal direction dur-
ing the initial stages of the impact
R if, in the event of a side impact, on the side
opposite the impact the vehicle deceler-
ates or accelerates rapidly in a lateral direc-
tion
R if in certain situations where the vehicle
overturns and the system determines that
it can provide additional protection If the airbags are deployed, you will hear a
bang, and a small amount of powder may also
be released. Only in rare cases will the bang
affect your hearing. The powder that is
released generally does not constitute a
health hazard. The
6SRS warning lamp
lights up. G
WARNING
If the seat belt tensioners have been trig-
gered, they provide no additional protection
in the event of another accident. Therefore,
have belt tensioners which have been trig-
gered replaced at a qualified specialist work-
shop.
Comply with safety regulations when dispos-
ing of belt tensioners. Any Mercedes-Benz
Service Centre can provide details of these
regulations.
! If the front-passenger seat is not occu-
pied, do not engage the seat belt tongue in
the buckle on the front-passenger seat.
Otherwise, the belt tensioner could be trig-
gered in the event of an accident. Children in the vehicle
Child restraint systems
Important safety notes G
WARNING
To reduce the risk of serious or even fatal
injury to the child in the event of a sudden
change in direction, braking or an accident:
R children less than 1.50 m tall and under
twelve years of age must always be secured
in special child restraint systems on a suit-
able vehicle seat. This is necessary
because the seat belts are not designed for
children.
R do not secure children less than 1.5 0mtall
and under twelve years of age on the front-
passenge rseat. Exception :ifthe vehicle is
equipped with automatic child seat recog-
nition on the front-passenger seat and the Children in the vehicle
53Safety
Z
Page 57 of 409
child is secured in a chil
drestrain tsystem
with transponders for automati cchild seat
recognition
R if you secure a forward-facing child
restraint system to the front-passenger
seat, you must move the front-passenger
seat as far back as possible.
R children must never travel sitting on the lap
of another occupant. Due to the forces
which occur in the event of a sudden
change of direction, heavy braking or an
accident, it would not be possible to
restrain the child. The child could be thrown
against parts of the vehicle interior and be
seriously or even fatally injured. G
WARNING
The child restraint system cannot perform its
protective function if it is not correctly fitted
to a suitable vehicle seat. The child cannot be
restrained in the event of an accident, heavy
braking or sudden changes of direction. The
child could be seriously or even fatally injured.
For this reason, when fitting a child restraint
system, observe the manufacturer's installa-
tion instructions and the correct use of the
child restraint system.
Child restraint systems should be fitted to the
rear seats. Children are generally better pro-
tected there.
The entire base of the child restraint system
must always rest on the seat cushion. There-
fore, never place objects, e.g. a cushion,
under the child restraint system.
Only use child restraint systems with the orig-
inal cover designed for them. Only replace
damaged covers with genuine Mercedes-Benz
covers.
We recommend the use of child restraint sys-
tems which have been approved for
Mercedes-Ben zvehicles.
If a child is travelling in your vehicle, secure
the child using a child restraint system which
is appropriate to the size, age and weight of
the child and recommended for Mercedes- Benz vehicles. You should preferably fit the
restraint system to a suitable rear seat. You
can also secure the child in the integrated
child seat (Y
page 60). Make sure that the
child is secured in a child restraint system
throughout the trip.
Mercedes-Benz recommends that you only
use the child restraint systems listed at
(Y page 67).
You can obtain further information about the
correct child restraint system from any
Mercedes-Benz Service Centre.
i It is advisable to use Mercedes-Benz care
products to clean child restraint systems.
You can obtain information about this at
any Mercedes-Benz Service Centre. G
WARNING
Do not leave children unsupervised in the
vehicle, even if they are secured in a child
restraint system. They could injure them-
selves on parts of the vehicle. They could also
be seriously or even fatally injured by pro-
longed exposure to extreme heat or cold.
Do not expose the child restraint system to
direct sunlight. Parts of the child restraint sys-
tem could heat up and the child could burn
herself/himself on them.
If a child opens a door, the child or other per-
sons could be injured as a result. They could
get out and injure themselves or be injured by
a passing vehicle.
Also observe the notes on HOLD .Relevant
information can be found in the index. G
WARNING
Unsecured or incorrectly positioned loads
increase the risk of injury for children and all
other occupants in the event of:
R an accident
R a braking manoeuvre
R a sudden change of direction
Do not carry heavy or hard objects in the vehi-
cle interior unless they are secured. You will 54
Children in the vehicleSafety