child seat MERCEDES-BENZ E-CLASS ESTATE 2012 Owner's Manual
[x] Cancel search | Manufacturer: MERCEDES-BENZ, Model Year: 2012, Model line: E-CLASS ESTATE, Model: MERCEDES-BENZ E-CLASS ESTATE 2012Pages: 457, PDF Size: 11.62 MB
Page 70 of 457
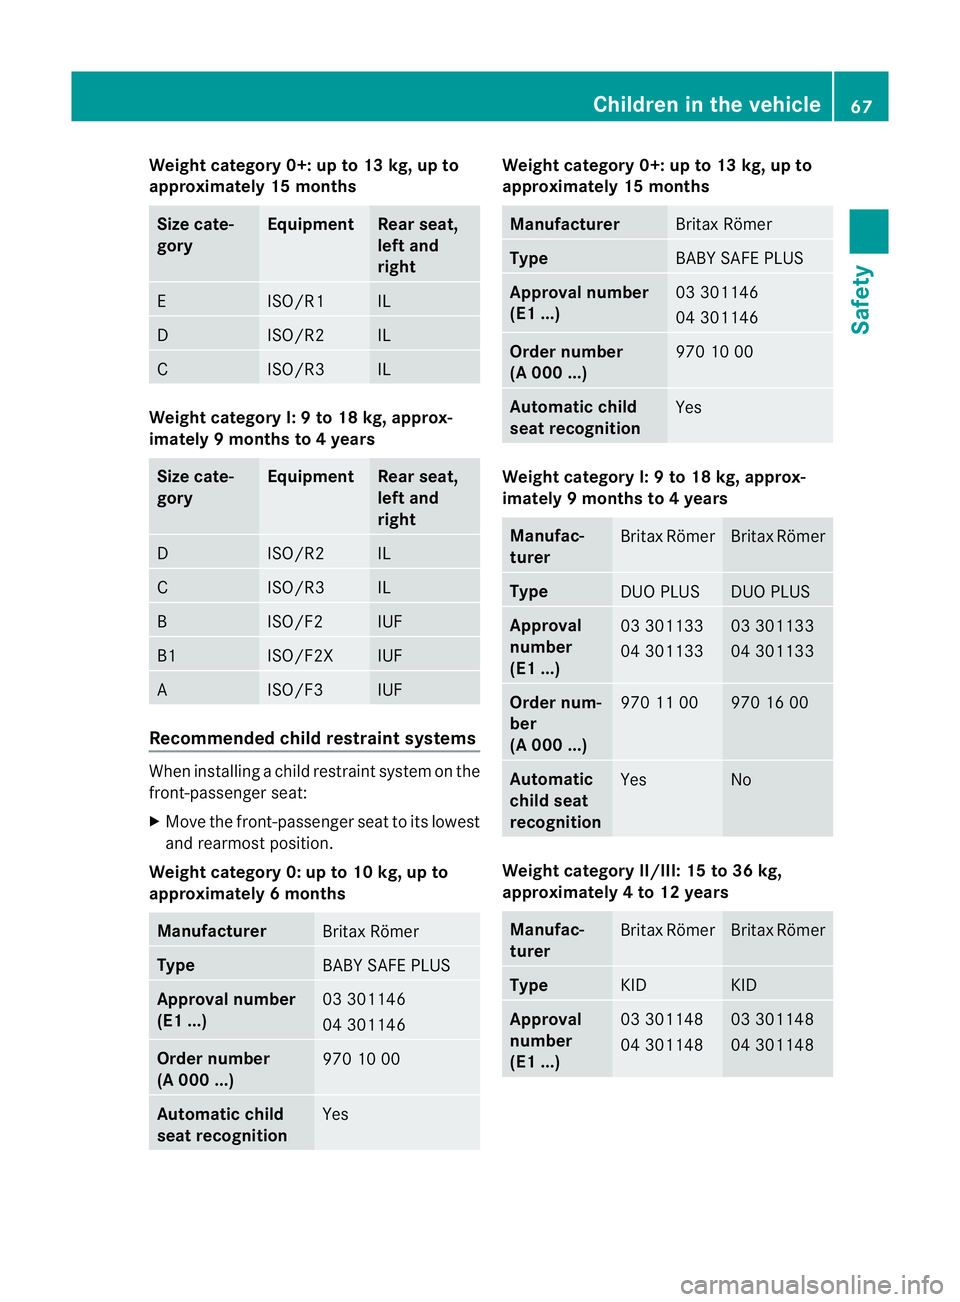
Weight category 0+: up to 13 kg, up to
approximately 15 months Size cate-
gory Equipment Rear seat,
left and
right
E ISO/R1 IL
D ISO/R2 IL
C ISO/R3 IL
Weight category I: 9 to 18 kg, approx-
imately 9 months to 4 years
Size cate-
gory Equipment Rear seat,
left and
right
D ISO/R2 IL
C ISO/R3 IL
B ISO/F2 IUF
B1 ISO/F2X IUF
A ISO/F3 IUF
Recommended child restraint systems
When installing a child restraint system on the
front-passenge
rseat:
X Move the front-passenger seat to its lowest
and rearmost position.
Weight category 0: up to 10 kg, up to
approximately 6 months Manufacturer
Britax Römer
Type
BABY SAFE PLUS
Approval number
(E1 ...)
03 301146
04 301146
Order number
(A 000 ...)
970 10 00
Automatic child
seat recognition
Yes Weight category 0+: up to 13 kg, up to
approximately 15 months
Manufacturer
Britax Römer
Type
BABY SAFE PLUS
Approval number
(E1 ...)
03 301146
04 301146
Order number
(A 000 ...)
970 10 00
Automatic child
seat recognition
Yes
Weight category I: 9 to 18 kg, approx-
imately 9 months to 4 years
Manufac-
turer
Britax Römer Britax Römer
Type
DUO PLUS DUO PLUS
Approval
number
(E1 ...)
03 301133
04 301133 03 301133
04 301133
Order num-
ber
(A 000 ...)
970 11 00 970 16 00
Automatic
child seat
recognition
Yes No
Weight category II/III: 15 to 36 kg,
approximately 4 to 12 years
Manufac-
turer
Britax Römer Britax Römer
Type
KID KID
Approval
number
(E1 ...)
03 301148
04 301148 03 301148
04 301148Children in the vehicle
67Safety Z
Page 71 of 457
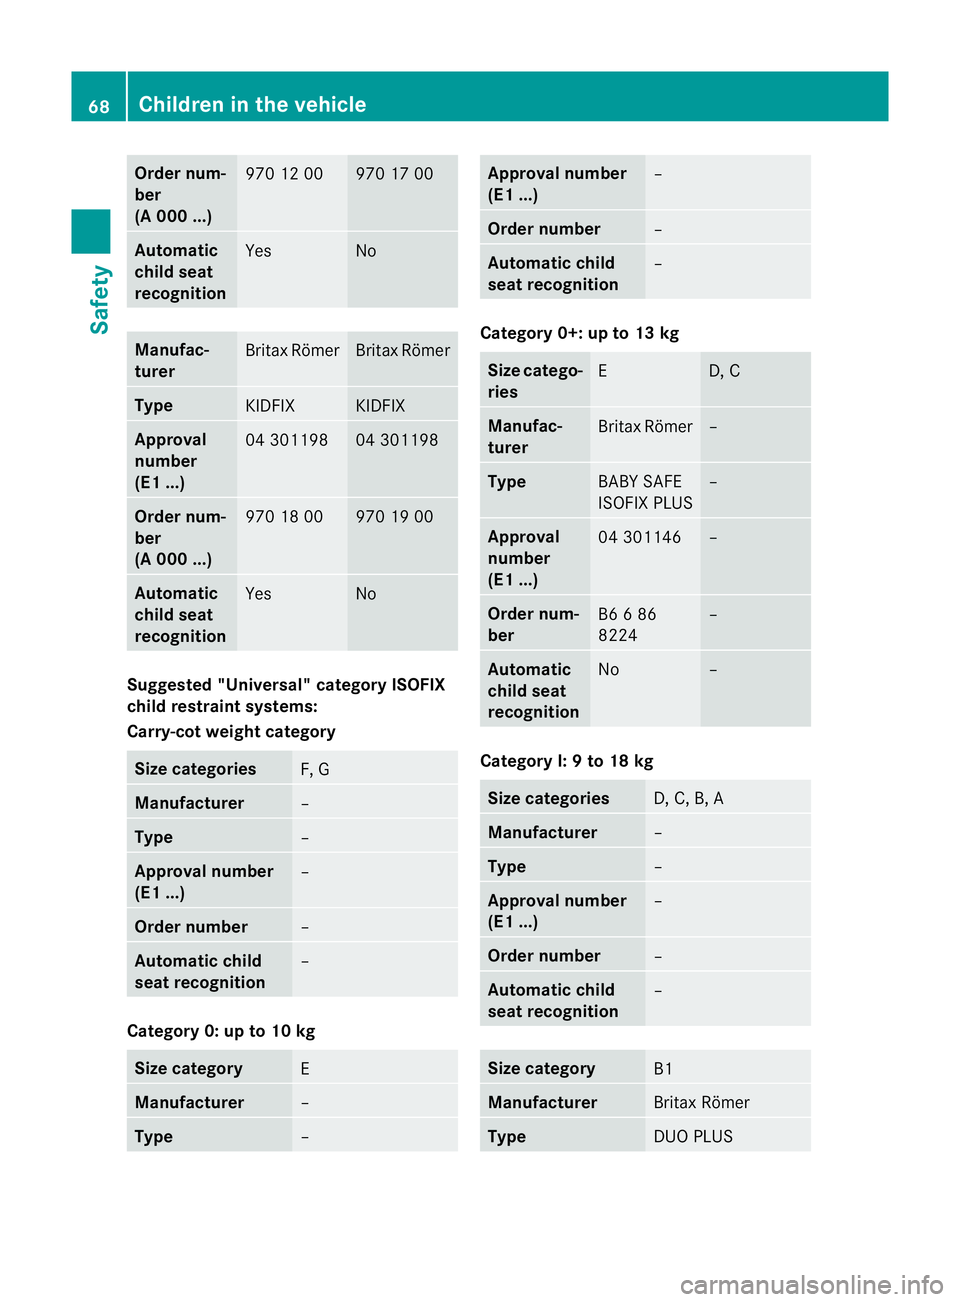
Order num-
ber
(A 000 ...)
970 12 00 970 17 00
Automatic
child seat
recognition
Yes No
Manufac-
turer
Britax Römer Britax Römer
Type
KIDFIX KIDFIX
Approval
number
(E1 ...)
04 301198 04 301198
Order num-
ber
(A 000 ...)
970 18 00 970 19 00
Automatic
child seat
recognition
Yes No
Suggested "Universal" category ISOFIX
child restraint systems:
Carry-cot weight category
Size categories
F, G
Manufacturer
–
Type
–
Approval number
(E1 ...)
–
Order number
–
Automatic child
seat recognition
–
Category 0: up to 10 kg
Size category
E
Manufacturer
–
Type
– Approval number
(E1 ...)
–
Order number
–
Automatic child
seat recognition
–
Category 0+: up to 13 kg
Size catego-
ries
E D, C
Manufac-
turer
Britax Römer –
Type
BABY SAFE
ISOFIX PLUS –
Approval
number
(E1 ...)
04 301146 –
Order num-
ber
B6 6 86
8224 –
Automatic
child seat
recognition
No –
Category I: 9 to 18 kg
Size categories
D, C, B, A
Manufacturer
–
Type
–
Approval number
(E1 ...)
–
Order number
–
Automatic child
seat recognition
–
Size category
B1
Manufacturer
Britax Römer
Type
DUO PLUS68
Children in the vehicleSafety
Page 72 of 457
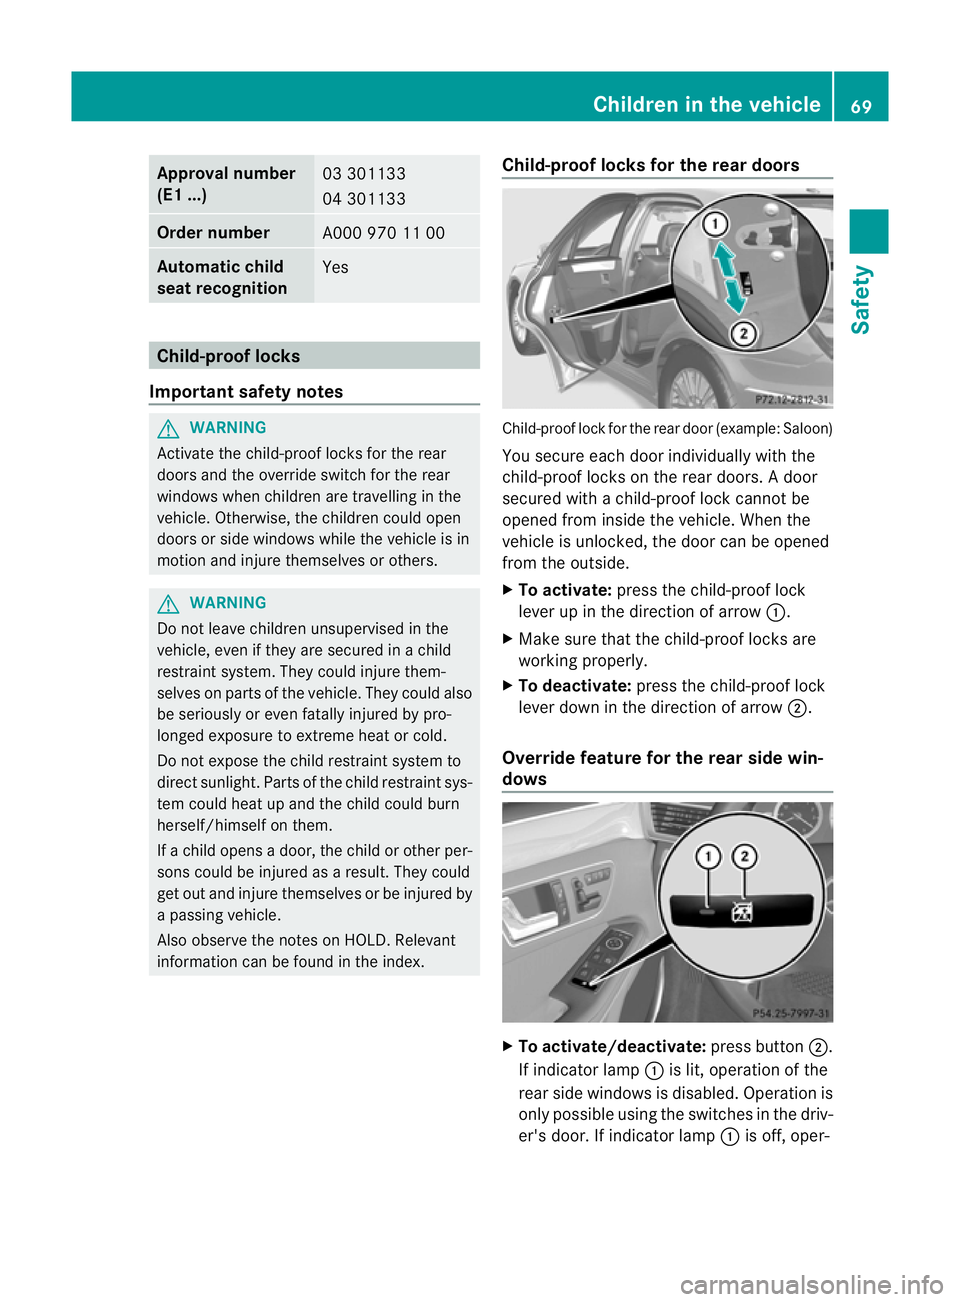
Approval number
(E1 ...)
03 301133
04 301133
Order number
A000 970 11 00
Automatic child
seat recognition
Yes
Child-proo
flocks
Important safety notes G
WARNING
Activate the child-proof locks for the rear
doors and the override switch for the rear
windows when children are travelling in the
vehicle .Otherwise, the children could open
doors or side windows while the vehicle is in
motion and injure themselves or others. G
WARNING
Do not leave children unsupervised in the
vehicle, eve nifthey are secured in a child
restraint system. They could injure them-
selves on parts of the vehicle. They could also
be seriously or even fatally injured by pro-
longed exposure to extreme heat or cold.
Do not expose the child restraint system to
direct sunlight. Parts of the child restraint sys-
tem could heat up and the child could burn
herself/himself on them.
If a child opens a door, the child or other per-
sons could be injured as a result. They could
get out and injure themselves or be injured by
a passing vehicle.
Also observe the notes on HOLD. Relevant
information can be found in the index. Child-proof locks for the rear doors Child-proof lock for the rear door (example: Saloon)
You secure each door individually with the
child-proof locks on the rear doors.
Adoor
secured with a child-proof lock cannot be
opened from inside the vehicle. When the
vehicle is unlocked, the door can be opened
from the outside.
X To activate: press the child-proof lock
lever up in the direction of arrow :.
X Make sure that the child-proof locks are
working properly.
X To deactivate: press the child-proof lock
lever down in the direction of arrow ;.
Override feature for the rear side win-
dows X
To activate/deactivate: press button;.
If indicator lamp :is lit, operation of the
rear side windows is disabled. Operation is
only possible using the switches in the driv-
er's door. If indicator lamp :is off, oper- Children in the vehicle
69Safety Z
Page 91 of 457
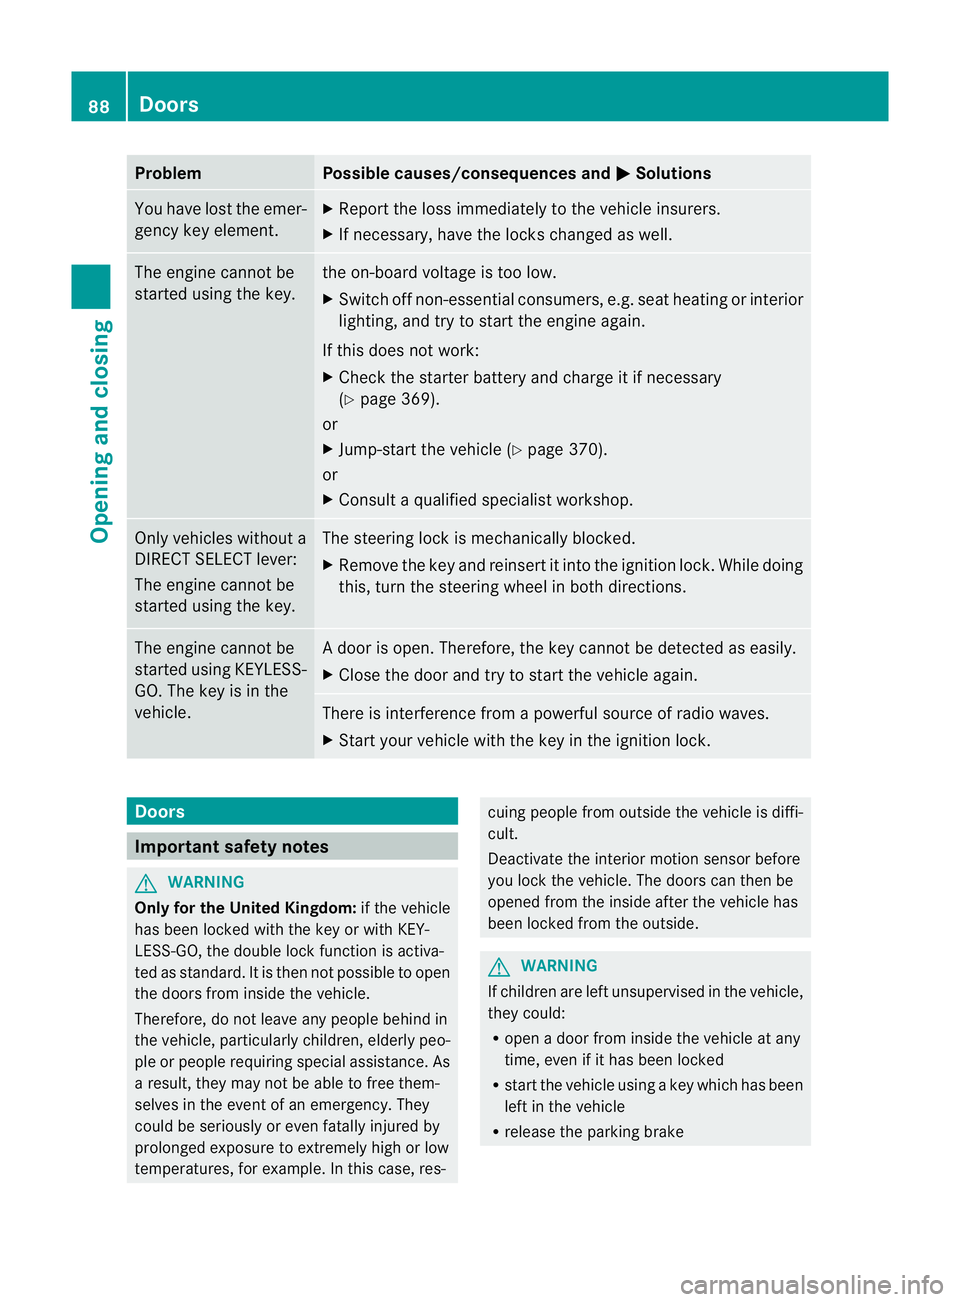
Problem Possible causes/consequences and
M Solutions
You have lost the emer-
gency key element. X
Report the loss immediately to the vehicle insurers.
X If necessary, have the locks changed as well. The engine cannot be
started using the key. the on-board voltage is too low.
X
Switch off non-essential consumers, e.g. seat heating or interior
lighting, and try to start the engine again.
If this does not work:
X Check the starter battery and charge it if necessary
(Y page 369).
or
X Jump-start the vehicle (Y page 370).
or
X Consult a qualified specialist workshop. Only vehicles without a
DIRECT SELECT lever:
The engine cannot be
started using the key. The steering lock is mechanically blocked.
X
Remove the key and reinsert it into the ignition lock. While doing
this, turn the steering wheel in both directions. The engine cannot be
started using KEYLESS-
GO. The key is in the
vehicle. Ad
oor is open. Therefore, the key cannot be detected as easily.
X Close the door and try to start the vehicle again. There is interference from a powerful source of radio waves.
X
Start your vehicle with the key in the ignition lock. Doors
Important safety notes
G
WARNING
Only for the United Kingdom: if the vehicle
has been locked with the key or with KEY-
LESS-GO, the double lock function is activa-
ted as standard. It is then not possible to open
the doors from inside the vehicle.
Therefore, do not leave any people behind in
the vehicle, particularly children, elderly peo-
ple or people requiring special assistance. As
a result, they may not be able to free them-
selves in the event of an emergency. They
could be seriously or even fatally injured by
prolonged exposure to extremely high or low
temperatures, for example. In this case, res- cuing people from outside the vehicle is diffi-
cult.
Deactivate the interior motion sensor before
you lock the vehicle. The doors can then be
opened from the inside after the vehicle has
been locked from the outside.
G
WARNING
If children are left unsupervised in the vehicle,
they could:
R open a door from inside the vehicle at any
time, even if it has been locked
R start the vehicle using akey which has been
left in the vehicle
R release the parking brake 88
DoorsOpening and closing
Page 102 of 457
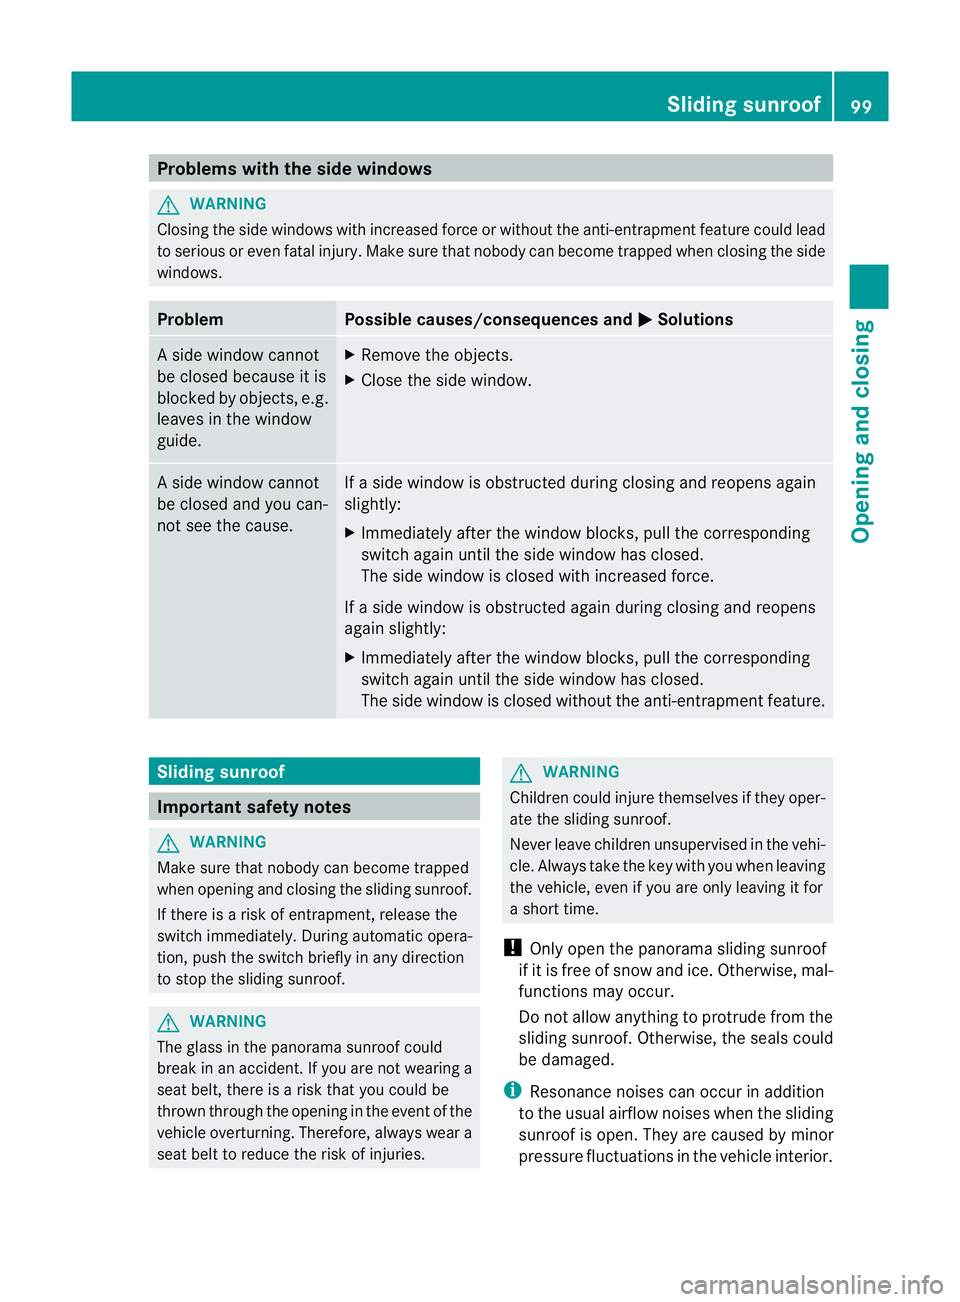
Problems with the side windows
G
WARNING
Closing the side windows with increased force or without the anti-entrapment feature could lead
to serious or even fatal injury. Make sure that nobody can become trapped when closing the side
windows. Problem Possible causes/consequences and
M Solutions
As
ide window cannot
be closed because it is
blocked by objects, e.g.
leaves in the window
guide. X
Remove the objects.
X Close the side window. As
ide window cannot
be closed and you can-
not see the cause. If a side window is obstructed during closing and reopens again
slightly:
X
Immediately after the window blocks, pull the corresponding
switch again until the side window has closed.
The side window is closed with increased force.
If a side window is obstructed again during closing and reopens
again slightly:
X Immediately after the window blocks, pull the corresponding
switch again until the side window has closed.
The side window is closed without the anti-entrapmen tfeature. Sliding sunroof
Important safety notes
G
WARNING
Make sure that nobody can become trapped
when opening and closing the sliding sunroof.
If there is a risk of entrapment, release the
switch immediately. During automatic opera-
tion, push the switch briefly in any direction
to stop the sliding sunroof. G
WARNING
The glass in the panorama sunroof could
break in an accident. If you are not wearing a
seat belt, there is a risk that you could be
thrown through the opening in the event of the
vehicle overturning .Therefore, always wear a
seat belt to reduce the risk of injuries. G
WARNING
Children could injure themselves if they oper-
ate the sliding sunroof.
Never leave children unsupervised in the vehi-
cle. Always take the key with you when leaving
the vehicle, even if you are only leaving it for
a short time.
! Only open the panorama sliding sunroof
if it is free of snow and ice. Otherwise, mal-
functions may occur.
Do not allow anything to protrude from the
sliding sunroof. Otherwise, the seals could
be damaged.
i Resonance noises can occur in addition
to the usual airflow noises when the sliding
sunroof is open. They are caused by minor
pressure fluctuations in the vehicle interior. Sliding sunroof
99Opening and closing Z
Page 110 of 457
settings with the memory function
(Y
page 121). Seats
Important safety notes
G
WARNING
The seats can still be adjusted when there is
no key in the ignition lock. For this reason,
children should never be left unsupervised in
the vehicle. They could adjust the seats and
become trapped. G
WARNING
Only adjust the driver's seat when the vehicle
is stationary. You will otherwise be distracted
from the road and traffic conditions and you
could lose control of the vehicle as a result of
the seat moving. This could cause an acci-
dent. G
WARNING
If you adjust the seat height carelessly, you or
others could be trapped and thereby injured.
Children in particular could unintentionally
press the buttons to electrically adjust the
seats and become trapped.
Take care that:
R while moving the seats, your hands do not
get under the lever assembly of the seat
adjustment system.
R children in the vehicle do not slide their
hands under the levers. G
WARNING
Make sure that nobody can become trapped
when adjusting the seats.
Observe the notes on airbags.
Secure children as recommended; see the
"Children in the vehicle" section. G
WARNING
Make sure that the back of your head is sup-
ported at eye level by the central area of the head restraint. If your head is not supported
correctly by the head restraint, you could suf-
fer a severe neck injury in the event of an
accident. Never drive if the head restraints are
not engaged and set correctly.
G
WARNING
As eat belt can only offer its intended degree
of protection when the backrest is almost ver-
tical and the occupant is sitting upright. Avoid
seat positions that do not allow the seat belt
to be routed correctly. Adjust the backrest so
that it is as upright as possible. Never travel
with the backrest reclined too far backwards.
You could otherwise be seriously or even
fatally injured in the event of an accident or
sudden braking.
! To avoid damage to the seats and the seat
heating, observe the following information:
R do not spill any liquids on the seats. If
liquid is spilled on the seats, dry them as
soon as possible.
R if the seat covers are damp or wet, do not
switch on the seat heating. The seat
heating should also not be used to dry
the seats.
R clean the seat covers as recommended;
see the "Interior care" section.
R do not transport heavy loads on the
seats. Do not place sharp objects on the
seat cushions, e.g. knives, nails or tools.
The seats should only be occupied by
passengers, if possible.
R when the seat heating is in operation, do
not cover the seats with insulating mate-
rials, e.g. blankets, coats, bags, seat cov-
ers, child seats or booster seats.
! To avoid damage to the seats and the seat
heating, observe the following information:
R do not spill any liquids on the seats. If
liquid is spilled on the seats, dry them as
soon as possible.
R if the seat covers are damp or wet, do not
switch on the seat heating. The seat Seats
107Seats, steering wheel and mirrors Z
Page 111 of 457
heating should also not be used to dry
the seats.
R clean the seat covers as recommended;
see "Interior care".
R do not transport heavy loads on the
seats. Do not place sharp objects on the
seat cushions, e.g. knives, nails or tools.
The seats should only be occupied by
passengers, if possible.
R when the seat heating is in operation, do
not cover the seats with insulating mate-
rials, e.g. blankets, coats, bags, seat cov-
ers, child seats or booster seats.
! Make sure that there are no objects in the
footwell or behind the seats when moving
the seat back. There is a risk that the seats
and/or the objects could be damaged.
i The head restraints in the front seats are
fitted with the NECK-PRO system
(Y page 48). For this reason, it is not pos-
sible to remove the head restraints from
the front seats.
Vehicles without the through-loading fea-
ture: the head restraints cannot be
removed from the rear compartments eats.
For more information, contact a qualified
specialist workshop.
i Further related subjects:
R Through-loading feature in the rear
bench seat (Saloon) (Y page 315)
R EASY-PACK through-loading feature in
the rear bench seat (Estate)
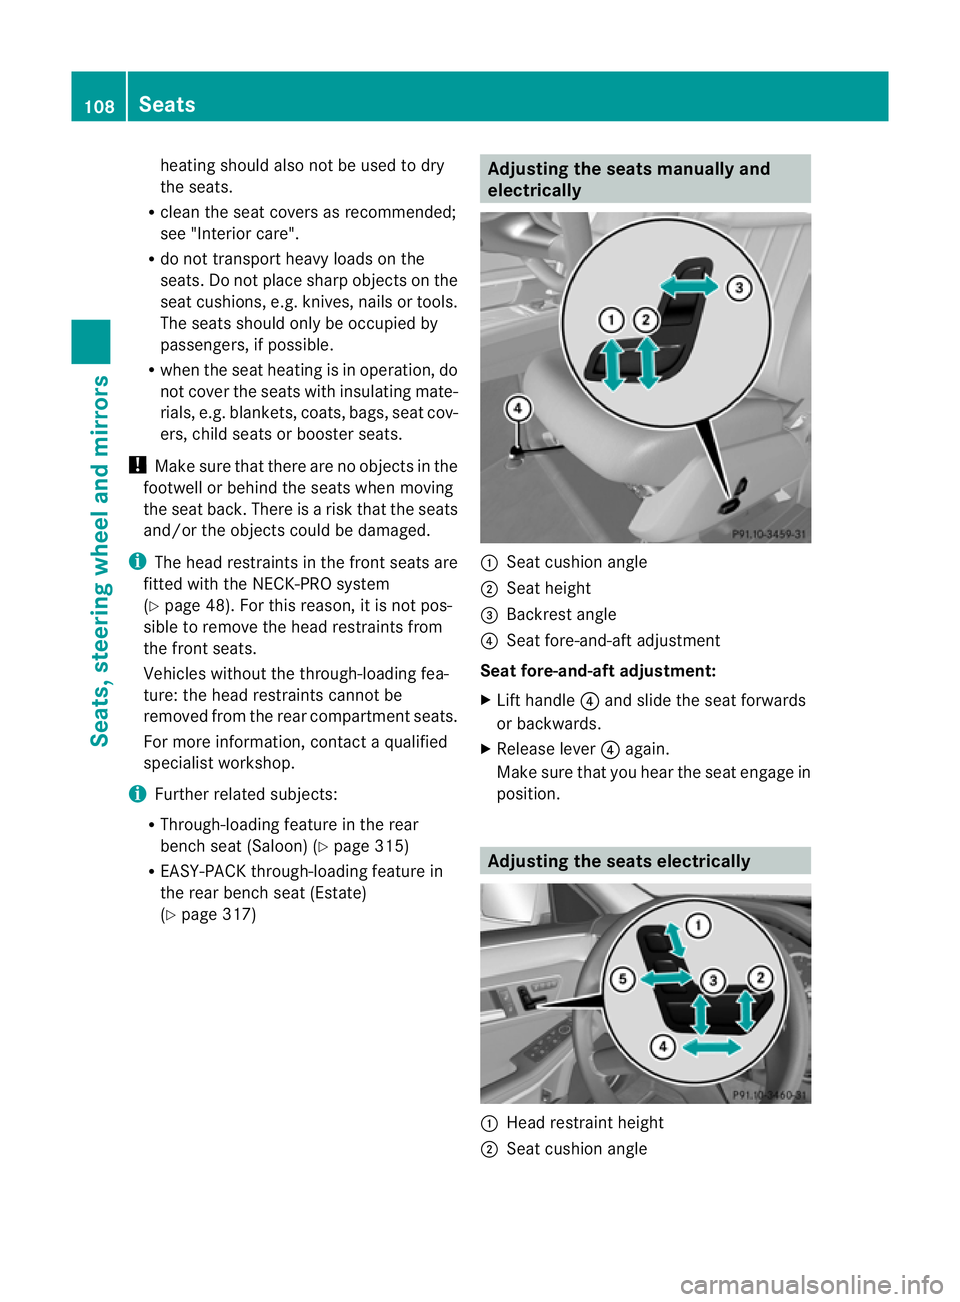
(Y page 317) Adjusting the seats manually and
electrically
:
Seat cushion angle
; Seat height
= Backrest angle
? Seat fore-and-aft adjustment
Seat fore-and-aft adjustment:
X Lift handle ?and slide the seat forwards
or backwards.
X Release lever ?again.
Make sure that you hear the seat engage in
position. Adjusting the seats electrically
:
Head restraint height
; Seat cushion angle 108
SeatsSeats, steering wheel and mirrors
Page 116 of 457
X
To switc hon:press button ?once or
twice until the desired level is set.
One or two indicator lamps in button ?
light up. The air cushions in the lumbar
region vibrate for approximately
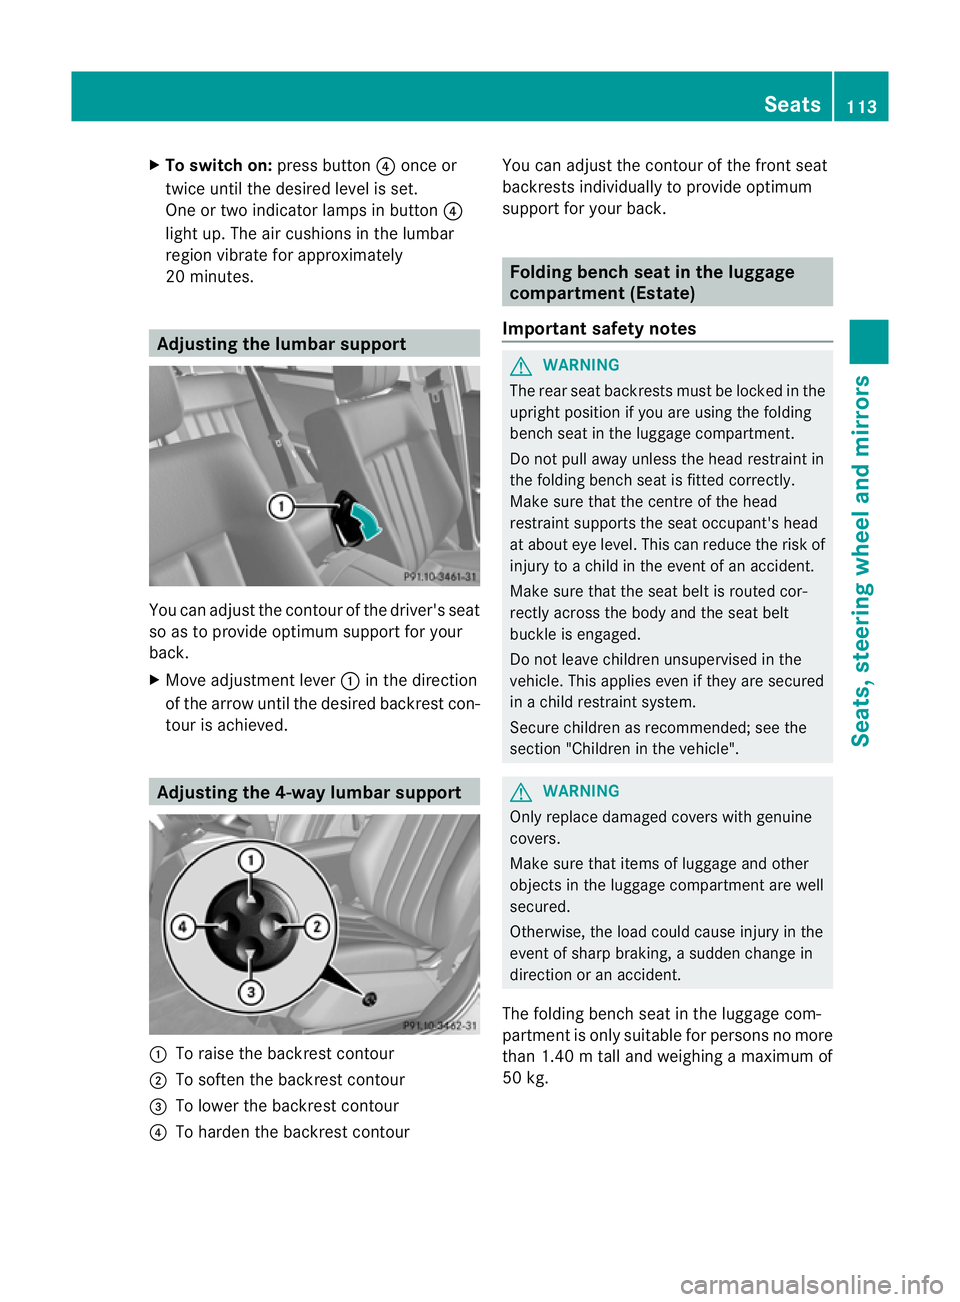
20 minutes. Adjusting the lumbar support
You can adjust the contour of the driver's seat
so as to provide optimum support for your
back.
X Move adjustment lever :in the direction
of the arrow until the desired backrest con-
tour is achieved. Adjusting the 4-way lumbar support
:
To raise the backrest contour
; To soften the backrest contour
= To lower the backrest contour
? To harden the backrest contour You can adjust the contour of the front seat
backrests individually to provide optimum
support for your back. Folding bench seat in the luggage
compartment (Estate)
Important safety notes G
WARNING
The rear seat backrests must be locked in the
upright position if you are using the folding
bench seat in the luggage compartment.
Do not pull away unless the head restraint in
the folding bench seat is fitted correctly.
Make sure that the centre of the head
restraint supports the seat occupant's head
at about eye level. This can reduce the risk of
injury to a child in the event of an accident.
Make sure that the seat belt is routed cor-
rectly across the body and the seat belt
buckle is engaged.
Do not leave children unsupervised in the
vehicle. This applies even if they are secured
in a child restraint system.
Secure children as recommended; see the
section "Children in the vehicle". G
WARNING
Only replace damaged covers with genuine
covers.
Make sure that items of luggage and other
objects in the luggage compartment are well
secured.
Otherwise, the load could cause injury in the
event of sharp braking, a sudden change in
direction or an accident.
The folding bench seat in the luggage com-
partmen tis only suitable for persons no more
than 1.40 m tall and weighing a maximum of
50 kg. Seats
113Seats, steering wheel and mirrors Z
Page 120 of 457
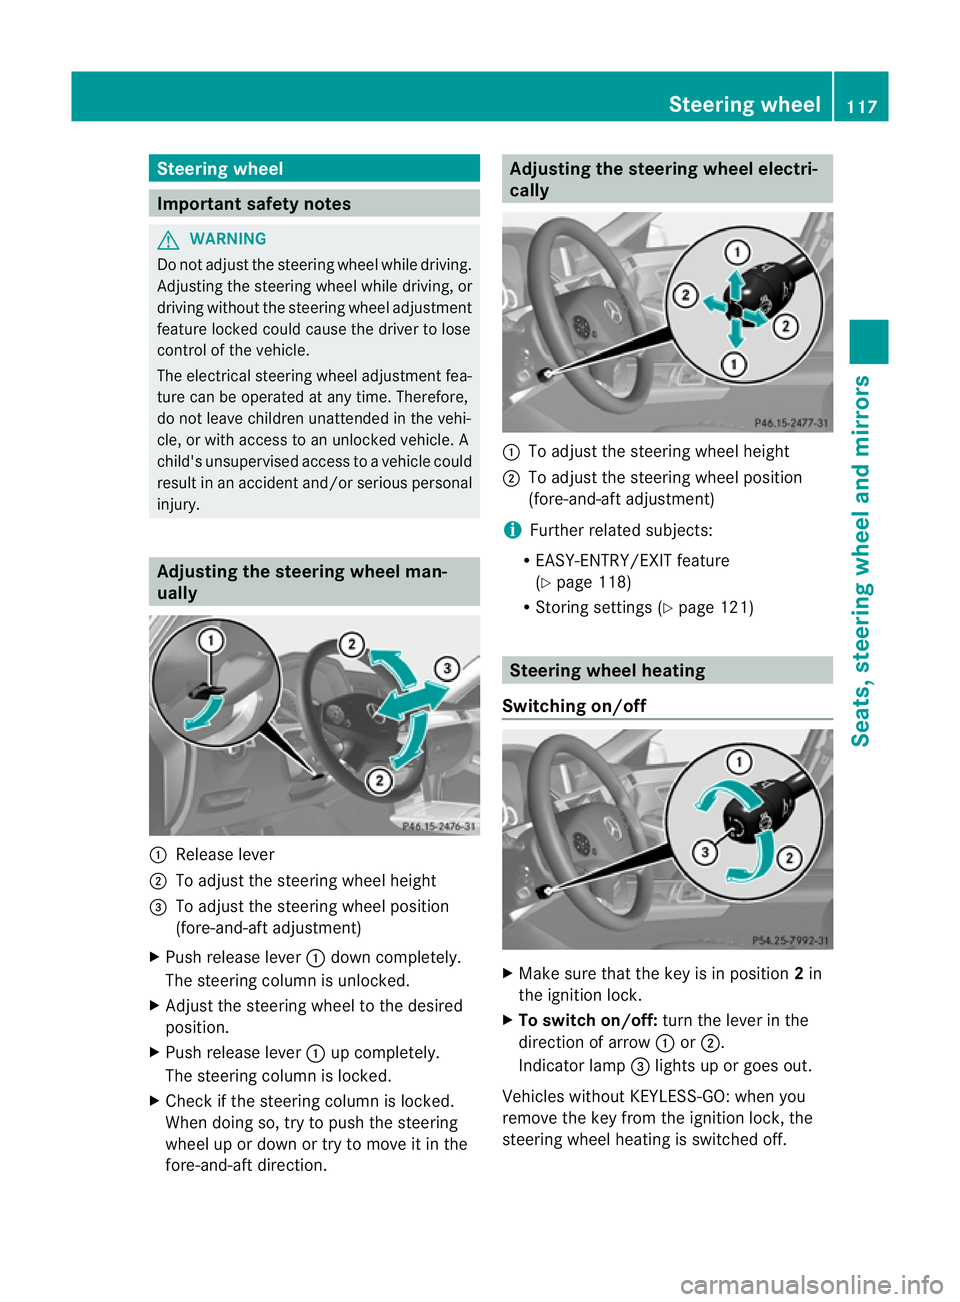
Steering wheel
Important safety notes
G
WARNING
Do not adjust the steering wheel while driving.
Adjusting the steering wheel while driving, or
driving without the steering wheel adjustment
feature locked could cause the driver to lose
control of the vehicle.
The electrical steering wheel adjustment fea-
ture can be operated at any time. Therefore,
do not leave children unattended in the vehi-
cle, or with access to an unlocked vehicle. A
child's unsupervised access to a vehicle could
result in an accident and/or serious personal
injury. Adjusting the steering wheel man-
ually
:
Release lever
; To adjust the steering wheel height
= To adjust the steering wheel position
(fore-and-aft adjustment)
X Push release lever :down completely.
The steering column is unlocked.
X Adjust the steering wheel to the desired
position.
X Push release lever :up completely.
The steering column is locked.
X Check if the steering column is locked.
When doing so, try to push the steering
wheel up or down or try to move it in the
fore-and-aft direction. Adjusting the steering wheel electri-
cally
:
To adjust the steering wheel height
; To adjust the steering wheel position
(fore-and-aft adjustment)
i Further related subjects:
R EASY-ENTRY/EXIT feature
(Y page 118)
R Storing settings (Y page 121) Steering wheel heating
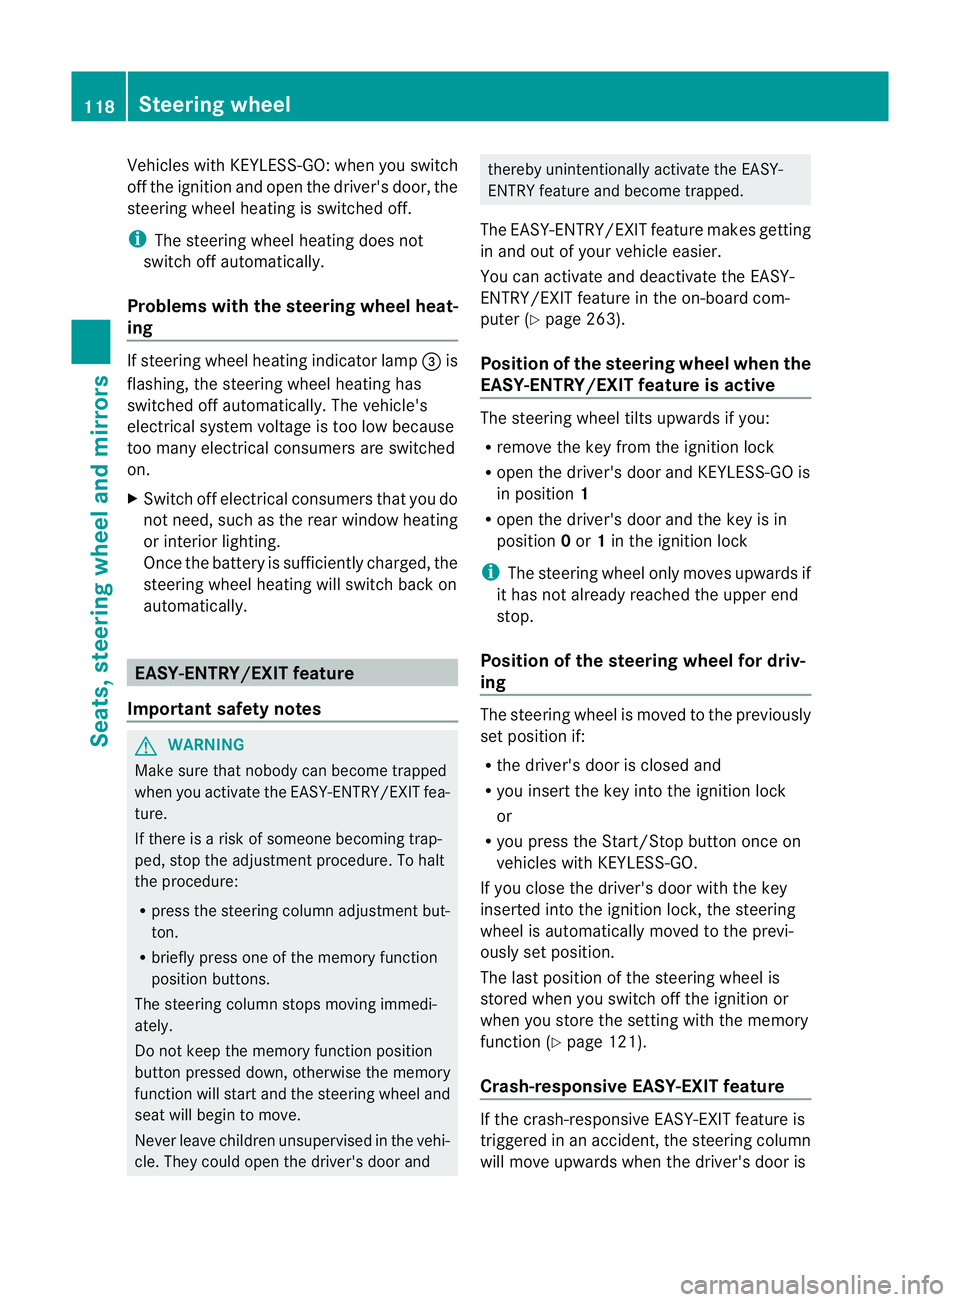
Switching on/off X
Make sure that the key is in position 2in
the ignition lock.
X To switch on/off: turn the lever in the
direction of arrow :or;.
Indicator lamp =lights up or goes out.
Vehicles without KEYLESS-GO: when you
remove the key from the ignition lock, the
steering wheel heating is switched off. Steering wheel
117Seats, steering wheel and mirrors Z
Page 121 of 457
Vehicles with KEYLESS-GO: when you switch
off the ignition and open the driver's door, the
steering wheel heating is switched off.
i
The steering wheel heating does not
switch off automatically.
Problems with the steering wheel heat-
ing If steering wheel heating indicator lamp
=is
flashing, the steering wheel heating has
switched off automatically. The vehicle's
electrical system voltage is too low because
too many electrical consumers are switched
on.
X Switch off electrical consumers that you do
not need, such as the rear window heating
or interior lighting.
Once the battery is sufficiently charged, the
steering wheel heating will switch back on
automatically. EASY-ENTRY/EXIT feature
Important safety notes G
WARNING
Make sure that nobody can become trapped
when you activate the EASY-ENTRY/EXIT fea-
ture.
If there is a risk of someone becoming trap-
ped, stop the adjustment procedure. To halt
the procedure:
R press the steering column adjustment but-
ton.
R briefly press one of the memory function
position buttons.
The steering column stops moving immedi-
ately.
Do not keep the memory function position
button pressed down, otherwise the memory
function will start and the steering wheel and
seat will begin to move.
Never leave children unsupervised in the vehi-
cle. They could open the driver's door and thereby unintentionally activate the EASY-
ENTRY feature and become trapped.
The EASY-ENTRY/EXIT feature makes getting
in and out of yourv ehicle easier.
You can activate and deactivate the EASY-
ENTRY/EXIT feature in the on-board com-
puter (Y page 263).
Position of the steering wheel when the
EASY-ENTRY/EXIT feature is active The steering wheel tilts upwards if you:
R
remove the key from the ignition lock
R open the driver's door and KEYLESS-GO is
in position 1
R open the driver's door and the key is in
position 0or 1in the ignition lock
i The steering wheel only moves upwards if
it has not already reached the upper end
stop.
Position of the steering wheel for driv-
ing The steering wheel is moved to the previously
set position if:
R the driver's door is closed and
R you insert the key intot he ignition lock
or
R you press the Start/Stop button once on
vehicles with KEYLESS-GO.
If you close the driver's door with the key
inserted into the ignition lock, the steering
wheel is automatically moved to the previ-
ously set position.
The last position of the steering wheel is
stored when you switch off the ignition or
when you store the settingw ith the memory
function (Y page 121).
Crash-responsive EASY-EXIT feature If the crash-responsive EASY-EXIT feature is
triggered in an accident, the steering column
will move upwards when the driver's door is 118
Steering wheelSeats, steering wheel and mirrors