oil MERCEDES-BENZ E-CLASS ESTATE 2012 Owner's Manual
[x] Cancel search | Manufacturer: MERCEDES-BENZ, Model Year: 2012, Model line: E-CLASS ESTATE, Model: MERCEDES-BENZ E-CLASS ESTATE 2012Pages: 457, PDF Size: 11.62 MB
Page 355 of 457
You can wash the vehicle in an automatic car
wash from the very start.
Wash off excess dirt before cleaning the vehi-
cle in an automatic car wash.
After using an automatic car wash, wipe off
wax fro
mthe windscreen and the wiper
blades. This will prevent smears and reduce
wiping noises caused by residue on the wind-
screen.
Washing by hand In some countries, washing by hand is only
allowed at specially equipped washing bays.
Observe the legal requirements for each indi-
vidual country.
X Do not use hot water and do not wash the
vehicle in direct sunlight.
X Use a soft sponge to clean.
X Use a mild cleaning agent, such as a car
shampoo approved by Mercedes-Benz.
X Thoroughly hose down the vehicle with a
gentle jet of water.
X Do not point the water jet directly towards
the air inlet.
X Use plenty of water and rinse out the
sponge frequently.
X Rinse the vehicle with clean water and dry
thoroughly with a chamois.
X Do not let the cleaning agent dry on the
paintwork.
When using the vehicle in winter, remove all
traces of road salt deposits carefully and as
soon as possible.
High-pressure cleaning equipment G
WARNING
Do not use high-pressure cleaners with circu-
lar-jet nozzles (dirt grinders) to clean your
vehicle, in particular the tyres. You could oth-
erwise damage the tyres and cause an acci-
dent.
! Always maintain a distance of at least
30 cm between the vehicle and the high- pressure cleaner nozzle. Information about
the correct distance is available from the
equipment manufacturer.
Move the high-pressure cleaner nozzle
around when cleaning your vehicle.
Do not aim directly at any of the following:
R tyres
R door gaps, roof gaps, joints etc.
R electrical components
R battery
R connectors
R lights
R seals
R trim elements
R ventilation slots
Damaged seals or electrical components
can lead to leaks or failures.
Cleaning the paintwork !
Do not affix:
R stickers
R films
R magnetic plates or similar items
to painted surfaces. You could otherwise
damage the paintwork.
Scratches, corrosive deposits, areas affected
by corrosion and damage caused by inade-
quate care cannot always be completely
repaired. In such cases, visit a qualified spe-
cialist workshop.
X Remove impurities immediately, where
possible, whilst avoiding rubbing too hard.
X Soak insect remains with insect remover
and rinse off the treated areas afterwards.
X Soak bird droppings with water and rinse
off the treated areas afterwards.
X Remove coolant, brake fluid, tree resin,
oils, fuels and greases by rubbing gently
with a cloth soaked in petroleum ether or
lighter fluid.
X Use tar remover to remove tar stains.
X Use silicone remover to remove wax. 352
CareMaintenance and care
Page 358 of 457
X
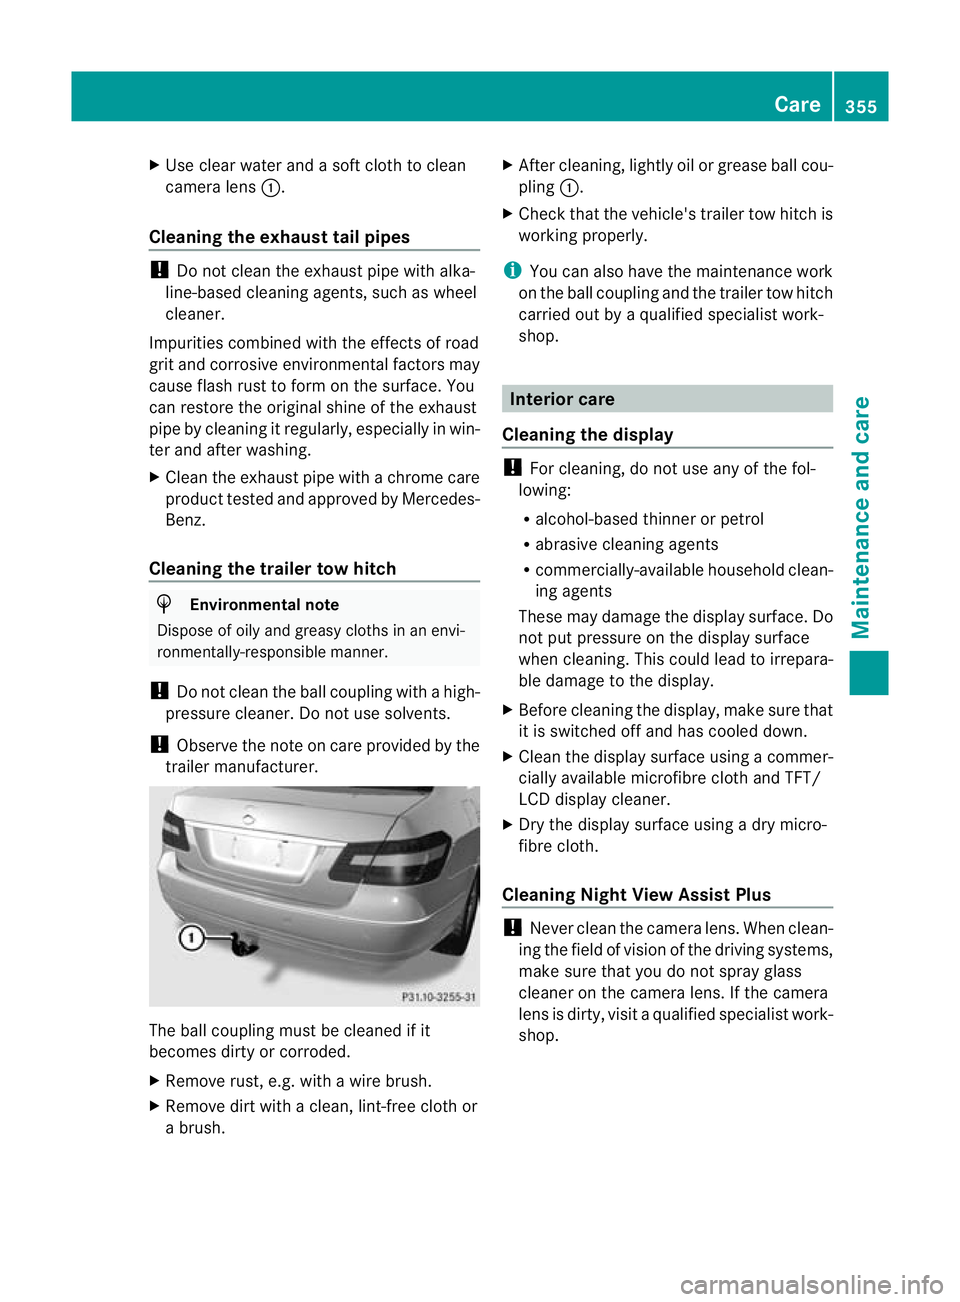
Use clear water and a soft cloth to clean
camera lens :.
Cleaning the exhaust tail pipes !
Do not clean the exhaust pipe with alka-
line-based cleaning agents, such as wheel
cleaner.
Impurities combined with the effects of road
grit and corrosive environmental factors may
cause flash rust to form on the surface. You
can restore the original shine of the exhaust
pipe by cleaning it regularly, especially in win-
ter and after washing.
X Cleant he exhaust pipe with a chrome care
product tested and approved by Mercedes-
Benz.
Cleaning the trailer tow hitch H
Environmental note
Dispose of oily and greasy cloths in an envi-
ronmentally-responsible manner.
! Do not clean the ball coupling with a high-
pressure cleaner. Do not use solvents.
! Observe the note on care provided by the
trailer manufacturer. The ball coupling must be cleaned if it
becomes dirty or corroded.
X Remove rust, e.g. with a wire brush.
X Remove dirt with a clean, lint-free cloth or
a brush. X
After cleaning, lightly oil or grease ball cou-
pling :.
X Check that the vehicle's trailer tow hitch is
working properly.
i You can also have the maintenance work
on the ball coupling and the trailer tow hitch
carried out by a qualified specialist work-
shop. Interior care
Cleaning the display !
For cleaning, do not use any of the fol-
lowing:
R alcohol-based thinner or petrol
R abrasive cleaning agents
R commercially-available household clean-
ing agents
These may damage the display surface. Do
not put pressure on the display surface
when cleaning. This could lead to irrepara-
ble damage to the display.
X Before cleaning the display, make sure that
it is switched off and has cooled down.
X Cleant he display surface using a commer-
cially available microfibre cloth and TFT/
LCD display cleaner.
X Dry the display surface using a dry micro-
fibre cloth.
Cleaning Night View Assist Plus !
Never clean the camera lens. When clean-
ing the field of vision of the driving systems,
make sure that you do not spray glass
cleaner on the camera lens. If the camera
lens is dirty, visit a qualified specialist work-
shop. Care
355Maintenance and care Z
Page 359 of 457
X
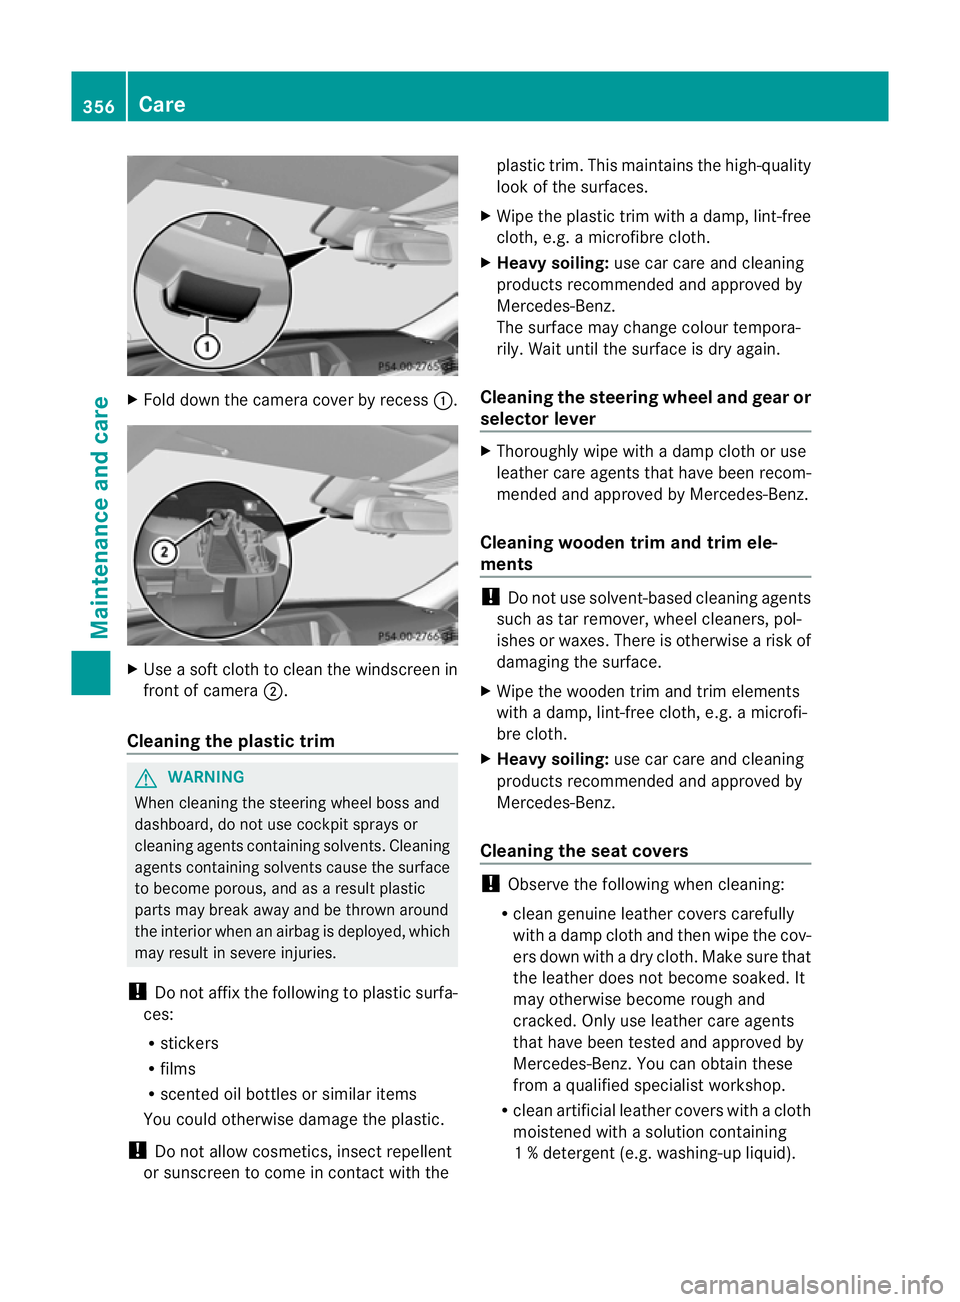
Fold dow nthe camera cover by recess :.X
Use a soft cloth to clean the windscreen in
front of camera ;.
Cleaning the plastic trim G
WARNING
When cleaning the steering wheel boss and
dashboard, do not use cockpit sprays or
cleaning agents containing solvents. Cleaning
agents containing solvents cause the surface
to become porous, and as aresult plastic
parts may break away and be thrown around
the interior when an airbag is deployed, which
may result in severe injuries.
! Do not affix the following to plastic surfa-
ces:
R stickers
R films
R scented oil bottles or similar items
You could otherwise damage the plastic.
! Do not allow cosmetics, insect repellent
or sunscreen to come in contact with the plastic trim
.This maintains the high-quality
look of the surfaces.
X Wipe the plastic trim with a damp, lint-free
cloth, e.g. a microfibre cloth.
X Heavy soiling: use car care and cleaning
products recommended and approved by
Mercedes-Benz.
The surface may change colour tempora-
rily. Wait until the surface is dry again.
Cleaning the steering wheel and gear or
selector lever X
Thoroughly wipe with a damp cloth or use
leather care agents that have been recom-
mended and approved by Mercedes-Benz.
Cleaning wooden trim and trim ele-
ments !
Do not use solvent-based cleaning agents
such as tar remover, wheel cleaners, pol-
ishes or waxes. There is otherwise a risk of
damaging the surface.
X Wipe the wooden trim and trim elements
with a damp, lint-free cloth, e.g. a microfi-
bre cloth.
X Heavy soiling: use car care and cleaning
products recommended and approved by
Mercedes-Benz.
Cleaning the seat covers !
Observe the following when cleaning:
R clean genuine leather covers carefully
with a damp cloth and then wipe the cov-
ers down with a dry cloth. Make sure that
the leather does not become soaked. It
may otherwise become rough and
cracked. Only use leather care agents
that have been tested and approved by
Mercedes-Benz. You can obtain these
from a qualified specialist workshop.
R clean artificial leather covers with a cloth
moistened with a solution containing
1%detergen t(e.g. washing-up liquid). 356
CareMaintenance and care
Page 392 of 457
Clean the contact surface
softhe wheel and
the brake disc thoroughly every time a wheel
is interchanged. Check the tyre pressure and,
if necessary, restart the tyre pressure loss
warning system or the tyre pressure monitor. Direction of rotation
Tyres with a specified direction of rotation
have additional benefits, e.g. if there is a risk
of aquaplaning. You will only gain these ben-
efits if the correct direction of rotation is
observed.
An arrow on the sidewall of the tyre indicates
its correct direction of rotation. Storing wheels
Store wheels that are not being used in a cool,
dry and preferably dark place. Protect the
tyres against oil, grease, petrol and diesel. Cleaning the wheels
G
WARNING
The water jet of circular-jet nozzles (dirt grind-
ers) can cause damage not visible from the
outside to tyres or chassis components. Com-
ponents damaged in this way can unexpect-
edly fail. There is a risk of an accident.
Do not use high-pressure cleaners with circu-
lar-jet nozzles to clean the vehicle. Have dam-
aged tyres or chassis components replaced
immediately. Fitting
awheel
Preparing the vehicle X
Stop the vehicle on solid, non-slippery and
level ground.
X Apply the parking brake.
X Bring the front wheels into the straight-
ahead position.
X Shift the transmission to position P.X
Vehicles with AIRMATIC :make sure that
"normal" level is selected (Y page 208).
X Switch off the engine.
X Vehicles without KEYLESS-GO: remove
the key from the ignition lock.
X Vehicles with KEYLESS-GO: open the
driver's door.
The on-board electronics have status 0,
which is the same as the key having been
removed.
X Vehicles with KEYLESS-GO: remove the
Start/Stop button from the ignition lock
(Y page 161).
X If included in the vehicle equipment,
remove the tyre-change tool kit from the
vehicle.
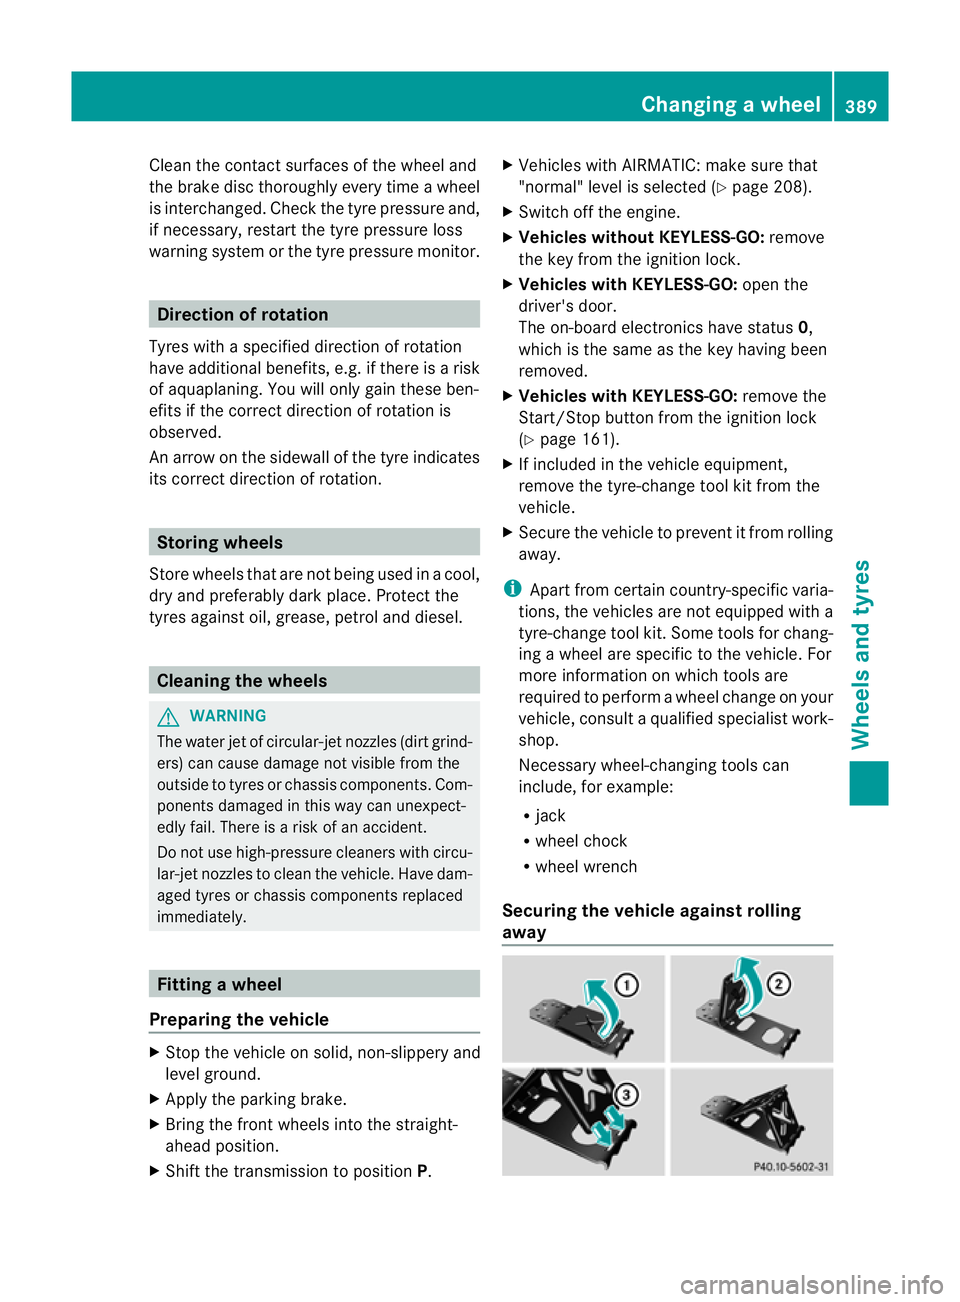
X Secure the vehicle to preven titfrom rolling
away.
i Apart from certain country-specific varia-
tions, the vehicles are not equipped with a
tyre-change tool kit. Some tools for chang-
ing a wheel are specific to the vehicle. For
more information on which tools are
required to perform a wheel change on your
vehicle, consult a qualified specialist work-
shop.
Necessary wheel-changing tools can
include, for example:
R jack
R wheel chock
R wheel wrench
Securing the vehicle agains trolling
away Changing
awheel
389Wheels and tyres Z
Page 395 of 457
X
Turn crank Aclockwise until jack ?sits
completely on jacking point =and the
base of the jack lies evenly on the ground.
X Turn crank Auntil the tyre is raised a max-
imum of 3 cm off the ground.
Removing awheel !
AMG vehicles: during removal and repo-
sitioning of the wheel, the wheel rim can
strike the ceramic-brake dis cand damage
it. Therefore, take precautions and ge ta
second person to assist you. Alternatively,
you can use a second centring pin.
! Do not place wheel bolts in sand or dirt.
The threads of the wheel bolts and wheel
hubs could otherwise be damaged when
the bolts are tightened. X
Unscrew the uppermost wheel bolt com-
pletely.
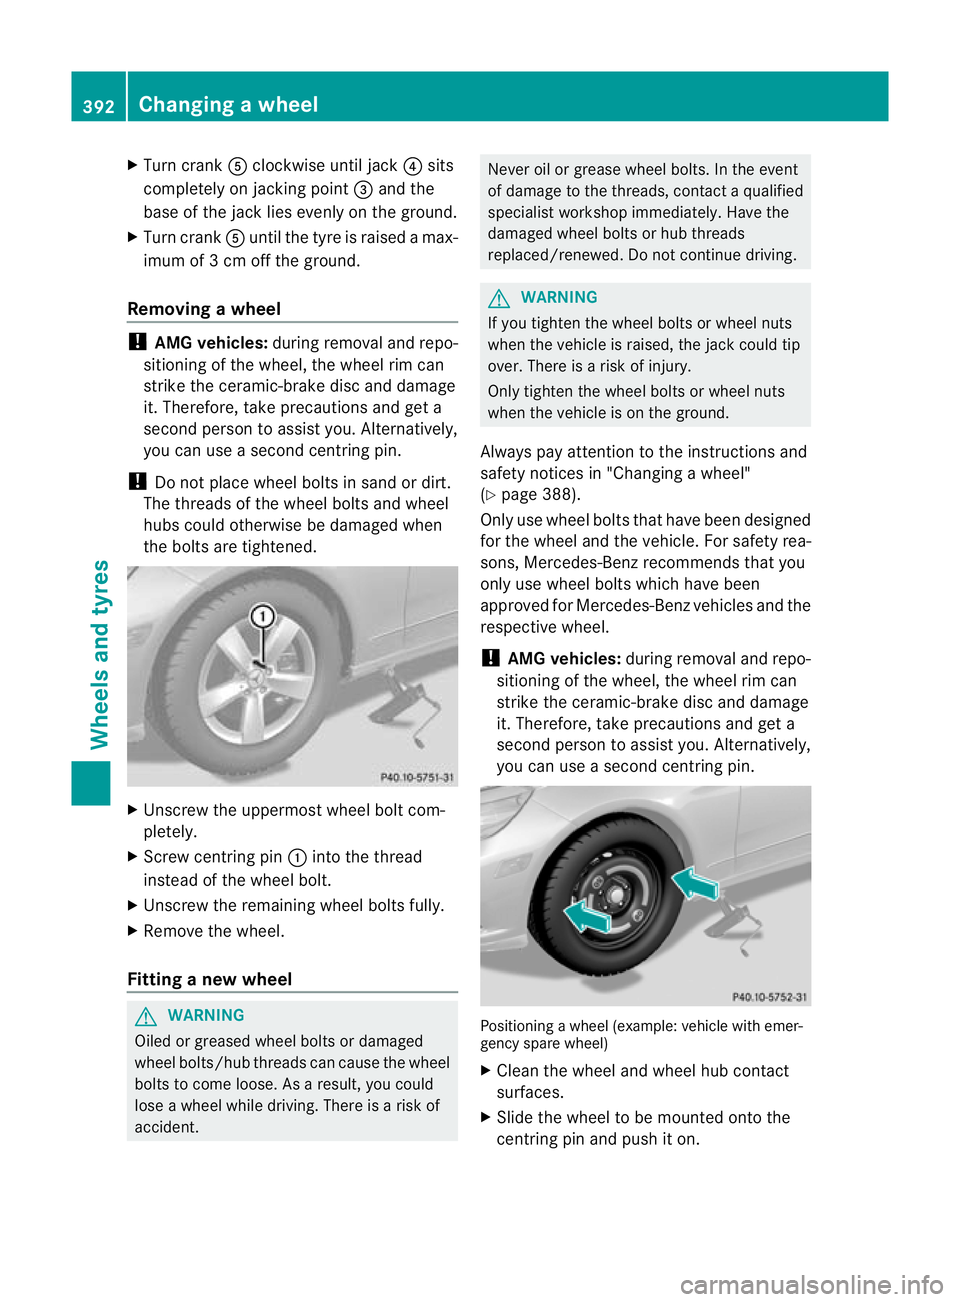
X Screw centring pin :into the thread
instead of the wheel bolt.
X Unscrew the remaining wheel bolts fully.
X Remove the wheel.
Fitting anew wheel G
WARNING
Oiled or greased wheel bolts or damaged
wheel bolts/hub threads can cause the wheel
bolts to come loose .As a result, you could
lose a wheel while driving. There is a risk of
accident. Never oil or grease wheel bolts. In the event
of damage to the threads, contact a qualified
specialist workshop immediately.H ave the
damaged wheel bolts or hub threads
replaced/renewed. Do no tcontinue driving. G
WARNING
If you tighten the wheel bolts or wheel nuts
when the vehicle is raised, the jack could tip
over. There is a risk of injury.
Only tighten the wheel bolts or wheel nuts
when the vehicle is on the ground.
Always pay attention to the instructions and
safety notices in "Changing a wheel"
(Y page 388).
Only use wheel bolts that have been designed
for the wheel and the vehicle. For safety rea-
sons, Mercedes-Benz recommends that you
only use wheel bolts which have been
approved for Mercedes-Benz vehicles and the
respective wheel.
! AMG vehicles: during removal and repo-
sitioning of the wheel, the wheel rim can
strike the ceramic-brake disc and damage
it. Therefore, take precautions and get a
second person to assist you. Alternatively,
you can use a second centring pin. Positioning a wheel (example: vehicle with emer-
gency spare wheel)
X
Clean the wheel and wheel hub contact
surfaces.
X Slide the wheel to be mounted onto the
centring pin and push it on. 392
Changing
awheelWheels and tyres
Page 439 of 457
H
Environmental note
Dispose of service products in an environ-
mentally-responsible manner.
Service products include the following:
R fuels (e.g .petrol, diesel)
R exhaust gas aftertreatmen tadditives, e.g.
AdBlue ®
R lubricants (e.g. engine oil, transmission oil)
R coolant
R brake fluid
R windscreen washer fluid
R climate control system refrigerant
Components and service products must be
matched. Mercedes-Benz recommends that
you use products tested and approved by
Mercedes-Benz .They are listed in this
Mercedes-Ben zOwner's Manual in the appro-
priate section.
You can identify service products approved
by Mercedes-Ben zby the following inscrip-
tions on the container:
R MB-Freigabe (e.g. MB-Freigabe 229.51)
R MB Approval (e.g. MB Approval 229.51)
Other designations or recommendations indi-
cate a level of quality or a specification in
accordance with an MB Sheet Number (e.g.
MB 229.5). The yhave no tnecessarily been
approved by Mercedes-Benz.
Further information can be obtained from any
Mercedes-Benz Service Centre or on the
Internet at http://bevo.mercedes-benz.com. Fuel
Important safety notes G
WARNING
Fuel is highly flammable. Fire, naked flames
and smoking are therefore prohibited when
handling fuels.
Switch off the engine and the auxiliary heating
before refuelling. G
WARNING
Avoid contact with fuels.
It is hazardous to your health if your skin
comes into direct contact with fuels or you
breathe in fuel vapours.
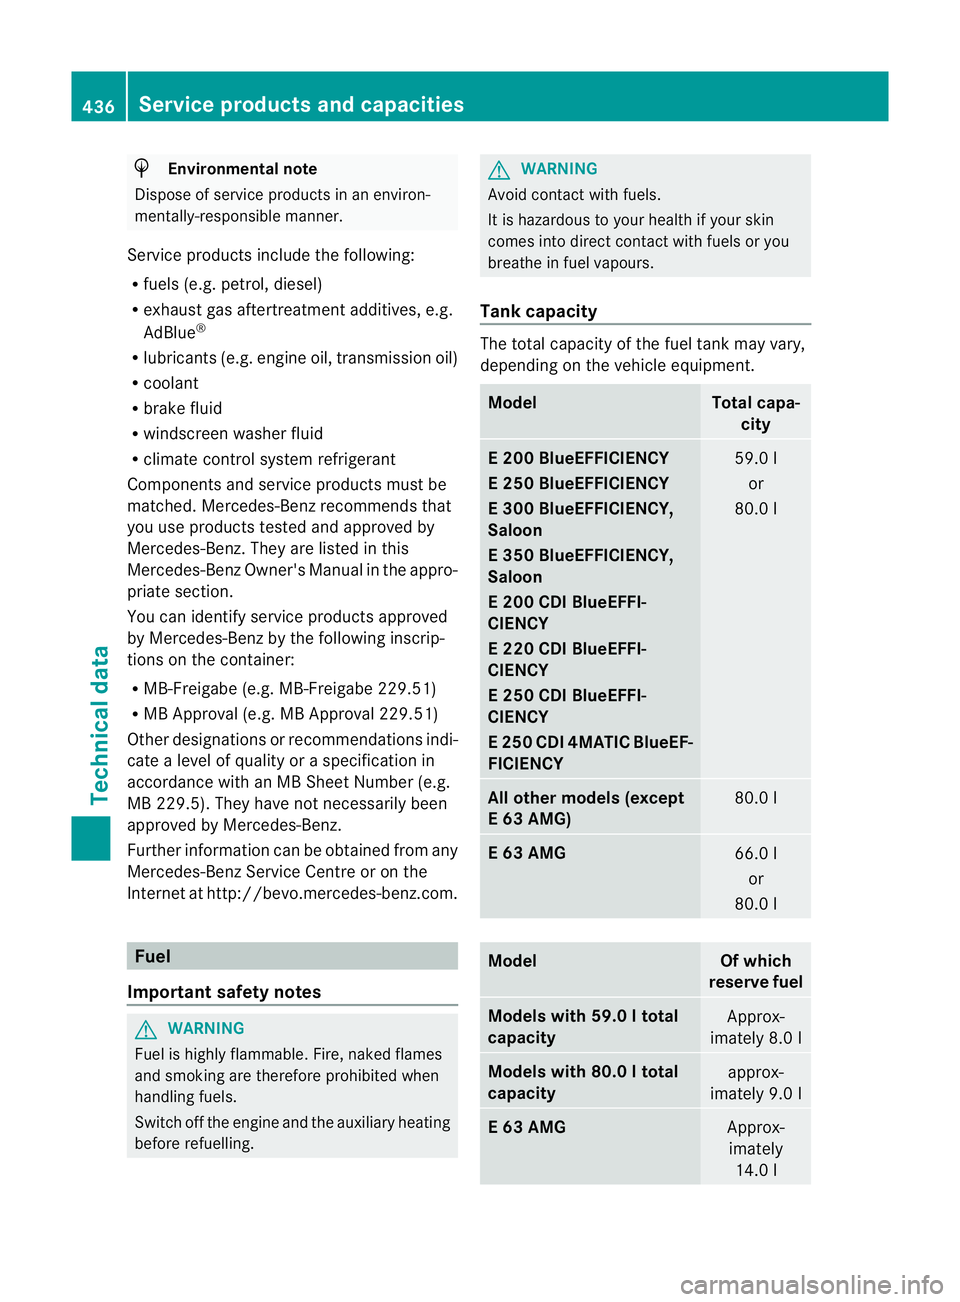
Tank capacity The total capacity of th
efuel tan kmay vary,
depending on the vehicle equipment. Model Total capa-
city E 200 BlueEFFICIENCY
E 250 BlueEFFICIENCY
E 300 BlueEFFICIENCY,
Saloon
E 350 BlueEFFICIENCY,
Saloon
E 200 CDI BlueEFFI-
CIENCY
E 220 CDI BlueEFFI-
CIENCY
E 250 CDI BlueEFFI-
CIENCY
E 250 CDI 4MATIC BlueEF-
FICIENCY
59.0 l
or
80.0 l All other models (except
E 63 AMG)
80.0 l
E 63 AMG
66.0 l
or
80.0 l Model Of which
reserve fuel Models with 59.0
l total
capacity Approx-
imately 8.0 l Models with 80.0
l total
capacity approx-
imately 9.0 l E 63 AMG
Approx-
imately 14.0 l 436
Service products and capacitiesTechnical data
Page 441 of 457
i
In some countries, the available petrol
may not be sufficiently low in sulphur. This
fuel can temporarily produce unpleasant
odours, especially on short journeys. As
soon as sulphur-free fuel (sulphur content
<10p pm) is used for refuelling, the odours
are reduced.
Additives
! Do not refuel with low grade fuel and do
not use fuel additives that have not been
tested and approved for Mercedes-Benz
vehicles. Otherwise the fuel system could
malfunction or be damaged.
One of the major problems with low-grade
fuel is the creation of carbon deposits during
the process of burning fuel. Mercedes-Benz
recommends that you use fuel brands that
have additives.
If you use fuels without these additives for a
longer period of time, there may be a build-up
of carbon deposits. These will form especially
on the inlet valves and in the combustion
chamber.
This could lead to engine running problems,
e.g.:
R longer engine warm-up phase
R uneven idle
R engine noise
R misfiring
R loss of power
In areas where petrol with the required addi-
tives is not available, carbon deposits can
build up. In this case, Mercedes-Benz recom-
mends the use of additives that have been
approved for Mercedes-Benz vehicles; see
http://bevo.mercedes-benz.com.
The quality of the fuel available in some coun-
tries may not be sufficient .Residue could
build up as a result. In such cases, and in
consultation with a Mercedes-BenzS ervice
Centre, the petrol may be mixed with the
additive recommended by Mercedes-Benz
(part no. A000989254510). You must
observe the notes and mixing ratios specified
on the container. Consult a Mercedes-Benz Service Centre to
view a list of approved products. Observe the
instructions for use in the product descrip-
tion.
Do not mix other fuel additives with fuel. This
causes unnecessary costs and could damage
the engine.
Diesel (EN 590)
Fuel grade
G
WARNING
Do not use petrol to refuel vehicles with a die-
sel engine. Do not mix diesel with petrol. This
would result in damage to the fuel system and
engine, which could lead to a vehicle fire.
! When refuelling, only use diesel fuel that
conforms to the European standard EN 590
or is of equivalent quality. Fuel that does
not conform to EN 590 can lead to
increased wear as well as damage to the
engine and exhaust system.
! Do not use the following:
R marine diesel
R heating oil
R bio-diesel
R vegetable oil
R petrol
R paraffin
R kerosene
Do not mix such fuels with diesel fuel and
do not use any special additives. This can
otherwise lead to engine damage. This
does not include flow improver additives.
For further information, see "Flow improv-
ers".
! Vehicles with adiesel particle filter: in
countries outside the EU, only refuel with
low-sulphur Euro diesel with a sulphur con-
ten tunde r50p pm; otherwise the emission
control system could be damaged.
! Vehicles without adiesel particle fil-
ter: in countries where only diesel fuel with 438
Service products and capacitiesTechnical data
Page 442 of 457
a high sulphur conten
tis available, you will
need to carry out your vehicle's oil change
at shorter intervals. More information
aboutt he interval for oil change can be
obtained from any qualified specialist
workshop.
Usually you will find information about the
fuel grade on the pump. If you cannot find the
label on the petrol pump, ask the filling sta-
tion staff.
Information on refuelling (Y page 180).
Low outside temperatures
In winter months, diesel fuel with an improved
cold flow quality is available. In Europe, the
EN 590 standard defines various climate-
dependent temperature categories. Malfunc-
tions can be avoided by refuelling with diesel
fuel that corresponds to the climatic specifi-
cations outlined in EN 590. At unusually low
outside temperatures, it is possible that the
flow characteristics of the diesel fuel could be
insufficient .Accordingly, diesel fuel from
warmer areas may not be suitable for opera-
tion in colder climati cconditions.
i Further information on country-specific
fuel properties can be obtained from oil
companies, e.g. at filling stations.
Flow improvers
To improve the low-temperature resistance of
diesel fuel, a flow improver can be attached.
The effectiveness of a flow improver is not
guaranteed for every fuel.
Only use flow improvers tested and approved
by Mercedes-Benz. During use, please
observe the information on operation.
Correct dosage and sufficient mixing are deci-
sive in improving low-temperature resistance
with the flow improver. Overdosage can
potentially even decrease low-temperature
resistance and must therefore be avoided.
Follow the manufacturer's guidelines on dos-
age.
Mix the additive into the diesel in good time,
before the flow characteristics of the diesel become insufficient. Otherwise, malfunctions
can arise through heating the fuel system,
e.g. through parking in a heated garage.
More information about recommended flow
improvers can be obtained from any qualified
specialist workshop.
Fuel consumption information
H
Environmental note
CO 2(carbon dioxide) is the gas which scien-
tists believe to be principally responsible for
global warming (the greenhouse effect). Your
vehicle's CO 2emissions are directly related to
fuel consumption and therefore depend on:
R efficient use of the fuel by the engine
R driving style
R other non-technical factors, such as envi-
ronmental influences or road conditions
You can minimise your vehicle's CO 2emis-
sions by driving carefully and having it serv-
iced regularly.
The vehicle will use more fuel than usual in
the following situations:
R at very low outside temperatures
R in urban traffic
R on short journeys
R in mountainous terrain
R when towing a trailer
i Only for certain countries: you can find
the current consumption and emission val-
ues of your vehicle in the COC documents
(EU CERTIFICATE OF CONFORMITY). These
documents are delivered with your vehicle.
The consumption figures were in each case
based on the currently applicable version:
R for vehicles that comply with standards
up to and including the EURO 4standard,
in accordance with EU Directive
80/1268/EEC
R for vehicles tha tcomply with or exceed
the EURO 5standard, in accordance with
Regulation (EC )No. 715/2007 Service products and capacities
439Technical data Z
Page 443 of 457

Deviations fro
mthese values may occur
under normal operating conditions. AdBlue
®
General notes AdBlue
®
is a non-flammable, non-toxic, col-
ourless, odourless and water-soluble fluid.
High outside temperatures G
WARNING
If you open the AdBlue ®
tank cap, small
amounts of ammonia vapour may be released.
This depends in particular upon the age of the
AdBlue ®
.
Ammonia vapours have a pungent odour and
are particularly irritating to:
R skin
R mucous membranes
R eyes
You may experience a burning sensation in
your eyes, nose and throat, as well as cough-
ing and watering of the eyes.
Do not inhale any ammonia vapours that may
be released. Fill the AdBlue ®
tank only in well-
ventilated areas.
Low outside temperatures AdBlue
®
freezes at a temperature of approx-
imately -11 †. The vehicle is equipped with
an AdBlue ®
preheating system at the factory.
Winter operation can therefore be guaran-
teed even at temperatures below -11 †.
Additives !
Only use AdBlue ®
in accordance with ISO
22241. Do not use additives with AdBlue ®
and do not dilute AdBlue ®
with water. This
may destroy the BlueTEC exhaust gas after-
treatment system. Purity !
Impurities in AdBlue ®
(e.g. due to other
service products, cleaning agents or dust)
lead to:
R increased emission values
R damage to the catalytic converter
R engine damage
R malfunctions in the BlueTEC ®
exhaust
gas aftertreatment system
Assuring the purity of AdBlue ®
is particularly
important with respect to avoiding malfunc-
tions in the BlueTEC exhaust gas aftertreat-
ment system.
If AdBlue ®
is pumped out of the AdBlue ®
tank,
e.g. during repair work, do not use this fluid
to refill the tank.T he purity of the fluid can no
longer be guaranteed.
Capacities model Total capacity
E 350 BlueTEC
24.5 l
Engine oil
General notes The quality of the engine oil is decisive for the
function and service life of an engine. After
extensive tests, Mercedes-Ben
zapproves
engine oils that correspond to the current
technical standard.
Therefore, only Mercedes-Benz approved
engine oils may be used in Mercedes-Benz
engines.
Further information on tested and approved
engine oils can be obtained from any
Mercedes-Benz Service Centre. Mercedes-
Ben zrecommends that you have the oil
change carried out at a qualified specialist
workshop. Mercedes-Benza pproval is indica-
ted on the oil container by the inscription "MB
Approval" and the corresponding designa-
tion, e.g. MB Approval 229.51. 440
Service products and capacitiesTechnical data
Page 444 of 457
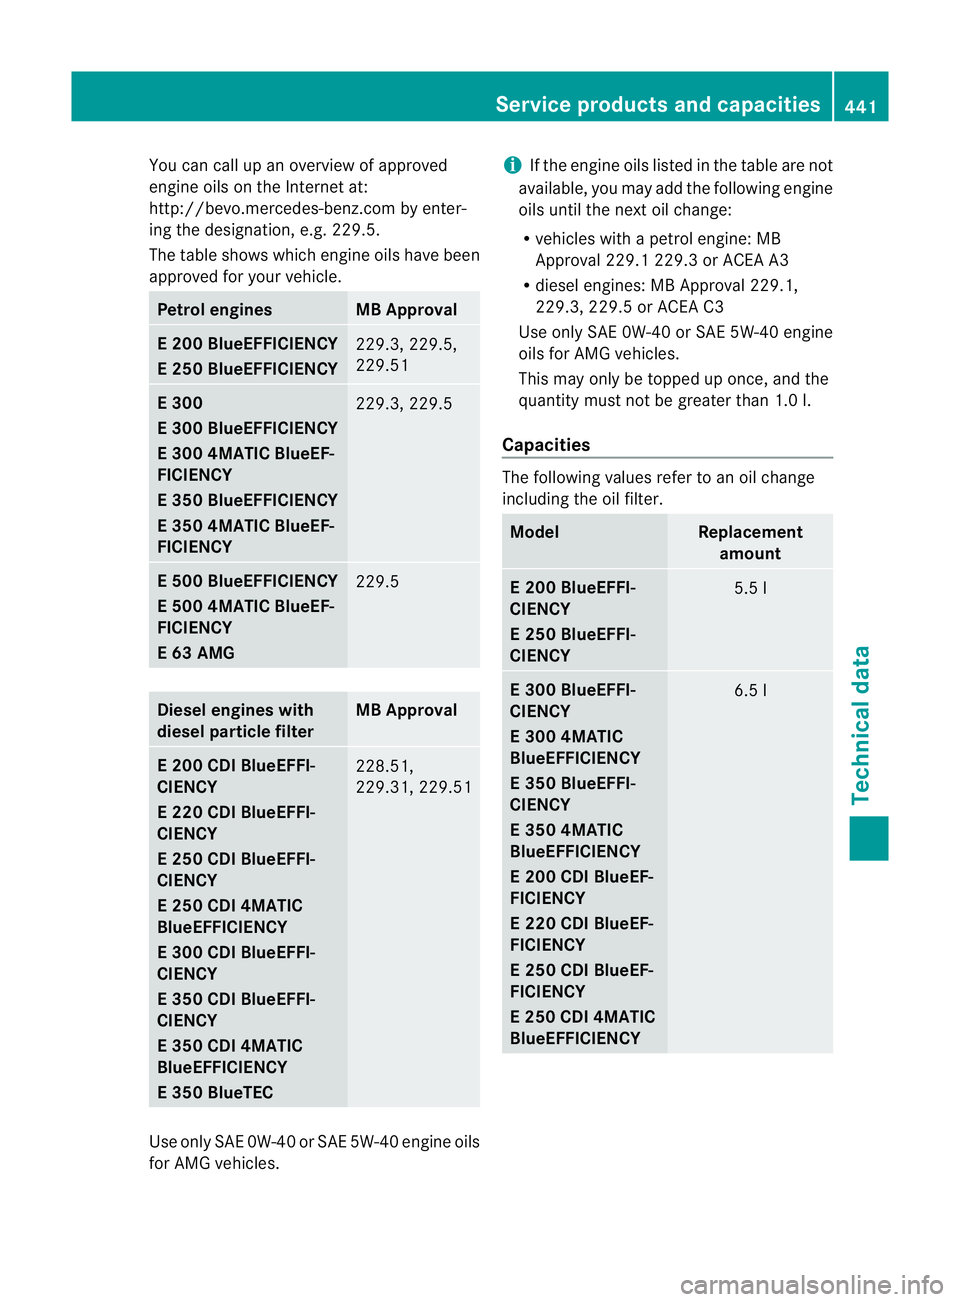
You can call up an overview of approved
engine oils on the Internet at:
http://bevo.mercedes-benz.com by enter-
ing the designation, e.g. 229.5.
The table shows which engine oils have been
approved for your vehicle. Petrol engines MB Approval
E 200 BlueEFFICIENCY
E 250 BlueEFFICIENCY
229.3, 229.5,
229.51
E 300
E 300 BlueEFFICIENCY
E 300 4MATIC BlueEF-
FICIENCY
E 350 BlueEFFICIENCY
E 350 4MATIC BlueEF-
FICIENCY
229.3, 229.5
E 500 BlueEFFICIENCY
E 500 4MATIC BlueEF-
FICIENCY
E 63 AMG
229.5
Diesel engines with
diesel particle filter MB Approval
E 200 CDI BlueEFFI-
CIENCY
E 220 CDI BlueEFFI-
CIENCY
E 250 CDI BlueEFFI-
CIENCY
E 250 CDI 4MATIC
BlueEFFICIENCY
E 300 CDI BlueEFFI-
CIENCY
E 350 CDI BlueEFFI-
CIENCY
E 350 CDI 4MATIC
BlueEFFICIENCY
E 350 BlueTEC
228.51,
229.31, 229.51
Use only SAE 0W-40 or SAE 5W-40 engin
eoils
for AMG vehicles. i
If the engine oils listed in the table are not
available, you may add the following engine
oils until the nex toil change:
R vehicles with a petrol engine: MB
Approval 229.1 229.3 or ACEA A3
R diesel engines :MBApproval 229.1,
229.3, 229.5 or ACEA C3
Use only SAE 0W-40 or SAE 5W-4 0engine
oils for AMG vehicles.
This may only be topped up once, and the
quantity must not be greater than 1.0 l.
Ca pacities The following values refe
rtoanoil change
including the oil filter. Model Replacement
amount E 200 BlueEFFI-
CIENCY
E 250 BlueEFFI-
CIENCY
5.5 l
E 300 BlueEFFI-
CIENCY
E 300 4MATIC
BlueEFFICIENCY
E 350 BlueEFFI-
CIENCY
E 350 4MATIC
BlueEFFICIENCY
E 200 CDI BlueEF-
FICIENCY
E 220 CDI BlueEF-
FICIENCY
E 250 CDI BlueEF-
FICIENCY
E 250 CDI 4MATIC
BlueEFFICIENCY
6.5 lService products and capacities
441Technical data Z