oil pressure MERCEDES-BENZ E-CLASS ESTATE 2012 Owners Manual
[x] Cancel search | Manufacturer: MERCEDES-BENZ, Model Year: 2012, Model line: E-CLASS ESTATE, Model: MERCEDES-BENZ E-CLASS ESTATE 2012Pages: 457, PDF Size: 11.62 MB
Page 7 of 457
1, 2, 3 ...
12 Vsocket
see Socket
4ETS
see ETS/4ETS (Electronic Trac-
tionS ystem)
4MATIC (permanent four-wheel
drive) .................................................. 211
4MATIC off-road system ...................211 A
ABS (Anti-lock Braking System) Display message ............................ 269
Function/notes ................................ 70
Important safety notes ....................70
Warning lamp ................................. 301
Activating/deactivating air-recir-
culation mode .................................... 149
Activating/deactivating cooling
with air dehumidification .................145
Active Blin dSpot Assist
Activating/deactivating (on-
board computer) ............................ 257
Display message ............................ 285
Function/notes ............................. 229
Towing atrailer .............................. 232
Active Driving Assistance package .229
Active Lane Keeping Assist Activating/deactivating (on-
board computer) ............................ 257
Display message ............................ 284
Function/notes ............................. 232
Towing atrailer .............................. 234
Active light function .........................130
Active multicontour seat ..................112
Active Service System see ASSYST PLUS
ADAPTIVE BRAKE ................................. 76
Adaptive brake lamps .........................72
Adaptive Highbeam Assist Display message ............................ 278
Function/notes ............................. 131
Adaptive Main-beam Assist
Switching on/off (on-board com-
puter) ............................................. 260AdBlue
®
Display message ............................ 281
Filling capacity ............................... 440
Notes ............................................. 440
Service indicator ............................ 350
AdBlue ®
service indicator ................350
Additional speedometer ...................258
Additives (engine oil) ........................442
Adjusting the headlamp range .........128
Airbags Front airbag (driver, front
passenger )....................................... 46
Important safety guidelines .............44
Kneebag .......................................... .46
Pelvis airbag .................................... 47
Sidebag ............................................ 47
Triggering ......................................... 43
Windowba g...................................... 48
Air-conditioning system
see Climate control
Airf ilter (white display message) ....281
AIRMATIC Display message ............................ 282
Function/notes ............................. 208
Air pressure
see Tyre pressure
Airv ents
Glove compartmen t....................... 156
Important safety notes ..................155
Rea r............................................... 156
Setting ........................................... 155
Setting the centre air vents ...........156
Setting the side air vents ...............156
Alarm system
see ATA (Anti-Theft Alarm system)
Ambient lighting
Setting the brightness (on-board
computer) ...................................... 260
AMG RIDE CONTROL sports sus-
pension ............................................... 209
Anti-glare film .................................... 341
Anti-loc kBraking System
see ABS (Anti-lock Braking System)
Anti-Theft Alarm system
see ATA (Anti-Theft Alarm system)
Aquaplaning ....................................... 188
Ashtray ............................................... 3314
Index
Page 189 of 457
Apart from driving style, consumption is
dependent on many factors such as:
R load
R tyre pressure
R cold start
R selected route
R numbe rofconsumers that are switched on
These variable are not included in the ECO
display.
Your driving style is evaluated on the basis of
the following three categories:
Acceleration (evaluation of all accelera-
tion processes) The bar fills up: The bar depletes:
Moderate accelera-
tion, espeically at
higher speeds Sporty acceleration
Constant (evaluation of the driving style
at any point in time)
The bar fills up: The bar depletes:
Constant speed and
avoidance of unnec-
essary acceleration
and deceleration
processes Fluctuations in
speed
Coasting (evaluation of total decelera-
tion)
The bar fills up: The bar depletes:
Drive with care,
keep your distance
from the vehicle
ahead and remove
your foot from the
accelerator pedal in
good time: the vehi-
cle can coast with-
out braking Frequent braking i
An economical driving style depends in
particular on driving at moderate speeds.
Achieving a higher value in the categories
"Acceleration" and "Constant":
R observe the gearshift recommendations.
R drive in drive program E(vehicles with
automatic transmission).
i On long journeys at constant speed, such
as on the motorway, only the "Constant"
category bar changes.
i The ECO display sums up the driving
behaviour from the start to the end of the
journey. As a result, the bars change
dynamically at the start of the journey. Dur-
ing long journeys there are fewer changes.
For more dynamic changes, perform a man-
ual reset.
For further information on ECO display, see
(Y page 250). Short journeys
! Vehicles with adiesel particle filter: if
the vehicle is mostly driven for short dis-
tances, it is possible that malfunctions may
occur during the automatic cleaning of the
diesel particle filter. This may lead to fuel
collecting in the engine oil and cause
engine failure. Therefore, if you frequently
drive short distances, you should take a 20
minute trip on a motorway or rural road at
least every 500km. Brakes
Important safety notes G
WARNING
If you shift down on a slippery road surface in
an attempt to increase the engine's braking
effect, the drive wheels could lose their grip.
This increases the risk of skidding and having
an accident. 186
Driving tipsDriving and parking
Page 351 of 457
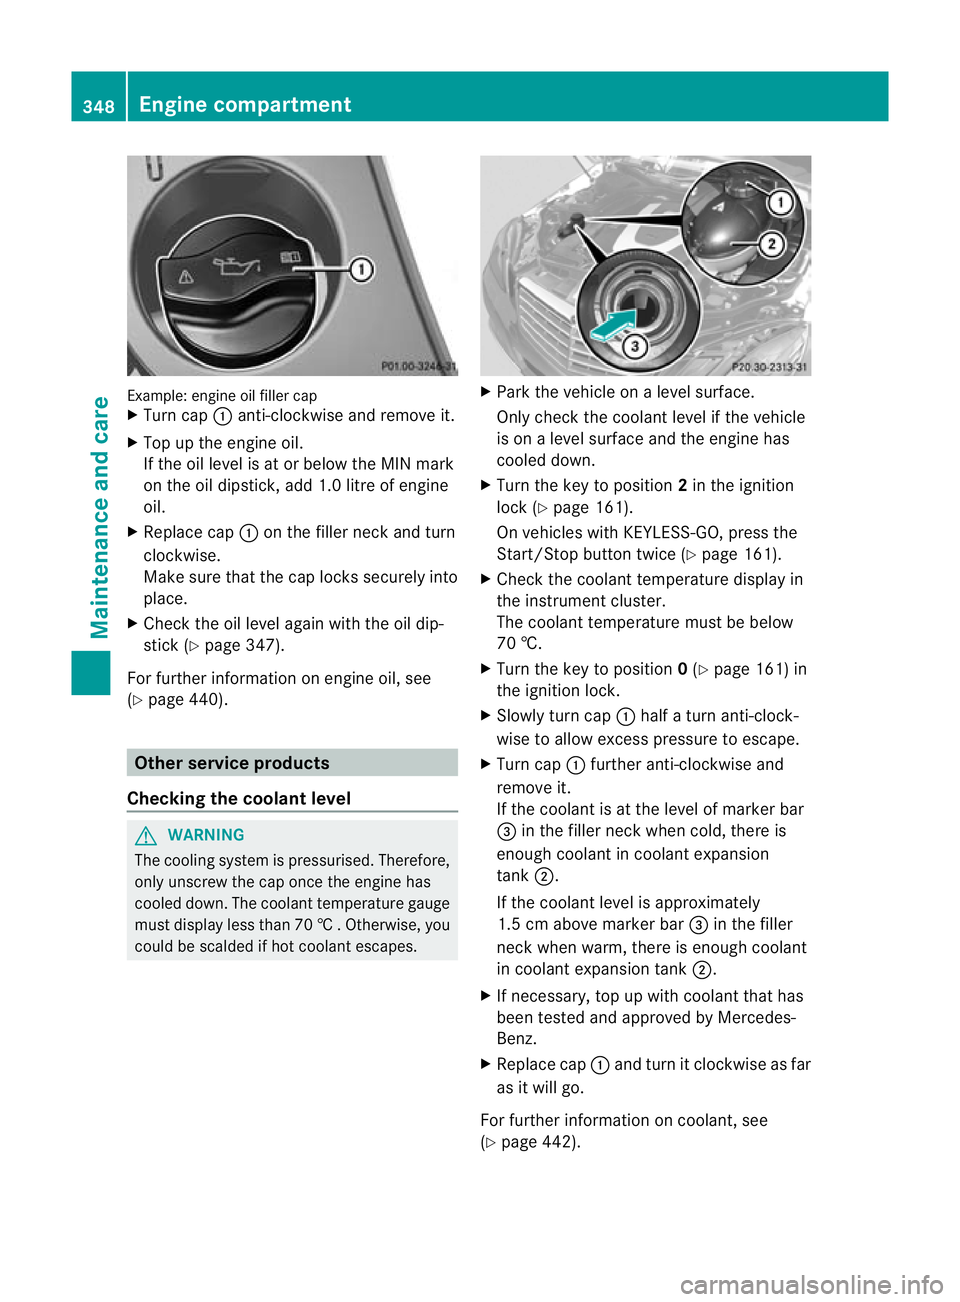
Example: engine oil fille
rcap
X Turn cap :anti-clockwise and remove it.
X Top up the engine oil.
If the oil level is at or below the MIN mark
on the oil dipstick, add 1. 0litre of engine
oil.
X Replace cap :on the filler neck and turn
clockwise.
Make sure that the cap locks securely into
place.
X Check the oil level again with the oil dip-
stick (Y page 347).
For further information on engine oil, see
(Y page 440). Other service products
Checking the coolant level G
WARNING
The cooling system is pressurised. Therefore,
only unscrew the cap once the engine has
cooled down. The coolan ttemperature gauge
must display less than 70 †.Otherwise, you
could be scalded if hot coolant escapes. X
Park the vehicle on a level surface.
Only check the coolant level if the vehicle
is on a level surface and the engine has
cooled down.
X Turn the key to position 2in the ignition
lock (Y page 161).
On vehicles with KEYLESS-GO, press the
Start/Stop button twice (Y page 161).
X Check the coolant temperature display in
the instrument cluster.
The coolant temperature must be below
70 †.
X Turn the key to position 0(Y page 161) in
the ignition lock.
X Slowly tur ncap : half a turn anti-clock-
wise to allow excess pressure to escape.
X Turn cap :further anti-clockwise and
remove it.
If the coolant is at the level of marker bar
= in the fille rneck when cold, there is
enough coolant in coolant expansion
tank ;.
If the coolant level is approximately
1.5 cm above marker bar =in the filler
neckw hen warm, there is enough coolant
in coolant expansion tank ;.
X If necessary, top up with coolant that has
been tested and approved by Mercedes-
Benz.
X Replace cap :and turn it clockwise as far
as it will go.
For further information on coolant, see
(Y page 442). 348
Engine compartmentMaintenance and care
Page 355 of 457
You can wash the vehicle in an automatic car
wash from the very start.
Wash off excess dirt before cleaning the vehi-
cle in an automatic car wash.
After using an automatic car wash, wipe off
wax fro
mthe windscreen and the wiper
blades. This will prevent smears and reduce
wiping noises caused by residue on the wind-
screen.
Washing by hand In some countries, washing by hand is only
allowed at specially equipped washing bays.
Observe the legal requirements for each indi-
vidual country.
X Do not use hot water and do not wash the
vehicle in direct sunlight.
X Use a soft sponge to clean.
X Use a mild cleaning agent, such as a car
shampoo approved by Mercedes-Benz.
X Thoroughly hose down the vehicle with a
gentle jet of water.
X Do not point the water jet directly towards
the air inlet.
X Use plenty of water and rinse out the
sponge frequently.
X Rinse the vehicle with clean water and dry
thoroughly with a chamois.
X Do not let the cleaning agent dry on the
paintwork.
When using the vehicle in winter, remove all
traces of road salt deposits carefully and as
soon as possible.
High-pressure cleaning equipment G
WARNING
Do not use high-pressure cleaners with circu-
lar-jet nozzles (dirt grinders) to clean your
vehicle, in particular the tyres. You could oth-
erwise damage the tyres and cause an acci-
dent.
! Always maintain a distance of at least
30 cm between the vehicle and the high- pressure cleaner nozzle. Information about
the correct distance is available from the
equipment manufacturer.
Move the high-pressure cleaner nozzle
around when cleaning your vehicle.
Do not aim directly at any of the following:
R tyres
R door gaps, roof gaps, joints etc.
R electrical components
R battery
R connectors
R lights
R seals
R trim elements
R ventilation slots
Damaged seals or electrical components
can lead to leaks or failures.
Cleaning the paintwork !
Do not affix:
R stickers
R films
R magnetic plates or similar items
to painted surfaces. You could otherwise
damage the paintwork.
Scratches, corrosive deposits, areas affected
by corrosion and damage caused by inade-
quate care cannot always be completely
repaired. In such cases, visit a qualified spe-
cialist workshop.
X Remove impurities immediately, where
possible, whilst avoiding rubbing too hard.
X Soak insect remains with insect remover
and rinse off the treated areas afterwards.
X Soak bird droppings with water and rinse
off the treated areas afterwards.
X Remove coolant, brake fluid, tree resin,
oils, fuels and greases by rubbing gently
with a cloth soaked in petroleum ether or
lighter fluid.
X Use tar remover to remove tar stains.
X Use silicone remover to remove wax. 352
CareMaintenance and care
Page 358 of 457
X
Use clear water and a soft cloth to clean
camera lens :.
Cleaning the exhaust tail pipes !
Do not clean the exhaust pipe with alka-
line-based cleaning agents, such as wheel
cleaner.
Impurities combined with the effects of road
grit and corrosive environmental factors may
cause flash rust to form on the surface. You
can restore the original shine of the exhaust
pipe by cleaning it regularly, especially in win-
ter and after washing.
X Cleant he exhaust pipe with a chrome care
product tested and approved by Mercedes-
Benz.
Cleaning the trailer tow hitch H
Environmental note
Dispose of oily and greasy cloths in an envi-
ronmentally-responsible manner.
! Do not clean the ball coupling with a high-
pressure cleaner. Do not use solvents.
! Observe the note on care provided by the
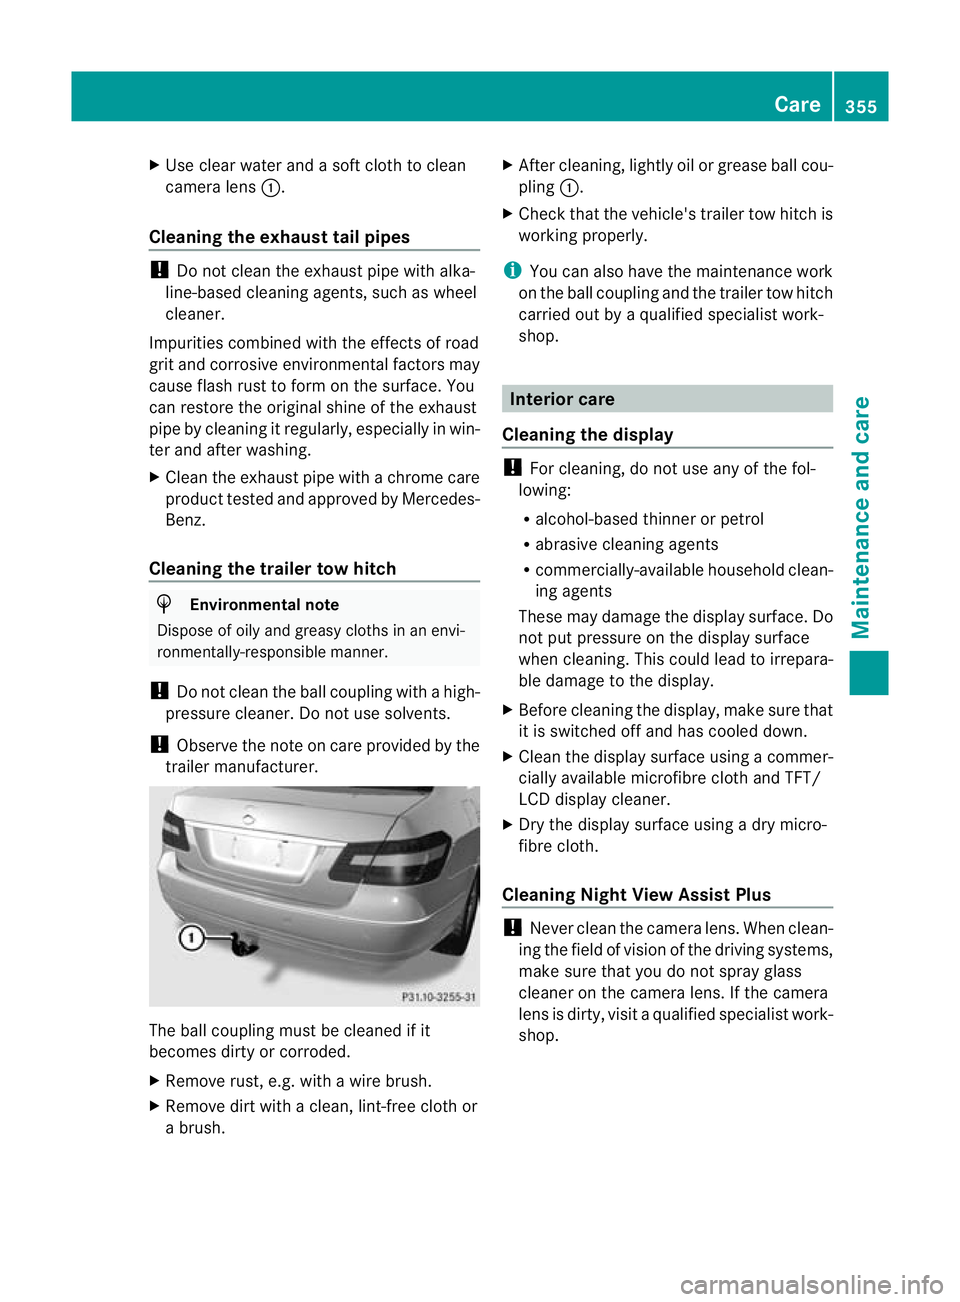
trailer manufacturer. The ball coupling must be cleaned if it
becomes dirty or corroded.
X Remove rust, e.g. with a wire brush.
X Remove dirt with a clean, lint-free cloth or
a brush. X
After cleaning, lightly oil or grease ball cou-
pling :.
X Check that the vehicle's trailer tow hitch is
working properly.
i You can also have the maintenance work
on the ball coupling and the trailer tow hitch
carried out by a qualified specialist work-
shop. Interior care
Cleaning the display !
For cleaning, do not use any of the fol-
lowing:
R alcohol-based thinner or petrol
R abrasive cleaning agents
R commercially-available household clean-
ing agents
These may damage the display surface. Do
not put pressure on the display surface
when cleaning. This could lead to irrepara-
ble damage to the display.
X Before cleaning the display, make sure that
it is switched off and has cooled down.
X Cleant he display surface using a commer-
cially available microfibre cloth and TFT/
LCD display cleaner.
X Dry the display surface using a dry micro-
fibre cloth.
Cleaning Night View Assist Plus !
Never clean the camera lens. When clean-
ing the field of vision of the driving systems,
make sure that you do not spray glass
cleaner on the camera lens. If the camera
lens is dirty, visit a qualified specialist work-
shop. Care
355Maintenance and care Z
Page 392 of 457
Clean the contact surface
softhe wheel and
the brake disc thoroughly every time a wheel
is interchanged. Check the tyre pressure and,
if necessary, restart the tyre pressure loss
warning system or the tyre pressure monitor. Direction of rotation
Tyres with a specified direction of rotation
have additional benefits, e.g. if there is a risk
of aquaplaning. You will only gain these ben-
efits if the correct direction of rotation is
observed.
An arrow on the sidewall of the tyre indicates
its correct direction of rotation. Storing wheels
Store wheels that are not being used in a cool,
dry and preferably dark place. Protect the
tyres against oil, grease, petrol and diesel. Cleaning the wheels
G
WARNING
The water jet of circular-jet nozzles (dirt grind-
ers) can cause damage not visible from the
outside to tyres or chassis components. Com-
ponents damaged in this way can unexpect-
edly fail. There is a risk of an accident.
Do not use high-pressure cleaners with circu-
lar-jet nozzles to clean the vehicle. Have dam-
aged tyres or chassis components replaced
immediately. Fitting
awheel
Preparing the vehicle X
Stop the vehicle on solid, non-slippery and
level ground.
X Apply the parking brake.
X Bring the front wheels into the straight-
ahead position.
X Shift the transmission to position P.X
Vehicles with AIRMATIC :make sure that
"normal" level is selected (Y page 208).
X Switch off the engine.
X Vehicles without KEYLESS-GO: remove
the key from the ignition lock.
X Vehicles with KEYLESS-GO: open the
driver's door.
The on-board electronics have status 0,
which is the same as the key having been
removed.
X Vehicles with KEYLESS-GO: remove the
Start/Stop button from the ignition lock
(Y page 161).
X If included in the vehicle equipment,
remove the tyre-change tool kit from the
vehicle.
X Secure the vehicle to preven titfrom rolling
away.
i Apart from certain country-specific varia-
tions, the vehicles are not equipped with a
tyre-change tool kit. Some tools for chang-
ing a wheel are specific to the vehicle. For
more information on which tools are
required to perform a wheel change on your
vehicle, consult a qualified specialist work-
shop.
Necessary wheel-changing tools can
include, for example:
R jack
R wheel chock
R wheel wrench
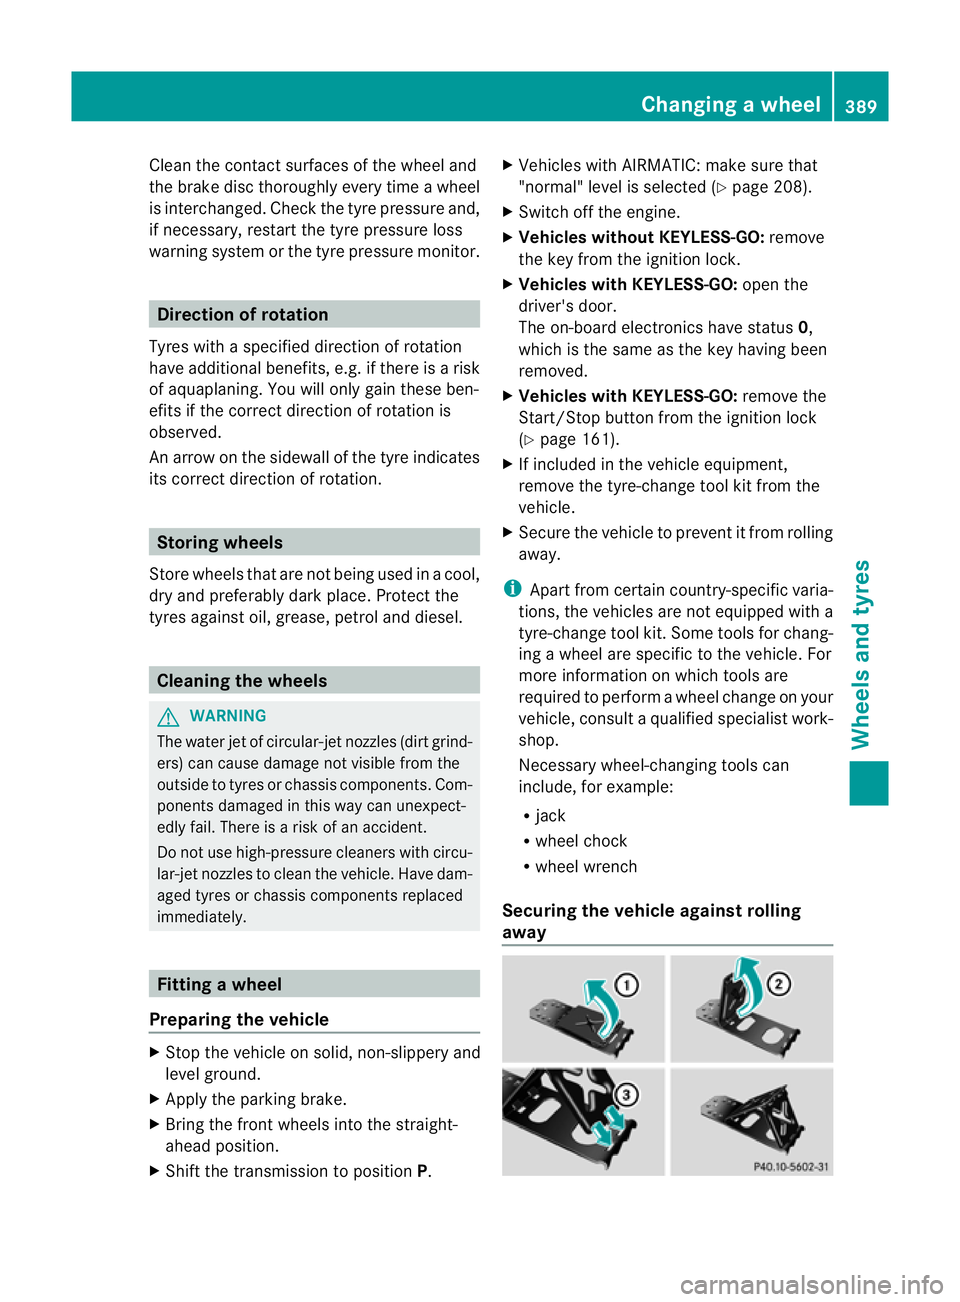
Securing the vehicle agains trolling
away Changing
awheel
389Wheels and tyres Z