MERCEDES-BENZ E-CLASS ESTATE 2015 Owners Manual
Manufacturer: MERCEDES-BENZ, Model Year: 2015, Model line: E-CLASS ESTATE, Model: MERCEDES-BENZ E-CLASS ESTATE 2015Pages: 497, PDF Size: 16.23 MB
Page 121 of 497
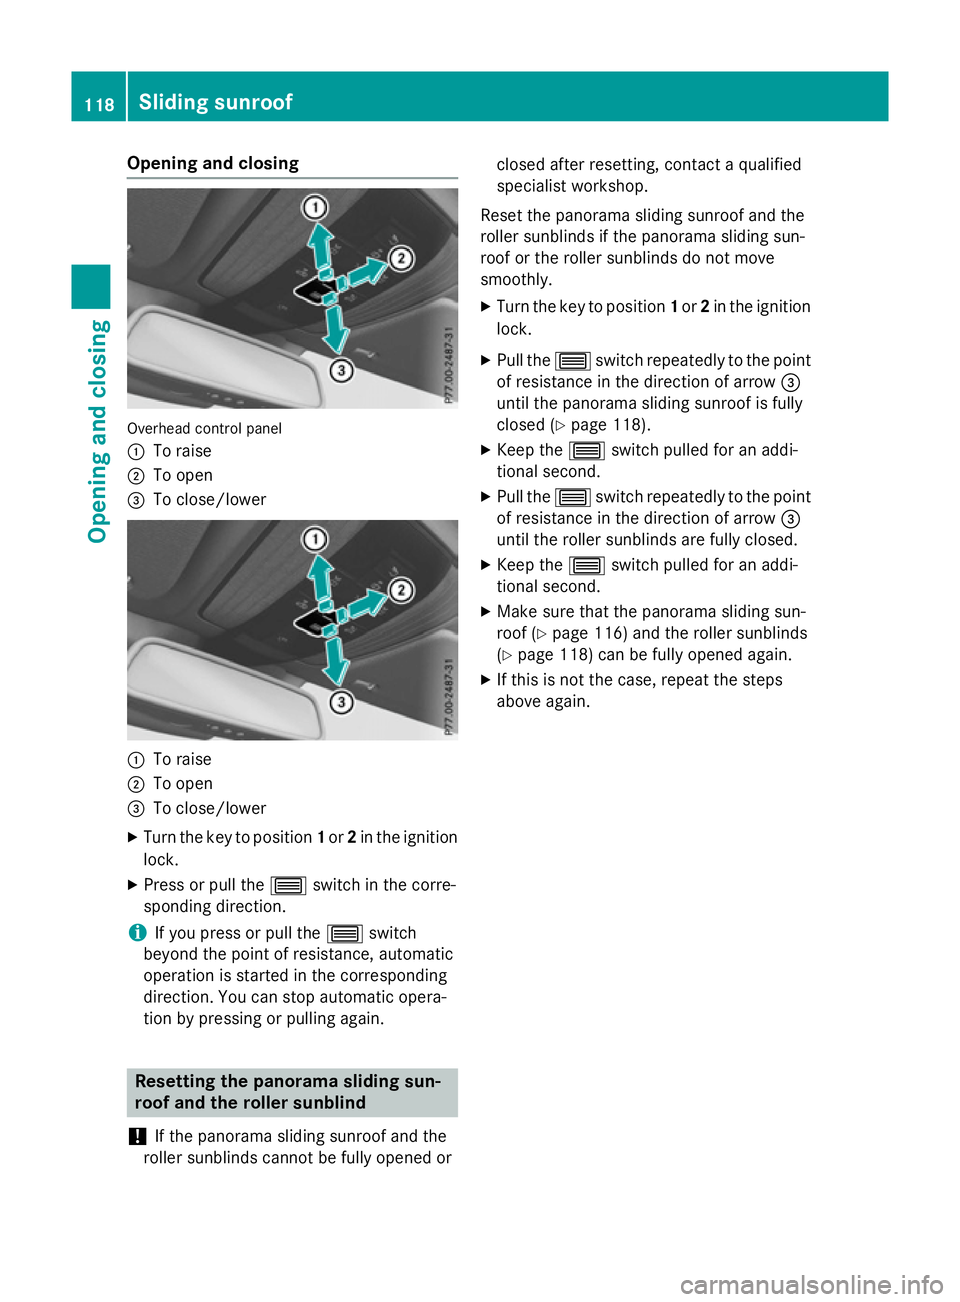
Opening and closing
Overhead control panel
:
To raise
; To open
= To close/lower :
To raise
; To open
= To close/lower
X Turn the key to position 1or 2in the ignition
lock.
X Press or pull the 3switch in the corre-
spondin gdirection.
i If you press or pull the
3switch
beyond the point of resistance, automatic
operation is started in the corresponding
direction. You can stop automatic opera-
tion by pressing or pulling again. Resetting the panorama sliding sun-
roof and the roller sunblind
! If the panorama sliding sunroof and the
roller sunblinds cannot be fully opened or closed after resetting, contact
aqualified
specialist workshop.
Reset the panorama sliding sunroof and the
roller sunblinds if the panorama sliding sun-
roof or the roller sunblinds do not move
smoothly. X Turn the key to position 1or 2in the ignition
lock.
X Pull the 3switch repeatedly to the point
of resistance in the direction of arrow =
until the panorama sliding sunroof is fully
closed (Y page 118).
X Keep the 3switch pulled for an addi-
tional second.
X Pull the 3switch repeatedly to the point
of resistance in the direction of arrow =
until the roller sunblinds are fully closed.
X Keep the 3switch pulled for an addi-
tional second.
X Make sure that the panorama sliding sun-
roof (Y page 116) and the roller sunblinds
(Y page 118) can be fully opened again.
X If this is not the case, repeat the steps
above again. 118
Sliding sunroofOpening and closing
Page 122 of 497
Problems with the sliding sunroof
Your vehicle may be fitted with asliding sunroof or apanorama sliding sunroof. In this section,
the term "sliding sunroof" refers to both types of sliding sunroof. G
WARNING
If you close the sliding sunroof again immediately after it has been blocked or reset, the sliding
sunroof closes with increased or maximum force. The reversing feature is then not active. Parts of the body could be trapped in the closing area in the process. This poses an increased risk of
injury or even fatal injury.
Make sure that no parts of the body are in the closing area.
If someone is trapped:
R release the switch immediately or
R press the switch in any direction during the automatic closing process
The closing process is stopped. Problem
Possible causes/consequences and
M MSolutions The sliding sunroof can-
not be closed and you
cannot see the cause. If the sliding sunroof is obstructed during closing and reopens
again slightly:
X Immediately after the sliding sunroof blocks, pull the 3
switch in the overhead control panel down to the point of resist-
ance and hold it until the sliding sunroof is closed.
The sliding sunroof is closed with increased force.
If the sliding sunroof is obstructed again during closing and
reopens again slightly:
X Immediately after the sliding sunroof blocks, pull the 3
switch in the overhead control panel down to the point of resist-
ance and hold it until the sliding sunroof is closed.
The sliding sunroof is closed without the anti-entrapment fea-
ture. Sliding sunroof
119Opening and closing Z
Page 123 of 497

120
Page 124 of 497
Useful information
............................122
Correct driver's seat position ..........122
Seats .................................................. 123
Steering wheel .................................. 133
Mirrors ............................................... 136
Memor yfunction ............................... 139 121Seats, steering wheel and mirrors
Page 125 of 497
Useful information
i This Owner's Manual describes all mod-
els, series and optional equipment for your
vehicle that were available at the time of
going to press. National variation sare pos-
sible. Not ethat your vehicle may not be
equipped with all of the function sdescri-
bed. This is also the case for system sand
function srelevan ttosafety.
i Read the information on qualified special-
ist workshops: (Y page 27). Correct driver's seat position
G
WARNING
You could lose contro lofthe vehicle while
drivin gifyou:
R adjust the driver' sseat, steering wheel or
mirrors
R faste nthe seat belt
There is arisk of an accident.
Adjust the driver' sseat, head restraint ,steer-
ing wheel and mirrors and faste nyour seat
belt before starting the engine. X
Observ ethe safet yguidelines on seat
adjustment (Y page 123).
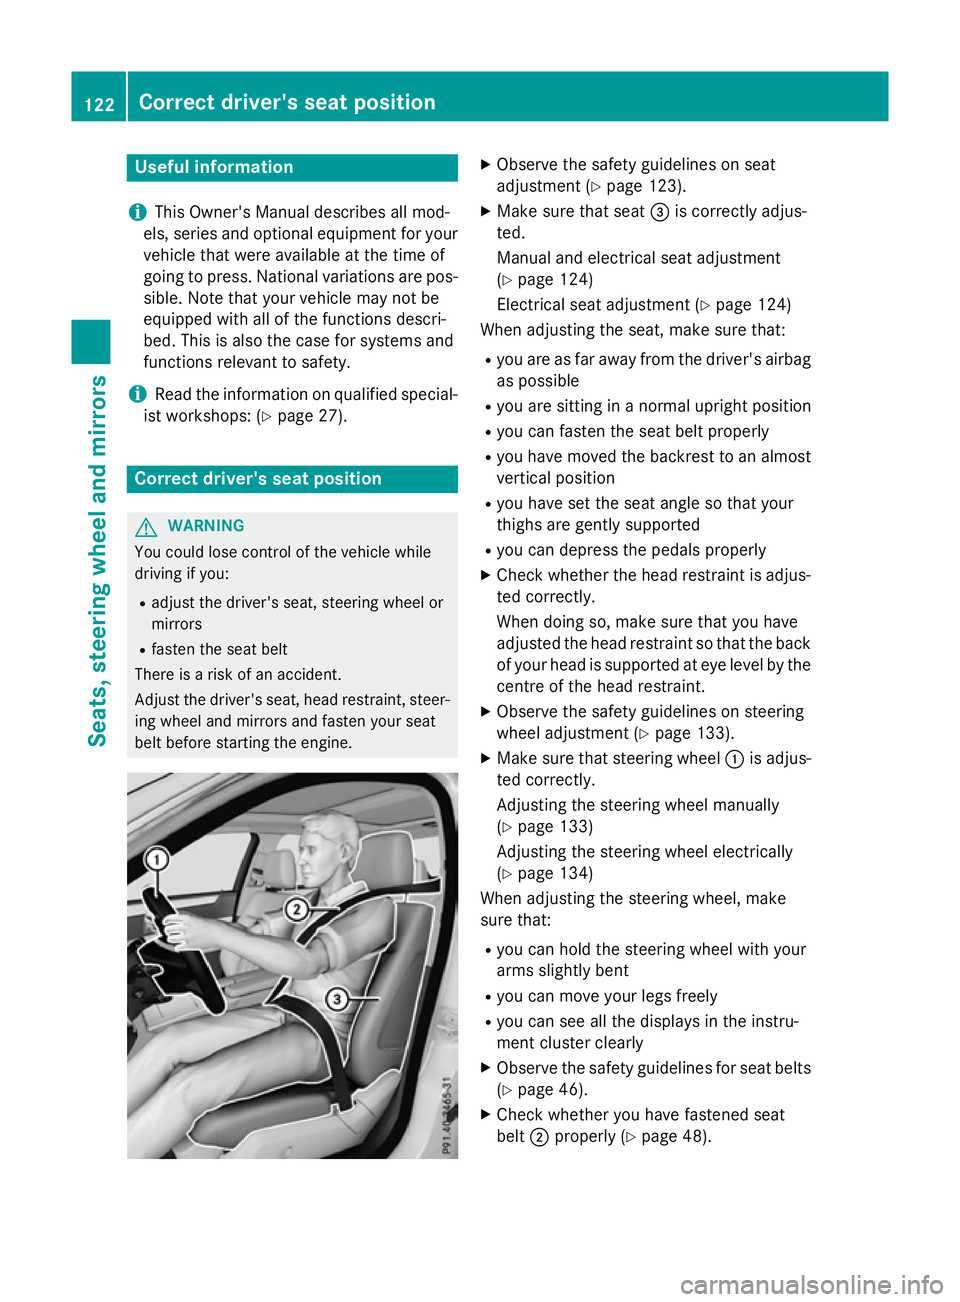
X Make sure that seat =is correctly adjus-
ted.
Manual and electrical seat adjustment
(Y page 124)
Electrical seat adjustment (Y page 124)
When adjusting the seat, make sure that:
R you are as far away from the driver' sairbag
as possible
R you are sitting in anormal upright position
R you can faste nthe seat belt properly
R you have moved the backrest to an almost
vertical position
R you have set the seat angle so that your
thighs are gently supported
R you can depress the pedals properly
X Check whether the head restraint is adjus-
ted correctly.
When doing so, make sure that you have
adjusted the head restraint so that the back
of your head is supported at eye level by the centre of the head restraint.
X Observ ethe safet yguidelines on steering
wheel adjustment (Y page 133).
X Make sure that steering wheel :is adjus-
ted correctly.
Adjustin gthe steering wheel manually
(Y page 133)
Adjustin gthe steering wheel electrically
(Y page 134)
When adjusting the steering wheel, make
sure that:
R you can hold the steering wheel with your
arms slightly bent
R you can move your legs freely
R you can see all the displays in the instru-
ment cluster clearly
X Observ ethe safet yguidelines for seat belts
(Y page 46).
X Check whether you have fastened seat
belt ;properly (Y page 48).122
Correct driver's seat positionSeats, steering wheel and mirrors
Page 126 of 497
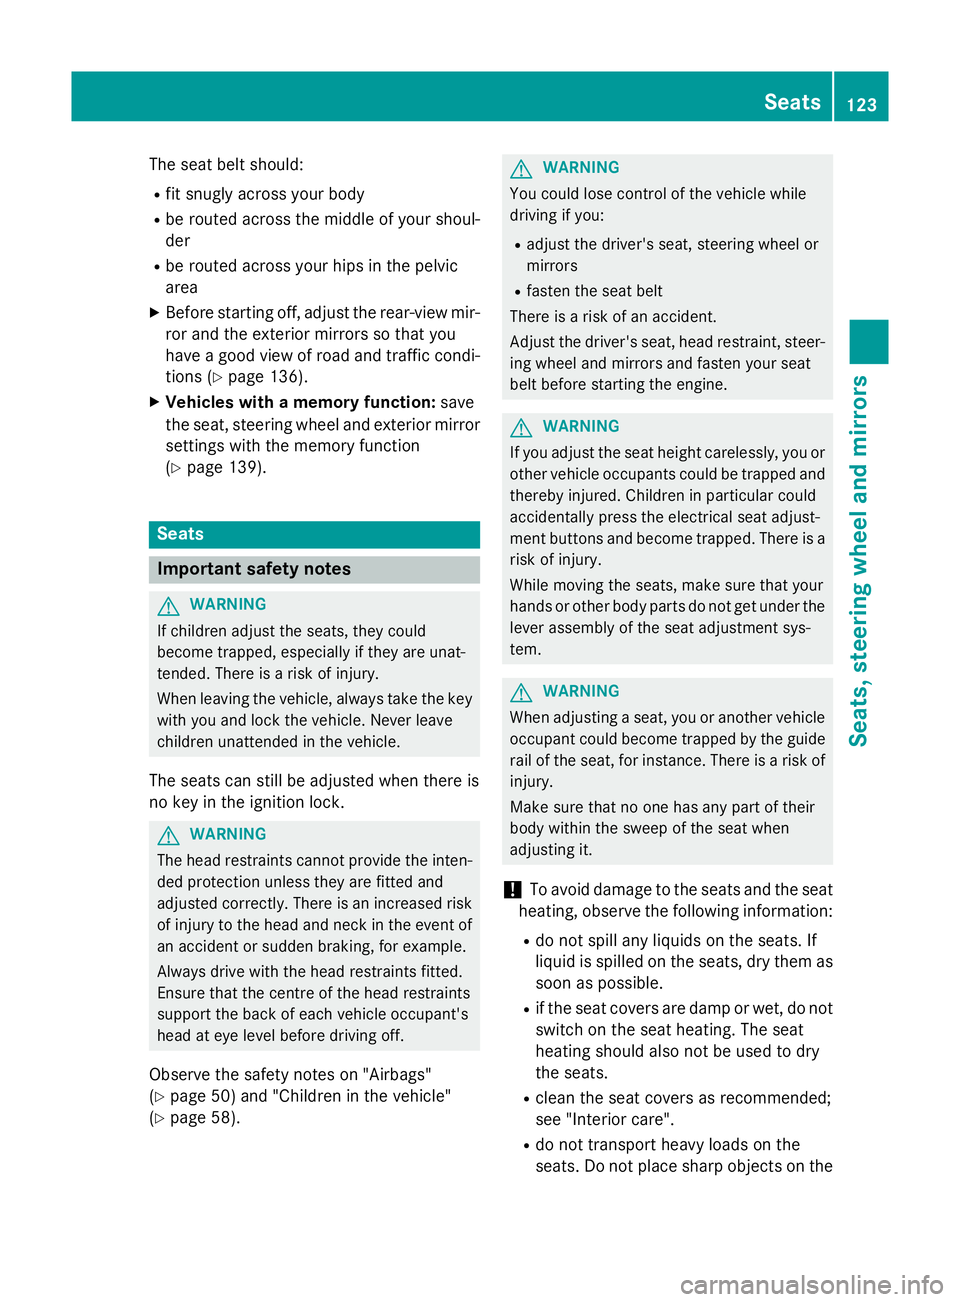
The seat belt should:
R fit snugly across your body
R be routed across the middle of your shoul-
der
R be routed across your hips in the pelvic
area
X Before starting off, adjust the rear-view mir-
ror and the exterior mirrors so that you
have agood view of road and traffic condi-
tions (Y page 136).
X Vehicles with amemor yfunction: save
the seat, steerin gwheel and exterior mirror
settings with the memory function
(Y page 139). Seats
Important safety notes
G
WARNING
If children adjust the seats, they could
become trapped, especially if they are unat-
tended. There is arisk of injury.
When leaving the vehicle, alway stake the key
with you and lock the vehicle. Never leave
children unattended in the vehicle.
The seats can still be adjusted when there is
no key in the ignition lock. G
WARNING
The head restraints cannot provide the inten-
ded protection unless they are fitted and
adjusted correctly. There is an increased risk of injury to the head and neck in the event of
an accident or sudden braking, for example.
Always drive with the head restraints fitted.
Ensure that the centre of the head restraints
support the back of each vehicle occupant's
head at eye level before driving off.
Observe the safety notes on "Airbags"
(Y page 50) and "Children in the vehicle"
(Y page 58). G
WARNING
You could lose control of the vehicle while
driving if you:
R adjust the driver's seat, steerin gwheel or
mirrors
R fasten the seat belt
There is arisk of an accident.
Adjust the driver's seat, head restraint, steer-
ing wheel and mirrors and fasten your seat
belt before starting the engine. G
WARNING
If you adjust the seat height carelessly, you or other vehicle occupant scould be trapped and
thereby injured. Children in particular could
accidentally press the electrical seat adjust-
ment button sand become trapped. There is a
risk of injury.
While moving the seats, make sure that your
hands or other body parts do not get under the
lever assembly of the seat adjustmen tsys-
tem. G
WARNING
When adjusting aseat, you or another vehicle
occupant could become trapped by the guide rail of the seat, for instance. There is arisk of
injury.
Make sure that no one has any part of their
body within the sweep of the seat when
adjusting it.
! To avoid damage to the seats and the seat
heating, observe the following information:
R do not spill any liquids on the seats. If
liquid is spilled on the seats, dry them as
soon as possible.
R if the seat covers are damp or wet, do not
switch on the seat heating. The seat
heating should also not be used to dry
the seats.
R clean the seat covers as recommended;
see "Interior care".
R do not transport heavy loads on the
seats. Do not place sharp object sonthe Seats
123Seats, steering wheel and mirrors Z
Page 127 of 497
seat cushions, e.g. knives, nails or tools.
The seats should only be occupied by
passengers, if possible.
R when the seat heating is in operation, do
not cover the seats with insulating mate-
rials, e.g. blankets, coats, bags, seat cov- ers, child seats or booster seats.
! Make sure that there are no objects in the
footwell under or behind the seats when
moving the seats back. There is arisk that
the seats and/or the objects could be dam- aged.
i The head restraints in the front seats are
fitted with the NECK-PRO system
(Y page 55). For this reason, it is not pos-
sible to remove the head restraints from
the front seats.
Vehicles without the through-loading fea-
ture: the head restraints cannot be
removed from the rear-compartment
seats.
For more information, contact aqualified
specialist workshop.
i Further related subjects:
R Through-loading facility in the rear bench
seat (Saloon)
R EASY-PACK through-loading facility in
the rear bench seat (Estate)
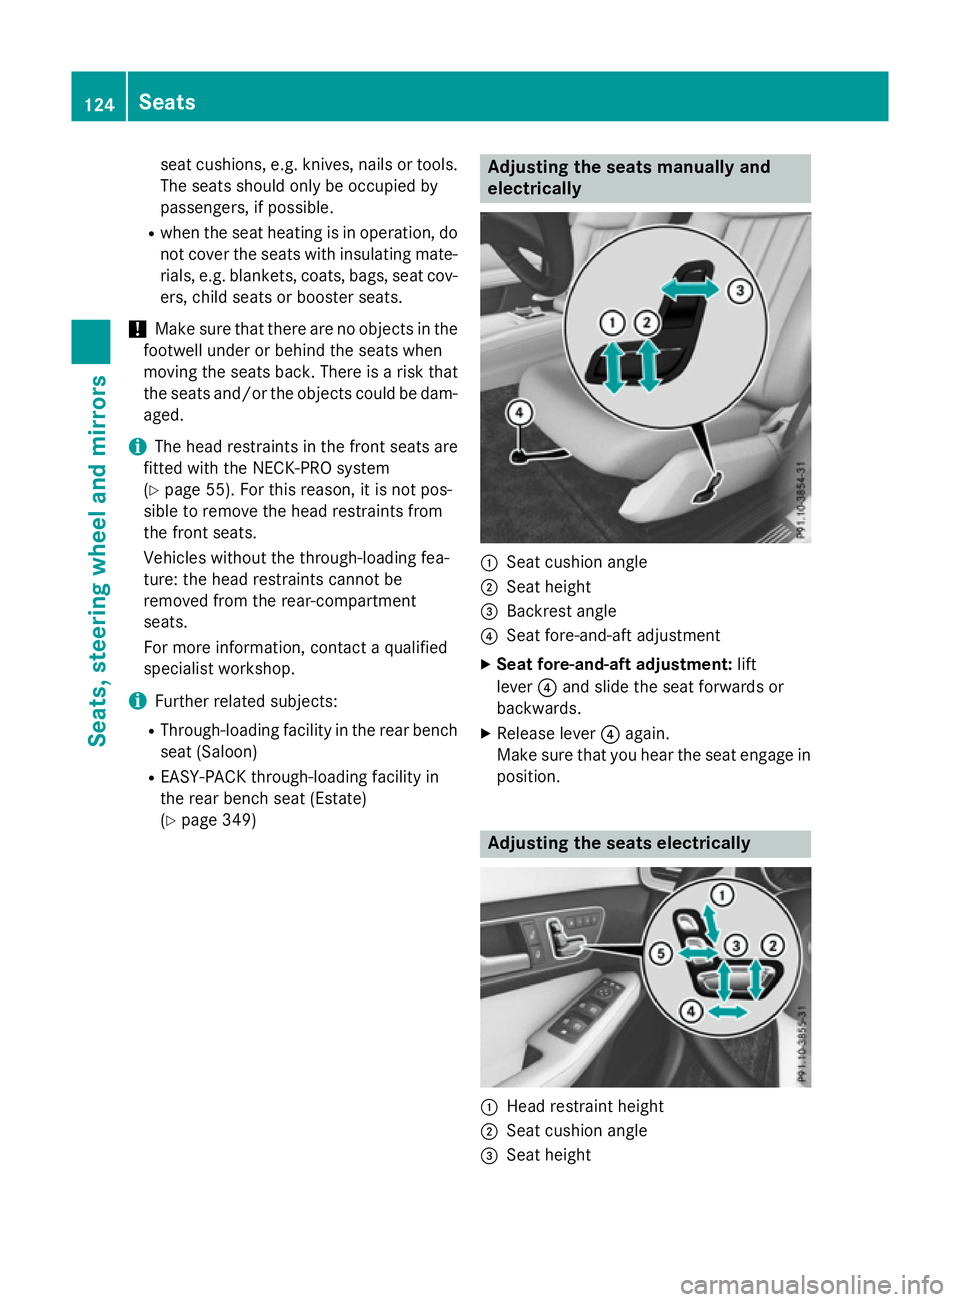
(Y page 349) Adjusting the seats manually and
electrically
:
Seat cushion angle
; Seat height
= Backrest angle
? Seat fore-and-aft adjustment
X Seat fore-and-aft adjustment: lift
lever ?and slide the seat forwards or
backwards.
X Release lever ?again.
Make sure that you hear the seat engage in
position. Adjusting the seats electrically
:
Head restraint height
; Seat cushion angle
= Seat height 124
SeatsSeats, steering wheela
nd mirrors
Page 128 of 497
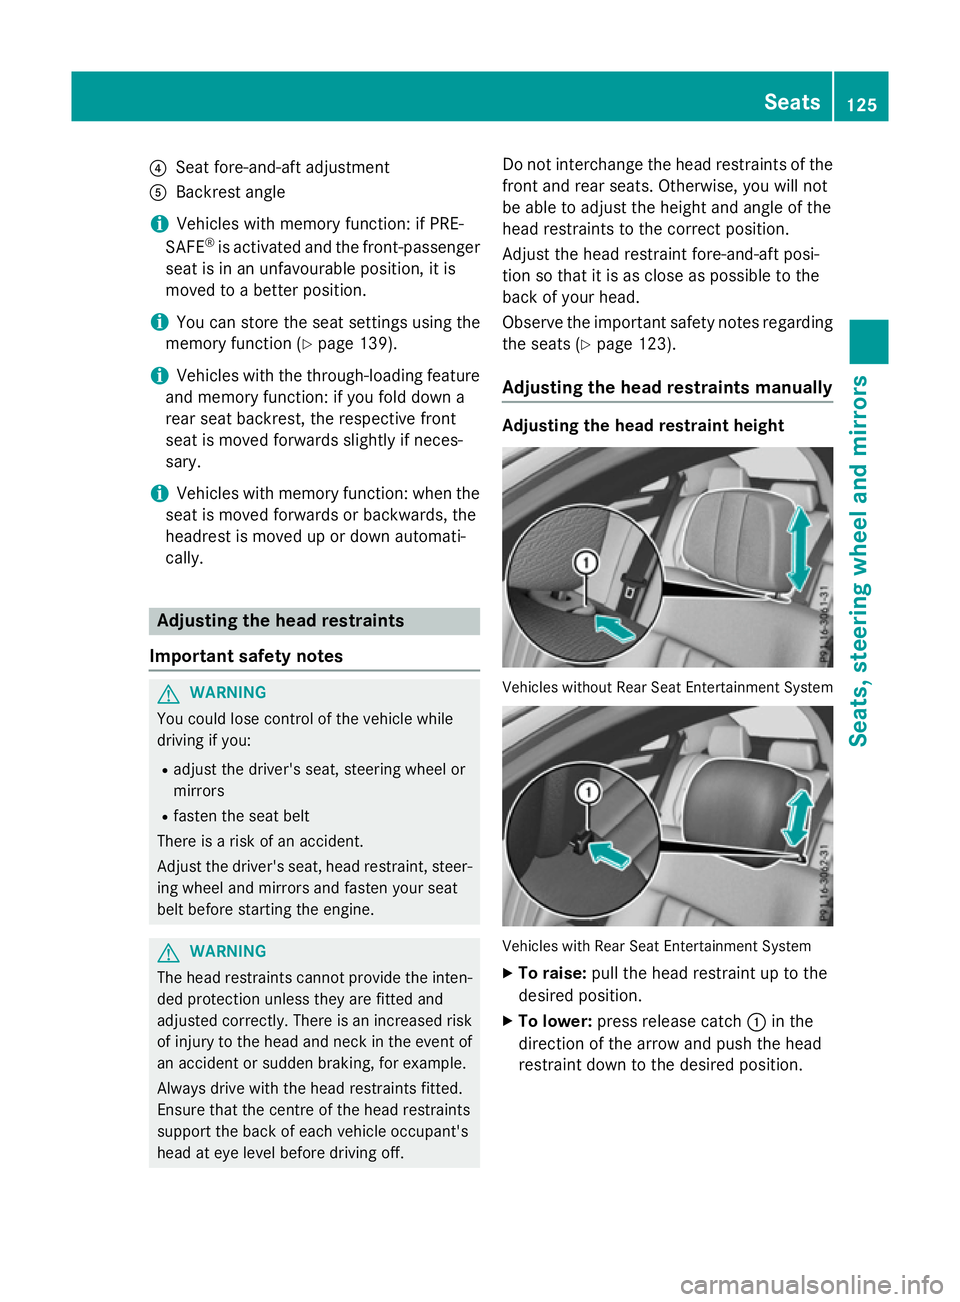
?
Sea tfore-and-aft adjustment
A Backrest angle
i Vehicles with memory function: if PRE-
SAFE ®
is activate dand the front-passenger
sea tisinanu nfavourable position, it is
move dtoab etter position.
i Yo
uc an store the sea tsettings using the
memory function (Y page 139).
i Vehicles with the through-loading feature
and memory function: if yo ufoldd owna
rea rseatb ackrest, the respective front
sea tism ovedforward sslightl yifneces-
sary.
i Vehicles with memory function: when the
sea tism ovedforward sorbackwards ,the
headrest is move dupordowna utomati-
cally. Adjustin
gthe hea drestraints
Important safety notes G
WARNING
Yo uc ould lose contro lofthe vehicl ewhile
driving if you:
R adjus tthe driver' sseat, steering wheel or
mirrors
R fasten the sea tbelt
There is ariskofana ccident.
Adjust the driver' sseat, hea drestraint, steer-
ing wheel and mirrors and fasten your seat
belt before starting the engine. G
WARNING
The hea drestraints canno tprovid ethe inten-
de dp rotectio nunless they are fitte dand
adjusted correctly .There is an increased risk
of injury to the hea dand neck in the event of
an accident or sudden braking, for example.
Alway sdrive with the hea drestraints fitted.
Ensur ethatthe centre of the hea drestraints
support the back of each vehicl eoccupant's
hea date yelevel before driving off. Do not interchange the hea
drestraints of the
front and rea rseats. Otherwise, yo uwilln ot
be able to adjus tthe height and angle of the
hea drestraints to the correct position.
Adjust the hea drestraint fore-and-aft posi-
tion so tha titisasc lose as possible to the
back of your head.
Observe the important safety notes regarding the seats (Y page 123).
Adjustin gthe hea drestraints manually Adjustin
gthe hea drestrain theight Vehicles withou
tRearS eatE ntertainment System Vehicles with Rear Sea
tEntertainment System
X To raise: pull the hea drestraint up to the
desired position.
X To lower: press release catch :in the
direction of the arrow and push the head
restraint dow ntothe desired position. Seats
125Seats, steering whee land mirrors Z
Page 129 of 497
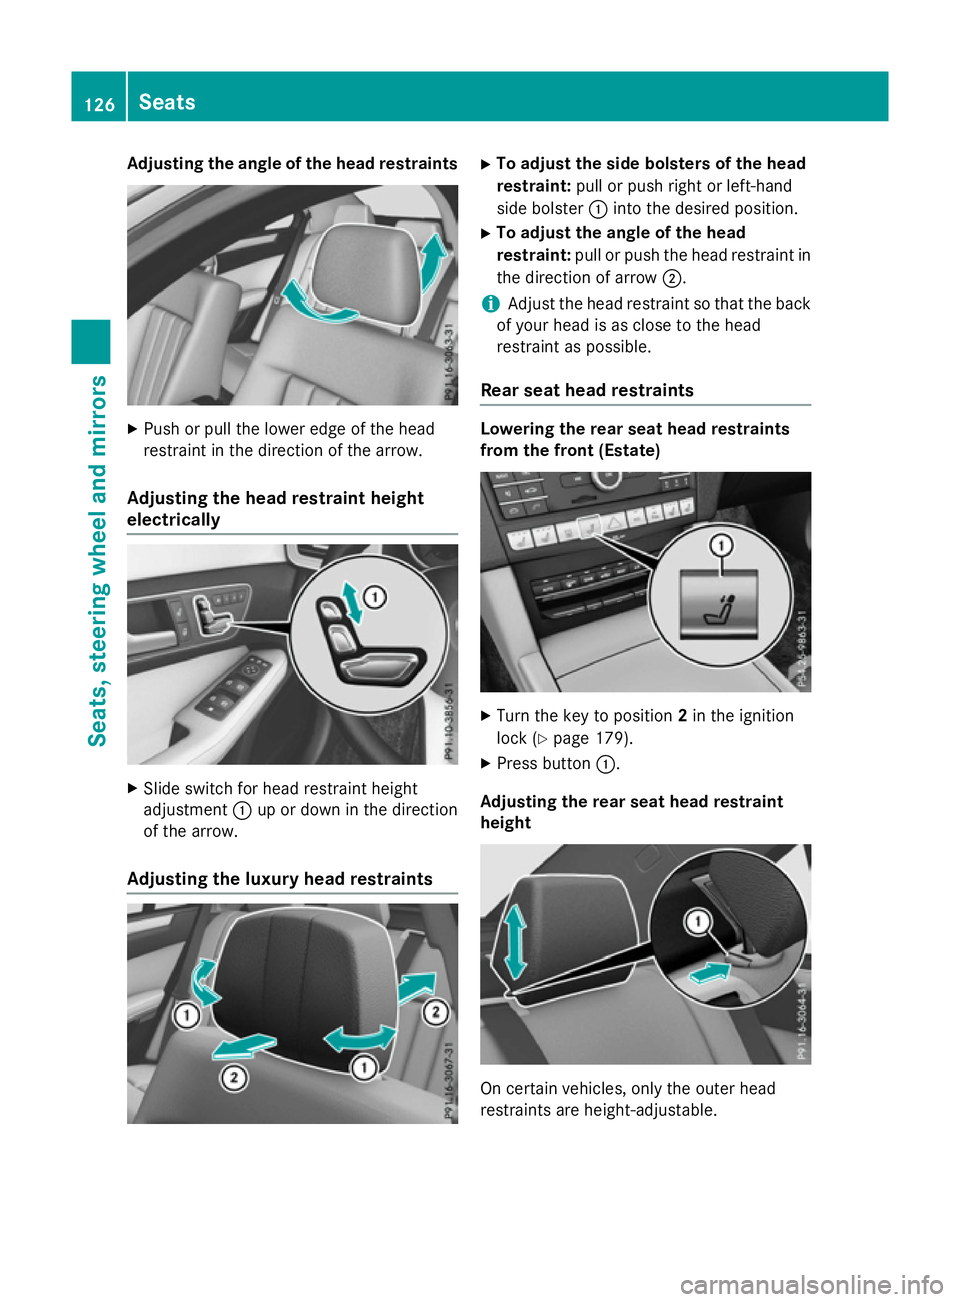
Adjusting th
eangle of th eheadr estraints X
Push or pull th elower edge of th ehead
restraint in th edirection of th earrow.
Adjusting th eheadr estrain theight
electrically X
Slide switch for head restraint height
adjustment :up or down in th edirection
of th earrow.
Adjusting th eluxur yheadr estraints X
To adjust th esideb olsters of th ehead
restraint: pull or push right or left-hand
side bolster :intot he desired position.
X To adjust th eangle of th ehead
restraint: pull or push th ehead restraint in
th ed irection of arrow ;.
i Adjus
tthe head restraint so that th eback
of your head is as close to th ehead
restraint as possible.
Rea rseat hea drestraints Lowering th
erears eat hea drestraints
from th efront (Estate) X
Turn th ekeyto position 2in th eignition
loc k(Ypage 179).
X Press button :.
Adjusting th erears eat hea drestraint
height On certai
nvehicles, only th eouter head
restraint sare height-adjustable. 126
SeatsSeats, steering wheel and
mirrors
Page 130 of 497
X
To raise: pull the hea drestraint up to the
desired height.
X To lower: press release catch :and push
the hea drestraint down unti litisinthe
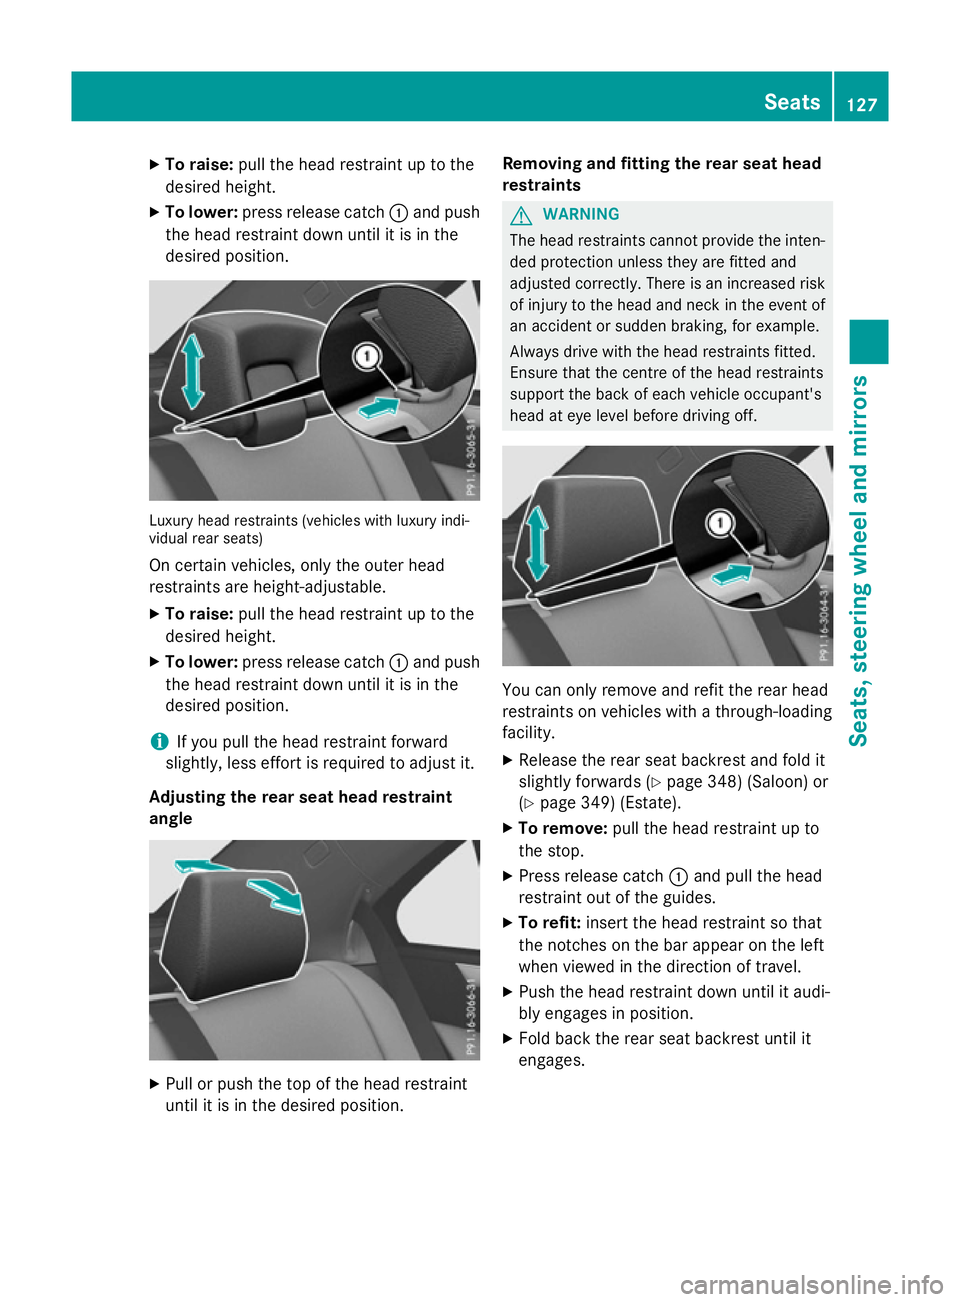
desired position. Luxur
yheadr estraints (vehicle swithl uxuryi ndi-
vidua lrea rs eats)
On certain vehicles, onl ythe outer head
restraints ar eheight-adjustable.
X To raise: pull the hea drestraint up to the
desired height.
X To lower: press release catch :and push
the hea drestraint down unti litisinthe
desired position.
i If yo
upullt he hea drestraint forward
slightly, less effort is required to adjus tit.
Adjusting the rear seat hea drestraint
angle X
Pull or push the top of the hea drestraint
unti litisint he desired position. Removing and fitting the rear seat head
restraints G
WARNING
The hea drestraints canno tprovid ethe inten-
de dp rotection unless they ar efitte dand
adjusted correctly. There is an increased risk of injury to the hea dand neck in the event of
an accident or sudden braking ,for example.
Alway sdrive with the hea drestraints fitted.
Ensure tha tthe centre of the hea drestraints
support the back of each vehicl eoccupant's
hea date yelevel before driving off. Yo
uc an onl yremove and refit the rea rhead
restraints on vehicles with athrough-loading
facility.
X Releas ethe rea rseatb ackres tand fol dit
slightl yforwards (Y page 348)(Saloon) or
(Y page 349 )(Estate).
X To remove: pull the headrestraint up to
the stop.
X Press release catch :and pull the head
restraint ou tofthe guides.
X To refit: insert the hea drestraint so that
the notche sonthe barappea ront he left
when viewe dinthe direction of travel.
X Push the hea drestraint down unti litaudi-
bl ye ngages in position.
X Fol db ackt he rea rseatb ackres tuntilit
engages. Seats
127Seats, steering wheel andmirrors Z