warning lights MERCEDES-BENZ E-CLASS ESTATE 2015 Owner's Manual
[x] Cancel search | Manufacturer: MERCEDES-BENZ, Model Year: 2015, Model line: E-CLASS ESTATE, Model: MERCEDES-BENZ E-CLASS ESTATE 2015Pages: 497, PDF Size: 16.23 MB
Page 155 of 497
If the wiper blades are worn, the windscreen
willnol onger be wiped properly. This could
prevent you from observing the traffic condi-
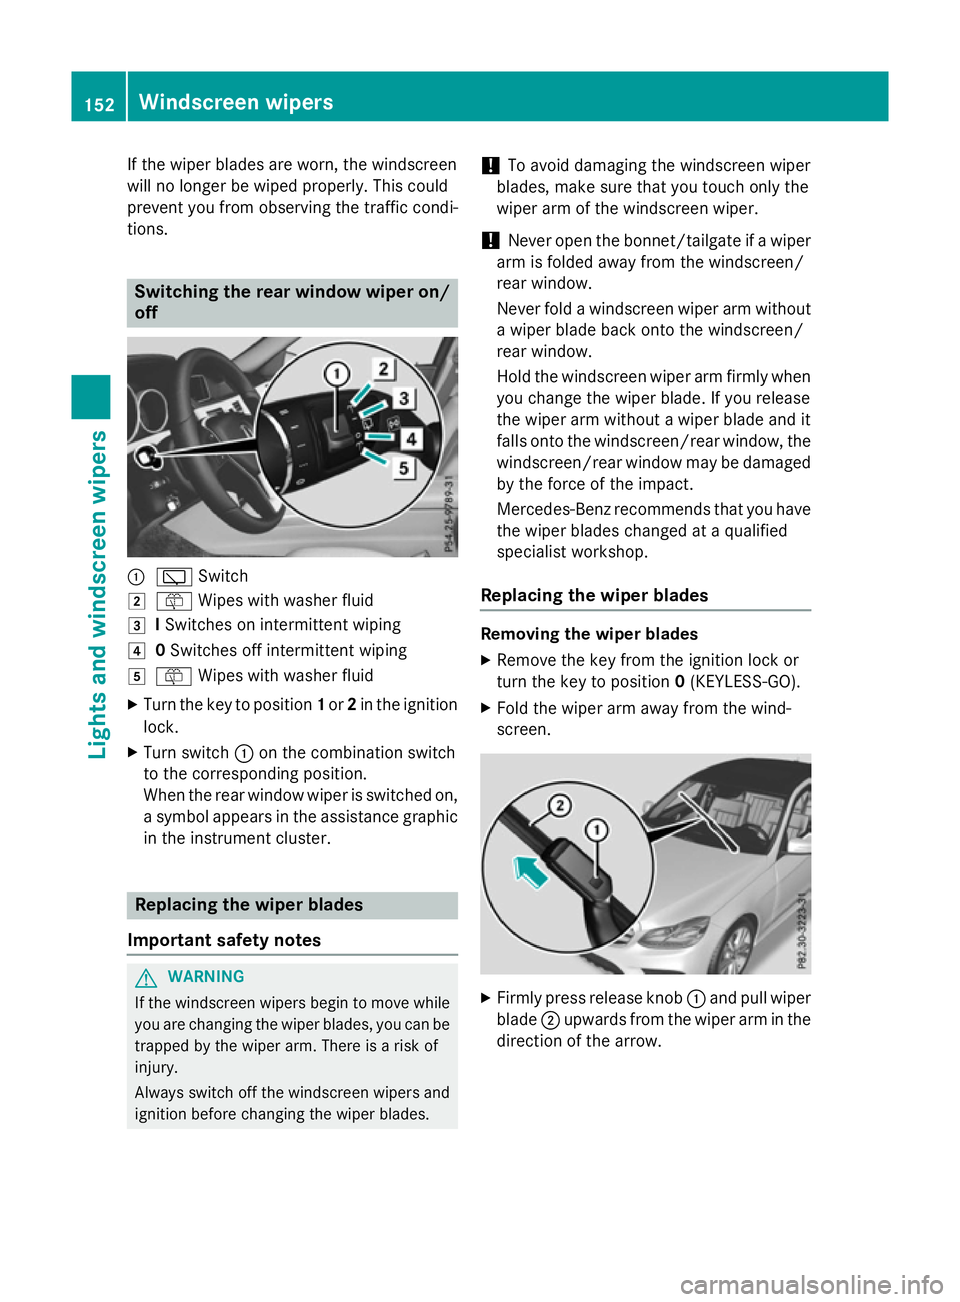
tions. Switching the rear window wipero
n/
off :
è Switch
2 ô Wipesw ith washer fluid
3 ISwitches on intermittent wiping
4 0Switches off intermittent wiping
5 ô Wipesw ith washer fluid
X Turn the key to position 1or 2in the ignition
lock.
X Turn switch :on the combination switch
to the corresponding position.
When the rear window wiper is switched on,
as ymbola ppears in the assistance graphic
in the instrument cluster. Replacing the wiperb
lades
Important safety notes G
WARNING
If the windscree nwipers begintom ove while
you are changing the wiper blades, you can be trapped by the wiper arm. There is arisk of
injury.
Alwayss witch off the windscree nwipers and
ignition before changing the wiper blades. !
To avoid damaging the windscree
nwiper
blades, make sure that you touch only the
wiper arm of the windscree nwiper.
! Never open the bonnet/tailgate if
awiper
arm is folded awayf rom the windscreen/
rear window.
Never fold awindscree nwiper arm without
aw iper blade back onto the windscreen/
rear window.
Hold the windscree nwiper arm firmly when
you change the wiper blade. If you release
the wiper arm withou tawiper blade and it
fallso nto the windscreen/rear window ,the
windscreen/rear window may be damaged
by the force of the impact.
Mercedes-Benz recommends that you have
the wiper blades changed at aqualified
specialist workshop.
Replacing the wiperb lades Removing the wiperb
lades
X Remove the key from the ignition lock or
turn the key to position 0(KEYLESS-GO).
X Fold the wiper arm awayf rom the wind-
screen. X
Firmly press release knob :and pullw iper
blade ;upwards from the wiper arm in the
direction of the arrow. 152
Windscreen wipersLights and windscreenw
ipers
Page 169 of 497
Problems with the rear window heating
Problem
Possible causes/consequences and
M
MSolutions The rear window heat-
ing has switched off
prematurely or cannot
be activated. The battery has not been sufficiently charged.
X Switch off any consumers that are not required, e.g. reading
lamps, interior lighting or the seat heating.
When the battery is sufficiently charged, the rear window heat- ing can be activated again. Switching air-recirculation mode
on/off
General notes You can deactivate the flow of fresh air if
unpleasant odours are enteringt he vehicle
from outside. The air already inside the vehi-
cle will then be recirculated.
If you activate air-recirculation mode, the win-
dows can mist up more quickly, in particular
at low temperatures. Only use air-recircula-
tion mode briefly to prevent the windows
misting up.
Activating/deactivating X
Turn the key to position 2in the ignition
lock (Y page 179).
X To activate: press thegbutton.
The indicator lamp above the gbutton
lights up.
i THERMATIC automatic climate control:
air-recirculation mode is activated auto-
matically at high outside temperatures.
THERMOTRONIC automatic climate con-
trol: air-recirculation mode is automatically
activated at high levels of pollution or at
high outside temperatures.
When air-recirculation mode is activated
automatically, the indicator lamp above the g button does not light up. Outside air is
added after about 30 minutes.
X To deactivate: press thegbutton.
The indicator lamp above the gbutton
goes out. i
Air-recirculation mode is deactivated
automatically:
R after approximately five minutes at out-
side temperatures below approximately
5†
R after approximately five minutes if cool-
ing with air dehumidification is deactiva-
ted
R after approximately 30 minutes at out-
side temperatures above approximately
5† if the cooling with air dehumidifica-
tion function is activated Convenience opening or closing using
the air-recirculation button G
WARNING
When the convenience closing feature is oper- ating, parts of the body could become trapped
in the closing area of the side window and the
sliding sunroof. There is arisk of injury.
Observe the complete closing procedure
when the convenience closing feature is oper-
ating. When closing make sure that no parts of the body are in the closing area. G
WARNING
During convenience opening parts of the body could be drawn in or become trapped
between the side window and window frame.
There is arisk of injury.
When opening, make sure that nobody is
touching the side window. If someone
becomes trapped, press the Wswitch 166
Operating the climate control systemClimatec
ontrol
Page 185 of 497
Manual transmission
X
Depress the brake peda land keep it
depressed.
X Full ydepress the clutch pedal.
X Shift to neutral N.
Automatic transmission X
Shift the transmission to position P.
The transmission position indicator in the
multifunction display shows P.
i You can start the engine in transmission
position Pand N.
Starting procedure with the key i
To start the engine using the key instead
of KEYLESS-GO, pullt he Start/Stop button
out of the ignitio nlock.
X Vehicles with diese lengine: turn the key
to position 2in the ignitio nlock
(Y page1 79).
The % preglow indicator lampint he
instrument cluster lights up.
X Turn the key to position 3in the ignition
lock and release it as soon as the engine is running (Y page179).
i Vehicles with
adiesele ngine: you can
start the engine without preglow if the
engine is warm.
Using KEYLESS-GO to start the engine i
The Start/Stop button can be usedto
start the vehicl emanually without inserting
the key into the ignitio nlock. The key must
be in the vehicl eand the Start/Stop button
must be inserted in the ignitio nlock. This
mode for starting the engine operates inde- pendently of the ECO start/stop automatic engine start function. X
Depress the brake peda land keep it
depressed.
X Press the Start/Stop button once
(Y page1 79).
Vehicles with apetrol engine: the engine
starts.
Vehicles with adiesele ngine: preglow is
activated and the engine starts. Pulling away
General notes G
WARNING
Vehicles with automatic transmission:
If the engine spee disabove the engine idling
spee dand you then engag etransmission
position Dor R,t he vehicl emay accelerate
suddenly .There is arisk of an accident.
When engaging transmission position Dor R,
alwaysk eep the brake peda lfirmly depressed
and do not depress the accelerator peda lat
the same time.
! Vehicles with manual transmission:
change gearing ood time and avoi dspin-
ning the wheels. You coul dotherwise dam-
age the vehicle.
! If
aw arning tone sound sand the
Release park. brake Release park. brake message appears
in the multifunction display,t he parking
brake is still applied. Releaset he parking
brake.
Depress the accelerator carefully when pull-
ing away.
The vehicl elocks centrall yonce you have
pulled away.T he locking knobs in the doors
drop down.
You can open the doors from the insid eatany
time.
You can alsod eactivate the automatic locking
feature (Y page293).
Vehicles with automatic transmission: it
is only possible to shift the transmission from 182
DrivingDriving and parking
Page 210 of 497
X
Releas ethe brak epedal.
X Releas ethe parkin gbrake.
X Switc hoff th eignition and leav ethe keyin
th ei gnition lock.
The engin ecan be switched off while th evehi-
cle is in motion by pressing and holdin gthe
Start/Sto pbutto nfor about three seconds.
This function operate sind ependentl yofthe
ECO start/sto pautomatic engin eswitch-off
function. Parking brake
G
WARNING
If you mus tbrak ethe vehicl ewitht he parking
brake, th ebrakin gdistanc eisconsid erably
longer and th ewheels could lock. This increa-
ses th eriskofs kiddin gand an accident.
Only use th eparkin gbrak etob rakethe vehi-
cle when th eservic ebrak eisf aulty. Do not
apply th eparkin gbrak etoo firmly. If the
wheels lock, release th eparkin gbrak euntil
th ew heels begi nturning again. G
WARNING
If you leav echildren unattended in th evehi-
cle ,the ym ay be able to set th evehicl ein
motion if, for example, they:
R release th eparkin gbrake
R shift th eautomati ctransmission out of park
position Por shift manual transmission into
neutral
R start th eengine
In addition ,the ym ay operate vehicl eequip-
men tand become trapped .There is ariskof
an acciden tand injury.
Whe nleavin gthe vehicle, always tak ethe key
wit hyou and loc kthe vehicle. Never leave
children unattended in th evehicle. The brak
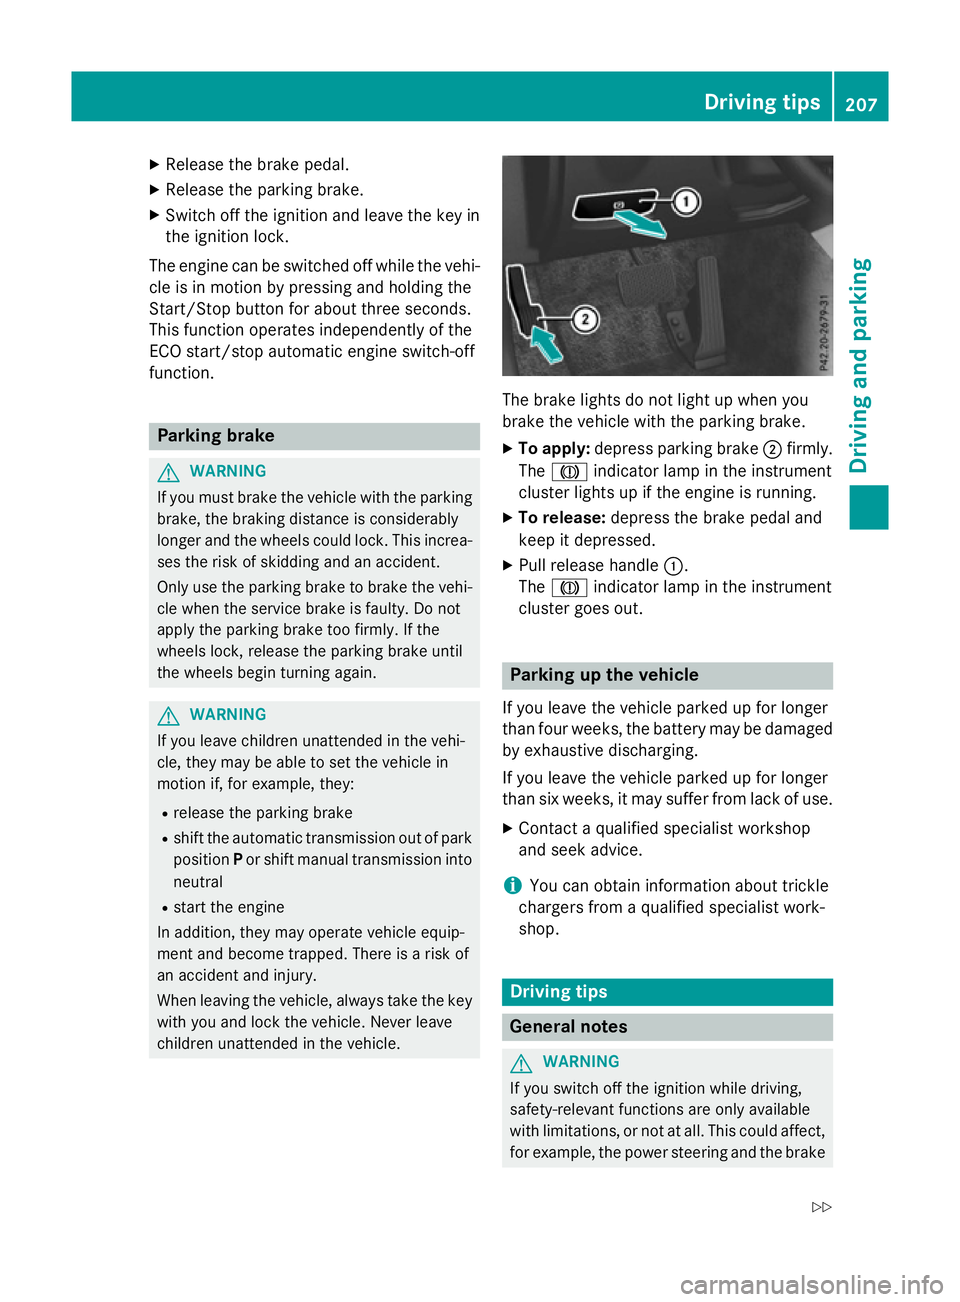
elights do no tligh tupw hen you
brak ethe vehicl ewitht he parkin gbrake.
X To apply: depress parkin gbrake ;firmly.
The J indicato rlamp in th einstrument
cluste rlights up if th eengineisr unning.
X To release: depress thebrak epedal and
keep it depressed.
X Pull release handle :.
The J indicato rlamp in th einstrument
cluste rgoeso ut. Parking up th
evehicle
If you leav ethe vehicl eparked up for longer
than fou rweeks, th ebattery may be damaged
by exhaustive discharging.
If you leav ethe vehicl eparked up for longer
than six weeks, it may suffer from lack of use.
X Contac taqualified specialist workshop
and see kadvice.
i You can obtain information about trickle
chargers from aqualified specialist work-
shop. Driving tips
Genera
lnotes G
WARNING
If you switch off th eignition while driving,
safety-relevant function sare only available
wit hlimitations, or no tatall. This could affect,
for example, th epowe rsteerin gand th ebrake Driving tips
207Driving and pa rking
Z
Page 219 of 497
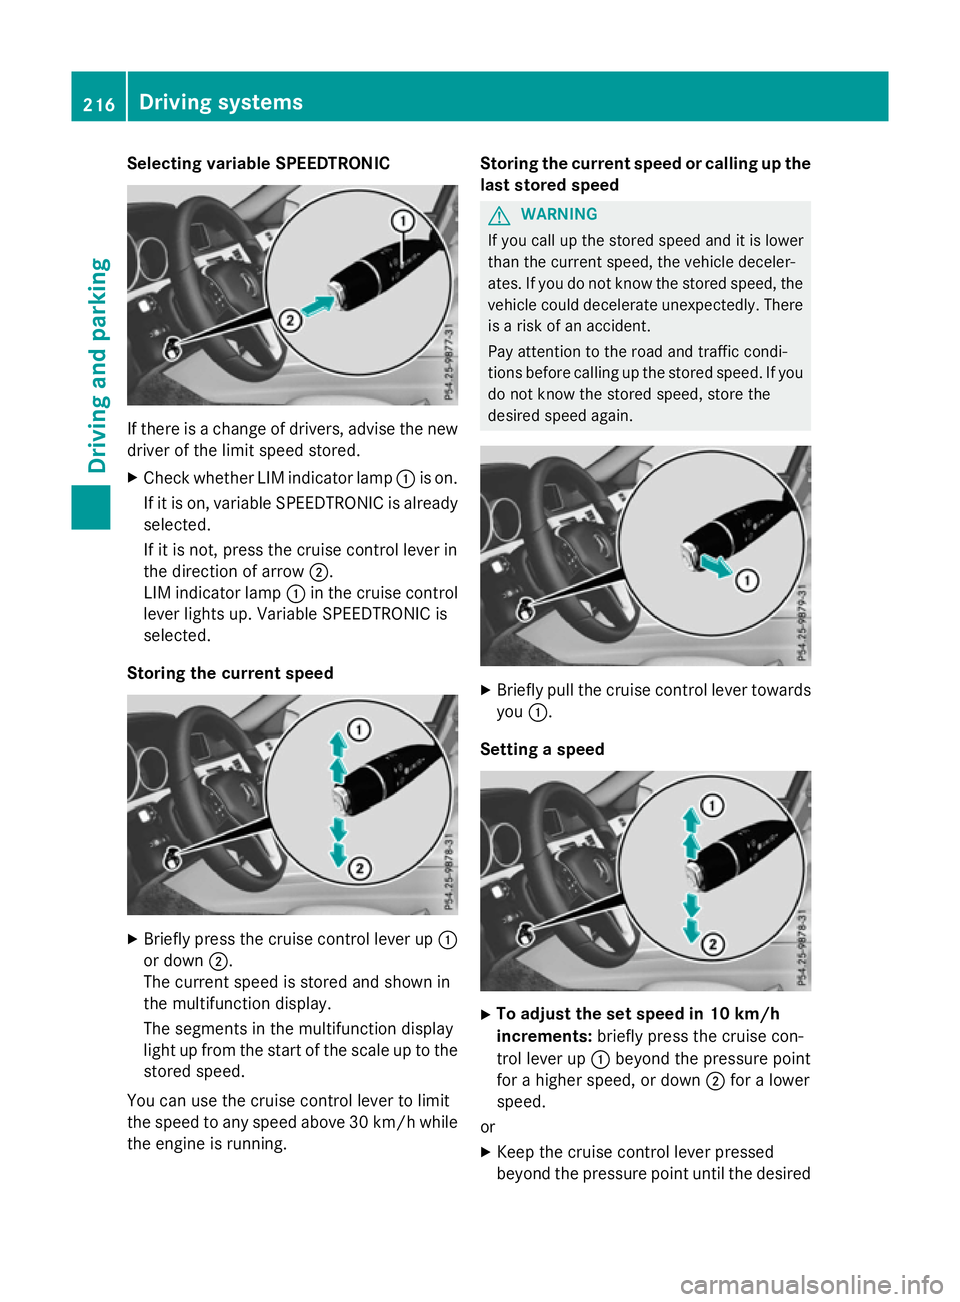
Selecting variable SPEEDTRONIC
If there is
achange of drivers, advise the new
driver of the limit speed stored.
X Check whether LIM indicator lamp :is on.
If it is on, variable SPEEDTRONIC is already
selected.
If it is not, press the cruise control lever in
the direction of arrow ;.
LIM indicator lamp :in the cruise control
lever lights up. Variable SPEEDTRONIC is
selected.
Storing the current speed X
Briefly press the cruise control lever up :
or down ;.
The current speed is stored and shown in
the multifunction display.
The segments in the multifunction display
light up from the start of the scale up to the
stored speed.
You can use the cruise control lever to limit
the speed to any speed above 30 km/hw hile
the engine is running. Storing the current speed or calling up the
last stored speed G
WARNING
If you call up the stored speed and it is lower
than the current speed, the vehicle deceler-
ates. If you do not know the stored speed, the vehicle could decelerate unexpectedly. There
is ar isk of an accident.
Pay attention to the road and traffic condi-
tions before calling up the stored speed. If you do not know the stored speed, store the
desired speed again. X
Briefly pull the cruise control lever towards
you :.
Setting aspeed X
To adjust the set speed in 10 km/h
increments: briefly press the cruise con-
trol lever up :beyond the pressure point
for ahigher speed, or down ;for alower
speed.
or X Keep the cruise control lever pressed
beyond the pressure point until the desired 216
Driving systemsDriving and parking
Page 228 of 497
There are several ways to deactivate
DISTRONIC PLUS:
X Briefly press the cruise control lever for-
wards :.
or
X Brake, unless the vehicle is stationary.
or X Briefly press the cruise control lever in the
direction of arrow =.
Variable SPEEDTRONIC is selected. LIM
indicator lamp ;in the cruise control lever
lights up.
When you deactivate DISTRONIC PLUS, you
will see the DISTRONIC
DISTRONIC PLUS PLUSoff
offmessage in
the multifunction display for approximately
five seconds.
i The last speed stored remains stored until
you switch off the engine.
i DISTRONIC PLUS is not deactivated if you
depress the accelerator pedal.
DISTRONIC PLUS is automatically deactiva-
ted if: R you apply the parking brake
R ESP ®
intervenes or you deactivate ESP ®
R the transmission is in the P,Ror Nposition
R you pull the cruise control lever towards
you in order to pull away and the front-
passenger door or one of the rear doors is
open
R the vehicle is skidding
R you activat eActive Parking Assist
If DISTRONIC PLUS is deactivated, you will
hear awarning tone. You will see the
DISTRONIC PLUS off DISTRONIC PLUS off message in the multi-
function display for approximately five sec-
onds. Tips for driving with DISTRONIC PLUS General notes
Pay particular attention in the following traffic
situations:
R cornering, entering and exitin gabend
R vehicles which are not driving in the middle
of their lane
R other vehicles changin glane
R narrow vehicles
R obstructions and stationary vehicles
R crossin gvehicles
In such situations, brake if necessary.
DISTRONIC PLUS is then deactivated.
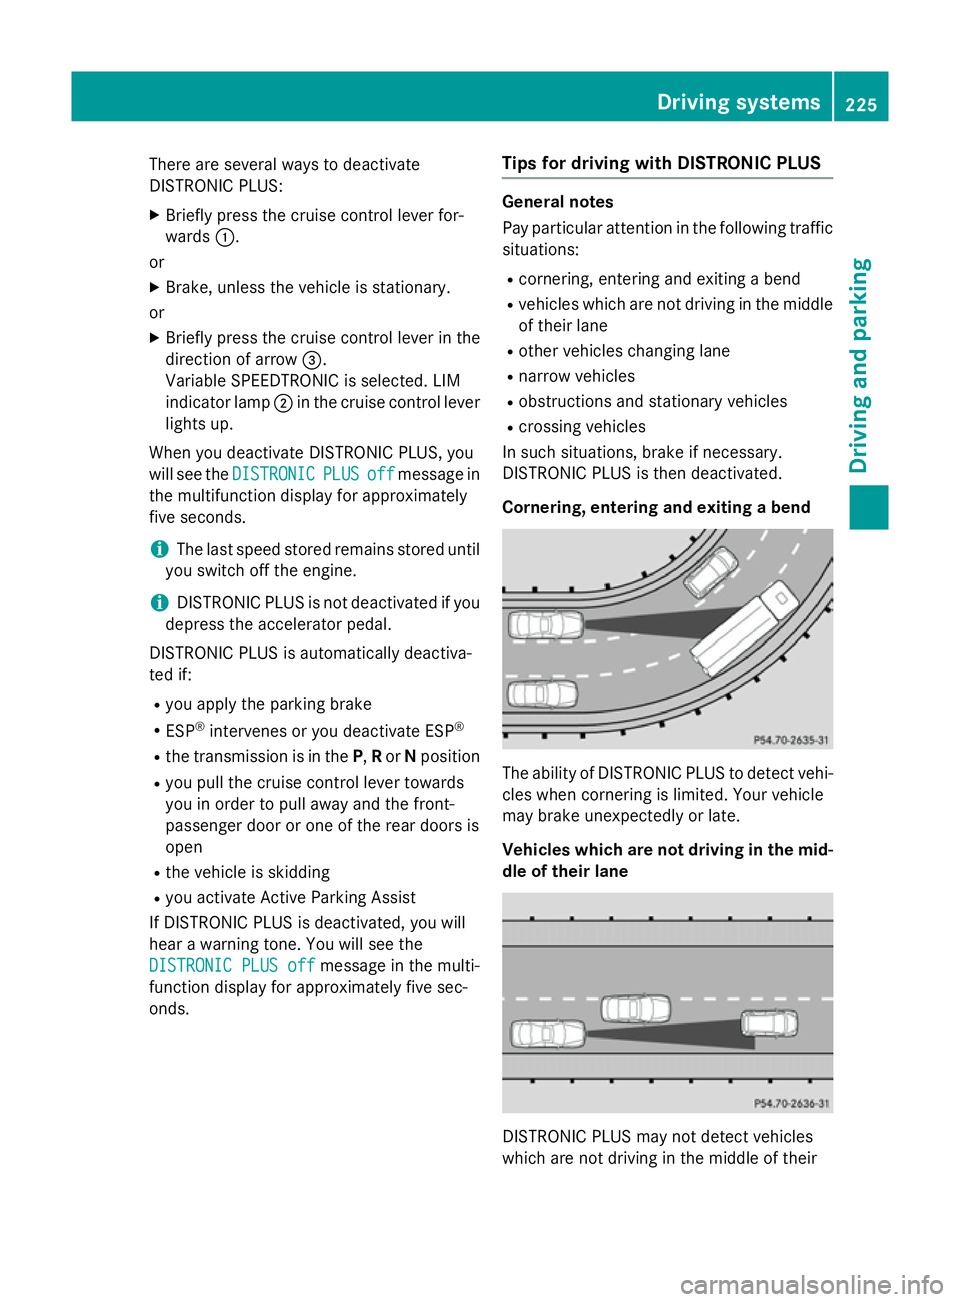
Cornering, entering and exiting abend The ability of DISTRONIC PLUS to detect vehi-
cles when cornering is limited. Your vehicle
may brake unexpectedly or late.
Vehicles which are not driving in the mid- dle of their lane DISTRONIC PLUS may not detect vehicles
which are not driving in the middle of their Driving systems
225Driving and parking Z
Page 236 of 497
X
Press button :.
Indicator lamp =lights up. You have selec-
ted "Comfort mode".
The AIRMATIC COMFORT
AIRMATIC COMFORT message appears
in the multifunction display. AMG RIDE CONTROL sport
ssuspen-
sion
Important safety notes G
WARNING
People's limbs may become trapped if they
are located underneat hthe vehicle or
between the vehicle body and the tyres when the vehicle is lowering. There is adanger of
injury.
When lowering the vehicle, make sure no one
is underneat hthe vehicle or in the immediate
vicinit yofthe wheel arches. G
WARNING
Vehicles with level control:
The vehicle is slightly lowered if you:
R have selected comfor tsuspension tuning
and
R you lock the vehicle within approximately
60 seconds of switchin goff the engine
You and people in the vicinit yofthe wheel
arch or the underbody may thus become trap- ped. There is arisk of injury.
Make sure that nobody is in the vicinit yofthe
wheel arch or the underbody when you lock
the vehicle.
! The vehicle is lowered by about 20 mm if:
R you have selected "Comfort tuning"
R you switch off the engine and
R you lock the vehicle within approximately
60 seconds
When parking, position your vehicle so that it does not make contact with the kerb as
the vehicle is lowered. Your vehicle could
otherwise be damaged. Suspension setting General notes
The electronically controlled damping system
works continuously. This improves driving
safety and ride comfort.
The damping is tuned individually to each
wheel and depends on:
R your driving style, e.g. sporty
R the road surface condition, e.g. bumps
R your individual selection of Sport ,Sport +
or Comfort
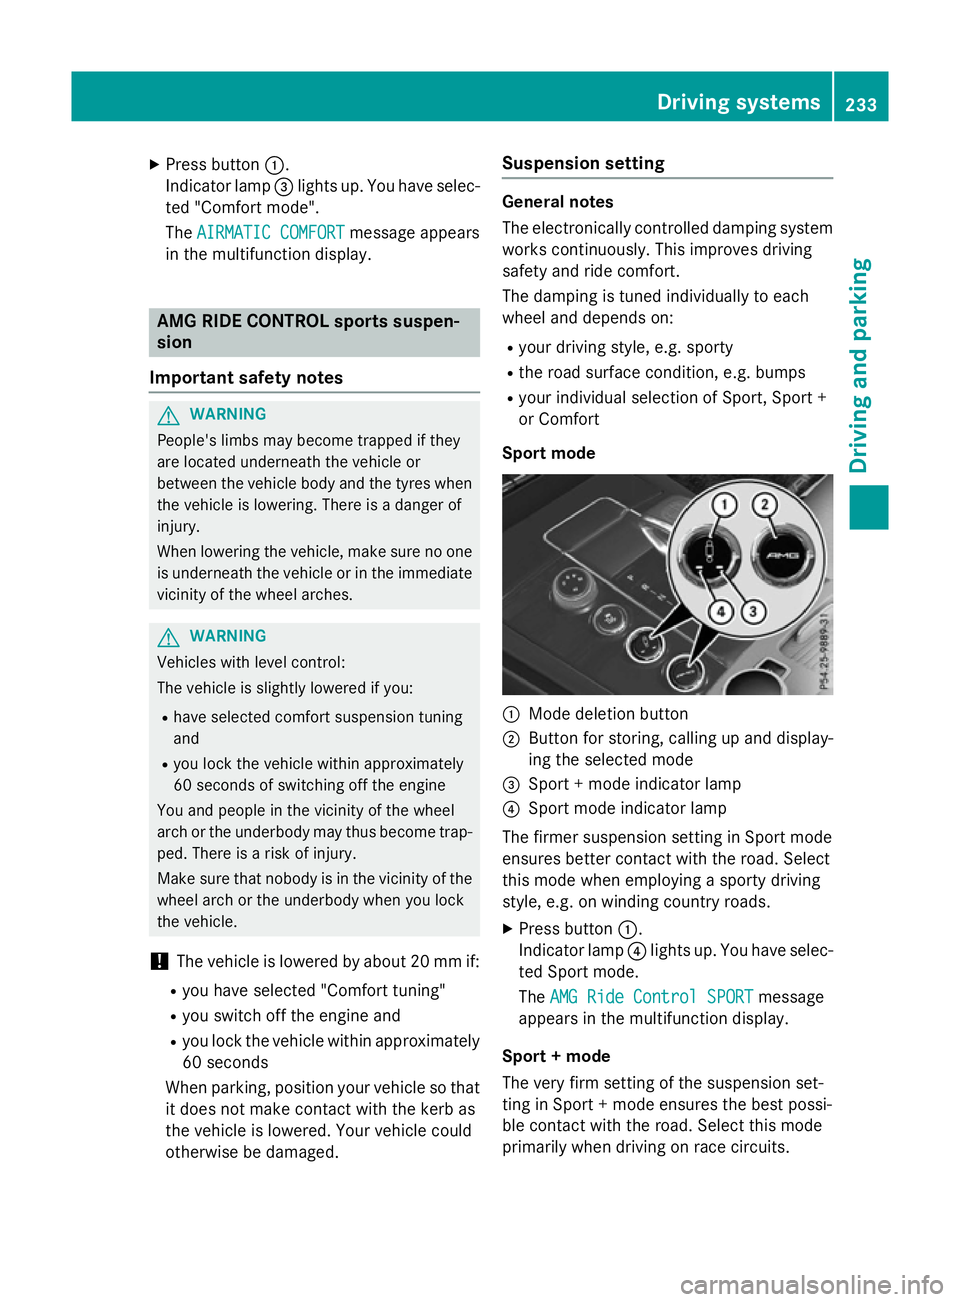
Sport mode :
Mode deletion button
; Button for storing, calling up and display-
ing the selected mode
= Sport +mode indicator lamp
? Sport mode indicator lamp
The firmer suspension setting in Sport mode
ensures better contact with the road. Select
this mode when employing asporty driving
style, e.g. on winding country roads.
X Press button :.
Indicator lamp ?lights up. You have selec-
ted Sport mode.
The AMG Ride Control SPORT AMG Ride Control SPORT message
appears in the multifunction display.
Sport +mode
The very firm setting of the suspension set-
ting in Sport +mode ensures the best possi-
ble contact with the road. Select this mode
primarily when driving on race circuits. Driving systems
233Driving and parking Z
Page 237 of 497
If indicator lamps
=and ?are off:
X Press button :twice.
Indicator lamps =and ?lightu p. You
have selected Sport +mode.
The AMG
AMG Ride
Ride Control
Control SPORT +
SPORT +message
appears in the multifunction display.
If indicator lamp ?lights up:
X Press button :once.
Second indicator lamp =lights up. You
have selected Sport +mode.
The AMG
AMG Ride
Ride Control
Control SPORT +
SPORT +message
appears in the multifunction display.
Comfort mode
When Comfort mode is selected, the handling
characteristics of yourv ehicle are more com-
fortable .Select this mode if you prefer amore
comfortable driving style. Select Comfort
mode also when driving fast on straight roads, e.g. on straight stretches of motorway.
X Press button :repeatedly until indicator
lamps =and ?go out.
You have selected Comfort mode.
The AMG Ride Control COMFORT
AMG Ride Control COMFORT mes-
sage appears in the multifunction display.
Storing and calling up settings
Once the suspension setting and drive pro-
gram have been selected, you can store and
call up yours ettings using AMG button ;.
X To store: press and hold AMG button ;
until you hear atone.
X To call up: press AMG button ;.
The stored suspension setting and drive
program are selected.
X To display: brieflypress AMG button ;.
Yours election appears in the multifunction
display. Vehicl
elevel Important safety notes
G
WARNING
People's limbs may become trapped if they
are located underneath the vehicle or
betwee nthe vehicle body and the tyres when
the vehicle is lowering. There is adanger of
injury.
When lowering the vehicle ,make sure no one
is underneath the vehicle or in the immediate vicinity of the wheela rches.
The vehicle may be lowered if you press the
suspension setting selector button or the
AMG button. The vehicle is lowered even if the
vehicle is at astandstill.
! If Sport or Sport
+suspension tuning has
been selected, the vehicle's ground clear-
ance decreases. Make sure that no objects
become trapped or that the vehicle has not
been damaged, for example, on the kerb.
i The vehicle level at the rear axle may
change visibly if you park the vehicle and
the outsid etemperature changes. If the
temperature drops, the vehicle level low-
ers; with an increase in temperature ,the
vehicle level rises.
Changing the rear axle level
This function is only available for the E63
AMG 4MATIC.
The vehicle level at the rear axle depends on
the selected suspension mode and the vehi-
cle speed.
The vehicle level at the rear axle changes
whiled riving depending on which suspension
mode is selected:
R Comfort: +10 mm
R Sport +and Sport: -15 mm
When changing from Comfort to Sport or
Sport +, the axle is lowered approximately
25 mm. When changing from Sport or Sport +
to Comfort, the axle is raiseda pproximately234
Driving systemsDriving and parking
Page 240 of 497
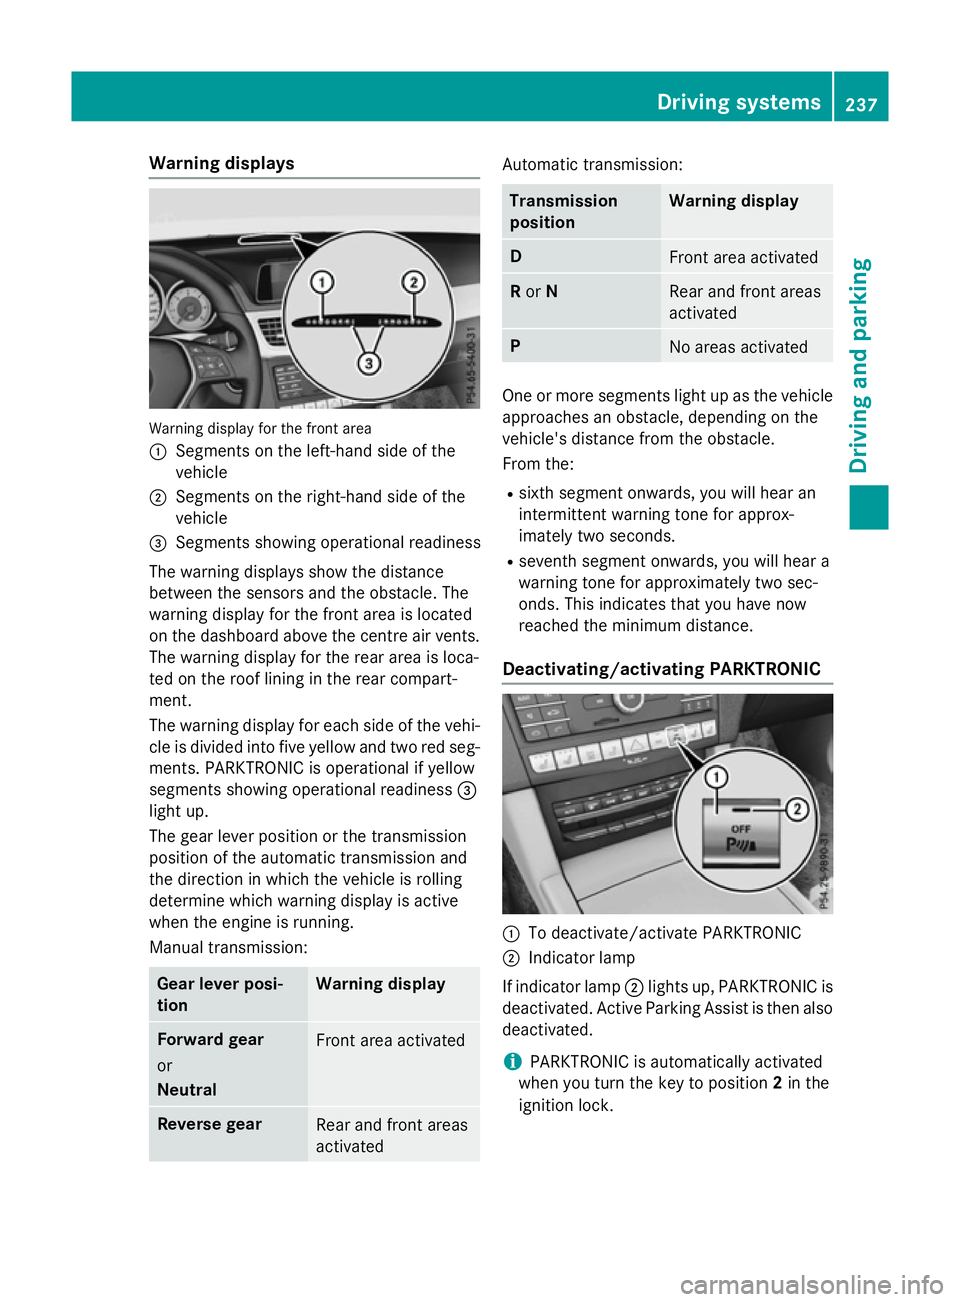
Warning displays
Warning display for the front area
: Segments on the left-hand side of the
vehicle
; Segments on the right-hand side of the
vehicle
= Segments showing operational readiness
The warning displays show the distance
between the sensors and the obstacle. The
warning displayf or the front area is located
on the dashboard above the centre airv ents.
The warning displayf or the rear area is loca-
ted on the roof lining in the rear compart-
ment.
The warning displayf or each side of the vehi-
cle is divided into five yellow and two red seg- ments. PARKTRONIC is operational if yellow
segments showing operational readiness =
light up.
The gea rleve rposition or the transmission
position of the automatic transmission and
the direction in which the vehicl eisrolling
determine which warning displayisa ctive
whe nthe engine is running.
Manual transmission: Gear lever posi-
tion Warning display
Forward gear
or
Neutral
Front area activated
Reverse gear
Rea
rand front areas
activated Automati
ctransmission: Transmission
position Warning display
D
Front area activated
R
or N Rea
rand front areas
activated P
No area
sactivated One or more segments light up as the vehicle
approache sanobstacle, depending on the
vehicle's distance from the obstacle.
From the:
R sixth segment onwards, you wil lhearan
intermittent warning tone for approx-
imately two seconds.
R seventh segment onwards, you wil lheara
warning tone for approximately two sec-
onds. This indicates that you have now
reache dthe minimu mdistance.
Deactivating/activating PARKTRONIC :
To deactivate/activate PARKTRONIC
; Indicator lamp
If indicator lamp ;lights up, PARKTRONIC is
deactivated. Active Parking Assist is then also
deactivated.
i PARKTRONIC is automatically activated
whe nyou turn the key to position 2in the
ignition lock. Driving systems
237Driving and parking Z
Page 242 of 497
Problems with PARKTRONIC
Problem
Possible causes/consequences and
M
MSolutions Only the red segments
in the PARKTRONIC
warning displaysa
re lit.
You also hear awarning
tone for approximately
two seconds.
PARKTRONIC is then
deactivated and the
indicator lamp on the
PARKTRONIC button
lights up. PARKTRONIC has malfunctioned and has switched off.
X If problems persist, have PARKTRONIC checked at aqualified
specialist workshop. Only the red segments
in the PARKTRONIC
warning displaysa
re lit.
PARKTRONIC is then
deactivated. The PARKTRONIC sensors are dirty or there is interference.
X Cleant he PARKTRONIC sensors (Y page 389).
X Switch the ignition back on. The problem may be caused by an external source of radio or
ultrasound waves.
X See if PARKTRONIC functions in adifferent location. Active Parking Assist
General notes Active Parking Assist is an electronic parking
aid with ultrasound. It measures the road on
both sides of the vehicle. Aparking symbol
indicates asuitable parking space. Active
steering intervention and brake application
can assist you during parking. You may also
use PARKTRONIC (Y page 235).
i The active braking application is only
available on vehicles with automatic trans- mission.
Important safety notes Active Parking Assist is only an aid. It is not a
substitute for your attention to the immediate surroundings. The responsibility for safe
manoeuvring and parking remains with you.
Make sure that no persons, animals or
objectsa re in the manoeuvring range. When PARKTRONIC is switched off, Active
Parking Assist is also unavailable. G
WARNING
While parking or pulling out of aparking
space, the vehicle swings out and can drive
onto areas of the oncomingl ane. This could
cause you to collide with other road users.
There is arisk of an accident.
Pay attention to other road users. Stop the
vehicle if necessary or cancel the Active Park- ing Assist parking procedure.
! If unavoidable, you should drive over
obstacles such as kerbs slowly and not at a
sharp angle. Otherwise, you may damage
the wheels or tyres.
Active Parking Assist may also display spaces not suitable for parking, e.g.:
R parking or stopping prohibitions
R in front of drivewaysore ntrances and exits
R unsuitable surfaces Driving systems
239Driving and parking Z