display MERCEDES-BENZ E-CLASS ESTATE 2015 Owner's Guide
[x] Cancel search | Manufacturer: MERCEDES-BENZ, Model Year: 2015, Model line: E-CLASS ESTATE, Model: MERCEDES-BENZ E-CLASS ESTATE 2015Pages: 497, PDF Size: 16.23 MB
Page 125 of 497
Useful information
i This Owner's Manual describes all mod-
els, series and optional equipment for your
vehicle that were available at the time of
going to press. National variation sare pos-
sible. Not ethat your vehicle may not be
equipped with all of the function sdescri-
bed. This is also the case for system sand
function srelevan ttosafety.
i Read the information on qualified special-
ist workshops: (Y page 27). Correct driver's seat position
G
WARNING
You could lose contro lofthe vehicle while
drivin gifyou:
R adjust the driver' sseat, steering wheel or
mirrors
R faste nthe seat belt
There is arisk of an accident.
Adjust the driver' sseat, head restraint ,steer-
ing wheel and mirrors and faste nyour seat
belt before starting the engine. X
Observ ethe safet yguidelines on seat
adjustment (Y page 123).
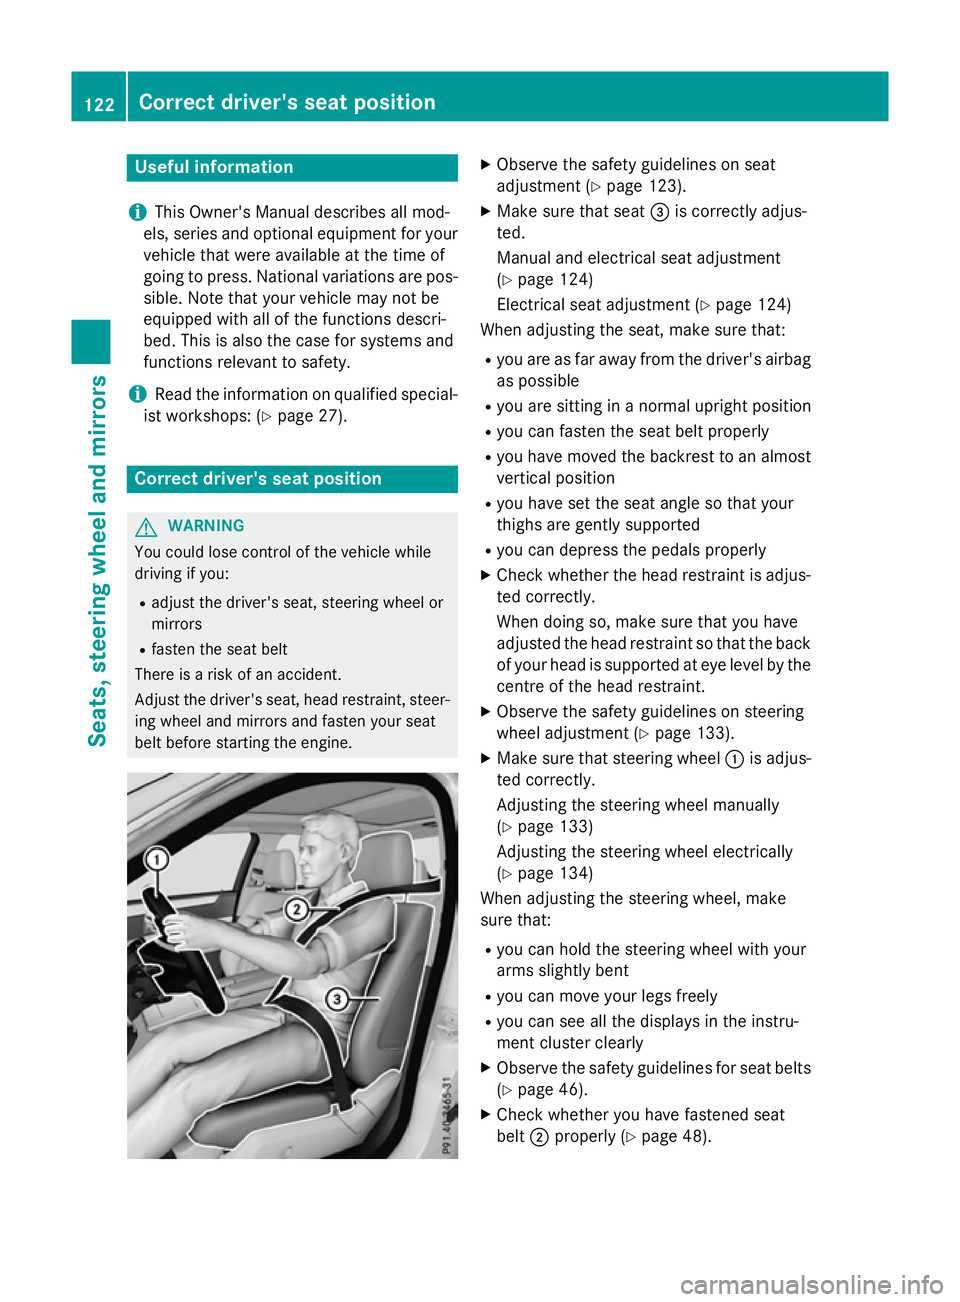
X Make sure that seat =is correctly adjus-
ted.
Manual and electrical seat adjustment
(Y page 124)
Electrical seat adjustment (Y page 124)
When adjusting the seat, make sure that:
R you are as far away from the driver' sairbag
as possible
R you are sitting in anormal upright position
R you can faste nthe seat belt properly
R you have moved the backrest to an almost
vertical position
R you have set the seat angle so that your
thighs are gently supported
R you can depress the pedals properly
X Check whether the head restraint is adjus-
ted correctly.
When doing so, make sure that you have
adjusted the head restraint so that the back
of your head is supported at eye level by the centre of the head restraint.
X Observ ethe safet yguidelines on steering
wheel adjustment (Y page 133).
X Make sure that steering wheel :is adjus-
ted correctly.
Adjustin gthe steering wheel manually
(Y page 133)
Adjustin gthe steering wheel electrically
(Y page 134)
When adjusting the steering wheel, make
sure that:
R you can hold the steering wheel with your
arms slightly bent
R you can move your legs freely
R you can see all the displays in the instru-
ment cluster clearly
X Observ ethe safet yguidelines for seat belts
(Y page 46).
X Check whether you have fastened seat
belt ;properly (Y page 48).122
Correct driver's seat positionSeats, steering wheel and mirrors
Page 151 of 497
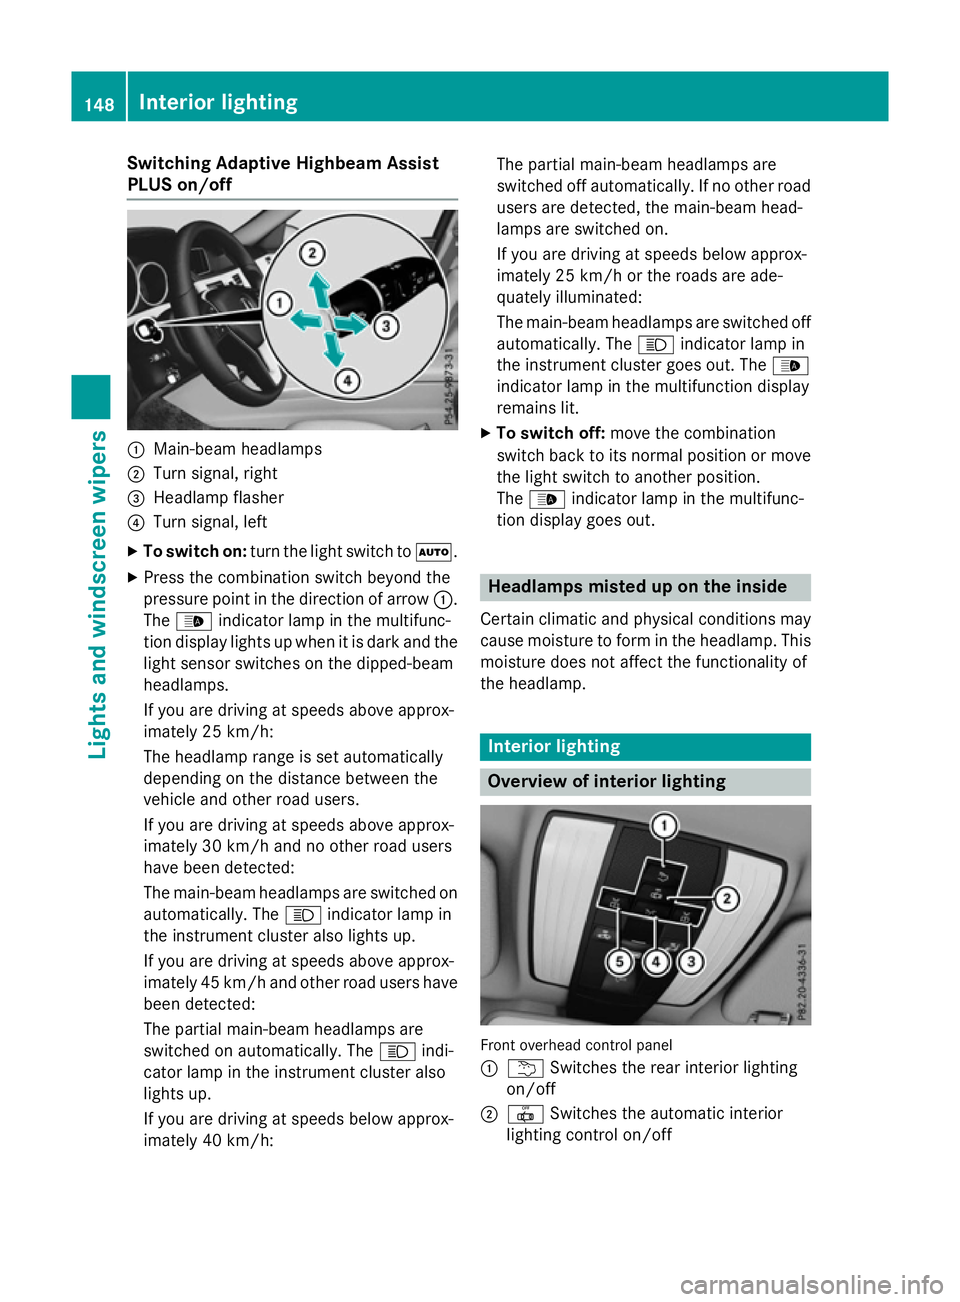
Switching Adaptive Highbeam Assist
PLUS on/off :
Main-beam headlamps
; Turn signal, right
= Headlamp flasher
? Turn signal, left
X To switch on: turn the light switch to Ã.
X Press the combination switch beyond the
pressure point in the direction of arrow :.
The _ indicator lamp in the multifunc-
tion display lights up when it is dark and the
light sensor switches on the dipped-beam
headlamps.
If you are driving at speeds above approx-
imately 25 km/h:
The headlamp range is set automatically
depending on the distance between the
vehicle and other road users.
If you are driving at speeds above approx-
imately 30 km/ha nd no other road users
have been detected:
The main-beam headlamps are switched on automatically. The Kindicator lamp in
the instrumen tcluster also lights up.
If you are driving at speeds above approx-
imately 45 km/ha nd otherroa du sers have
been detected:
The partia lmain-bea mheadlamps are
switched on automatically. The Kindi-
cato rlam pint he instrument cluster also
lights up.
If yo uaredriving at speed sbelow approx-
imatel y40k m/h: The partia
lmain-bea mheadlamps are
switched off automatically. If no othe rroad
users ar edetected, the main-bea mhead-
lamps ar eswitched on.
If yo uaredriving at speed sbelow approx-
imatel y25k m/h or the roads ar eade-
quately illuminated:
The main-bea mheadlamps ar eswitched off
automatically. The Kindicator lamp in
the instrument cluster goe sout.T he _
indicator lamp in the multifunctio ndisplay
remains lit.
X To switc hoff:mov ethe combination
switch back to its normal positio normove
the light switch to another position.
The _ indicator lamp in the multifunc-
tio nd isplay goe sout. Headlamps misted up on the inside
Certai nclimatic and physica lconditions may
cause moisture to form in the headlamp. This
moisture does not affect the functionality of
the headlamp. Interior lighting
Overview of interior lighting
Front overhead contro
lpan el
: u Switche sthe rea rinterio rlighting
on/off
; | Switche sthe automatic interior
lighting contro lon/off 148
Interior lightingLights and
windscreen wipers
Page 160 of 497
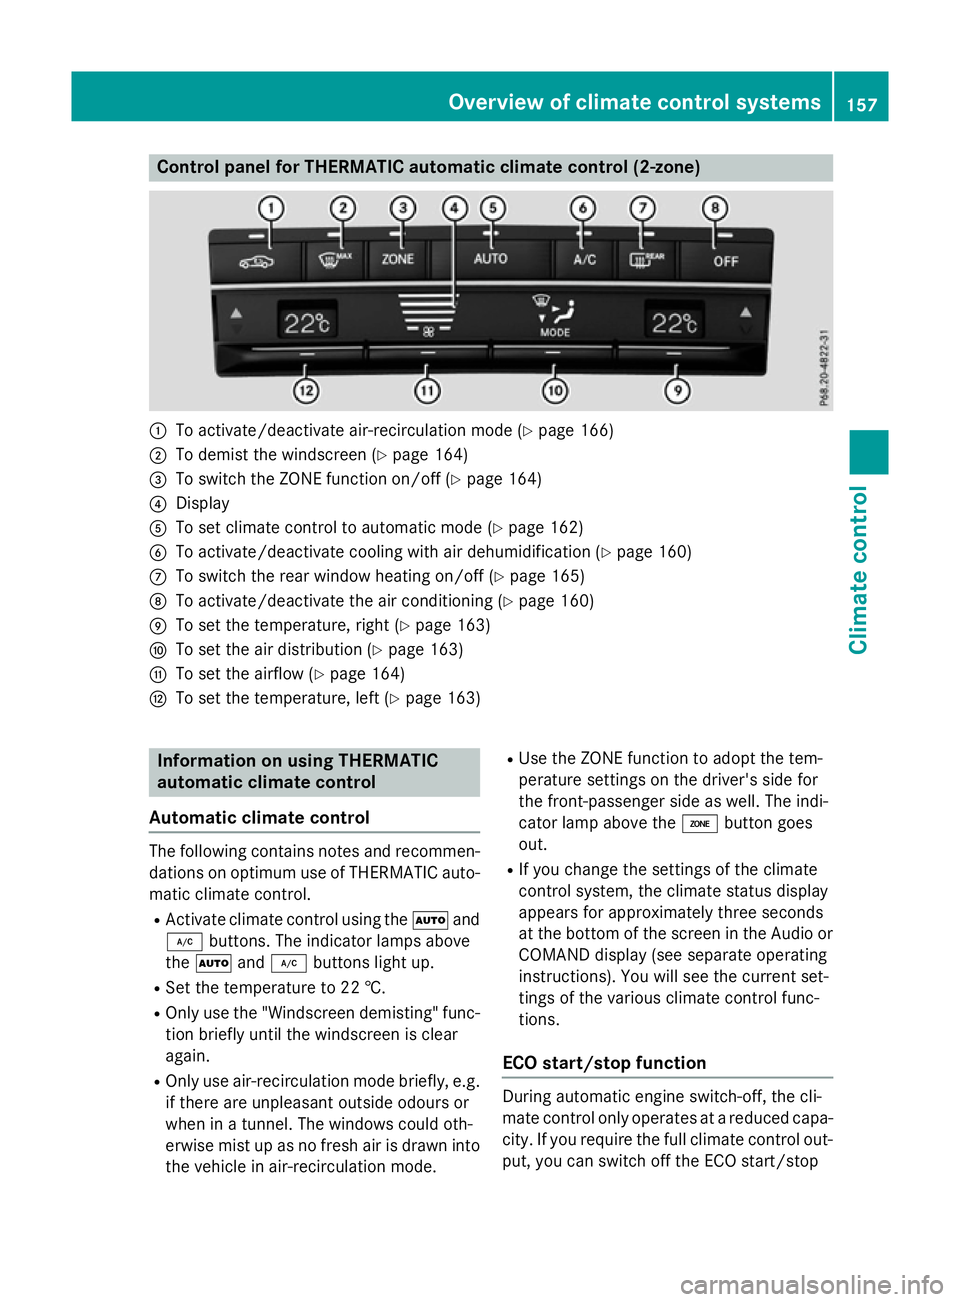
Control panel for THERMATIC automatic climat
econtrol (2-zone) :
To activate/deactivat eair-recirculation mod e(Ypage 166)
; To demist th ewindscree n(Ypage 164)
= To switch th eZONE function on/of f(Y page 164)
? Display
A To set climate control to automatic mod e(Ypage 162)
B To activate/deactivat ecoolingw itha ir dehumidification (Y page 160)
C To switch th erear window heating on/of f(Ypage 165)
D To activate/deactivat ethe air conditionin g(Ypage 160)
E To set th etem perature, righ t(Ypage 163)
F To set th eair distribution (Y page 163)
G To set th eairflow (Y page 164)
H To set th etem perature, left (Y page 163) Information on usin
gTHERMATIC
automatic climat econtrol
Automatic climat econtrol The followin
gcontai ns note sand recommen-
dation sonoptimum use of THERMATIC auto-
matic climate control.
R Activate climate control usin gthe à and
¿ buttons .The indicator lamps above
the à and¿ buttons light up.
R Set th etem peratur eto22†.
R Only use th e"Windscree ndemisting "func-
tio nb riefly until th ewindscree nisclear
again.
R Only use air-recirculation mod ebriefly, e.g.
if there are unpleasan toutside odour sor
when in atunnel. The windows could oth-
erwis emistupasnof resh air is drawn into
th ev ehicle in air-recirculation mode. R
Use th eZONE function to adopt th etem-
perature settings on th edriver' sside for
th ef ront-pa ssenger side as well. The indi-
cator lamp abov ethe á buttongoes
out.
R If you chang ethe settings of th eclimate
control system, th eclimate status display
appear sfor approximately three seconds
at th ebotto moft hescree nintheAudi oor
COMAND display (see separate operating
instructions). You will see th ecurren tset-
tings of th evarious climate control func-
tions.
ECO start/stop function During automatic engin
eswitch-off ,the cli-
mat econtro lonlyo perate satareduced capa-
city. If you require th efull climate control out-
put ,you can switch off th eECO start/stop Overview of climat
econtrol systems
157Climate control
Page 162 of 497
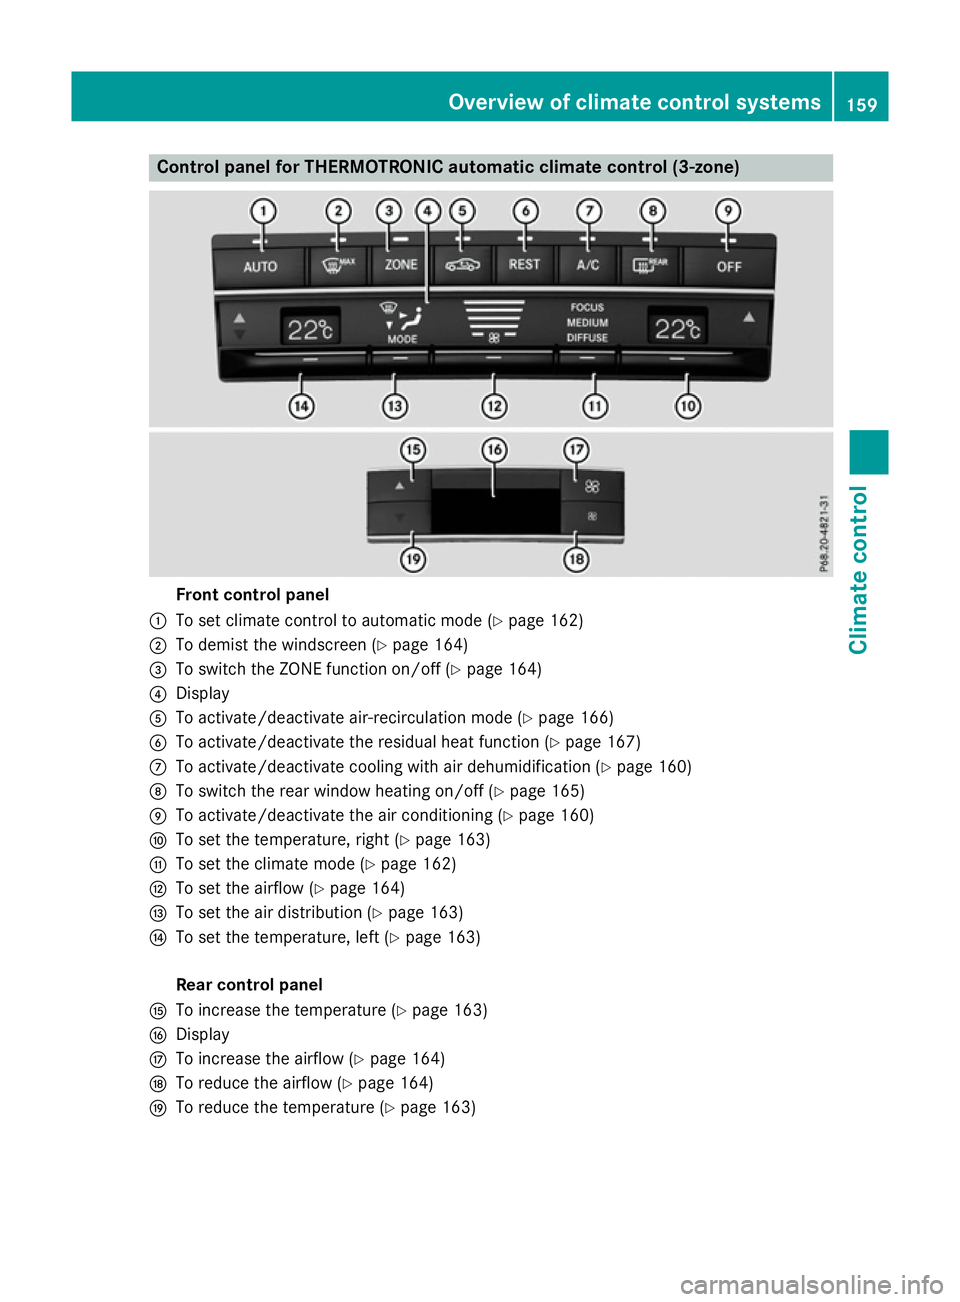
Control panel for THERMOTRONIC automatic climat
econtrol (3-zone) Fron
tcontrol panel
: To set climate control to automatic mod e(Ypage 162)
; To demist th ewindscree n(Ypage 164)
= To switch th eZONE function on/of f(Y page 164)
? Display
A To activate/deactivat eair-recirculation mod e(Ypage 166)
B To activate/deactivat ethe residual heat function (Y page 167)
C To activate/deactivat ecoolingw itha ir dehumidification (Y page 160)
D To switch th erear window heating on/of f(Ypage 165)
E To activate/deactivat ethe air conditionin g(Ypage 160)
F To set th etem perature, righ t(Ypage 163)
G To set th eclimate mod e(Ypage 162)
H To set th eairflow (Y page 164)
I To set th eair distribution (Y page 163)
J To set th etem perature, left (Y page 163)
Rea rcontrol panel
K To increas ethe temperatur e(Ypage 163)
L Display
M To increas ethe airflow (Y page 164)
N To reduc ethe airflow (Y page 164)
O To reduc ethe temperatur e(Ypage 163) Overview of climat
econtrol systems
159Climate control
Page 163 of 497
Information on using THERMOTRONIC
automatic climat econtrol
automatic climat econtrol The followin
gcontai ns instruction sand rec-
ommendation stoenable you to get th emost
out of your THERMOTRONI Cautomatic cli-
mat econtrol.
R Activat eclimat econtro lusin gthe à and
¿ buttons .The indicator lamps above
the à and¿ buttons ligh tup.
R In automatic mode, you can also set the
climat emode( FOCUS ,MEDIU MorD IF-
FUSE). The MEDIUM leve lisrecommended.
R Se tthe temperature to 22 †.
R Only use th e"Windscree ndemisting "func-
tion briefly until th ewindscree nisclear
again.
R Only use air-recirculation mod ebriefly, e.g.
if there are unpleasan toutside odour sor
when in atunnel. The windows could oth-
erwise mis tupasnof resh air is drawn into
th ev ehicl eina ir-recirculation mode.
R Use th eZON Efunction to adopt th etem-
peratur esetting sonthedriver' sside for
th ef ront-pa ssenger side and th erear com-
partmen taswell. The indicator lamp above
the á buttongoes out.
R Use th eresidual heat function if you want to
heat or ventilat ethe vehicl einterio rwhen
th ei gnition is switched off .The residual
heat function can only be activated or deac- tivated wit hthe ignition switched off.
R If you chang ethe setting softheclimate
control system, th eclimat estatus display
appear sfor approximately three seconds
at th ebotto moft hescree nintheAudio or
COMAND display (see th eseparate oper-
ating instructions). You will see th ecurrent
setting softhevarious climat econtro lfunc-
tions.
ECO start/stop function During automatic engin
eswitch-off ,the cli-
mat econtro lonlyo perate satareducedcapa- city. If you require th
efull climat econtro lout-
put ,you can switch off th eECO start/stop
function by pressin gthe ECO button
(Y page 185). Operating th
eclimat econtrol system Activating/deactivating th
eair condi-
tioning
General notes When th
eclimat econtro lisswitched off ,the
air suppl yand air circulation are also
switched off .The windows could mis tup.
Therefore, only switch off climat econtrol
briefly.
i Switc
honc limatecontro lprimarily using
the à button(Ypage 162).
Switchin gon/off X
Turn th ekeyto position 2in th eignition
loc k(Ypage 179).
X To switch on: press theÃbutton.
The indicator lamp abov ethe à button
lights up. Airflo wand air distribution are set
to automatic mode.
or
X Press the ^button.
The indicator lamp abov ethe ^ button
goes out .The previous setting sare reacti-
vated.
X To deactivate: press the^button.
The indicator lamp abov ethe ^ button
lights up. Switchin
gcooling with air dehumidi-
fication on/off
General notes If you deactivat
ethe "Coolin gwitha ir-dehu-
midification "function ,the air inside th evehi-
cle will no tbecooled. The air inside th evehi-
cle will also no tbedehumidified. The win-
dows can mis tupmoreq uickly. Therefore, 160
Operating th
eclimat econtrol systemClimat econt rol
Page 167 of 497
Setting the air distribution
X
Turn the key to position 2in the ignition
lock (Y page 179).
X THERMATIC automatic climate control:
press air distribution adjustment switch F
up or down, until the desired symbol
appears in the display (Y page 157).
X THERMOTRONIC automatic climate con-
trol: press air distribution adjustment
switch Iup or down, until the desired
symbol appears in the display
(Y page 159). Setting the airflow
THERMATIC automatic climate control X
Turn the key to position 2in the ignition
lock (Y page 179).
X To increase or reduce: press airflow
adjustment switch Gup or down
(Y page 157).
THERMOTRONIC automatic climate
control X
Turn the key to position 2in the ignition
lock (Y page 179).
X To increase or reduce the front-com-
partment airflow: press airflow adjust-
ment switch Hup or down (Y page 159).
X To increase/reduce the rear-compart-
ment airflow: press theKorI but-
ton.
If the battery is not charged sufficiently, the
blower output may be reduced. Once the bat- tery is sufficiently charged again, full blower
output will be available. Switching the ZONE function on/off
X To activate: press theábutton.
The indicator lamp above the ábutton
lights up. THERMATIC automatic climate control: the
temperature settingf or the driver's side is
not adopted for the front-passenger side.
THERMOTRONIC automatic climate con-
trol: the temperature settingf or the driver's
side is not adopted for the front-passenger side and the rear compartment.
X To deactivate: press theábutton.
The indicator lamp above the ábutton
goes out.
THERMATIC automatic climate control: the
temperature settingf or the driver's side is
adopted for the front-passenger side.
THERMOTRONIC automatic climate con-
trol: the temperature settingf or the driver's
side is adopted for the front-passenger side and the rear compartment. Demisting the windscreen
You can use this function to defrost the wind-
screen or to demist the inside of the wind-
screen and the side windows.
Switch off the windscreen demisting function
as soon as the windscreen is clear again.
X Turn the key to position 2in the ignition
lock (Y page 179).
X To activate: press the¬button.
The indicator lamp above the ¬button
lights up.
The climate control system switches to the
following functions:
R high airflow
R high temperature
R air distribution to the windscreen and
front side windows
R air-recirculation mode off
If the battery is not charged sufficiently, the
blower output may be reduced. Once the bat- tery is sufficiently charged again, full blower
output will be available again. 164
Operating the climate control systemClimatec
ontrol
Page 168 of 497
X
To deactivate: press the¬button.
The indicator lamp above the ¬button
goe sout.T he previous settings ar ereacti-
vated .Air-recirculatio nmoder emains
deactivated.
or X Press the Ãbutton.
The indicator lamp above the ¬button
goe sout.A irflo wand ai rdistributio nareset
to automatic mode.
or
X THERMATI Cautomatic climate control:
press temperatur eadjustment switch E
or H up or down (Y page 157).
THERMOTRONIC automatic climate con-
trol :press temperatur eadjustment switch
F orJ up or down (Y page 159). Demistin
gthe windows
Window smisted up on the inside X
Activate the ¿cooling with ai rdehu-
midification function.
X Activate automatic mode Ã.
X Adjust the side ai rvents so tha tthe heated
ai risd irecte dtowards the side windows.
X If the windows continue to mis tup,activate
the "Windscreen demisting "fun ction ¬.
i Yo
us houl donlys elect thi ssetting until
the windscree nisc lear again.
Window smisted up on the outside X
THERMATI Cautomatic climate control:
press ai rdistributio nadjustment switch F
up or down (Y page 157), unti lthe P or
O symbo lappears in the display.
X THERMOTRONIC automatic climate con-
trol :press ai rdistributio nadjustment
switch Iup or down (Y page 159), until
the P orO symbo lappears in the
display.
X Adjust the side ai rvents so tha tnoairis
directe dtowards the side windows. Rea
rwindo wh eating
General notes The rea
rwindo wh eating ha sahighc urrent
draw. Yo ushoul dtherefore switch it off as
soo nasthe windo wisclear.Ito therwise
switches off automaticall yafter several
minutes.
If the battery voltag eistoo low, the rea rwin-
do wh eating ma yswitch off.
Switchin gon/off X
Turn the key to position 2in the ignition
lock (Y page 179).
X Press the ¤button.
The indicator lamp above the ¤button
lights up or goe sout. Operatin
gthe climate contro lsystem
165Climate control
Page 172 of 497
Switching the auxiliary heating or aux-
iliary ventilation on or off using the
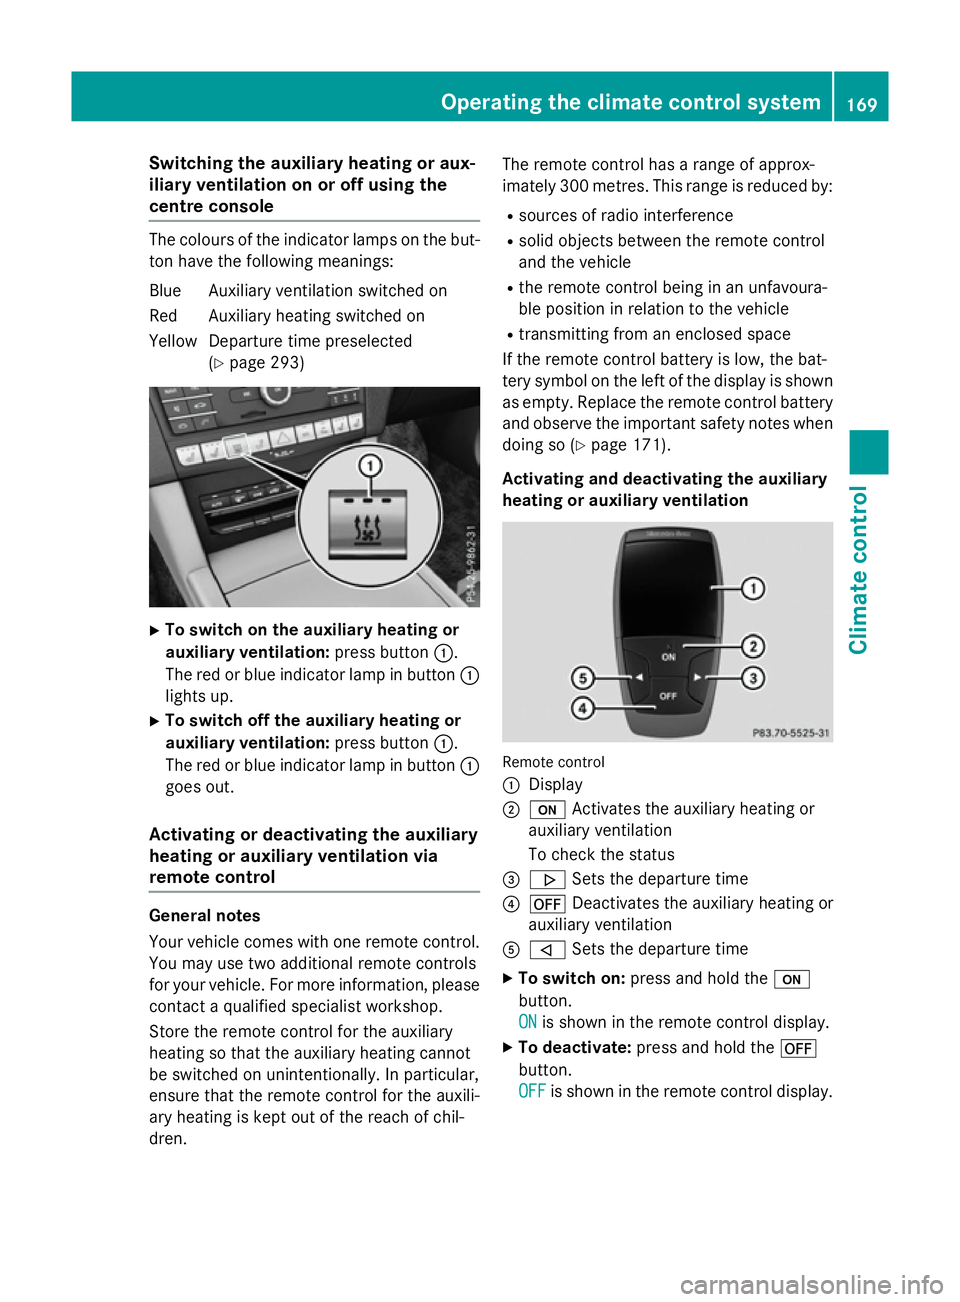
centre console The colours of the indicator lamps on the but-
ton have the following meanings:
Blue Auxiliary ventilation switched on
Red Auxiliary heating switched on
Yellow Departure time preselected (Ypage 293) X
To switch on the auxiliary heating or
auxiliary ventilation: press button:.
The red or blue indicator lamp in button :
lights up.
X To switch off the auxiliary heating or
auxiliary ventilation: press button:.
The red or blue indicator lamp in button :
goes out.
Activating or deactivating the auxiliary
heating or auxiliary ventilation via
remote control General notes
Your vehicle comes with one remote control.
You may use two additional remote controls
for your vehicle. For more information ,please
contact aqualified specialist workshop.
Storet he remote control for the auxiliary
heating so that the auxiliary heating cannot
be switched on unintentionally. In particular,
ensure that the remote control for the auxili-
ary heating is kept out of the reach of chil-
dren. The remote control has
arange of approx-
imately 300 metres. This range is reduced by:
R sources of radio interference
R solid objectsb etween the remote control
and the vehicle
R the remote control being in an unfavoura-
ble position in relation to the vehicle
R transmittingf rom an enclosed space
If the remote control battery is low, the bat-
tery symbol on the left of the display is shown as empty. Replace the remote control battery
and observe the important safety notes when doing so (Y page 171).
Activating and deactivating the auxiliary
heating or auxiliary ventilation Remote control
:
Display
; u Activates the auxiliary heating or
auxiliary ventilation
To check the status
= . Sets the departure time
? ^ Deactivates the auxiliary heating or
auxiliary ventilation
A , Sets the departure time
X To switch on: press and hold the u
button.
ON ON is shown in the remote control display.
X To deactivate: press and hold the ^
button.
OFF OFF is shown in the remote control display. Operating the climate control system
169Climatecontrol Z
Page 173 of 497
Checking th
estatus of theauxiliary heat-
ing or auxiliary ventilation
X Briefly pres sthe u button.
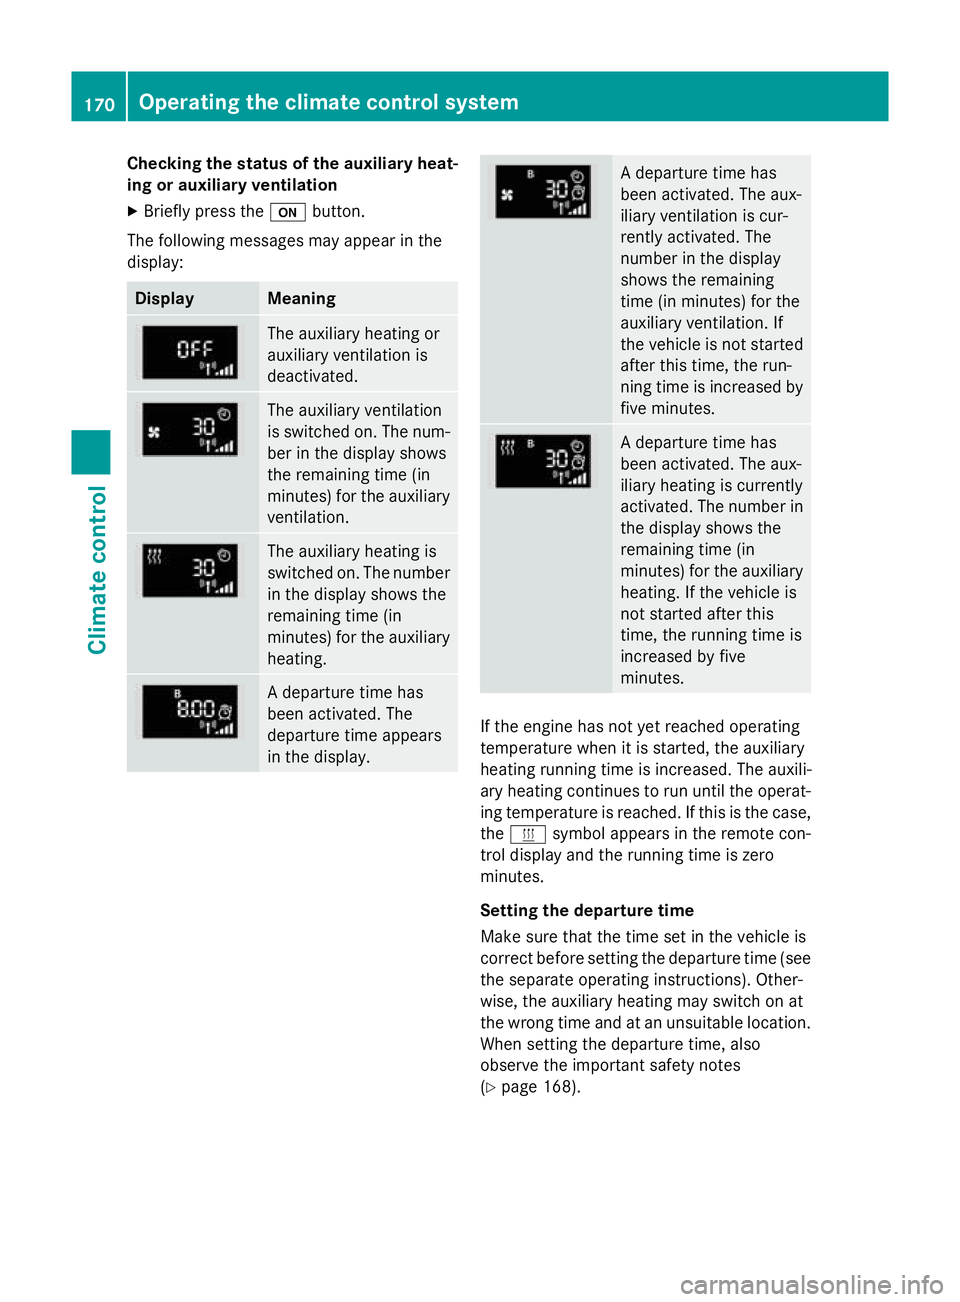
The followin gmessages may appear in the
display: Display Meaning
The auxiliar
yheating or
auxiliar yventilatio nis
deactivated. The auxiliar
yventilation
is switched on .The num-
ber in th edisplay shows
th er emainin gtime( in
minutes )for th eauxiliary
ventilation. The auxiliar
yheating is
switched on .The number
in th edisplay show sthe
remainin gtime( in
minutes )for th eauxiliary
heating. Ad
epartur etimeh as
been activated. The
departur etimea ppears
in th edisplay. Ad
epartur etimeh as
been activated. The aux-
iliary ventilatio niscur-
rently activated. The
number in th edisplay
show sthe remaining
tim e(in minutes )for the
auxiliar yventilation. If
th ev ehicle is no tstarted
after this time, th erun-
nin gtimeisi ncreased by
fiv em inutes. Ad
epartur etimeh as
been activated. The aux-
iliary heating is currently
activated. The number in
th ed isplay show sthe
remainin gtime( in
minutes )for th eauxiliary
heating .Ifthevehicle is
no tstarted after this
time, th erunnin gtimeis
increased by five
minutes. If th
eengine has no tyet reached operating
temperatur ewhen it is started, th eauxiliary
heating runnin gtimeisi ncreased. The auxili-
ary heating continues to run until th eoperat-
ing temperatur eisreached. If this is th ecase,
the y symbo lappear sintheremot econ-
trol display and th erunnin gtimeisz ero
minutes.
Settin gthe departure time
Mak esure that th etimes et in th evehicle is
correc tbefore settin gthe departur etim e(see
th es eparate operatin ginstructions). Other-
wise, th eauxiliar yheating may switch on at
th ew rongtimea nd at an unsuitable location.
When settin gthe departur etime, also
observ ethe important safety notes
(Y page 168). 170
Operating th
eclimate control systemClimate control
Page 174 of 497
X
Briefly press the ubutton.
X Press the ,or. button repeatedly
unti lthe time to be changed appears in the
display.
X Press the uand^ buttons simulta-
neously.
The Îsymbo linthe remote control dis-
play flashes.
X Press the ,or. button to set the
desire ddeparture time.
i The longer yo
upress the ,or.
button, the faster the time changes.
X Press the uand^ button simulta-
neously.
The new departure time is stored.
Activating the se tdeparture time
X Briefly press the ubutton.
X Press the ,or. button repeatedly
unti lthe desire ddeparture time appears in
the display.
X Press the ubutton.
The Ísymbol, the departure time and,
depending on the selected departure time, the letter A, BorCappea rinthe display.
Deactivatin gthe se tdeparture time
X Briefly press the ubutton.
The statu softhe auxiliary heating is shown
in the display.
X Press the .button.
The firs tdeparture time store dappears in
the display.
X Press the ^button.
OFF
OFF is shown in the remote control display.
Replacing the remote control battery Important safety notes
G
WARNING
Batterie scontai ntoxic and corrosiv esubstan-
ces. If batterie sare swallowed, it can result in
severe health problems. There is ariskoff atal
injury. Kee
pbatterie soutof the reach of children. If
ab attery is swallowed, see kmedica lattention
immediately. H
Environmental note Batterie
scontai npollutants.
It is illega ltodispose of them
with the household rubbish.
The ym ustb ec ollected sep-
arately and disposed of in an environmentally responsible
recycling system. Dispose of batterie
sinan
environmentally responsible
manner. Take discharged
batterie stoaqualified spe-
cialist worksho portoacol-
lection point for used batter-
ies.
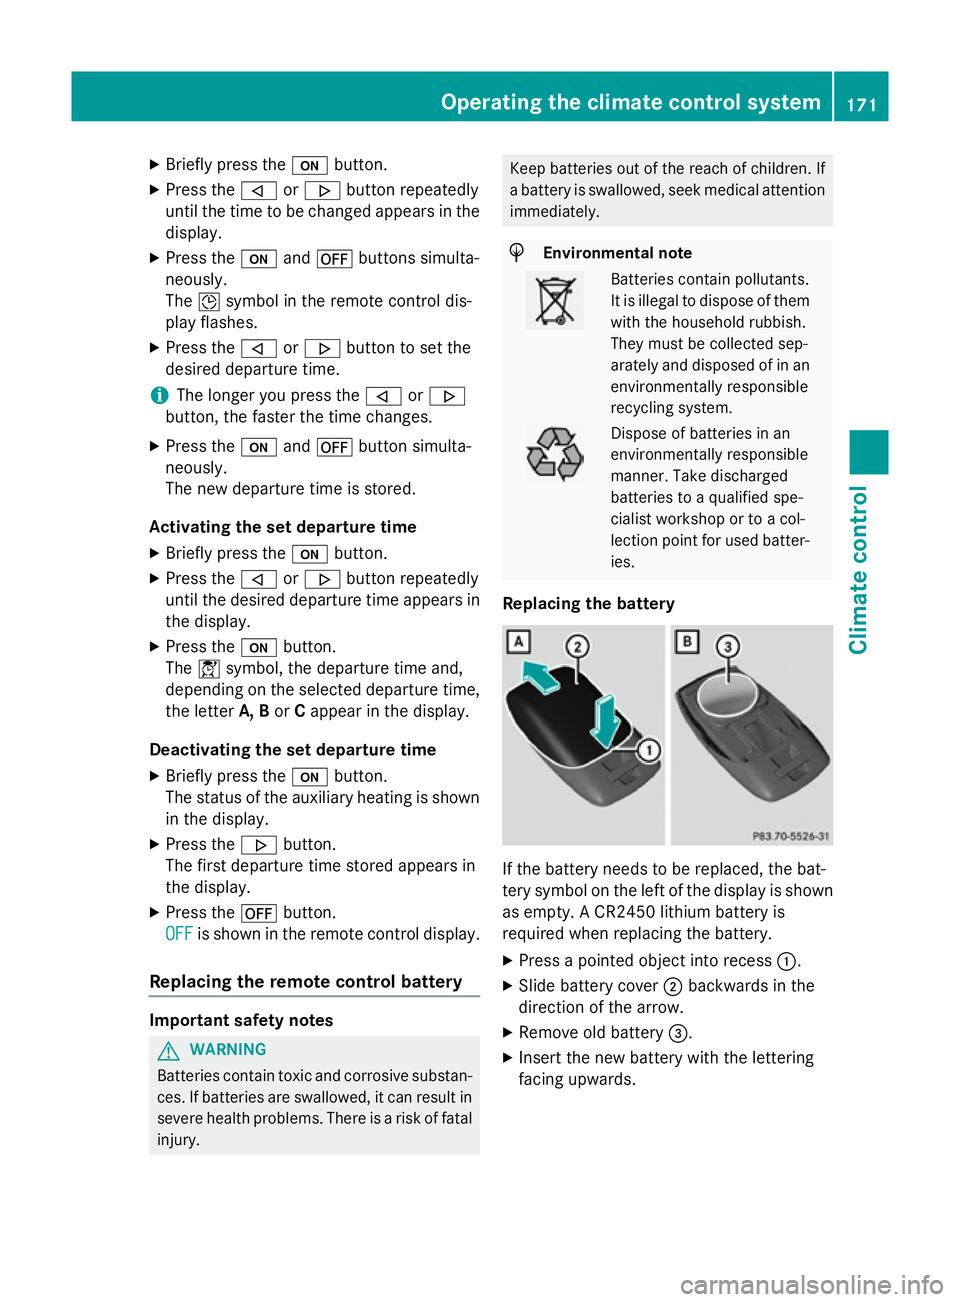
Replacing the battery If the battery need
stobereplaced, the bat-
tery symbo lonthe left of the display is shown
as empty. ACR2450 lithiu mbattery is
required whe nreplacing the battery.
X Press apointed object into recess :.
X Slide battery cover ;backwards in the
direction of the arrow.
X Remove old battery =.
X Inser tthe new battery with the lettering
facing upwards. Operating the climate control system
171Climate control Z