mirror MERCEDES-BENZ E-CLASS ESTATE 2015 Workshop Manual
[x] Cancel search | Manufacturer: MERCEDES-BENZ, Model Year: 2015, Model line: E-CLASS ESTATE, Model: MERCEDES-BENZ E-CLASS ESTATE 2015Pages: 497, PDF Size: 16.23 MB
Page 373 of 497
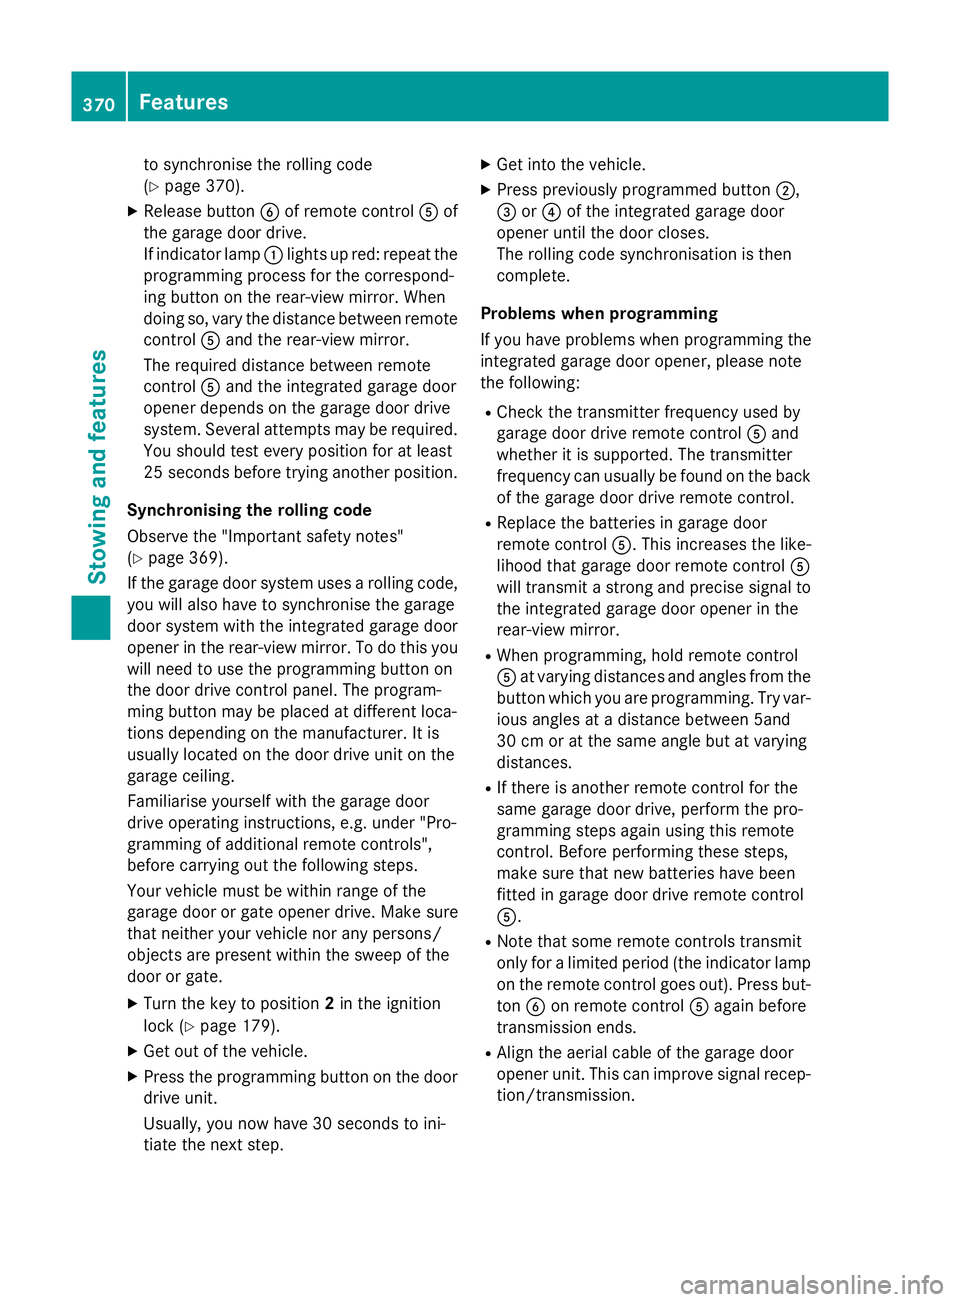
to synchronise the rolling code
(Y
page 370).
X Releas ebutton Bof remote control Aof
the garage door drive.
If indicator lamp :lights up red :repea tthe
programming proces sfor the correspond-
ing button on the rear-view mirror. When
doing so ,varyt he distance between remote
control Aand the rear-view mirror.
Th er equired distance between remote
control Aand the integrated garage door
opene rdepen ds on the garage door drive
system. Severa lattempts ma yberequired.
Yo us houl dteste very positio nfor at least
25 second sbefore trying another position.
Synchronising the rolling code
Observe the "Important safety notes"
(Y page 369).
If the garage door system uses arolling code,
you will also have to synchronise the garage
door system with the integrated garage door
opener in the rear-view mirror .Todothis you
will need to use the programming button on
the door drive control panel. The program-
ming button may be placed at differen tloca-
tion sdepending on the manufacturer. It is
usually located on the door drive unit on the
garage ceiling.
Familiarise yourself with the garage door
drive operatin ginstructions, e.g. under "Pro-
grammin gofadditional remot econtrols",
before carrying out the following steps.
Your vehicle must be within range of the
garage door or gate opener drive. Make sure
that neither your vehicle nor any persons/
objects are present within the sweep of the
door or gate.
X Turn the key to position 2in the ignition
lock (Y page 179).
X Get out of the vehicle.
X Press the programming button on the door
drive unit.
Usually, you now have 30 seconds to ini-
tiate the nexts tep. X
Get intot he vehicle.
X Press previously programmed button ;,
= or? of the integrated garage door
opener until the door closes.
The rolling code synchronisation is then
complete.
Problems when programming
If you have problems when programming the
integrated garage door opener, please note
the following: R Check the transmitter frequenc yused by
garage door drive remot econtrol Aand
whether it is supported. The transmitter
frequenc ycan usually be found on the back
of the garage door drive remot econtrol.
R Replace the batteries in garage door
remot econtrol A.This increases the like-
lihood that garage door remot econtrol A
will transmit astrong and precise signal to
the integrated garage door opener in the
rear-view mirror.
R When programming, hold remot econtrol
A at varying distances and angles from the
button which you are programming. Try var- ious angles at adistanc ebetween 5and
30 cm or at the same angle but at varying
distances.
R If ther eisanother remot econtrol for the
same garage door drive, perform the pro-
grammin gsteps again using this remote
control. Befor eperforming these steps,
make sure that new batteries have been
fitted in garage door drive remot econtrol
A.
R Note that some remot econtrols transmit
only for alimited period (the indicator lamp
on the remot econtrol goes out). Press but-
ton Bon remot econtrol Aagain before
transmission ends.
R Align the aerial cable of the garage door
opener unit. This can improve signal recep-
tion/transmission. 370
FeaturesStowing and features
Page 374 of 497
Opening or closing the garage door
Oncep
rogrammed, the integrated garage
door opener will assume the function of the
garage door system's remot econtrol. Please
also read the operatin ginstructions for the
garage door system.
X Turn the key to position 2in the ignition
lock (Y page 179).
X Press button ;,=or? which you have
programmed to operate the garage door.
Garage door system with afixed code: indi-
cator lamp :lights up green.
Garage door system with arolling code:
indicator lamp :flashes green.
The transmitter will transmit asignal for as
long as the button is pressed. The trans-
mission is halted after amaximum of ten
seconds and indicator lamp :lights up
yellow.
X Press button ;,=or? again if neces-
sary.
Clearing the memory Make sure that you clear the memory of the
integrated garage door opener before selling
the vehicle.
X Turn the key to position 2in the ignition
lock (Y page 179).
X Press and hold buttons ;and ?.
The indicator lamp initially lights up yellow
and then green.
X Release buttons ;and ?.
The memory of the integrated garage door
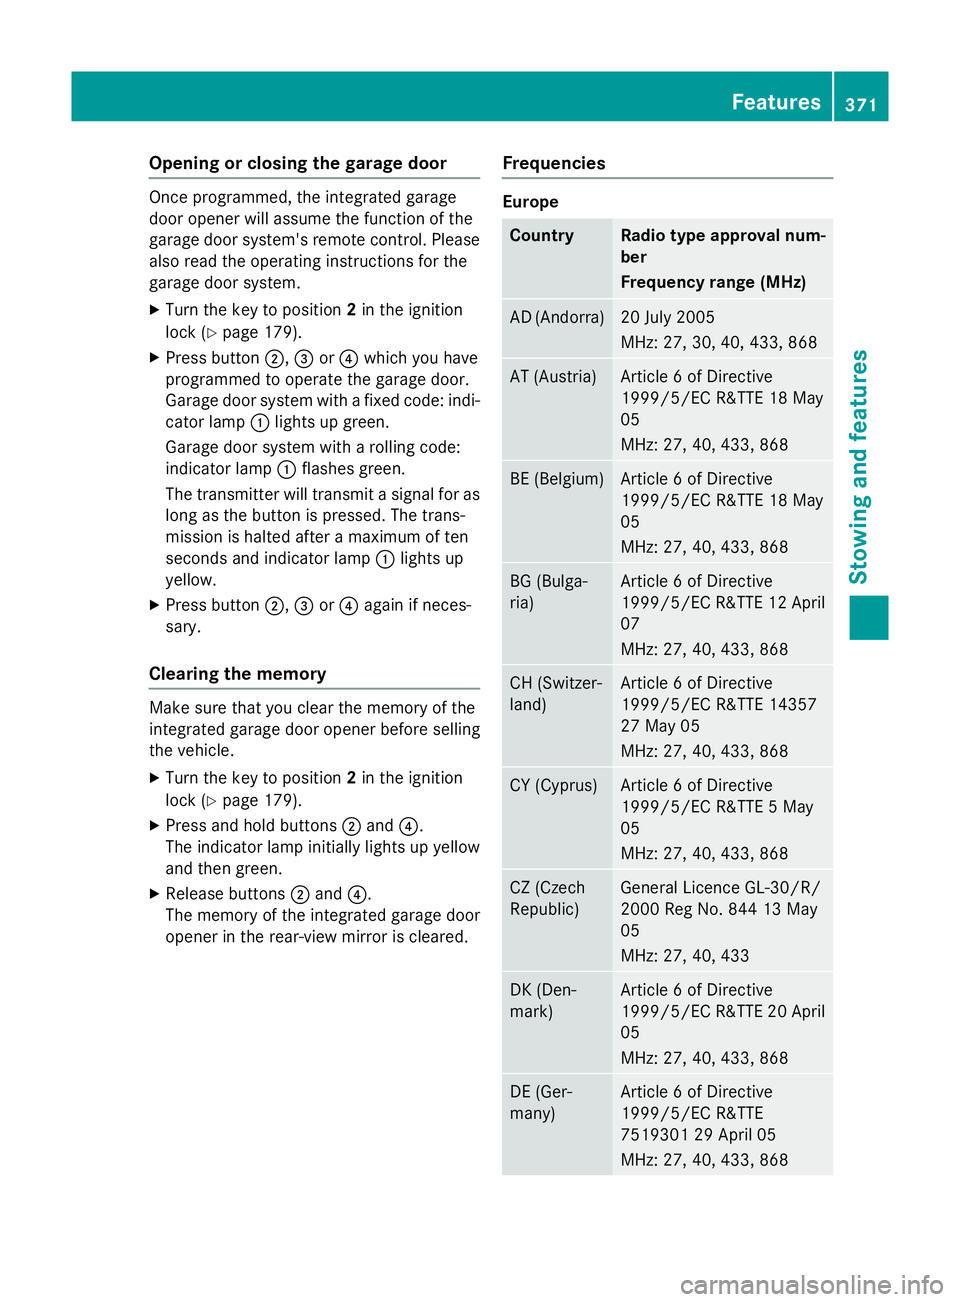
opener in the rear-view mirror is cleared. Frequencies Europe
Country Radio typea
pproval num-
ber
Frequency range (MHz) AD (Andorra) 20 July 2005
MHz:2
7, 30, 40, 433,8 68 AT (Austria) Article
6ofDirective
1999/5/ECR &TTE 18 May
05
MHz:2 7, 40, 433,8 68 BE (Belgium) Article
6ofDirective
1999/5/ECR &TTE 18 May
05
MHz:2 7, 40, 433,8 68 BG (Bulga-
ria) Article
6ofDirective
1999/5/ECR &TTE 12 April
07
MHz:2 7, 40, 433,8 68 CH (Switzer-
land) Article
6ofDirective
1999/5/ECR &TTE 14357
27 May 05
MHz:2 7, 40, 433,8 68 CY (Cyprus) Article
6ofDirective
1999/5/ECR &TTE5May
05
MHz:2 7, 40, 433,8 68 CZ (Czech
Republic) General Licence GL-30/R/
2000R
eg No. 844 13 May
05
MHz:2 7, 40, 433 DK (Den-
mark) Article
6ofDirective
1999/5/ECR &TTE 20 April
05
MHz:2 7, 40, 433,8 68 DE (Ger-
many) Article
6ofDirective
1999/5/ECR &TTE
751930129A pril 05
MHz:2 7, 40, 433,8 68 Features
371Stowing and features Z
Page 392 of 497
Alway
sswitch off the windscree nwiper sand
the ignition before cleaning the windscree nor
wipe rblade s.
! Do not us
edry cloths, abrasive products,
solvents or cleaning agents containing sol-
vents to clean the insid eofthe windows .Do
not touch the insides of the windows with
hard objects, e.g .anice scrape rorring.
There is otherwise ariskofd amagin gthe
windows.
! Clea
nthe water drainage channel softhe
windscree nand the rea rwindo watr egular
intervals .Deposits such as leaves, petals
and pollen ma yunder certain circumstan-
ces prevent water from draining away .This
can lead to corrosion damage and damage to electronic components.
X Clea nthe insid eand outsid eofthe win-
dows with adam pcloth and acleaning
agent tha tisr ecommende dand approved
by Mercedes-Benz.
Cleanin gthe wiper blades G
WARNING
If the windscree nwiper sareset in motion
when cleaning the windscree norwiper
blades, yo ucould become trapped. There is a
dange rofinjury.
Alway sswitch off the windscree nwiper sand
the ignition before cleaning the windscree nor
wipe rblade s.
! Do not pull on the wipe
rblade .Otherwise,
the wipe rblade could be damaged.
! Do not clean wipe
rblade stoo ofte nand
do not ru bthem too hard. Otherwise, the
graphite coating could be damaged. This
could cause wipe rnoise.
! Hol
dthe wipe rarm securel ywhenf olding
back. The windscree ncould be damage dif
the wipe rarm hits against it suddenly. X
Fol dthe wipe rarm sa wayfrom the wind-
screen.
X Clea nthe wipe rblade scarefull yusing a
damp cloth.
X Fol dthe windscree nwiper sbacka gain
before switching on the ignition.
Cleanin gthe exterior lighting !
Onl
yusecleaning agents or cleaning
cloths tha tare suitabl efor plastic lenses.
Unsuitabl ecleaning agents or cleaning
cloths could scratch or damage the plastic lenses of the exterio rlighting.
X Clea nthe plastic lenses of the exterior
lighting using awetsponge and amild
cleaning agent, e.g .Mercedes-Benz car
shampo oorcleaning cloths.
Mirro rturn signals !
Onl
yusecleaning agents or cleaning
cloths tha tare suitabl efor plastic lenses.
Unsuitabl ecleaning agents or cleaning
cloths could scratch or damage the plastic lenses of the mirror turn signals.
X Clea nthe plastic lenses of the mirror turn
signals in the exterio rmirror housing using
aw etsponge and mil dcleaning agent, e.g.
Mercedes-Benz car shampo oorcleaning
cloths.
Cleanin gthe sensors !
If yo
uclean the sensors with ahigh-pres-
sure cleaner, make sure tha tyou kee pa
distance of at leas t30cmbetween the
vehicl eand the high-pressure cleane rnoz-
zle .Informatio nabout the correct distance
is availabl efrom the equipment manufac-
turer. Care
389Maintenance and care Z
Page 484 of 497
Vehicl
edata General notes
Please note tha tfor the specified vehicle
data:
R the heights specified ma yvaryasar esult
of:
- tyres
- load
- condition of the suspension
- optional equipment
R optional equipment reduce sthe maximum
payload.
R vehicle-specific weight informatio ncan be
found on the vehicl eide ntificatio nplate
(Y page 472).
R onl yfor certain countries: yo ucan find vehi-
cle-specifi cvehicl edataint he CO Cdocu-
ments (CERTIFICATE OF CONFORMITY).
These documents ar edelive redw ithy our
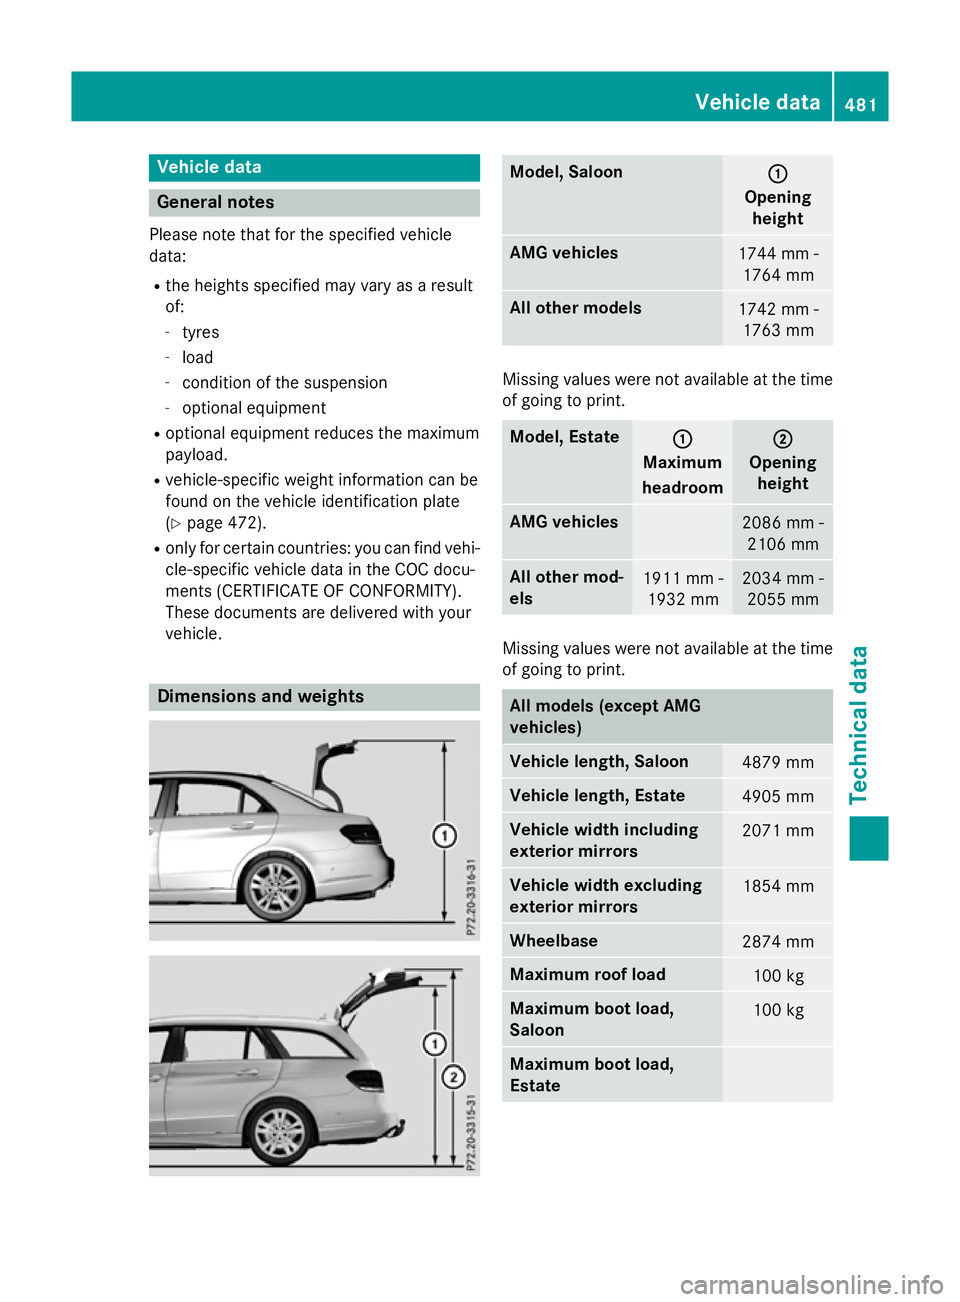
vehicle. Dimension
sand weights Model, Saloon
:
:
Opening height AM
Gvehicles 1744 mm -
1764 mm Al
lo the rm odels 1742 mm -
1763 mm Missing values were not availabl
eatthe time
of going to print. Model, Estate
:
:
Maximum
headroom ;
;
Opening height AM
Gvehicles 2086 mm -
2106 mm Al
lo the rm od-
els 1911 mm -
1932 mm 2034 mm -
2055 mm Missing values were not availabl
eatthe time
of going to print. Al
lm odels (except AMG
vehicles) Vehicl
elengt h, Saloon 4879 mm
Vehicl
elengt h, Estate 4905 mm
Vehicl
ewidth including
exterior mirrors 2071 mm
Vehicl
ewidth excluding
exterior mirrors 1854 mm
Wheelbase
2874 mm
Maximum roo
fload 100 kg
Maximum boot load,
Saloon
100 kg
Maximum boot load,
Estate Vehicl
edata
481Technica ldata Z
Page 485 of 497
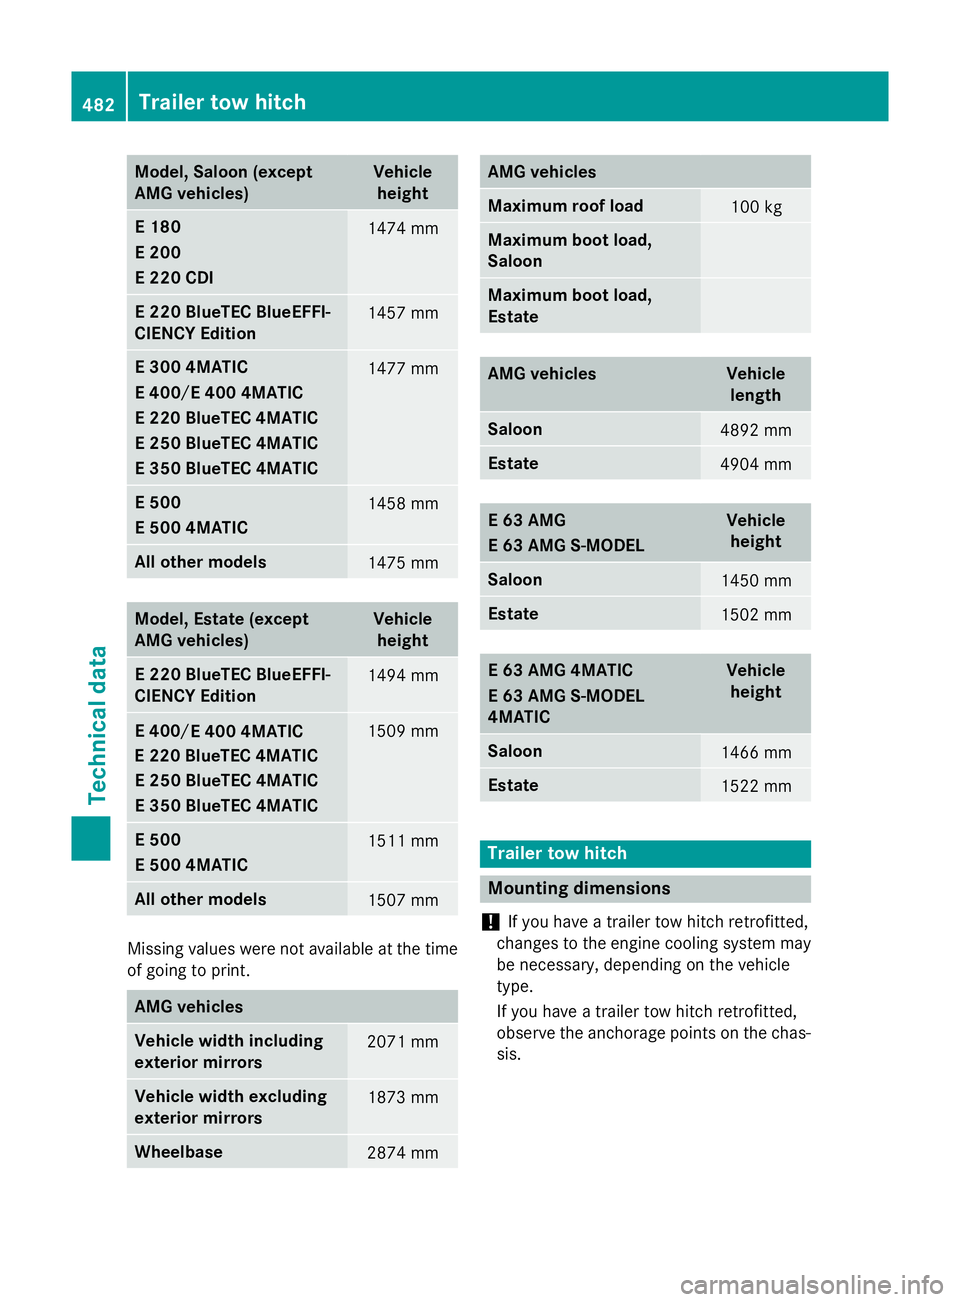
Model
,Saloon (except
AMG vehicles) Vehicle
height E1
80
E2 00
E2 20 CDI 1474 mm
E2
20 BlueTEC BlueEFFI-
CIENCY Edition 1457 mm
E3
00 4MATIC
E4 00
E400 4MATIC
E2 50 BlueTEC 4MATIC
E3 50 BlueTEC 4MATIC 1477 mm
E5
00
E5 00 4MATIC 1458 mm
All other models
1475 mm
Model
,Estate (except
AMG vehicles) Vehicle
height E2
20 BlueTEC BlueEFFI-
CIENCY Edition 1494 mm
E2
50 BlueTEC 4MATIC
E3 50 BlueTEC 4MATIC 1509 mm
E5
00
E5 00 4MATIC 1511 mm
All other models
1507 mm
Missing values were not available at the time
of going to print. AMG vehicles
Vehicle width including
exterio rmirrors 2071 mm
Vehicle width excluding
exterio rmirrors 1873 mm
Wheelbase
2874 mm AMG vehicles
Maximum roof load
100 kg
Maximum bootl
oad,
Saloon Maximum bootl
oad,
Estate AMG vehicles Vehicle
length Saloon
4892 mm
Estate
4904 mm
E63A
MG
E63A MG S-MODEL Vehicle
height Saloon
1450 mm
Estate
1502 mm
E63A
MG 4MATIC
E63A MG S-MODEL
4MATIC Vehicle
height Saloon
1466 mm
Estate
1522 mm
Trailer tow hitch
Mountin
gdimensions
! If you have
atrailer tow hitch retrofitted,
changes to the engine cooling system may
be necessary, depending on the vehicle
type.
If you have atrailer tow hitch retrofitted,
observe the anchorage points on the chas- sis. 482
Trailer tow hitchTechnical data E2
20 BlueTEC 4MATIC/
E4 00
E400 4MATIC
/
E2 20 BlueTEC 4MATIC