audio MERCEDES-BENZ E-CLASS ESTATE 2015 Owners Manual
[x] Cancel search | Manufacturer: MERCEDES-BENZ, Model Year: 2015, Model line: E-CLASS ESTATE, Model: MERCEDES-BENZ E-CLASS ESTATE 2015Pages: 497, PDF Size: 16.23 MB
Page 18 of 497
Locking centrally
see Central locking
Locking verification signa l(on-
boar dcomputer) .............................. .293
Luggage compartment
Opening/closing (from outside,
HANDS-FREE ACCESS) .................. 106
Luggage compartment cover
Important safety notes .................. 351
Luggage compartment enlarge-
ment ................................................... 349
Luggage compartment floor ............ 357
Luggage holde r(EA SY-PAC Kload-
securing kit) ....................................... 356
Lumbar support
Adjusting the 4-way lumba rsup-
port ................................................ 128
Luxury head restraint ....................... 126M
M+S tyres .......................................... .418
Main-beam headlamps
Adaptive Highbeam Assist PLUS .... 147
Changing bulbs .............................. 150
Display message ............................ 308
Switching on/off ........................... 144
Maintenance
see ASSYST PLUS
Manual transmission
Engaging revers egear................... 189
Gea rleve r...................................... 188
Pulling away ................................... 182
Shift recommendation ................... 189
Shifting to neutral .......................... 189
Starting the engine ........................ 182
Matt finis h(clea ning instructions) .. 388
Medi aInterface
USB por tinthe armres tofthe
centre console ............................... 344
see Separate operating instructions
Memory card (audio) ......................... 283
Memory function ............................... 139
Mercedes-Benz Contact
Displa ymessage ............................ 303 Mercedes-Benz emergenc
ycall
system
Switch in the overhead control
panel .............................................. 366
Mercedes-Benz Intelligent Drive
360°camera .................................. 249
ABS (Anti-lock Braking System) ....... 77
Active Blind Spot Assist ................. 261
Active Lane Keeping Assist ............ 263
Active Parking Assist ..................... 239
ATTENTIO NASSIST ........................ 253
BAS (Brake Assist) ........................... 78
BAS PLU S(Brake Assist PLUS)
with Cross-Traffic Assist .................. 78
Blind Spot Assist ............................ 257
COLLISION PREVENTION ASSIST
PLU S................................................ 80
Cruise control ................................ 212
DISTRONIC PLU S........................... 217
DISTRONIC PLU SwithS teering
Assist and Stop&G oPilot ............... 226
ESP ®
(Electronic Stability Pro-
gram) ............................................... 83
Genera lnotes ................................ 211
Lane Keeping Assist ...................... 259
PARKTRONIC ................................. 235
PRE-SAFE ®
(anticipatory occu-
pant protection) ............................... 56
PRE-SAFE ®
Brake ............................. 87
PRE-SAFE ®
PLU S(anticipatory
occupant protectio nPLUS) .............. 57
Reversing camera .......................... 244
SPEEDTRONIC ............................... 215
Traffic Sig nAssist .......................... 255
Mercedes-Benz Servic eCentre
see Qualifie dspecialist workshop
Messag ememory (on-board com-
puter) .................................................. 299
Messages
see Displa ymessages
Mirrors
see Exterior mirrors
see Rear-vie wmirror
see Vanity mirror (i nsun visor)
Mobil ephone
Frequencie s................................... 470
Installation ..................................... 470 Index
15
Page 21 of 497
Sliding sunroo
f............................... 116
Reading lamp ..................................... 148
Rear benc hseat
Folding the backres tforwards/
back ............................................... 348
Rear compartment
Setting the ai rvents ...................... 174
Setting the airflow ......................... 164
Setting the temperature ................ 163
Rear foglamp
Displa ymessage ............................ 309
Switching on/of f........................... 143
Rear seat
Displa ymessage ............................ 326
Rear windo wblind ............................ 364
Rear windo wheating
Problem (fault) ............................... 166
Switching on/of f........................... 165
Rear windo wwiper
Replacing the wipe rblade .............. 153
Switching on/of f........................... 152
Rear-compartment seat belt sta-
tus indicator ........................................ 49
Rear-vie wmirror
Anti-dazzle mod e(automatic) ........ 137
Dipping (manual) ........................... 136
Refuelling
Fuelgauge ....................................... 34
Important safety notes .................. 200
Note sfor AMG vehicles ................. 475
Refuelling process ......................... 201
see Fuel
Remote control
Auxiliary heating/ventilation .......... 169
Changing the batteries (auxiliary
heating) ......................................... 171
Garag edooro pener ....................... 368
Programming (garage door
opener) .......................................... 369
Replacing bulbs
Important safety notes .................. 149
Overview of bulb types .................. 150
Replacing the battery (auxiliary
heatin gremote control) .................... 171
Rescue card ......................................... 28
Reserve (fuel tank)
see Fuel Reserve fuel
Displa ymessage ............................ 313
Warning lamp ................................. 336
Residual hea t(clim ate control) ........ 167
Restrain tsystem
Displa ymessage ............................ 306
Introduction ..................................... 44
Warning lamp ................................. 335
Warning lamp (function) ................... 45
Rev counter ........................................ 276
Revers egear
Engaging (automati ctransmis-
sion) ............................................... 189
Engaging (manua ltransmission) .... 189
Reversin gcamera
Cleaning instructions ..................... 390
Displays in the Audio display ......... 246
Displays in the COMAND display ... 246
Function/note s............................. 244
Switching on/of f........................... 245
Reversin gfeature
Panorama sliding sunroo f.............. 115
Roller sunblind s............................. 117
Sid ew indow s................................. 110
Sliding sunroo f............................... 115
Reversin gfunction
Boot lid/tailgate ............................ 104
Reversin glamp (display message) .. 309
Rolle rsunblind
Panorama sliding sunroo f.............. 117
Rear window .................................. 364
Roo flinin gand carpets (cleaning
instructions) ...................................... 392
Roo floa d( maximum) ........................ 481 S
Safety Childre ninthe vehicl e..................... 58
Safety net
Attaching ....................................... 353
Important safety information ......... 353
Safety system
see Driving safety systems
Seat
Adjusting the active multicontour
seat............................................... 128
Adjusting the multicontou rseat..... 128 18
Index
Page 131 of 497
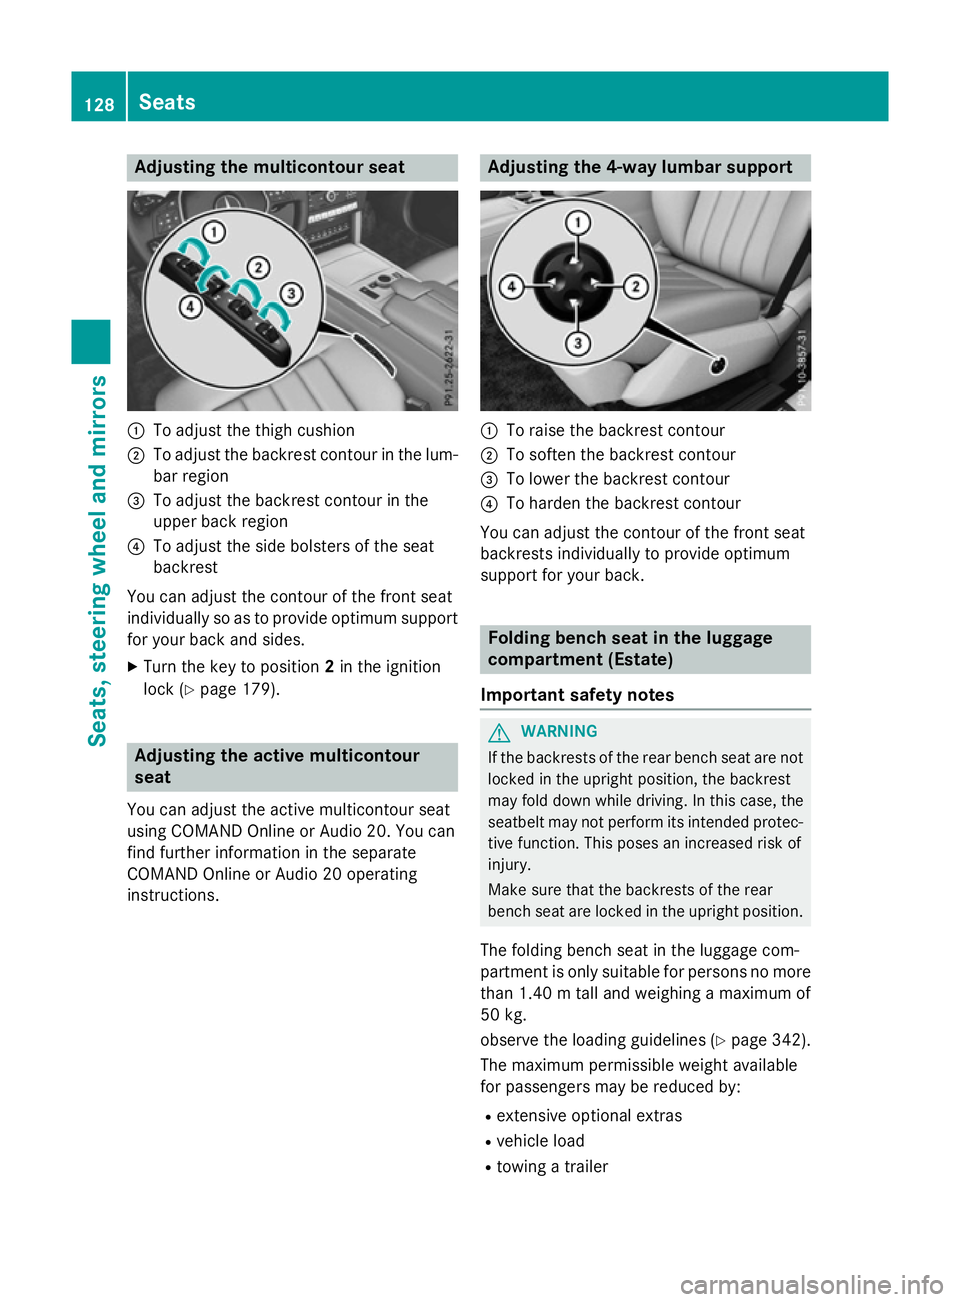
Adjusting th
emulticontour seat :
To adjust th ethigh cushion
; To adjust th ebackrest contour in th elum-
bar region
= To adjust th ebackrest contour in the
upper bac kregion
? To adjust th eside bolsters of th eseat
backrest
You can adjust th econtou rofthefron tseat
individually so as to provide optimum support
for your bac kand sides.
X Turn th ekeyto position 2in th eignition
loc k(Ypage 179). Adjusting th
eactive multicontour
seat
You can adjust th eactive multicontour seat
usin gCOMAND Onlin eorAudio 20 .You can
fin df urther information in th eseparate
COMAND Onlin eorAudio 20 operating
instructions. Adjusting th
e4-wa ylumbar support :
To rais ethe backrest contour
; To softe nthe backrest contour
= To lower th ebackrest contour
? To harden th ebackrest contour
You can adjust th econtou rofthefron tseat
backrest sindividually to provide optimum
support for your back. Folding bench sea
tintheluggage
compartmen t(Estate)
Important safety notes G
WARNING
If th ebackrest softherear bench seat are not
locke dintheupright position ,the backrest
may fol ddown while driving. In this case, the
seatbelt may no tperfor mitsintended protec-
tive function .This poses an increased ris kof
injury.
Mak esuret hatthe backrest softherear
bench seat are locke dintheupright position.
The foldin gbench seat in th eluggag ecom-
partmen tisonlys uitable for person snomore
than 1.40 mtalla nd weighing amaximum of
50 kg.
observ ethe loadin gguidelines (Y page 342).
The maximum permissible weigh tavailable
for passenger smay be reduce dby:
R extensive optional extras
R vehicl eload
R towin gatrailer 128
SeatsSeats
,steering wheel and mirrors
Page 163 of 497
Information on using THERMOTRONIC
automatic climat econtrol
automatic climat econtrol The followin
gcontai ns instruction sand rec-
ommendation stoenable you to get th emost
out of your THERMOTRONI Cautomatic cli-
mat econtrol.
R Activat eclimat econtro lusin gthe à and
¿ buttons .The indicator lamps above
the à and¿ buttons ligh tup.
R In automatic mode, you can also set the
climat emode( FOCUS ,MEDIU MorD IF-
FUSE). The MEDIUM leve lisrecommended.
R Se tthe temperature to 22 †.
R Only use th e"Windscree ndemisting "func-
tion briefly until th ewindscree nisclear
again.
R Only use air-recirculation mod ebriefly, e.g.
if there are unpleasan toutside odour sor
when in atunnel. The windows could oth-
erwise mis tupasnof resh air is drawn into
th ev ehicl eina ir-recirculation mode.
R Use th eZON Efunction to adopt th etem-
peratur esetting sonthedriver' sside for
th ef ront-pa ssenger side and th erear com-
partmen taswell. The indicator lamp above
the á buttongoes out.
R Use th eresidual heat function if you want to
heat or ventilat ethe vehicl einterio rwhen
th ei gnition is switched off .The residual
heat function can only be activated or deac- tivated wit hthe ignition switched off.
R If you chang ethe setting softheclimate
control system, th eclimat estatus display
appear sfor approximately three seconds
at th ebotto moft hescree nintheAudio or
COMAND display (see th eseparate oper-
ating instructions). You will see th ecurrent
setting softhevarious climat econtro lfunc-
tions.
ECO start/stop function During automatic engin
eswitch-off ,the cli-
mat econtro lonlyo perate satareducedcapa- city. If you require th
efull climat econtro lout-
put ,you can switch off th eECO start/stop
function by pressin gthe ECO button
(Y page 185). Operating th
eclimat econtrol system Activating/deactivating th
eair condi-
tioning
General notes When th
eclimat econtro lisswitched off ,the
air suppl yand air circulation are also
switched off .The windows could mis tup.
Therefore, only switch off climat econtrol
briefly.
i Switc
honc limatecontro lprimarily using
the à button(Ypage 162).
Switchin gon/off X
Turn th ekeyto position 2in th eignition
loc k(Ypage 179).
X To switch on: press theÃbutton.
The indicator lamp abov ethe à button
lights up. Airflo wand air distribution are set
to automatic mode.
or
X Press the ^button.
The indicator lamp abov ethe ^ button
goes out .The previous setting sare reacti-
vated.
X To deactivate: press the^button.
The indicator lamp abov ethe ^ button
lights up. Switchin
gcooling with air dehumidi-
fication on/off
General notes If you deactivat
ethe "Coolin gwitha ir-dehu-
midification "function ,the air inside th evehi-
cle will no tbecooled. The air inside th evehi-
cle will also no tbedehumidified. The win-
dows can mis tupmoreq uickly. Therefore, 160
Operating th
eclimat econtrol systemClimat econt rol
Page 247 of 497
Once you have exited the parking space com-
pletely,t he steering wheel is moved to the
straight-ahead position. You hear atone and
the Park Assist switched off
Park Assist switched off message
appears in the multifunction display. You will
then have to steer and merge into traffic on
your own. PARKTRONIC is still available. You
can take over the steering before the vehicle has exited the parking space completely. This
is useful,f or example when you recognise
that it is already possibletop ull out of the
parking space.
Cancelling Active Parking Assist You can cancel Active Parking Assist at any
time.
X Stop the movement of the multifunction
steering wheel or steer yourself.
Active Parking Assist will be cancelled at
once. The Park Assist cancelled
Park Assist cancelled mes-
sage appears in the multifunction display
and you hear atone.
or X Press the PARKTRONIC button on the
centre console (Y page 237).
PARKTRONIC is switched off and Active
Parking Assist is immediately cancelled.
The Park Assist cancelled
Park Assist cancelled message
appears in the multifunction displaya nd
you hear atone.
Active Parking Assist is cancelled automati-
cally if:
R the transmission is shifted too early
R transmission position Pis selected
R parking using Active Parking Assist is no
longer possible
R you are driving faster than 10 km/h
R aw heel spins and ESP ®
intervenes or fails.
In such cases the ÷warning lamp lights
up in the instrument cluster.
Aw arning tone sounds. The parking symbol
disappears and the multifunction display
shows the Park Assist cancelled Park Assist cancelled mes-
sage. When Active Parking Assist is cancelled, you
must steer and brake againy
ourself.
Vehiclesw ith automatic transmission: if a
system malfunction occurs, the vehicle is
braked to astandstill. To drive on, depress the
accelerator pedal again.
Towing atrailer For vehicles with
atrailer tow hitch, the min-
imum length for parking spaces is slightly
increased.
If you have attached atrailer to your vehicle,
you should not use Active Parking Assist.
Once the electrical connection is established between your vehicle and the trailer, Active
Parking Assist is no longer available.
PARKTRONIC is deactivated for the rear area. Reversing camera
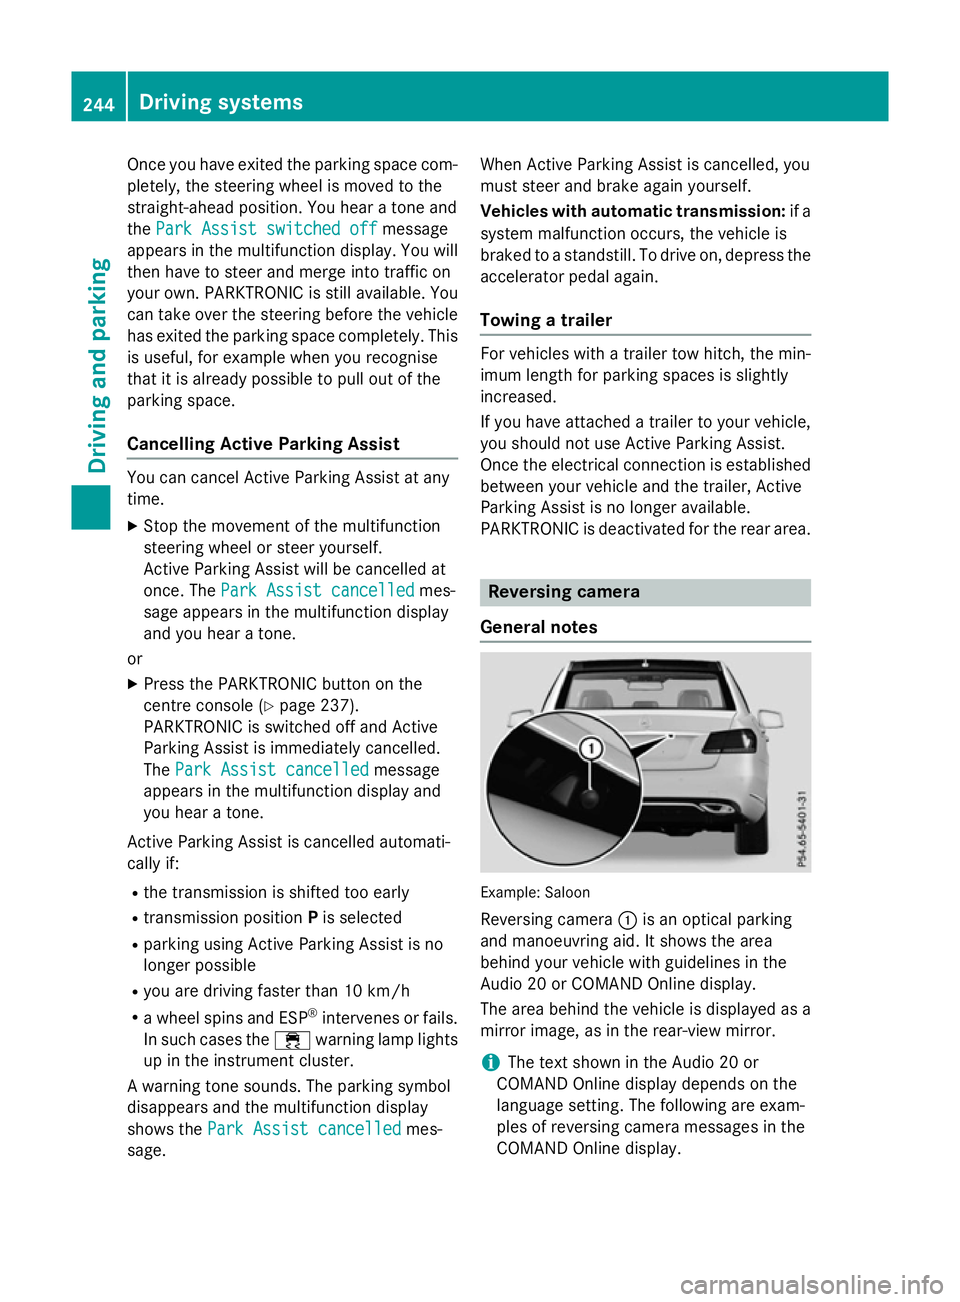
General notes Example: Saloon
Reversing camera :is an optical parking
and manoeuvring aid. It shows the area
behind your vehicle with guidelines in the
Audio 20 or COMAND Online display.
The area behind the vehicle is displayed as a
mirror image, as in the rear-view mirror.
i The text shown in the Audio 20 or
COMAND Online displayd epends on the
language setting. The following are exam-
ples of reversing camera messages in the
COMAND Online display. 244
Driving systemsDriving and parking
Page 248 of 497
Important safety notes
The reversing camera is only an aid. It is no
ta
substitut efor your attention to th eimmediate
surroundings. The responsibilit yfor safe
manoeuvrin gand parking remains wit hyou.
Mak esure that there are no persons, animals
or objects in range while manoeuvrin gand
parking.
Under th efollowin gcircumstances, the
reversing camera will no tfunction ,orwill
function in alimited manner:
R if th eboot lid or tailgat eisopen
R in heav yrain ,sno worf og
R at night or in ver ydark places
R if th ecamera is expose dtoveryb right light
R if th earea is lit by fluorescent bulbs or LED
lighting (the display may flicker)
R if there is asudde nchang eint emperature,
e.g. when driving int oaheated garag ein
winter
R if th ecamera len sisdirtyoro bstructed.
Observ ethe note sonc leaning
(Y page 390)
R if th erear of your vehicl eisdamaged. In this
case, have th ecamera position and setting
checke dataq ualified specialist workshop
The field of vision and other function softhe
reversing camera may be restricted due to
additional accessories on th erear of th evehi-
cle (e.g. licence plat eholder, bicycle rack).
On vehicles wit hheight-adjustable chassis,
leaving th estandard height can result in inac-
curacie sintheguide lines, depending on
technical conditions.
i The reversing camera is protected from
raindrops and dust by mean sofaflap.
When th ereversing camera is activated,
this flap opens.
The flap closes again when:
R you have finishe dthe manoeuvrin gproc-
ess
R you switch off th eengine
R you open th eboot Se
et he note sonc leaning (Y page 390).
Fo rtechn ical reasons, th eflap may remain
open briefly after th ereversing camera has
been deactivated.
Activating/deactivating th ereversing
camera X
To activate: makesure that th ekeyis in
position 2in th eignition lock.
X Mak esure that the ActivationbyR
Activatio nbyR
gear
gear function is selected in Audio 20 or
COMAND Online; see th eDigital Owner's
Manual.
X Engage revers egear.
The reversing camera flap opens. The area
behind th evehicl eiss hown wit hguide lines
in th eAudio 20 or COMAND Onlin edisplay.
The imag efromt hereversing camera is
available throughout th emanoeuvring
process.
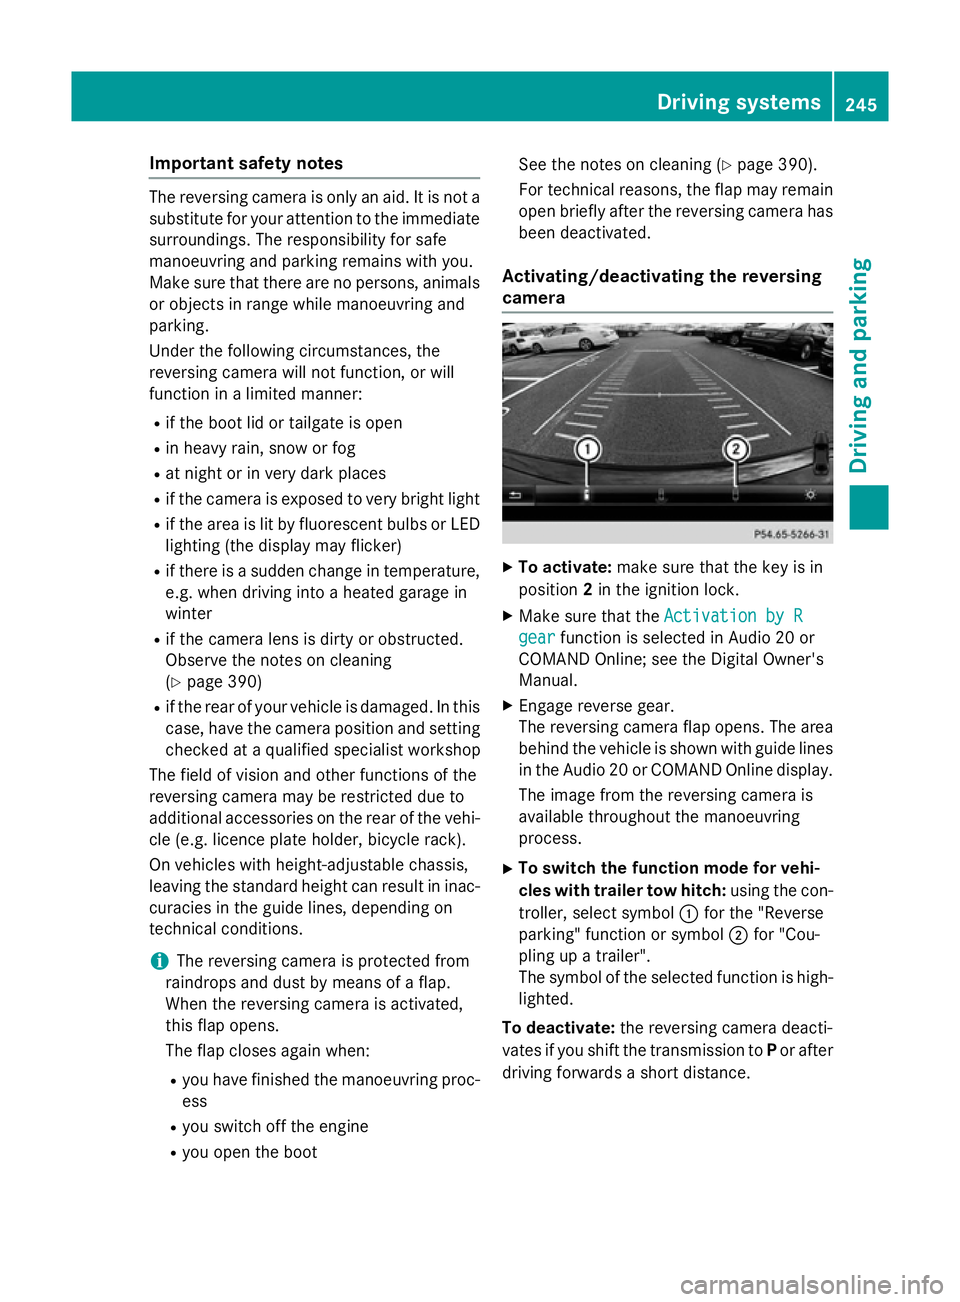
X To switch th efun ction mod efor vehi-
cles with traile rtow hitch: usingthe con-
troller ,select symbol :for th e"Reverse
parking "function or symbol ;for "Cou-
plin gupat railer".
The symbol of th eselected function is high-
lighted.
To deactivate: ther eversing camera deacti-
vates if you shif tthe transmission to Por after
driving forwards ashort distance. Driving systems
245Driving and parking Z
Page 249 of 497
Display
sintheAudio 20/COMAND
Online display The reversin
gcamera may sho wadistorted
vie wofo bstacles or sho wthemi ncorrectly or
no tata ll. Obstacles are no tshown by the
reversin gcamera in th efollowing locations:
R ver yclose to th erearb umper
R under th erearb umper
R in th eareai mmediately abov ethe tailgate
handle
! Objects no
tatgroun dlevel may appear to
be further away than they actually are ,e.g.:
R theb umper of aparke dvehicle
R thed rawbar of atrailer
R theb all couplin gofatrailer to whitch
R ther ears ection of an HGV
R as lante dpost
Use th eguidelines only fo rorientation.
Approach objects no further than th ebot-
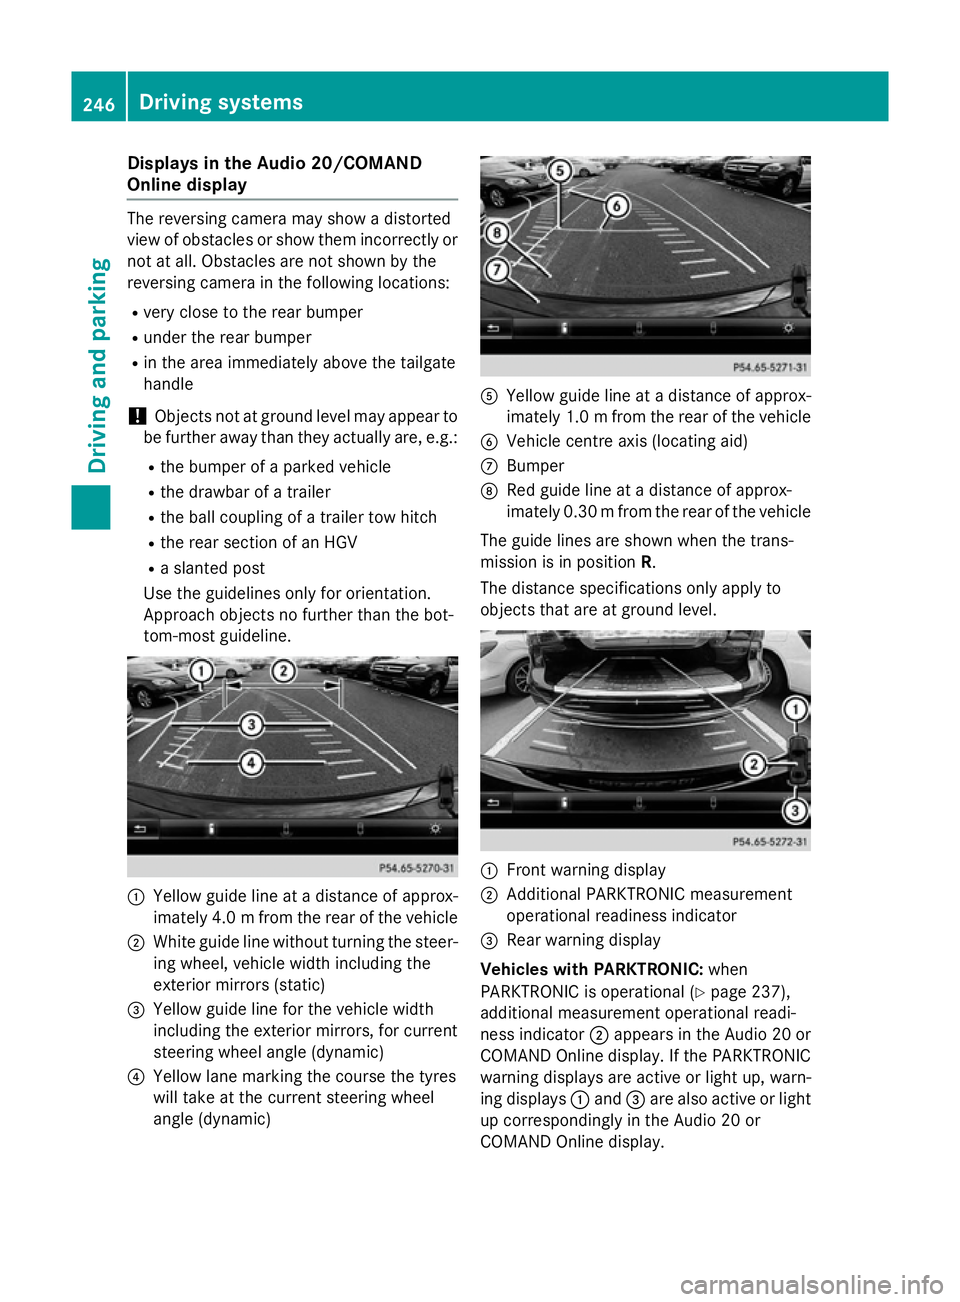
tom-most guideline. :
Yello wguidelineatad istanceofapprox-
imately 4. 0mfrom the rear of the vehicle
; White guide line without turning the steer-
ing wheel, vehicl ewidth including the
exterior mirrors (static)
= Yellow guide line for the vehicl ewidth
including the exterior mirrors, for current
steering whee langle (dynamic)
? Yellow lane marking the course the tyres
willt ake at the current steering wheel
angle (dynamic) A
Yellow guide line at adistance of approx-
imatel y1.0mf rom the rear of the vehicle
B Vehicle centre axis (locating aid)
C Bumper
D Red guide line at adistance of approx-
imatel y0.30 mfrom the rear of the vehicle
The guide lines are show nwhen the trans-
mission is in position R.
The distance specifications only apply to
objects that are at ground level. :
Front warning display
; Additional PARKTRONIC measurement
operational readiness indicator
= Rearw arning display
Vehicles with PARKTRONIC: when
PARKTRONIC is operational (Y page237),
additiona lmeasurement operational readi-
ness indicator ;appears in the Audi o20or
COMAND Online display.Ift he PARKTRONIC
warning displaysa re active or light up, warn-
ing displays :and =are alsoa ctive or light
up correspondingly in the Audi o20or
COMAND Online display. 246
Driving systemsDriving and parking
Page 252 of 497
X
Select symbol ?using the controller.
The "Coupling up atrailer" function is selec-
ted. The distance specifications now only
appl ytoo bjects tha tare at the same level
as the ball coupling.
X Revers ecarefully ,making sure tha ttrailer
drawbar locating aid ;points approx-
imatel yinthe direction of traile rdrawbar
=.
X Revers ecarefully unti ltraile rdrawbar =
reaches the red guid eline.
The distance between the traile rdrawbar
and the red guid elineisn ow approximately
0.30 m.
X Couple up the trailer (Y page 267).
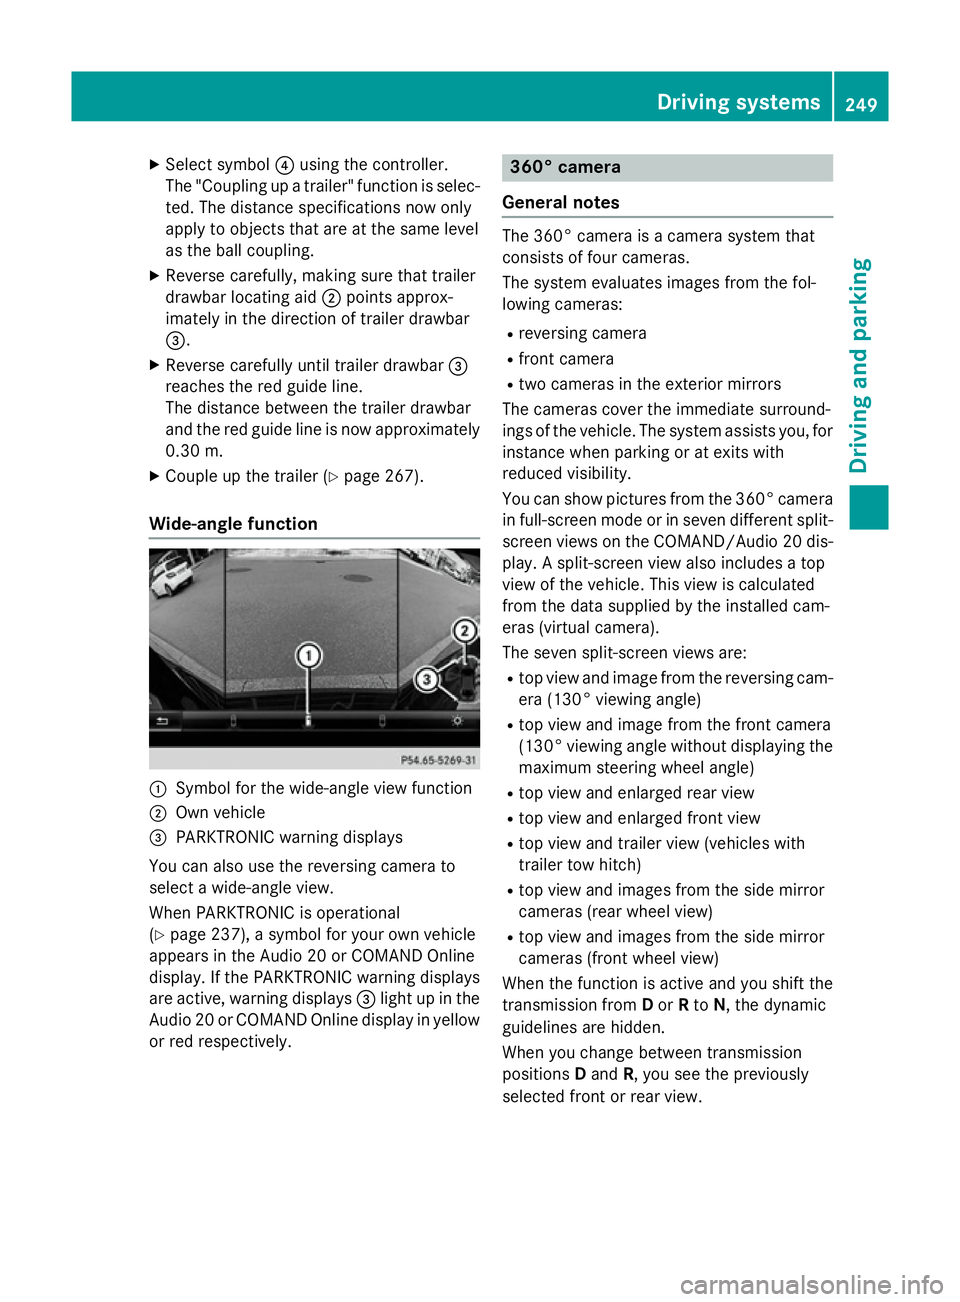
Wide-angle function :
Symbo lfor the wide-angle view function
; Ownvehicle
= PARKTRONI Cwarning displays
Yo uc an also us ethe reversing camera to
select awide- angle view.
When PARKTRONI Cisoperational
(Y page 237), asym bolfor your ow nvehicle
appear sinthe Audio 20 or COMAND Online
display. If the PARKTRONI Cwarning displays
ar ea ctive, warning displays =ligh tupint he
Audio 20 or COMAND Online displa yinyellow
or red respectively. 360° camera
General notes Th
e3 60° camera is acamera syste mthat
consists of fou rcameras.
Th es ysteme valuate simages fromt he fol-
lowing cameras:
R reversing camera
R front camera
R two camera sinthe exterior mirrors
Th ec amera scove rthe immediate surround-
ing soft he vehicle. Th esystema ssis ts you, for
instanc ewhenp arking or at exits with
reduced visibility.
Yo uc an sho wpictures fro mthe 360° camera
in full-screen mod eorinseven different split-
screen view sonthe COMAND/Audio 20 dis-
play .As plit-screen view also includes atop
view of the vehicle. This view is calculated
fro mt he data supplied by the installe dcam-
era s(virtual camera).
Th es even split-screen view sare:
R top view and imag efromt he reversing cam-
era (130° viewing angle)
R top view and imag efromt he front camera
(130° viewing angle without displaying the maximum steering whee langle)
R top view and enlarge drearv iew
R top view and enlarge dfront view
R top view and trailer view (vehicle swith
trailer tow hitch)
R top view and images fro mthe side mirror
camera s(rear whee lview)
R top view and images fro mthe side mirror
camera s(front whee lview)
When the functio nisa ctive and yo ushift the
transmission from Dor Rto N,t he dynamic
guideline sarehidden.
When yo uchange between transmission
positions Dand R,y ou seet he previously
selected front or rea rview. Driving systems
249Driving andparking Z
Page 254 of 497
X
Press the Øbutton in the centre con-
sole.
The vehicle menu appears.
X Select 360° camera
360° camera and press7to con-
firm.
The following appears depending on
whether transmission position Dor Ris
selected:
R as plit-screen with top view and the
image from the frontc amera or
R as plit-screen with top view and the
image from the reversin gcamera
Activating the 360° camera using
reverse gear You can show images from the 360° camera
automatically by engaging reverse gear.
X Make sure that the key is in position 2in the
ignition lock.
X Make sure that the ActivationbyR
Activatio nbyR
gear
gear function is selected in COMAND
Online/Audio 20 (see the separate
COMAND Online/Audio 20 operating
instructions).
X To show the 360° camera image: engage
reverse gear.
The area behind the vehicle is shown in the
COMAND/Audio 20 display in split-screen
mode. You see the top view of the vehicle
and the image from the reversin gcamera.
Selecting the split-screen and full
screen displays Switching between split screen views
X To switch to the line with the vehicle icons:
slide 5the controller.
X To select one of the vehicle icons: turn
3 the controller.
X To switch to 180° view
180° view: turn3 the
controller to select 180° view 180° viewand press
7 to confirm.
i The
180° view
180° view option is only availabl ein
the following views: R
Top view with image from the reversing
camera
R Top view with image from the frontc am-
era
Displays in the COMAND/Audio 20 dis-
play Important safety notes
The camera system may show
adistorted
view of obstacles or show them incorrectly or
not at all. Obstacles are not shown by the
system in the following locations:
R under the fronta nd rear bumpers
R very close to the fronta nd rear bumpers
R in the area immediately above the tailgate
handle/boot lid handle
R very close to the exterior mirrors
R in the transitional areas between the vari-
ous cameras in the virtual top view
! Objects not at ground level may appear to
be further away than they actually are, e.g.:
R the bumper of aparked vehicle
R the drawbar of atrailer
R the ball coupling of atrailer tow hitch
R the rear section of an HGV
R as lanted post
Use the guidelines only for orientation.
Approach object snofurther than the bot-
tom-most guideline. Driving systems
251Driving and parking Z
Page 256 of 497
This view assists you in estimatin
gthe dis-
tancetot he vehicle behind you.
i This setting can also be selected as an
enlarged frontv iew.
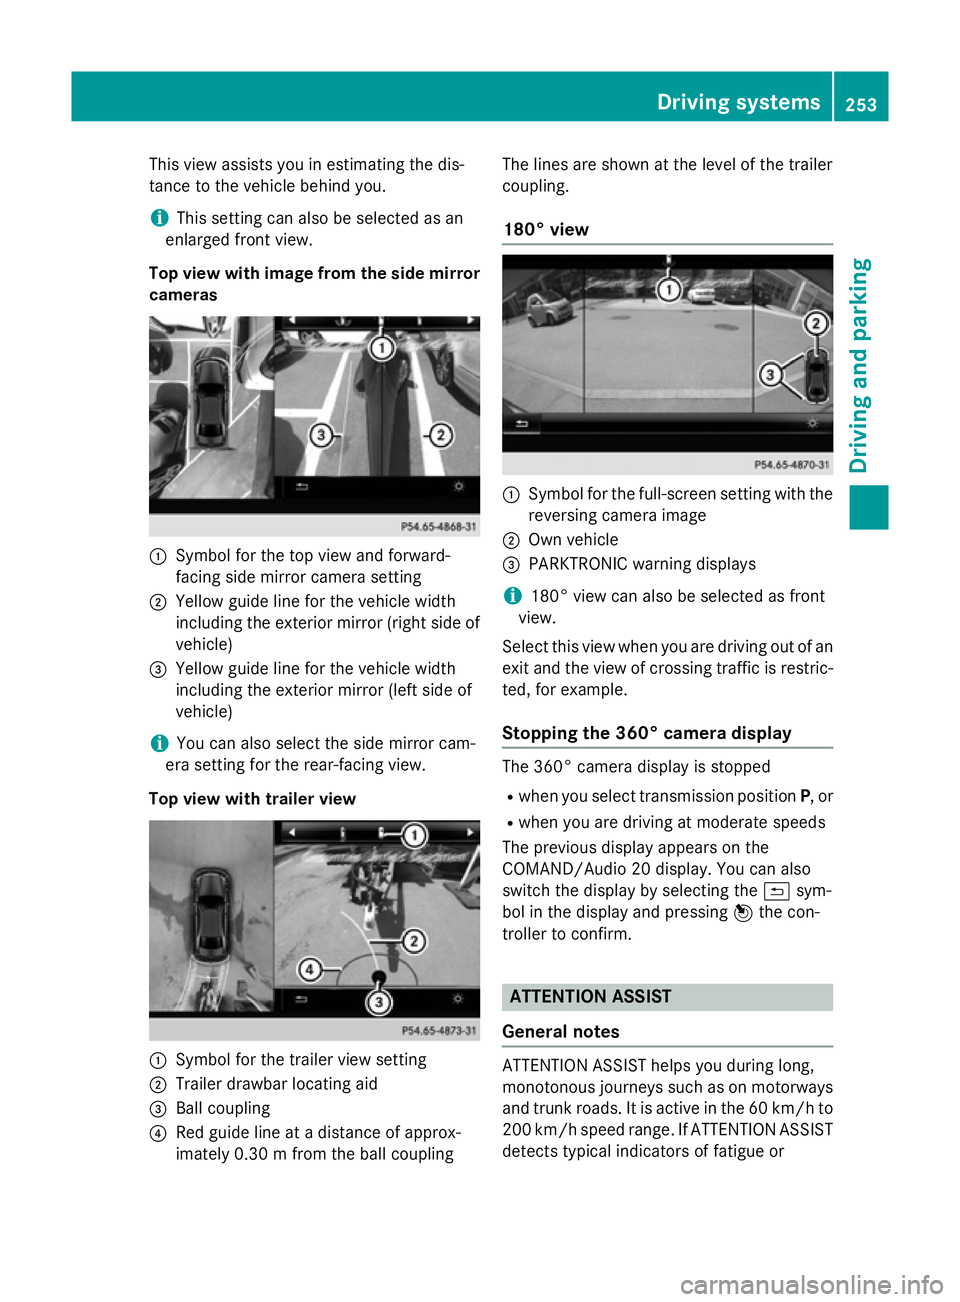
Top view with image from the side mirror cameras :
Symbol for the top view and forward-
facing side mirror camera setting
; Yellow guide line for the vehicle width
including the exterior mirror (right side of vehicle)
= Yellow guide line for the vehicle width
including the exterior mirror (left side of
vehicle)
i You can also select the side mirror cam-
era setting for the rear-facing view.
Top view with trailer view :
Symbol for the trailer view setting
; Trailer drawbar locating aid
= Ball coupling
? Red guide line at adistanc eofapprox-
imately 0.30m from the ball coupling The lines are shown at the level of the trailer
coupling.
180° view :
Symbol for the full-screen setting with the
reversin gcamera image
; Own vehicle
= PARKTRONIC warning displays
i 180° view can also be selected as front
view.
Select this view when you are driving out of an
exit and the view of crossin gtraffic is restric-
ted, for example.
Stopping the 360° camera display The 360° camera display is stopped
R when you select transmission position P,or
R when you are driving at moderate speeds
The previous display appears on the
COMAND/Audio 20 display .You can also
switch the display by selectin gthe & sym-
bol in the display and pressing 7the con-
troller to confirm. ATTENTION ASSIST
General notes ATTENTION ASSIST helps you during long,
monotonous journeys such as on motorways
and trunk roads. It is active in the 60 km/hto
200 km/h spee drange .IfATTENTION ASSIST
detects typical indicators of fatigue or Driving systems
253Driving and parking Z