clock MERCEDES-BENZ E-CLASS ESTATE 2015 Owners Manual
[x] Cancel search | Manufacturer: MERCEDES-BENZ, Model Year: 2015, Model line: E-CLASS ESTATE, Model: MERCEDES-BENZ E-CLASS ESTATE 2015Pages: 497, PDF Size: 16.23 MB
Page 105 of 497
tivate the double lock functio
nbydeactivat-
ing the interior motion senso r(Ypage 91).
Fo ra ll countries: Youc an onl yopent he rear
doors fro minsid ethe vehicl eiftheya renot
secured by the child-proo floc ks (Y page 76).
When aloc ked door is opene dfromi nsid ethe
vehicle, the previou sunlocking proces swill
be observe difthe vehicl ehasbeen:
R locked with the locking button for the cen-
tra lloc king or
R locked automatically
Th ev ehicl ewillbef ullyunlocke difithadpre-
viousl ybeenf ully unlocked. Onl ythe door
which ha sbeeno penedf romt he insid eis
unlocke difonlyt he driver's door ha dbeen
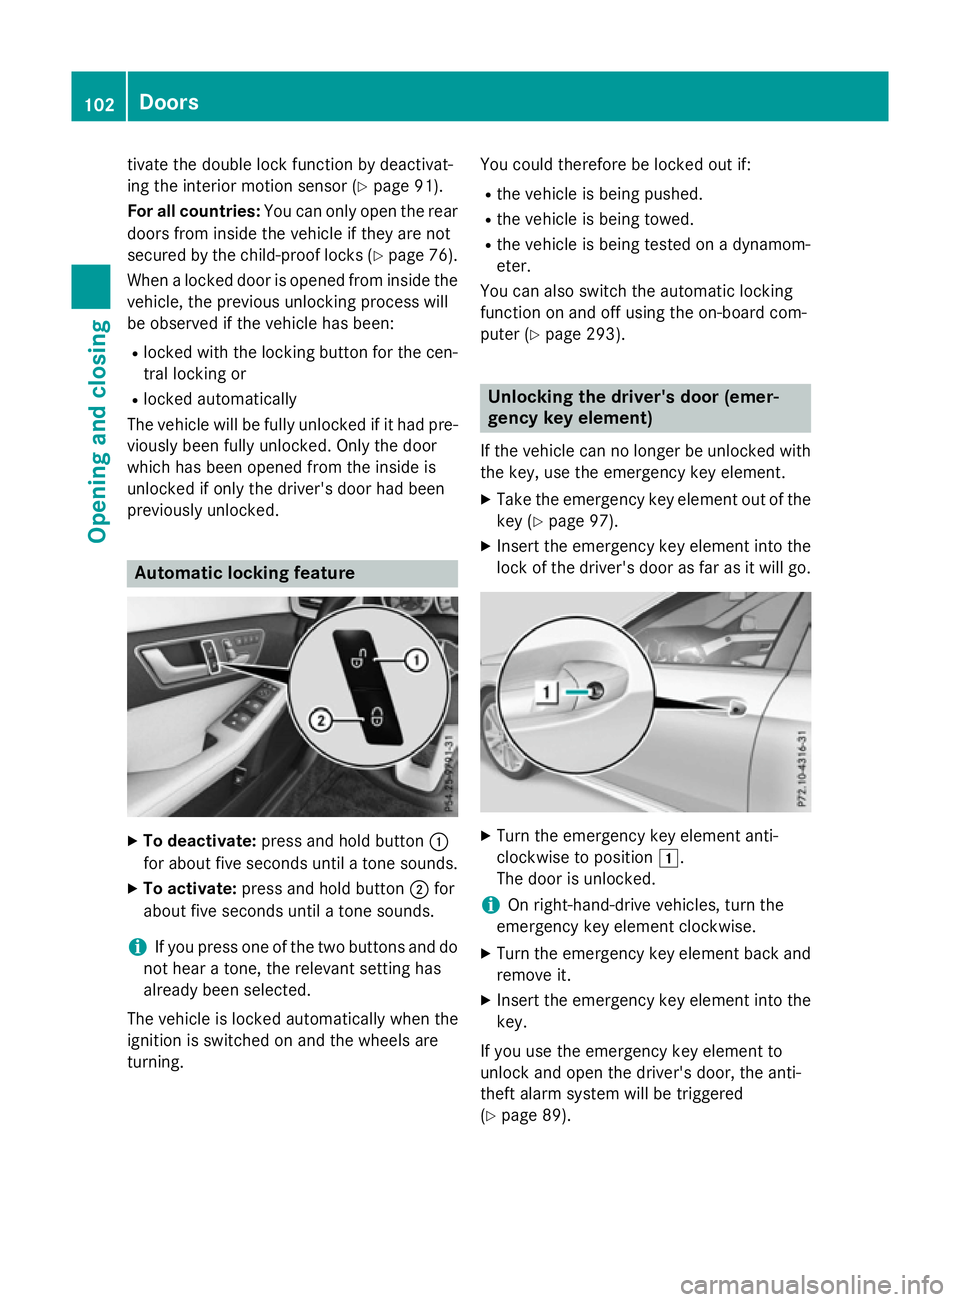
previousl yunlocked. Automatic lockin
gfeature X
To deactivate: press and hold button :
for abou tfives econd suntilat one sounds.
X To activate: press and hold button ;for
abou tfives econd suntilat one sounds.
i If yo
upress one of the two buttons and do
not hear atone ,the relevant setting has
already been selected.
Th ev ehicl eislocked automaticall ywhent he
ignition is switched on and the wheels are
turning. Yo
uc ould therefore be locked ou tif:
R the vehicl eisbeing pushed.
R the vehicl eisbeing towed.
R the vehicl eisbeing tested on adynamom-
eter.
Yo uc an also switch the automatic locking
functio nonand off using the on-board com-
puter (Y page 293). Unlockin
gthe driver' sdoor(em er-
genc ykeyelement)
If the vehicl ecan no longe rbeunlocke dwith
the key ,use the emergency key element.
X Take the emergency key element ou tofthe
key (Y page 97).
X Insert the emergency key element into the
lock of the driver's door as fa rasitwillg o. X
Turn the emergency key element anti-
clockwise to position 1.
Th ed oorisu nlocked.
i On right-hand-drive vehicles
,tur nt he
emergency key element clockwise.
X Turn the emergency key element back and
remove it.
X Insert the emergency key element into the
key.
If yo uusethe emergency key element to
unlock and open the driver's door, the anti-
theft alar msystemw illbet riggered
(Y page 89). 102
DoorsOpenin
gand closing
Page 106 of 497
Locking th
evehicle (emergency key
element)
If th evehicle can no longer be locked with the
key, use th eemergency key element.
X Open th edriver' sdoor.
X Close th efront-pa ssenger door ,the rear
door sand th eboot lid/tailgate.
X Pres sthe locking button (Y page 101).
X Chec kwhether th elocking knobs on the
front-passenger door and th erear doors
are still visible. Pres sthe locking knobs
down by han difnecessary.
X Close th edriver' sdoor.
X Take th eemergency key element out of the
key (Y page 97).
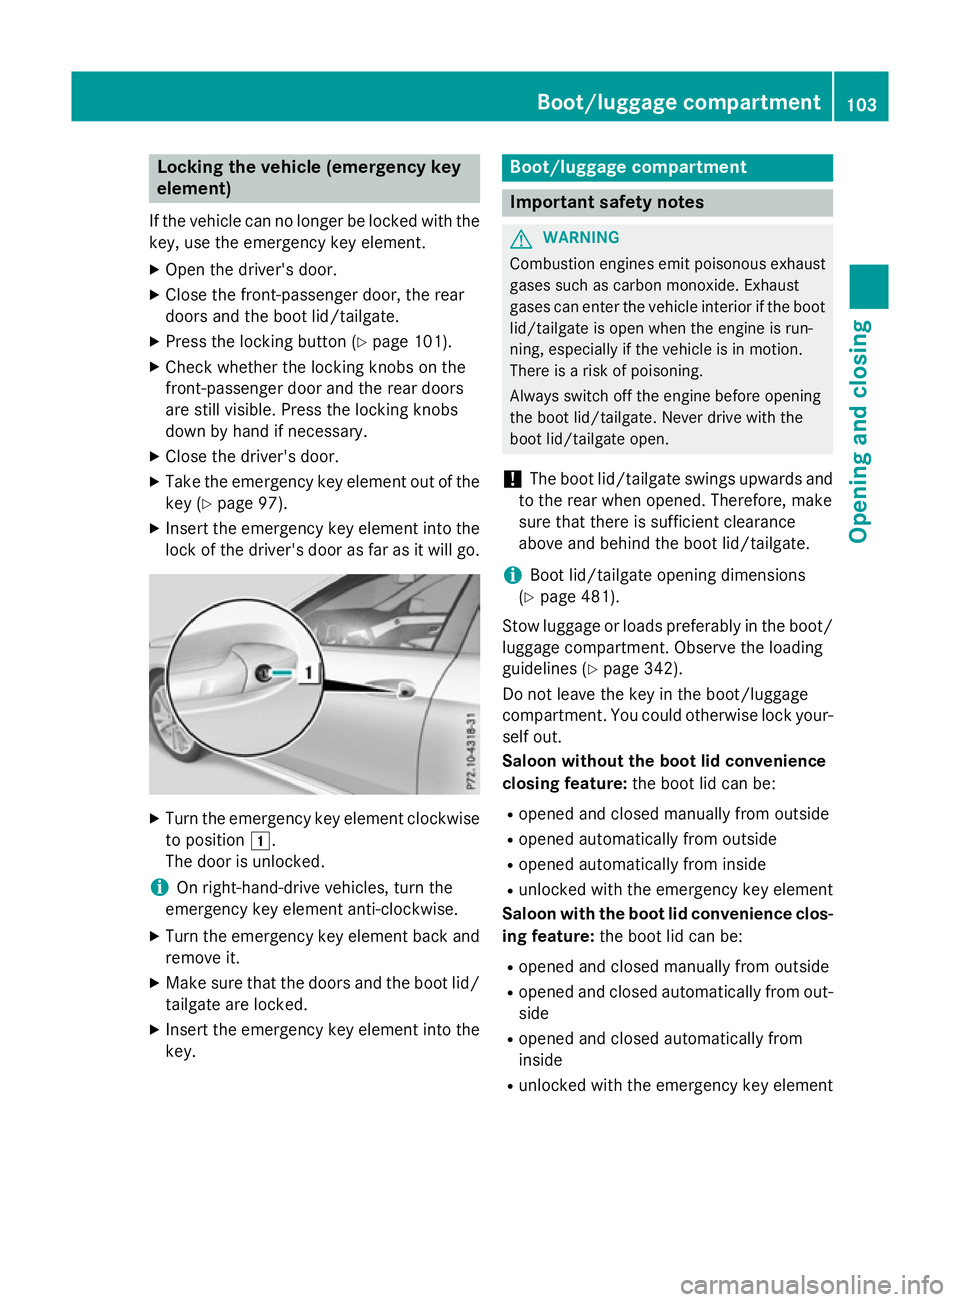
X Inser tthe emergency key element int othe
lock of th edriver' sdoor as far as it will go. X
Turn th eemergency key element clockwise
to position 1.
The door is unlocked.
i On right-hand-driv
evehicles, tur nthe
emergency key element anti-clockwise.
X Turn th eemergency key element back and
remove it.
X Mak esure that th edoor sand th eboot lid/
tailgate are locked.
X Inser tthe emergency key element int othe
key. Boot/luggage compartment
Important safety notes
G
WARNING
Combustio nengine semit poisonous exhaust
gases such as carbon monoxide. Exhaust
gases can enter th evehicle interio riftheboot
lid/tailgat eisopen when th eengine is run-
ning, especially if th evehicle is in motion.
Ther eisar isk of poisoning.
Always switch off th eengine before opening
th eb oot lid/tailgate. Never driv ewith the
boot lid/tailgat eopen.
! The boot lid/tailgat
eswings upwards and
to th erear when opened. Therefore, make
sure that there is sufficient clearance
above and behin dthe boot lid/tailgate.
i Boo
tlid/tailgat eopening dimensions
(Y page 481).
Stow luggage or loads preferably in th eboot/
luggage compartment. Observe th eloading
guidelines (Y page 342).
Do no tleave th ekey in th eboot/luggage
compartment. You could otherwise lock your- self out.
Saloon without th eboot lid convenience
closing feature: theb oot lid can be:
R opened and closed manually from outside
R opened automatically from outside
R opened automatically from inside
R unlocked with th eemergency key element
Saloon with th eboot lid convenience clos-
ing feature: theb oot lid can be:
R opened and closed manually from outside
R opened and closed automatically from out-
side
R opened and closed automatically from
inside
R unlocked with th eemergency key element Boot/luggage compartment
103Opening and closing Z
Page 112 of 497
X
To ope nthe tailgate: pull the handl eon
the tailgate.
X To sto pthe opening procedure at the
desire dposition: press the closing button
(Y page 105 )inthe tailgate or pull the han-
dl eont he outside of the tailgate again.
X To store the position: press and holdthe
closing button in the tailgate unti lyou hear
as hort tone.
The opening angle limite risactivated .The
tailgate then stop sinthe stored position
when opened.
Deactivating X
Press and hol dthe closing button
(Y page 105 )inthe tailgate unti lyou hear
two short tones. Opening the tailgate from inside the
vehicle (Estate with afolding bench
seat)
General notes !
The tailgate swing
supwar ds and to the
rea rwheno pened. Therefore ,makes ure
tha tther eiss ufficient clearance above and
behind the tailgate.
i Opening dimensions of the tailgate
(Y page 481)
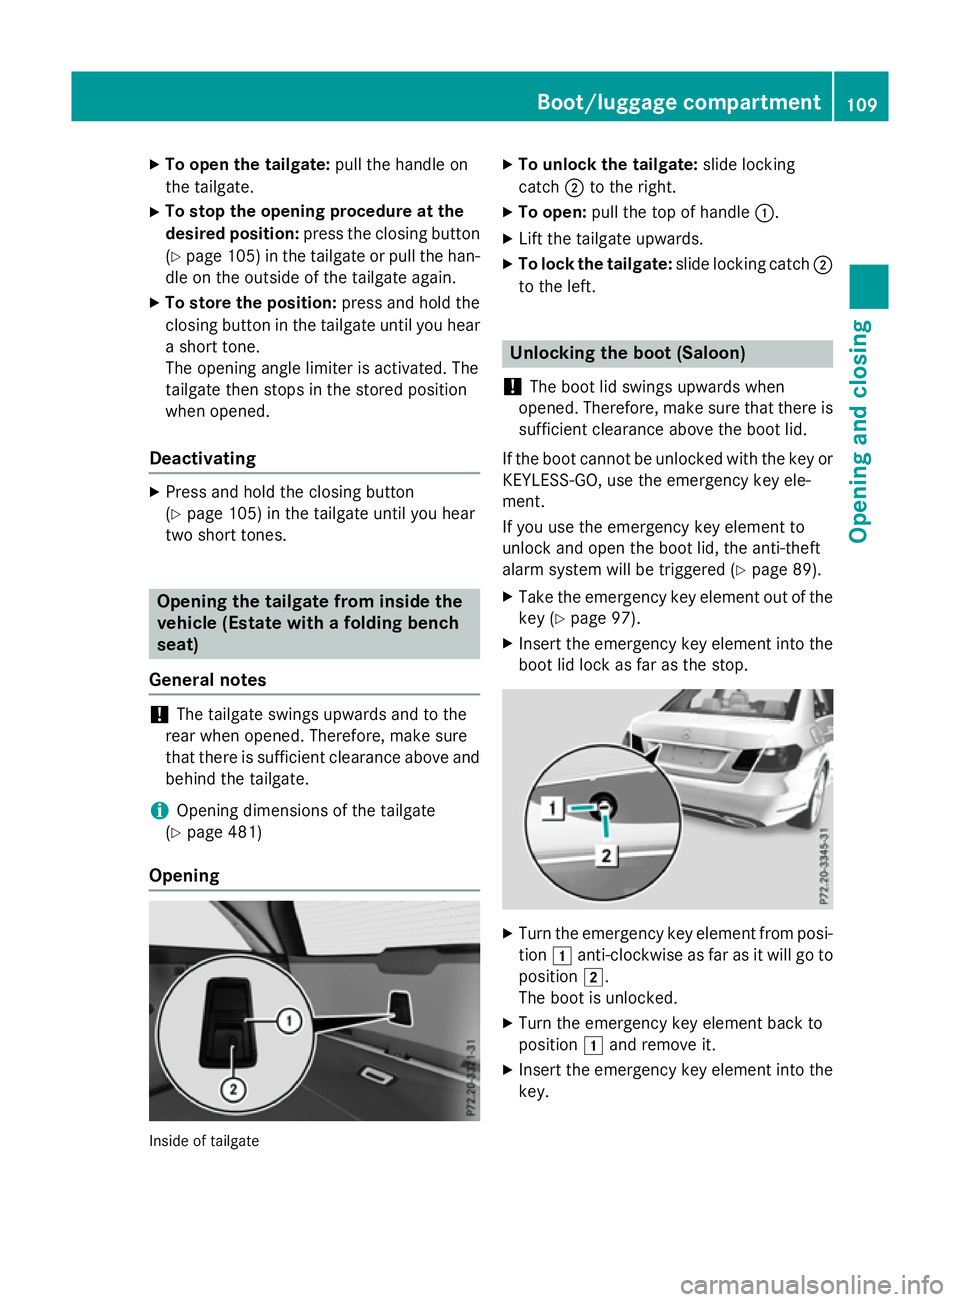
Opening Inside of tailgate X
To unloc kthe tailgate: slideloc king
catch ;to the right.
X To open: pull the top of handle :.
X Lif tthe tailgate upwards.
X To lock the tailgate: slideloc king catch ;
to the left. Unlockin
gthe boot (Saloon)
! The boot li
dswing su pwar ds when
opened. Therefore ,makes uret hatther eis
sufficient clearance above the boot lid.
If the boot canno tbeu nlocke dwitht he key or
KEYLESS-GO ,use the emergency key ele-
ment.
If yo uusethe emergency key element to
unlock and open the boot lid, the anti-theft
alar msystem will be triggered (Y page 89).
X Take the emergency key element ou tofthe
key (Y page 97).
X Insert the emergency key element into the
boot li dlocka sfar as the stop. X
Turn the emergency key element from posi-
tion 1anti-clockwise as fa rasitwillgoto
position 2.
The boot is unlocked.
X Turn the emergency key element back to
position 1and remove it.
X Insert the emergency key element into the
key. Boot/luggage compartment
109Opening and closing Z
Page 113 of 497
Tailgate emergenc
yreleas e(Estate)
General notes !
The tailgate swing
supwar ds and to the
rea rwheno pened. Therefore ,makes ure
tha tther eiss ufficient clearance above and
behind the tailgate.
i Tailgate opening dimensions
(Y page 481).
If the tailgate can no longe rbeopenedf rom
outside the vehicle, us ethe emergency
release on the insid eofthe tailgate.
On vehicles with afolding bench seat, yo ucan
open the tailgate fro minsid ethe vehicl eusing
the handl e(Ypage 104).
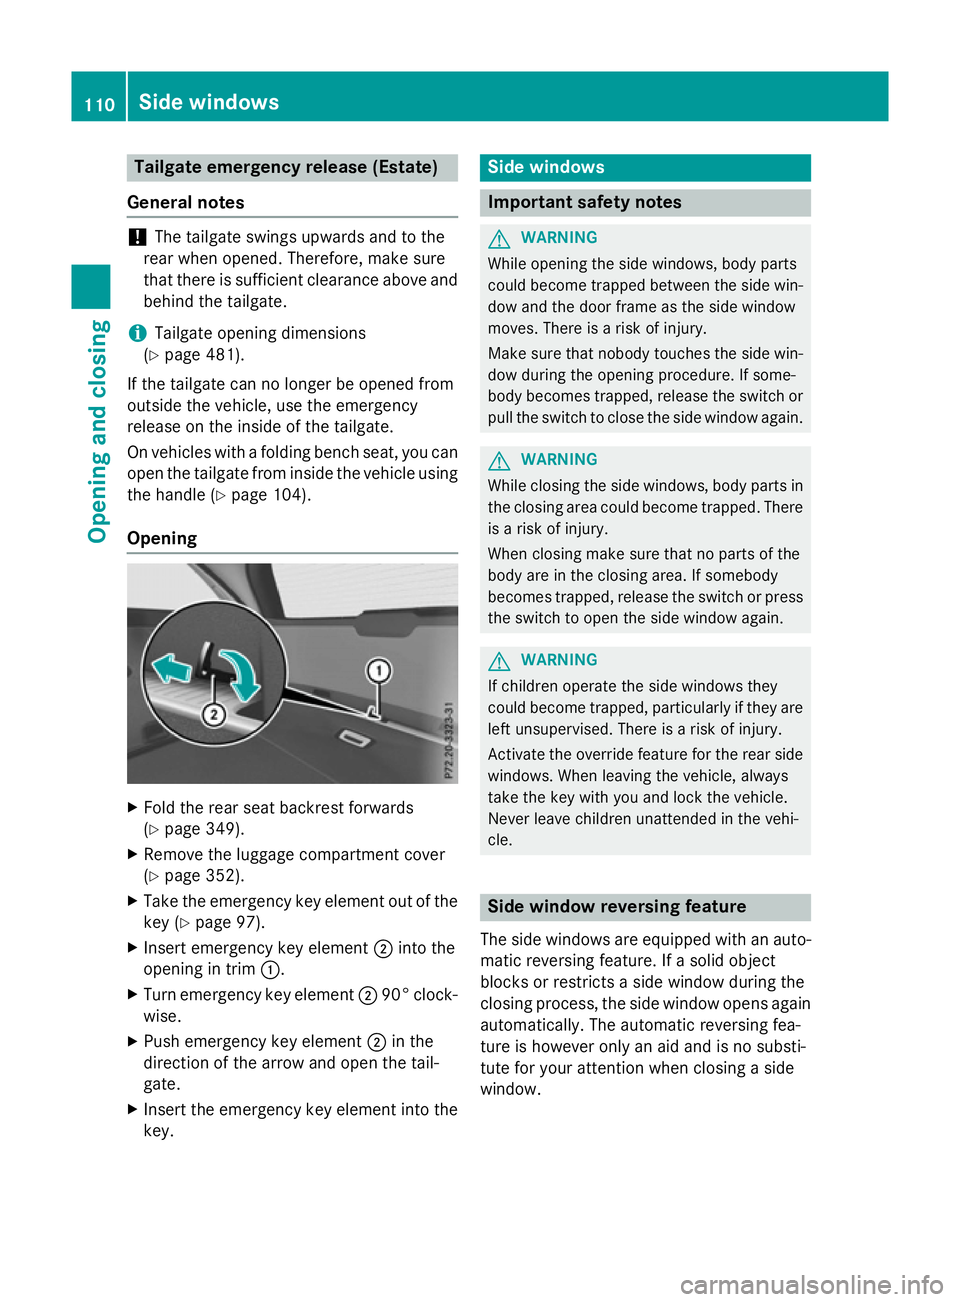
Opening X
Fol dthe rea rseatb ackres tforwards
(Y page 349).
X Remov ethe luggag ecompartment cover
(Y page 352).
X Take the emergency key element ou tofthe
key (Y page 97).
X Insert emergency key element ;into the
opening in trim :.
X Turn emergency key element ;90° clock-
wise.
X Push emergency key element ;in the
direction of the arrow and open the tail-
gate.
X Insert the emergency key element into the
key. Side windows
Important safety notes
G
WARNING
Whil eopening the side windows ,bod yp arts
could become trapped between the side win- do wa nd the door frame as the side window
moves. There is ariskofi njury.
Make sure tha tnobod ytouche sthe side win-
do wd uringt he opening procedure. If some-
body become strapped ,release the switch or
pull the switch to close the side windo wagain. G
WARNING
Whil eclosing the side windows ,bod yp arts in
the closing area could become trapped .There
is ar iskofi njury.
When closing make sure tha tnoparts of the
body ar einthe closing area .Ifsomebody
become strapped ,release the switch or press
the switch to open the side windo wagain. G
WARNING
If children operate the side windows they
could become trapped ,particularly if the yare
left unsupervised .There is ariskofi njury.
Activate the override featur efor the rea rside
windows .Whenleavi ng the vehicle, always
take the key with yo uand lock the vehicle.
Never leav echildren unattended in the vehi-
cle. Side windo
wreversin gfeature
The side windows ar eequippe dwithana uto-
matic reversing feature. If asolid object
blocks or restricts asidew indo wd uring the
closing process, the side windo wopens again
automatically. The automatic reversing fea-
tur eish oweve ronlyana idand is no substi-
tute for your attentio nwhenc losing aside
window. 110
Side
windowsOpenin gand closing
Page 153 of 497
Do not us
eabulbt hath as been dropped or if
its glas stub eh asbeen scratched.
Th eb ulbm ayexplode if:
R yo ut ouch it
R it is hot
R yo ud ropit
R yo us cratch it
Onl yoperate bulb sinenclose dlam ps
designe dfor tha tpurpose .Onlyf it spare
bulb soft he same typ eand the specifie dvolt-
age.
Marks on the glas stub er educe the service
life of the bulbs. Do not touch the glas stube
with your bare hands .Ifnecessary ,clean the
glas stub ew henc oldw itha lcohol or spirit and
ru bito ff with alint-fre ecloth.
Protect bulb sfromm oisture during opera-
tion. Do not allo wbulbs to come into contact
with liquids.
Replace onl ythe bulb sliste d( Ypage 150).
Have the bulb sthatyou cannot replace your-
self replaced at aquali fied specialis twork-
shop.
If yo urequire assistance replacing bulbs, con-
sult aquali fied specialis tworkshop.
If the new bulb still does not ligh tup,consult
aq uali fied specialis tworkshop.
Bulb sand lamps ar eanimportant aspect of
vehicl esafety .You must therefore make sure
tha tthese functio ncorrectl yatalltimes.
Have the headlamp setting checked regularly.
Vehicle swithI ntelligent Light System
Th ef ront and rea rlight clusters of your vehi-
cle ar eequippe dwithL ED ligh tbulbs .Don ot
replace the bulb syoursel f. Contact aquali fied
specialis tworkshop which ha sthe necessary
specialis tknowledg eand tools to carry out
the work required.
Lamps ar eanimportant aspect of vehicle
safety .You must therefore make sure that
these functio ncorrectl yatalltimes .Havet he
headlamp setting checked regularly. Overvie
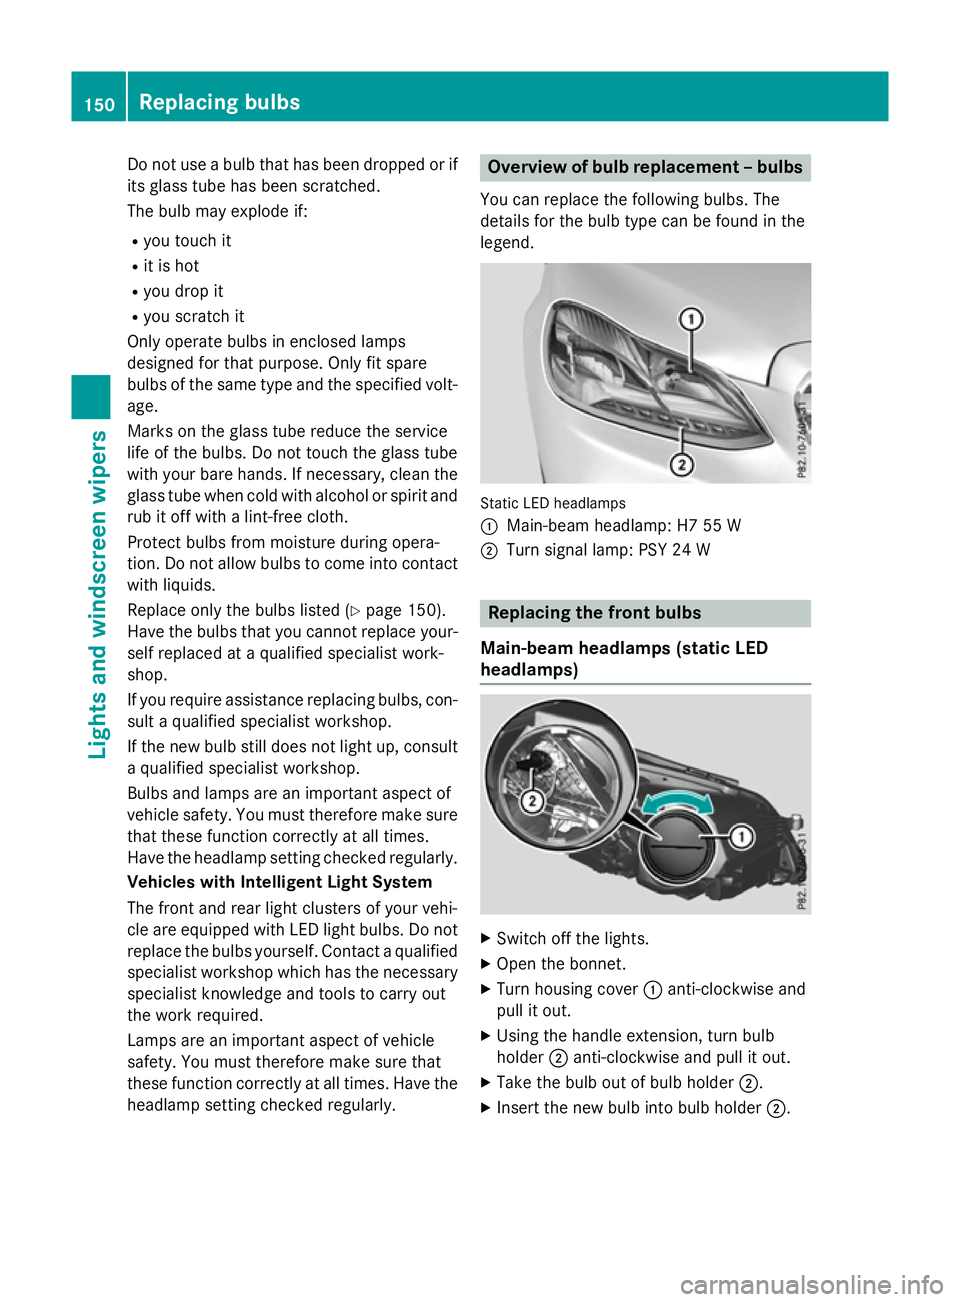
wofbulbr eplacement –bulbs
Yo uc an replace the following bulbs. The
details for the bulb typ ecan be found in the
legend. Static LED headlamps
:
Main-bea mheadlam p: H7 55 W
; Turn signa llam p: PSY 24 W Replacin
gthe front bulbs
Main-bea mheadlamps (static LED
headlamps) X
Switch off the lights.
X Open the bonnet.
X Turn housing cover :anti-clockwise and
pull it out.
X Using the handl eextension, tur nbulb
holder ;anti-clockwise and pull it out.
X Take the bulb ou tofbulbh older ;.
X Insert the new bulb into bulb holder ;.150
Replacin
gbulbsLights and windscreen wipers
Page 154 of 497
X
Insert bulbh older;into the lamp and turn
it clockwise.
X Align housing cover :and turn it clock-
wise until it engages.
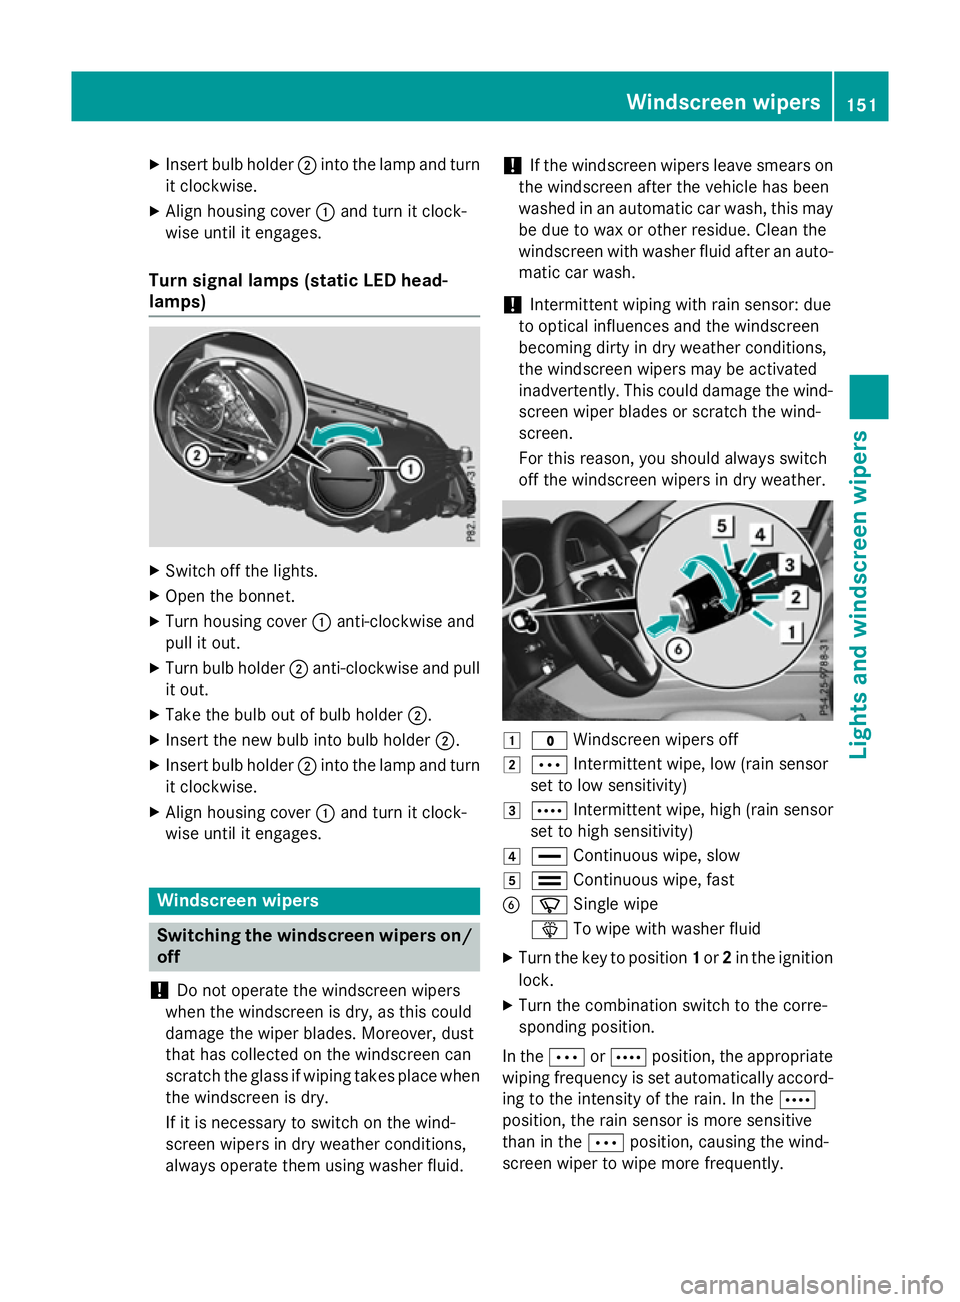
Turn signal lamps (static LED head-
lamps) X
Switch off the lights.
X Open the bonnet.
X Turn housing cover :anti-clockwise and
pullito ut.
X Turn bulbh older;anti-clockwise and pull
it out.
X Take the bulbo ut of bulbholder;.
X Insert the new bulbi nto bulbholder;.
X Insert bulbh older;into the lamp and turn
it clockwise.
X Align housing cover :and turn it clock-
wise until it engages. Windscreen wipers
Switching the windscreen wipers on/
off
! Do not operate the windscree
nwipers
when the windscree nisdry, as this could
damage the wiper blades. Moreover, dust
that has collected on the windscree ncan
scratch the glass if wiping takes place when the windscree nisdry.
If it is necessary to switch on the wind-
screen wipers in dry weather conditions,
alwayso perate them using washer fluid. !
If the windscree
nwipers leave smears on
the windscree nafter the vehicle has been
washed in an automatic car wash, this may
be due to wax or other residue. Clean the
windscree nwith washer fluida fter an auto-
matic car wash.
! Intermittent wiping with rain sensor: due
to optical influences and the windscreen
becoming dirty in dry weather conditions,
the windscree nwipers may be activated
inadvertently .This could damage the wind-
screen wiper blades or scratch the wind-
screen.
For this reason, you shoulda lwaysswitch
off the windscree nwipers in dry weather. 1
$ Windscreen wipers off
2 Ä Intermittent wipe, low (rains ensor
set to low sensitivity)
3 Å Intermittent wipe, high (rains ensor
set to high sensitivity)
4 ° Continuou swipe, slow
5 ¯ Continuou swipe, fast
B í Single wipe
î To wipew ith washer fluid
X Turn the key to position 1or 2in the ignition
lock.
X Turn the combination switch to the corre-
sponding position.
In the ÄorÅ position, the appropriate
wiping frequency is set automaticall yaccord-
ing to the intensity of the rain. In the Å
position, the rain sensor is more sensitive
than in the Äposition, causing the wind-
screen wiper to wipem ore frequently. Windscreen wipers
151Lights and windscreenw ipers Z
Page 205 of 497
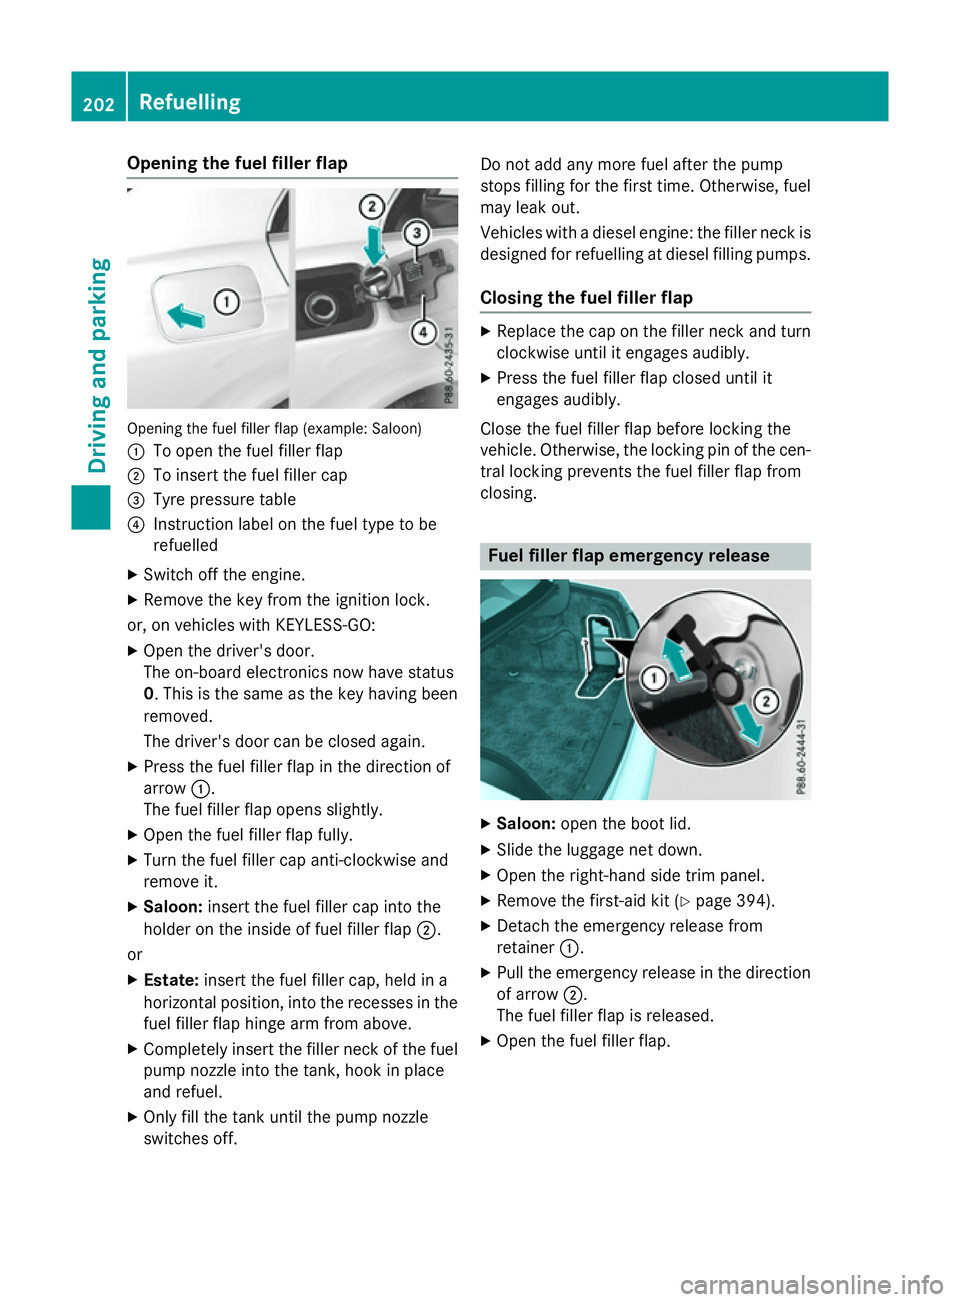
Opening the fuel filler flap
Openin
gthe fuel filler flap (example: Saloon)
: To open the fuel filler flap
; To insert the fuel filler cap
= Tyre pressure table
? Instruction label on the fuel type to be
refuelled
X Switc hoff the engine.
X Remove the key from the ignition lock.
or, on vehicles with KEYLESS‑GO: X Open the driver's door.
The on-board electronics now have status
0.T his is the same as the key having been
removed.
The driver's door can be closed again.
X Press the fuel filler flap in the direction of
arrow :.
The fuel filler flap opens slightly.
X Open the fuel filler flap fully.
X Turn the fuel filler cap anti-clockwise and
remove it.
X Saloon: insert the fuel filler cap intot he
holder on the inside of fuel filler flap ;.
or
X Estate: insert the fuel filler cap, held in a
horizontal position ,intot he recesses in the
fuel filler flap hinge arm from above.
X Completely insert the filler neckoft he fuel
pump nozzle intot he tank,hook in place
and refuel.
X Only fill the tank until the pump nozzle
switches off. Do not add any more fuel after the pump
stops filling for the first time. Otherwise, fuel
may leak out.
Vehicles with adiesel engine: the filler neckis
designed for refuelling at diesel filling pumps.
Closing the fuel filler flap X
Replace the cap on the filler necka nd turn
clockwise until it engages audibly.
X Press the fuel filler flap closed until it
engages audibly.
Close the fuel filler flap before lockin gthe
vehicle. Otherwise, the lockin gpin of the cen-
tral lockin gprevents the fuel filler flap from
closing. Fuel filler flap emergency release
X
Saloon: open the boot lid.
X Slide the luggage net down.
X Open the right-hand side trim panel.
X Remove the first-aid kit (Y page 394).
X Detach the emergency release from
retainer :.
X Pull the emergency release in the direction
of arrow ;.
The fuel filler flap is released.
X Open the fuel filler flap. 202
RefuellingDriving and parking
Page 233 of 497
On vehicles with
amanual transmission, you
will also hear ahorn at regulari ntervals if the
HOLD function is activated and you:
R switch the engine off, open the driver's
door and take off your seat belt
The sounding of the horn alerts you to the fact
that the vehicle has been parked while the
HOLD function is still activated. If you attempt to lock the vehicle, the tone becomes louder.
The vehicle is not locked until the HOLD func- tion is deactivated.
i If the engine has been switched off, it
cannot be started againu ntil the HOLD
function has been deactivated. RACE START
Important safety notes i
Observe the safety notes for the SPORT
handling mode (Y page 85).
Only activate RACE START on dedicated race
circuits.
RACE START enables optimum acceleration
from astanding start. The precondition for
this is asuitableh igh-grip road surface.
i RACE START is only available in AMG vehi-
cles.
Activation conditions You can activate RACE START if:
R the doors are closed
R the engine is running and it has reached an
operating temperature of approximately
80 †. This is the case when the engine oil
temperature in the multifunction display
stops flashing.
R SPORT handling mode is activated
(Y page 85).
R the steering wheel is in the straight-ahead
position R
the vehicle is stationary and the brake
pedal is depressed (left foot)
R the transmission is in position D
Activating RACE START X
Depress the brake pedal with your left foot
and keep it depressed.
X Turn the drive program selector clockwise
(Y page 195) until the RSlamp lights up.
The RACE START Confirm: Paddle UP RACE START Confirm: Paddle UP
Cancel: Paddle DOWN
Cancel: Paddle DOWN message appears
in the multifunction display.
i If the activation conditions are no longer
fulfilled, RACE START is cancelled. The
RACE RACE START
START cancelled
cancelled message appears
in the multifunction display.
X To cancel: pull the left steering wheel shift
paddle( Ypage 195).
or
X To confirm: pull the right steering wheel
shift paddle( Ypage 195).
The RACE START available Depress RACE START available Depress
accelerator
accelerator message appears in the mul-
tifunction display.
i If you do not depress the accelerator
pedal fully within two seconds, RACE
START is cancelled. The RACE RACESTART
START not
not
possible
possible See
SeeOwner's
Owner's Manual
Manual message
appears in the multifunction display.
X Fully depress the accelerator pedal.
The engine speed rises to approximately
3,500 rpm.
The RACE START Release brake to RACE START Release brake to
start
start message appears in the multifunc-
tion display.
i If you do not release the brake pedal
within five seconds, RACE START is cancel-
led. The RACE
RACESTART
START cancelled
cancelled message
appears in the multifunction display.
X Take your foot off the brake, but keep the
accelerator pedal depressed.
The vehicle pullsa wayatmaximum accel-
eration. 230
Driving systemsDriving and parking
Page 272 of 497
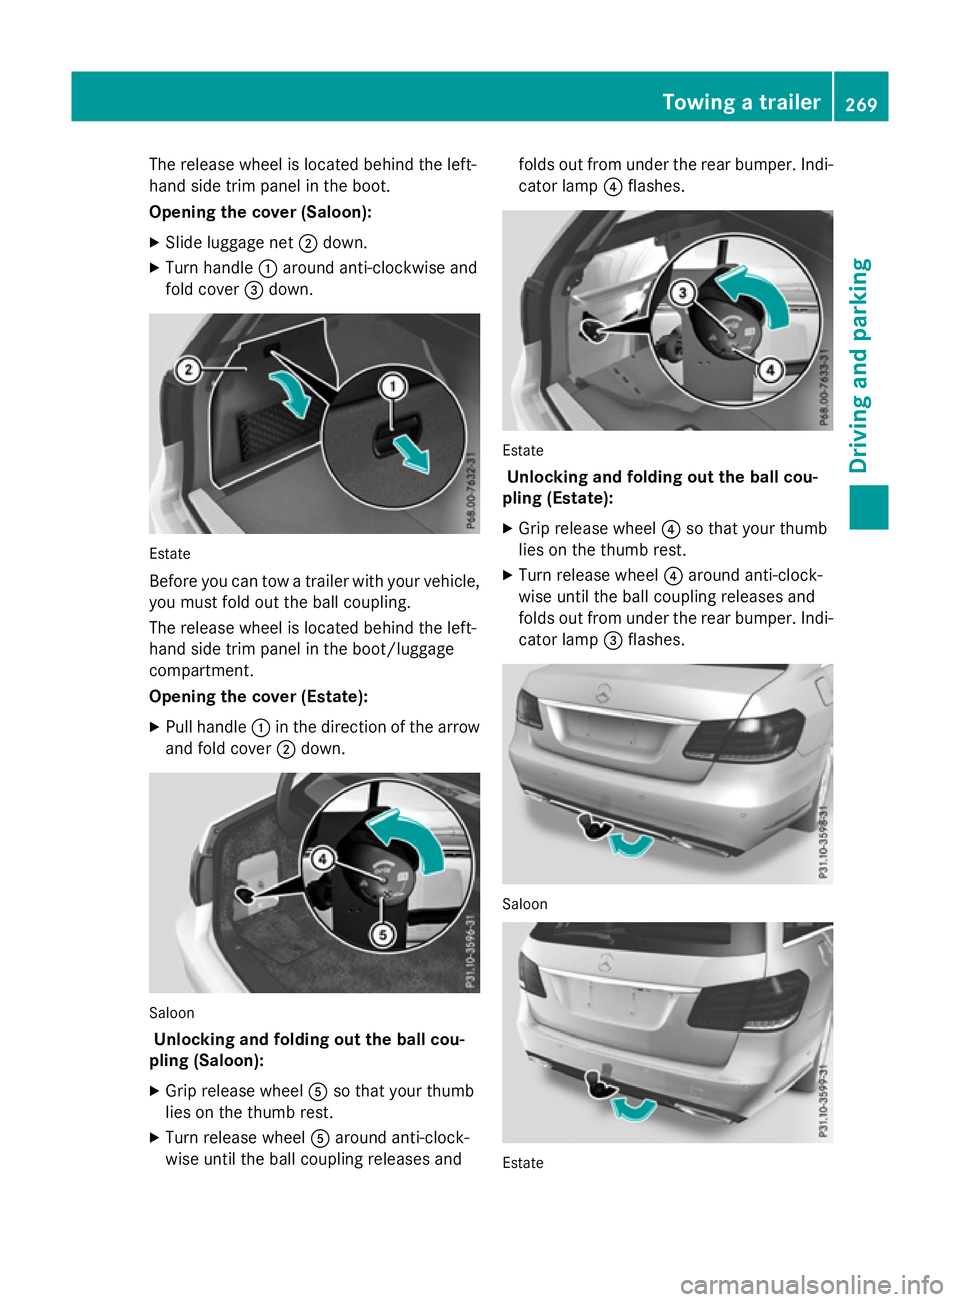
The release wheel is located behind the left-
hand side trim panel in the boot.
Opening the cover (Saloon):
X Slide luggage net ;down.
X Turn handle :around anti-clockwise and
fold cover =down. Estate
Before you can tow
atrailer with your vehicle,
you must fold out the ball coupling.
The release wheel is located behind the left-
hand side trim panel in the boot/luggage
compartment.
Opening the cover (Estate):
X Pull handle :in the direction of the arrow
and fold cover ;down. Saloon
Unlocking and folding out the ball cou-
pling (Saloon):
X Grip release wheel Aso that your thumb
lies on the thumb rest.
X Turn release wheel Aaround anti-clock-
wise until the ball coupling releases and folds out from under the rear bumper. Indi-
cator lamp ?flashes. Estate
Unlocking and folding out the ball cou-
pling (Estate):
X Grip release wheel ?so that your thumb
lies on the thumb rest.
X Turn release wheel ?around anti-clock-
wise until the ball coupling releases and
folds out from under the rear bumper. Indi- cator lamp =flashes. Saloon
Estate Towing
atrailer
269Driving and parking Z
Page 274 of 497
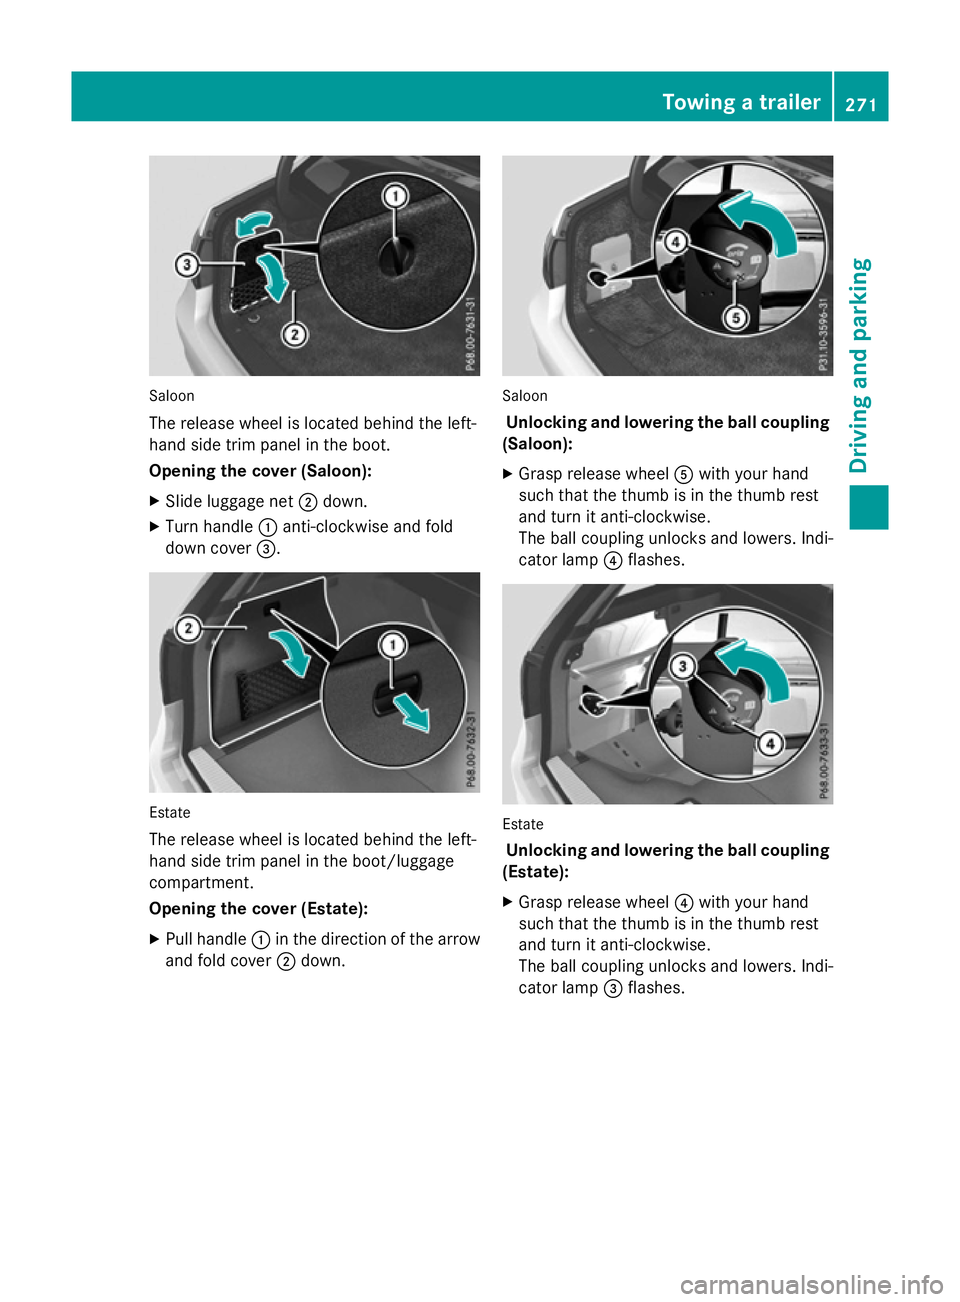
Saloon
The release wheel is located behind the left-
hand sid etrim panel in the boot.
Opening the cover (Saloon):
X Slide luggage net ;down.
X Turn handle :anti-clockwise and fold
dow ncover =. Estate
The release wheel is located behind the left-
hand sid etrim panel in the boot/luggage
compartment.
Opening the cover (Estate):
X Pull handle :in the direction of the arrow
and fol dcover ;down. Saloon
Unlockin gand lowering the bal lcou pling
(Saloon):
X Grasp release wheel Awith your hand
such that the thum bisinthe thum brest
and turn it anti-clockwise.
The ball coupling unlocks and lowers. Indi-
cator lamp ?flashes. Estate
Unlockin gand lowering the bal lcou pling
(Estate):
X Grasp release wheel ?with your hand
such that the thum bisinthe thum brest
and turn it anti-clockwise.
The ball coupling unlocks and lowers. Indi-
cator lamp =flashes. Towin
gatrailer
271Drivingand parking Z