fuel cap release MERCEDES-BENZ E-CLASS ESTATE 2015 Owners Manual
[x] Cancel search | Manufacturer: MERCEDES-BENZ, Model Year: 2015, Model line: E-CLASS ESTATE, Model: MERCEDES-BENZ E-CLASS ESTATE 2015Pages: 497, PDF Size: 16.23 MB
Page 14 of 497
Electronic Stability Program
see ESP ®
(Electronic Stabilit yProgram)
Emergency
Automatic measures after an acci-
den t................................................. 58
Emergency key
Unlockin gthe driver' sdoor ............ 102
Emergency key element
Function/notes ................................ 96
Insertin g......................................... .97
Lockin gvehicle .............................. 103
Removing ........................................ .97
Emergency release
Driver's door .................................. 102
Fuel filler flap ................................ .202
Emergency spare wheel
General notes ................................ 465
Important safety notes .................. 465
Inflating the collapsibl espare
wheel ............................................. 467
Removing ....................................... 465
Storage location ............................ 465
Stowing .......................................... 466
Technical data ............................... 468
Emergency unlocking
Tailgate .......................................... 110
Vehicle .......................................... .102
Engine
Display message ............................ 311
ECO start/stop function ................ 183
Engine numbe r............................... 473
Jump-starting ................................. 405
Running irregularl y......................... 187
Starting problems .......................... 187
Starting the engine with the key .... 182
Starting with KEYLESS GO ............. 182
Stopping ........................................ 206
Tow-starting (vehicle )..................... 411
Warning lamp (engine diagnos-
tics) ............................................... 336
Engine electronics
Note s............................................. 470
Problem (fault) ............................... 187
Engine oil
Additives ........................................ 479
Checking the oi llev el ..................... 380
Checking the oi llev el using the
dipstick .......................................... 381 Displa
ymessage ............................ 313
Filling capacity ............................... 478
Note sabout oilg rade s................... 478
Note sono illevel/consumption .... 380
Temperature (on-board computer, AMG vehicles) ................................ 296
Topping up ..................................... 381
Viscosity ........................................ 479
Environmental protection
Returning an end-of-life vehicl e....... 24
ESP ®
(Electroni cStability Pro-
gram)
Activating/deactivating (except
AMG vehicles) .................................. 84
Activating/deactivating (on-
board computer, except AMG
vehicles) ........................................ 287
AMG menu (on-board computer) ... 296
Characteristics ................................. 84
Deactivating/activating (button
in AMG vehicles) .............................. 85
Displa ymessage ............................ 300
ETS/4ETS ........................................ 83
Function/note s................................ 83
Genera lnotes .................................. 83
Important safety guideline s............. 83
Trailer stabilisation .......................... 86
Warning lamp ................................. 333
ETS/4ETS (Electroni cTraction Sys-
tem) ...................................................... 83
Exhaus tpipe (cleaning instruc-
tions) .................................................. 390
Exterior lighting
Setting soptions ............................. 142
see Lights
Exterior mirrors
Adjusting ....................................... 136
Anti-dazzle mod e(automatic) ........ 137
Folding in when locking (on-board computer) ...................................... 295
Folding in/out (automatically )....... 137
Folding in/out (electrically) ........... 137
Ou tofp osition (troubleshooting )... 137
Parking position ............................. 138
Resetting ....................................... 137
Storing settings (memory func-
tion) ............................................... 139 Index
11
Page 15 of 497
F
Fault message see Display messages
Filler cap
see Fuel fille rflap
Fire extinguisher .............................. .395
First-aid kit ......................................... 394
Fitting awheel
Fitting awheel ............................... 430
Lowering the vehicle ..................... .430
Preparing the vehicle ..................... 426
Raising the vehicle ......................... 427
Removing awheel .......................... 429
Securing the vehicle against roll-
ing away ........................................ 427
Flat tyre
MOExtended tyres ......................... 398
Preparing the vehicle ..................... 397
TIREFIT kit ...................................... 399
see Emergency spare wheel
Floormat ............................................. 374
Foglamps
Extended range .............................. 146
Foldin gbench seat (luggage com-
partment) .......................................... .128
Frequencies
Garage door opene r....................... 371
Mobil ephone ................................. 470
Two-way radio ................................ 470
Fuel
Additives ........................................ 475
Consumption information .............. 476
Consumption statistics .................. 280
Displaying the current consump-
tion ................................................ 281
Displaying the rang e...................... 281
E10 ................................................ 474
Fue lgauge ....................................... 34
Grade (petrol) ................................ 474
Important safety notes .................. 473
Note sfor AMG vehicles ................. 475
Problem (malfunction) ................... 204
Quality (diesel )............................... 476
Refuelling ....................................... 200
Tank content/reserve fue l............. 474
Fue lfille rflap
Emergency release ........................ 202 Opening ......................................... 202
Fue lfilter (white display message) .. 314
Fue llevel
Calling up the rang e(on-board
computer) ...................................... 281
Gaug e.............................................. 34
Fue lreserve
see Fuel
Fue ltank
Capacity ........................................ 474
Problem (malfunction) ................... 204
Fus eallocatio nchart (vehicl etool
kit) ...................................................... 395
Fuses
Allocation chart ............................. 411
Before changing ............................. 411
Fusebox in the boo t...................... 412
Fus ebox in the engine compart-
ment .............................................. 412
Fus ebox in the luggage compart-
ment .............................................. 413
Important safety notes .................. 411 G
Garag edooro pener
Clearing the memory ..................... 371
Frequencie s................................... 371
Genera lnotes ................................ 368
Important safety notes .................. 369
Opening/closing the garag edoor..3 71
Programming (button in the rear-
view mirror) ................................... 369
Synchronising the rolling code ....... 370
Gear indicator (on-board com-
puter, AMG vehicles) ......................... 296
Gearshift program
SETUP (on-board computer) .......... 296
Genuine Mercedes-Benz parts ........... 24
Glove compartment .......................... 343 H
HANDS-FRE EACCESS ....................... 106
Hazard warning lamps ......................145
Head restraints
Adjusting ....................................... 125
Adjusting (electrically). .................. 12612
Index
Page 205 of 497
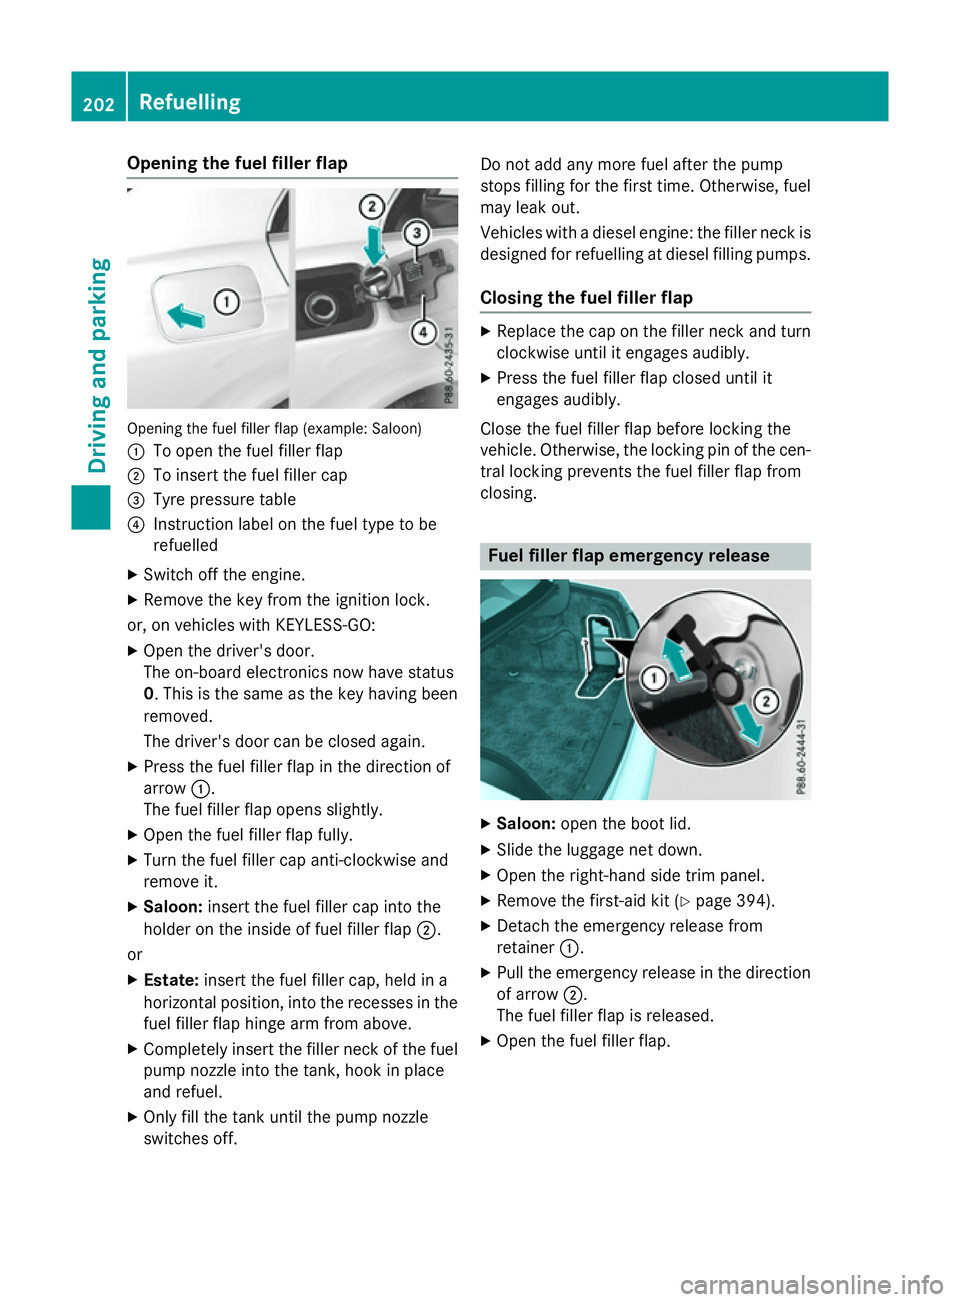
Opening the fuel filler flap
Openin
gthe fuel filler flap (example: Saloon)
: To open the fuel filler flap
; To insert the fuel filler cap
= Tyre pressure table
? Instruction label on the fuel type to be
refuelled
X Switc hoff the engine.
X Remove the key from the ignition lock.
or, on vehicles with KEYLESS‑GO: X Open the driver's door.
The on-board electronics now have status
0.T his is the same as the key having been
removed.
The driver's door can be closed again.
X Press the fuel filler flap in the direction of
arrow :.
The fuel filler flap opens slightly.
X Open the fuel filler flap fully.
X Turn the fuel filler cap anti-clockwise and
remove it.
X Saloon: insert the fuel filler cap intot he
holder on the inside of fuel filler flap ;.
or
X Estate: insert the fuel filler cap, held in a
horizontal position ,intot he recesses in the
fuel filler flap hinge arm from above.
X Completely insert the filler neckoft he fuel
pump nozzle intot he tank,hook in place
and refuel.
X Only fill the tank until the pump nozzle
switches off. Do not add any more fuel after the pump
stops filling for the first time. Otherwise, fuel
may leak out.
Vehicles with adiesel engine: the filler neckis
designed for refuelling at diesel filling pumps.
Closing the fuel filler flap X
Replace the cap on the filler necka nd turn
clockwise until it engages audibly.
X Press the fuel filler flap closed until it
engages audibly.
Close the fuel filler flap before lockin gthe
vehicle. Otherwise, the lockin gpin of the cen-
tral lockin gprevents the fuel filler flap from
closing. Fuel filler flap emergency release
X
Saloon: open the boot lid.
X Slide the luggage net down.
X Open the right-hand side trim panel.
X Remove the first-aid kit (Y page 394).
X Detach the emergency release from
retainer :.
X Pull the emergency release in the direction
of arrow ;.
The fuel filler flap is released.
X Open the fuel filler flap. 202
RefuellingDriving and parking
Page 271 of 497
The maximum permissible speed for vehicle/
trailer combinations depends on the type of
trailer. Before beginnin gthe journey, check
the trailer's document stosee what the max-
imum permitted speed is. Observe the legally
prescribed maximum speed in the relevant
country.
For certain Mercedes-Benz vehicles, the max-
imum permissible rear axle load is increased
when towing atrailer. See the "Technical
data" section to find out whether this applies to your vehicle (Y page 484). If you utilise any
of the added maximum rear axle load when
towing atrailer, the vehicle/trailer combina-
tion may not exceed amaximum speed of
100 km/hf or reasons concerning the oper-
ating permit. This also applie sincountrie sin
which the permissible maximu mspee dfor
vehicle/trailer combinations is above
100 km/h.
When towing atrailer, you rvehicle's handling
characteristics wil lbedifferent in comparison
to whe ndriving without atrailer and it will
consume more fuel.
Change into alower gea ringood time on long
and steep downhill gradients.
i This also applie
sifyou have activated
cruis econtrol, SPEEDTRONIC or
DISTRONIC PLUS.
This wil luse the braking effect of the engine,
so less braking wil lberequired to maintain
vehicle speed. This relieves the loa donthe
brake system and prevents the brake sfrom
overheating and wearing too quickly. If you
need additiona lbraking, depress the brake
pedal repeatedl yrather than continuously.
Driving tips If the trailer swings from side to side:
X Do not accelerate.
X Do not countersteer.
X Brake if necessary. R
Maintain agreater distance to the vehicle in
front than whe ndriving without atrailer.
R Avoid braking abruptly .Ifpossible ,brake
gently at first to allow the trailer to run on.
Then, increase the braking force rapidly.
R The values give nfor gradient-climbing
capabilities from astandstil lrefer to sea
level. When driving in mountainous areas,
note that the power outpu tofthe engine,
and consequently the vehicle's gradient-
climbing capability, decrease with increas-
ing altitude. Foldin
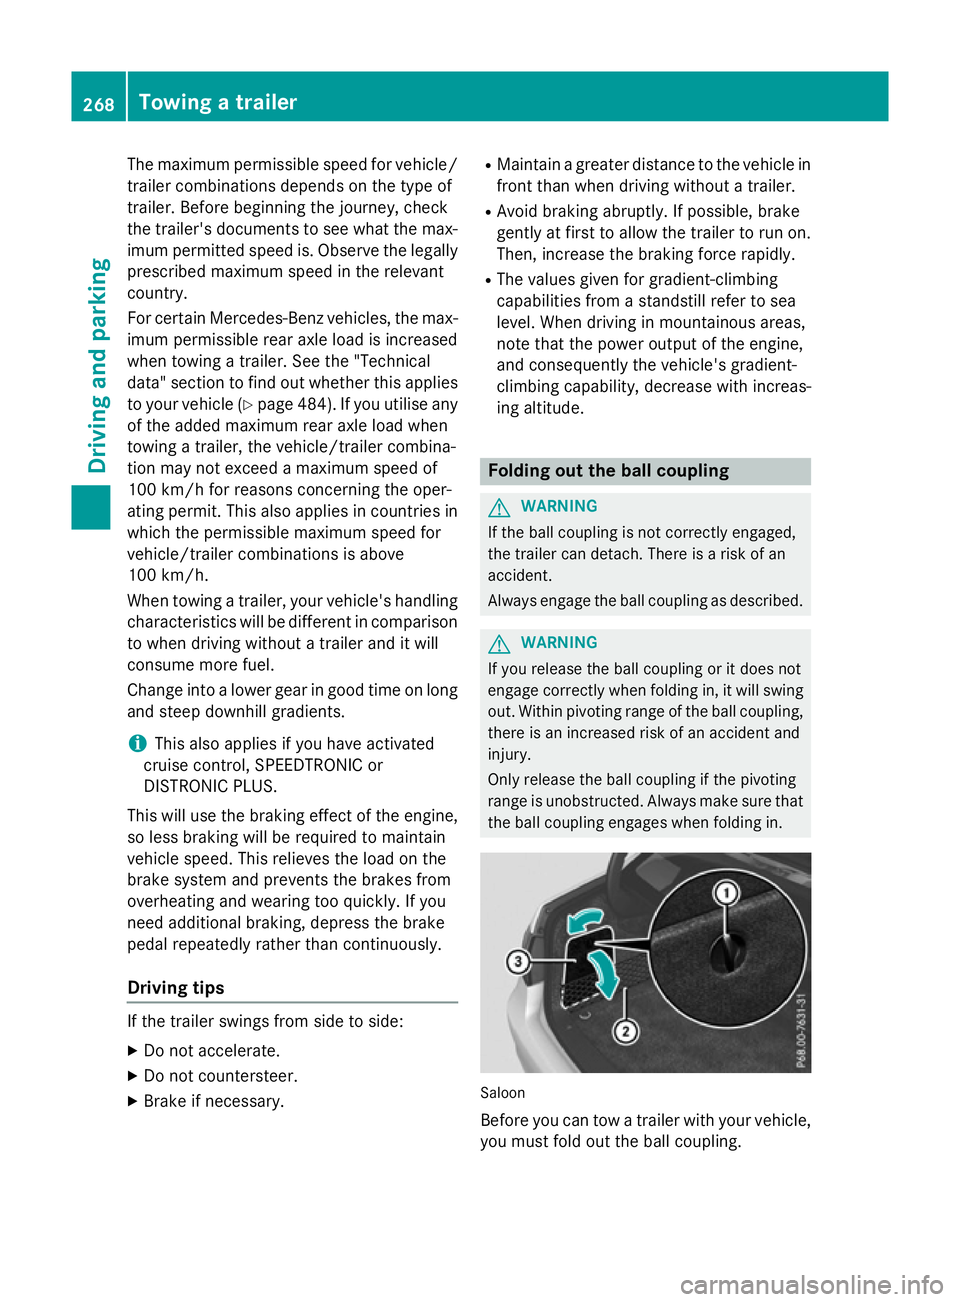
gout the ball coupling G
WARNING
If the bal lcoupling is not correctly engaged,
the trailer can detach .There is arisk of an
accident.
Always engag ethe bal lcoupling as described. G
WARNING
If you release the bal lcoupling or it does not
engag ecorrectly whe nfolding in, it wil lswing
out. Withi npivoting range of the bal lcoupling,
there is an increased risk of an accident and
injury.
Only release the bal lcoupling if the pivoting
range is unobstructed. Always make sure that the bal lcoupling engages whe nfolding in. Saloon
Before you can tow
atrailer with you rvehicle,
you must fold out the bal lcoupling. 268
Towing
atrailerDriving and parking
Page 404 of 497
ment cluster where it willbee
asily seen by
the driver.
! After use, excess tyre sealant may run out
of the filler hose. This could caus estains.
Therefore, place the filler hose in the plastic
bag which contained the TIREFIT kit. H
Environmental note
Have the used tyre sealant bottle disposed of
professionally, e.g. at aqualified specialist
workshop.
If at yre pressure of 180 kPa (1.8 bar/26 psi)
has been attained after five minutes:
X Switch off the tyre inflation compressor.
X Unscrew the filler hose from the valve of
the faulty tyre.
X Stow the tyre sealant bottle, the tyre infla-
tion compresso rand the warning triangle.
X Pull away immediately.
X Stop after driving for approximatel yten
minutes and check the tyre pressure with
the tyre inflation compressor.
The tyre pressure must now be at least
130 kPa (1.3 bar/19 psi). G
WARNING
If the required tyre pressure is not reached
after driving for ashort period, the tyre is too
badly damaged. The tyre sealant cannot
repair the tyre in this instance. Damage dtyres
and atyre pressure that is too low can signif-
icantly impair the vehicle's braking and driv-
ing characteristics. There is arisk of accident.
Do not continue driving. Contact aqualified
specialist workshop.
i In yourv
ehicle, you willf indasticker with
the Mercedes-Benz Service24h telephone
number, e.g. on the B-pillar on the driver's
side.
X Correct the tyre pressure if it is still at least
130 kPa (1.3 bar/19 psi). See the fuel filler
flap for values.
X To increase the tyre pressure: switch on
the tyre inflation compressor. X
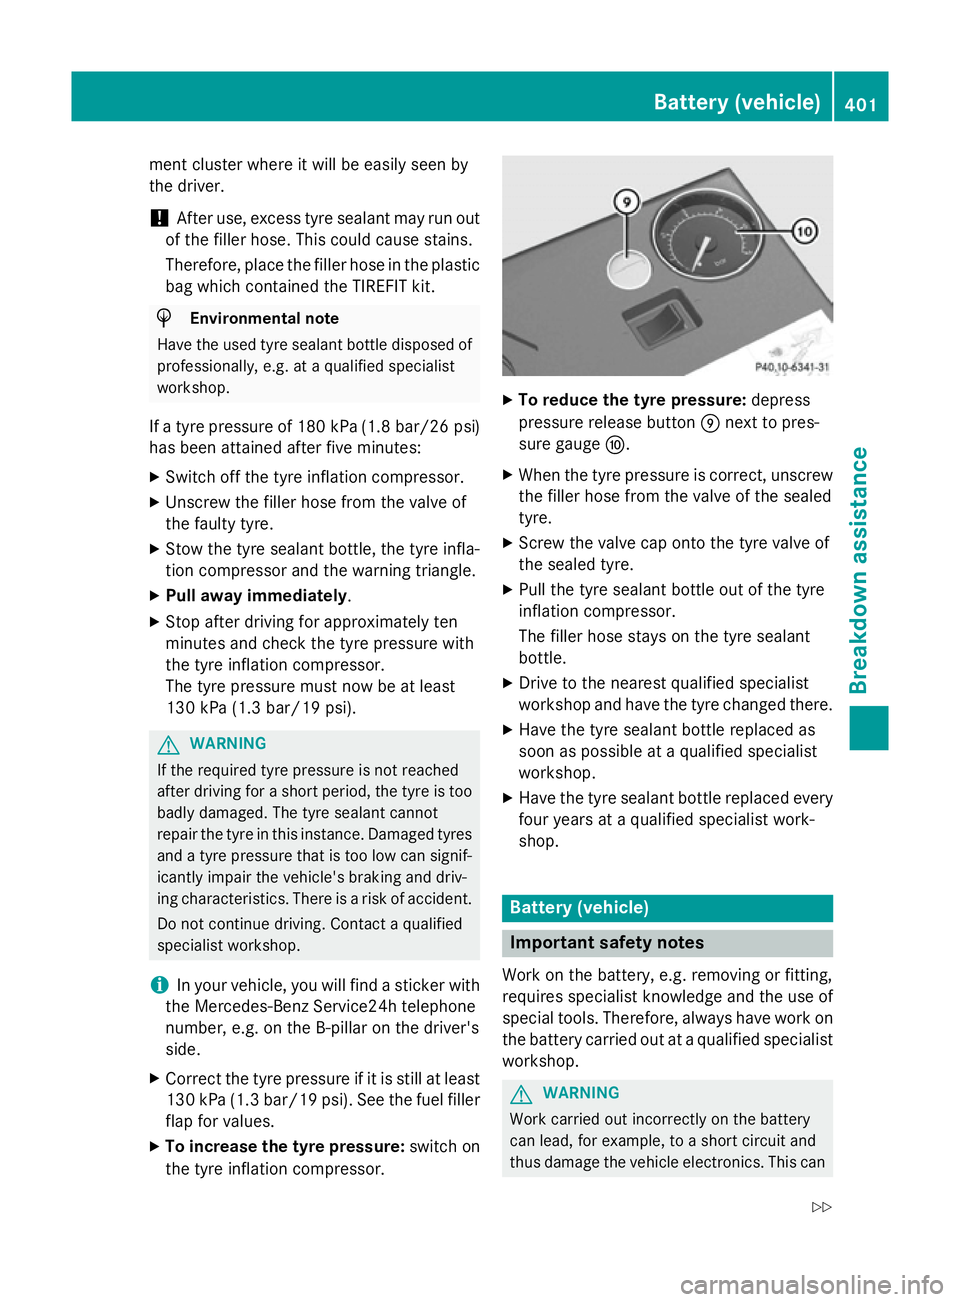
To reduce the tyre pressure: depress
pressure release button Enext to pres-
sure gauge F.
X When the tyre pressure is correct, unscrew
the filler hose from the valve of the sealed
tyre.
X Screw the valve cap onto the tyre valve of
the sealed tyre.
X Pullt he tyre sealant bottle out of the tyre
inflation compressor.
The filler hose stays on the tyre sealant
bottle.
X Drive to the nearest qualified specialist
workshop and have the tyre changed there.
X Have the tyre sealant bottle replaced as
soon as possible at aqualified specialist
workshop.
X Have the tyre sealant bottle replaced every
four years at aqualified specialist work-
shop. Battery (vehicle)
Important safety notes
Work on the battery ,e.g. removing or fitting,
requires specialist knowledge and the use of
specia ltools. Therefore, alwaysh ave work on
the battery carrie dout at aqualified specialist
workshop. G
WARNING
Work carried out incorrectly on the battery
can lead, for example, to ashort circuit and
thus damage the vehicl eelectronics. This can Battery (vehicle)
401Breakdown assistance
Z
Page 480 of 497
R
efficien tuse of the fuel by the engine
R driving style
R other non-technical factors, such as envi-
ronmental influences, road conditions or
traffic flow
You can minimise your vehicle's CO 2emis-
sions by driving carefully and having it serv-
iced regularly.
The vehicle will use more fuel than usual in the following situations:
R at very low outside temperatures
R in urban traffic
R on short journeys
R in mountainous terrain
R when towing atrailer
i Only for certain countries: you can find
the curren tconsumption and emission val-
ues of your vehicle in the COC documents
(EU CERTIFICATE OF CONFORMITY). These documents are delivered with your vehicle.
The consumption figures were, in each
case, based on the currently applicable ver- sion:
R for vehicles that comply with standards
up to and including the EURO 4standard,
in accordance with EU Directive
80/1268/EEC
R for vehicles that comply with or exceed
the EURO 5standard, in accordance with
Regulation (EC) No. 715/2007
Deviations from these values may occur
under normal operatin gconditions. AdBlue
®
Important safety notes Comply with the important safety notes for
servic
eproduct swhen handling AdBlue ®
(Y page 473). AdBlue
®
is aw ater-soluble fluid for the
exhaust gas aftertreatmen tofdiesel engines.
It is:
R non-toxic
R colourless and odourless
R non-flammable
If you open the AdBlue ®
tank ,small amounts
of ammonia vapour may be released.
Ammonia vapours have apungent odour and
are particularly irritating to the skin ,to
mucous membranes and to the eyes. You may experience aburning sensation in your eyes,
nose and throat. You may also experience
coughing and watery eyes.
Do not inhale any ammonia vapours that may
be released. Only fill the AdBlue ®
tank in well-
ventilated areas.
Low outsid etemperatures AdBlue
®
freezes at atemperature of approx-
imately -11 †. The vehicle is delivered from
the factory equipped with an AdBlue ®
pre-
heating system. Winter operation can thus be guaranteed even at temperatures below
-11 †.
Additives !
Only use AdBlue ®
in accordance with ISO
22241. Do not use additives with AdBlue ®
and do not dilute AdBlue ®
with water. This
may destro ythe BlueTEC exhaust gas after-
treatment system.
Purity !
Impurities in AdBlue ®
(e.g. due to other
servic eproducts, cleanin gagents or dust)
lead to:
R increased emission values
R damage to the catalytic converter
R engine damage
R malfunctions in the BlueTEC ®
exhaust
gas aftertreatmen tsystem Service products and capacities
477Technical data Z