height adjustment MERCEDES-BENZ E-CLASS ESTATE 2015 Owners Manual
[x] Cancel search | Manufacturer: MERCEDES-BENZ, Model Year: 2015, Model line: E-CLASS ESTATE, Model: MERCEDES-BENZ E-CLASS ESTATE 2015Pages: 497, PDF Size: 16.23 MB
Page 22 of 497
Folding the backrest (rear com-
partment) forwards/back .............. 349
Sea tbelt
Centre rear-compartment sea t........ 48
Correct usag e.................................. 47
Switching belt adjustment on/off
(on-board computer) ...................... 295
Seat belts
Adjusting the driver' sand front-
passenger sea tbelt. ........................ 49
Adjusting the height ......................... 48
Cleaning ......................................... 392
Displa ymessage ............................ 305
Fastening ......................................... 48
Important safety guideline s............. 46
Introduction ..................................... 46
Rear sea tbelts tatus indicator ......... 49
Releasing ......................................... 49
Warning lamp ................................. 329
Warning lamp (function) ................... 49
Seats
Adjusting (electrically) ................... 124
Adjusting (manuall yand electri-
cally ).............................................. 124
Adjusting the 4-wa ylum bars up-
por t................................................ 128
Adjusting the hea drestraint .......... 125
Cleaning the cove r......................... 392
Correct driver' sseatp osition ........ 122
Important safety notes .................. 123
Overview ........................................ 123
Sea theating problem .................... 132
Sea tventilation problem ................ 133
Storing settings (memory func-
tion) ............................................... 139
Switching sea theating on/of f....... 130
Switching the sea tventilation on/
off .................................................. 132
Securing luggage ............................... 350
Selecto rlever
Cleaning ......................................... 391
Sensors (cleaning instructions) ....... 389
Service
see ASSYST PLUS
Servic eCentre
see Qualifie dspecialist workshop
Servic emenu( on-board com-
puter) .................................................. 288 Servic
eproducts
AdBlue ®
specia laddit ives.............. 477
Brake fluid ..................................... 479
Coolant (engine) ............................ 479
Engine oi l....................................... 478
Fue l................................................ 473
Important safety notes .................. 473
Washe rfluid ................................... 480
Settin gthe air distribution ............... 163
Setting the airflow ............................ 164
Settings
Factory (on-board computer) ......... 295
On-board compute r....................... 289
SETUP (on-board computer) ............. 296
Shiftin gtoneutral (manual trans-
mission) ............................................. 189
Side hea drestraints
Integrate dchild sea t........................ 65
Side lamps
Switching on/of f........................... 144
Side marker lamp Display mes-
sage .................................................... 309
Side windows
Convenience closing ...................... 112
Convenience opening .................... 111
Important safety notes .................. 110
Opening/closing ............................ 111
Problem (malfunction) ................... 114
Resetting ....................................... 113
Sidebag ................................................ 52
Skibag ................................................ 346
Sliding sunroof
Important safety information ......... 114
Opening/closing ............................ 115
Problem (malfunction) ................... 119
Rain closing feature ....................... 116
Resetting ....................................... 116
see Panorama sliding sunroof
Sno wchains ...................................... 419
Socket
Luggage compartment ................... 366
Sockets
Centre console .............................. 366
Genera lnotes ................................ 366
Rear compartment ......................... 366
Spare wheel
Storing ........................................... 466 Index
19
Page 51 of 497
Infants and childre
nmust never travel sit-
ting on the lap of avehicle occupant. In the
event of an accident, they could be crushed betwee nthe vehicle occupant and seat
belt.
R objects are never secured with aseat belt if
the seat belt is also being used by one of the vehicle's occupants.
Seat belts are only intended to secure and
restrain vehicle occupants. Alwayso bserve
the "Loading guidelines" for securing objects,
luggage or loads (Y page 342).
Fastening and adjusting the seat belts Observe the safety notes on the seat belt
(Y page 46) and the notes on correct use of
seat belts (Y page 47).
If ap assenger is wearing the centre rear seat
belt, also observe the information on the seat belt for the centre rear seat (Y page 48).X
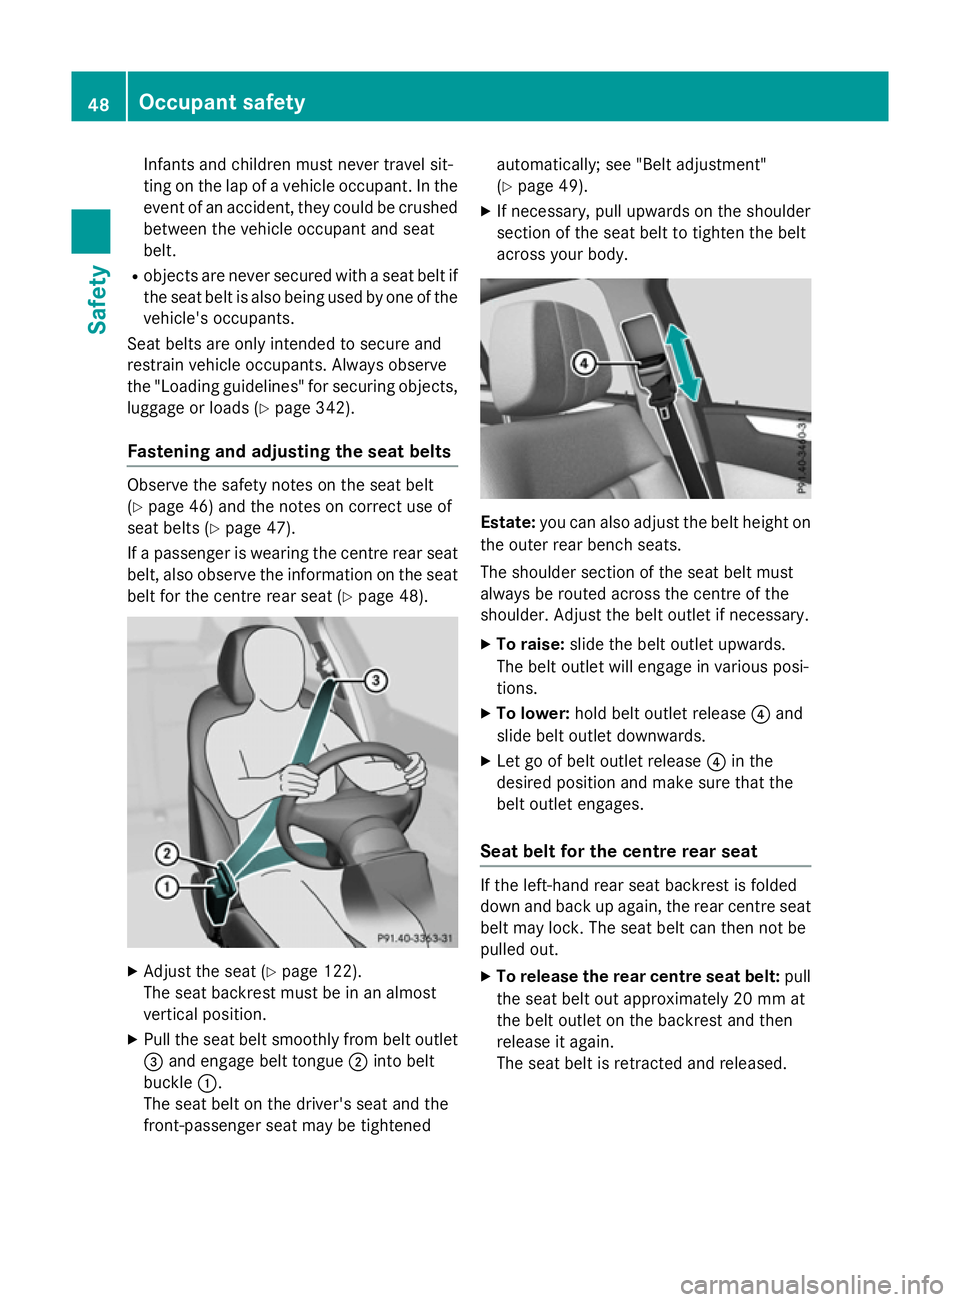
Adjust the seat (Y page 122).
The seat backrest must be in an almost
vertical position.
X Pullt he seat belt smoothly from belt outlet
= and engage belt tongue ;into belt
buckle :.
The seat belt on the driver's seat and the
front-passenger seat may be tightened automatically; see "Belt adjustment"
(Y
page 49).
X If necessary ,pullu pwards on the shoulder
section of the seat belt to tighten the belt
across yourb ody. Estate:
you can also adjustt he belt heighton
the outer rear bench seats.
The shoulder section of the seat belt must
alwaysber outed across the centre of the
shoulder. Adjust the belt outlet if necessary.
X To raise: slidethe belt outlet upwards.
The belt outlet wille ngage in variousposi-
tions.
X To lower: hold belt outlet release ?and
slideb elt outlet downwards.
X Let go of belt outlet release ?in the
desire dpositio nand make sure that the
belt outlet engages.
Seat beltf or the centre rear seat If the left-hand rear seat backrest is folded
down and back up again, the rear centre seat
belt may lock. The seat belt can then not be
pulled out.
X To release the rear centre seat belt: pull
the seat belt out approximately 20 mm at
the belt outlet on the backrest and then
release it again.
The seat belt is retracted and released. 48
Occupant safetySafety
Page 74 of 497
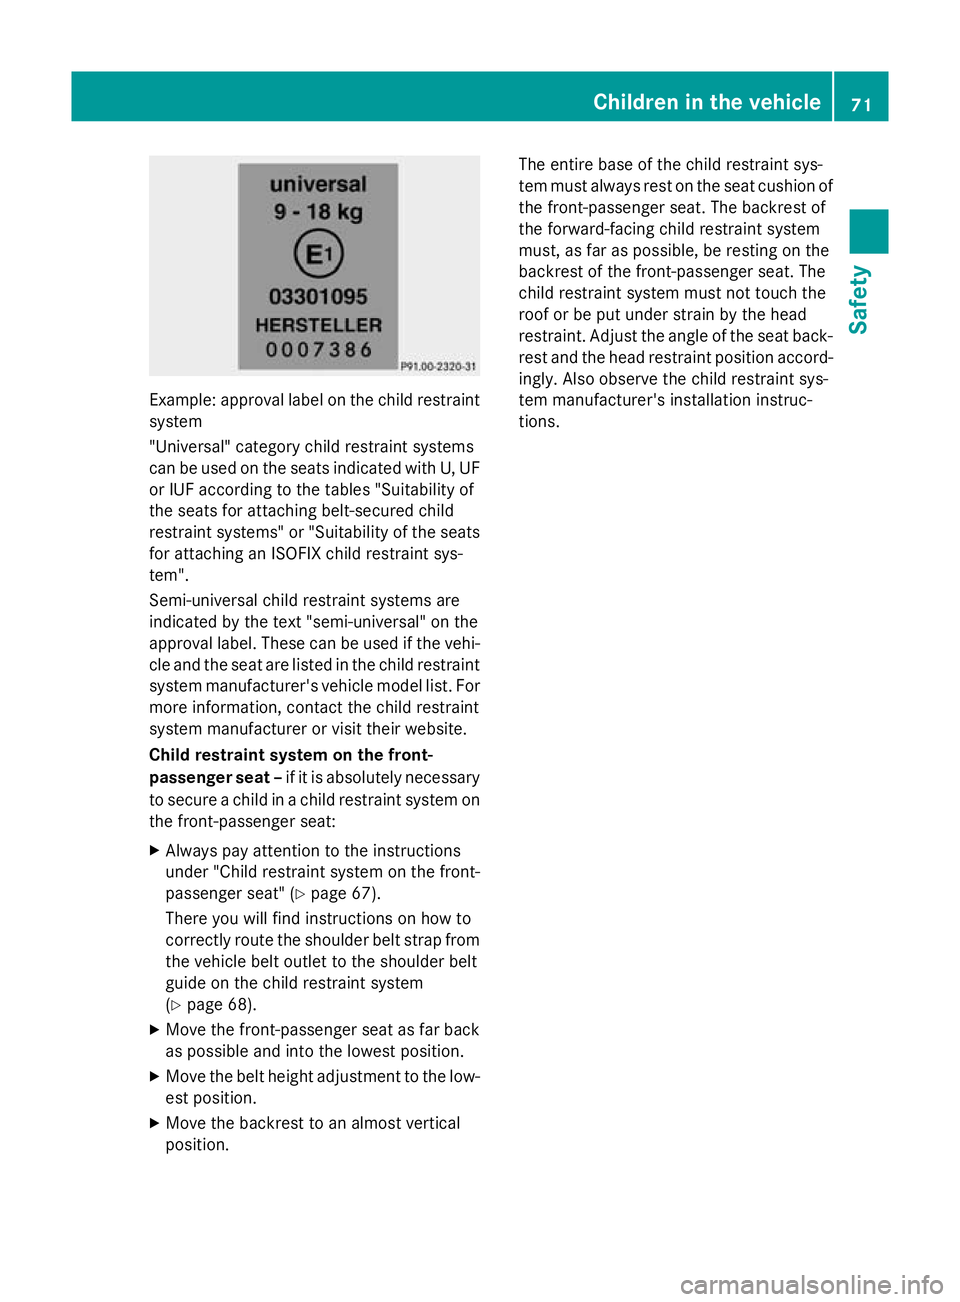
Example: approva
llabel on the child restraint
system
"Universal "category child restraint systems
can be used on the seats indicated with U, UF
or IUF according to the table s"Suitability of
the seats for attaching belt-secured child
restraint systems" or "Suitability of the seats
for attaching an ISOFIX child restraint sys-
tem".
Semi-universal child restraint systems are
indicated by the text "semi-universal" on the
approva llabel .These can be used if the vehi-
cle and the seat ar eliste dint he child restraint
syste mmanufacturer's vehicl emodel list. For
mor einformation, contact the child restraint
syste mmanufacturer or visi ttheir website.
Chil drestrain tsystem on the front-
passenge rsea t–if it is absolutely necessary
to secur eachild in achild restraint syste mon
the front-passenge rseat:
X Alway spayattentio ntothe instructions
under "Child restraint syste monthe front-
passenge rseat" (Y page 67).
There yo uwillf indi nstructions on ho wto
correctl yroute the shoulde rbelts tra pfrom
the vehicl ebelto utlettot he shoulde rbelt
guid eont he child restraint system
(Y page 68).
X Move the front-passenge rseatasf arback
as possibl eand into the lowest position.
X Move the belt height adjustment to the low-
es tp osit ion.
X Move the backrest to an almos tvertical
position. Th
ee ntire base of the child restraint sys-
tem must always res tonthe seat cushion of
the front-passenge rseat. Th ebackrest of
the forward-facing child restraint system
must, as fa raspossible, be resting on the
backrest of the front-passenge rseat. The
child restraint syste mmustn ot touch the
roo forbep utunder strain by the head
restraint. Adjust the angle of the seat back- res tand the head restraint positio naccord-
ingly .Alsoo bser ve the child restraint sys-
tem manufacturer's installatio ninstruc-
tions. Children in the vehicle
71Safety Z
Page 127 of 497
seat cushions, e.g. knives, nails or tools.
The seats should only be occupied by
passengers, if possible.
R when the seat heating is in operation, do
not cover the seats with insulating mate-
rials, e.g. blankets, coats, bags, seat cov- ers, child seats or booster seats.
! Make sure that there are no objects in the
footwell under or behind the seats when
moving the seats back. There is arisk that
the seats and/or the objects could be dam- aged.
i The head restraints in the front seats are
fitted with the NECK-PRO system
(Y page 55). For this reason, it is not pos-
sible to remove the head restraints from
the front seats.
Vehicles without the through-loading fea-
ture: the head restraints cannot be
removed from the rear-compartment
seats.
For more information, contact aqualified
specialist workshop.
i Further related subjects:
R Through-loading facility in the rear bench
seat (Saloon)
R EASY-PACK through-loading facility in
the rear bench seat (Estate)
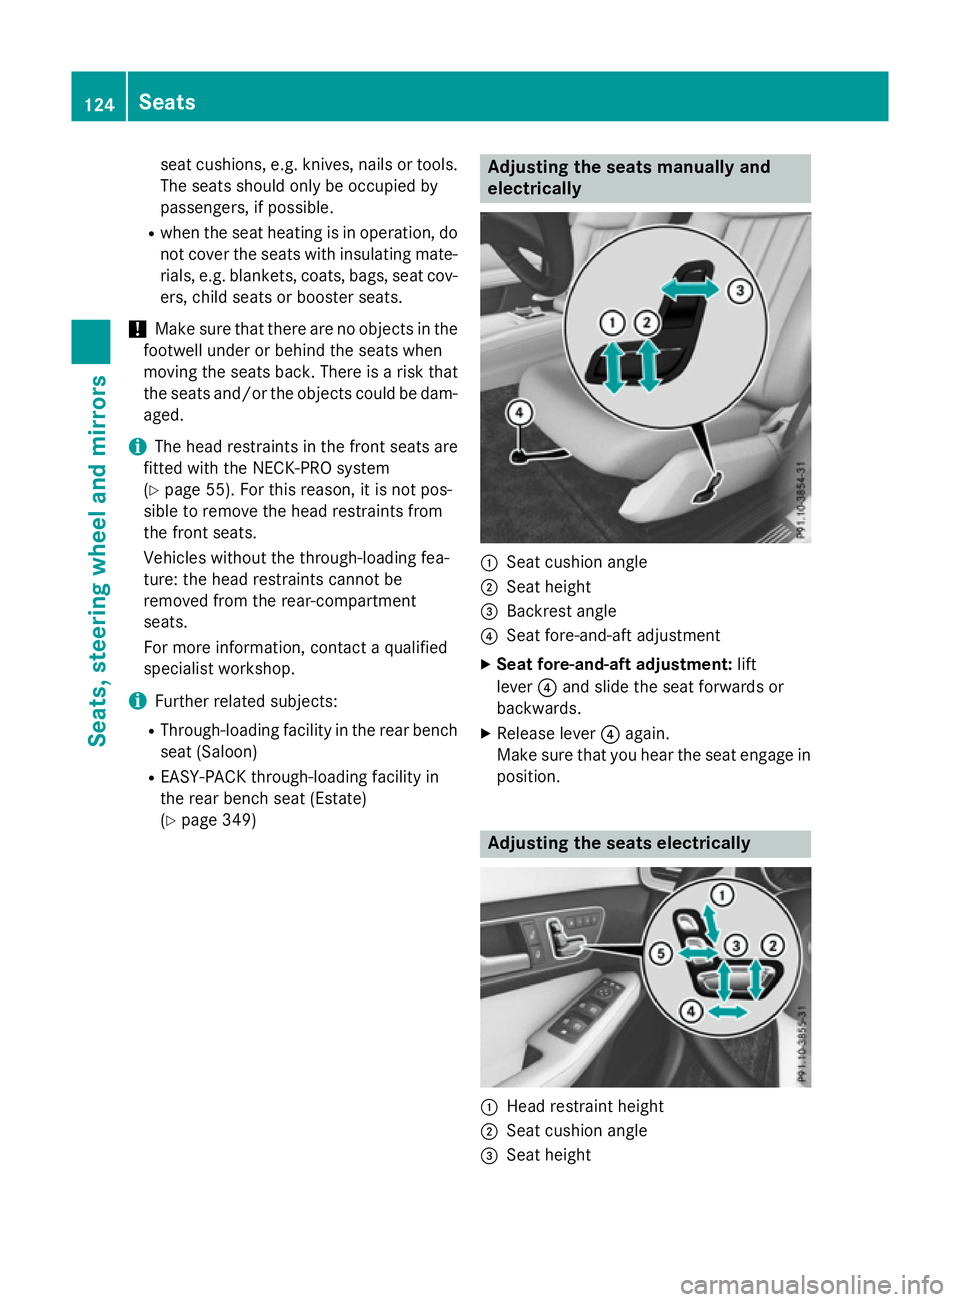
(Y page 349) Adjusting the seats manually and
electrically
:
Seat cushion angle
; Seat height
= Backrest angle
? Seat fore-and-aft adjustment
X Seat fore-and-aft adjustment: lift
lever ?and slide the seat forwards or
backwards.
X Release lever ?again.
Make sure that you hear the seat engage in
position. Adjusting the seats electrically
:
Head restraint height
; Seat cushion angle
= Seat height 124
SeatsSeats, steering wheela
nd mirrors
Page 128 of 497
?
Sea tfore-and-aft adjustment
A Backrest angle
i Vehicles with memory function: if PRE-
SAFE ®
is activate dand the front-passenger
sea tisinanu nfavourable position, it is
move dtoab etter position.
i Yo
uc an store the sea tsettings using the
memory function (Y page 139).
i Vehicles with the through-loading feature
and memory function: if yo ufoldd owna
rea rseatb ackrest, the respective front
sea tism ovedforward sslightl yifneces-
sary.
i Vehicles with memory function: when the
sea tism ovedforward sorbackwards ,the
headrest is move dupordowna utomati-
cally. Adjustin
gthe hea drestraints
Important safety notes G
WARNING
Yo uc ould lose contro lofthe vehicl ewhile
driving if you:
R adjus tthe driver' sseat, steering wheel or
mirrors
R fasten the sea tbelt
There is ariskofana ccident.
Adjust the driver' sseat, hea drestraint, steer-
ing wheel and mirrors and fasten your seat
belt before starting the engine. G
WARNING
The hea drestraints canno tprovid ethe inten-
de dp rotectio nunless they are fitte dand
adjusted correctly .There is an increased risk
of injury to the hea dand neck in the event of
an accident or sudden braking, for example.
Alway sdrive with the hea drestraints fitted.
Ensur ethatthe centre of the hea drestraints
support the back of each vehicl eoccupant's
hea date yelevel before driving off. Do not interchange the hea
drestraints of the
front and rea rseats. Otherwise, yo uwilln ot
be able to adjus tthe height and angle of the
hea drestraints to the correct position.
Adjust the hea drestraint fore-and-aft posi-
tion so tha titisasc lose as possible to the
back of your head.
Observe the important safety notes regarding the seats (Y page 123).
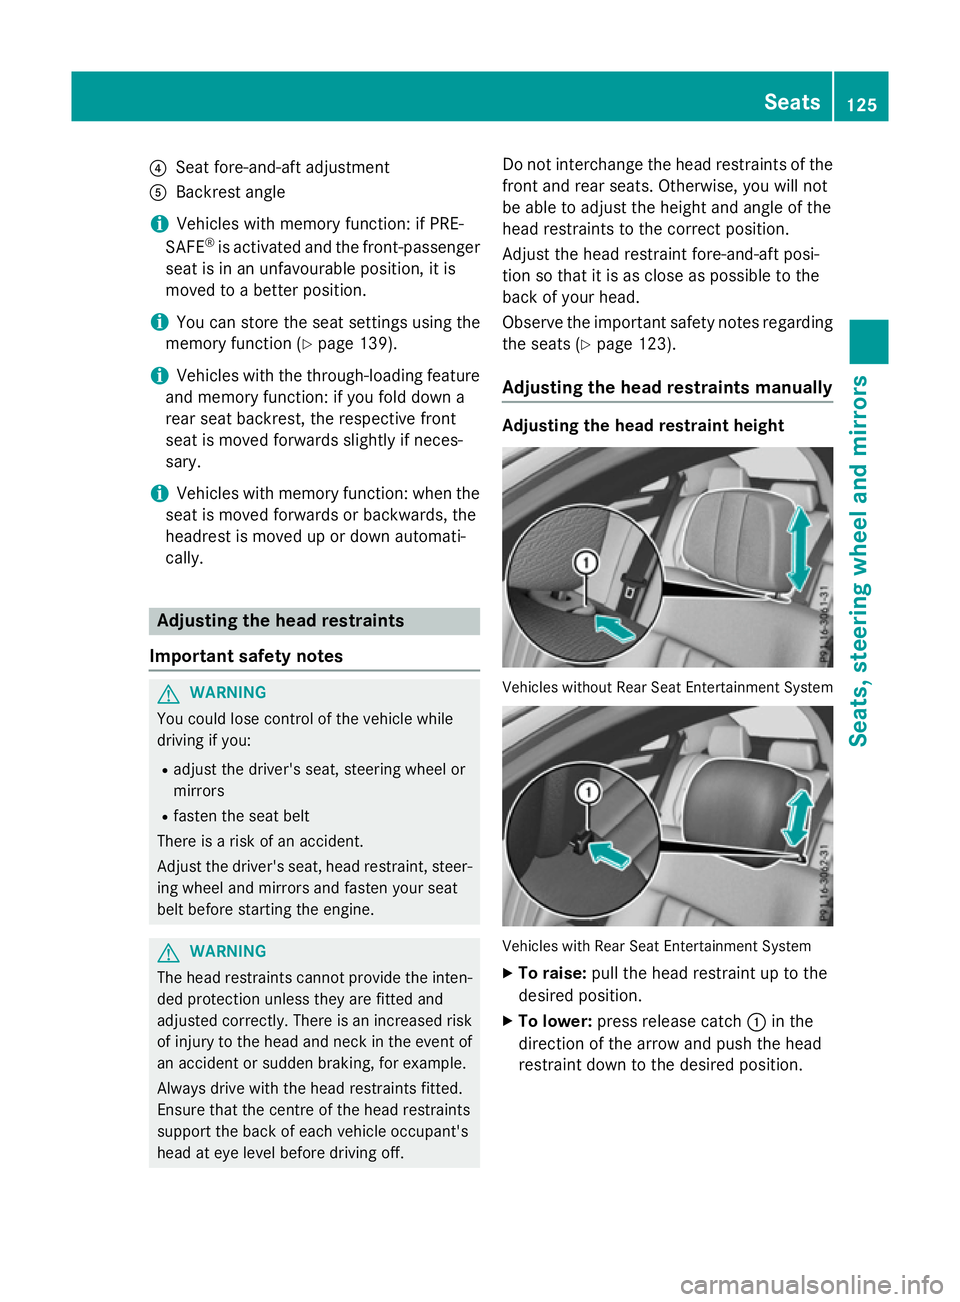
Adjustin gthe hea drestraints manually Adjustin
gthe hea drestrain theight Vehicles withou
tRearS eatE ntertainment System Vehicles with Rear Sea
tEntertainment System
X To raise: pull the hea drestraint up to the
desired position.
X To lower: press release catch :in the
direction of the arrow and push the head
restraint dow ntothe desired position. Seats
125Seats, steering whee land mirrors Z
Page 129 of 497
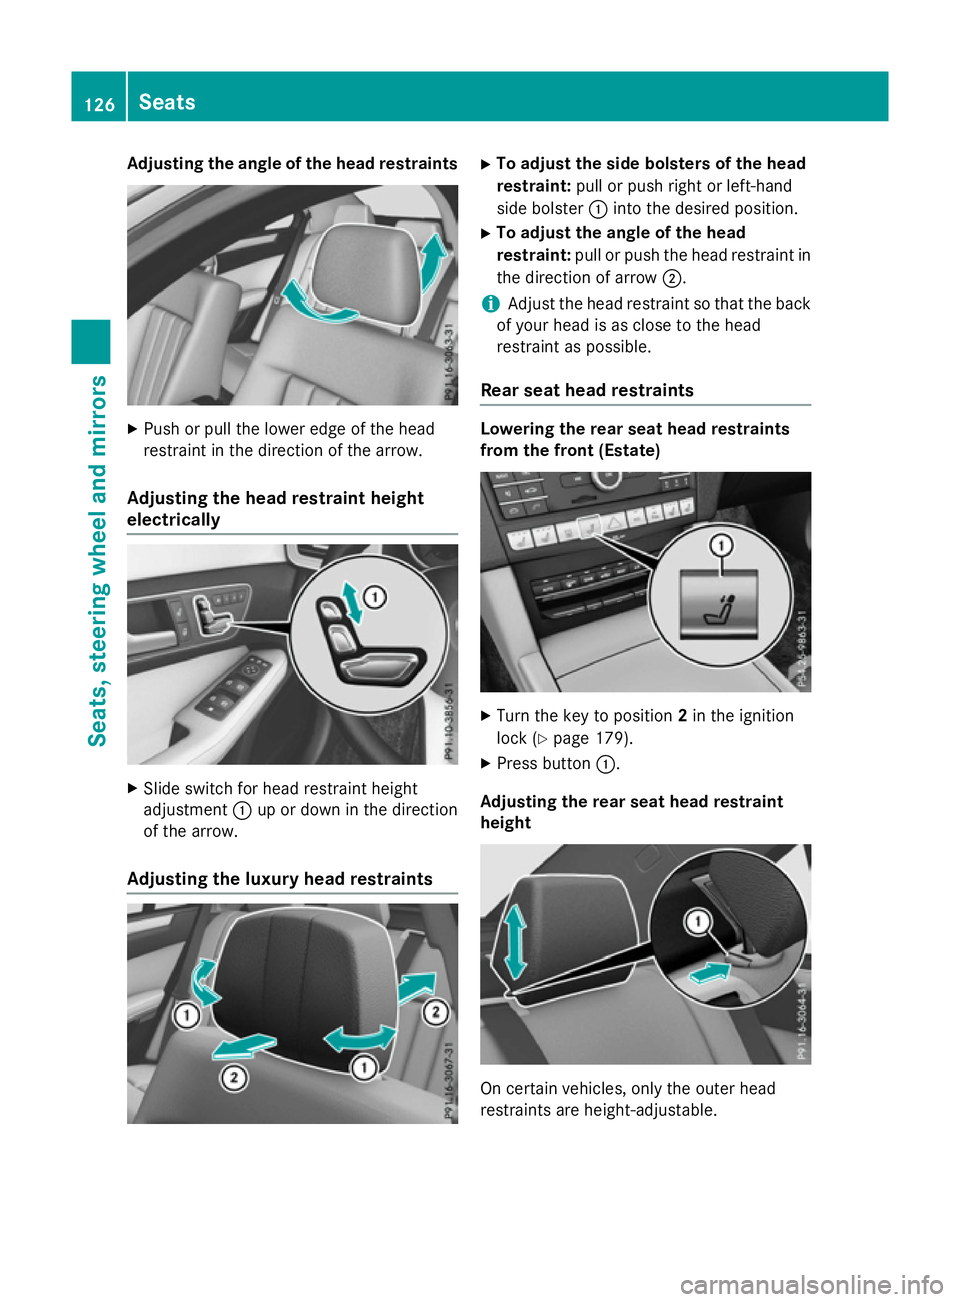
Adjusting th
eangle of th eheadr estraints X
Push or pull th elower edge of th ehead
restraint in th edirection of th earrow.
Adjusting th eheadr estrain theight
electrically X
Slide switch for head restraint height
adjustment :up or down in th edirection
of th earrow.
Adjusting th eluxur yheadr estraints X
To adjust th esideb olsters of th ehead
restraint: pull or push right or left-hand
side bolster :intot he desired position.
X To adjust th eangle of th ehead
restraint: pull or push th ehead restraint in
th ed irection of arrow ;.
i Adjus
tthe head restraint so that th eback
of your head is as close to th ehead
restraint as possible.
Rea rseat hea drestraints Lowering th
erears eat hea drestraints
from th efront (Estate) X
Turn th ekeyto position 2in th eignition
loc k(Ypage 179).
X Press button :.
Adjusting th erears eat hea drestraint
height On certai
nvehicles, only th eouter head
restraint sare height-adjustable. 126
SeatsSeats, steering wheel and
mirrors
Page 136 of 497
Problems with the seat ventilation
Problem
Possible causes/consequences and
M
MSolutions The seat ventilation has
switched off prema-
turely or cannot be
switched on. The on-board voltage is too low because too many electrical con-
sumers are switched on.
X Switch off electrical consumers that you do not need, such as
the rear window heating or interior lighting.
Once the battery is sufficiently charged, the seat ventilation will
switch back on automatically. Steering wheel
Important safety notes
G
WARNING
You could lose control of the vehicle while
driving if you:
R adjust the driver's seat, steering wheel or
mirrors
R fasten the seat belt
There is arisk of an accident.
Adjust the driver's seat, head restraint ,steer-
ing wheel and mirrors and fasten your seat
belt before startingt he engine. G
WARNING
Children could become trapped by the steer-
ing wheel if they adjust it. There is arisk of
injury.
When leaving the vehicle, always take the key with you and lock the vehicle. Never leave
children unattended in the vehicle.
The electrically adjustable steering wheel can
still be adjusted when there is no key in the
ignition lock. Adjusting the steering wheel man-
ually
G
WARNING
The steering wheel may move unexpectedly if you adjust it while driving. This could cause you to lose control of the vehicle. There is a
risk of an accident.
Make sure that the steering wheel is locked
before driving off. Never unlock the steering
wheel when the vehicle is in motion.
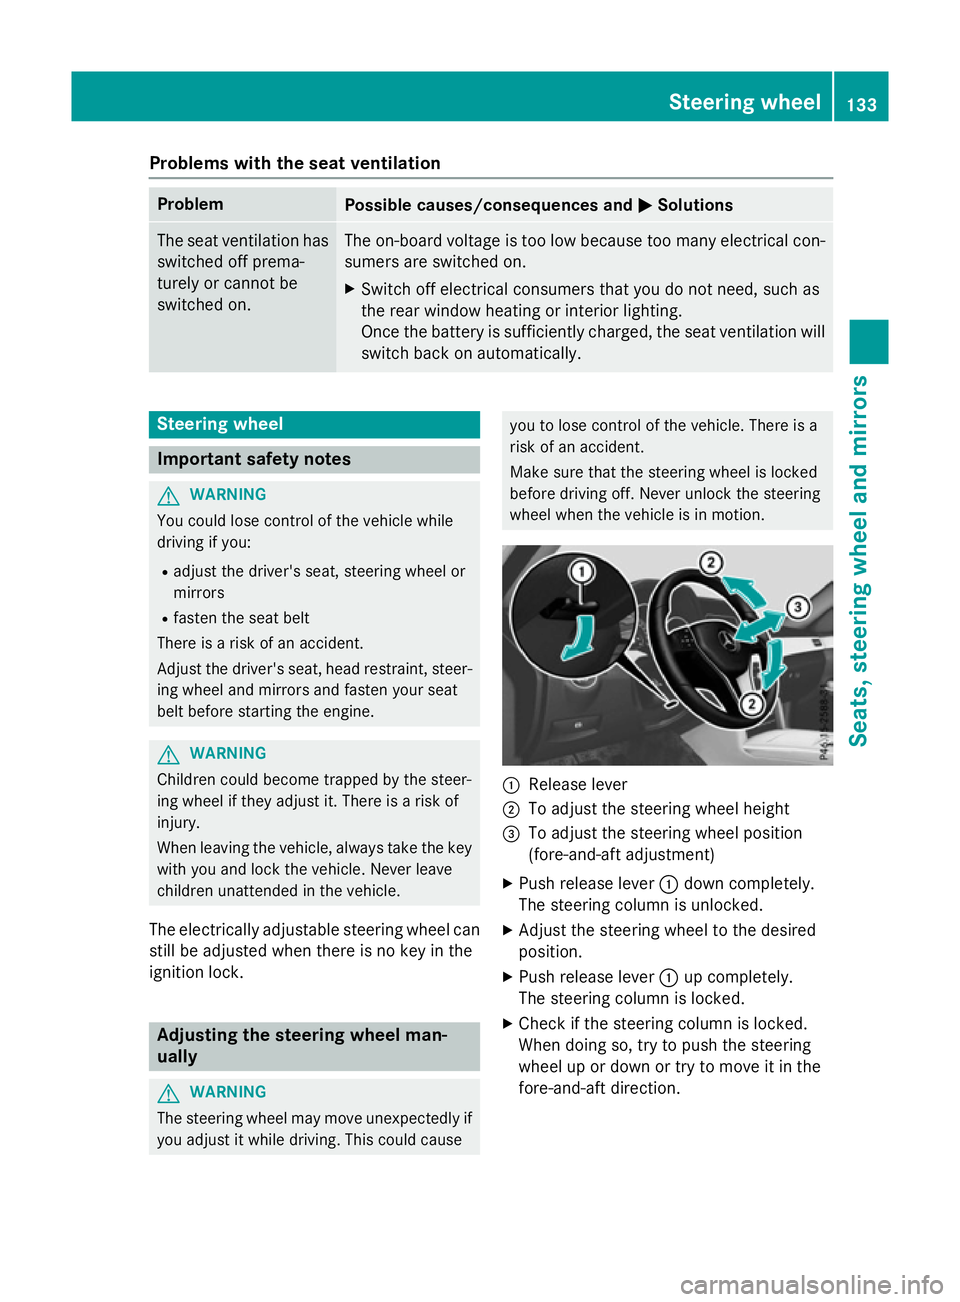
:
Release lever
; To adjust the steering wheel height
= To adjust the steering wheel position
(fore-and-aft adjustment)
X Push release lever :down completely.
The steering column is unlocked.
X Adjust the steering wheel to the desired
position.
X Push release lever :up completely.
The steering column is locked.
X Check if the steering column is locked.
When doing so, try to push the steering
wheel up or down or try to move it in the
fore-and-aft direction. Steering wheel
133Seats, steering wheela nd mirrors Z
Page 137 of 497
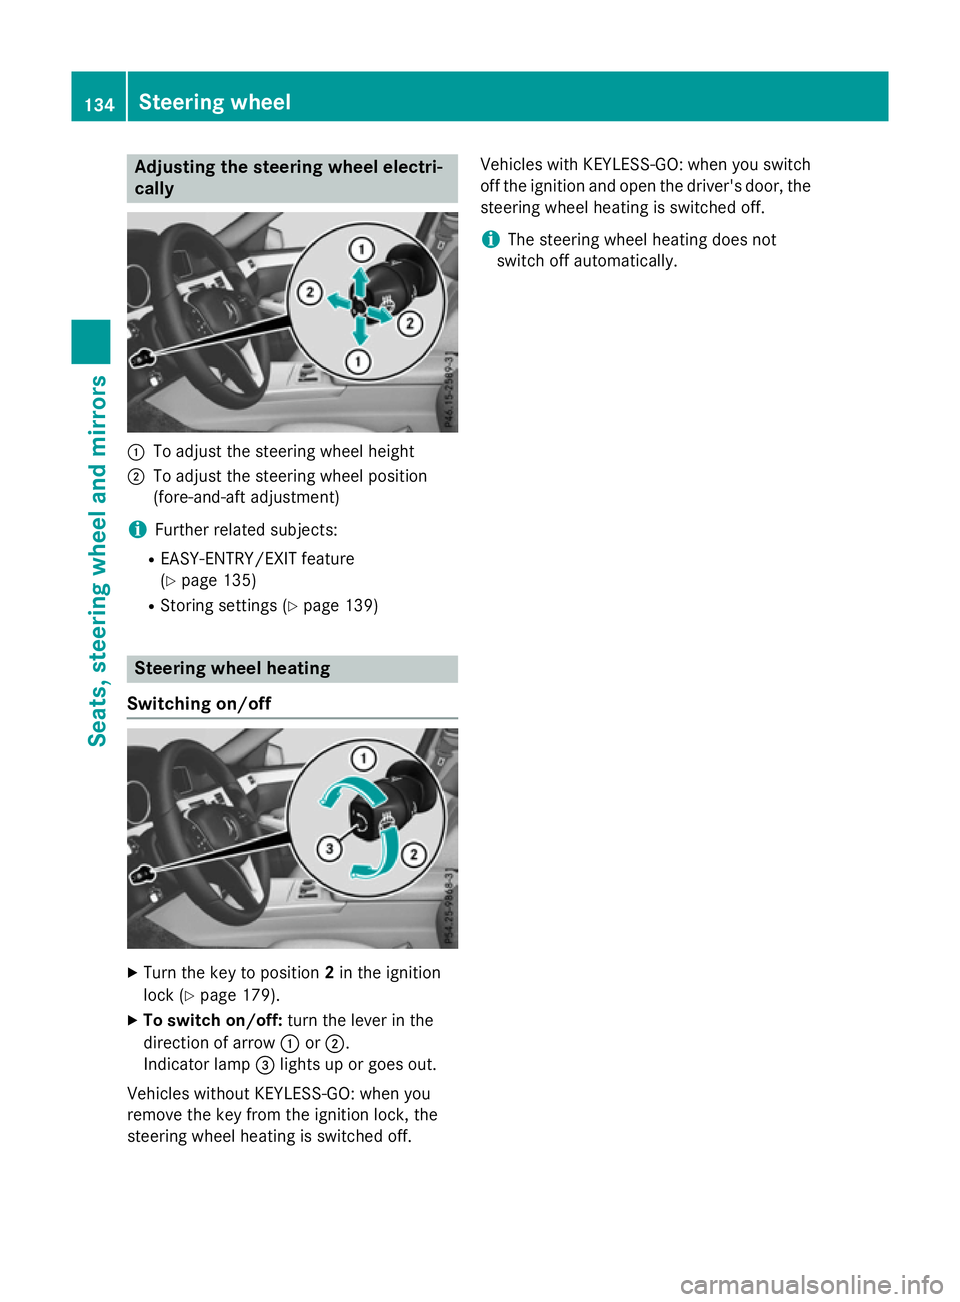
Adjusting th
esteering wheel electri-
cally :
To adjust th esteering whee lheight
; To adjust th esteering whee lposition
(fore-and-af tadjustment)
i Further relate dsubjects:
R EASY-ENTRY/EXIT feature
(Y page 135)
R Storing setting s(Ypage 139) Steering wheel heating
Switchin gon/off X
Turn th ekeyto position 2in th eignition
loc k(Ypage 179).
X To switch on/off: turnthe lever in the
direction of arrow :or;.
Indicato rlamp =lights up or goes out.
Vehicles without KEYLESS-GO :when you
remove th ekeyfrom th eignition lock, the
steering whee lheating is switched off. Vehicles wit
hKEYLESS-GO :when you switch
off th eignition and open th edriver' sdoor ,the
steering whee lheating is switched off.
i The steering whee
lheating does not
switch off automatically. 134
Steering wheelSeats
,steering wheel and mirrors