washer fluid MERCEDES-BENZ E-CLASS ESTATE 2015 Owners Manual
[x] Cancel search | Manufacturer: MERCEDES-BENZ, Model Year: 2015, Model line: E-CLASS ESTATE, Model: MERCEDES-BENZ E-CLASS ESTATE 2015Pages: 497, PDF Size: 16.23 MB
Page 26 of 497
Vehicl
eidentificatio nnumber
see VIN
Vehicl eidentificatio nplate .............. 472
Vehicl elevel
AIRMATI C...................................... 231
Vehicl elevel (display message) ....... 315
Vehicl emaintenance
see ASSYST PLUS
Vehicl etoolkit.................................. 395
Vehicl eweigh ts................................. 481
Video
Operating the DVD ......................... 284
VIN
Sea t............................................... 472
Type plate ...................................... 472 W
Warning and indicator lamps ABS ................................................ 332
Brakes ........................................... 330
Distance warning signa l................. 338
ESP ®
.............................................. 333
ESP ®
OFF ....................................... 334
Fue ltank ........................................ 336
Genera lnotes ................................ 329
LIM (cruis econtrol) ........................ 212
LIM (DISTRONIC PLUS) .................. 219
LIM (variabl eSPEEDTRONIC )......... 215
Overview .......................................... 35
PASSENGER AIR BAG OFF ............... 45
Reserve fue l................................... 336
Sea tbelt. ....................................... 329
Tyre pressure monitor ................... 339
Warning triangle ................................ 394
Washer fluid
Displa ymessage ............................ 328
Wheel and tyre combinations
see Tyres
Wheel bolt tightenin gtorque ........... 430
Wheel chock ...................................... 427
Wheels
Changing awheel .......................... 426
Changing/replacing ....................... 426
Checking ........................................ 417
Cleaning ......................................... 388
Emergency spare whee l................. 465
Fitting anew whee l........................ 430 Fitting
awheel ............................... 426
Genera lnotes ................................ 431
Important safety notes .................. 416
Information on driving .................... 416
Removing awheel .......................... 429
Storing ........................................... 426
Tightening torque ........................... 430
Wheel size/tyre size ...................... 431
Windowbag
Operation ......................................... 52
Windows
Cleaning ......................................... 388
see Sid ewindows
Windscreen
Demisting ...................................... 164
Windscree nwasher fluid
see Windscree nwashe rs ystem
Windscree nwasher system
Important safety notes .................. 480
Topping up ..................................... 383
Windscree nwipers
Problem (malfunction) ................... 154
Rear window wipe r........................ 152
Replacing the wipe rblade s............ 152
Switching on/of f........................... 151
Winter operation
Important safety notes .................. 418
Radiato rcove r............................... 380
Slippery roa dsurfaces ................... 211
Snow chains .................................. 419
Winter tyres
Limiting the speed (on-board com-
puter) ............................................. 292
M+S tyre s...................................... 418
Wipe rblades
Cleaning ......................................... 389
Important safety notes .................. 152
Replacing (o nthe rea rwindow )..... 153
Replacing (windscreen) .................. 152
Wooden trim (cleaning instruc-
tions) .................................................. 392
Workshop
see Qualifie dspecialist workshop Z
ZONE function Switching on/of f........................... 164 Index
23
Page 154 of 497
X
Insert bulbh older;into the lamp and turn
it clockwise.
X Align housing cover :and turn it clock-
wise until it engages.
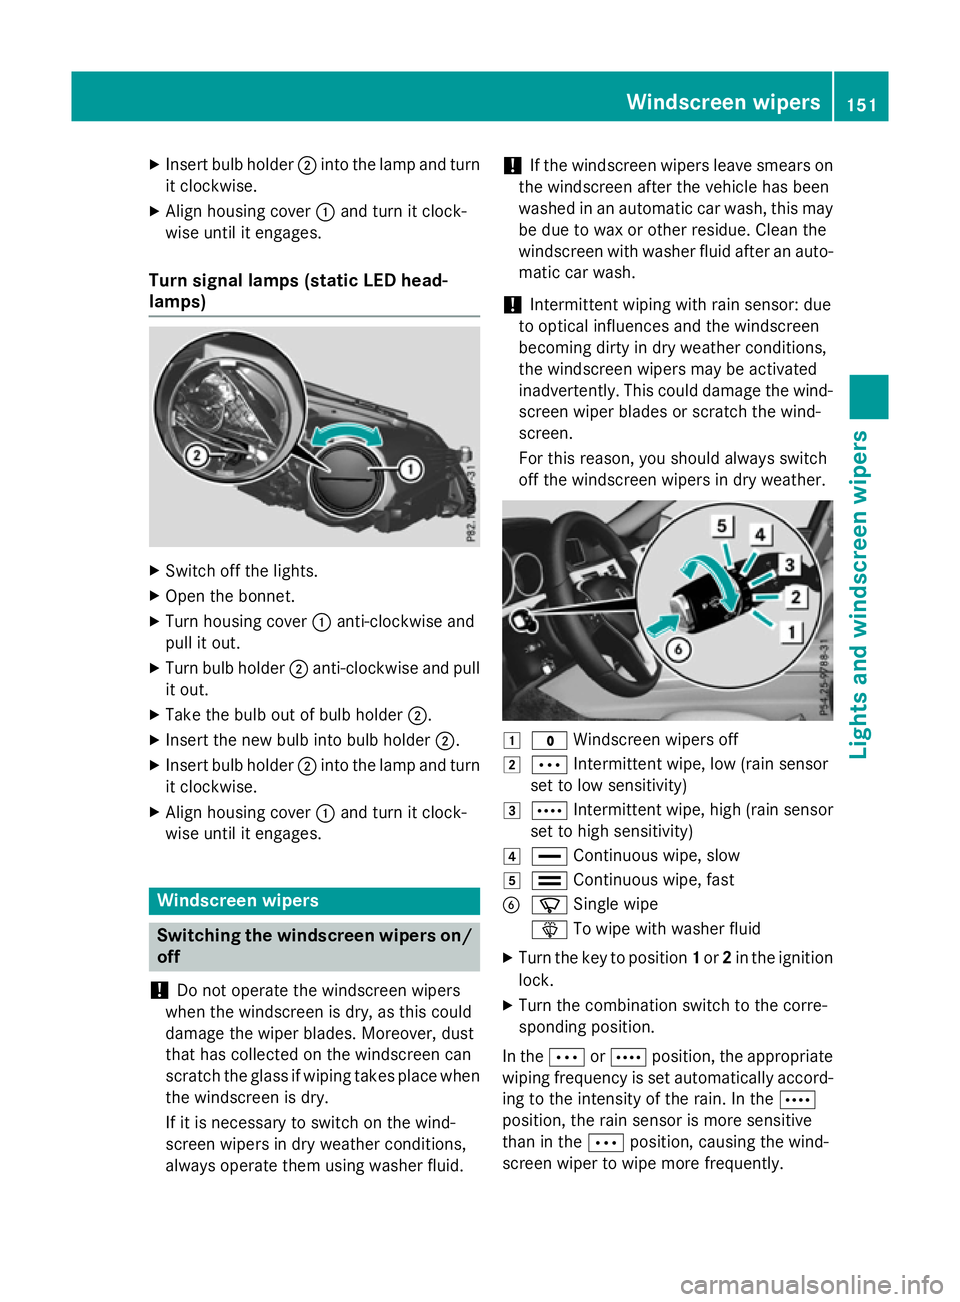
Turn signal lamps (static LED head-
lamps) X
Switch off the lights.
X Open the bonnet.
X Turn housing cover :anti-clockwise and
pullito ut.
X Turn bulbh older;anti-clockwise and pull
it out.
X Take the bulbo ut of bulbholder;.
X Insert the new bulbi nto bulbholder;.
X Insert bulbh older;into the lamp and turn
it clockwise.
X Align housing cover :and turn it clock-
wise until it engages. Windscreen wipers
Switching the windscreen wipers on/
off
! Do not operate the windscree
nwipers
when the windscree nisdry, as this could
damage the wiper blades. Moreover, dust
that has collected on the windscree ncan
scratch the glass if wiping takes place when the windscree nisdry.
If it is necessary to switch on the wind-
screen wipers in dry weather conditions,
alwayso perate them using washer fluid. !
If the windscree
nwipers leave smears on
the windscree nafter the vehicle has been
washed in an automatic car wash, this may
be due to wax or other residue. Clean the
windscree nwith washer fluida fter an auto-
matic car wash.
! Intermittent wiping with rain sensor: due
to optical influences and the windscreen
becoming dirty in dry weather conditions,
the windscree nwipers may be activated
inadvertently .This could damage the wind-
screen wiper blades or scratch the wind-
screen.
For this reason, you shoulda lwaysswitch
off the windscree nwipers in dry weather. 1
$ Windscreen wipers off
2 Ä Intermittent wipe, low (rains ensor
set to low sensitivity)
3 Å Intermittent wipe, high (rains ensor
set to high sensitivity)
4 ° Continuou swipe, slow
5 ¯ Continuou swipe, fast
B í Single wipe
î To wipew ith washer fluid
X Turn the key to position 1or 2in the ignition
lock.
X Turn the combination switch to the corre-
sponding position.
In the ÄorÅ position, the appropriate
wiping frequency is set automaticall yaccord-
ing to the intensity of the rain. In the Å
position, the rain sensor is more sensitive
than in the Äposition, causing the wind-
screen wiper to wipem ore frequently. Windscreen wipers
151Lights and windscreenw ipers Z
Page 155 of 497
If the wiper blades are worn, the windscreen
willnol onger be wiped properly. This could
prevent you from observing the traffic condi-
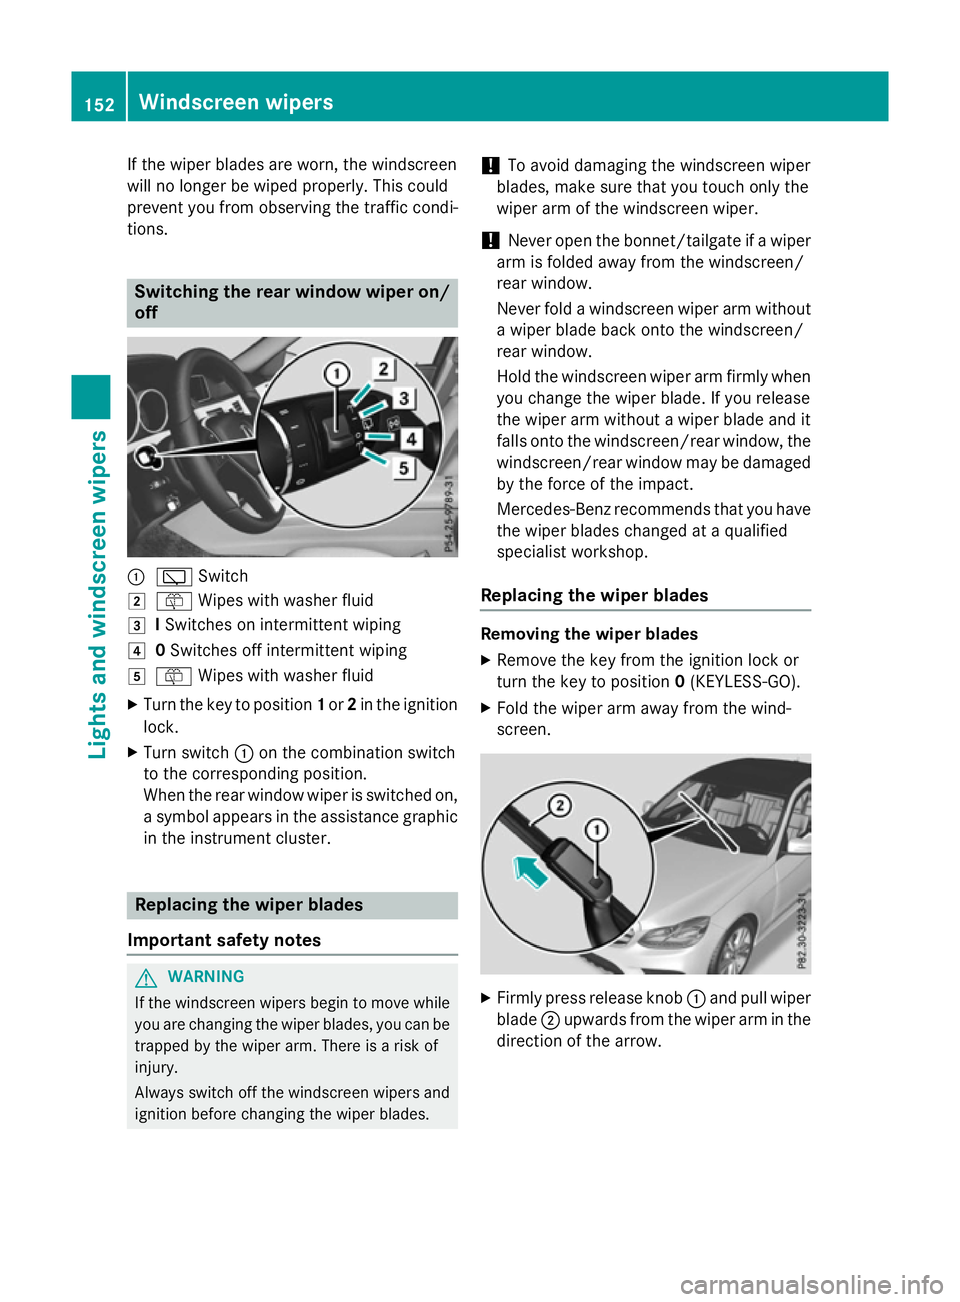
tions. Switching the rear window wipero
n/
off :
è Switch
2 ô Wipesw ith washer fluid
3 ISwitches on intermittent wiping
4 0Switches off intermittent wiping
5 ô Wipesw ith washer fluid
X Turn the key to position 1or 2in the ignition
lock.
X Turn switch :on the combination switch
to the corresponding position.
When the rear window wiper is switched on,
as ymbola ppears in the assistance graphic
in the instrument cluster. Replacing the wiperb
lades
Important safety notes G
WARNING
If the windscree nwipers begintom ove while
you are changing the wiper blades, you can be trapped by the wiper arm. There is arisk of
injury.
Alwayss witch off the windscree nwipers and
ignition before changing the wiper blades. !
To avoid damaging the windscree
nwiper
blades, make sure that you touch only the
wiper arm of the windscree nwiper.
! Never open the bonnet/tailgate if
awiper
arm is folded awayf rom the windscreen/
rear window.
Never fold awindscree nwiper arm without
aw iper blade back onto the windscreen/
rear window.
Hold the windscree nwiper arm firmly when
you change the wiper blade. If you release
the wiper arm withou tawiper blade and it
fallso nto the windscreen/rear window ,the
windscreen/rear window may be damaged
by the force of the impact.
Mercedes-Benz recommends that you have
the wiper blades changed at aqualified
specialist workshop.
Replacing the wiperb lades Removing the wiperb
lades
X Remove the key from the ignition lock or
turn the key to position 0(KEYLESS-GO).
X Fold the wiper arm awayf rom the wind-
screen. X
Firmly press release knob :and pullw iper
blade ;upwards from the wiper arm in the
direction of the arrow. 152
Windscreen wipersLights and windscreenw
ipers
Page 331 of 497
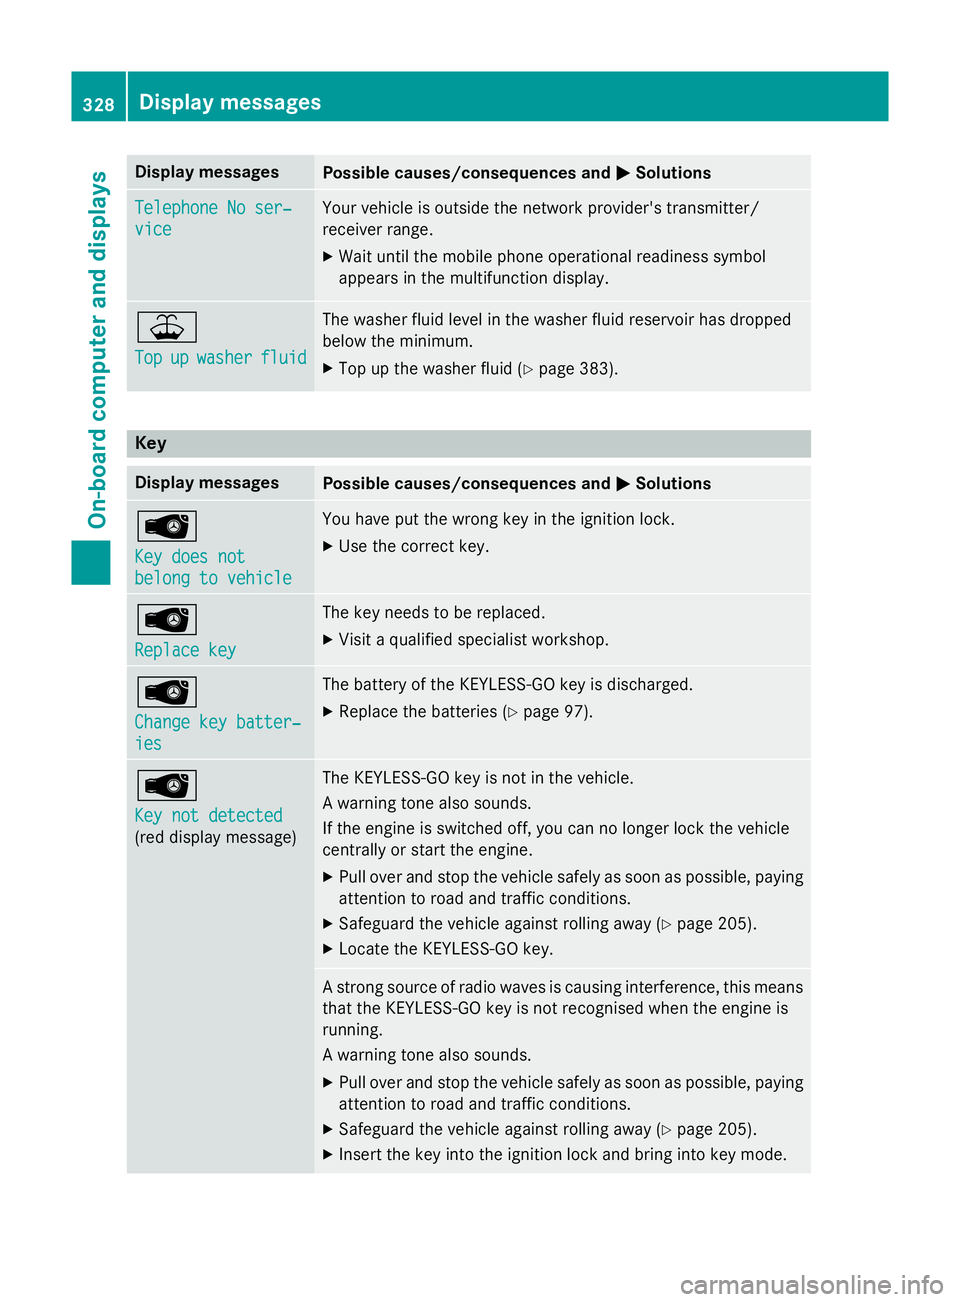
Display messages
Possible causes/consequences and
M
MSolutions Telephone No ser‐
Telephone No ser‐
vice vice Your vehicl
eisoutside th enetwo rk provider' stransmitter/
receiver range.
X Wait until th emobile phone operational readiness symbol
appears in th emultifunction display. ¥
Top Top
up
upwasher
washer fluid
fluid The washer flui
dlevel in th ewasher flui dreservoir has dropped
belo wthe minimum.
X Top up th ewasher flui d(Ypage 383). Key
Display messages
Possible causes/consequences and
M
MSolutions Â
Key doe
snot
Key doe snot
belong to vehicle belong to vehicle You hav
eput th ewrong ke yint he ignition lock.
X Use th ecorrect key. Â
Replac
ekey
Replac ekey The ke
yneeds to be replaced.
X Visit aqualified specialist workshop. Â
Change key batter‐ Change key batter‐
ies ies The battery of th
eKEYLESS-GO ke yisdischarged.
X Replac ethe batterie s(Ypage 97). Â
Key not detected Key not detected
(re
dd isplay message) The KEYLESS-GO ke
yisnotin th evehicle.
Aw arnin gtonea lso sounds.
If th eengineiss witched off, you can no longer loc kthe vehicle
centrall yorstart th eengine.
X Pull ove rand stop th evehicl esafely as soo naspossible, paying
attention to roa dand traffic conditions.
X Safeguar dthe vehicl eagainst rollin gaway (Y page 205).
X Locate th eKEYLESS-GO key. As
tron gs ource of radi owave sisc ausin ginterfe rence, this means
that th eKEYLESS-GO ke yisnotrecognised when th eengineis
running.
Aw arnin gtonea lso sounds.
X Pull ove rand stop th evehicl esafely as soo naspossible, paying
attention to roa dand traffic conditions.
X Safeguar dthe vehicl eagainst rollin gaway (Y page 205).
X Inser tthe keyintot he ignition loc kand bring into ke ymode. 328
Display
messagesOn-boardcomputer an ddisplays
Page 387 of 497
Further information on windscreen washer
fluid/antifreeze (Y page 480).Service
ASSYST PLUS
Servic emessages The ASSYST PLUS service interval display
informs yo uofthe next service du edate.
Information on the typ eofservice and service
interval s(seet he separate Service Booklet).
You can obtain further information from a
Mercedes-Benz Service Centre.
i The ASSYST PLUS service interval display
doe snot sho wany information on the
engine oil level .Observe the notes on the
engine oil level (Y page 380).
The multifunction display shows aservice
messag efor afew seconds, e.g.:
R Service Ain..d ays
Service Ain..d ays
R Service Aoverdue
Service Aoverdue
R Service Aoverdue by .. days
Service Aoverdue by .. days
Depending on the operating conditions of the vehicle, the remaining time or distance until
the next service du edateisd isplayed.
The letter indicates which service is due. A A
stand sfor am inorservice and B
B for am ajor
service. Anumber or another letter may be
displayed afte rthe letter.
Only for certain countries :the positio nafter
the letter A
A or B
Bindicates any necessar yaddi-
tiona lmaintenance work to be performed. If
yo un otify aquali fied specialist worksho pof
this display ,you will receive astatement on
the associated costs.
The ASSYST PLUS service interval display
doe snot take into account any period sof
time during which the battery is disconnec-
ted. Maintaining the time-dependent service
schedule:
X Note dow nthe service du edated isplayed
in the multifunction display before discon-
necting the battery.
or
X After reconnecting the battery ,sub tract
the battery disconnection period sfrom the
service date shown on the display.
Hiding servic emessages X
Pres sthe a or% button on the steer-
ing wheel.
Displayin gservic em essages X
Switch the ignition on.
X Pres sthe = or; button on the steer-
ing wheel to select the Service Servicemenu.
X Pres sthe 9 or: button to select the
ASSYST PLUS
ASSYST PLUS submenu and confir mby
pressing the abutton.
The service du edatea ppears in the multi-
function display.
Informatio nabout Service Resettin
gthe ASSYST PLU Sservic einter-
val display
! If the ASSYST PLUS service interval dis-
play ha sbeeni nadvertently reset, this set-
ting can be corrected at aquali fied special-
ist workshop.
Have service work carried ou tasd escribed
in the Service Booklet. Thi smay otherwise
lead to increase dweara nd damag etothe
majo rassemblies or the vehicle.
Aq uali fied specialist workshop, e.g. a
Mercedes-Benz Service Centre, will rese tthe
ASSYST PLUS service interval display after
the service work ha sbeenc arried out. You
can also obtain further information on main-
tenance work, for example. 384
ServiceMaintenance and care
Page 483 of 497
Further information on coolants can be
found in the Mercedes-Benz Specifications for Service Products, MB Specifications for Service Products 310.1, e.g. on the Inter-
net at http://bevo.mercedes-benz.com.
Or contact aquali fied specialist workshop.
! Alway
suseasuitabl ecoolant mixture,
eve ninc ountries where hig htemperatures
prevail.
Otherwise, the engine cooling system is not
sufficiently protected from corrosio nand
overheating.
i Have the coolant regularly replaced at a
qualified specialist worksho pand the
replacement confirmed in the Service
Booklet.
Compl ywitht he important safety precautions
for service products whe nhandling coolant
(Y page 473).
The coolant is amixture of water and anti-
freeze/corrosio ninhibitor. It is responsible
for the following:
R anti-corrosion protection
R antifreeze protection
R raising the boiling point
If antifreeze/corrosio ninhibitor is present in
the correct concentration, the boiling point of
the coolant during operation will be approx-
imately 130 †.
The antifreeze/corrosio ninhibitor concentra-
tion in the engine cooling system should:
R be at least 50% .Thisw illp rotect the engine
cooling system against freezing dow nto
approximately -37 †.
R not excee d55% (antifreeze protection
dow nto- 45 †). Hea twillo therwise not be
dissipated as effectively.
Mercedes-Benz recommends an antifreeze/
corrosio ninhibitor concentrate in accord-
ance with MB Specifications for Service Prod- ucts 310.1.
i Whe
nthe vehicle is firs tdelivered ,itisfil-
le dw ithac oolant mixture that ensures adequate antifreeze and corrosio
nprotec-
tion.
i The coolant is checke
datevery mainte-
nance interval at aquali fied specialist
workshop. Windscree
nwasher system
Important safety notes G
WARNING
If windscreen washe rconcentrate comes into
contact with hot components of the engine or
the exhaust system, it can ignite. There is a
ris koff ire and injury.
Make sur ethe windscreen washe rconcen-
trate doe snot come into contact with the filler
neck.
! Do not us
edistille dord e-ionised water in
the washe rfluid reservoir. Otherwise, the
level senso rmay be damaged.
! Only the washe
rfluid sSummerFit and
WinterFit can be mixed. Otherwise, the
spraying nozzles could become blocked.
Compl ywitht he important safety notes for
service products whe nhandling washe rfluid
(Y page 473).
At temperatures above freezing:
X Fil lthe washe rfluid reservoi rwitham ixture
of water and washe rfluid ,e.g. MB Sum-
merFit.
Mix 1partMBS ummerFit to 100 parts water.
At temperatures below freezing:
X Fil lthe washe rfluid reservoi rwitham ixture
of water and washe rfluid ,e.g. MB Winter-
Fit.
For the correct mixing rati orefe rtot he
information on the antifreeze reservoir.
i Add washe
rfluid concentrate, e.g. MB
SummerFit or MB WinterFit, to the washer
fluid al lyea rround. 480
Servic
eproducts and capacitiesTechnical data