fuel pressure MERCEDES-BENZ E-CLASS SALOON 2008 Owners Manual
[x] Cancel search | Manufacturer: MERCEDES-BENZ, Model Year: 2008, Model line: E-CLASS SALOON, Model: MERCEDES-BENZ E-CLASS SALOON 2008Pages: 401, PDF Size: 6.89 MB
Page 11 of 401
8 G
Garage door Opening/closing (with the remote
control) . . . . . . . . . . . . . . . . . . . . .215
Garage door opener . . . . . . . . . . . . ..214
Clearing the memory . . . . . . . . . . .216
Frequencies . . . . . . . . . . . . . . . . . .391
Programming the remote control . .214
Gear indicator (on-board computer) 126
Gearshift program Manual . . . . . . . . . . . . . . . . . . . . . .118
Genuine Mercedes-Benz parts . . . ..344
Glove compartment . . . . . . . . . . . . ..205
Gross vehicle weight, maximum
permissible . . ..369, 371, 372, 373, 374 H
Headlamp Misting up . . . . . . . . . . . . . . . . . . .299
Headlamps
Cleaning . . . . . . . . . . . . . . . . . . . . .246
Cleaning system . . . . . . . . . . . . . . .103
Headlamps delayed switch-off
see Exterior lighting delayed switch-off
Head restraint
Adjusting (front) . . . . . . . . . . . . .79, 80
Adjusting (rear) . . . . . . . . . . . . . . . .81
Luxury . . . . . . . . . . . . . . . . . . . .79, 81 NECK-PR
O.. . . . . . . . . . . . . . . . . . .47
Removing (rear) . . . . . . . . . . . . . . . .83
Head restraints
Resetting triggered NECK-PRO
head restraints . . . . . . . . . . . . . . . .309
Heating
see Air conditioning
High-pressure cleaners . . . . . . . . . ..245
HOLD . . . . . . . . . . . . . . . . . . . . . . . . . .155
Display message . . . . . . . . . . . . . .264
HomeLink ®
see Garage door opener I
Immobiliser . . . . . . . . . . . . . . . . . . . . .62
Indicator and warning lamp Brakes (red ).. . . . . . . . . . . . . . . . .286
Coolant . . . . . . . . . . . . . . . . . . . . .287
Distronic (red ).. . . . . . . . . . .149, 286
Engine diagnostic . . . . . . . . . . . . . .288
ESP ®
. . . . . . . . . . . . . . . . . . . .60, 285
PASSENGER AIRBAG OFF . . . .49, 283
Reserve fuel . . . . . . . . . . . . . . . . . .291
Seat belt . . . . . . . . . . . . . . . . . . . . .290
SRS . . . . . . . . . . . . . . . . . . . . .41, 289
Tyre pressure monitor . . . . . . . . . .289
Indicator and warning lamps . . . . ..285
Indicator lamp see Indicator and warning lamp Instrument cluster
. . . . . . . . . . . . ..120
Overview . . . . . . . . . . . . . . . . . .26, 28
Selecting the language (on-board
computer) . . . . . . . . . . . . . . . . . . .133
Instrument lighting . . . . . . . . . . . . ..120
Integrated child seat . . . . . . . . . . . . ..55
Intelligent Light System . . . . . . . . ..103
Display message . . . . . . . . . . . . . .274
Menu (on-board computer) . . . . . .137
Interior lighting . . . . . . . . . . . . . . . . .104
Ambient (on-board computer) . . . .136
Automatic control . . . . . . . . . . . . .105
Delayed switch-off (on-board
computer) . . . . . . . . . . . . . . . . . . .136
Manual control . . . . . . . . . . . . . . . .105
Reading lamp . . . . . . . . . . . . . . . . .105
Interior motion sensor . . . . . . . . . . ..63
ISOFIX child seat securing system ..54 J
Jack Operation . . . . . . . . . . . . . . . . . . . .324
Storage location . . . . . . . . . . . . . . .254
Jump-starting . . . . . . . . . . . . . . . . . . .333
Jump leads . . . . . . . . . . . . . . . . . . .333 K
Key . . . . . . . . . . . . . . . . . . . . . . . . . . . .66
Changing the battery . . . . . . . . . . .310 Index
211_AKB; 2; 5, en-GB
mkalafa,
Version: 2.9.4 2008-02-29T16:57:07+01:00 - Seite 8Dateiname: 6515_3416_02_buchblock.pdf; preflight
Page 17 of 401
14
Switching off the alarm
ATA . . . . . . . . . . . . . . . . . . . . . . . . . .62T
Tailgate Display message . . . . . . . . . . . . . .266
Emergency unlocking . . . . . . . . . . .308
Limiting the opening angl e.. . . . . ..76
Opening/closing (manually) . . . . . . .70
Tail lamps
Display message . . . . . . . . . . . . . .276
Tank capacity . . . . . . . . . . . . . . . . . . .377
Technical data Acceleration . . . . . . . . . . . . . . . . . .354
Engine . . . . . . . . . . . . . . . . . . . . . .348
Speed . . . . . . . . . . . . . . . . . . . . . . .352
Trailer loads . . . . . . . . . . . . . . . . . .376
Tyres . . . . . . . . . . . . . . . . . . . . . . .357
Vehicle dimensions . . . . . . . . . . . .366
Vehicle weights . . . . . . . . . . . . . . .369
Wheels . . . . . . . . . . . . . . . . . . . . . .357
Telephone
see Mobile phone
Telescopic lever . . . . . . . . . . . . . . . . .239
Telescopic rod (Easy-Pack fix kit) ..2 04
Temperature Engine oil (on-board computer) . . .126
Outside temperature . . . . . . . . . . .121 Thermatic
Malfunction indicator lamp . . . . . .283
Thermotronic
Malfunction indicator lamp . . . . . .283
Third brake lamp
Display message . . . . . . . . . . . . . .274
Through-loading feature . . . . . . . . ..195
Tightening torque . . . . . . . . . . . . . ..327
Time Lap time (on-board computer) . . . .127
Setting (on-board computer) . . . . .134
Setting the time (on-board com-
puter) . . . . . . . . . . . . . . . . . . . . . . .134
Timer (on-board computer) . . . . . ..127
TIREFIT kit Storage location . . . . . . . . . . . . . . .255
Using . . . . . . . . . . . . . . . . . . . . . . .318
Total distance recorder
. . . . . . . . . . . . . . . . . . . . . . . . . . . . .27, 29
Resetting the trip meter . . . . . . . . .121
Tow-away protection . . . . . . . . . . . . ..63
Towing . . . . . . . . . . . . . . . . . . . . . . . .339
Towing eye Fitting . . . . . . . . . . . . . . . . . . . . . . .338
Removing . . . . . . . . . . . . . . . . . . . .339
Tow-starting . . . . . . . . . . . . . . . . . . . .339
Trailer 7-pin connector . . . . . . . . . . . . . . .242
Display message . . . . . .268, 272, 273
Power supply . . . . . . . . . . . . . . . . .242 Trailer loads
Technical data . . . . . . . . . . . . . . . .376
Trailer tow hitch . . . . . . . . . . . . . . . .239
Notes on care . . . . . . . . . . . . . . . .248
Trailer towing
Driving tips . . . . . . . . . . . . . . . . . . .240
Mounting dimensions . . . . . . . . . . .375
Parktroni c.. . . . . . . . . . . . . . . . . .161
Transmission output (maximum)
Telephone/two-way radio . . . . . . .345
Transport (vehicle) . . . . . . . . . . . . ..340
Trip computer Menu (on-board computer) . . . . . .139
Trip meter . . . . . . . . . . . . . . . . . . . . . .125
Resetting . . . . . . . . . . . . . . . . . . . .121
Turn signal lamps
Display message . . . . . . . . . .273, 274
TV
Operating (on-board computer) . . .130
Two-way radio
Installatio n.. . . . . . . . . . . . . . . . . .345
Tyre grip . . . . . . . . . . . . . . . . . . . . . . .237
Tyre pressure . . . . . . . . . . . . . . . . . . .229
Calling up (on-board computer) . .232
Display message . . . . . . . . . .262, 278
Table (see Fuel filler flap) . . . . . . . .219
see Tyre pressure
Tyre pressure loss warning system 230
Tyre pressure monitor Warning lamp . . . . . . . . . . . . . . . . .289 Index
211_AKB; 2; 5, en-GB
mkalafa,
Version: 2.9.4 2008-02-29T16:57:07+01:00 - Seite 14Dateiname: 6515_3416_02_buchblock.pdf; preflight
Page 19 of 401
Protection of the environment
16 Protection of the environment
H
Environmental note
Daimler's declared policy is one of integra-
ted environmental protection.
Our objectives are to use the natural
resources which form the basis of our exis-
tence on this planet sparingly and in a man-
ner which takes the requirements of both
nature and humanity into consideration.
You too can help to protect the environ-
ment by operating your vehicle in an envi-
ronmentally responsible manner.
Fuel consumption and the rate of engine,
transmission, brake and tyre wear depend
on the following factors:
R Operating conditions of your vehicle
R Your personal driving style
You can influence both factors.
Therefore, please bear the following in
mind:
Operating conditions
R Avoid short trips as these increase fuel
consumption.
R Make sure that the tyre pressures are
always correct. R
Do not carry any unnecessary weight in
the vehicle.
R Keep an eye on the vehicle’s fuel con-
sumption.
R Remove roof racks once you no longer
need them.
R A regularly serviced vehicle will contrib-
ute to environmental protection. You
should therefore adhere to the service
intervals.
R Always have maintenance work carried
out at a qualified specialist workshop,
e.g. a Mercedes-Benz Service Centre.
Personal driving style
R Do not depress the accelerator pedal
when starting the engine.
R Do not warm up the engine when the
vehicle is stationary.
R Drive carefully and maintain a safe dis-
tance from the vehicle in front.
R Avoid frequent, sudden acceleration.
R Change gear in good time and only use
each gear for up to 2
/ 3 of its maximum
engine speed.
R Switch off the engine in stationary traffic. Returning used vehicles
Mercedes-Benz will take back your
Mercedes-Benz to dispose of it in an environ-
mentally-responsible manner, in accordance
with the European Union (EU) End of Life
Vehicles Directive.
The End of Life Vehicles Directive applies to
vehicles of up to 3.5 t gross vehicle weight, in
accordance with national regulations. For
several years, Mercedes-Benz has been
meeting all the legal requirements for a
design which allows for recycling and re-use.
There is a network of return points and dis-
assembly plants which can recycle your vehi-
cle in an environmentally-responsible man-
ner. The options for recycling vehicles and
parts are constantly being developed and
improved. This means that your Mercedes-
Benz will also continue to meet even the
increased recycling quotas in the future in
good time. You can obtain further information
from your national Mercedes-Benz homepage
or your national hotline number. Introduction
211_AKB; 2; 5, en-GB
mkalafa,
Version: 2.9.4 2008-02-29T16:57:07+01:00 - Seite 16Dateiname: 6515_3416_02_buchblock.pdf; preflight
Page 24 of 401
Exterior view
21Function Page
1 Luggage compartment/
boot Opening and closing 70
Spare wheel 254
Vehicle tool kit 254
Vehicle battery 329
2 Rear lights
311
3 Rear window heating
175
4 Fuel filler flap
218
Fuel requirements 219
5 Opening and closing the
doors 66
6 Demisting the windscreen
174
Cleaning the windows 246
7
Sliding/tilting sunroof* 180
Panorama sliding sunroof*
183 Function Page
8 Exterior mirrors
91
Parking aid* 92
9 Windscreen wipers, opera-
tion
105
Cleaning the wiper blades 246
Replacing the wiper blades 315
a Opening the bonnet
222
Engine oil 223
Coolant 225
b Front lights
311
c Fitting the front towing eye
337
d Tyres and wheels
227
Checking the tyre pressure 229
Flat tyre, fitting the spare
wheel
317
e Fitting the rear towing eye
337 At a glance
* optional
211_AKB; 2; 5, en-GB
mkalafa,
Version: 2.9.4
2008-02-29T16:57:07+01:00 - Seite 21 Dateiname: 6515_3416_02_buchblock.pdf; preflight
Page 30 of 401
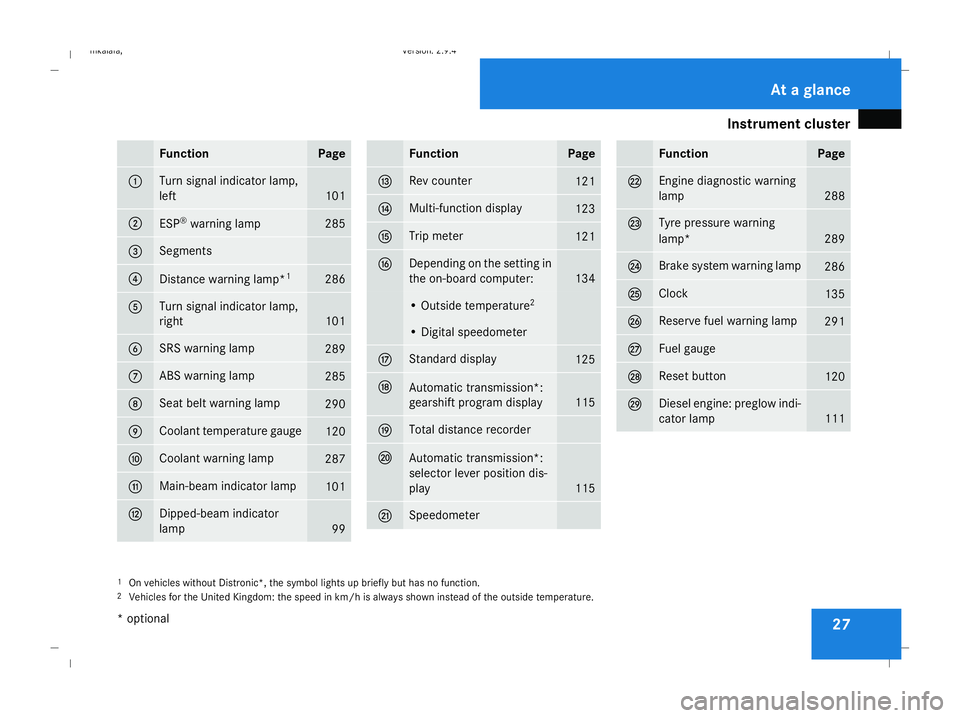
Instrument cluster
27Function Page
1 Turn signal indicator lamp,
left
101
2
ESP
®
warning lamp 285
3 Segments
4
Distance warning lamp*
1 286
5 Turn signal indicator lamp,
right
101
6 SRS warning lamp
289
7 ABS warning lamp
285
8 Seat belt warning lamp
290
9 Coolant temperature gauge
120
a Coolant warning lamp
287
b Main-beam indicator lamp
101
c Dipped-beam indicator
lamp
99 Function Page
d Rev counter
121
e Multi-function display
123
f Trip meter
121
g Depending on the setting in
the on-board computer:
134
• Outside temperature
2 • Digital speedometer
h Standard display
125
j
Automatic transmission*:
gearshift program display
115
k Total distance recorder
l
Automatic transmission*:
selector lever position dis-
play
115
m Speedometer Function Page
n Engine diagnostic warning
lamp
288
o Tyre pressure warning
lamp*
289
p Brake system warning lamp
286
q Clock
135
r Reserve fuel warning lamp
291
s Fuel gauge
t Reset button
120
u Diesel engine: preglow indi-
cator lamp
111
1
On vehicles without Distronic*, the symbol lights up briefly but has no function.
2 Vehicles for the United Kingdom: the speed in km/h is always shown instead of the outside temperature. At a glance
* optional
211_AKB; 2; 5, en-GB
mkalafa,
Version: 2.9.4 2008-02-29T16:57:07+01:00 - Seite 27Dateiname: 6515_3416_02_buchblock.pdf; preflight
Page 32 of 401
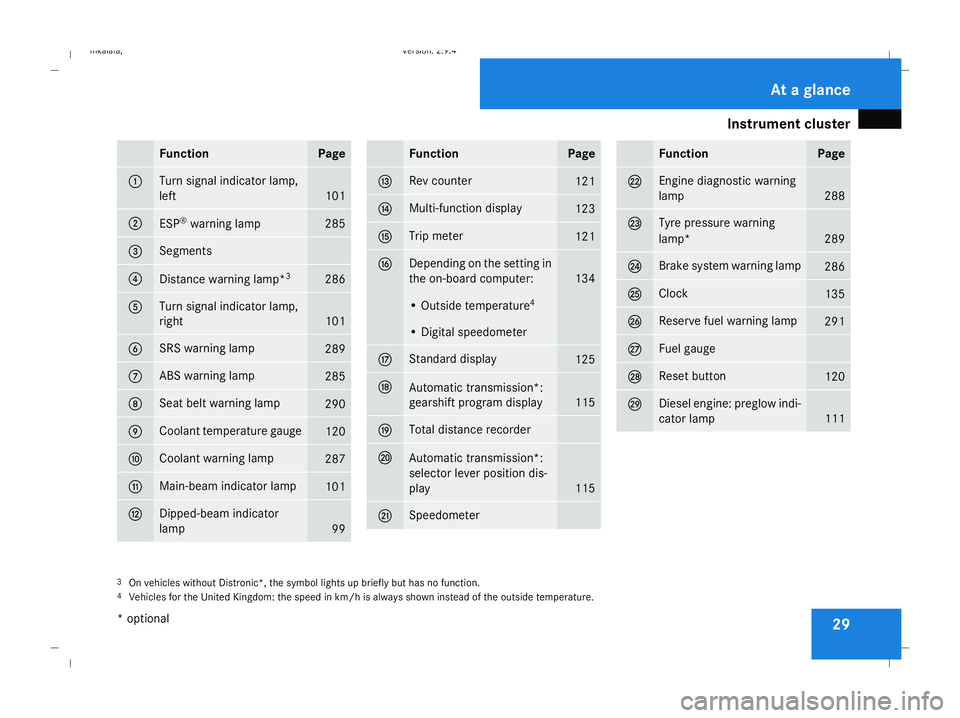
Instrument cluster
29Function Page
1 Turn signal indicator lamp,
left
101
2
ESP
®
warning lamp 285
3 Segments
4
Distance warning lamp*
3 286
5 Turn signal indicator lamp,
right
101
6 SRS warning lamp
289
7 ABS warning lamp
285
8 Seat belt warning lamp
290
9 Coolant temperature gauge
120
a Coolant warning lamp
287
b Main-beam indicator lamp
101
c Dipped-beam indicator
lamp
99 Function Page
d Rev counter
121
e Multi-function display
123
f Trip meter
121
g Depending on the setting in
the on-board computer:
134
• Outside temperature
4 • Digital speedometer
h Standard display
125
j
Automatic transmission*:
gearshift program display
115
k Total distance recorder
l
Automatic transmission*:
selector lever position dis-
play
115
m Speedometer Function Page
n Engine diagnostic warning
lamp
288
o Tyre pressure warning
lamp*
289
p Brake system warning lamp
286
q Clock
135
r Reserve fuel warning lamp
291
s Fuel gauge
t Reset button
120
u Diesel engine: preglow indi-
cator lamp
111
3
On vehicles without Distronic*, the symbol lights up briefly but has no function.
4 Vehicles for the United Kingdom: the speed in km/h is always shown instead of the outside temperature. At a glance
* optional
211_AKB; 2; 5, en-GB
mkalafa,
Version: 2.9.4 2008-02-29T16:57:07+01:00 - Seite 29Dateiname: 6515_3416_02_buchblock.pdf; preflight
Page 122 of 401
Transmission
119
currently selected and engaged is shown in
the display.
Upshifting
X
Briefly press the selector lever to the right
towards D+
or
X Pull the right-hand steering wheel gearshift
paddle (Y page 118).
The automatic transmission shifts up to the
next gear.
Vehicles with AMG engines
! In manual gearshift program M, the auto-
matic transmission does not shift up auto-
matically even when the limiting speed for
the current gear is reached. When the lim-
iting speed is reached, the fuel supply is cut
to prevent the engine from overrevving.
You must make sure that the engine speed
does not reach the red area of the rev coun-
ter. There is otherwise a risk of engine
damage.
X Shift up a gear when the ^upshift symbol
appears in the display instead of M.
When the AMG display is switched on, the
display colour changes to red and UPappears next to the gear indicator, instructing you to
shift up.
Downshifting G
Risk of accident
Do not change down for additional engine
braking on a slippery road surface. This
could cause the drive wheels to lose their
grip and the vehicle could skid.
X Briefly press the selector lever to the left
towards D-
or
X Pull the left-hand steering wheel gearshift
paddle (Y page 118).
The automatic transmission shifts down to
the next gear.
i For maximum acceleration, pull the left-
hand steering wheel gearshift paddle until
the transmission selects the optimum gear
for the current speed.
Kickdown
i It is not possible to use kickdown in the
manual gearshift program Mon vehicles
with AMG engines. You can also use kickdown for maximum
acceleration in manual gearshift program
M.
X Depress the accelerator pedal beyond the
pressure point.
The transmission shifts to a lower gear
depending on the engine speed.
i It is not possible to shift gears using the
steering wheel gearshift paddles during
kickdown. Controls
211_AKB; 2; 5, en-GB
mkalafa
,V ersion: 2.9.4
2008-02-29T16:57:07+01:00 - Seite 119 ZDateiname: 6515_3416_02_buchblock.pdf; preflight
Page 221 of 401
Refuelling
218 Running-in notes
The first 1,500 km
If you treat the engine with sufficient care
from the very start, it will reward you with
excellent performance for a very long period
afterwards.
R You should therefore drive at varying road
and engine speeds for the first 1,500 km.
R Avoid heavy loads, e.g. driving at full throt-
tle, during this time. Do not exceed 2
/ 3 of
the maximum permissible engine speed for
each gear.
R Change gear in good time.
R Do not shift down a gear manually in order
to brake.
Vehicles with automatic transmission*:
R Try to avoid depressing the accelerator
pedal beyond the pressure point (kick-
down).
R Only use ranges 3,2or 1for slow driving,
e.g. in mountainous terrain.
After 1,500 km you may gradually bring the
vehicle up to full road and engine speeds.
Additional driving tips for AMG vehicles: R
Do not drive faster than 140 km/h for the
first 1,500 km.
R Only bring the engine up to a maximum
speed of 4,500 rpm for a brief period.
i You should also observe these notes if the
engine or rear axle transmission on your
vehicle has been replaced. AMG vehicles with a rear axle differ-
ential lock*
Your vehicle is equipped with a self-locking
differential on the rear axle. To better protect
the differential gear on the rear axle, you
should perform an oil change after a running-
in phase of 3,000 km. This oil change will
increase the service life of your differential.
Have the oil change performed at a qualified
specialist workshop. Mercedes-Benz recom-
mends that you use a Mercedes-Benz Service
Centre for this purpose. Refuelling
Refuelling
G
Risk of explosion
Fuel is highly flammable. Fire, naked flames
and smoking are therefore prohibited when
handling fuels.
Switch off the engine and the auxiliary heat-
ing* before refuelling. G
Risk of injury
Do not come into direct contact with fuel.
Direct skin contact with fuels or the inha-
lation of fuel vapours is a health hazard. G
Risk of fire
Do not use petrol to refuel vehicles with a
diesel engine. Never mix diesel with petrol.
This causes damage to the fuel system and
engine and could result in the vehicle catch-
ing fire.
! Do not use petrol to refuel vehicles with a
diesel engine. Do not use diesel to refuel
vehicles with a petrol engine. Even small
amounts of the wrong fuel will cause dam-
age to the injection system. Damage result-
ing from adding the wrong fuel is not
covered by the warranty. Operation
* optional
211_AKB; 2; 5, en-GB
mkalafa
,V ersion: 2.9.4
2008-02-29T16:57:07+01:00 - Seite 218 Dateiname: 6515_3416_02_buchblock.pdf; preflight
Page 222 of 401
Refuelling
219
!
If the wrong fuel has been added by mis-
take, do not switch on the ignition. If you
do, the fuel could enter the fuel lines. The
tank and the fuel lines would then have to
be emptied. Inform a qualified specialist
workshop and have the tank and the fuel
lines emptied completely.
When you open or close the vehicle with the
key or KEYLESS GO*, the fuel filler flap is
automatically unlocked or locked.
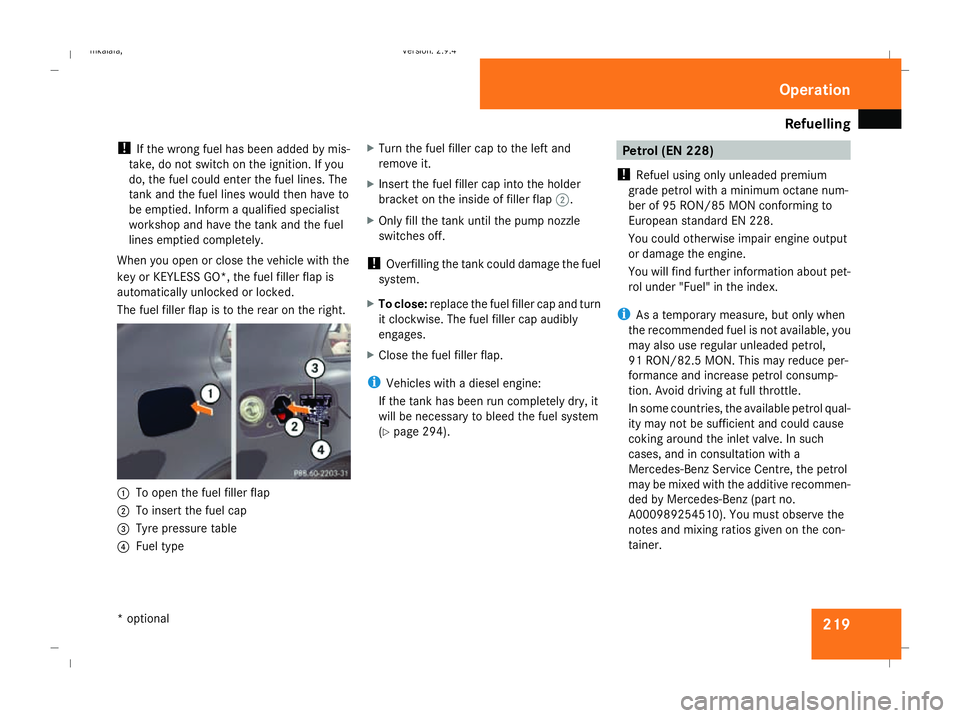
The fuel filler flap is to the rear on the right. 1
To open the fuel filler flap
2 To insert the fuel cap
3 Tyre pressure table
4 Fuel type X
Turn the fuel filler cap to the left and
remove it.
X Insert the fuel filler cap into the holder
bracket on the inside of filler flap 2.
X Only fill the tank until the pump nozzle
switches off.
! Overfilling the tank could damage the fuel
system.
X To close: replace the fuel filler cap and turn
it clockwise. The fuel filler cap audibly
engages.
X Close the fuel filler flap.
i Vehicles with a diesel engine:
If the tank has been run completely dry, it
will be necessary to bleed the fuel system
(Y page 294). Petrol (EN 228)
! Refuel using only unleaded premium
grade petrol with a minimum octane num-
ber of 95 RON/85 MON conforming to
European standard EN 228.
You could otherwise impair engine output
or damage the engine.
You will find further information about pet-
rol under "Fuel" in the index.
i As a temporary measure, but only when
the recommended fuel is not available, you
may also use regular unleaded petrol,
91 RON/82.5 MO N. Thismay reduce per-
formance and increase petrol consump-
tion. Avoid driving at full throttle.
In some countries, the available petrol qual-
ity may not be sufficient and could cause
coking around the inlet valve. In such
cases, and in consultation with a
Mercedes-Benz Service Centre, the petrol
may be mixed with the additive recommen-
ded by Mercedes-Benz (part no.
A000989254510). You must observe the
notes and mixing ratios given on the con-
tainer. Operation
* optional
211_AKB; 2; 5, en-GB
mkalafa,
Version: 2.9.4 2008-02-29T16:57:07+01:00 - Seite 219 ZDateiname: 6515_3416_02_buchblock.pdf; preflight
Page 233 of 401
Tyres and wheels
230
If the vehicle is to be heavily laden or driven
at high speeds, the tyre pressure must be
adapted according to the specifications given
in the fuel filler flap (Y page 218).
Use the highest specified tyre pressure for
the spare wheel*. G
Risk of accident
Should the tyre pressure drop repeatedly:
R Check the tyre for foreign bodies.
R Check whether the wheel is losing air or
the valve is leaking.
Tyre pressure that is too low has a negative
effect on the vehicle’s active safety, which
could lead to your causing an accident.
Tyre pressure changes by approximately
0.1 bar for every 10 °C change in ambient
temperature.
If you measure the tyre pressure in enclosed
spaces where the temperature differs from
the outside temperature, you will have to cor-
rect the measured value accordingly.
When the vehicle is driven, the tyre tempera-
ture, and with it the tyre pressure, will
increase depending on the road speed and
the load on the tyres. Therefore, you should only correct tyre pres-
sures when the tyres are cold.
The pressure of warm tyres should only be
corrected if it is too low for the current oper-
ating conditions.
You will find a table of tyre pressures for var-
ious operating conditions on the inside of
your vehicle's fuel filler flap.
Driving with tyre pressure that is too high or
too low can:
R shorten the service life of the tyres
R cause increased tyre damage
R have a negative effect on handling charac-
teristics (e.g. by causing aquaplaning)
E 350 CGI 31
/E 300 BLUETEC: the values on
the tyre pressure information label (fuel filler
flap) are for the use of the vehicle in partially
laden and fully laden condition whilst driving
at maximum speed.
Despite what is stated on the tyre pressure
information label, for speeds up to
210 km/h the values stated can be reduced
as follows, without a reduction in safety:
-0.4 bar /-6 psi: E 350 CGI
-0.3 bar/-4 psi: E 300 BLUETEC This improves the ride comfort of your vehi-
cle, however the fuel consumption could
increase slightly.
Also check the tyre pressure of the spare
wheel*. H
Environmental note
Check the tyre pressure regularly, at least
every 14 days. Tyre pressure loss warning system
G
Risk of accident
The tyre pressure loss warning system does
not warn you of an incorrectly set tyre pres-
sure. The table on the inside of the fuel filler
flap will help you decide whether the tyre
pressures should be corrected.
The tyre pressure loss warning system does
not replace the need to regularly check
your vehicle's tyre pressures, since an even
loss of pressure on several tyres at the
same time cannot be detected by the tyre
pressure loss warning system.
The tyre pressure loss warning system is
not able to warn you of a sudden loss of
31 Only for certain countries. Operation
* optional
211_AKB; 2; 5, en-GB
mkalafa
,V ersion: 2.9.4
2008-02-29T16:57:07+01:00 - Seite 230 Dateiname: 6515_3416_02_buchblock.pdf; preflight