door lock MERCEDES-BENZ E-CLASS SALOON 2009 User Guide
[x] Cancel search | Manufacturer: MERCEDES-BENZ, Model Year: 2009, Model line: E-CLASS SALOON, Model: MERCEDES-BENZ E-CLASS SALOON 2009Pages: 373, PDF Size: 12.37 MB
Page 45 of 373
in the event of an accident. Appropriate seat
covers can be obtained from a Mercedes-
Benz Service Centre.
The purpose of pelvisbag deployment is to
enhance the level of protection of the vehicle
occupants on the side of the vehicle on which
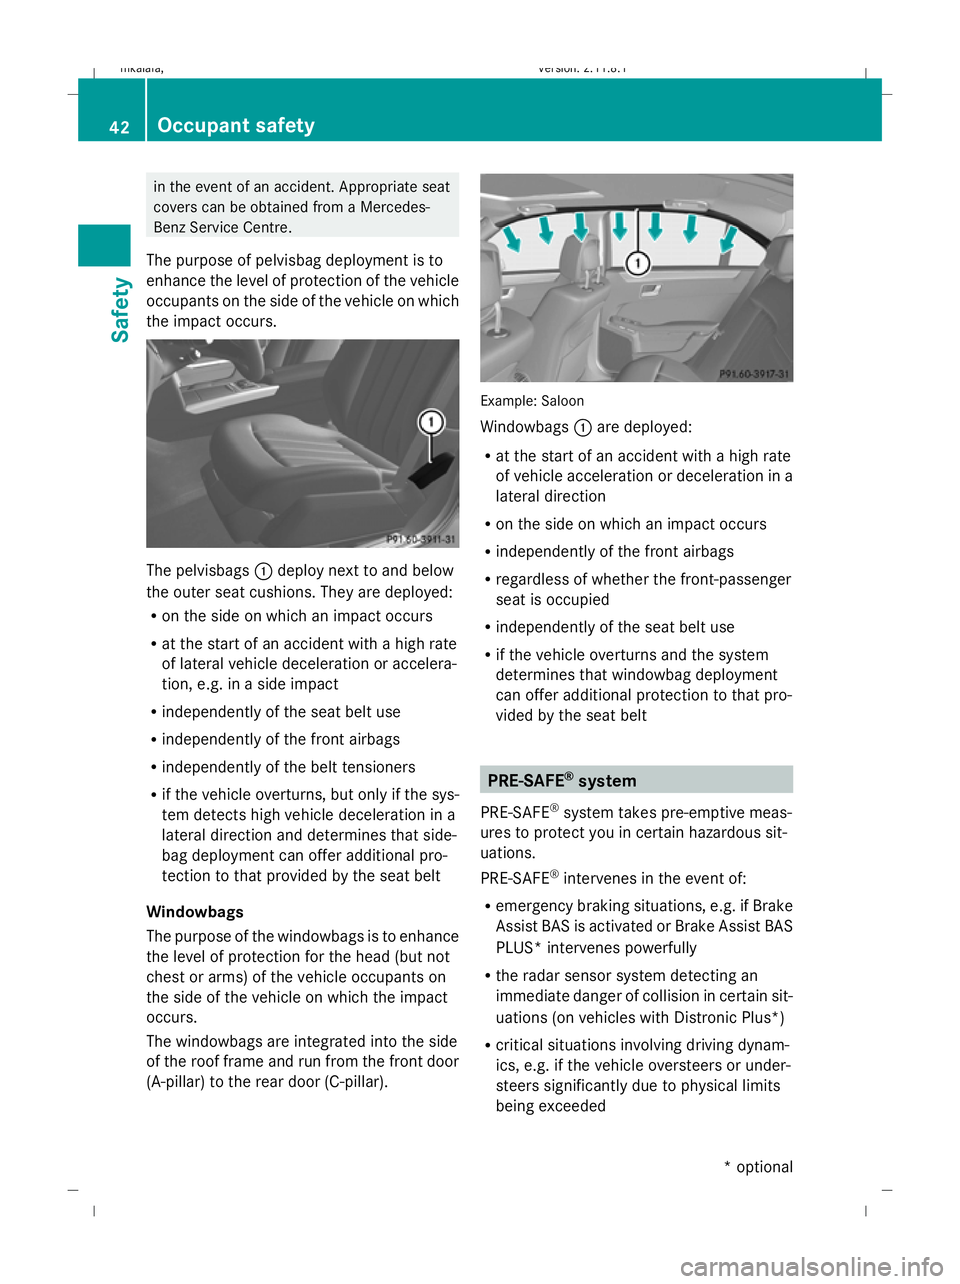
the impact occurs. The pelvisbags
:deploy next to and below
the outer seat cushions. They are deployed:
R on the side on which an impact occurs
R at the start of an accident with a high rate
of lateral vehicle deceleration or accelera-
tion, e.g. in a side impact
R independently of the seat belt use
R independently of the front airbags
R independently of the belt tensioners
R if the vehicle overturns, but only if the sys-
tem detects high vehicle deceleration in a
lateral direction and determines that side-
bag deployment can offer additional pro-
tection to that provided by the seat belt
Windowbags
The purpose of the windowbags is to enhance
the level of protection for the head (but not
chest or arms) of the vehicle occupants on
the side of the vehicle on which the impact
occurs.
The windowbags are integrated into the side
of the roof frame and run from the front door
(A-pillar) to the rear door (C-pillar). Example: Saloon
Windowbags
:are deployed:
R at the start of an accident with a high rate
of vehicle acceleration or deceleration in a
lateral direction
R on the side on which an impact occurs
R independently of the front airbags
R regardless of whether the front-passenger
seat is occupied
R independently of the seat belt use
R if the vehicle overturns and the system
determines that windowbag deployment
can offer additional protection to that pro-
vided by the seat belt PRE-SAFE
®
system
PRE-SAFE ®
system takes pre-emptive meas-
ures to protect you in certain hazardous sit-
uations.
PRE-SAFE ®
intervenes in the event of:
R emergency braking situations, e.g. if Brake
Assist BAS is activated or Brake Assist BAS
PLUS* intervenes powerfully
R the radar sensor system detecting an
immediate danger of collision in certain sit-
uations (on vehicles with Distronic Plus*)
R critical situations involving driving dynam-
ics, e.g. if the vehicle oversteers or under-
steers significantly due to physical limits
being exceeded 42
Occupant safetySafety
* optional
212_AKB; 2; 4, en-GB
mkalafa,
Version: 2.11.8.1
2009-05-05T14:17:16+02:00 - Seite 42
Dateiname: 6515346702_buchblock.pdf; erzeugt am 07. May 2009 14:15:38; WK
Page 47 of 373

If a child opens a door, the child or other per-
sons could be injured as a result. The child
could get out and be injured in the process or
be injured by a passing vehicle. G
Risk of injury
An unsecured or an incorrectly positioned
load increases the risk of injury for the child
and all other occupants, during:
R an accident
R a braking manoeuvre
R a sudden change of direction
Do not carry heavy or hard objects inside the
vehicle unless they are secured. You will find
further information under "Loading guide-
lines" in the index.
Child restraint systems Mercedes-Benz recommends that you only
use the child restraint systems listed on
(Y page 49). G
Risk of injury
To reduce the risk of serious or even fatal
injury to the child in the event of a sudden
change in direction, braking or an accident:
R children less than 1.50 m tall and under
twelve years of age must always be secured
in special child restraint systems on a suit-
able vehicle seat. This is necessary
because the seat belts are not designed for
children of this size.
R do not secure children less than 1.50 m tall
or under twelve years of age on the front-
passenger seat. Exception: the child is
secured in a vehicle with automatic child
seat recognition on the front-passenger
seat* and is secured in a child restraint
system with automatic child seat recogni-
tion.
R if you secure a forward-facing child
restraint system to the front-passenger seat, you must move the front-passenger
seat as far back as possible.
R children must never travel sitting on the lap
of another occupant. Due to the forces
occurring in the event of a sudden change
of direction, heavy braking or an accident,
it would not be possible to restrain the
child. The child could be thrown against
parts of the vehicle interior and be seriously
or even fatally injured. G
Risk of injury
The child restraint system cannot perform its
protective function if it is not correctly fitted
to a suitable vehicle seat. The child cannot be
restrained in the event of a sudden change of
direction, heavy braking or an accident. This
may lead to serious or even fatal injuries. For
this reason, when fitting a child restraint sys-
tem, observe the manufacturer's installation
instructions and the correct use of the child
restraint system.
Child restraint systems should be fitted to the
rear seats. Children are generally better pro-
tected there.
The entire base of the child restraint system
must always rest on the seat cushion. Never
place objects, e.g. a cushion, under the child
restraint system.
Only use child restraint systems with their
original covers. Only replace damaged covers
with genuine Mercedes-Benz covers.
For safety reasons, you should only use child
restraint systems which have been approved
for use in Mercedes-Benz vehicles. 44
Occupant safetySafety
* optional
212_AKB; 2; 4, en-GB
mkalafa
,V ersion: 2.11.8.1
2009-05-05T14:17:16+02:00 - Seite 44
Dateiname: 6515346702_buchblock.pdf; erzeugt am 07. May 2009 14:15:38; WK
Page 48 of 373
Child seat on the front-passenger seat
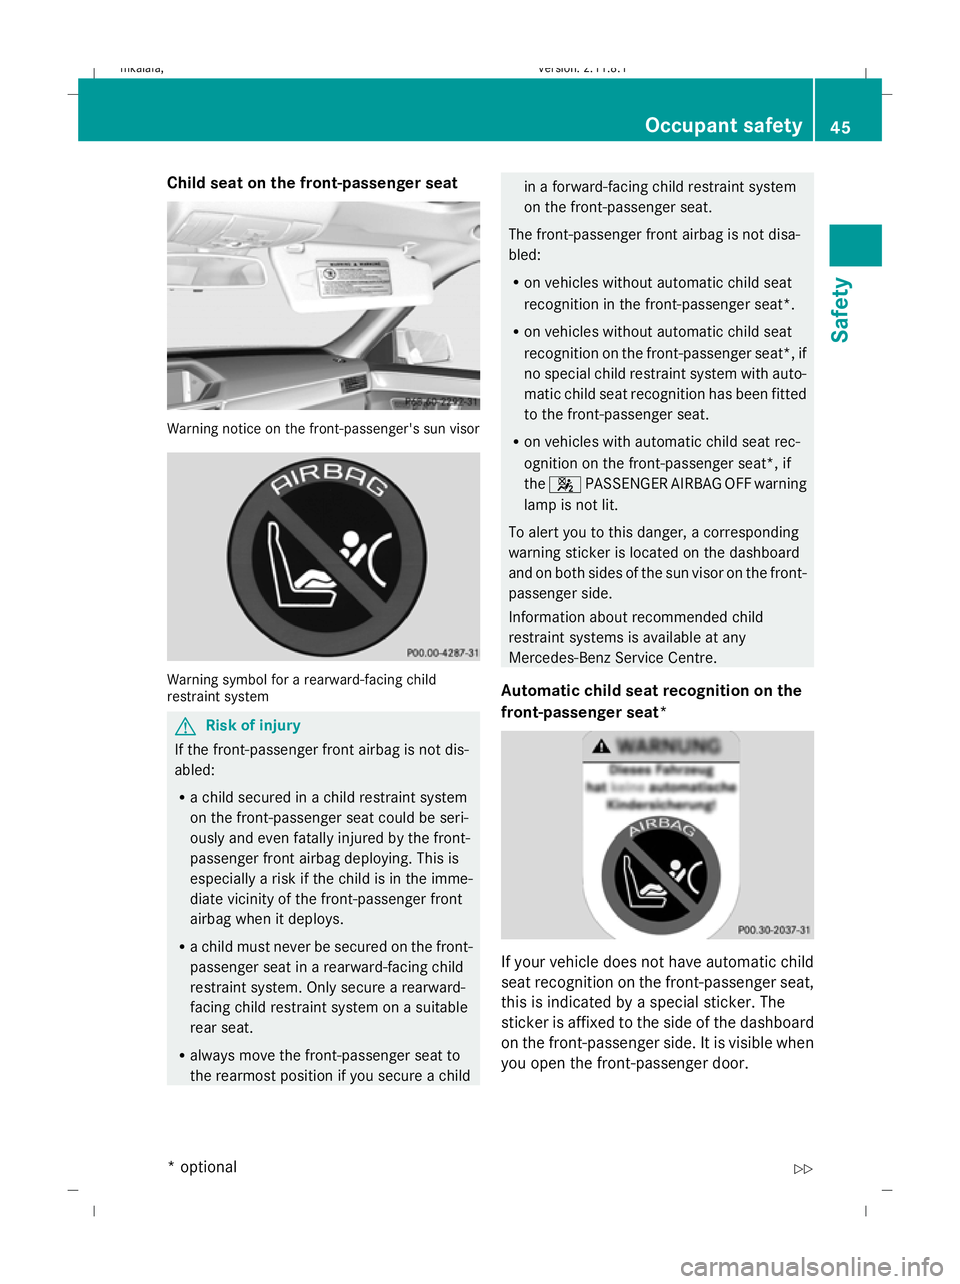
Warning notice on the front-passenger's sun visor
Warning symbol for a rearward-facing child
restraint system
G
Risk of injury
If the front-passenger front airbag is not dis-
abled:
R a child secured in a child restraint system
on the front-passenger seat could be seri-
ously and even fatally injured by the front-
passenger front airbag deploying. This is
especially a risk if the child is in the imme-
diate vicinity of the front-passenger front
airbag when it deploys.
R a child must never be secured on the front-
passenger seat in a rearward-facing child
restraint system. Only secure a rearward-
facing child restraint system on a suitable
rear seat.
R always move the front-passenger seat to
the rearmost position if you secure a child in a forward-facing child restraint system
on the front-passenger seat.
The front-passenger front airbag is not disa-
bled:
R on vehicles without automatic child seat
recognition in the front-passenger seat *.
R on vehicles without automatic child seat
recognition on the front-passenger seat*, if
no special child restraint system with auto-
matic child seat recognition has been fitted
to the front-passenger seat.
R on vehicles with automatic child seat rec-
ognition on the front-passenger seat*, if
the 4 PASSENGER AIRBAG OFF warning
lamp is not lit.
To alert you to this danger, a corresponding
warning sticker is located on the dashboard
and on both sides of the sun visor on the front-
passenger side.
Information about recommended child
restraint systems is available at any
Mercedes-Benz Service Centre.
Automatic child seat recognition on the
front-passenger seat* If your vehicle does not have automatic child
seat recognition on the front-passenger seat,
this is indicated by a special sticker. The
sticker is affixed to the side of the dashboard
on the front-passenger side. It is visible when
you open the front-passenger door. Occupant safety
45Safety
* optional
212_AKB; 2; 4, en-GB
mkalafa,
Version: 2.11.8.1 2009-05-05T14:17:16+02:00 - Seite 45 Z
Dateiname: 6515346702_buchblock.pdf; erzeugt am 07. May 2009 14:15:38; WK
Page 57 of 373
or damaged. For instance, this may occur
when you close the doors, adjust the seat,
stow away the padded table* and the side
head restraints or transport heavy items.
R replace the integrated child seat, the pad-
ded table* and the side head restraints if
these were damaged or subjected to heavy
loads during an accident.
R bear in mind that children weighing less
than 12.5 kg require a different child
restraint system. Information about other
child restraint systems is available from any
Mercedes-Benz Service Centre.
R the rear seat backrest in the vehicle must
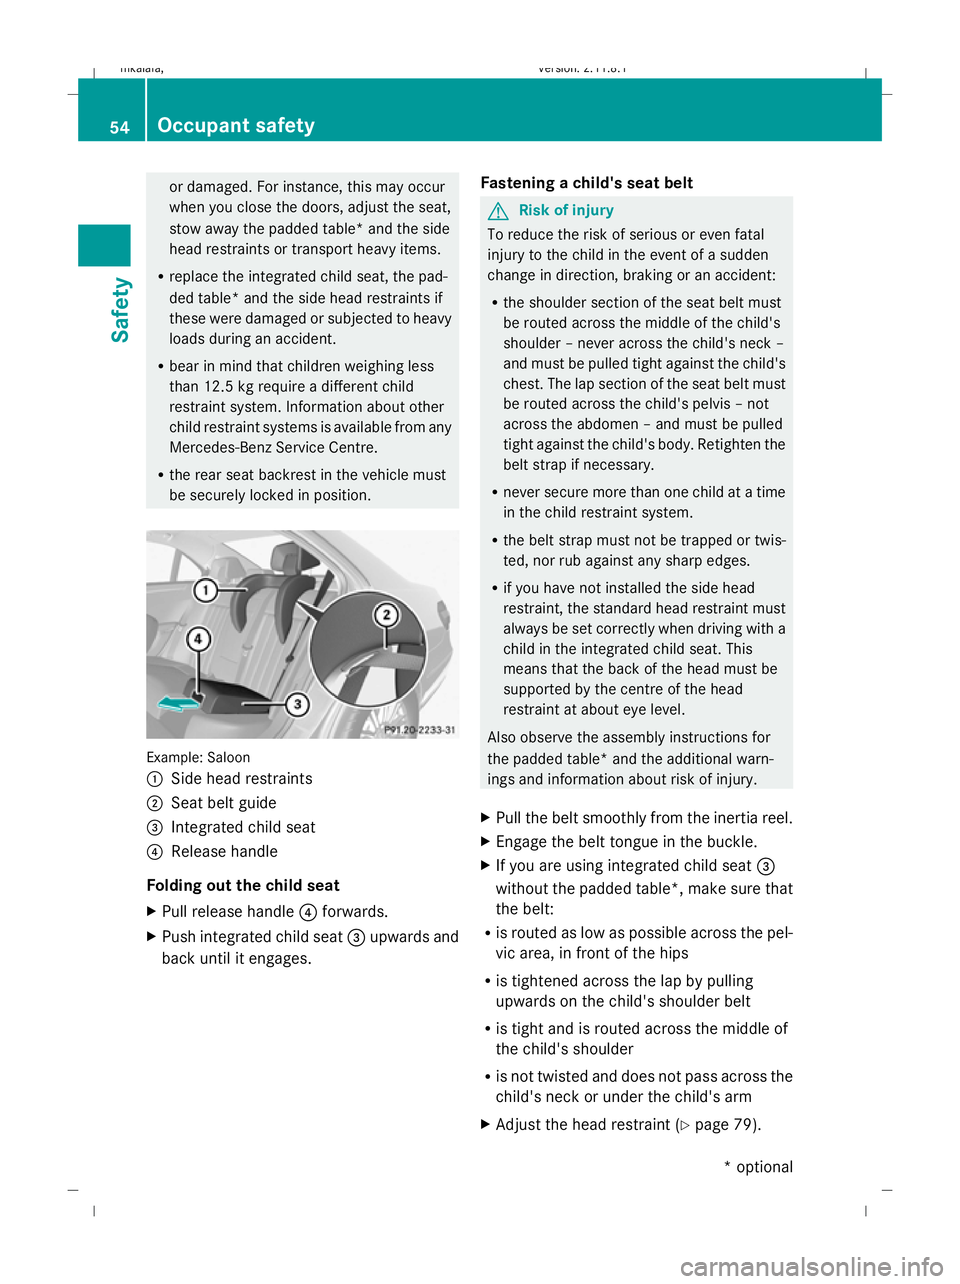
be securely locked in position. Example: Saloon
:
Side head restraints
; Seat belt guide
= Integrated child seat
? Release handle
Folding out the child seat
X Pull release handle ?forwards.
X Push integrated child seat =upwards and
back until it engages. Fastening a child's seat belt G
Risk of injury
To reduce the risk of serious or even fatal
injury to the child in the event of a sudden
change in direction, braking or an accident:
R the shoulder section of the seat belt must
be routed across the middle of the child's
shoulder – never across the child's neck –
and must be pulled tight against the child's
chest. The lap section of the seat belt must
be routed across the child's pelvis – not
across the abdomen – and must be pulled
tight against the child's body. Retighten the
belt strap if necessary.
R never secure more than one child at a time
in the child restraint system.
R the belt strap must not be trapped or twis-
ted, nor rub against any sharp edges.
R if you have not installed the side head
restraint, the standard head restraint must
always be set correctly when driving with a
child in the integrated child seat. This
means that the back of the head must be
supported by the centre of the head
restraint at about eye level.
Also observe the assembly instructions for
the padded table* and the additional warn-
ings and information about risk of injury.
X Pull the belt smoothly from the inertia reel.
X Engage the belt tongue in the buckle.
X If you are using integrated child seat =
without the padded table*, make sure that
the belt:
R is routed as low as possible across the pel-
vic area, in front of the hips
R is tightened across the lap by pulling
upwards on the child's shoulder belt
R is tight and is routed across the middle of
the child's shoulder
R is not twisted and does not pass across the
child's neck or under the child's arm
X Adjust the head restraint (Y page 79).54
Occupant safetySafety
* optional
212_AKB; 2; 4, en-GB
mkalafa,
Version: 2.11.8.1 2009-05-05T14:17:16+02:00 - Seite 54
Dateiname: 6515346702_buchblock.pdf; erzeugt am 07. May 2009 14:15:41; WK
Page 60 of 373
X
Guide the seat belt through seat belt guide
A on the door side on side head restraint
B.
X Secure the child using the seat belt
(Y page 53).
Removing the side head restraints
X Take the seat belt out of seat belt guide
A.
X Move head restraint ;upwards.
X Press left or right release button ?and pull
side head restraint Bforward to remove
it.
Left-hand and right-hand lock verification
indicators :fold out briefly.
X Adjust head restraints ;(Ypage 79).
Storing the padded table and the side
head restraint G
Risk of injury
If the padded table and the side head
restraints are not secured in the vehicle as
specified, they may come loose. In the event
of an accident, sudden braking or abrupt
change in direction, they could injure vehicle
occupants or cause damage to the vehicle.
Secure the padded table in the vehicle as
specified.
On vehicles with TIREFIT kit, the side head
restraints can be stored in the stowage com-
partment under the boot/luggage compart-
ment floor (Y page 204)/(Y page 204).
Child-proof locks If children are travelling in the vehicle, you can
activate the child-proof locks for the rear
doors.
Child-proof locks for the rear doors
The child-proof locks on the rear doors enable
you to secure each door individually. A locked
door cannot be opened from the inside. The
door can be opened from the outside if the
vehicle is unlocked. G
Risk of accident and injury
Activate the child-proof locks for the rear
doors and the override switch for the rear
windows if children are travelling in the vehi-
cle. Otherwise, the children could open doors
or windows while the vehicle is in motion and
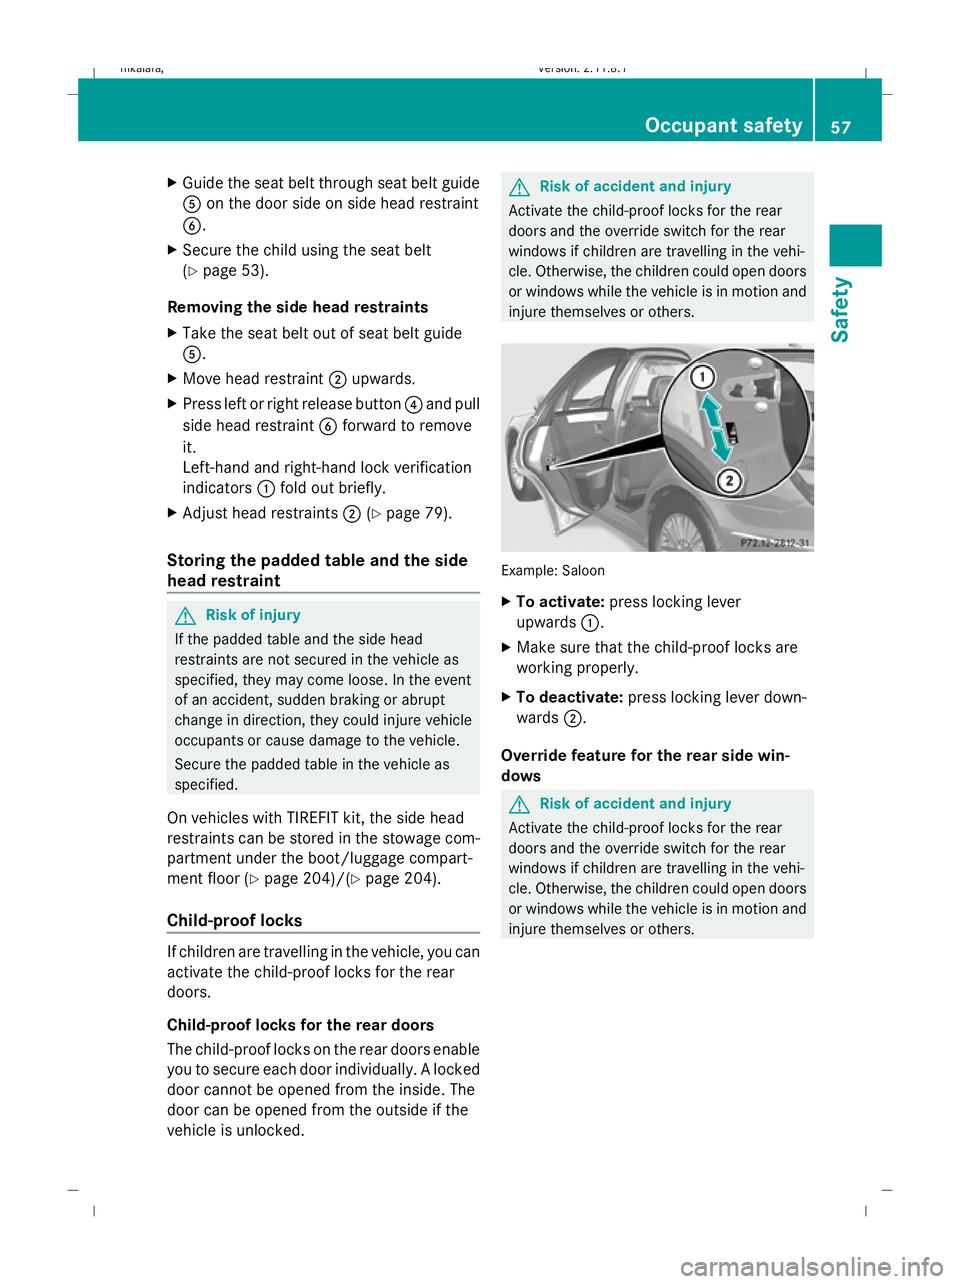
injure themselves or others. Example: Saloon
X
To activate: press locking lever
upwards :.
X Make sure that the child-proof locks are
working properly.
X To deactivate: press locking lever down-
wards ;.
Override feature for the rear side win-
dows G
Risk of accident and injury
Activate the child-proof locks for the rear
doors and the override switch for the rear
windows if children are travelling in the vehi-
cle. Otherwise, the children could open doors
or windows while the vehicle is in motion and
injure themselves or others. Occupant safety
57Safety
212_AKB; 2; 4, en-GB
mkalafa,V ersion: 2.11.8.1
2009-05-05T14:17:16+02:00 - Seite 57 Z
Dateiname: 6515346702_buchblock.pdf; erzeugt am 07. May 2009 14:15:42; WK
Page 61 of 373
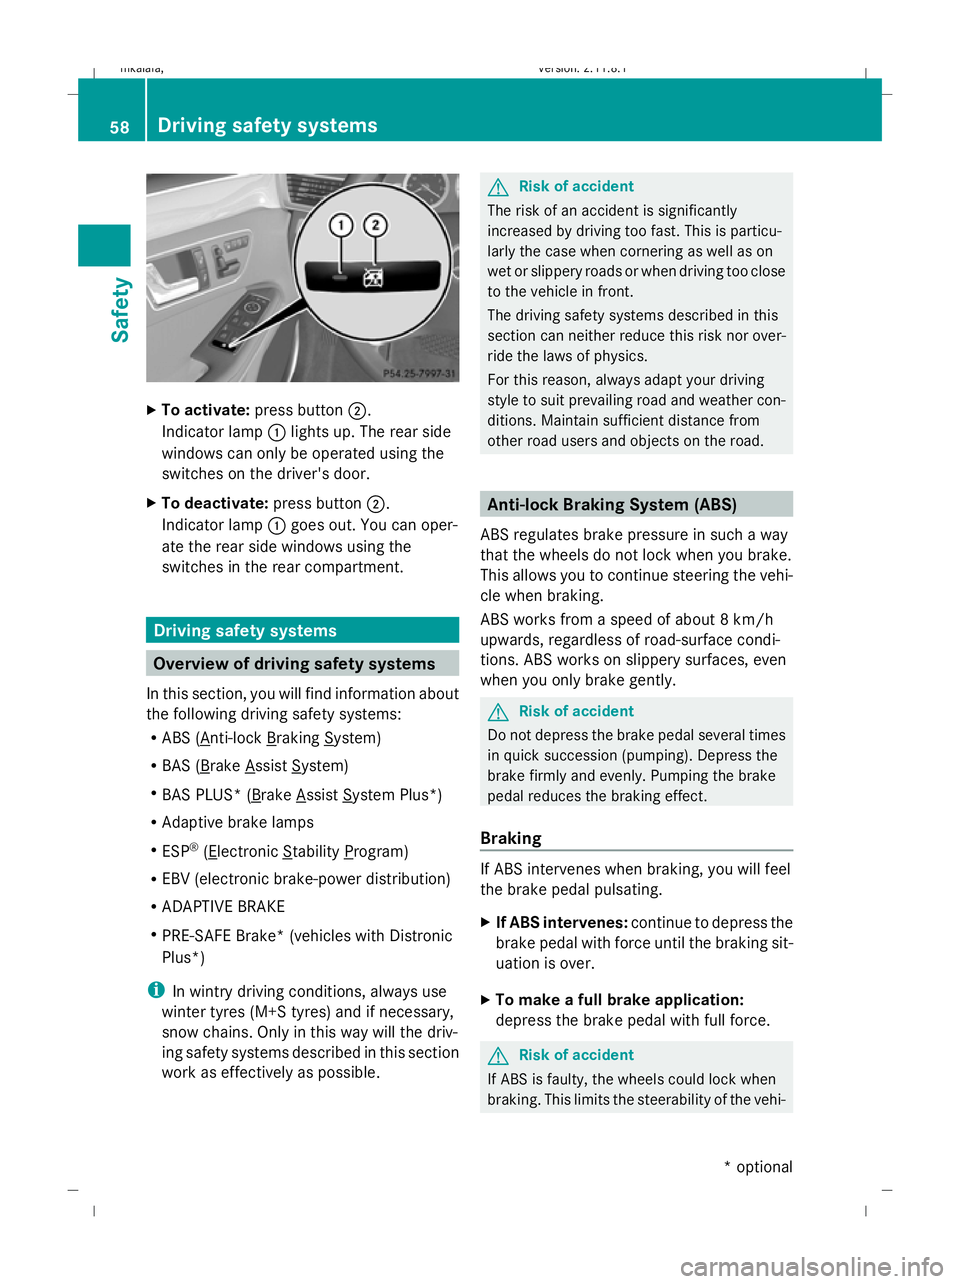
X
To activate: press button ;.
Indicator lamp :lights up. The rear side
windows can only be operated using the
switches on the driver's door.
X To deactivate: press button;.
Indicator lamp :goes out. You can oper-
ate the rear side windows using the
switches in the rear compartment. Driving safety systems
Overview of driving safety systems
In this section, you will find information about
the following driving safety systems:
R ABS ( Anti-lock Braking System)
R BAS ( Brake Assist System)
R BAS PLUS* ( Brake Assist System Plus*)
R Adaptive brake lamps
R ESP ®
( Electronic Stability Program)
R EBV (electronic brake-power distribution)
R ADAPTIVE BRAKE
R PRE-SAFE Brake* (vehicles with Distronic
Plus*)
i In wintry driving conditions, always use
winter tyres (M+S tyres) and if necessary,
snow chains. Only in this way will the driv-
ing safety systems described in this section
work as effectively as possible. G
Risk of accident
The risk of an accident is significantly
increased by driving too fast. This is particu-
larly the case when cornering as well as on
wet or slippery roads or when driving too close
to the vehicle in front.
The driving safety systems described in this
section can neither reduce this risk nor over-
ride the laws of physics.
For this reason, always adapt your driving
style to suit prevailing road and weather con-
ditions. Maintain sufficient distance from
other road users and objects on the road. Anti-lock Braking System (ABS)
ABS regulates brake pressure in such a way
that the wheels do not lock when you brake.
This allows you to continue steering the vehi-
cle when braking.
ABS works from a speed of about 8 km/h
upwards, regardless of road-surface condi-
tions. ABS works on slippery surfaces, even
when you only brake gently. G
Risk of accident
Do not depress the brake pedal several times
in quick succession (pumping). Depress the
brake firmly and evenly. Pumping the brake
pedal reduces the braking effect.
Braking If ABS intervenes when braking, you will feel
the brake pedal pulsating.
X
If ABS intervenes: continue to depress the
brake pedal with force until the braking sit-
uation is over.
X To make a full brake application:
depress the brake pedal with full force. G
Risk of accident
If ABS is faulty, the wheels could lock when
braking. This limits the steerability of the vehi- 58
Driving safety systemsSafety
* optional
212_AKB; 2; 4, en-GB
mkalafa,
Version: 2.11.8.1 2009-05-05T14:17:16+02:00 - Seite 58
Dateiname: 6515346702_buchblock.pdf; erzeugt am 07. May 2009 14:15:42; WK
Page 68 of 373

G
Risk of accident
If, in a critical driving situation, you do not
receive a visual and acoustic warning:
R PRE-SAFE ®
Brake did not detect the risk of
a collision
R PRE-SAFE ®
Brake is switched off
R PRE-SAFE ®
Brake has failed
You must then brake to avoid a collision.
X To activate: activate PRE-SAFE ®
Brake in
the on-board computer (Y page 130).
The Ä symbol appears in the lower
multi-function display, as long as the HOLD
function is not activated (Y page 151).
On vehicles with parking guidance*, drive
range Pmust be engaged for the symbol to
be displayed.
The radar sensors are automatically deacti-
vated in the vicinity of radio telescope facili-
ties (Y page 362).
For PRE-SAFE ®
Brake to assist you when driv-
ing, the radar sensor system must be
switched on and operational.
PRE-SAFE ®
Brake does not always detect
complex traffic situations properly. You can
terminate the braking action of PRE-SAFE ®
Brake in a non-critical driving situation at any
time if:
R an acoustic and visual warning occurs
R the vehicle brakes
To end this you can either depress the accel-
erator pedal further, activate kickdown or
release the brake pedal.
The braking action of PRE-SAFE ®
Brake is
ended automatically if:
R you manoeuvre to avoid the obstacle.
R you drive slower than approximately
15 km/h.
R there is no longer an obstacle detected in
front of your vehicle.
R there is no longer any danger of a collision. Following a collision or crash-related damage
to the front end of the vehicle, have the con-
figuration and operation of the radar sensors
checked. Choose a qualified specialist work-
shop for this which has the necessary spe-
cialist knowledge and tools for the work
required. Mercedes-Benz recommends that
you use a Mercedes-Benz Service Centre for
this purpose.
Anti-theft systems
Immobiliser
The immobiliser prevents your vehicle from
being started without the correct key.
Activating the immobiliser X
With the key: remove the key from the
ignition lock.
X With KEYLESS GO*: press the start/stop
button on the dashboard.
The engine switches off.
Deactivating the immobiliser X
With the key: turn the key to position 2in
the ignition lock.
X With KEYLESS GO*: press the start/stop
button on the dashboard twice without
depressing the brake.
i The immobiliser is always deactivated
when you start the engine. ATA* (anti-theft alarm system)
A visual and audible alarm is triggered when
the alarm system is primed and you open:
R a door
R a door or the boot lid with the emergency
key element
R the boot lid/tailgate
R the bonnet Anti-theft systems
65Safety
* optional
212_AKB; 2; 4, en-GB
mkalafa
,V ersion: 2.11.8.1
2009-05-05T14:17:16+02:00 - Seite 65 Z
Dateiname: 6515346702_buchblock.pdf; erzeugt am 07. May 2009 14:15:44; WK
Page 69 of 373

The alarm is not switched off even if you close
a door again. X
To prime: lock the vehicle using the key.
Vehicles with KEYLESS GO* can also be
locked by touching the door handle on the
outside.
Indicator lamp :flashes. The alarm sys-
tem is primed after approximately 15 sec-
onds.
X To deactivate: unlock the vehicle using the
key. Vehicles with KEYLESS GO* can also
be unlocked by opening the door/boot lid/
tailgate.
Deactivating the alarm X
With the key: insert the key into the igni-
tion lock.
The alarm is deactivated.
or
X Press the %or& button on the key.
The alarm is deactivated.
X With KEYLESS GO*: grasp the outside
door handle. The key must be outside the
vehicle.
The alarm is deactivated.
or
X Press the Start/Stop button on the dash-
board. The key must be inside the vehicle.
The alarm is deactivated. Tow-away protection*
An audible and visual alarm is triggered if the
vehicle's angle of inclination is altered while
tow-away protection is primed. For example,
this occurs if the vehicle is jacked up on one
side.
Priming tow-away protection X
Lock the vehicle using the key. Vehicles
with KEYLESS GO* can also be locked by
touching the door handle on the outside.
Tow-away protection is primed after
approximately 30 seconds.
Deactivating tow-away protection When you unlock your vehicle using the key
or KEYLESS GO*, tow-away protection is
automatically deactivated.
Deactivate tow-away protection manually to
prevent a false alarm if your vehicle:
R is being transported
R is being loaded, e.g. onto a ferry or car
transporter
R is parked on a movable surface, e.g. split-
level garages 66
Anti-theft systemsSafety
* optional
212_AKB; 2; 4, en-GB
mkalafa,
Version: 2.11.8.1 2009-05-05T14:17:16+02:00 - Seite 66
Dateiname: 6515346702_buchblock.pdf; erzeugt am 07. May 2009 14:15:44; WK
Page 70 of 373
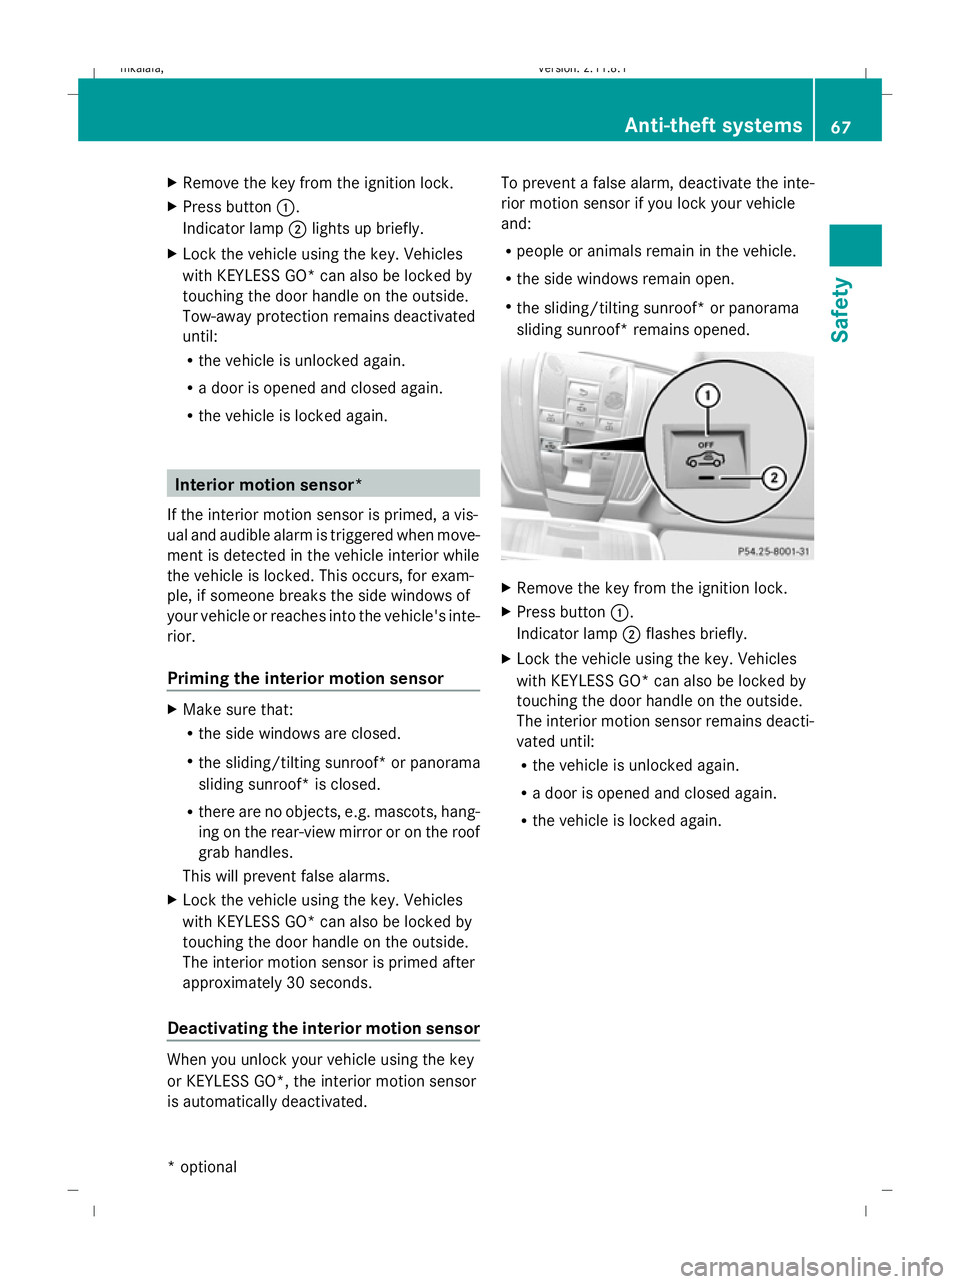
X
Remove the key from the ignition lock.
X Press button :.
Indicator lamp ;lights up briefly.
X Lock the vehicle using the key. Vehicles
with KEYLESS GO* can also be locked by
touching the door handle on the outside.
Tow-away protection remains deactivated
until:
R
the vehicle is unlocked again.
R a door is opened and closed again.
R the vehicle is locked again. Interior motion sensor*
If the interior motion sensor is primed, a vis-
ual and audible alarm is triggered when move-
ment is detected in the vehicle interior while
the vehicle is locked. This occurs, for exam-
ple, if someone breaks the side windows of
your vehicle or reaches into the vehicle's inte-
rior.
Priming the interior motion sensor X
Make sure that:
R
the side windows are closed.
R the sliding/tilting sunroof* or panorama
sliding sunroof* is closed.
R there are no objects, e.g. mascots, hang-
ing on the rear-view mirror or on the roof
grab handles.
This will prevent false alarms.
X Lock the vehicle using the key. Vehicles
with KEYLESS GO* can also be locked by
touching the door handle on the outside.
The interior motion sensor is primed after
approximately 30 seconds.
Deactivating the interior motion sensor When you unlock your vehicle using the key
or KEYLESS GO*, the interior motion sensor
is automatically deactivated. To prevent a false alarm, deactivate the inte-
rior motion sensor if you lock your vehicle
and:
R
people or animals remain in the vehicle.
R the side windows remain open.
R the sliding/tilting sunroof* or panorama
sliding sunroof* remains opened. X
Remove the key from the ignition lock.
X Press button :.
Indicator lamp ;flashes briefly.
X Lock the vehicle using the key. Vehicles
with KEYLESS GO* can also be locked by
touching the door handle on the outside.
The interior motion sensor remains deacti-
vated until:
R the vehicle is unlocked again.
R a door is opened and closed again.
R the vehicle is locked again. Anti-theft systems
67Safety
* optional
212_AKB; 2; 4, en-GB
mkalafa,
Version: 2.11.8.1 2009-05-05T14:17:16+02:00 - Seite 67 Z
Dateiname: 6515346702_buchblock.pdf; erzeugt am 07. May 2009 14:15:45; WK
Page 73 of 373
Opening and closing
Key
The key centrally locks/unlocks:
R the doors
R the boot lid/tailgate
R the fuel filler flap G
Risk of accident
If children are left unsupervised in the vehicle,
they could:
R open a door from the inside at any time,
even if it has been locked
R start the vehicle using a key which has been
left in the vehicle
R release the parking brake
They could thereby endanger themselves and
others. Never leave children unsupervised in
the vehicle. Always take the key with you
when leaving the vehicle, even if you are only
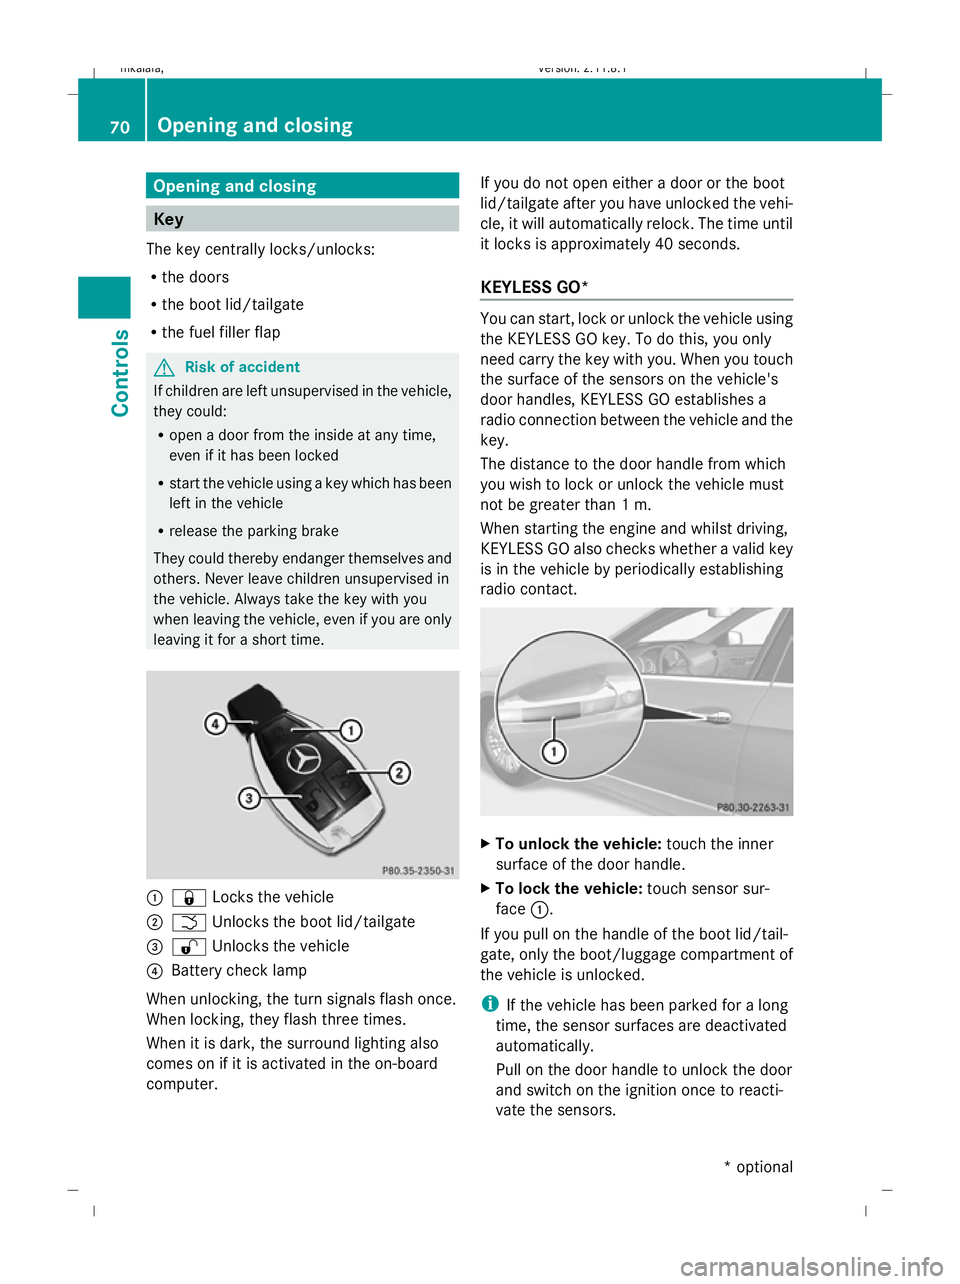
leaving it for a short time. :
& Locks the vehicle
; F Unlocks the boot lid/tailgate
= % Unlocks the vehicle
? Battery check lamp
When unlocking, the turn signals flash once.
When locking, they flash three times.
When it is dark, the surround lighting also
comes on if it is activated in the on-board
computer. If you do not open either a door or the boot
lid/tailgate after you have unlocked the vehi-
cle, it will automatically relock. The time until
it locks is approximately 40 seconds.
KEYLESS GO* You can start, lock or unlock the vehicle using
the KEYLESS GO key. To do this, you only
need carry the key with you. When you touch
the surface of the sensors on the vehicle's
door handles, KEYLESS GO establishes a
radio connection between the vehicle and the
key.
The distance to the door handle from which
you wish to lock or unlock the vehicle must
not be greater than 1 m.
When starting the engine and whilst driving,
KEYLESS GO also checks whether a valid key
is in the vehicle by periodically establishing
radio contact. X
To unlock the vehicle: touch the inner
surface of the door handle.
X To lock the vehicle: touch sensor sur-
face :.
If you pull on the handle of the boot lid/tail-
gate, only the boot/luggage compartment of
the vehicle is unlocked.
i If the vehicle has been parked for a long
time, the sensor surfaces are deactivated
automatically.
Pull on the door handle to unlock the door
and switch on the ignition once to reacti-
vate the sensors. 70
Opening and closingControls
* optional
212_AKB; 2; 4, en-GB
mkalafa,
Version: 2.11.8.1 2009-05-05T14:17:16+02:00 - Seite 70
Dateiname: 6515346702_buchblock.pdf; erzeugt am 07. May 2009 14:15:46; WK