engine compartment MERCEDES-BENZ E-CLASS SALOON 2009 Owner's Manual
[x] Cancel search | Manufacturer: MERCEDES-BENZ, Model Year: 2009, Model line: E-CLASS SALOON, Model: MERCEDES-BENZ E-CLASS SALOON 2009Pages: 373, PDF Size: 12.37 MB
Page 324 of 373
right-hand side when viewed in the direction
of travel.
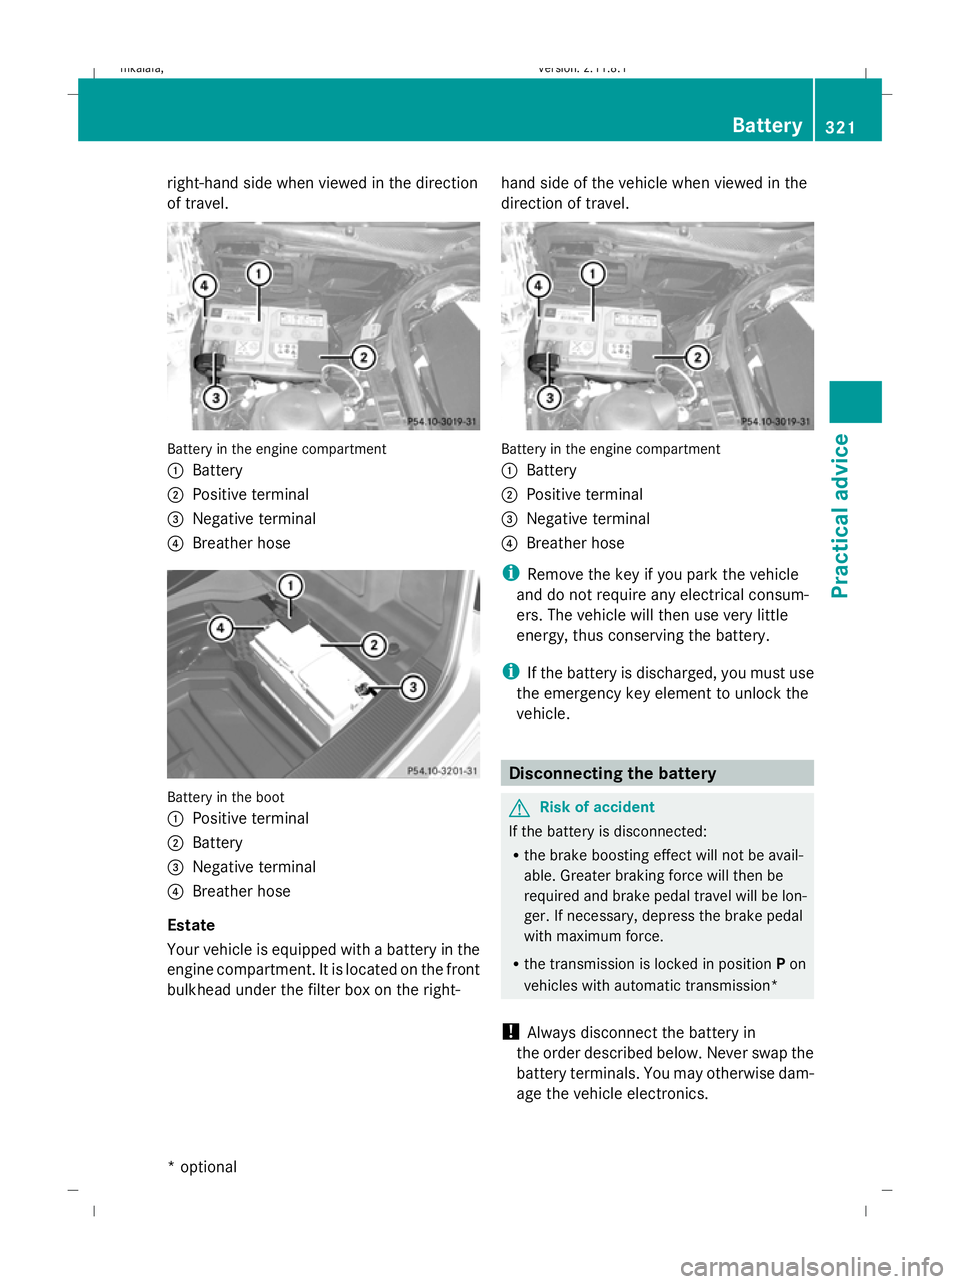
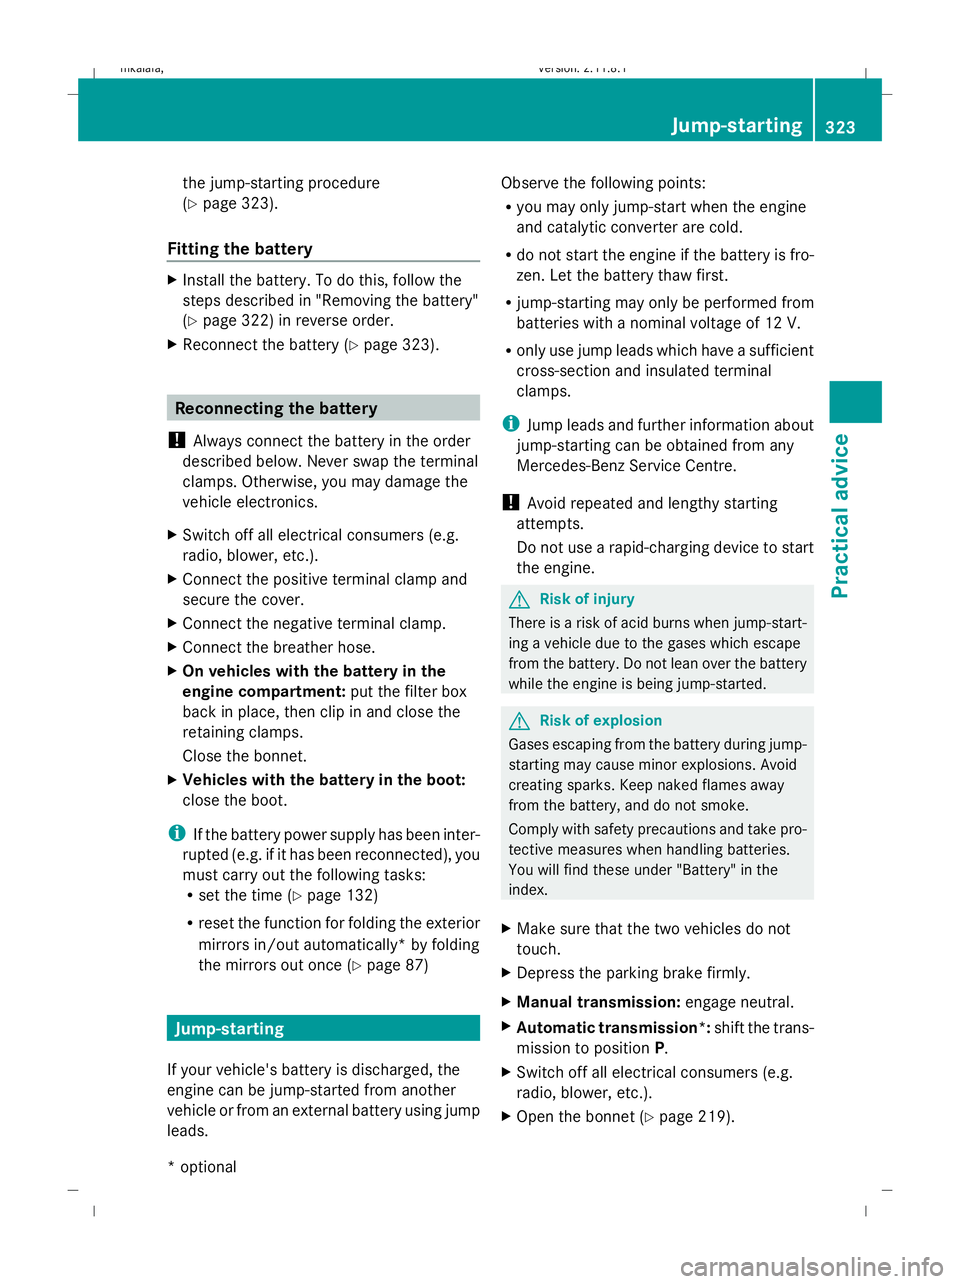
Battery in the engine compartment
:
Battery
; Positive terminal
= Negative terminal
? Breather hose Battery in the boot
:
Positive terminal
; Battery
= Negative terminal
? Breather hose
Estate
Your vehicle is equipped with a battery in the
engine compartment. It is located on the front
bulkhead under the filter box on the right- hand side of the vehicle when viewed in the
direction of travel. Battery in the engine compartment
:
Battery
; Positive terminal
= Negative terminal
? Breather hose
i Remove the key if you park the vehicle
and do not require any electrical consum-
ers. The vehicle will then use very little
energy, thus conserving the battery.
i If the battery is discharged, you must use
the emergency key element to unlock the
vehicle. Disconnecting the battery
G
Risk of accident
If the battery is disconnected:
R the brake boosting effect will not be avail-
able. Greater braking force will then be
required and brake pedal travel will be lon-
ger. If necessary, depress the brake pedal
with maximum force.
R the transmission is locked in position Pon
vehicles with automatic transmission*
! Always disconnect the battery in
the order described below. Never swap the
battery terminals. You may otherwise dam-
age the vehicle electronics. Battery
321Practical advice
* optional
212_AKB; 2; 4, en-GB
mkalafa,
Version: 2.11.8.1 2009-05-05T14:17:16+02:00 - Seite 321 Z
Dateiname: 6515346702_buchblock.pdf; erzeugt am 07. May 2009 14:17:25; WK
Page 325 of 373
X
Firmly depress the parking brake and on
vehicles with automatic transmission*,
shift the transmission to position P.
X Switch off all electrical consumers (e.g.
radio, blower, etc.).
X Turn the key to 0(Y page 75) in the ignition
lock and remove it or make sure that no
ignition position has been selected with
KEYLESS GO*. In the instrument cluster, all
of the indicator lamps must be out.
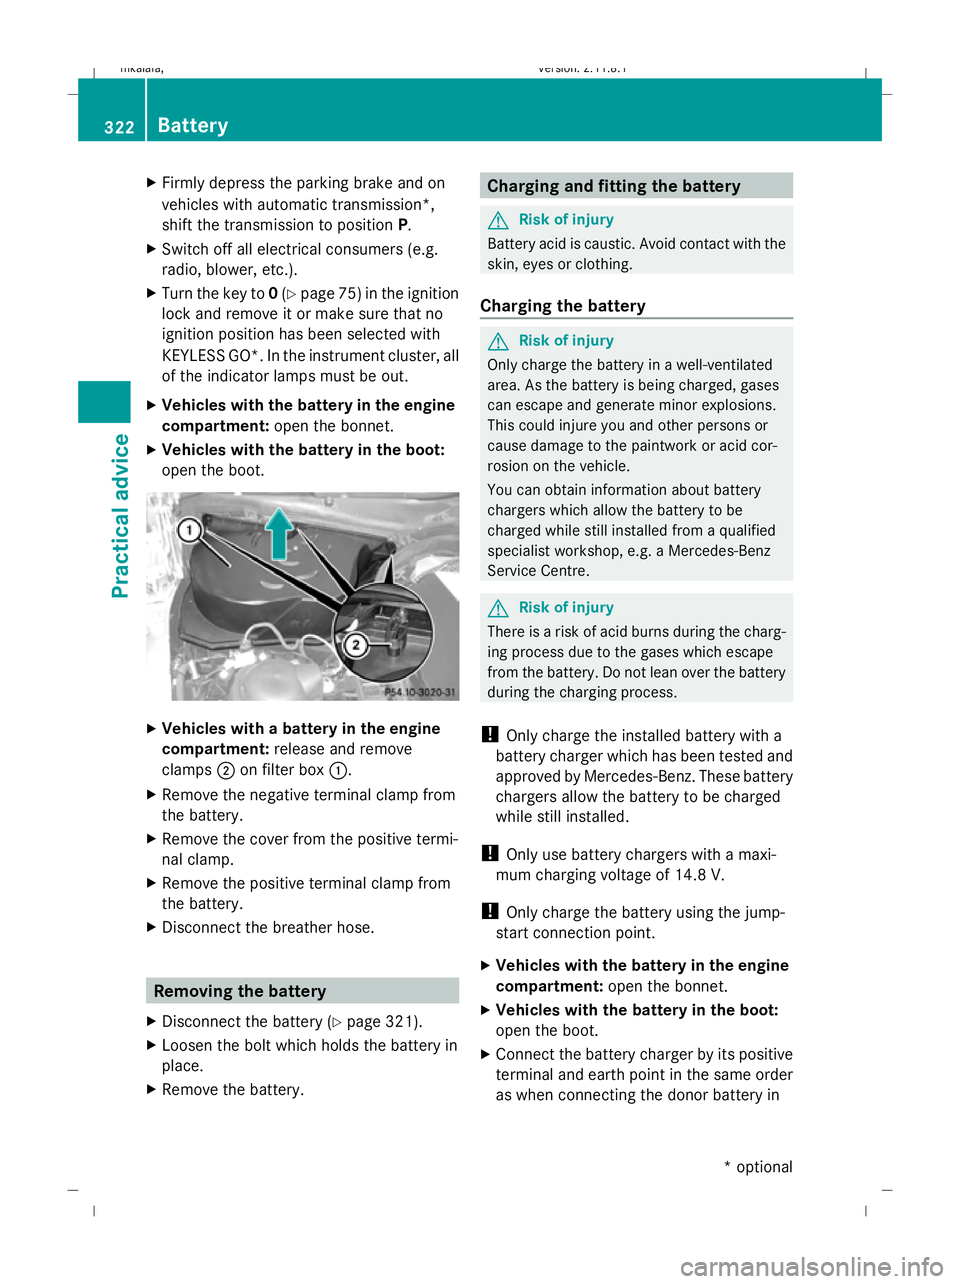
X Vehicles with the battery in the engine
compartment: open the bonnet.
X Vehicles with the battery in the boot:
open the boot. X
Vehicles with a battery in the engine
compartment: release and remove
clamps ;on filter box :.
X Remove the negative terminal clamp from
the battery.
X Remove the cover from the positive termi-
nal clamp.
X Remove the positive terminal clamp from
the battery.
X Disconnect the breather hose. Removing the battery
X Disconnect the battery ( Ypage 321).
X Loosen the bolt which holds the battery in
place.
X Remove the battery. Charging and fitting the battery
G
Risk of injury
Battery acid is caustic. Avoid contact with the
skin, eyes or clothing.
Charging the battery G
Risk of injury
Only charge the battery in a well-ventilated
area. As the battery is being charged, gases
can escape and generate minor explosions.
This could injure you and other persons or
cause damage to the paintwork or acid cor-
rosion on the vehicle.
You can obtain information about battery
chargers which allow the battery to be
charged while still installed from a qualified
specialist workshop, e.g. a Mercedes-Benz
Service Centre. G
Risk of injury
There is a risk of acid burns during the charg-
ing process due to the gases which escape
from the battery. Do not lean over the battery
during the charging process.
! Only charge the installed battery with a
battery charger which has been tested and
approved by Mercedes-Benz. These battery
chargers allow the battery to be charged
while still installed.
! Only use battery chargers with a maxi-
mum charging voltage of 14.8 V.
! Only charge the battery using the jump-
start connection point.
X Vehicles with the battery in the engine
compartment: open the bonnet.
X Vehicles with the battery in the boot:
open the boot.
X Connect the battery charger by its positive
terminal and earth point in the same order
as when connecting the donor battery in 322
BatteryPractical advice
* optional
212_AKB; 2; 4, en-GB
mkalafa
,V ersion: 2.11.8.1
2009-05-05T14:17:16+02:00 - Seite 322
Dateiname: 6515346702_buchblock.pdf; erzeugt am 07. May 2009 14:17:26; WK
Page 326 of 373
the jump-starting procedure
(Y
page 323).
Fitting the battery X
Install the battery. To do this, follow the
steps described in "Removing the battery"
(Y page 322) in reverse order.
X Reconnect the battery (Y page 323).Reconnecting the battery
! Always connect the battery in the order
described below. Never swap the terminal
clamps. Otherwise, you may damage the
vehicle electronics.
X Switch off all electrical consumers (e.g.
radio, blower, etc.).
X Connect the positive terminal clamp and
secure the cover.
X Connect the negative terminal clamp.
X Connect the breather hose.
X On vehicles with the battery in the
engine compartment: put the filter box
back in place, then clip in and close the
retaining clamps.
Close the bonnet.
X Vehicles with the battery in the boot:
close the boot.
i If the battery power supply has been inter-
rupted (e.g. if it has been reconnected), you
must carry out the following tasks:
R set the time ( Ypage 132)
R reset the function for folding the exterior
mirrors in/out automatically* by folding
the mirrors out once ( Ypage 87) Jump-starting
If your vehicle's battery is discharged, the
engine can be jump-started from another
vehicle or from an external battery using jump
leads. Observe the following points:
R
you may only jump-start when the engine
and catalytic converter are cold.
R do not start the engine if the battery is fro-
zen. Let the battery thaw first.
R jump-starting may only be performed from
batteries with a nominal voltage of 12 V.
R only use jump leads which have a sufficient
cross-section and insulated terminal
clamps.
i Jump leads and further information about
jump-starting can be obtained from any
Mercedes-Benz Service Centre.
! Avoid repeated and lengthy starting
attempts.
Do not use a rapid-charging device to start
the engine. G
Risk of injury
There is a risk of acid burns when jump-start-
ing a vehicle due to the gases which escape
from the battery. Do not lean over the battery
while the engine is being jump-started. G
Risk of explosion
Gases escaping from the battery during jump-
starting may cause minor explosions. Avoid
creating sparks. Keep naked flames away
from the battery, and do not smoke.
Comply with safety precautions and take pro-
tective measures when handling batteries.
You will find these under "Battery" in the
index.
X Make sure that the two vehicles do not
touch.
X Depress the parking brake firmly.
X Manual transmission: engage neutral.
X Automatic transmission*: shift the trans-
mission to position P.
X Switch off all electrical consumers (e.g.
radio, blower, etc.).
X Open the bonnet (Y page 219). Jump-starting
323Practical advice
* optional
212_AKB; 2; 4, en-GB
mkalafa
,V ersion: 2.11.8.1
2009-05-05T14:17:16+02:00 - Seite 323 Z
Dateiname: 6515346702_buchblock.pdf; erzeugt am 07. May 2009 14:17:26; WK
Page 330 of 373
Removing the towing eye
X Take the wheel wrench from the vehicle
tool kit (Y page 249).
X Insert the wheel wrench handle into the
towing eye and turn it anti-clockwise.
X Unscrew the towing eye.
X Replace the cover and press it until it
engages.
X Return the towing eye and the wheel
wrench to the vehicle tool kit. Transporting the vehicle
The towing eyes or trailer coupling* can be
used to pull the vehicle onto a trailer or trans-
porter if you wish to transport it.
! Only secure the vehicle by the wheels or
wheel rims, not by parts of the vehicle such
as axle or steering components. Otherwise,
the vehicle could be damaged.
Vehicles with manual transmission X
Shift to neutral.
Vehicles with automatic transmission* X
Turn the key to position 2(Y page 75) in
the ignition lock.
X Move the transmission to position N.Fuses
Notes on changing fuses
The fuses in your vehicle serve to close down
faulty circuits. If a fuse blows, all the compo-
nents on the circuit and their functions will
fail.
Blown fuses must be replaced with fuses of
the same rating, which you can recognise by
the colour and value. The fuse ratings are lis-
ted in the fuse allocation chart. A Mercedes- Benz Service Centre will be happy to advise
you. G
Risk of fire
Only use fuses that have been approved for
Mercedes-Benz vehicles and which have the
required fuse rating for the systems con-
cerned. Do not attempt to repair or bridge
faulty fuses. A circuit overload could other-
wise cause a fire. Have the cause traced and
rectified at a qualified specialist workshop,
e.g. a Mercedes-Benz Service Centre.
If the newly inserted fuse also blows, have the
cause traced and rectified at a qualified spe-
cialist workshop, e.g. a Mercedes-Benz
Service Centre.
! Only use fuses that have been approved
for Mercedes-Benz vehicles and which
have the correct fuse rating for the system
concerned. Otherwise, components or sys-
tems could be damaged.
The fuses are located in various fuse boxes:
R fuse box in the engine compartment on the
driver's side
R fuse box in the boot/luggage compartment
on the right-hand side of the vehicle
Fuse allocation chart The fuse allocation chart is located with the
vehicle tool kit (Y
page 249) in the stowage
compartment under the boot/luggage com-
partment floor. Before changing a fuse
X Park the vehicle.
X Switch off all electrical consumers.
X Remove the key from the ignition lock. Fuse box in the engine compartment
X Make sure that the windscreen wipers are
turned off. Fuses
327Practical advice
* optional
212_AKB; 2; 4, en-GB
mkalafa
,V ersion: 2.11.8.1
2009-05-05T14:17:16+02:00 - Seite 327 Z
Dateiname: 6515346702_buchblock.pdf; erzeugt am 07. May 2009 14:17:28; WK
Page 342 of 373
driving downhill). This would impair braking
efficiency.
Have the brake fluid renewed every two years
with a brake fluid that has been approved by
Mercedes-Benz and have this confirmed in
the Service Booklet.
i There is usually a notice in the engine
compartment to remind you when the next
brake fluid change is due. Windscreen washer system
The headlamp cleaning system* and wind-
screen washer system are both supplied from
the washer fluid reservoir.
Further information on windscreen washer
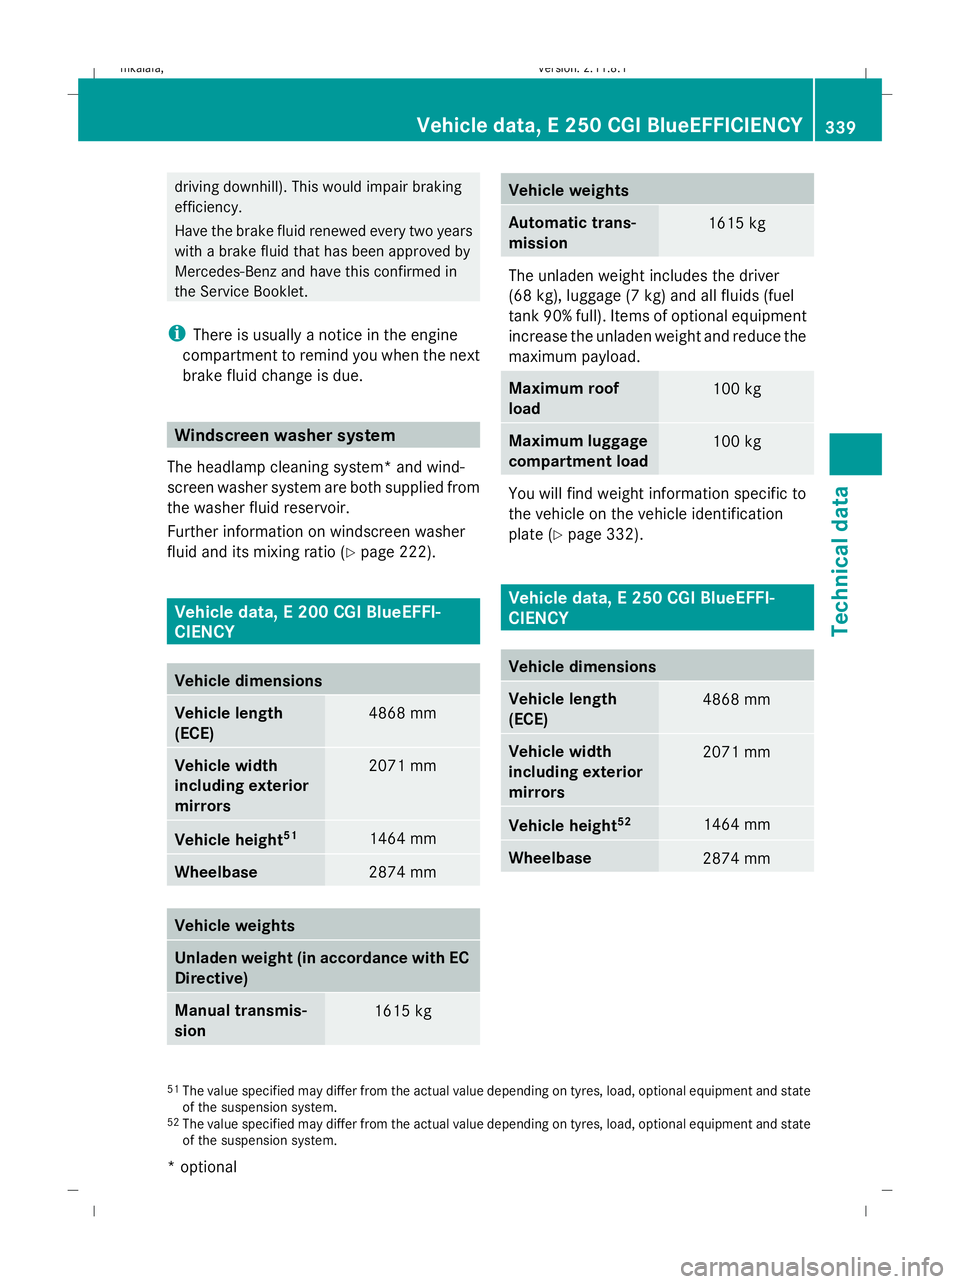
fluid and its mixing ratio ( Ypage 222). Vehicle data, E 200 CGI BlueEFFI-
CIENCY
Vehicle dimensions
Vehicle length
(ECE)
4868 mm
Vehicle width
including exterior
mirrors
2071 mm
Vehicle height
51 1464 mm
Wheelbase
2874 mm
Vehicle weights
Unladen weight (in accordance with EC
Directive)
Manual transmis-
sion
1615 kg Vehicle weights
Automatic trans-
mission
1615 kg
The unladen weight includes the driver
(68 kg), luggage (7 kg) and all fluids (fuel
tank 90% full). Items of optional equipment
increase the unladen weight and reduce the
maximum payload.
Maximum roof
load
100 kg
Maximum luggage
compartment load
100 kg
You will find weight information specific to
the vehicle on the vehicle identification
plate (Y
page 332). Vehicle data, E 250 CGI BlueEFFI-
CIENCY
Vehicle dimensions
Vehicle length
(ECE)
4868 mm
Vehicle width
including exterior
mirrors
2071 mm
Vehicle height
52 1464 mm
Wheelbase
2874 mm
51
The value specified may differ from the actual value depending on tyres, load, optional equipment and state
of the suspension system.
52 The value specified may differ from the actual value depending on tyres, load, optional equipment and state
of the suspension system. Vehicle data, E 250 CGI BlueEFFICIENCY
339Technical data
* optional
212_AKB; 2; 4, en-GB
mkalafa,
Version: 2.11.8.1 2009-05-05T14:17:16+02:00 - Seite 339 Z
Dateiname: 6515346702_buchblock.pdf; erzeugt am 07. May 2009 14:17:33; WK